Opening the Custom Zones Page
-
Click the ⚙️ Settings icon in the top-right corner.
-
Under the Scheduling & Dispatch section, click Custom Zones.
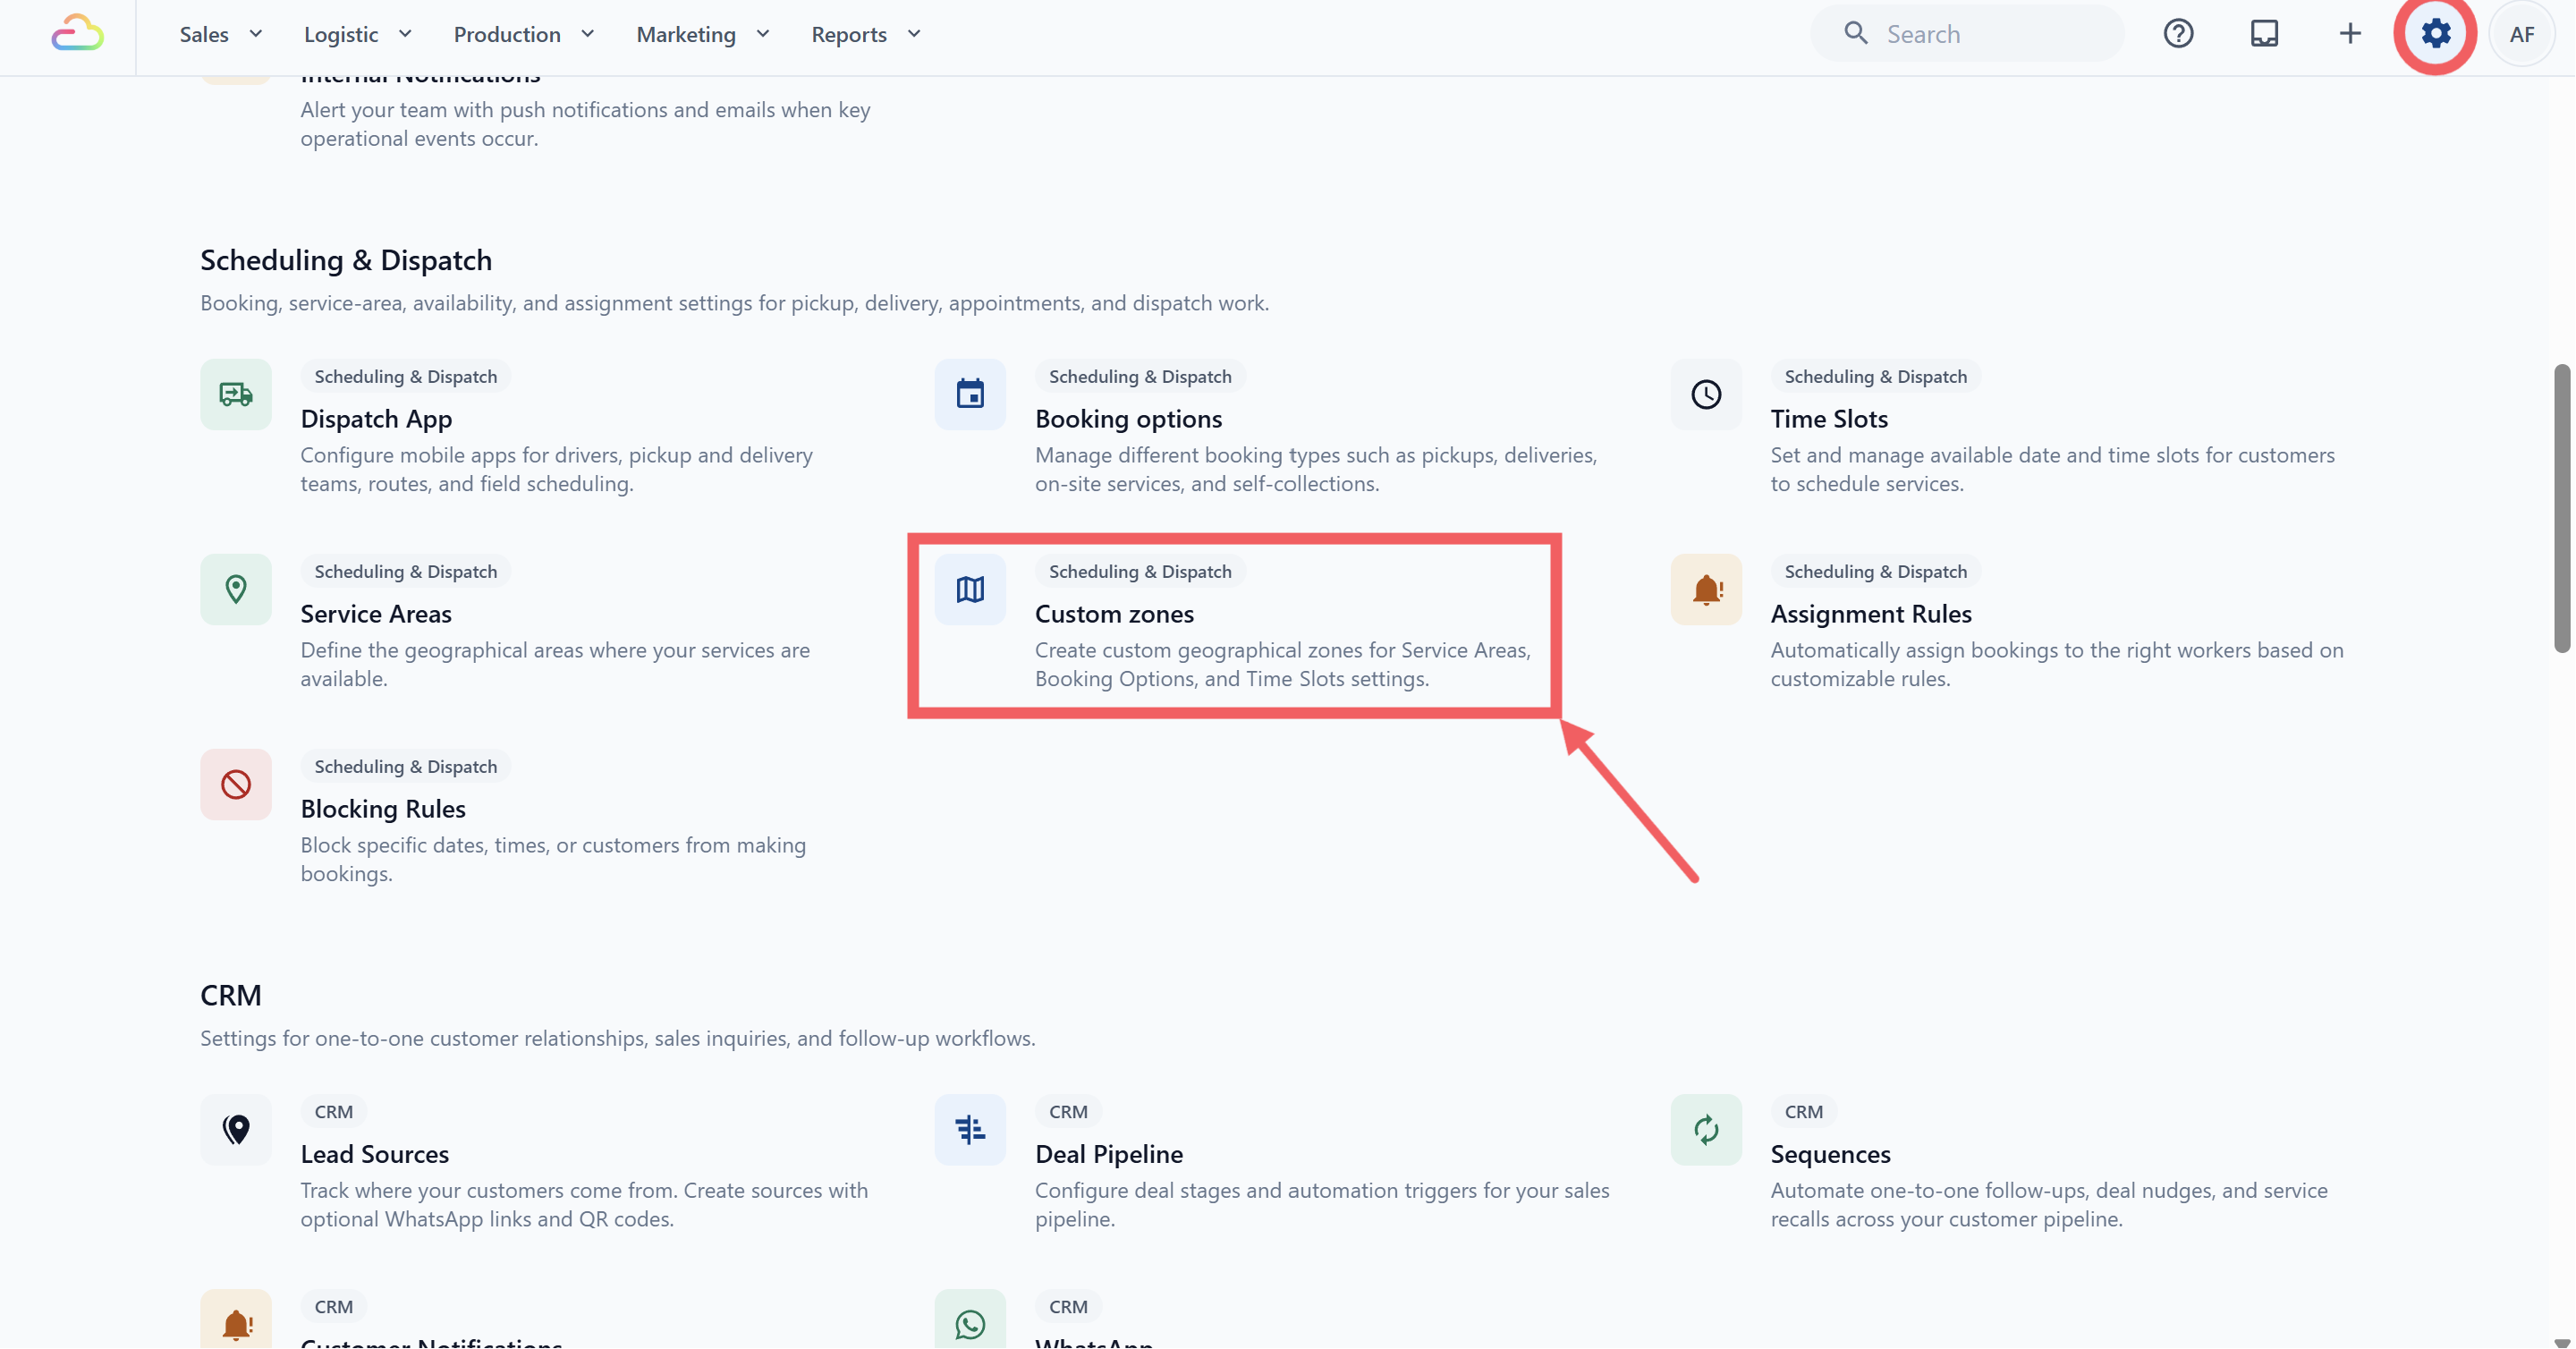
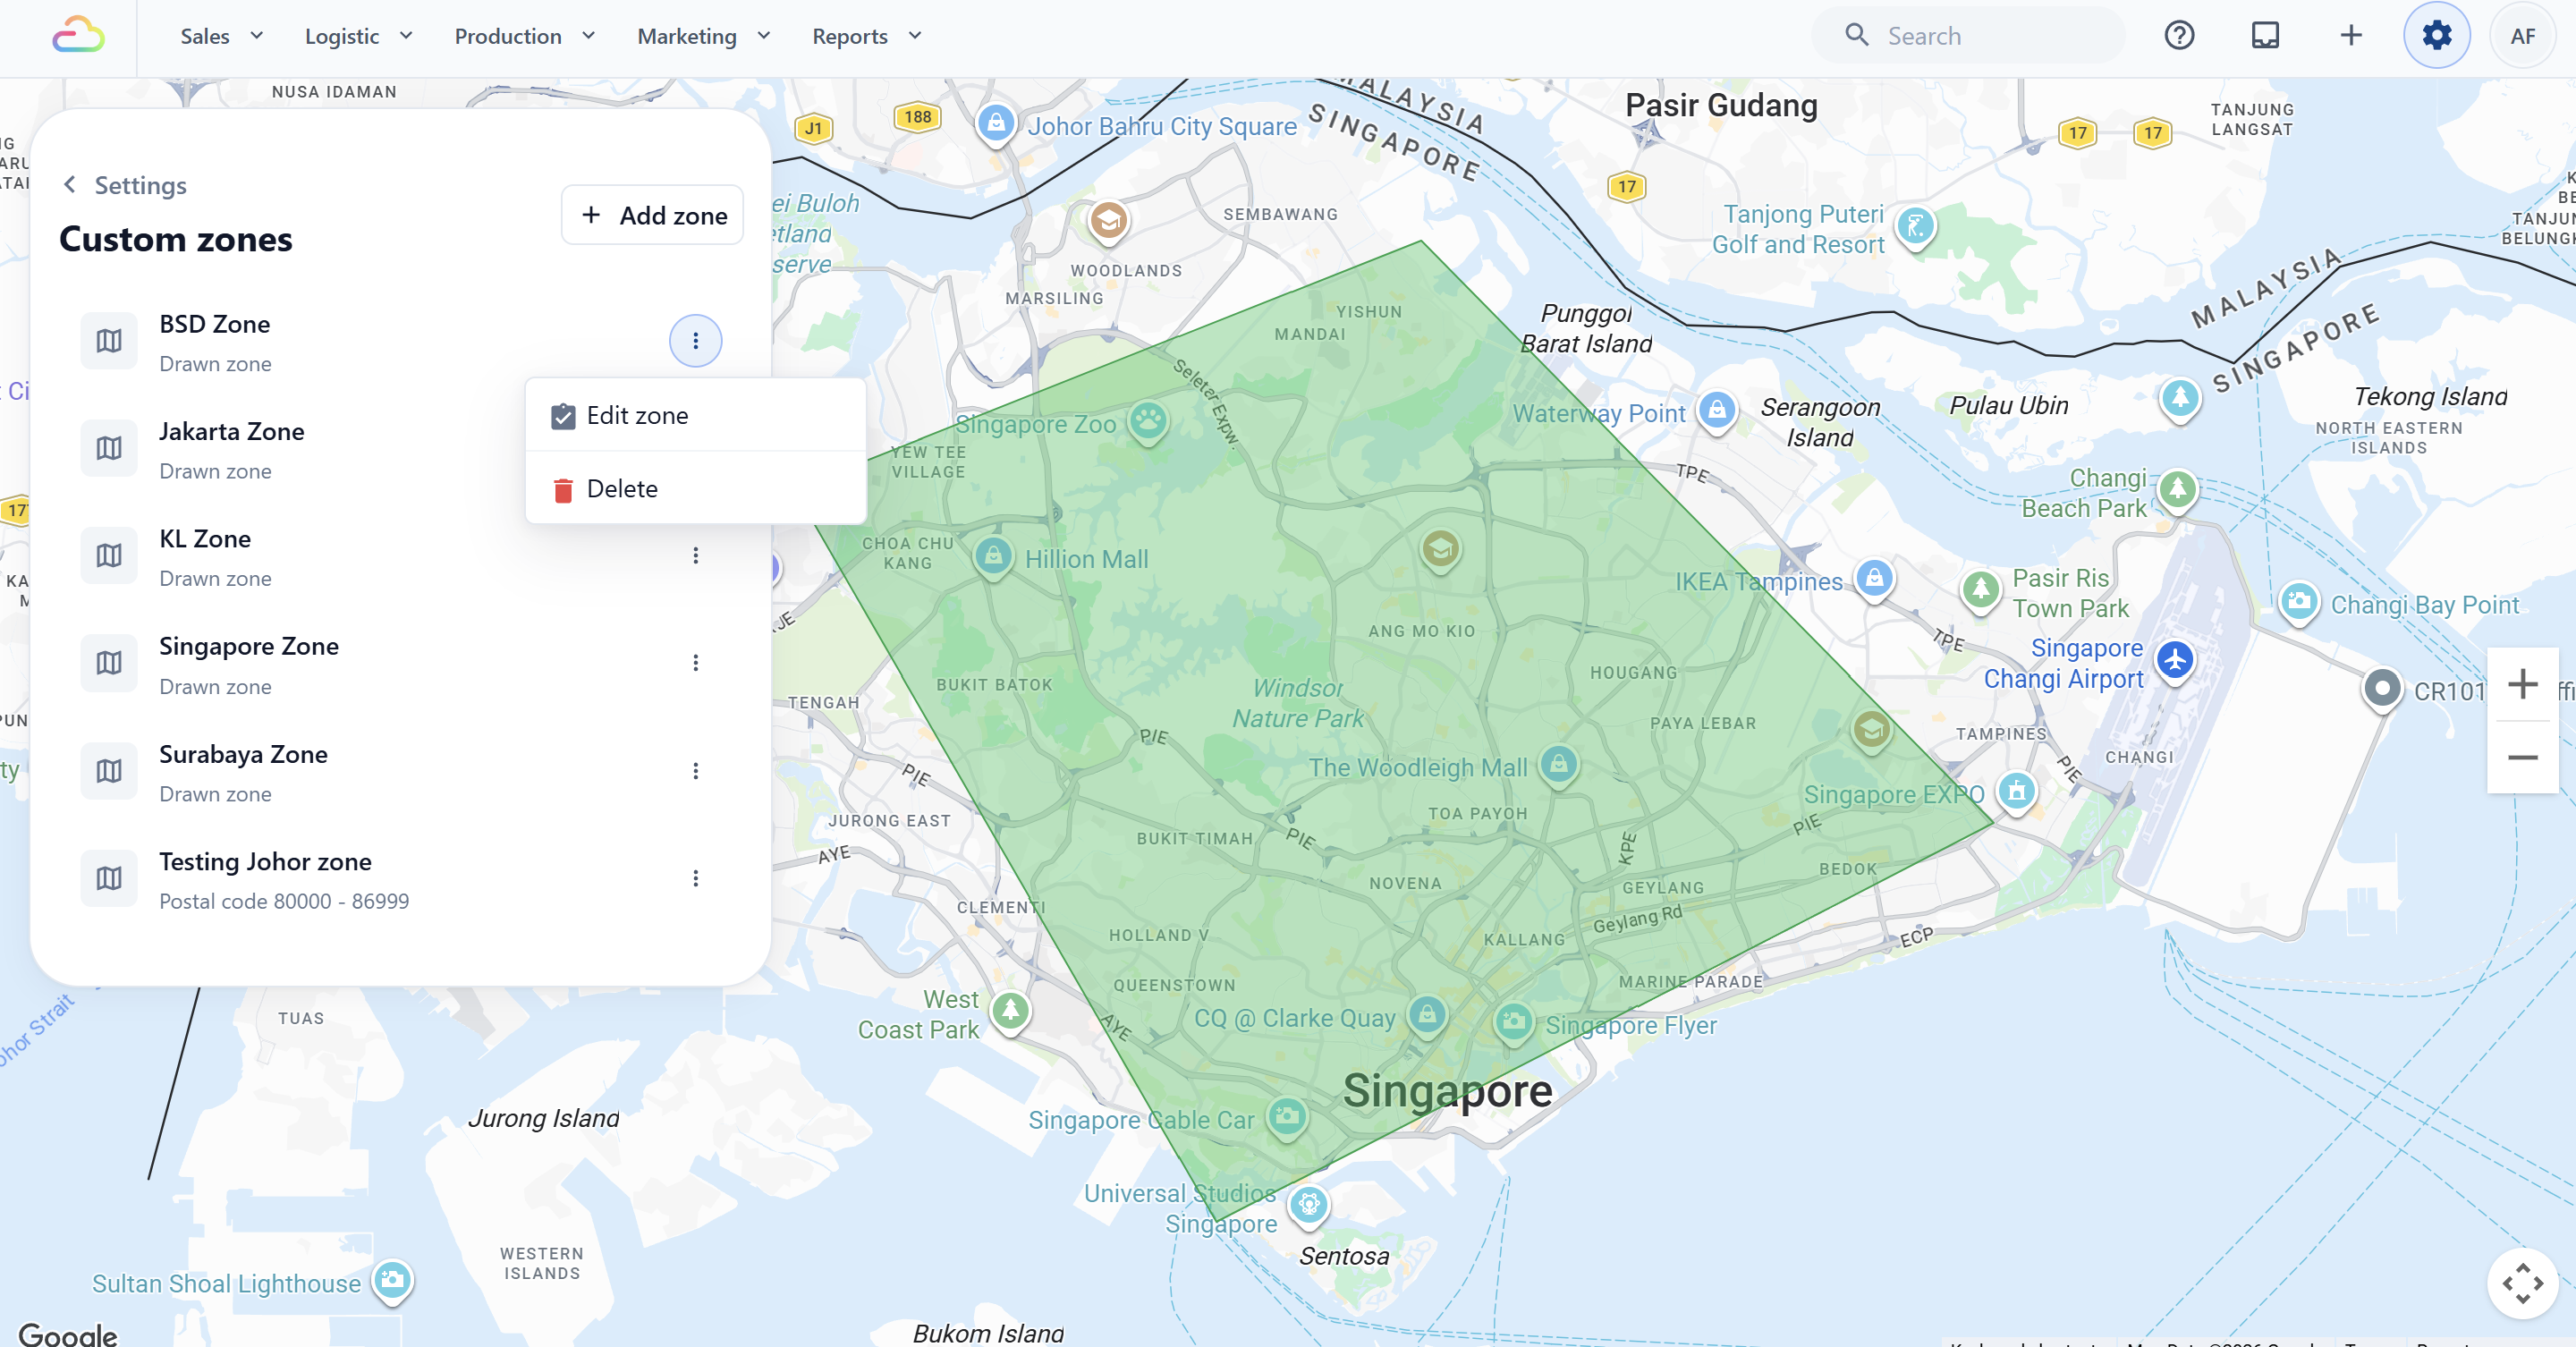
The page is a full-screen map with a floating panel on the top-left. The panel lists every zone you have already created. If you have not created any, the panel shows “No custom zones yet”. The only action on the top-right is the Add zone button.
Each existing zone row in the panel shows:
-
A map icon
-
The zone name
-
A short description: “Postal code X – Y” for postal zones, “N districts” for district zones, or “Drawn zone” for drawn shapes
-
A three-dot menu with Edit zone and Delete options
Adding a Zone
-
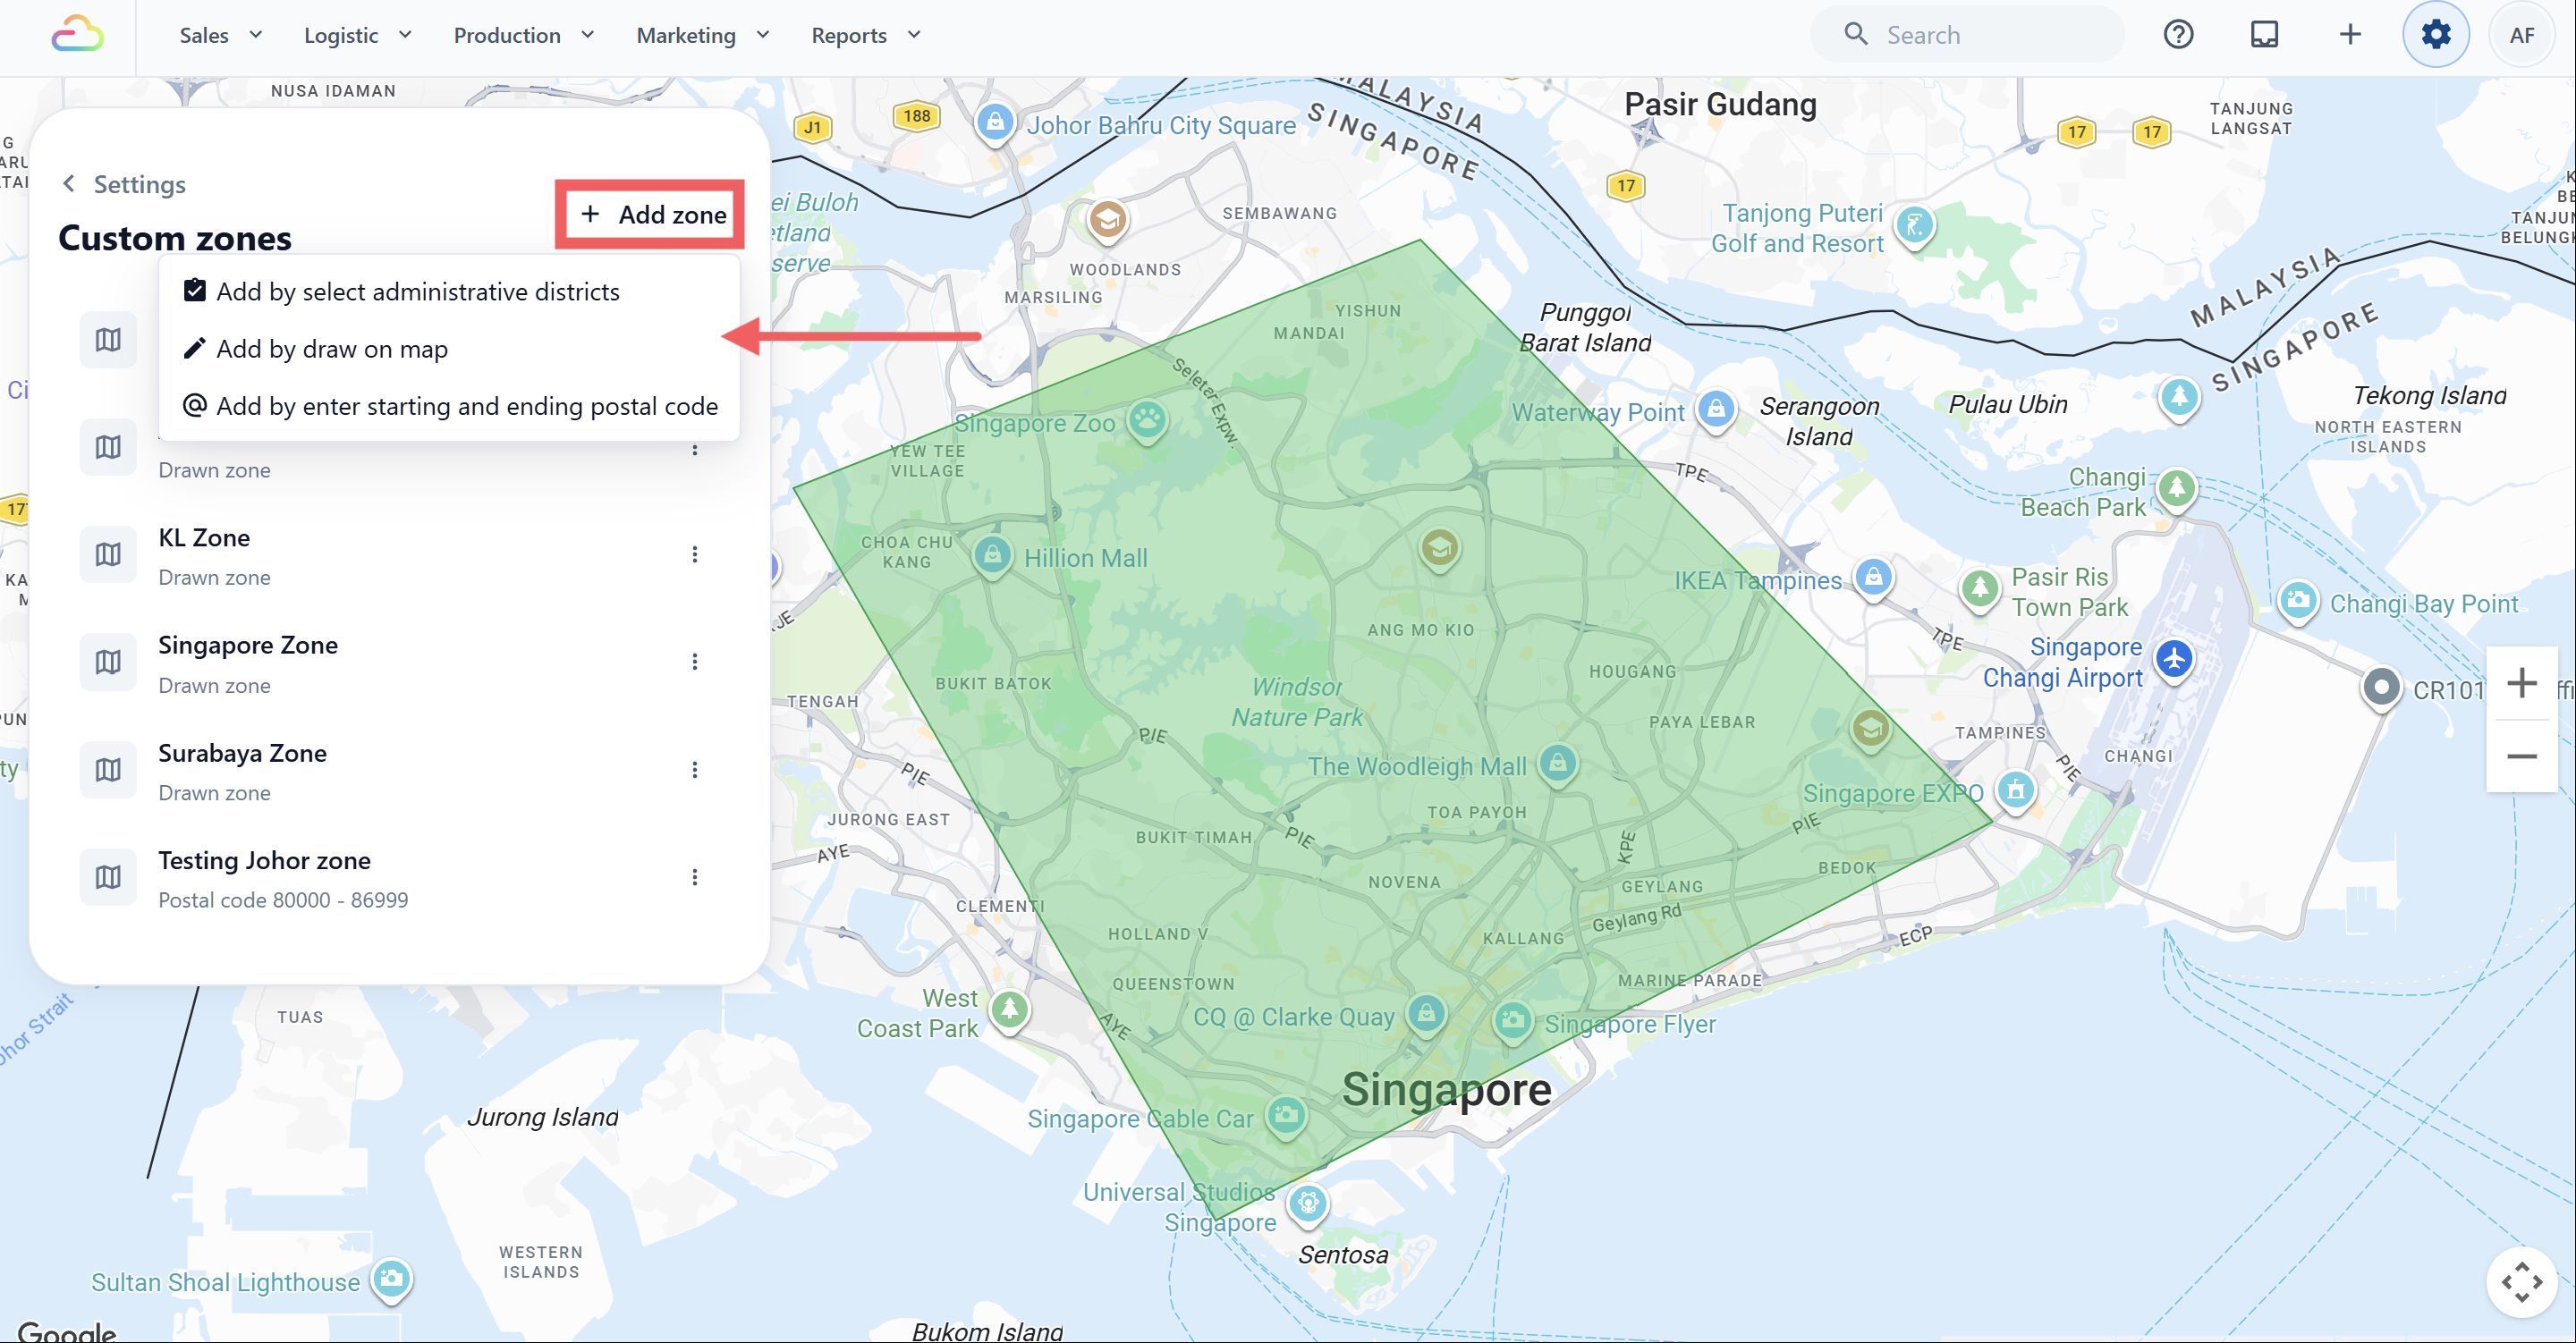
Click Add zone in the top-right corner.
-
Pick one of the three methods from the dropdown:
| Pick this | What happens |
|---|---|
| Add by selecting administrative districts | Opens a panel listing every available district. Click districts on the list or on the map to add them to the zone. |
| Add by draw on map | Lets you click points on the map to draw a custom polygon shape. |
| Add by enter starting and ending postal code | Opens a panel with two number fields for the postal code range. |
After you pick a method, the panel on the left switches to the create form. The map view stays in place so you can see your zone as you build it.
Method 1: Select Administrative Districts
-
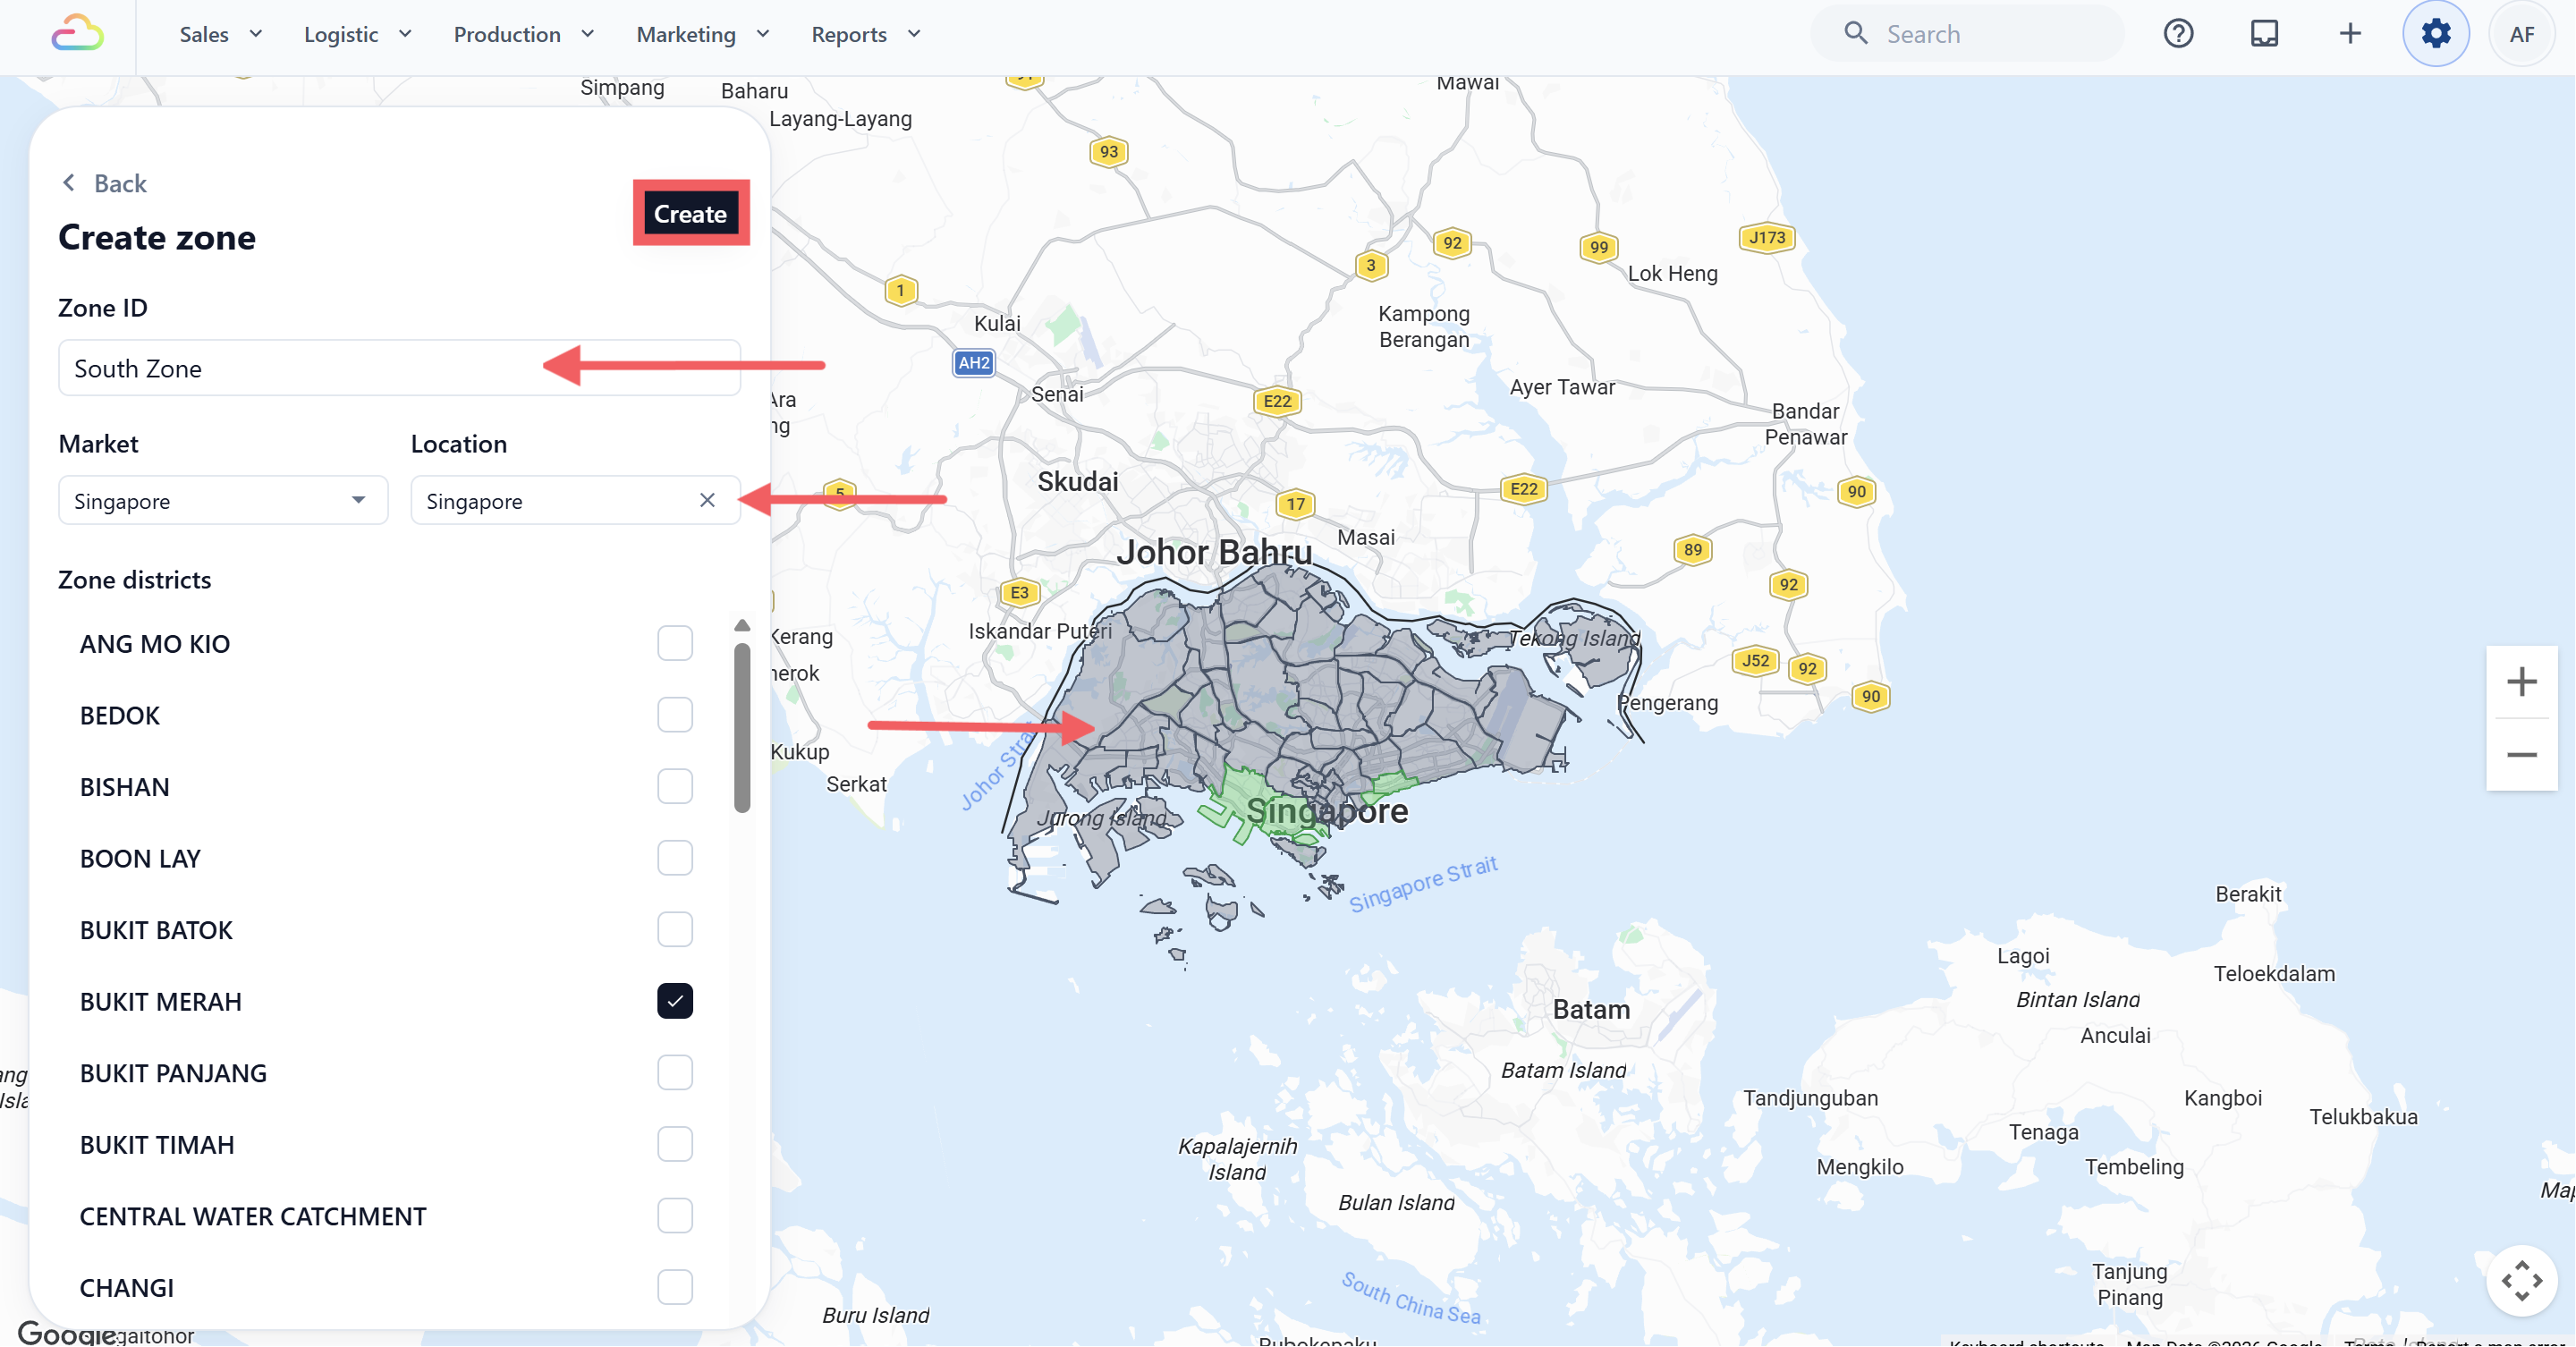
Enter a name in the Zone ID field at the top of the panel.
-
Choose where this zone applies so orders use the correct market and physical location.
-
Scroll the Zone districts list and tick each district to include. You can also click directly on a district shape on the map.
-
Each selected district highlights on the map and shows a tick in the panel.
-
Click Create in the top-right corner of the panel.
Method 2: Draw on the Map
-
Enter a name in the Zone ID field.
-
Choose where this zone applies so orders use the correct market and physical location.
-
Read the three on-screen steps in the panel: Click anywhere on the map, Draw your zone in any shape, Finish your drawing.
-
Click on the map to place the starting point.
-
Continue clicking to add more corners to the shape.
-
After at least three points, the map closes the shape automatically. Add more points if needed.
-
Click Create.
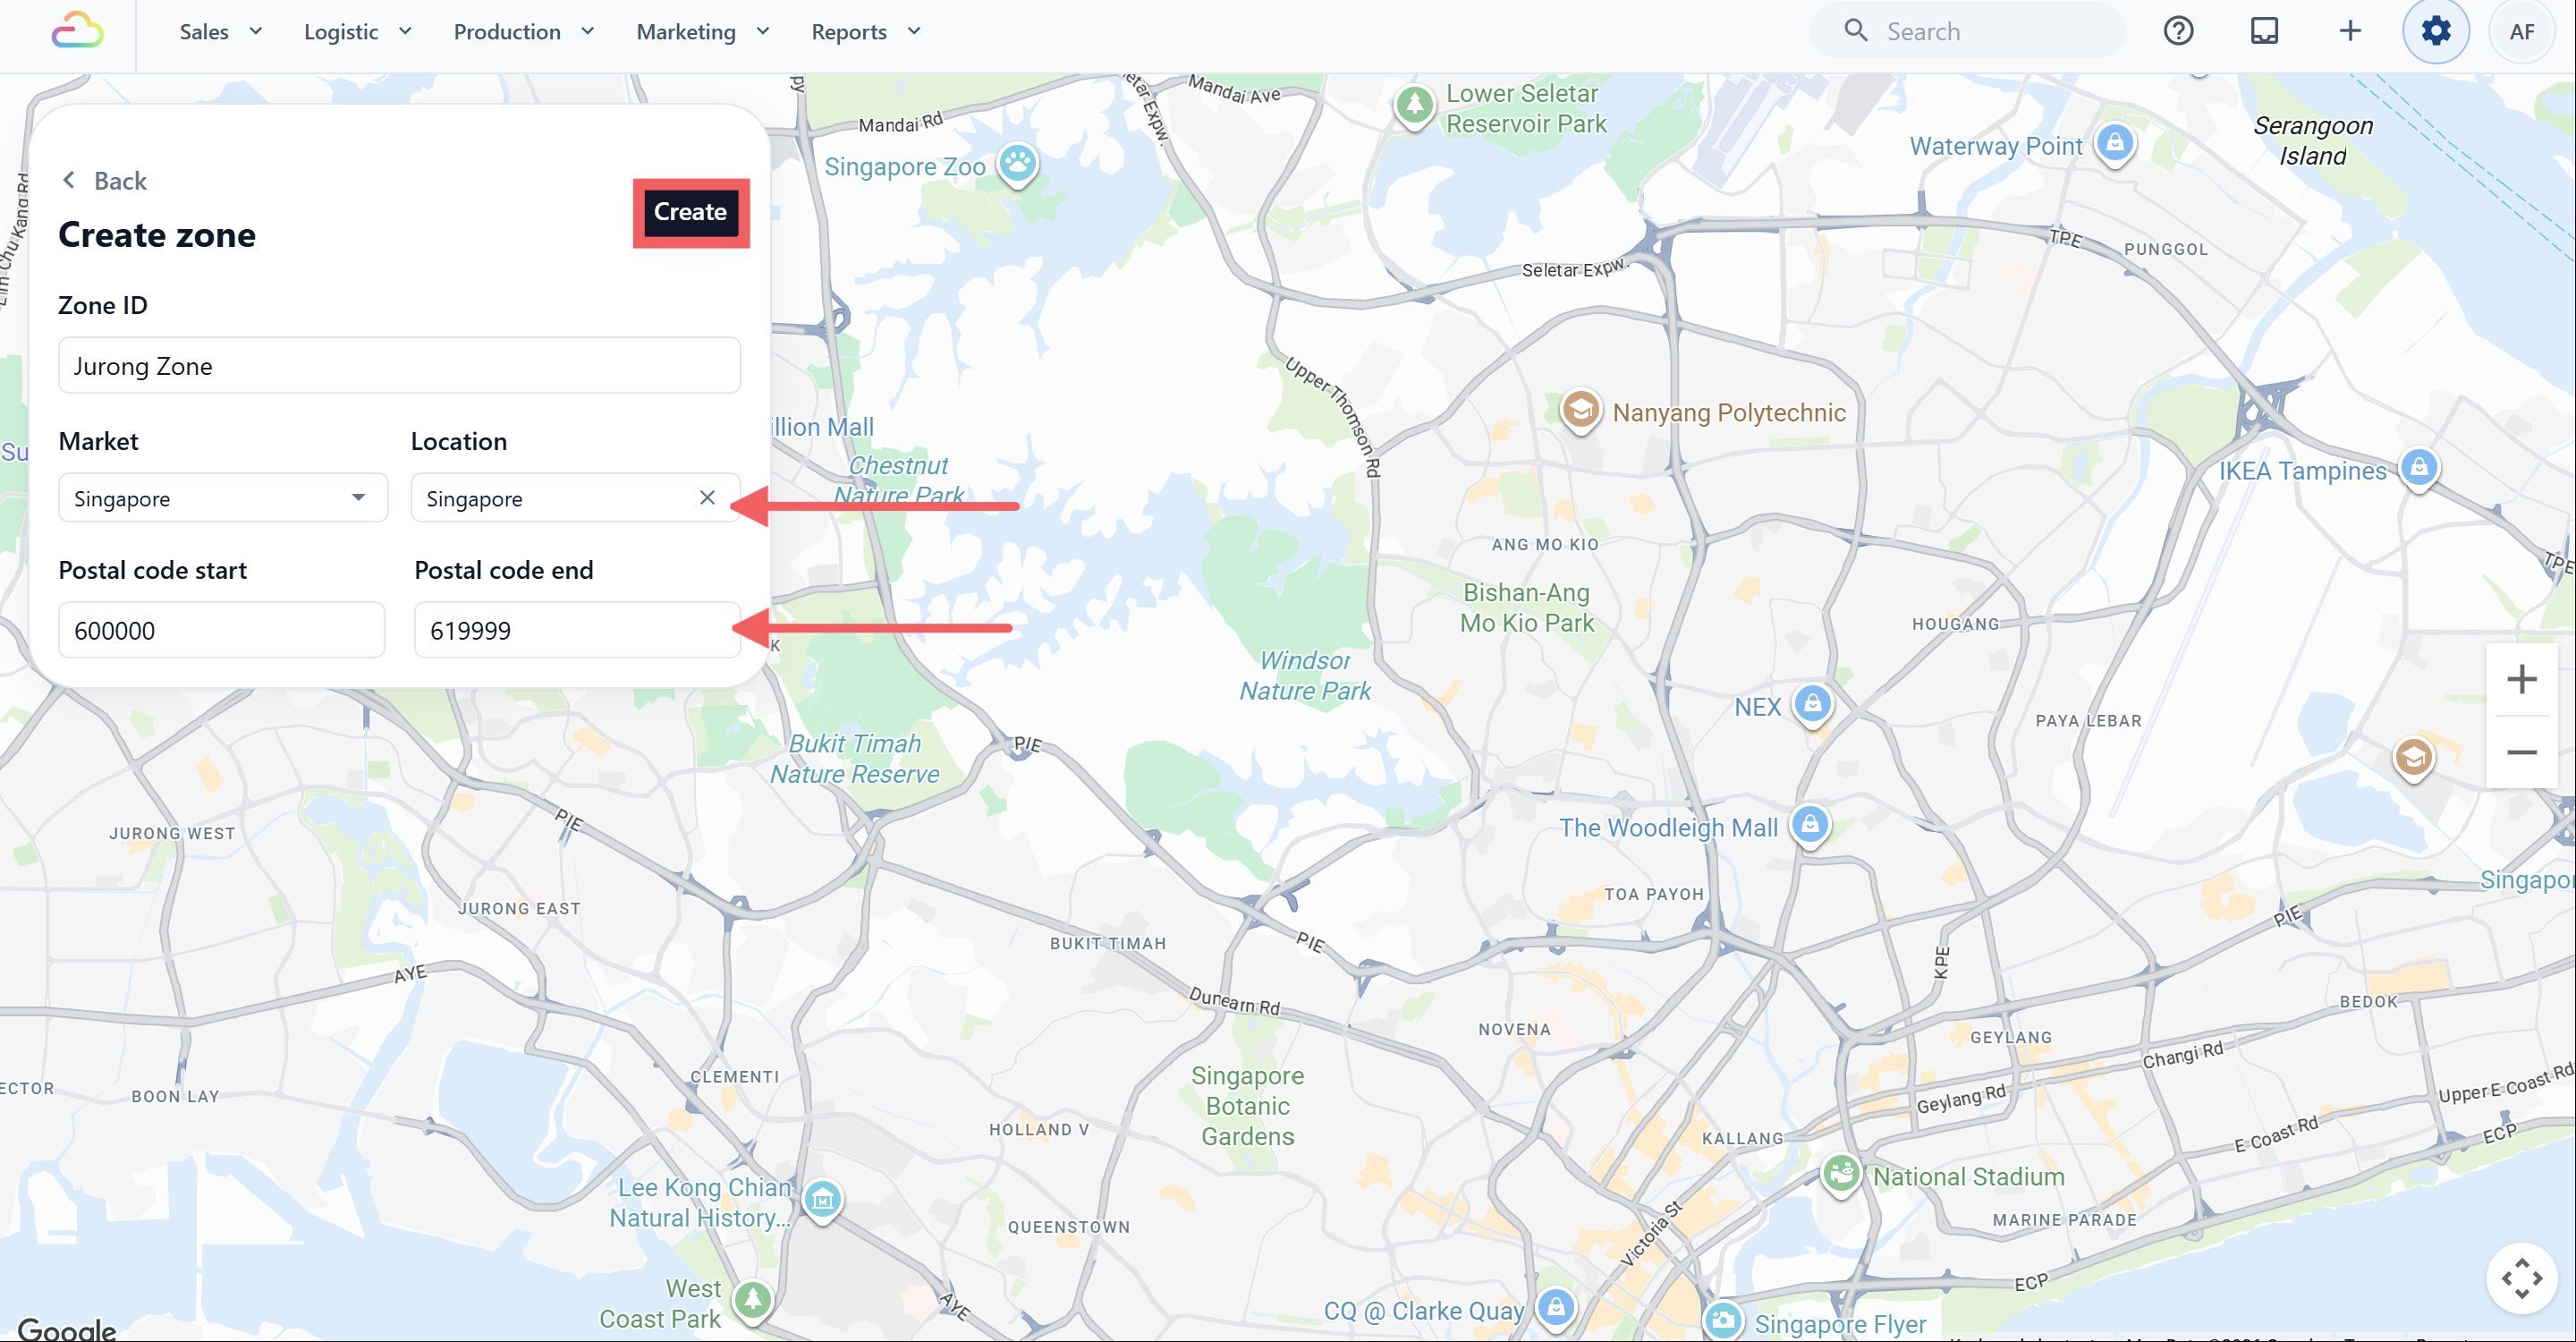
Method 3: Enter a Postal Code Range
-
Enter a name in the Zone ID field.
-
Choose where this zone applies so orders use the correct market and physical location.
-
Type the first postal code in the area into Postal code start.
-
Type the last postal code in the area into Postal code end.
-
Click Create.
Editing a Zone
-
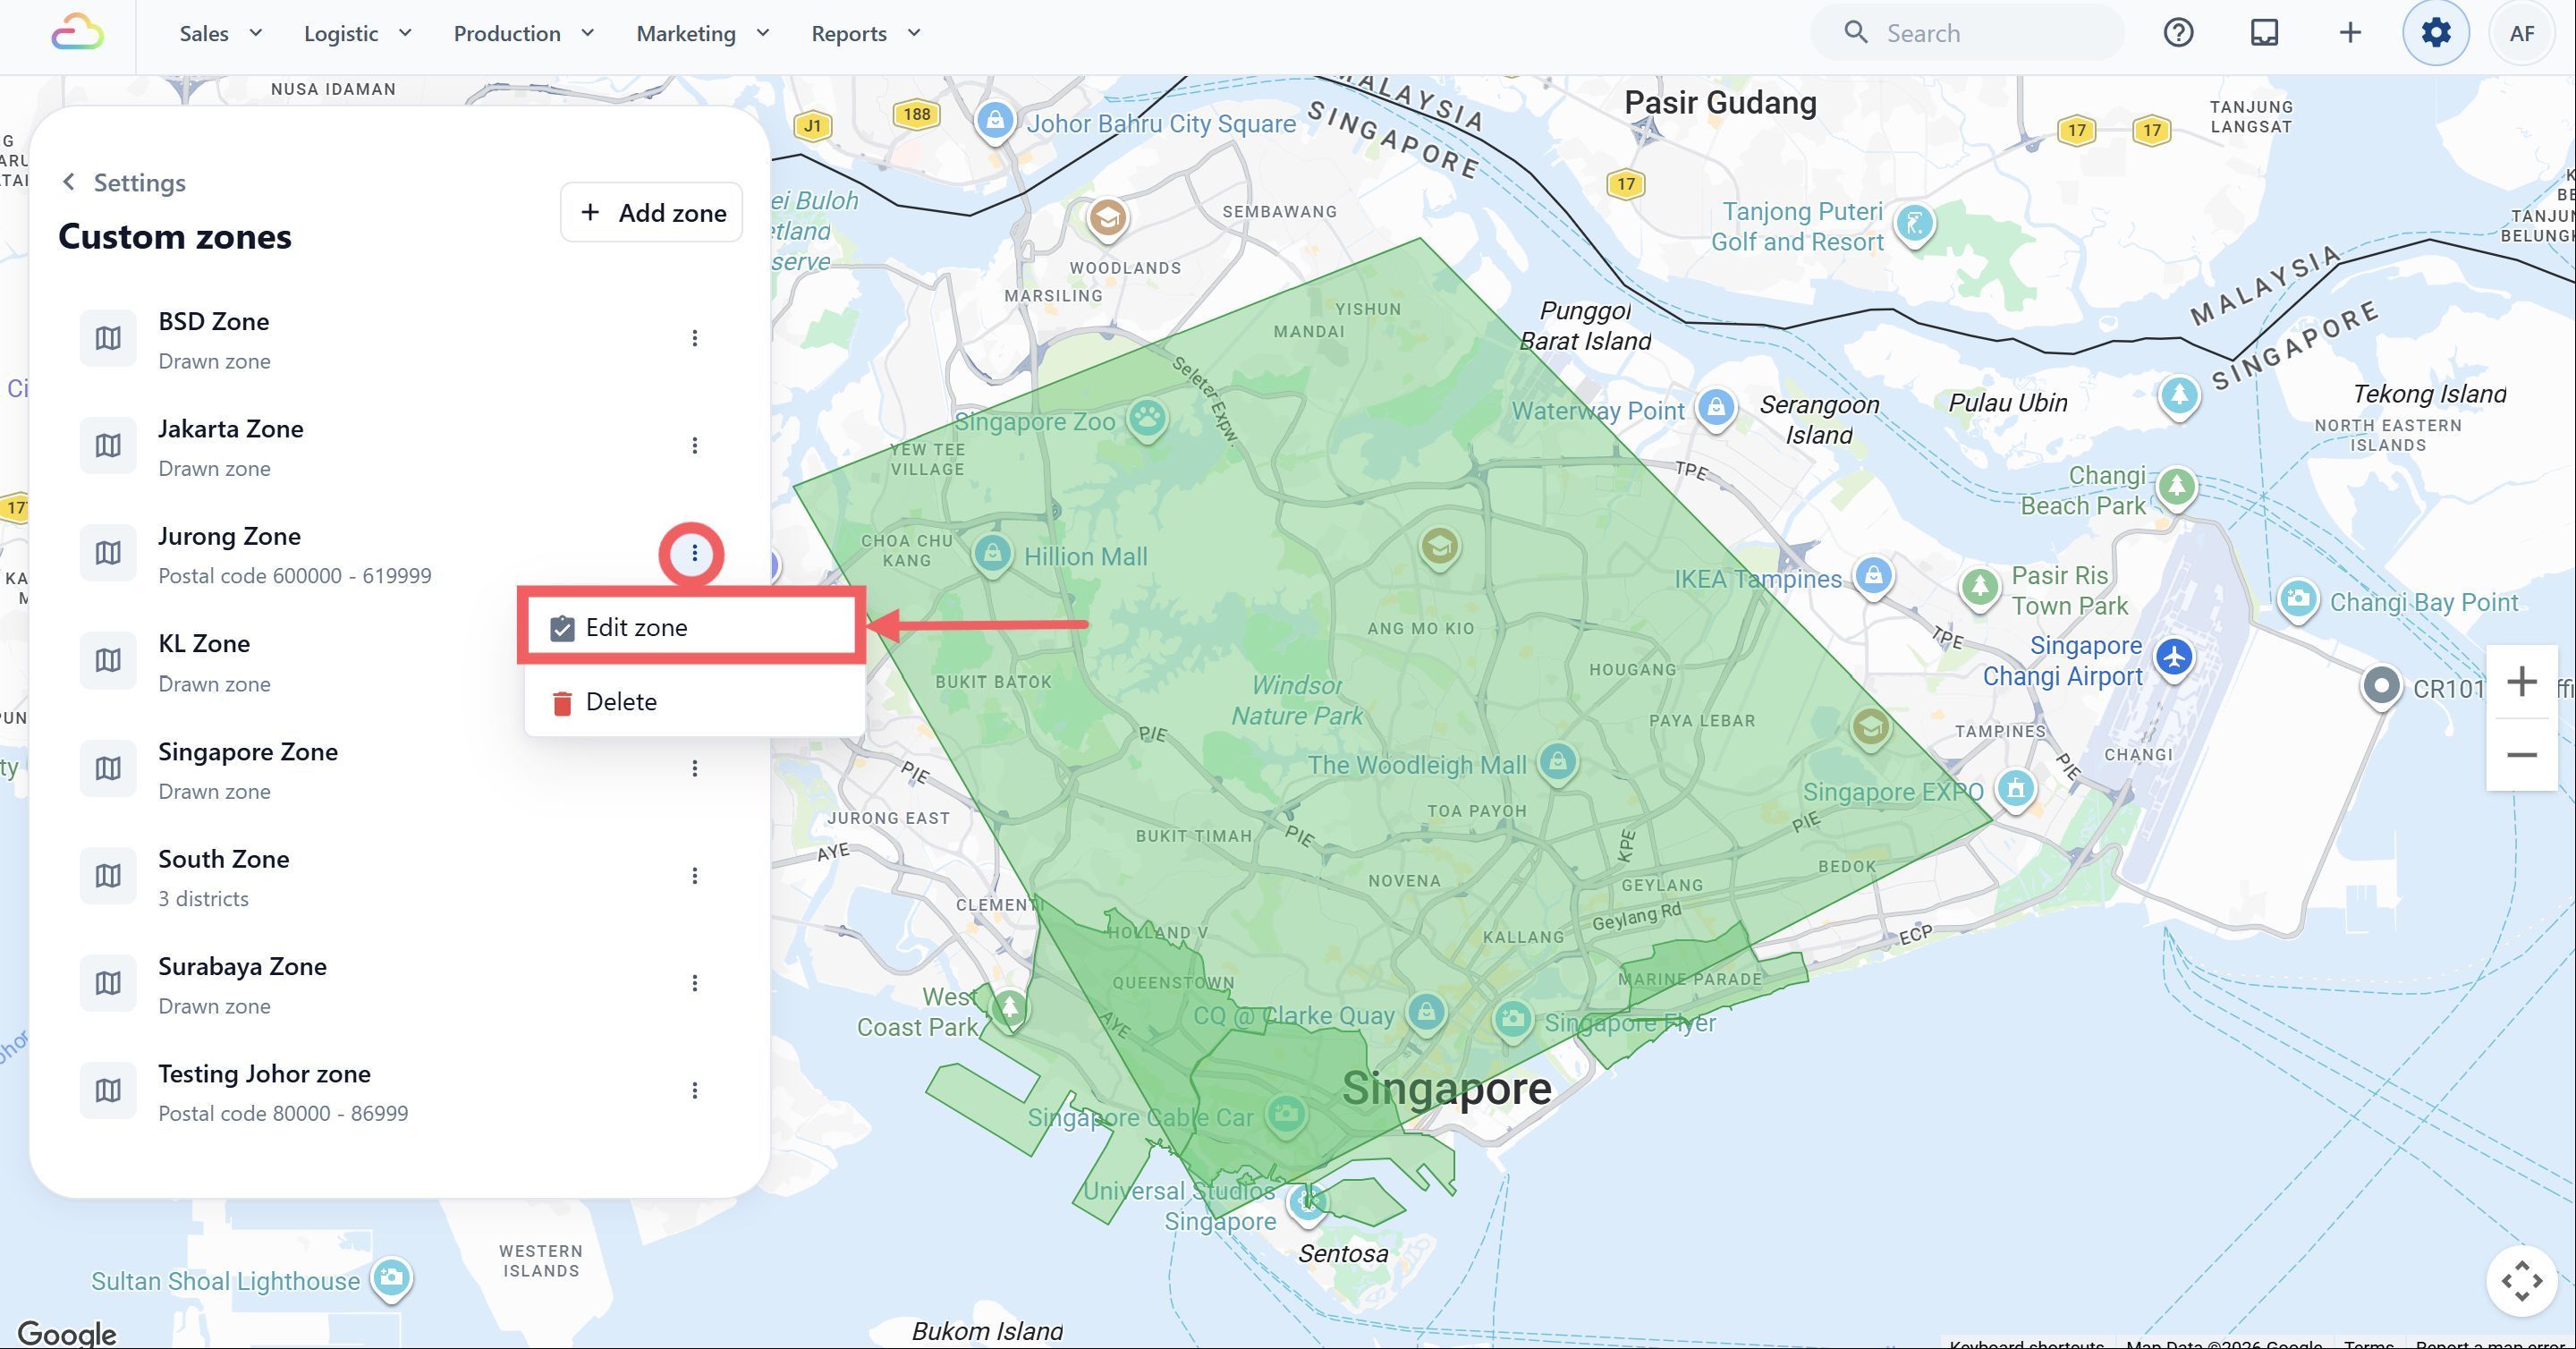
On the Custom Zones page, find the zone row in the panel on the left.
-
Click the three-dot menu on the right of the row.
-
Click Edit zone.
-
The same create panel opens, pre-filled with the zone’s existing values.
-
Make your changes. You can update the districts, redraw the shape, or change the postal code range, depending on how the zone was originally created.
-
Click Save.
| Field | Status when editing |
|---|---|
| Zone ID | Locked. You cannot rename a zone after it has been created. |
| Districts, shape, or postal range | Editable. You can fully replace the area. |
Deleting a Zone
-
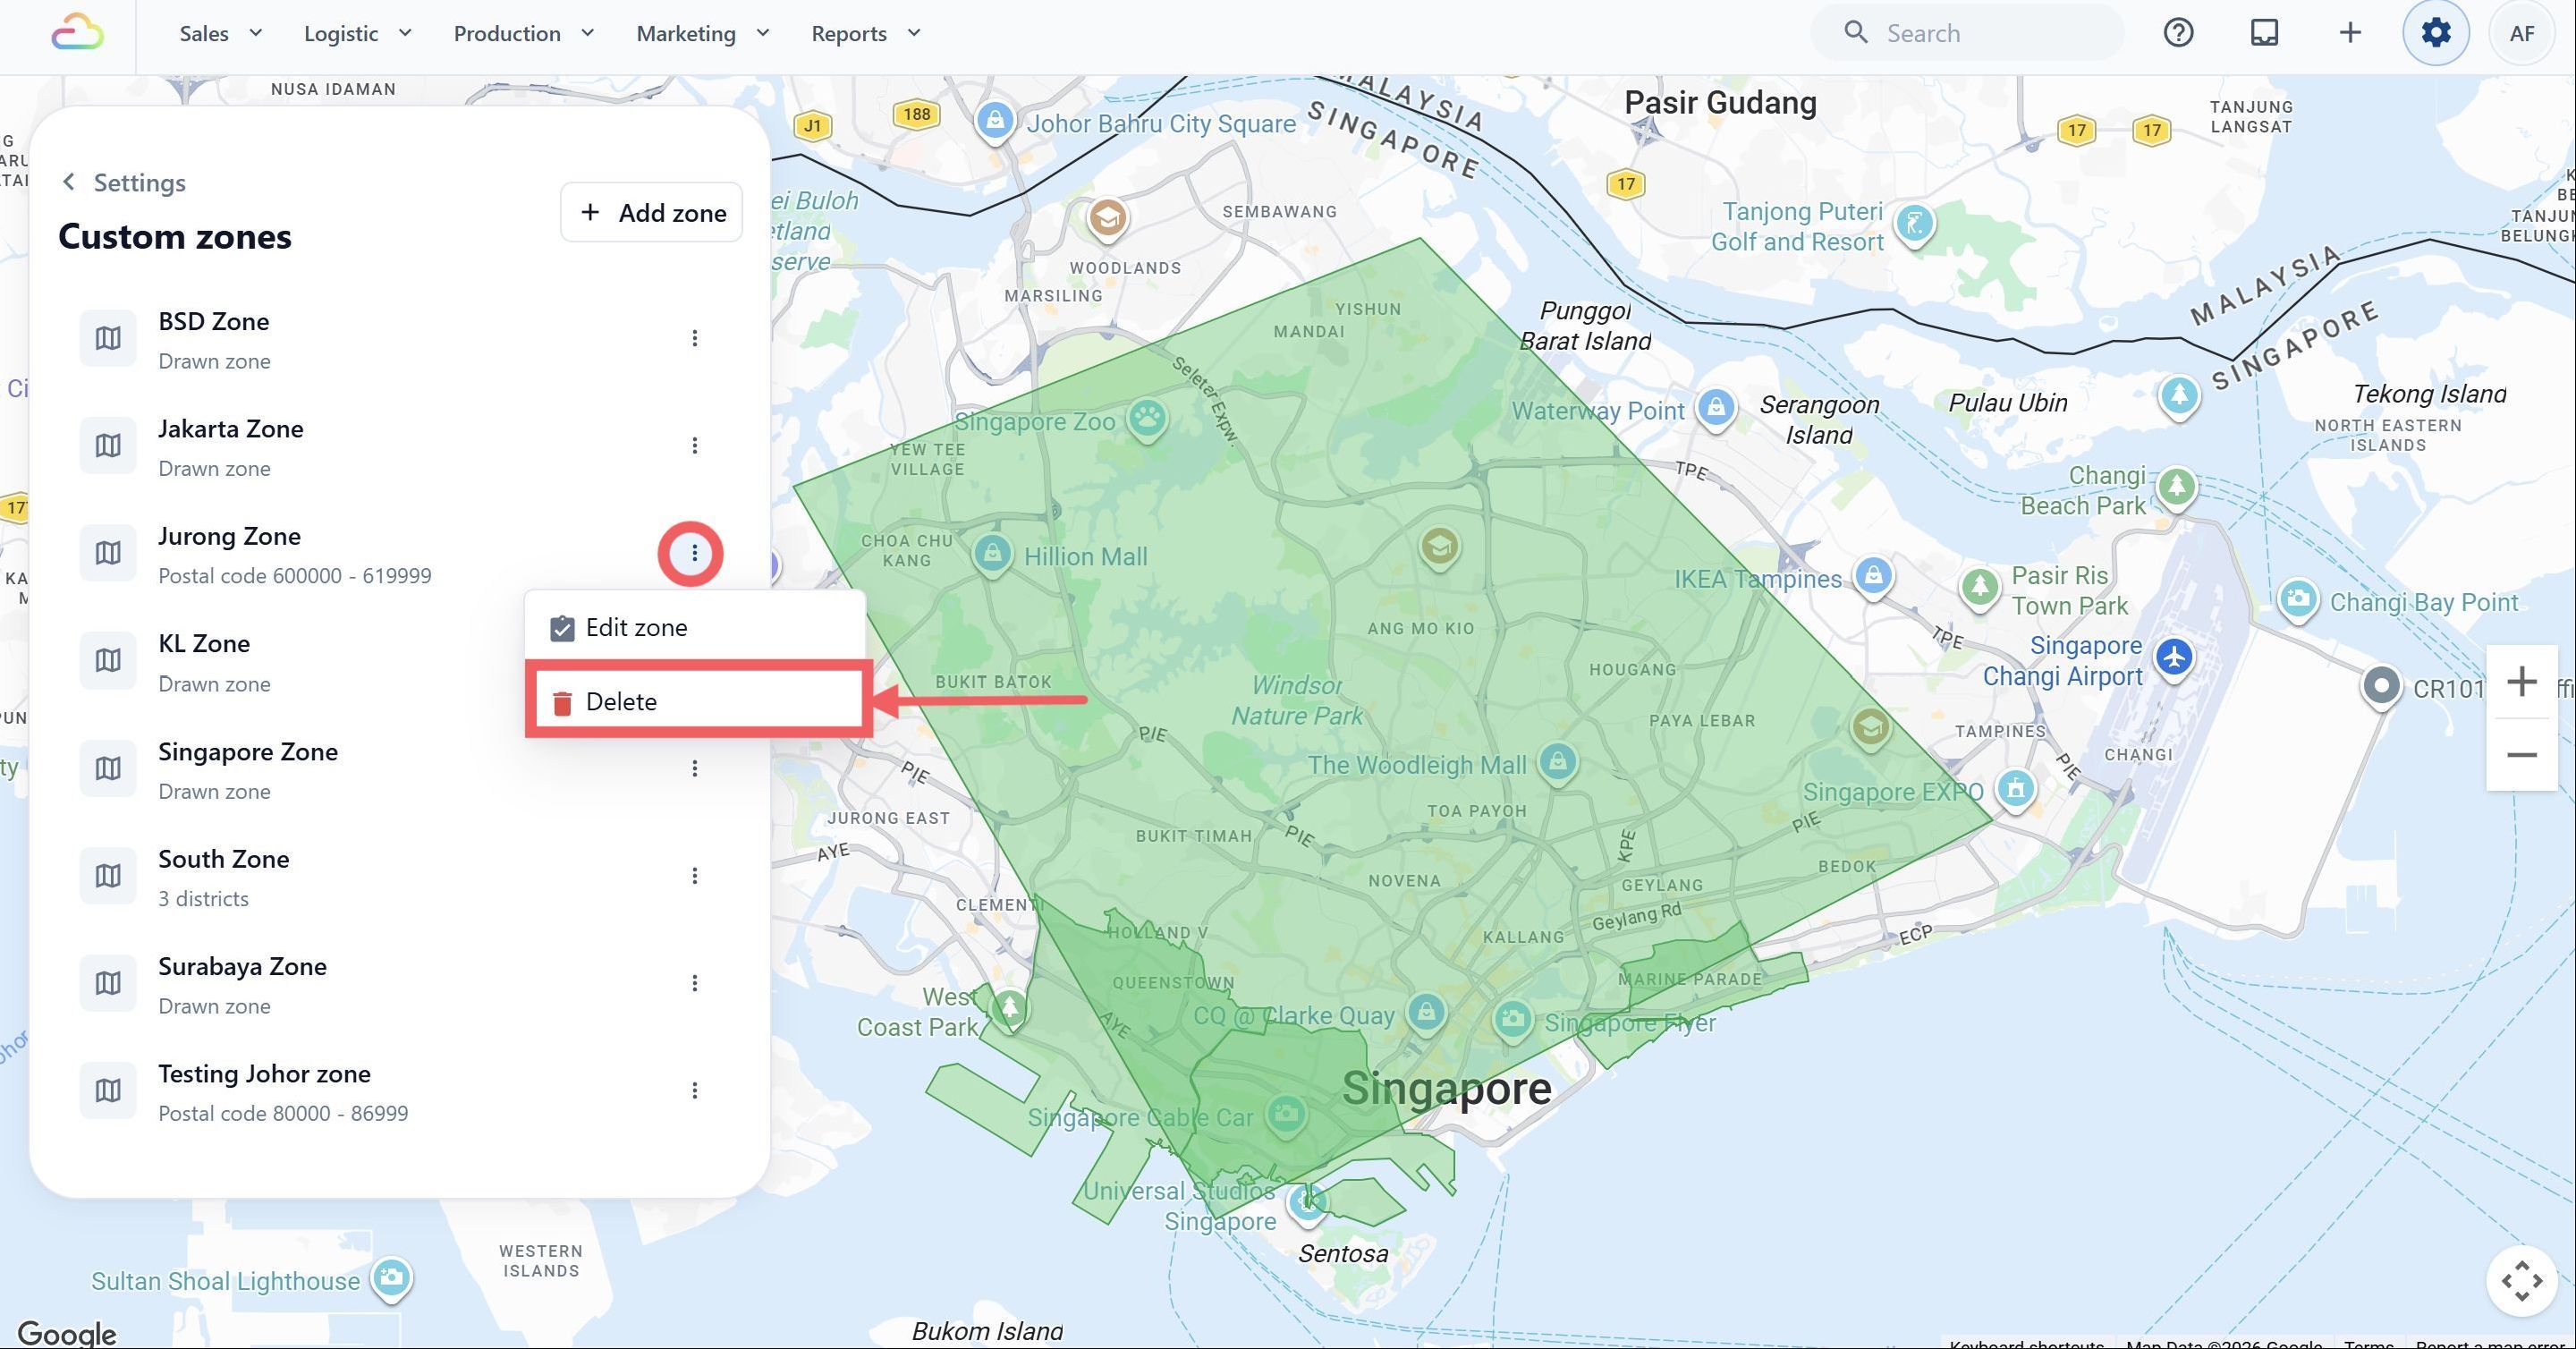
On the Custom Zones page, find the zone row in the panel on the left.
-
Click the three-dot menu on the right of the row.
-
Click Delete.
- A confirmation dialog opens.
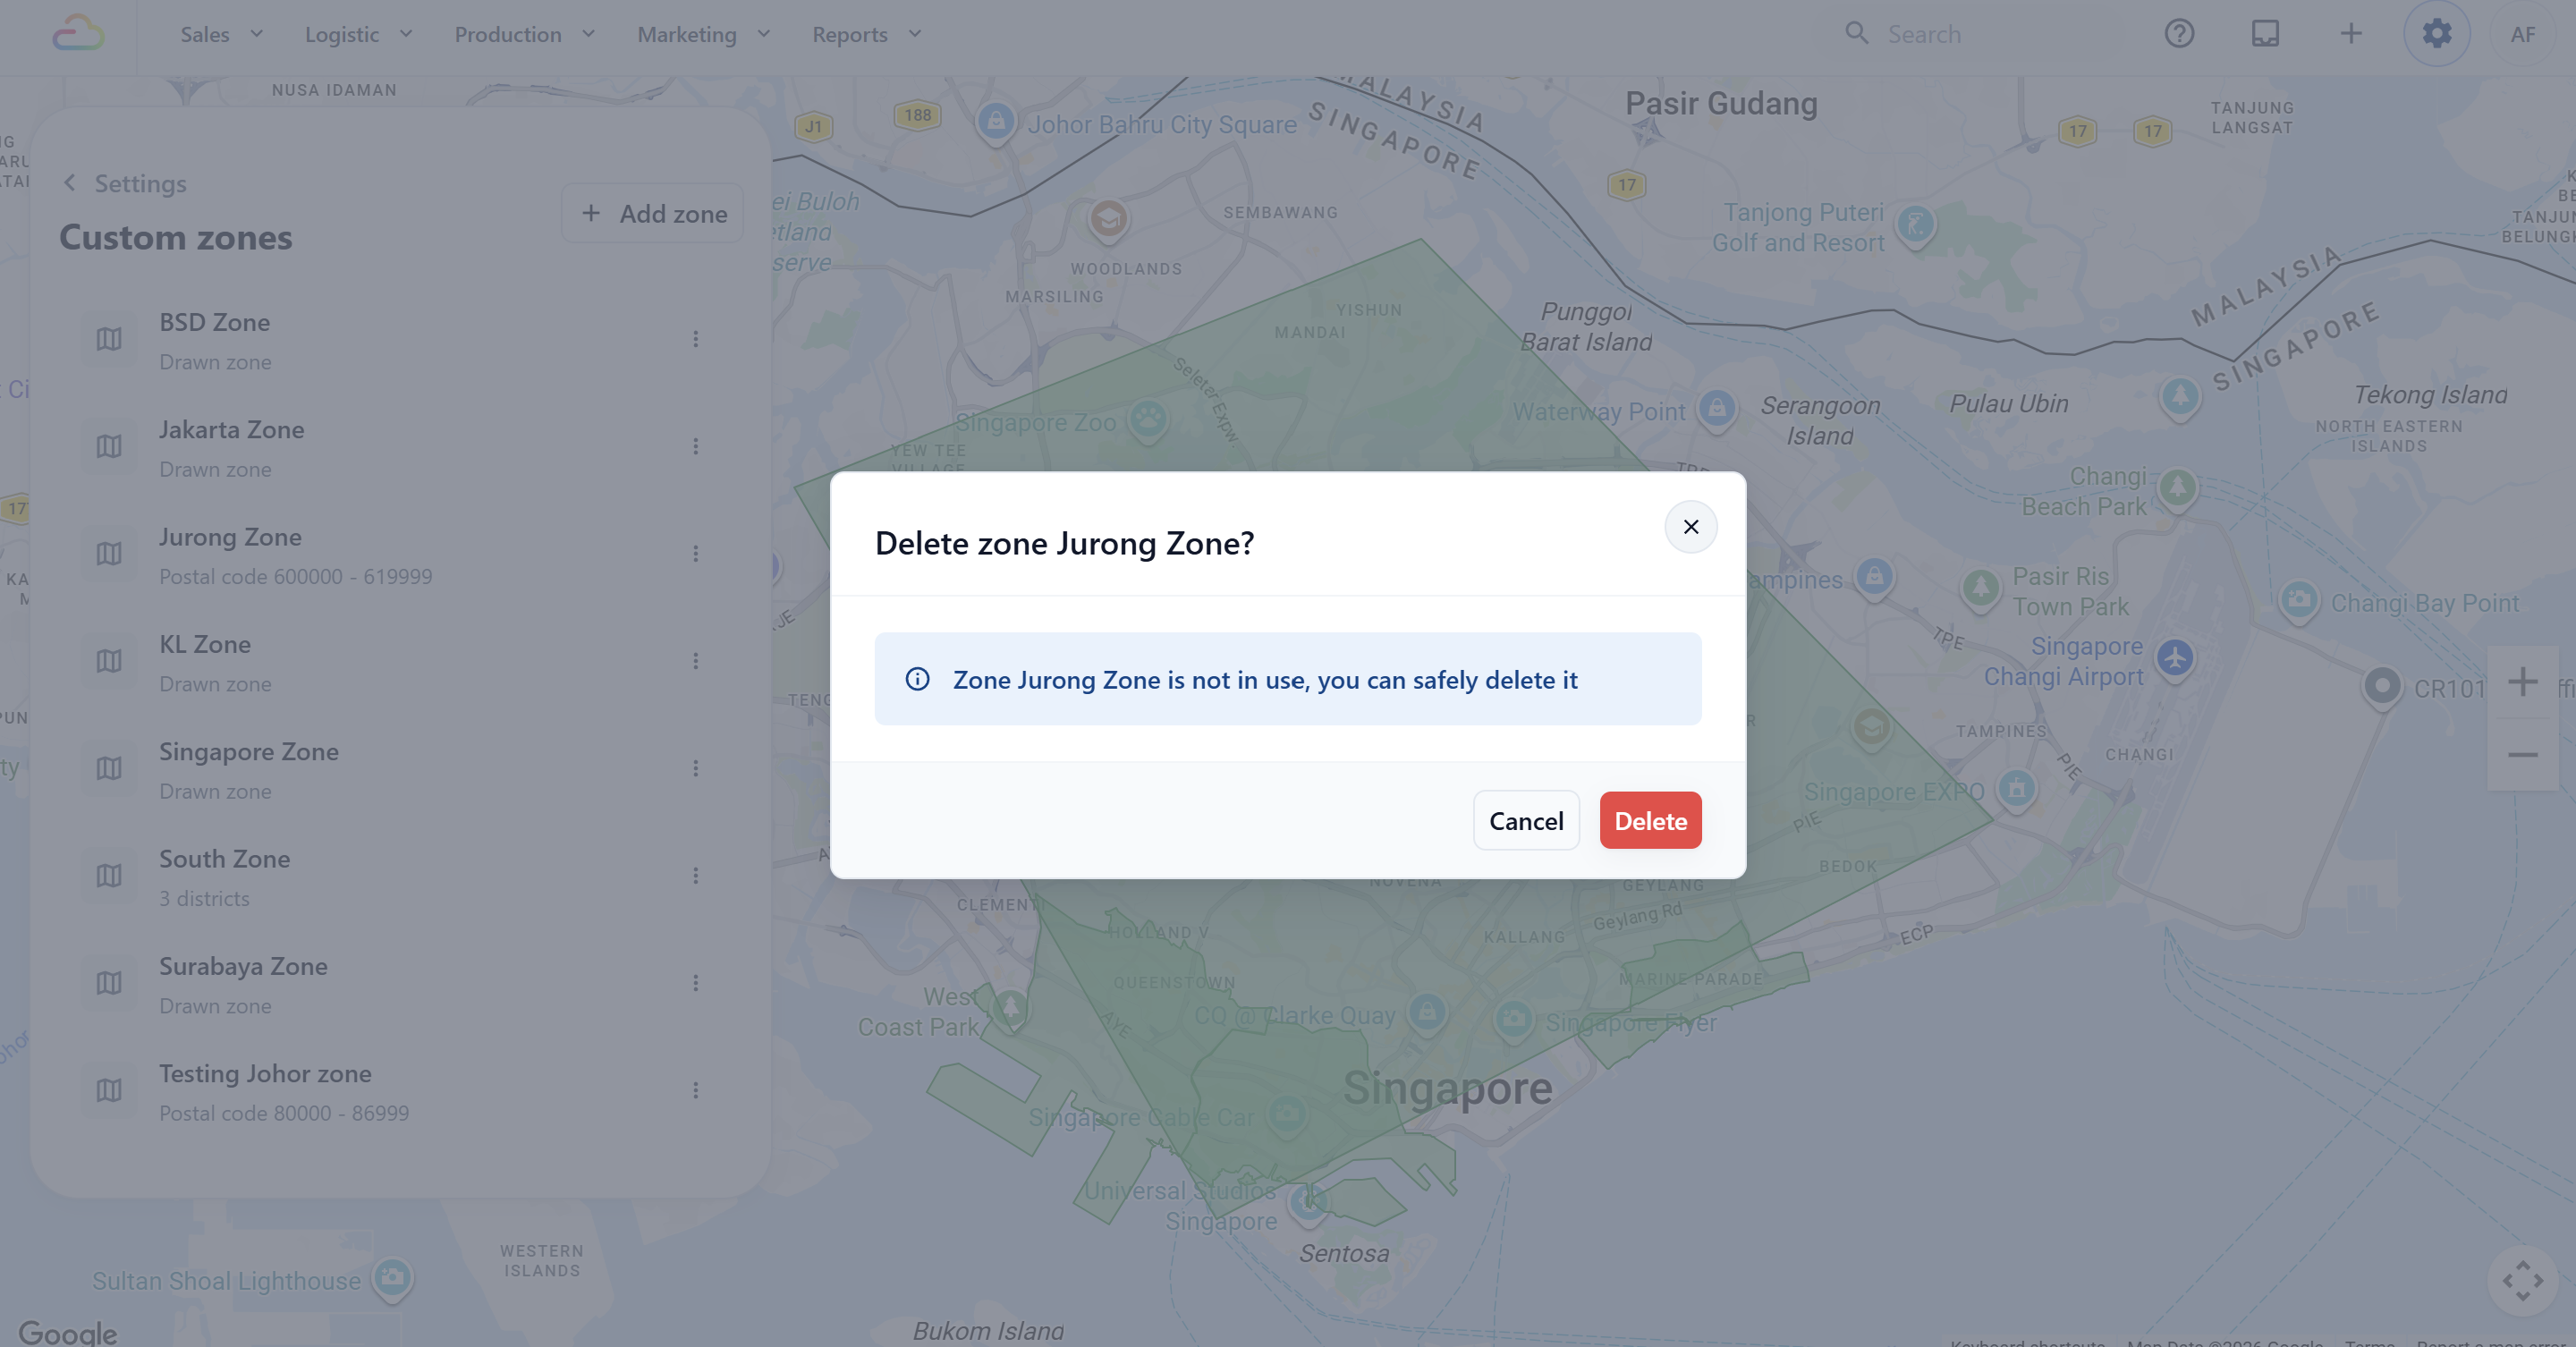
- The dialog runs a usage check and shows one of two messages:
| Status | Message | What you can do |
|---|---|---|
| Not in use | ”Zone [name] is not in use, you can safely delete it” | Click Delete to confirm. |
| In use | ”Zone [name] is in use by business [names], please remove it from checkout settings first” | The Delete button stays disabled. Go to the listed business, remove the zone from its checkout settings, then come back and delete. |
How Zones Connect to Other Settings
A zone is only useful once another setting points to it. The same zone can be selected from any of the following:
-
Service Areas: choose which zones each business unit covers
-
Time Slots: offer different time windows per zone. There is also an “All other areas” option for any address not covered by a specific zone
-
Assignment Rules: auto-assign a worker based on the zone an address falls into
FAQs
Why is my Create button greyed out?
The form has not passed validation. Check that the Zone ID is filled in, and for postal zones, that both postal codes are numbers and the end is larger than the start. For district and drawn zones, you must have at least one district selected or one shape drawn.
Can I change the Zone ID after saving?
No. The Zone ID is locked once the zone exists. If you picked the wrong name, delete the zone and create a new one with the correct name.
The system says my zone is in use, but I removed it. Why can’t I delete it?
The usage check looks at the listed business’s checkout settings. If you removed the zone from one business but it is still linked to another, the warning will still appear with the new business name. Remove the zone from every place it is used, then try again.
Do zones work for online bookings only, or also for orders made at the counter?
Zones are part of the booking and dispatch system. They affect online and app-based bookings where the customer enters an address. Walk-in counter orders do not use zones.
What is the difference between Drawn zone and a district zone in the panel?
Drawn zone means the area was hand-drawn on the map. A district zone shows “N districts” and is made up of pre-mapped administrative areas. You can have both styles in the same shop.
What’s Next
If you need to choose which areas each line of business covers, or set a minimum order by area, continue to [Introduction to Service Areas]. If your zones are only for setting time windows, you can skip Service Areas and continue to [Introduction to Time Slots].