
Before You Start
- Customers already in your Contacts list. To add one, see Add a New Customer.
- Permission to edit customers, if you want to change details, addresses, booking access or Do Not Contact. Staff without it can open the page and read everything, but see no Edit buttons, no Online bookings panel and no Merge or Delete Contact panel.
- If you used the older customer page: blocking a customer from booking used to sit under Blocking Rules in your settings. It is now on each customer's page, and customers you blocked there already show as blocked.
Overview
Every customer has their own page that brings together their history with your shop. It shows what they ordered, what they paid, the invoices you sent them and how much store credit or prepaid packages they have left. It also keeps their phone numbers, addresses, saved cards and messaging choices in one place. Your counter staff can answer most customer questions from this one screen. Owners get a quick read on how often each customer comes back and how much they spend.
Where it works
- Console: the customer page described in this article, where staff read and edit everything.
- Online Store, Mobile App and WhatsApp: customers never see this page, but the Blocked from booking switch decides whether they can book there.
- Campaigns: the Do Not Contact switch keeps the customer out of your marketing campaigns.
Why use it
When a customer calls, your staff no longer need to search the order list, scroll through payments and check the loyalty page separately. The answer to "Where is my last order?", "How much credit do I have left?" or "Which card did I save?" is on one screen. Details you update here, such as a new phone number, are used on the customer's next orders straight away, so staff stop calling an old number.
Where to find it
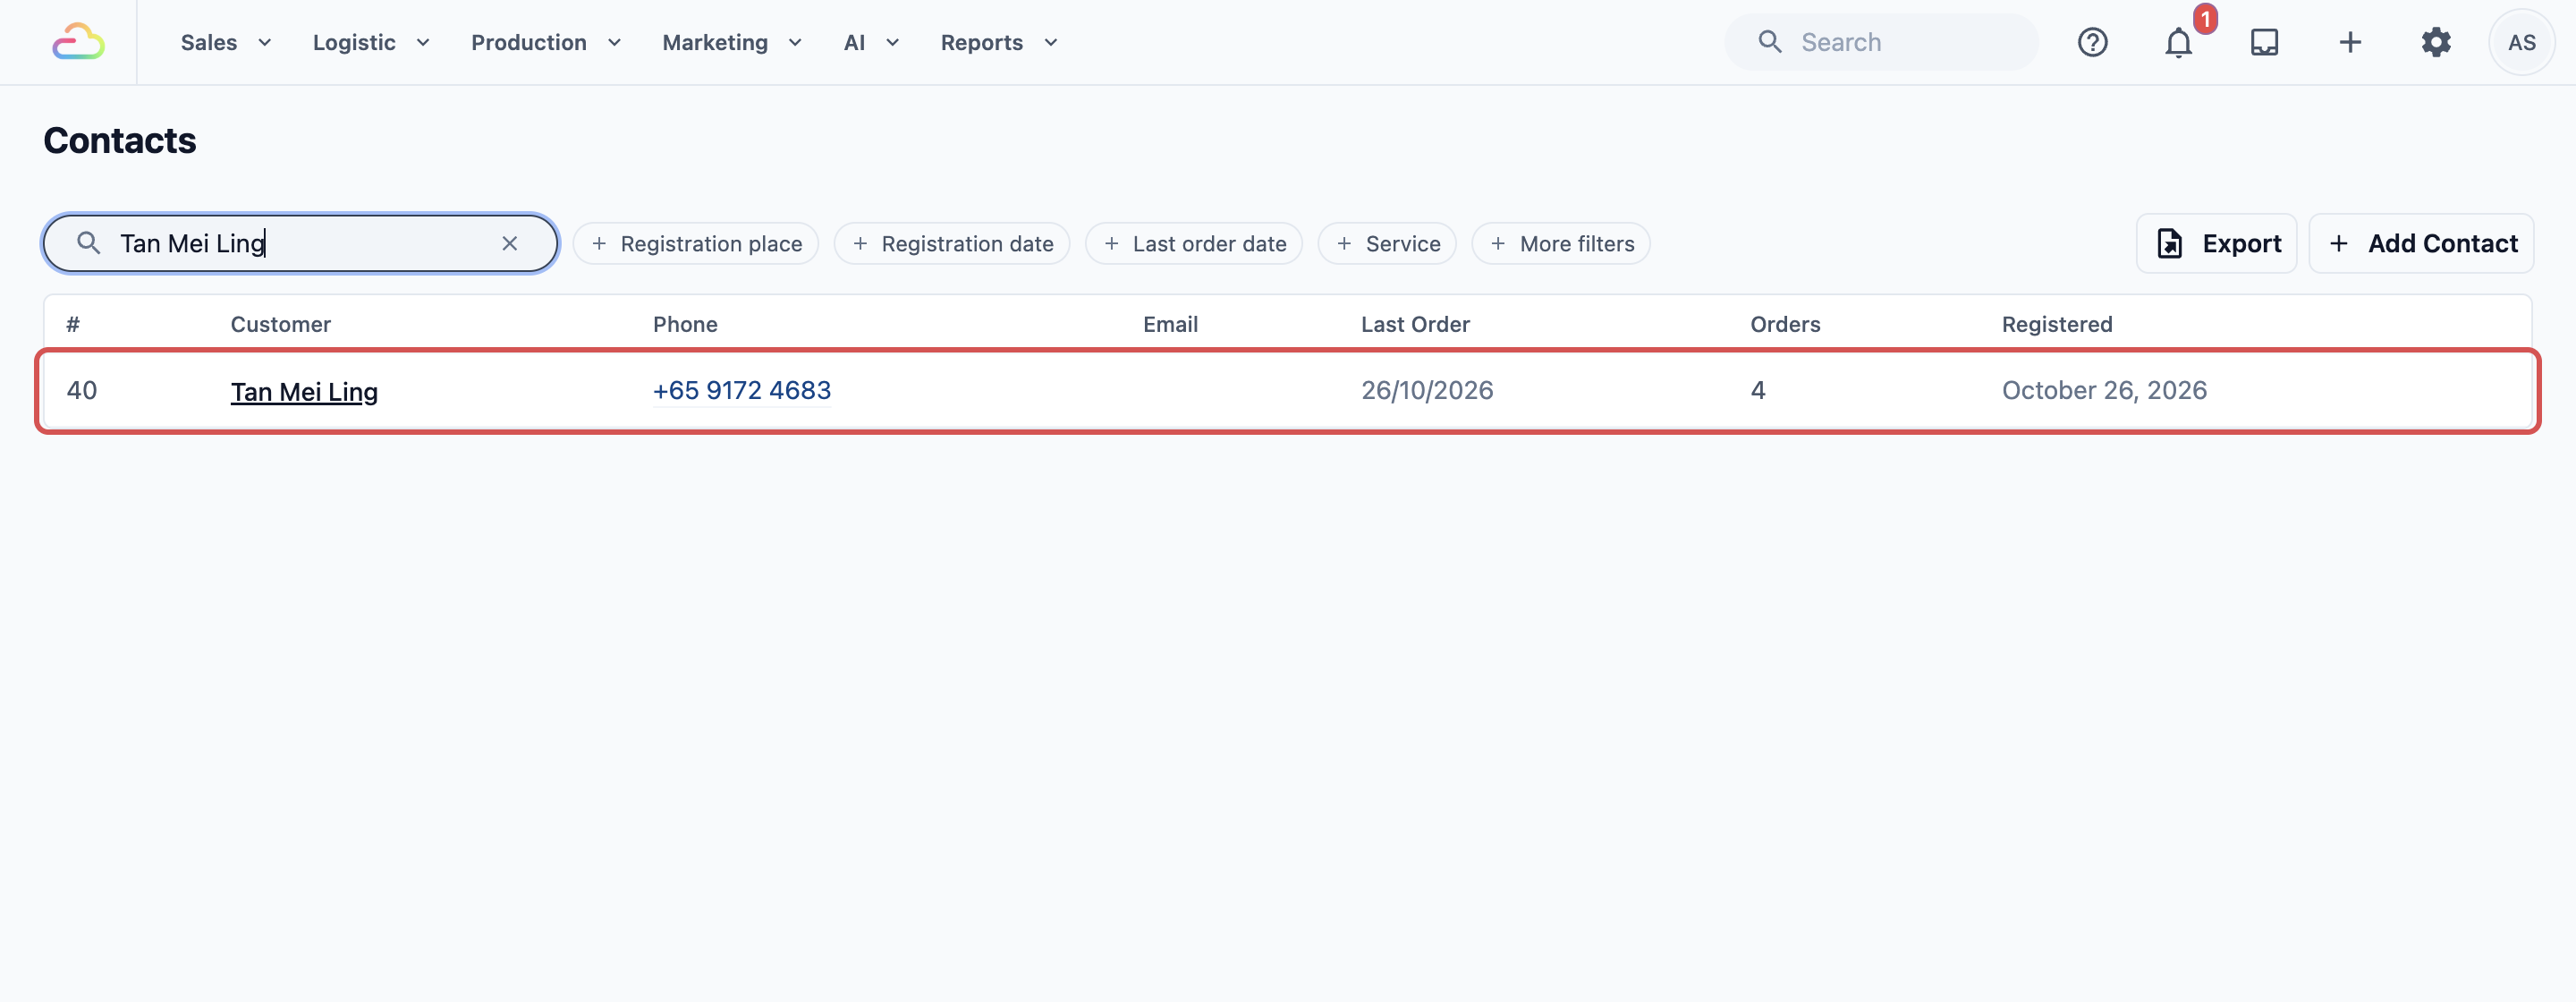
- In the top navigation bar, click the Sales dropdown, then click Contacts.
- Search for the customer by name or phone number.
- Click the customer's row. Their page opens.
What each section shows
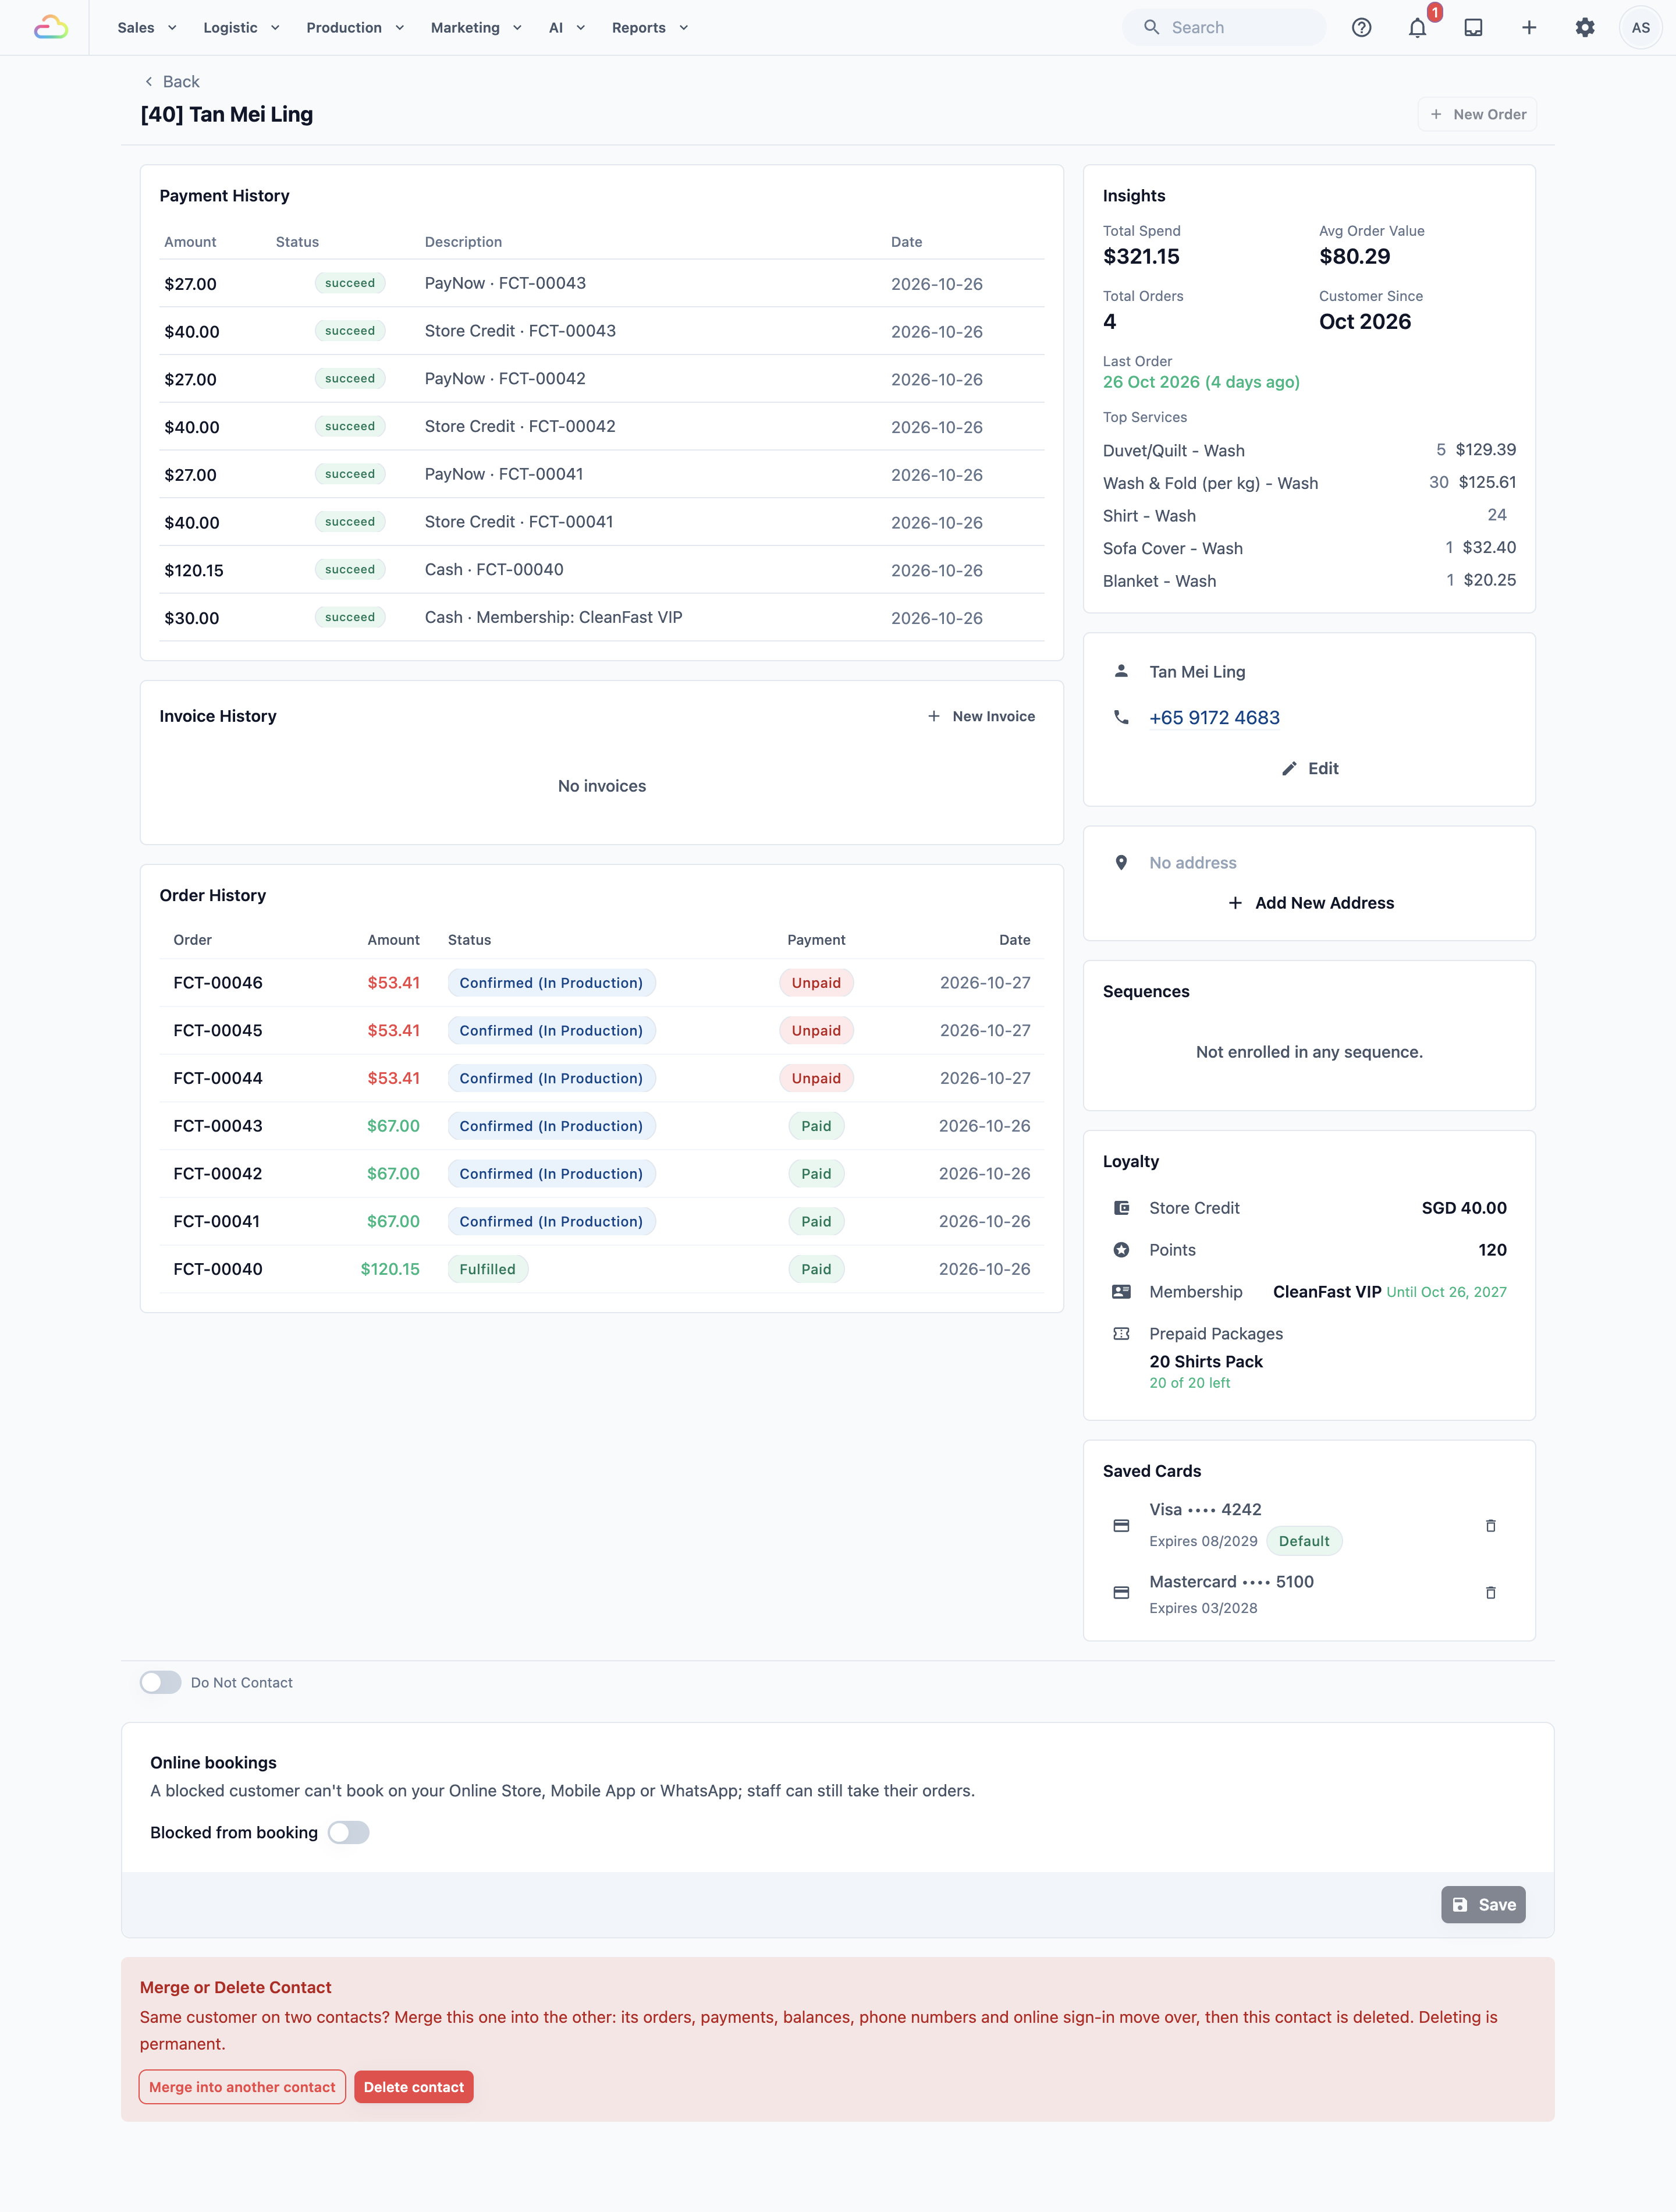
The top of the page shows the customer's name and customer number, with New Order on the right. Below it, the wide left column holds their history and the right column holds their details and balances.
Payment History
Every payment the customer made, with its Date, Description, Amount and Status. Store credit top-ups and membership payments are listed here too. A new customer shows "No payments".
Invoice History
The invoices you issued to this customer, with Invoice #, Date, Amount and Status. Click New Invoice to start one for them.
Order History
Their orders, newest first, with Order, Date, Amount, Payment and Status. Click an order to open it.
Insights
A quick summary of the customer's value to your shop:
- Total Spend and Total Orders: everything they have spent and ordered with you.
- Avg Order Value: how much they spend on a typical order.
- Last Order and Customer Since: when they last ordered and when they first became your customer.
- Top Services: what they order most.
- Return Cadence: the average number of days between this customer's orders, once they have ordered on two different days. It shows On track, Due to return or Overdue, so you know who to remind.
Contact Info
The customer's name, phone number and email. Click Edit here to change them (see below).
Address
Every address saved for the customer, with their Default address first. Click an address to change it, or click Add New Address to add another. A customer with no address shows "No address".
Sequences
Sequences are follow-up messages that go out on a schedule, such as a reminder 30 days after a deep clean. This card shows the sequences the customer is in, the next message and when it goes out, and how many messages were delivered. A customer in none shows "Not enrolled in any sequence."
Loyalty
The customer's balances, each on its own row:
- Store Credit: money the customer has paid in advance or been given, which they can spend on orders. Click it to see the balance and its history, or to Top up .
- Points: loyalty points they have collected.
- Membership: their membership plan, or None. Click it for details.
- Prepaid Packages: packages they bought in advance, such as 10 shirt washes, and what is left. Click it for details.
Saved Cards
Cards the customer saved while paying on your Online Store or Mobile App. Each card shows its expiry date, and is marked Default or Expired where that applies. A customer who never saved a card shows "No saved cards". Removing a card is explained below.
Notes
Your staff's private note about the customer, such as "Prefers pickup after 6pm". Customers never see it. Click Edit to change it.
Update the customer's details
- On the Contact Info card, click Edit . The Update Account window opens.
- Change the fields you need.
- Click Update Account .
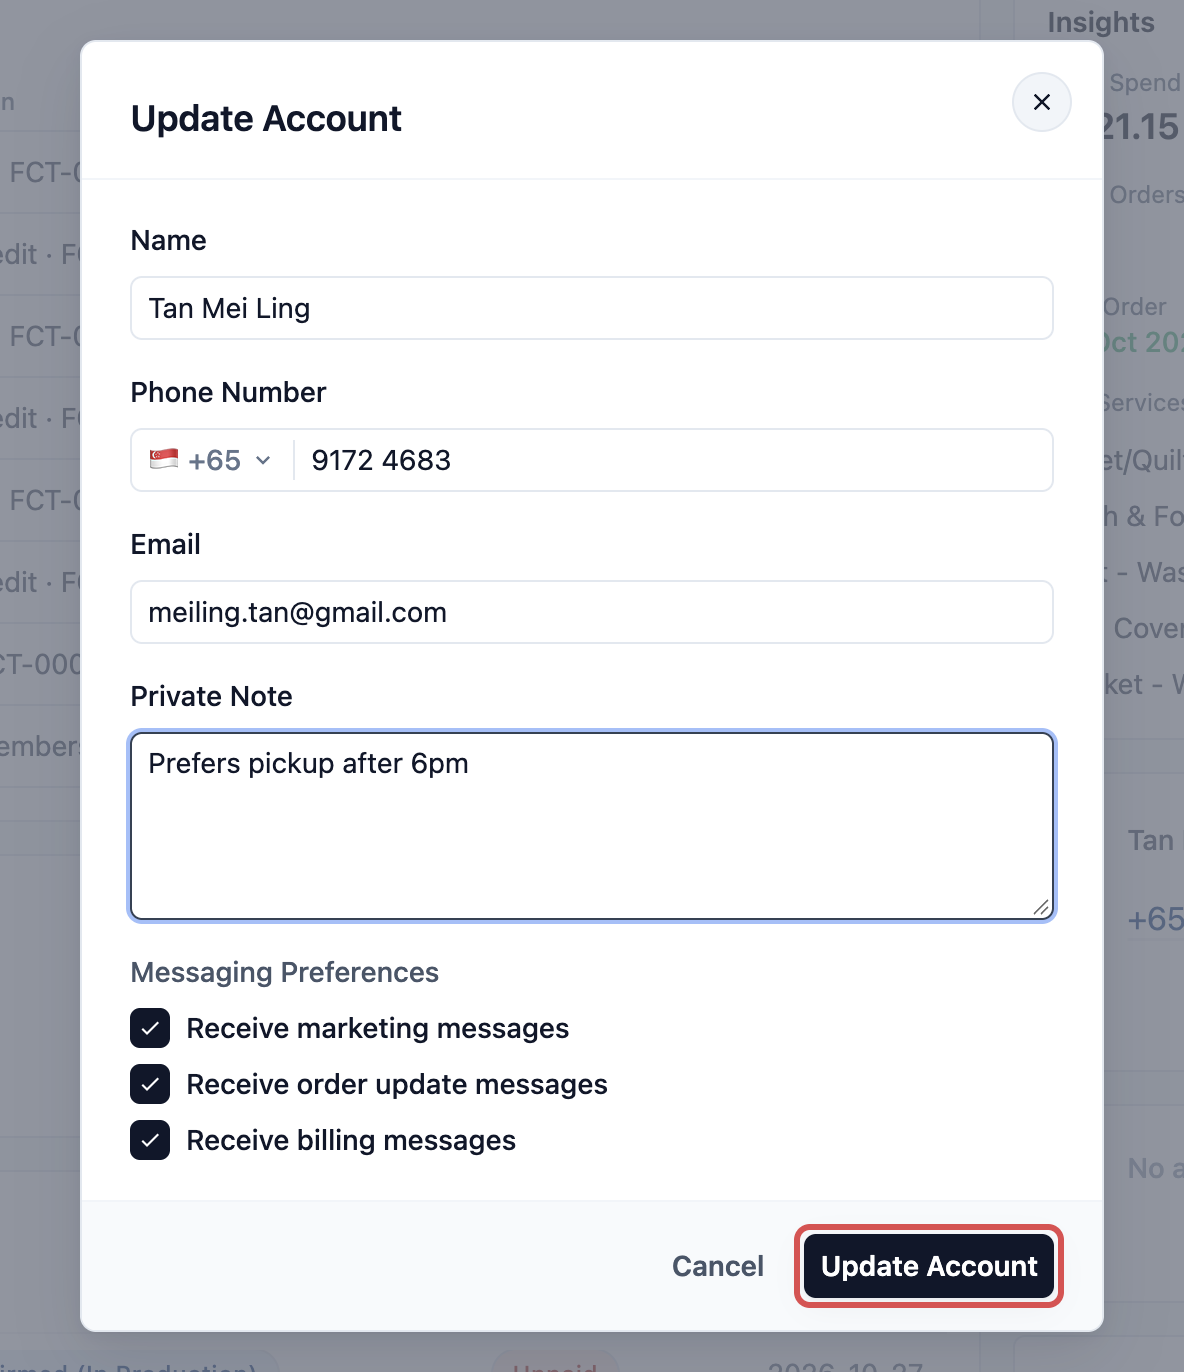
The fields follow your shop's contact form, so your window may show more or fewer. You set them up in Add a New Customer.
Name
The customer's name as staff see it on orders and receipts. It can't be left empty.
Phone Number
The customer's main mobile number, with the country code.
Other phone
Shows only when the customer has more than one number, for example after you merged two contacts for the same person. Edit it like the main number, or click the ✕ next to it to remove it.
The customer's email address, for receipts and messages sent by email.
Private Note
A note only your staff see. It is the same note shown on the Notes card.
Birthday and Referral Source
Shown only if your shop added them to its contact form.
Messaging Preferences
| Checkbox | What it controls |
|---|---|
| Receive marketing messages | Whether the customer gets your campaigns and promotions |
| Receive order update messages | Whether the customer gets messages about their orders, such as "ready for pickup" |
| Receive billing messages | Whether the customer gets messages about payments and invoices |
If Receive marketing messages is greyed out with the note "This customer stopped your marketing messages in WhatsApp", the customer switched off your offers inside WhatsApp itself. You can't tick it for them. Only they can switch it back on, in WhatsApp, and the tick then comes back by itself. See Letting Customers Stop Promotions.
If the email or phone number is already on another contact, the window says so and offers Open contact . If it is the same person, open that contact and merge the two (see Merge or Delete a Contact).
Add or change an address
- On the Address card, click Add New Address , or click an existing address. The Add Address or Update Address window opens.
- Find the address, or fill in Address line 1, Address line 2 and Postal code.
- Tick Set as default address if this is where you usually pick up or deliver.
- Click Add Address or Update Address .
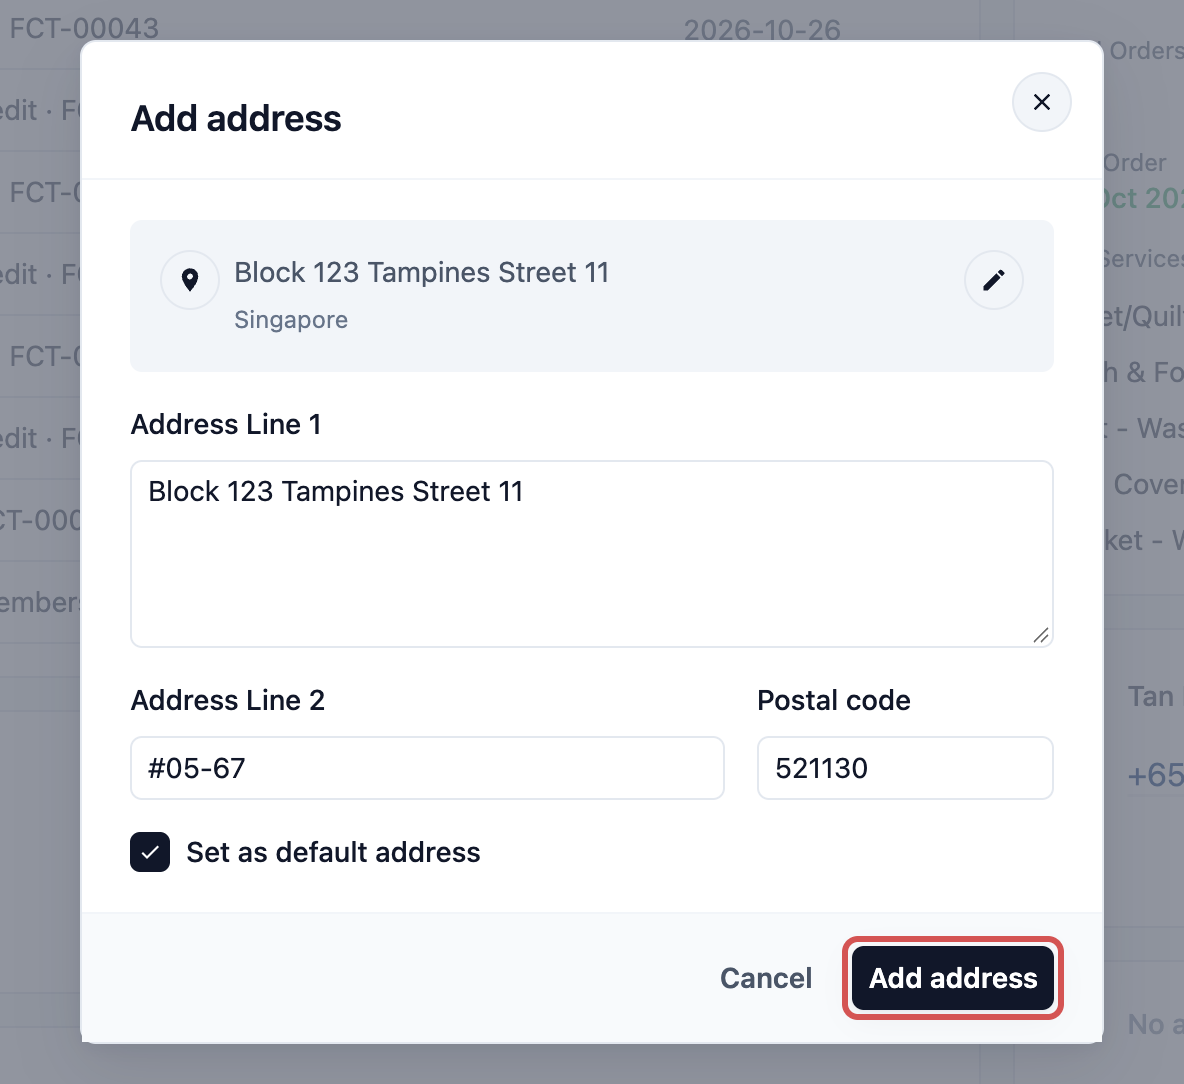
A customer's first address becomes their default automatically.
Turn on Do Not Contact
Do Not Contact is for a customer who asked you to stop sending them promotions, or one you should not market to. It sits at the bottom of the customer's details.
- Scroll down to the Do Not Contact switch and turn it on.
- In Note (optional), type why, for example "Asked by phone on 12 Oct to stop promotions".
- Click Confirm .
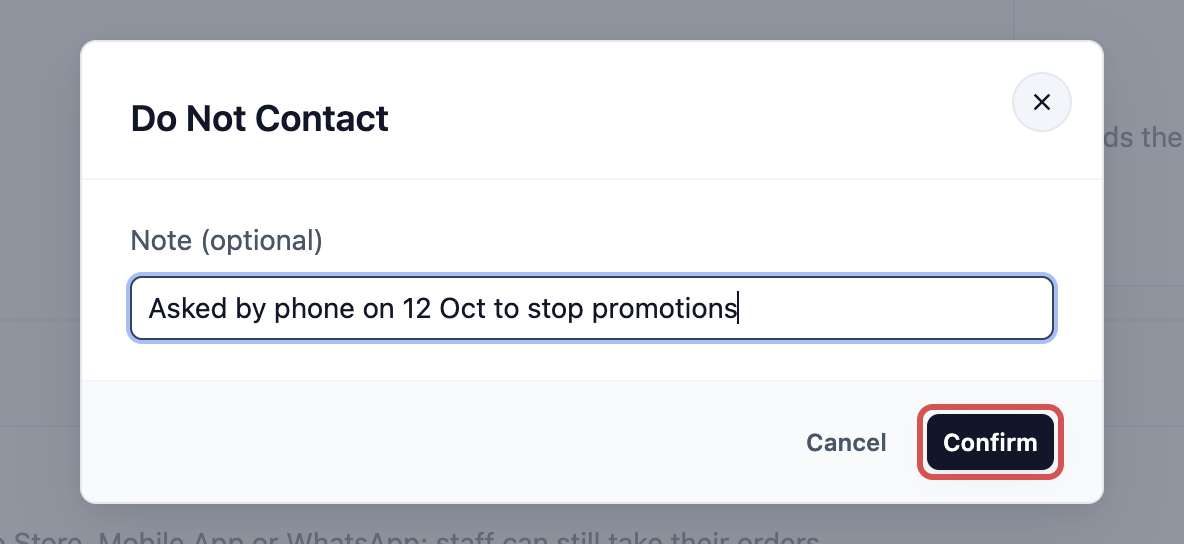
If you turn this on:
- A Do Not Contact badge appears next to the customer's name, with your note, so every staff member sees it.
- The customer is left out of every campaign you send, even if they are in the campaign's audience.
- Receive marketing messages is switched off for them, and they can't switch it back on themselves when they sign in online.
- Order update and billing messages still go out. Those follow their own checkboxes in Update Account.

Each time someone turns it on or off, Suppression History below the switch records it as Suppressed or Re-enabled, with who did it.
To turn it off, switch it off and click Confirm when asked "Re-enable marketing messages for this contact?". The customer's earlier marketing choice comes back. If they stopped your marketing messages inside WhatsApp, it stays off until they switch it back on there.
Block a customer from booking online
Use this only if a customer should no longer place bookings themselves, for example after repeated no-shows.
- Scroll down to the Online bookings panel.
- Turn on Blocked from booking.
- In Alert message (for customer), type what the customer sees when they try to book.
- Click Save .
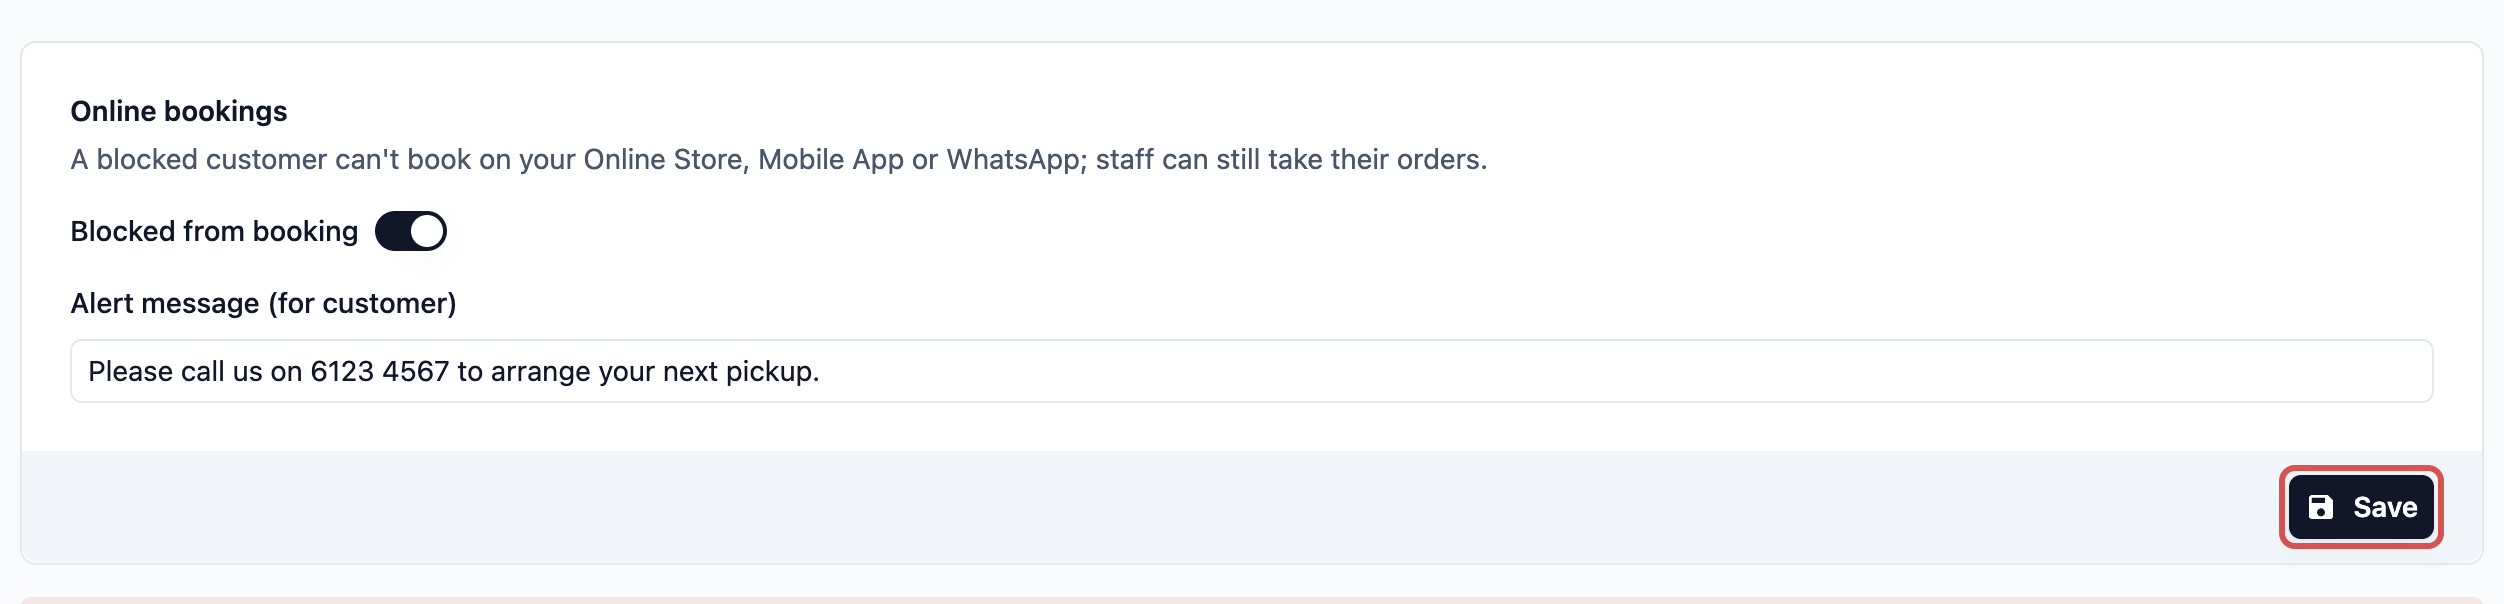
If you turn this on, the customer can't book on your Online Store, Mobile App or WhatsApp. They see your alert message instead. Your staff can still take their orders at the counter or with New Order .
Alert message (for customer)
| If you | The customer sees |
|---|---|
| Leave it empty | "Booking is unavailable for this account. Please contact support for assistance." |
| Type a message | Your message, word for word |
If this customer was blocked together with other customers under the old Blocking Rules, the panel says so. They share one message, so changing it changes it for all of them.
Remove a saved card
- On the Saved Cards card, click the bin icon (Remove card) next to the card.
- Read the message and click Remove card .
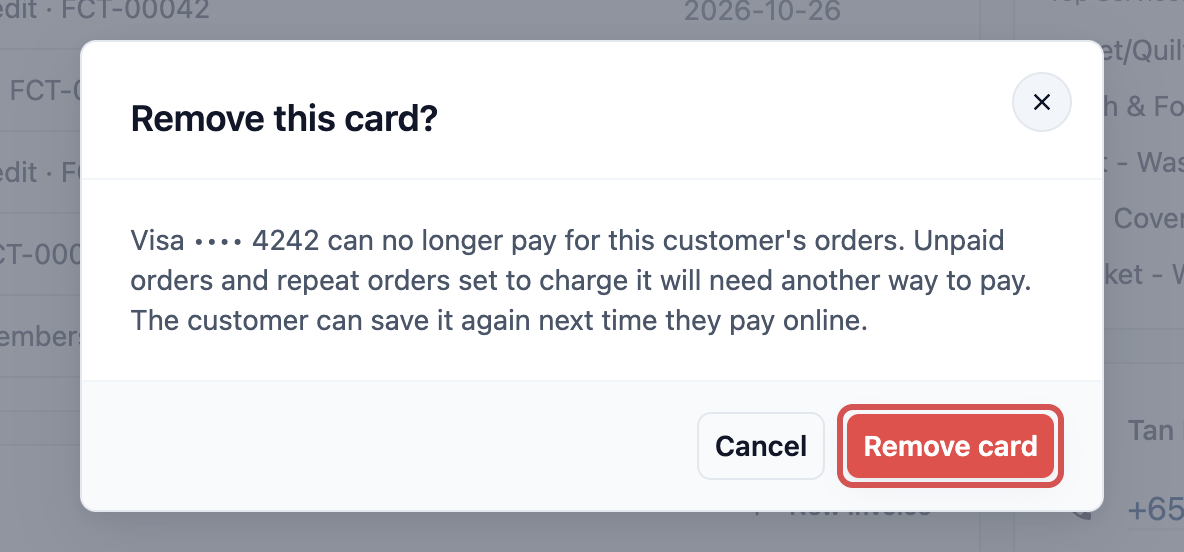
The card can no longer pay for this customer's orders. Unpaid orders and repeat orders set to charge it will need another way to pay. The customer can save it again next time they pay online.
Start a new order for the customer
- Click New Order at the top of the page.
- If your shop has more than one online sales channel, or takes B2B orders, choose which one the order is for.
- The new order opens with this customer already filled in.

Example
Tan Mei Ling calls CleanFast Laundry's Tampines shop. She has moved, wants to know if her shirts are ready and asks how much store credit she has. She also asks not to get promotions any more.
- Staff open Sales › Contacts, search "Tan Mei Ling" and open her page.
- Order History shows her latest order and its status, so staff tell her when it will be ready.
- Loyalty shows Store Credit of $42.00, so staff tell her she can use it at pickup.
- On Address, staff click Add New Address , enter her new Jurong address and tick Set as default address.
- Staff turn on Do Not Contact with the note "Asked by phone on 12 Oct to stop promotions".
The next campaign skips her, her next delivery goes to Jurong, and she still gets the message when her order is ready.
Delete or merge this customer
The Merge or Delete Contact panel is at the very bottom of the page. See Merge or Delete a Contact.
FAQs
Why is Receive marketing messages greyed out for a customer?
The customer stopped your marketing messages inside WhatsApp. WhatsApp refuses your offers to them until they switch them back on themselves, so EasyBiz keeps the box off and leaves them out of your campaigns. They open your chat in WhatsApp, tap your shop's name at the top and turn Offers and announcements back on. The box is then ticked again by itself.
What is the difference between Do Not Contact and Blocked from booking?
Do Not Contact stops your marketing campaigns reaching the customer, but they can still book online. Blocked from booking stops them booking on your Online Store, Mobile App or WhatsApp, but they still get your messages. You can turn on both.
Why is a section missing from my customer page?
Your shop chose which sections show, and Notes is not shown until you add it. See Customize the Contact List and Profile.
Where did this customer's store credit come from?
Click Store Credit on the Loyalty card. It opens the balance with its history of top-ups, adjustments and use. Top-ups also appear in Payment History.
If I change a customer's name or phone number, do their past orders change too?
Yes. The new name, phone number or email also replaces the old one on their most recent orders, so staff searching orders find them under the new details.
A customer removed their card. What happens to their repeat order?
A repeat order set to charge that card can't use it any more. Ask the customer to pay another way or save a card again when they next pay online.
Why can't some staff see the Edit buttons or the Online bookings panel?
They don't have permission to edit customers. They can still read the whole page. You can change what each staff member may do in their staff permissions.
What's Next
You can now read a customer's full history on one page and keep their details, addresses and messaging choices up to date. Next, save time finding the right customers with Contact Shortcuts.