Why use a Mini App for your Home Pickup Bookings?
-
Zero Friction: Customers don’t need to download a new app or remember a website password.
-
Convert Leads Faster: New customers are automatically added to your EasyBiz Cloud database the moment they book. No manual data entry is needed!
-
Higher Completion Rates: Because it feels like a simple conversation, customers are much more likely to finish the booking.
-
All-in-One Tracking: Every booking made via WhatsApp automatically appears as a New Sales Order in your dashboard.
Create a new Mini App
To start creating your booking process, you will first need to create a new Mini App.
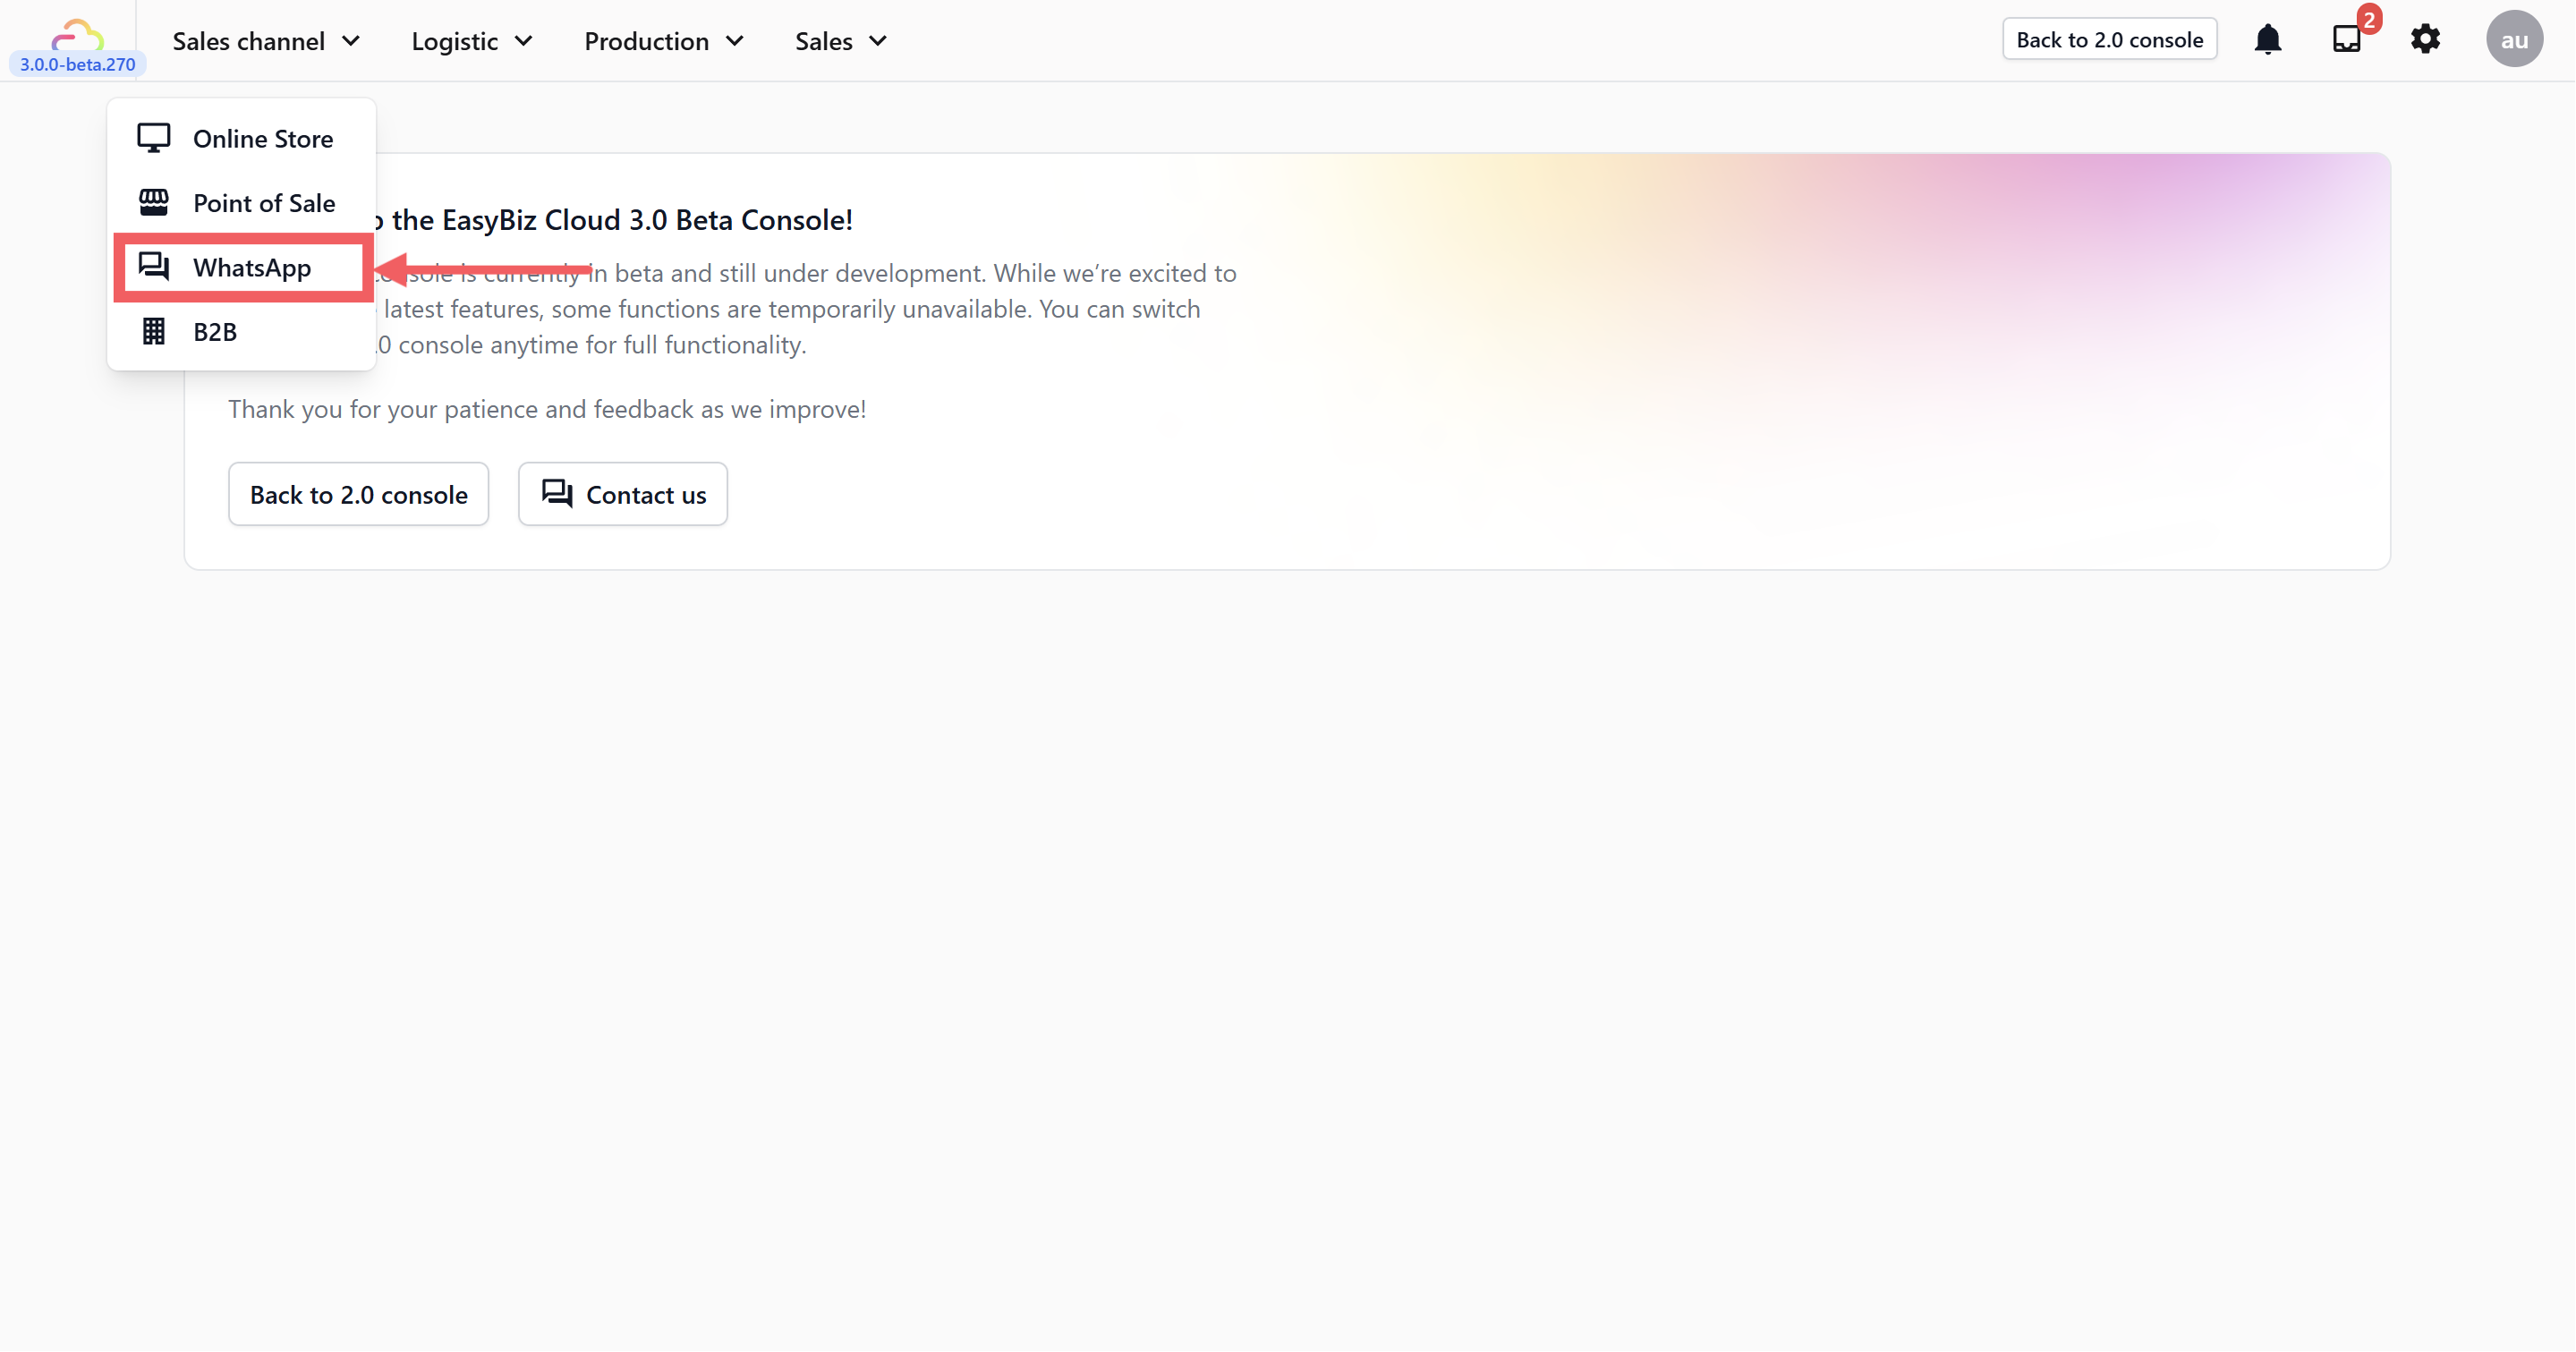
- From the top navigation bar in your Easybiz console, click on Sales Channel and select WhatsApp.
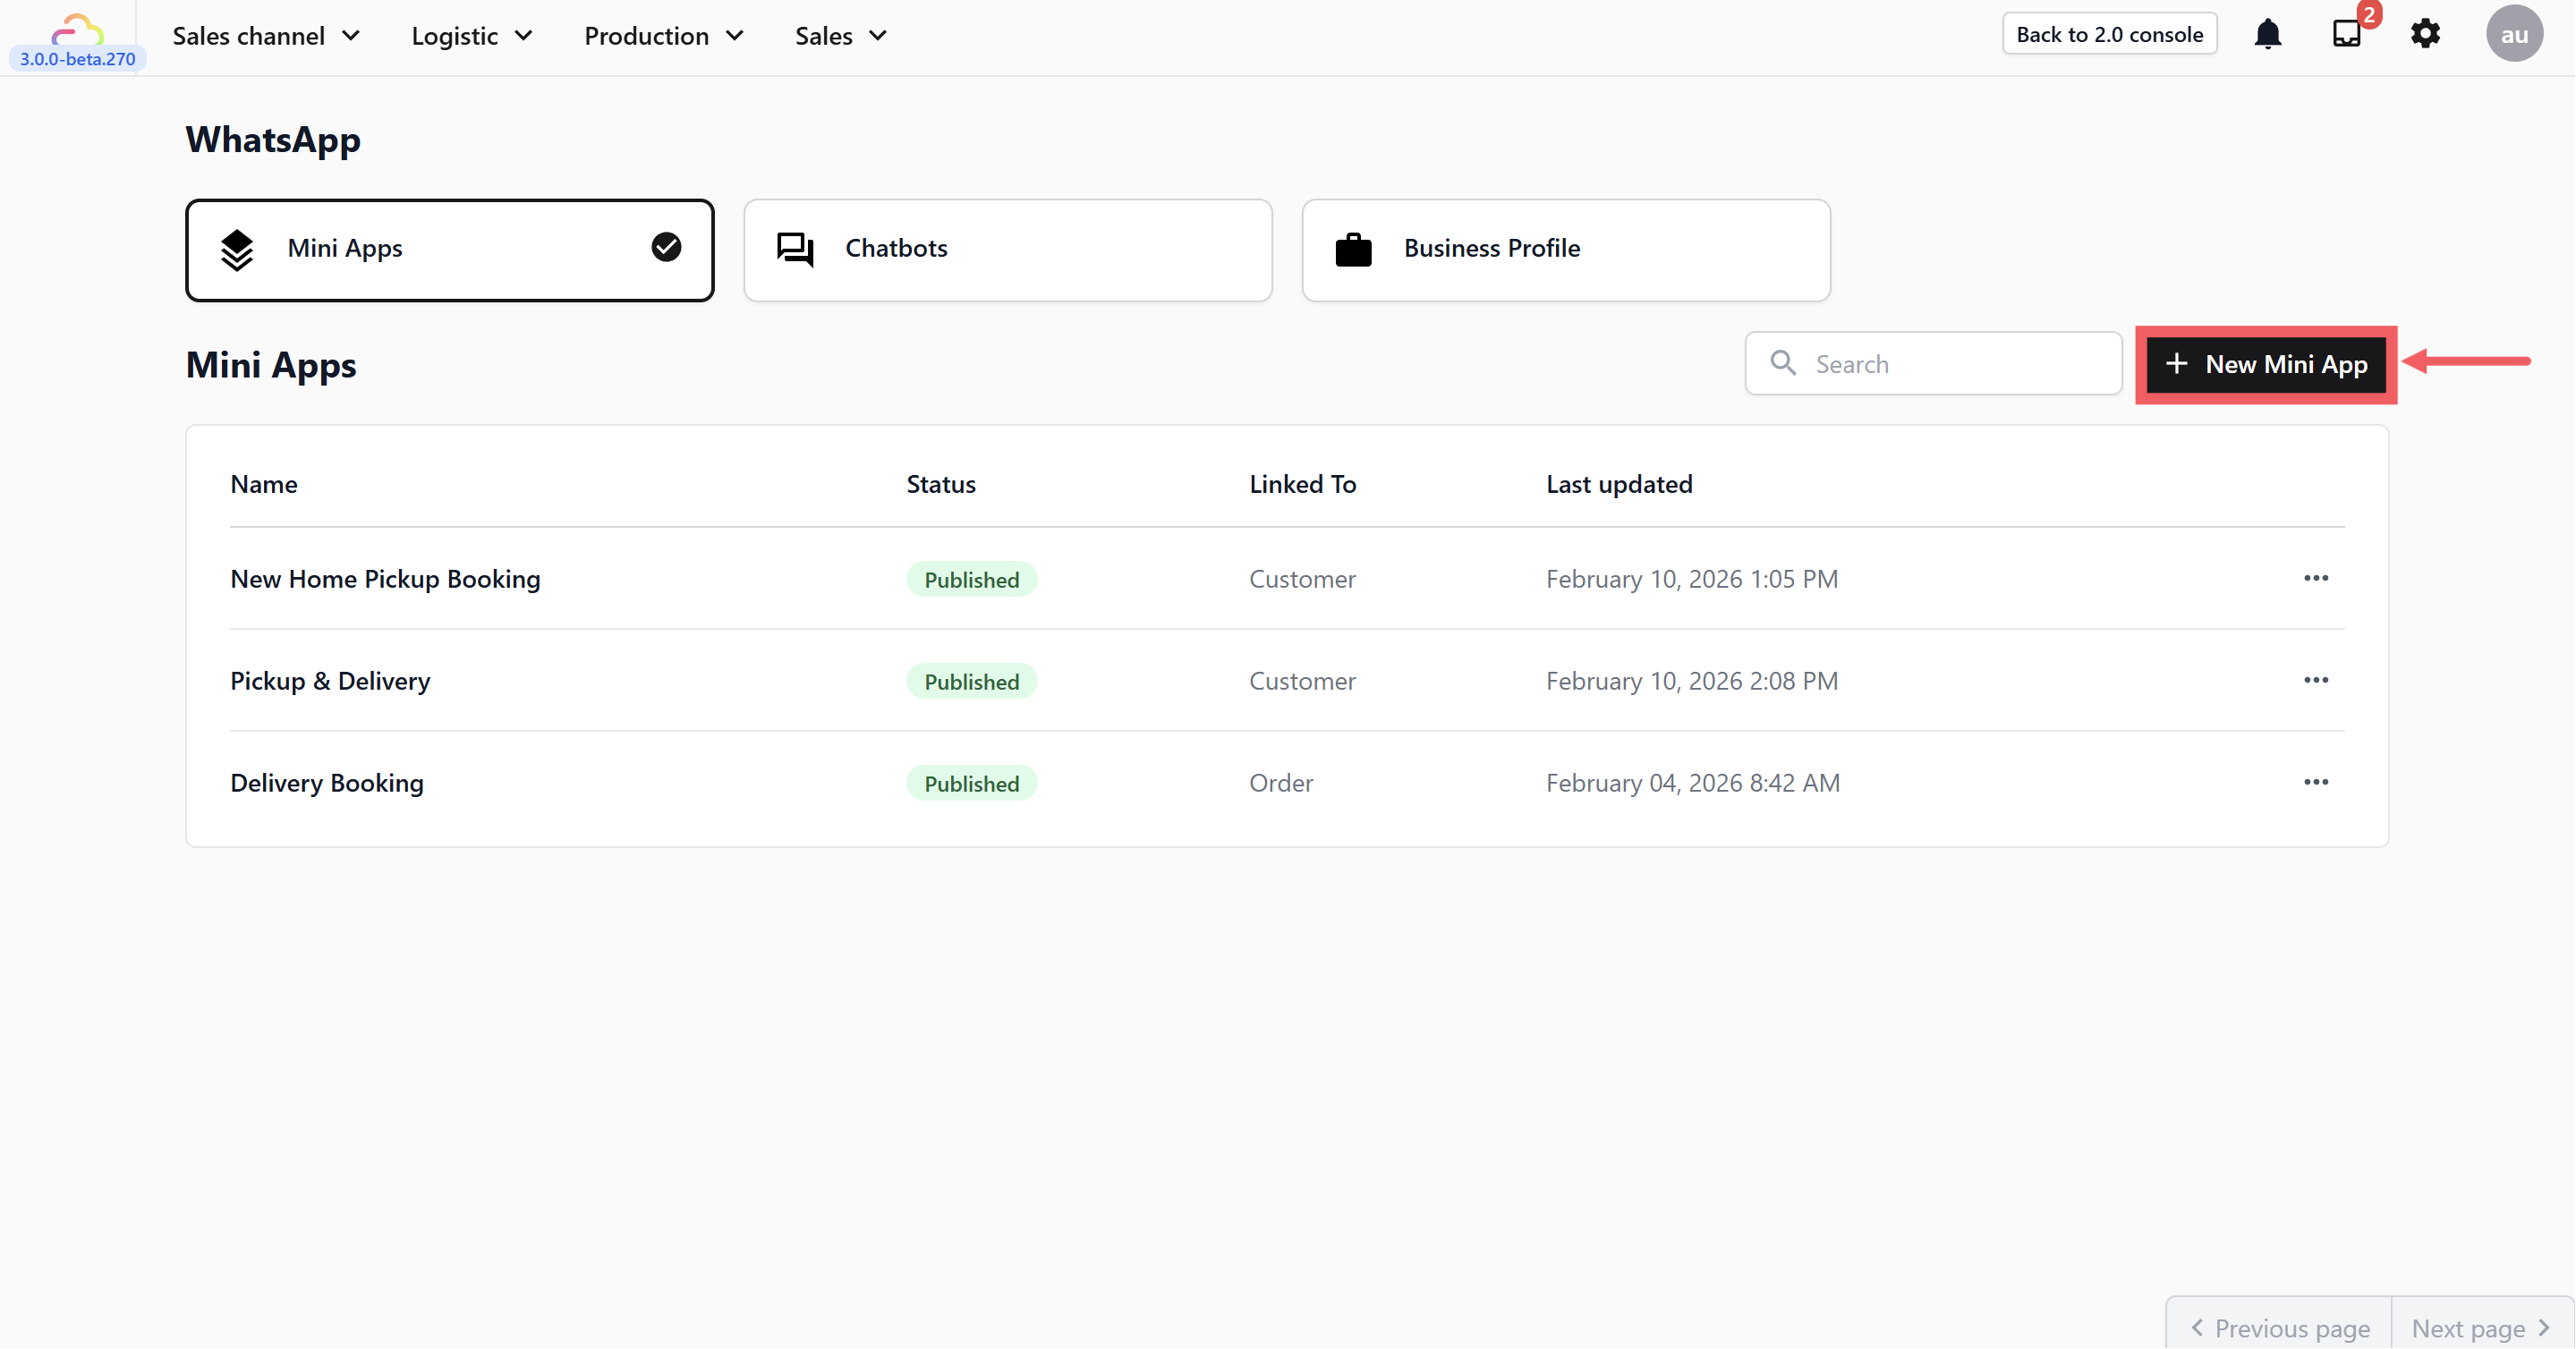
- In the WhatsApp page, you should land on the Mini Apps tab. Click on the + New Mini App button.
-
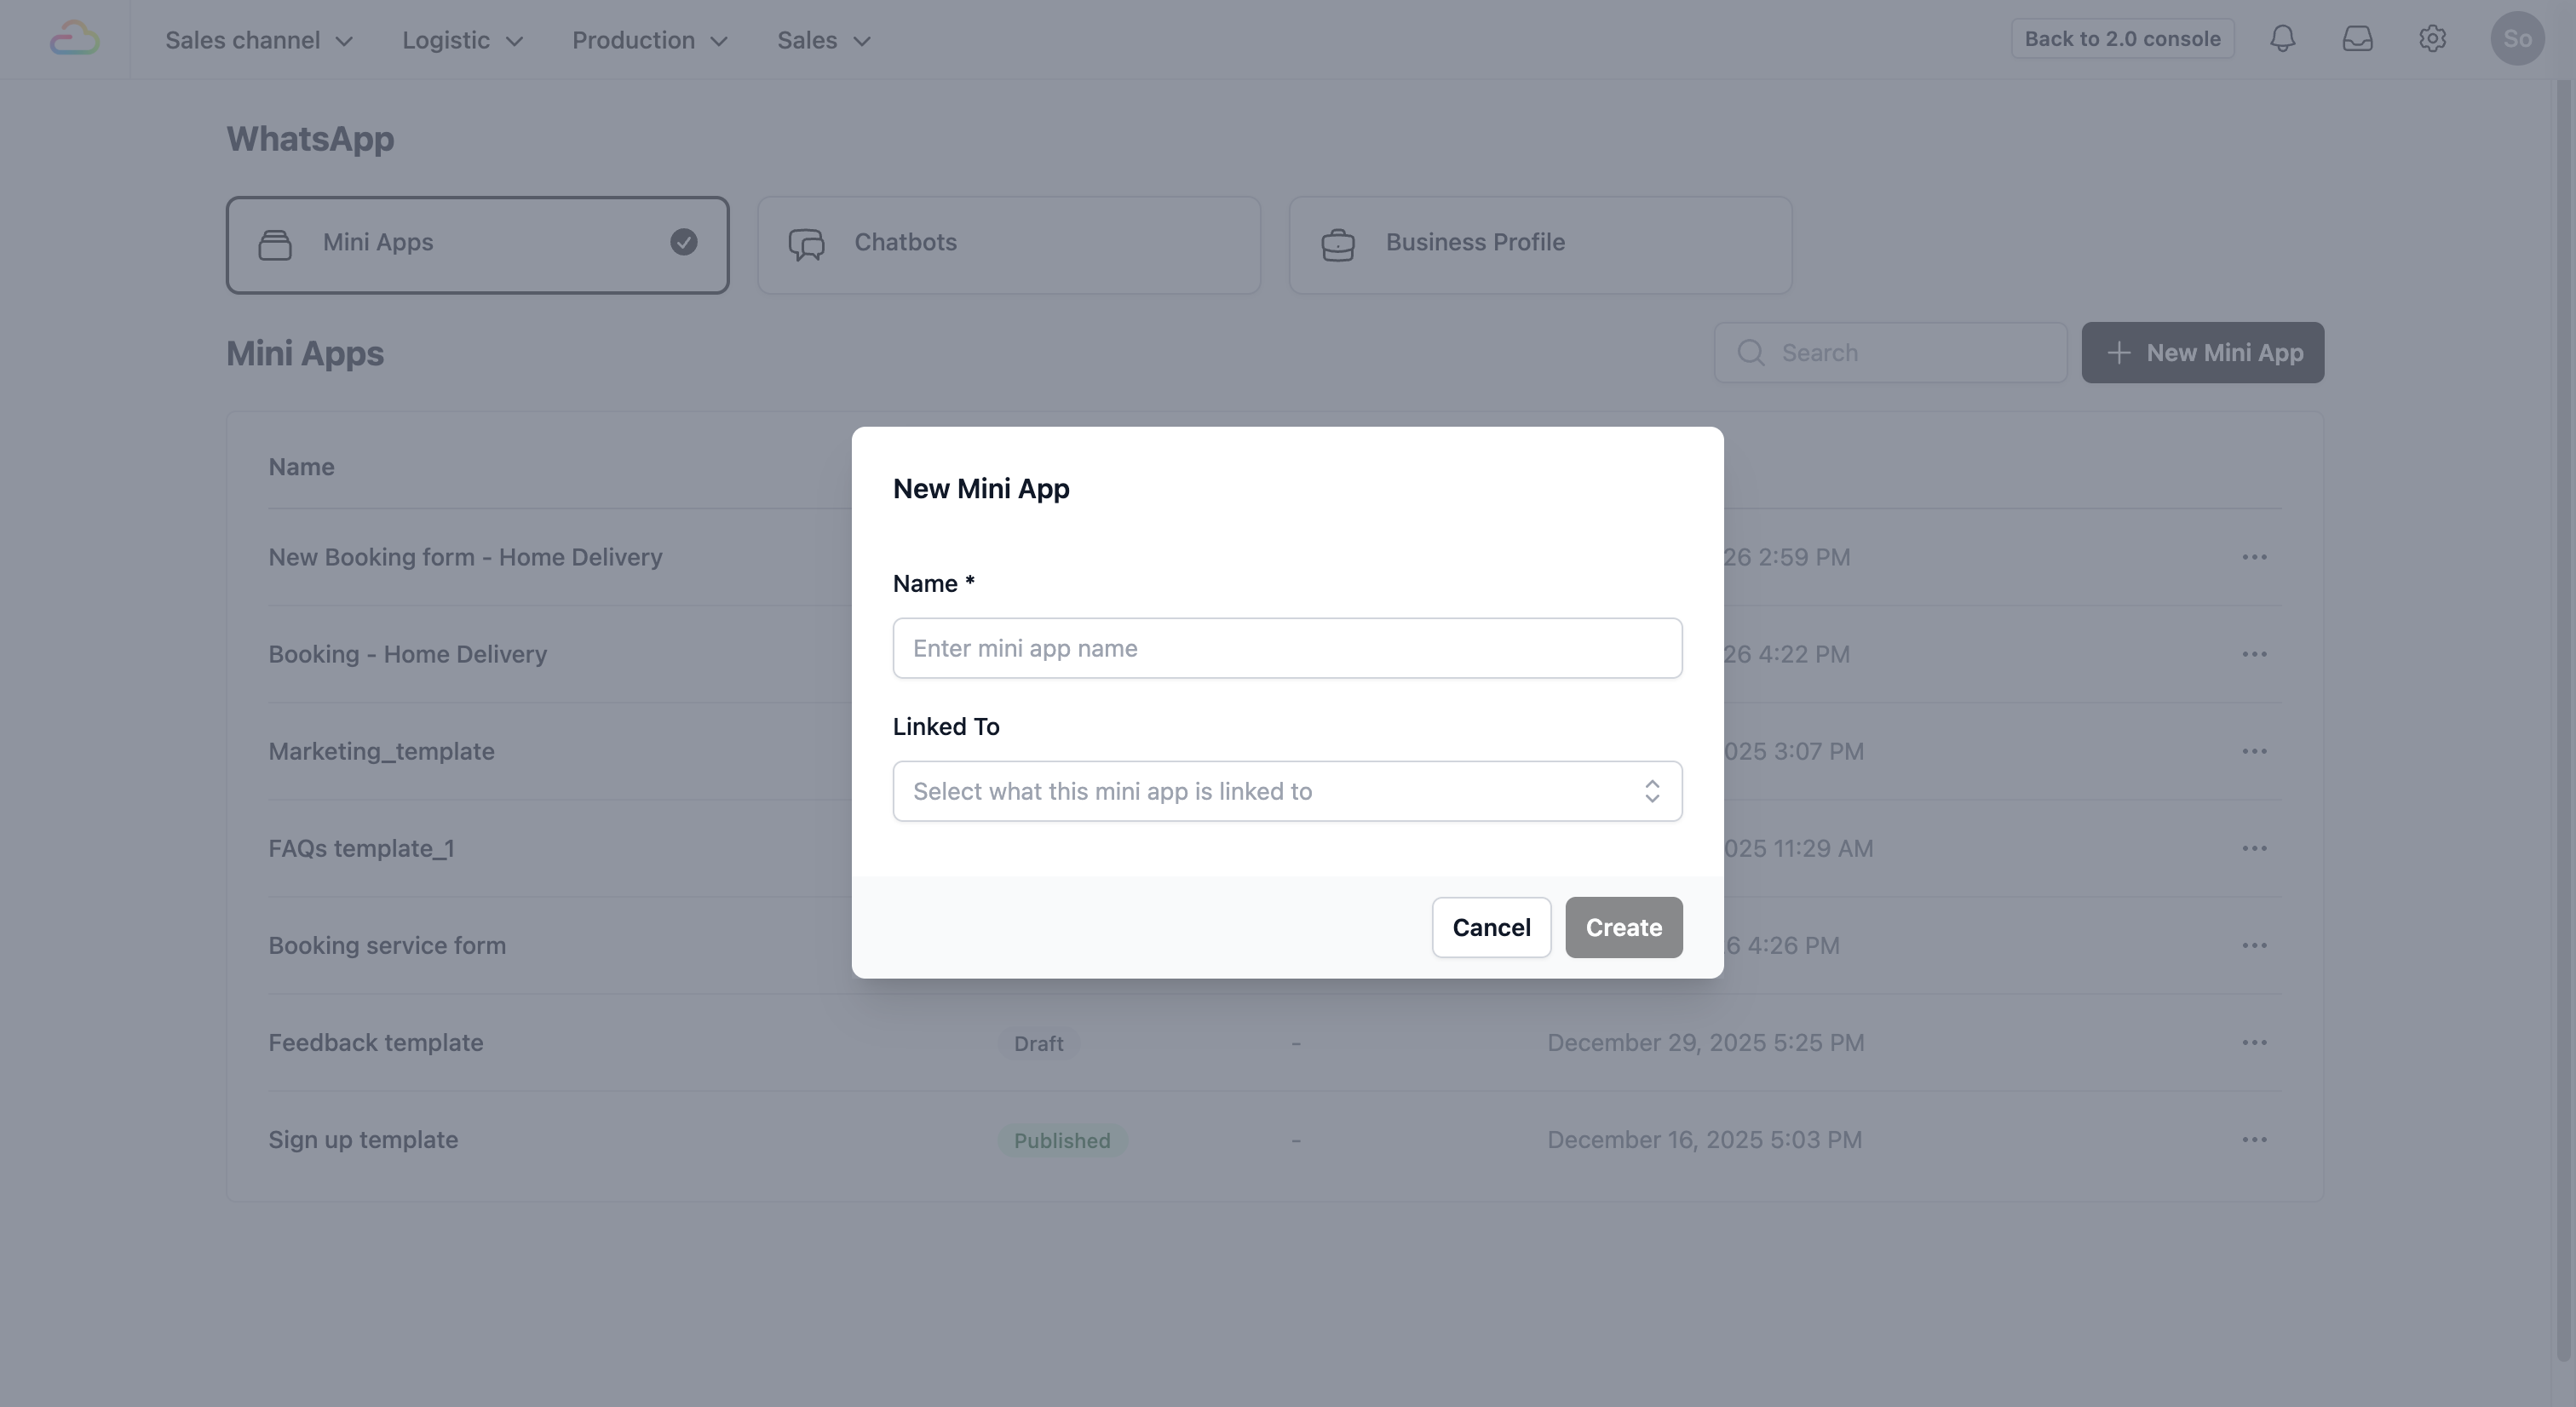
A pop-up window will appear. Fill in the following:
-
Name: Give your app a clear name based on what it does (e.g., “New Booking” or “Dry Cleaning Pickup”).
-
Linked To: From the dropdown, select Customer. This ensures that if a returning customer books, the system finds their name automatically. If it is a new customer, the system creates a new profile for them in your database so you don’t have to type in their details yourself.
-
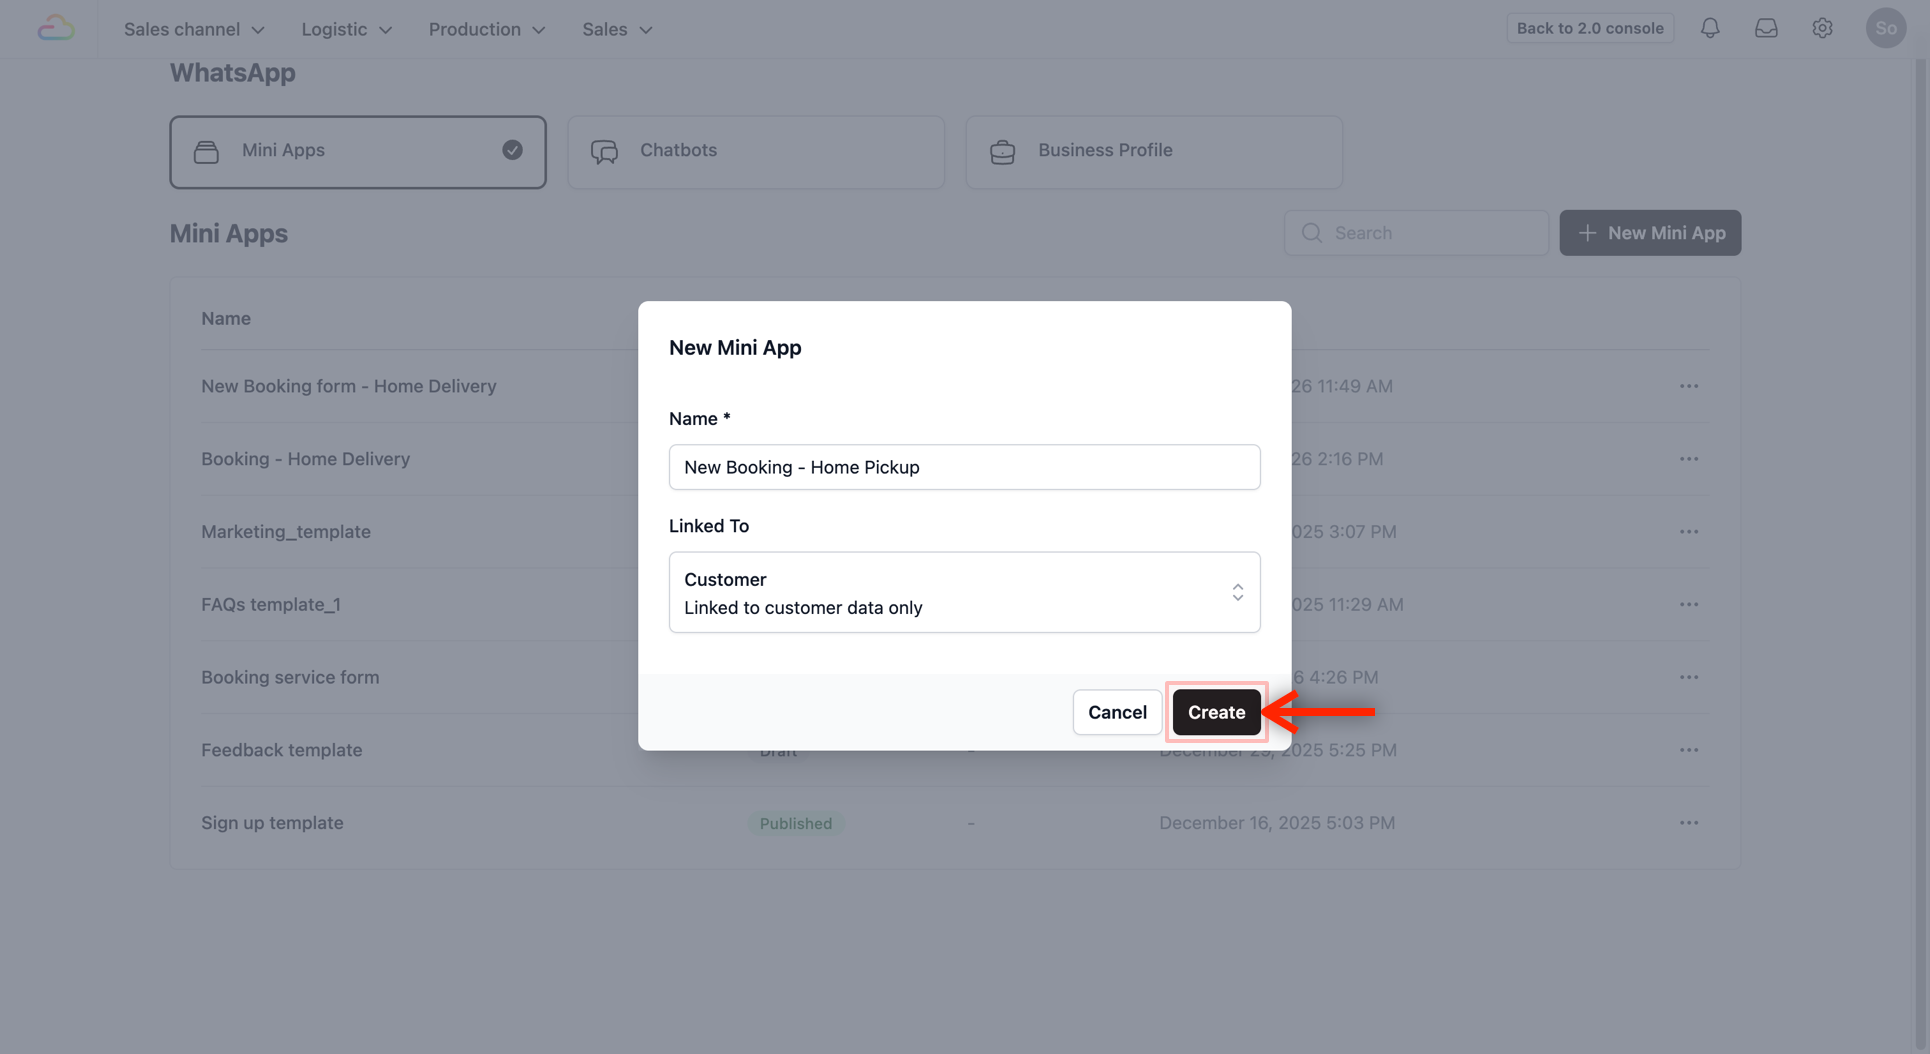
- Click Create. You should now see the newly created Mini App for booking.
Open the Mini App Editor
Now that you have created a new Mini App for your booking, the next thing to do is to create the process that your customers take to book a service with you.
Before we start building, here is the flow your customers will follow when they use this Mini App: Contact → Address → Pickup Quantity (Add-on) → Date & Time.
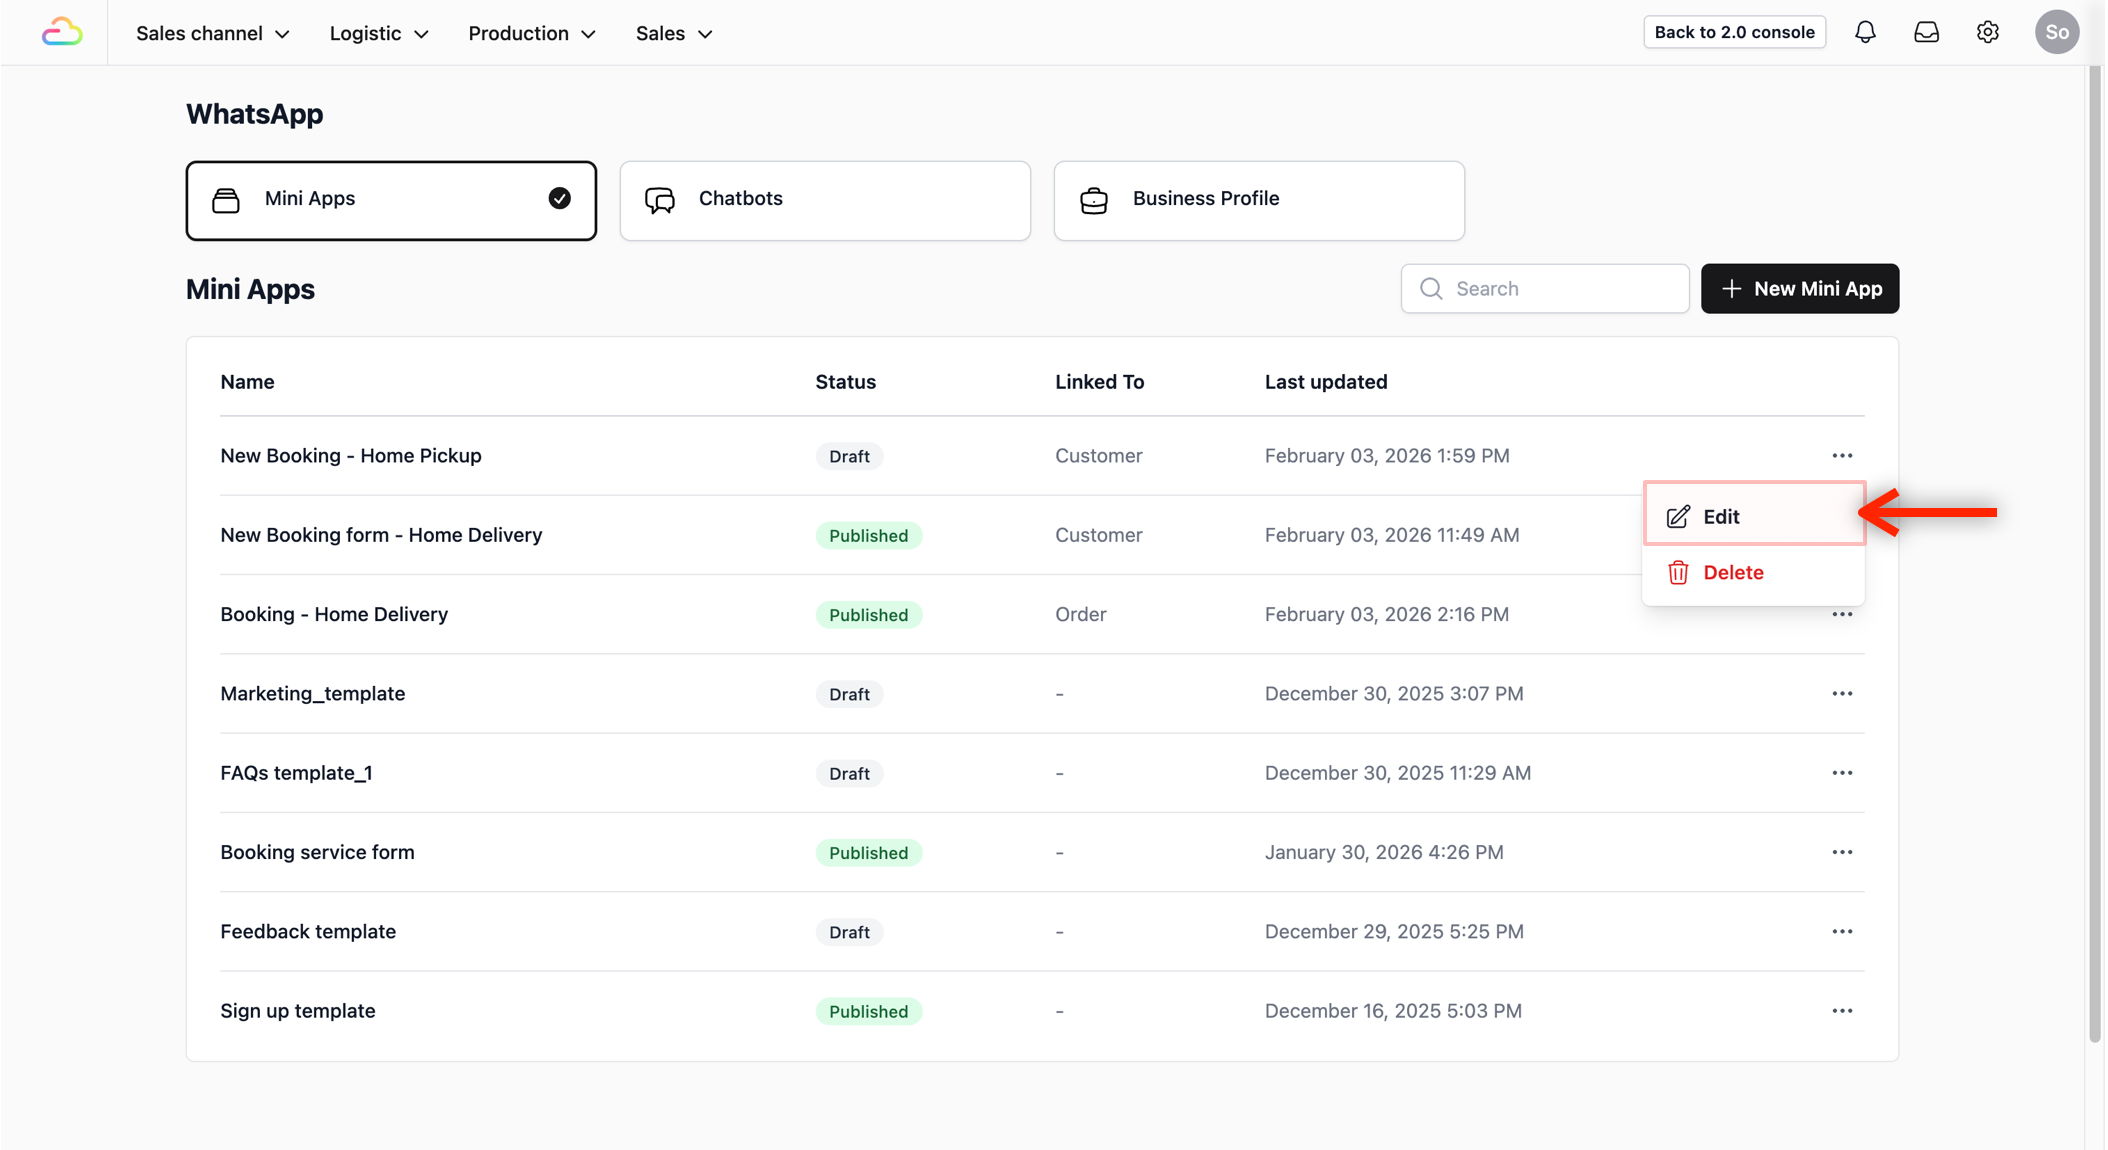
- Click on the three dots (•••) on the right of the Mini App you just created and select Edit.
You will see two sides to the screen:
- Left Side: This is where you add contents to the form.
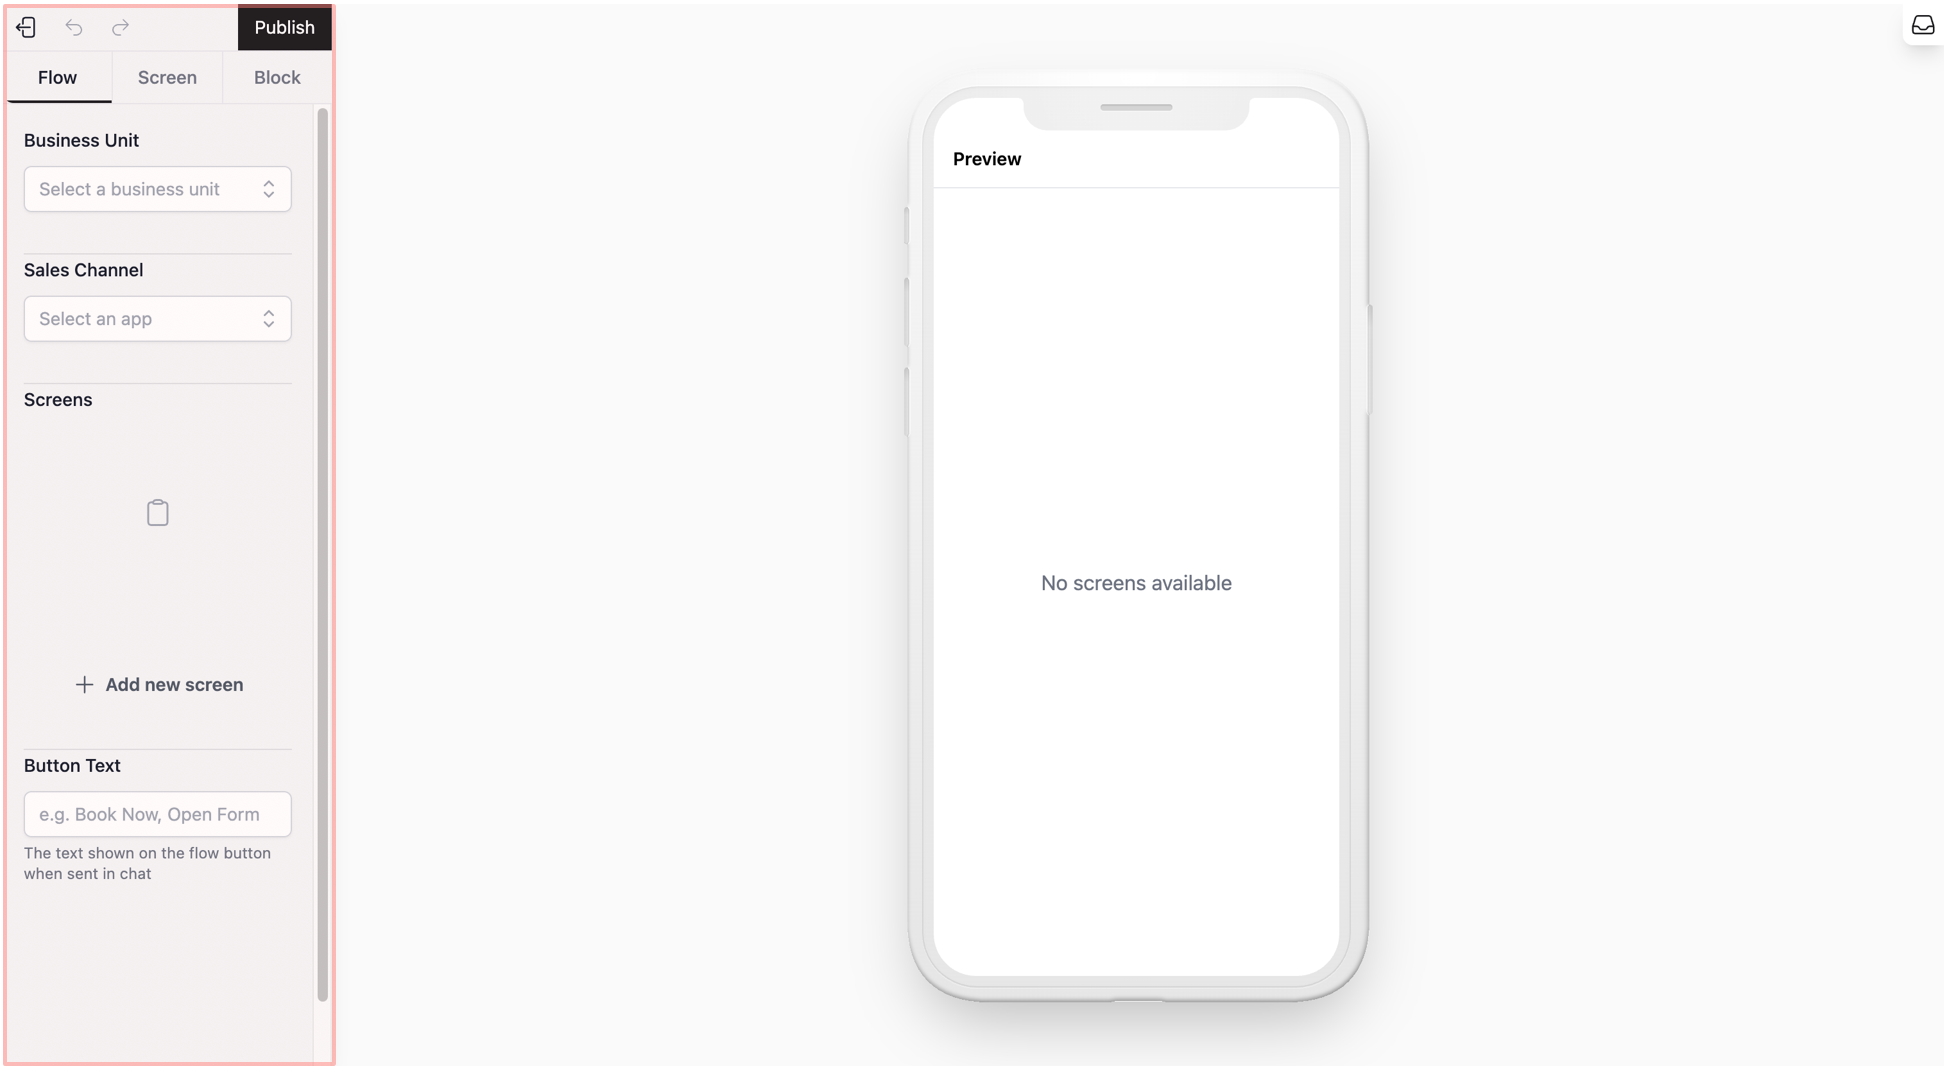
- Right Side: This is a Live Preview. It shows you exactly what the form looks like on a customer’s phone.

Link Your Shop and Name Your WhatsApp Button
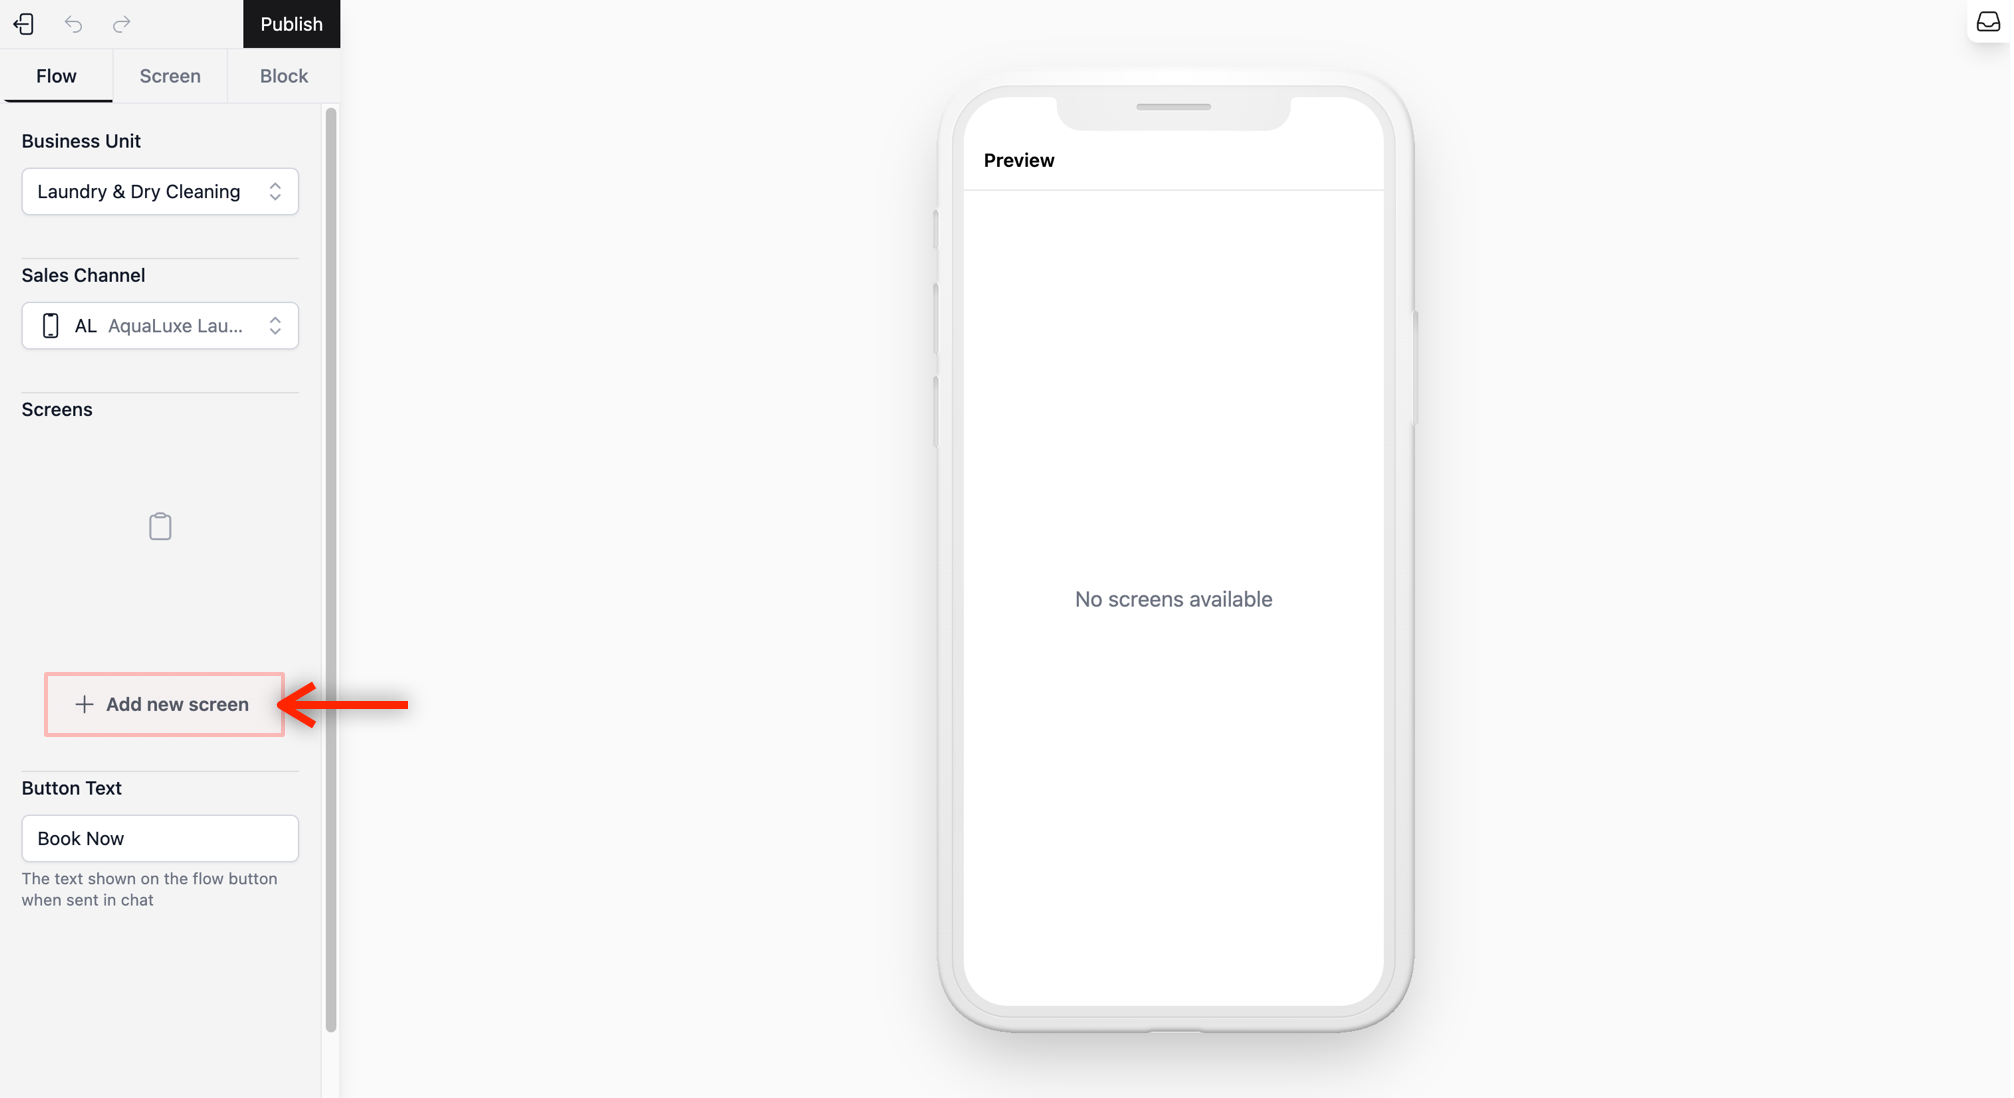
In this step, you will be working in the Flow Tab on the left side of your screen. This tab is where you set the link between your Mini App and the branch that receives the orders. You can also name the button of this mini app here, so your customers know what this button links to.
-
Business Unit: Select from the dropdown the branch that will receive these bookings. This ensures orders go to the correct shop location.
-
Sales Channel: Select your Online Store. This ensures that if a customer visits your online store later, they can see a record of the booking they made on WhatsApp.
-
Button Text: Enter the text you want the customer to see on the WhatsApp button (e.g., **“**Book Now”).
- Note: This is the text shown on the button in the chat. You can change this to fit your business, like “Schedule Repair.”

Create your Screens
First, we will create all the pages (screens) needed for your form. Think of these as the steps your customer will take. You can choose to create all of them or skip the optional one if it doesn’t fit your business.
The 4 screens we will build are:
-
Contact: To get the customer’s name and phone number.
-
Address: To know where to go for the pickup.
-
Pickup Quantity (Optional): Use this if you want to ask how many items they have or ask any other specific questions.
-
Date & Time: To let the customer pick their preferred pickup schedule.
How to create them:
- To make a new screen, click on the Flow Tab and click the + Add New Screen button.
-
A pop-up window will appear. Fill in the following:
-
Screen Title: type the name of your first screen (e.g., “Contact”).This name appears at the top of the form for the customer.
-
Layout Type: Leave this as Default.
-
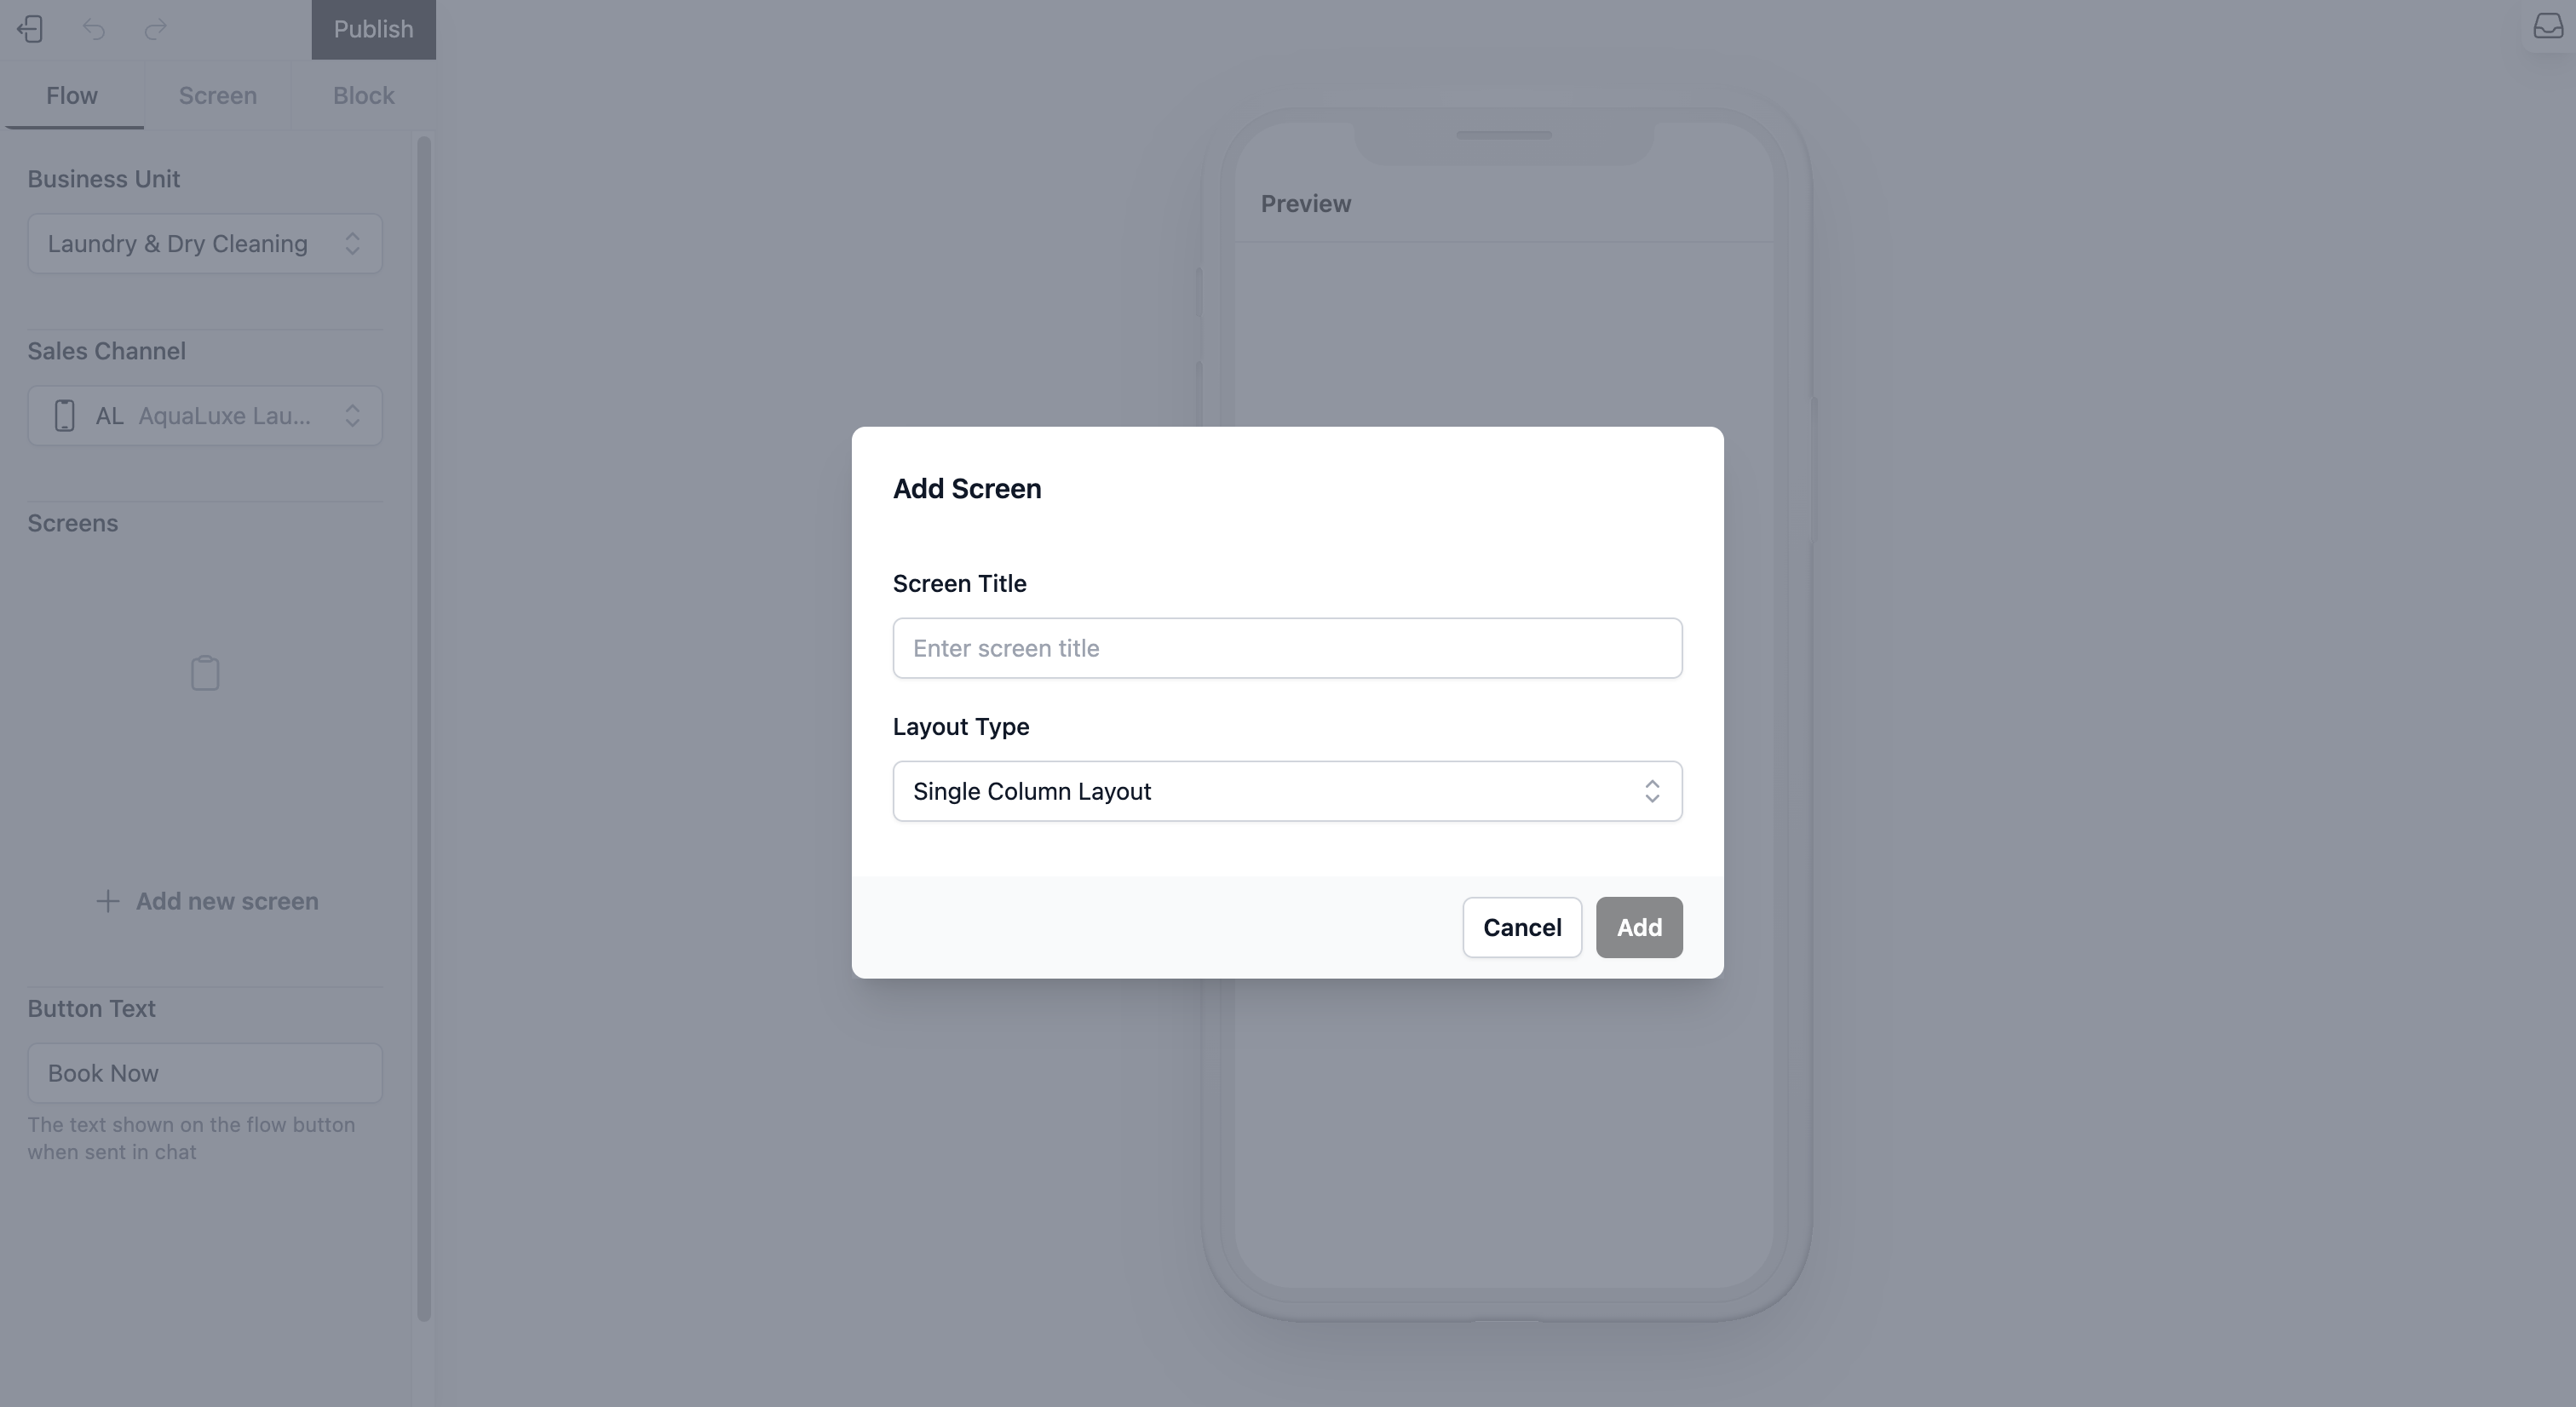
- Click Add. You should now see an empty form in the preview with your Screen Title at the top.
- Repeat this process for each screen you want to use.
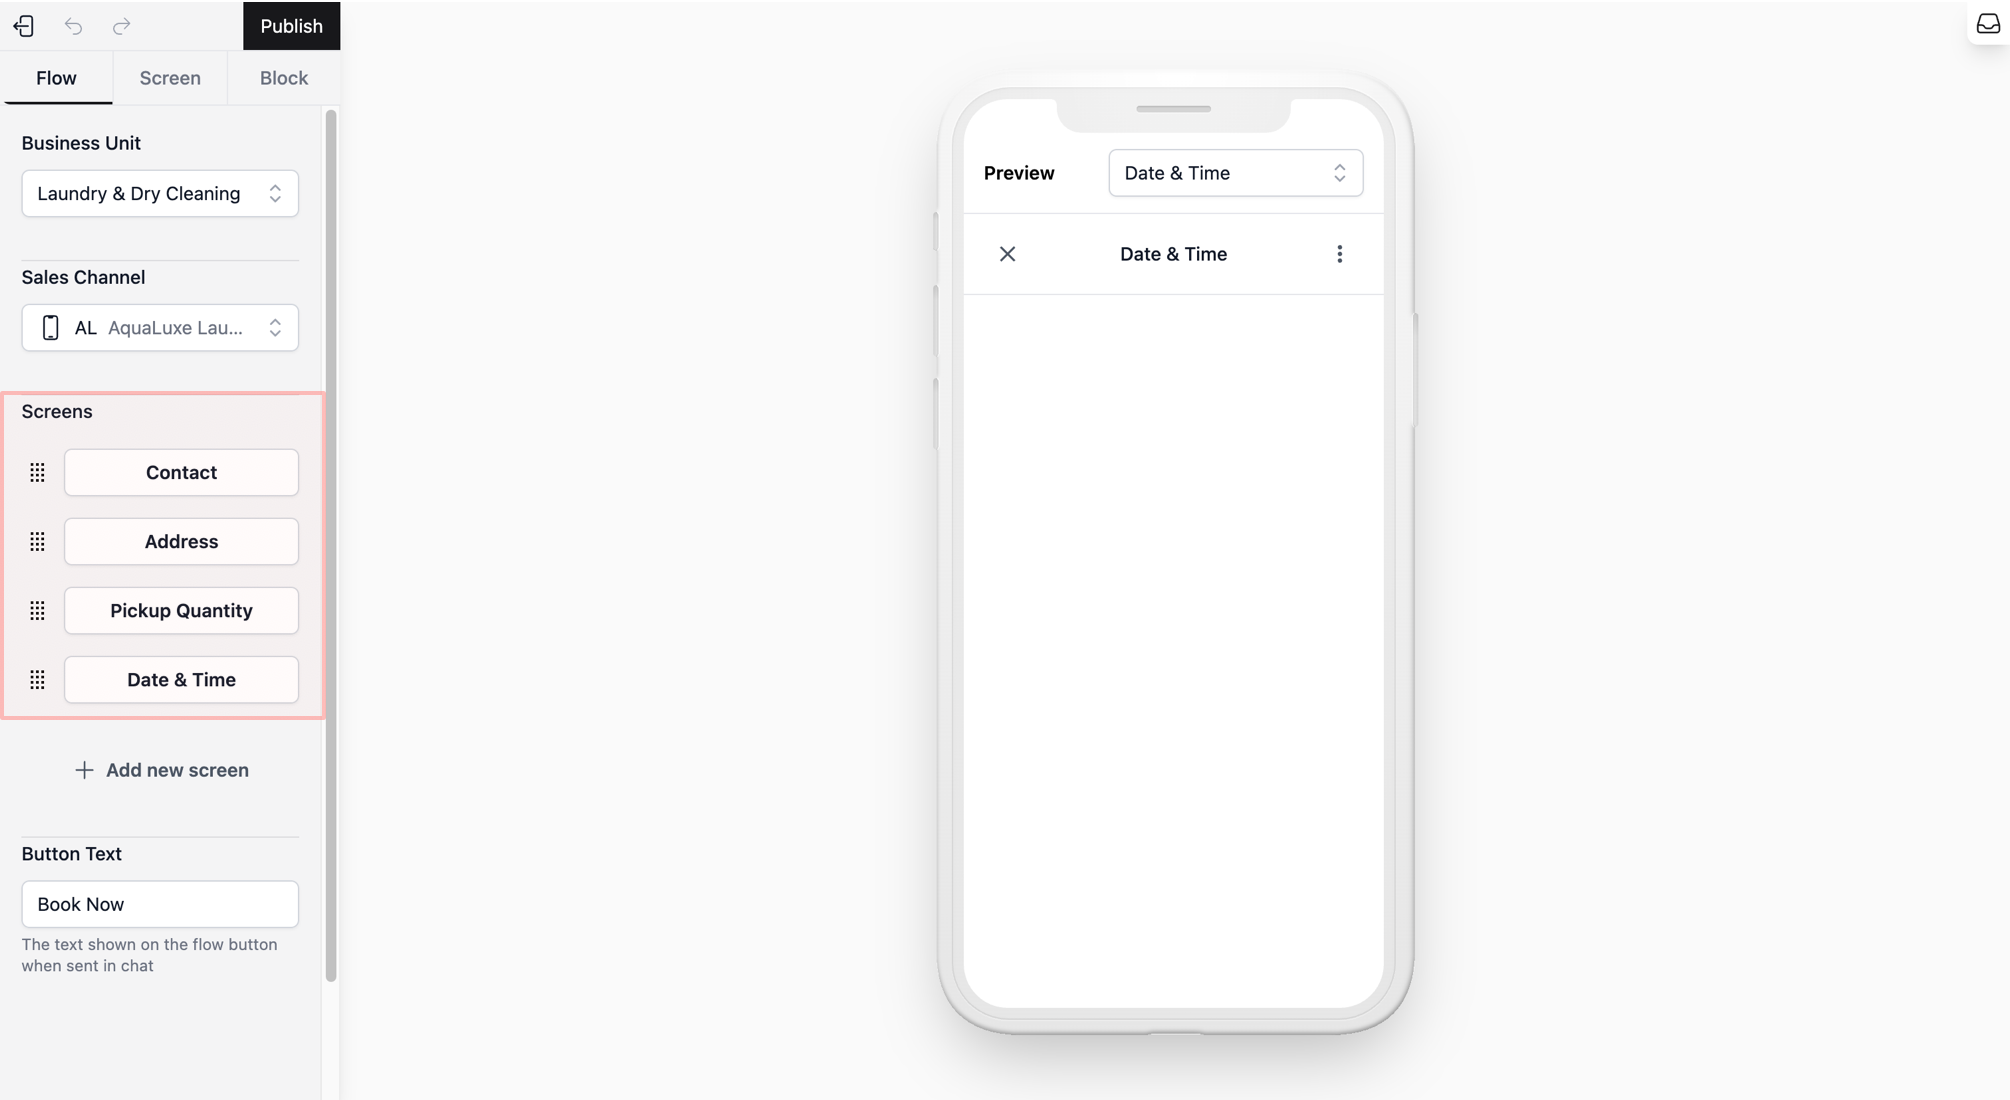
- You can now see all your screens listed in the Flow Tab. If you accidentally added a screen in the wrong order, you don’t need to delete it. You can simply drag and drop them to change the order your customer sees.
Setup the Contact Screen
This screen collects the customer’s basic information.
Add Information Fields
We will now add the necessary blocks to capture the customer’s identity.
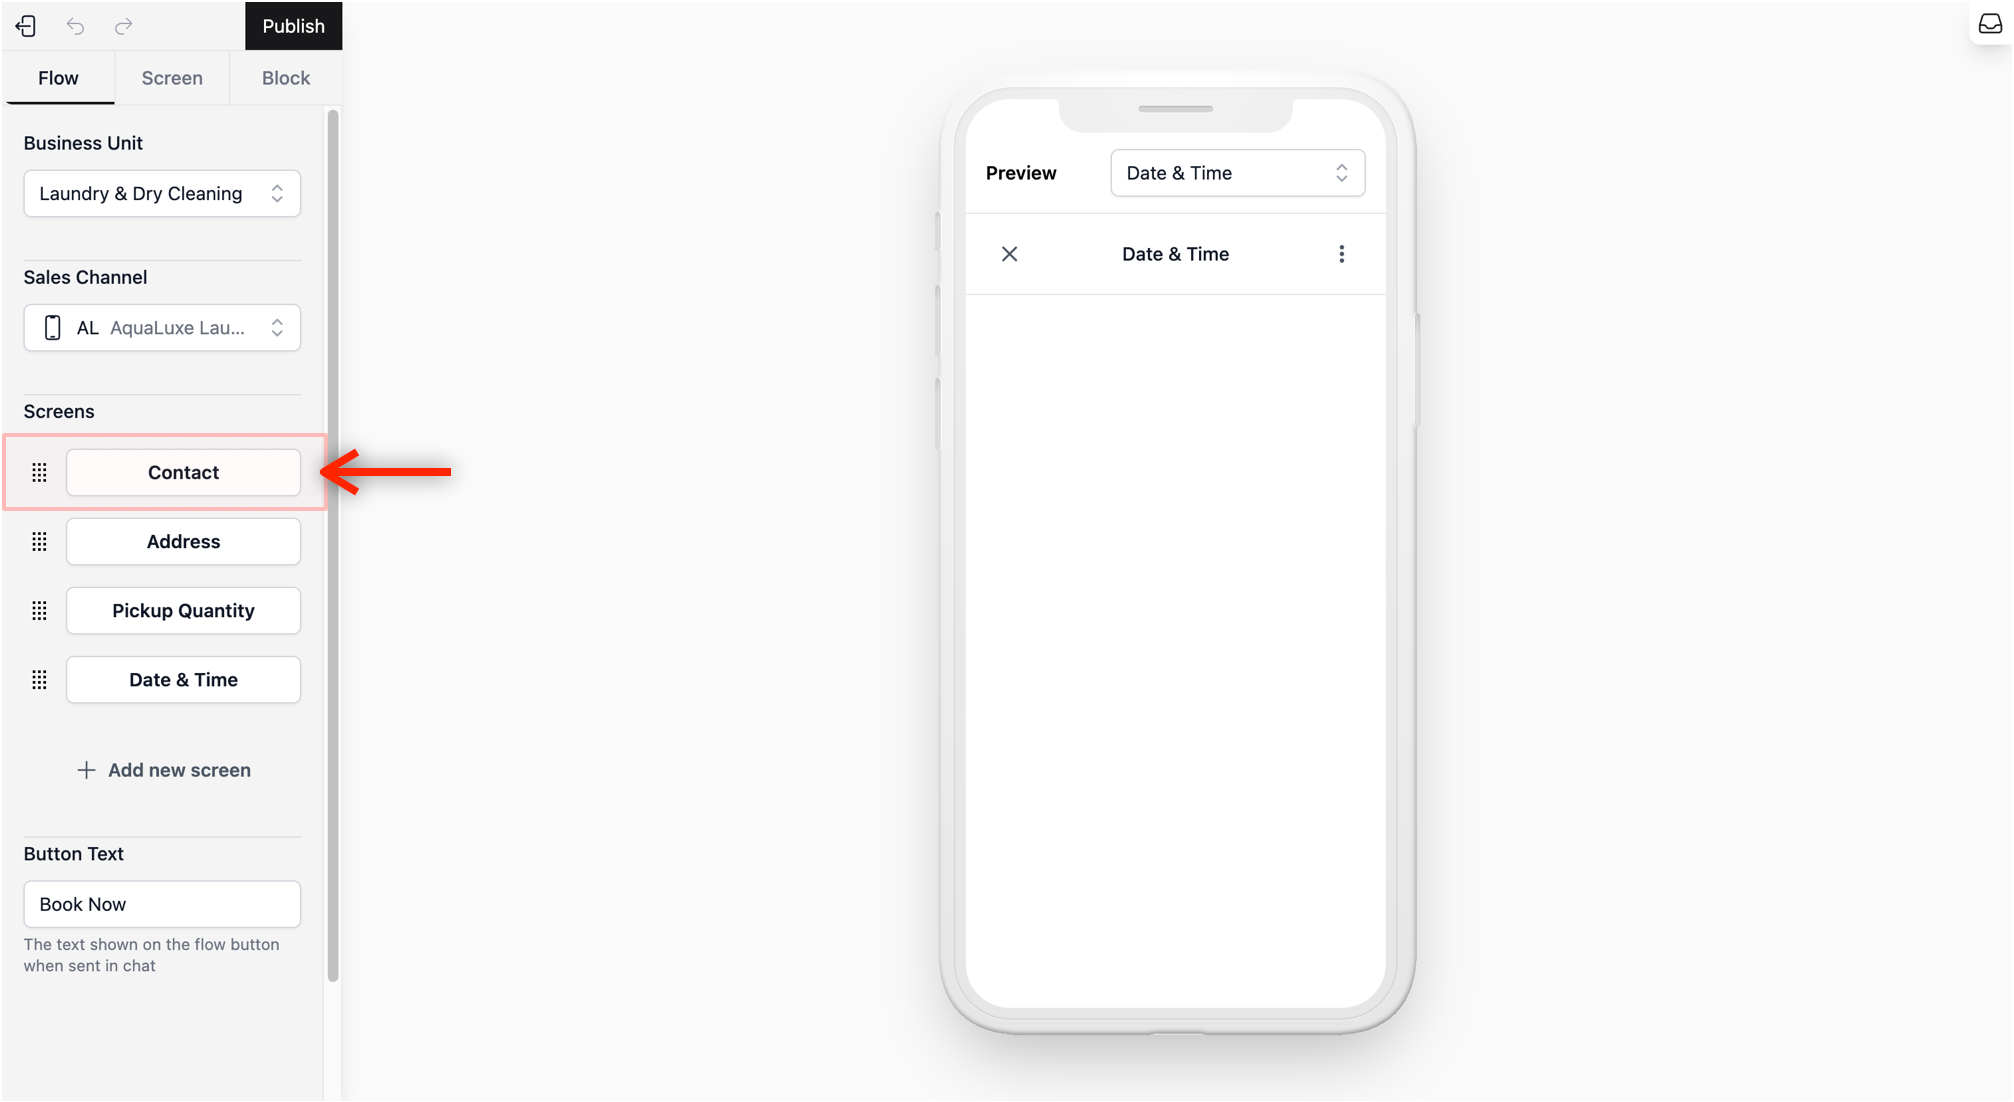
- From the Flow Tab, click on the Contact Screen to start adding the contact information fields required.
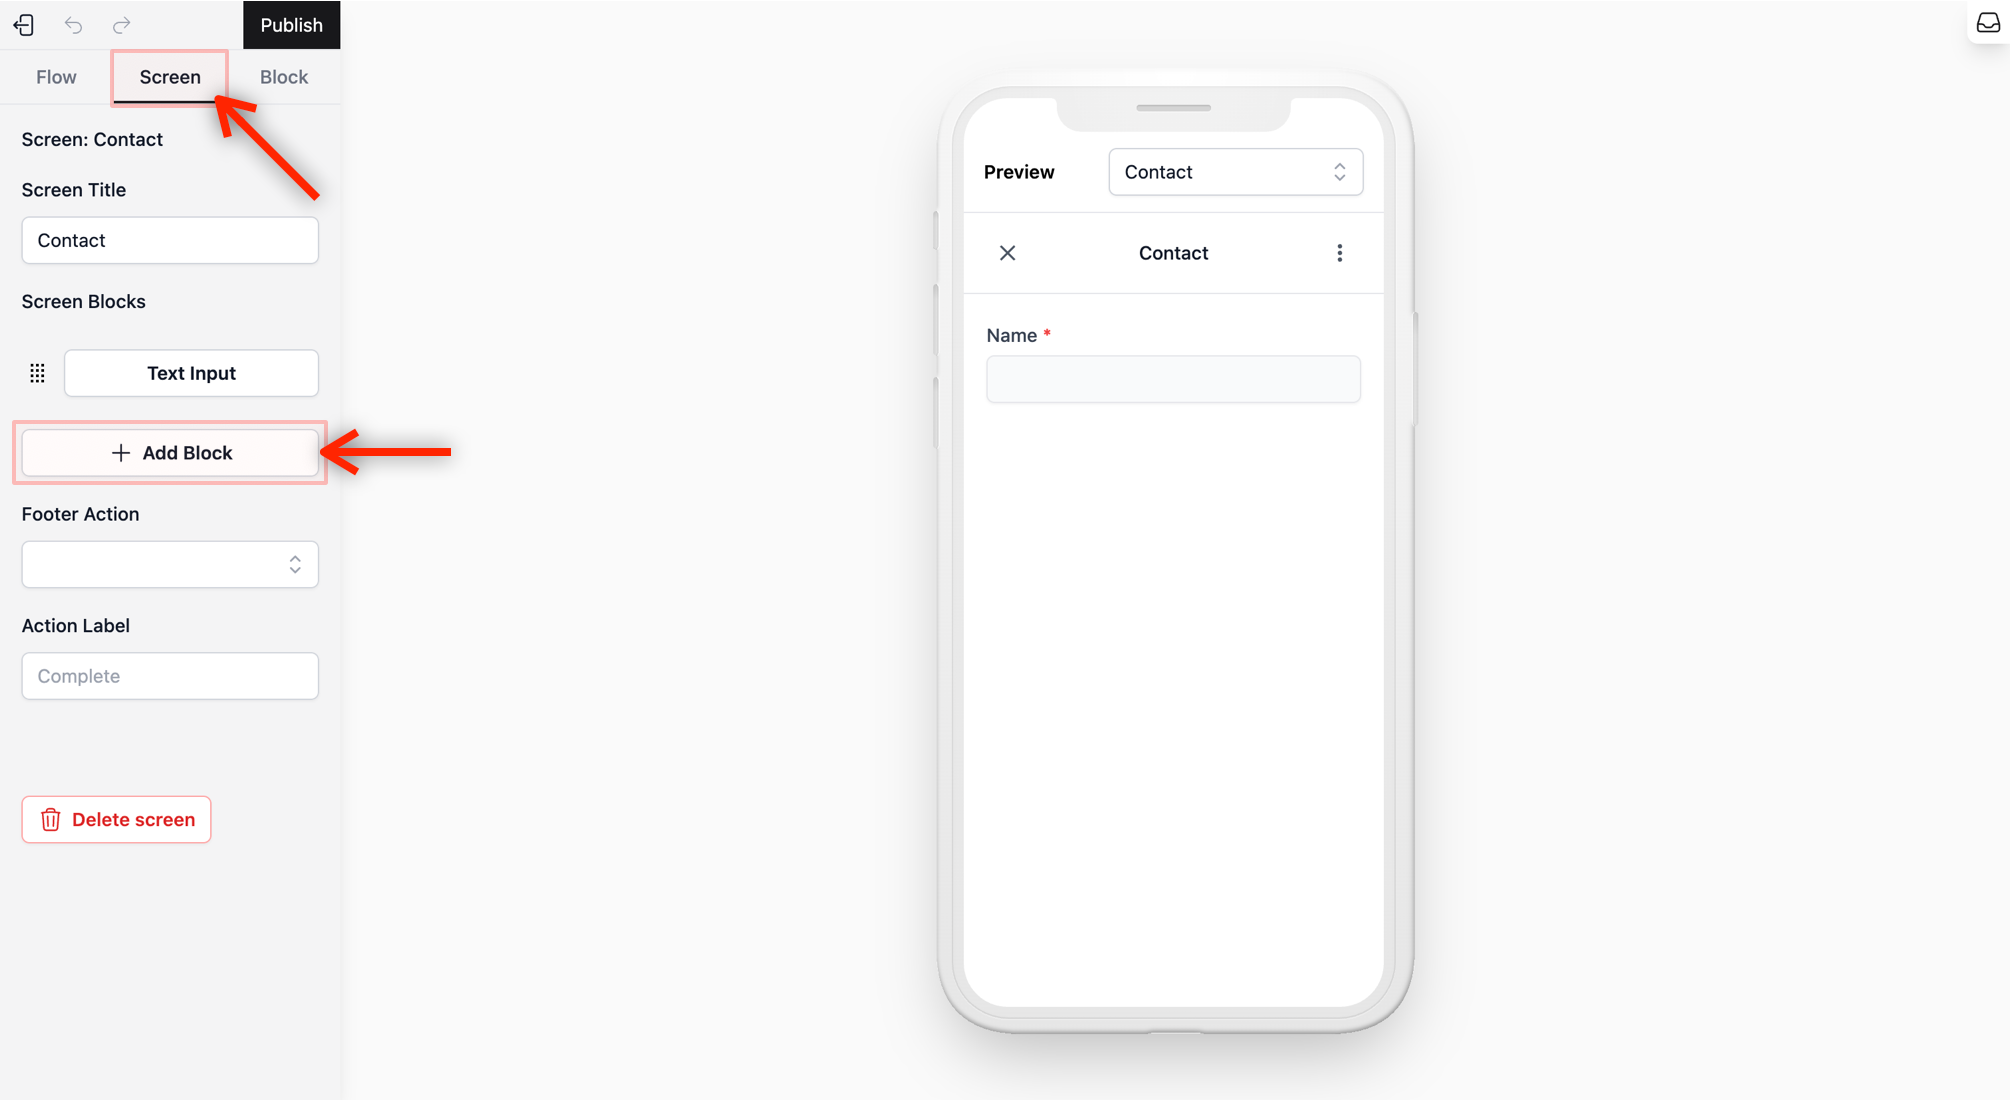
- In the Screen Tab, click + Add Block and select Text Input.

-
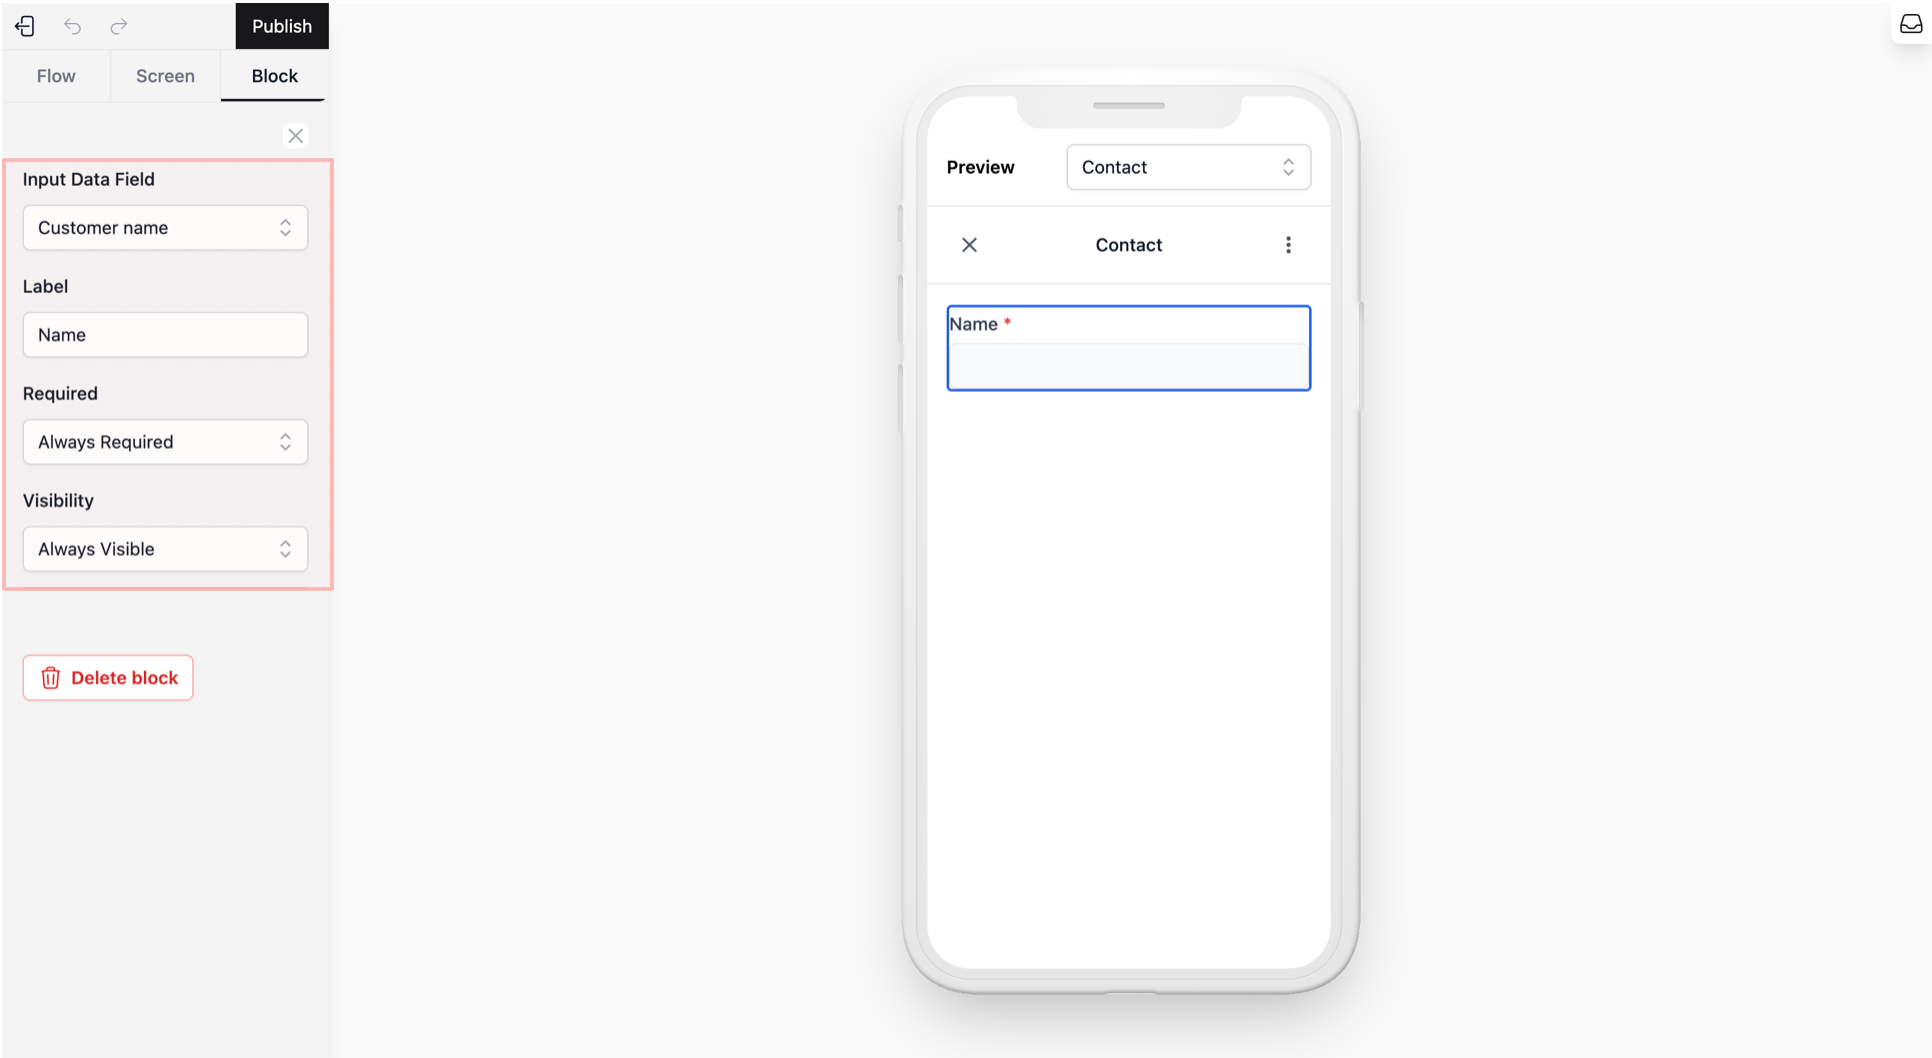
Once selected, the view on the left changes to the Block Tab. This is where you set up the field and set rules to it. Fill in the settings for the Name field as follows:
-
Input Data Field: From the dropdown list, select Customer Name. This tells the system to sync the customer with your database.
-
Label: By default, the label name follows the Input Data Field name. Rename this to something meaningful if needed. This is what the customer sees on the form when they fill up their name.
-
Required: Select Required. A red asterisk (*) will appear, showing it is a must-fill field.
-
- To add a new field to , head back to the Screen Tab and click on + Add Block.
Repeat the same steps for the Phone number and Email fields:
-
Select Text Input.
-
Notice the view switch to the Block Tab again.
-
Set the Input Data Field to Customer phone number (for Phone number field) and Customer email (for Email field).
-
Update the Label to a meaningful one such as “Phone number” and “Email” so they are clear for your customers.
-
Set the Required field to Always Required.
- Refer to the video below to see a demonstration of how to add these fields for your reference.
Configure the Progress Button
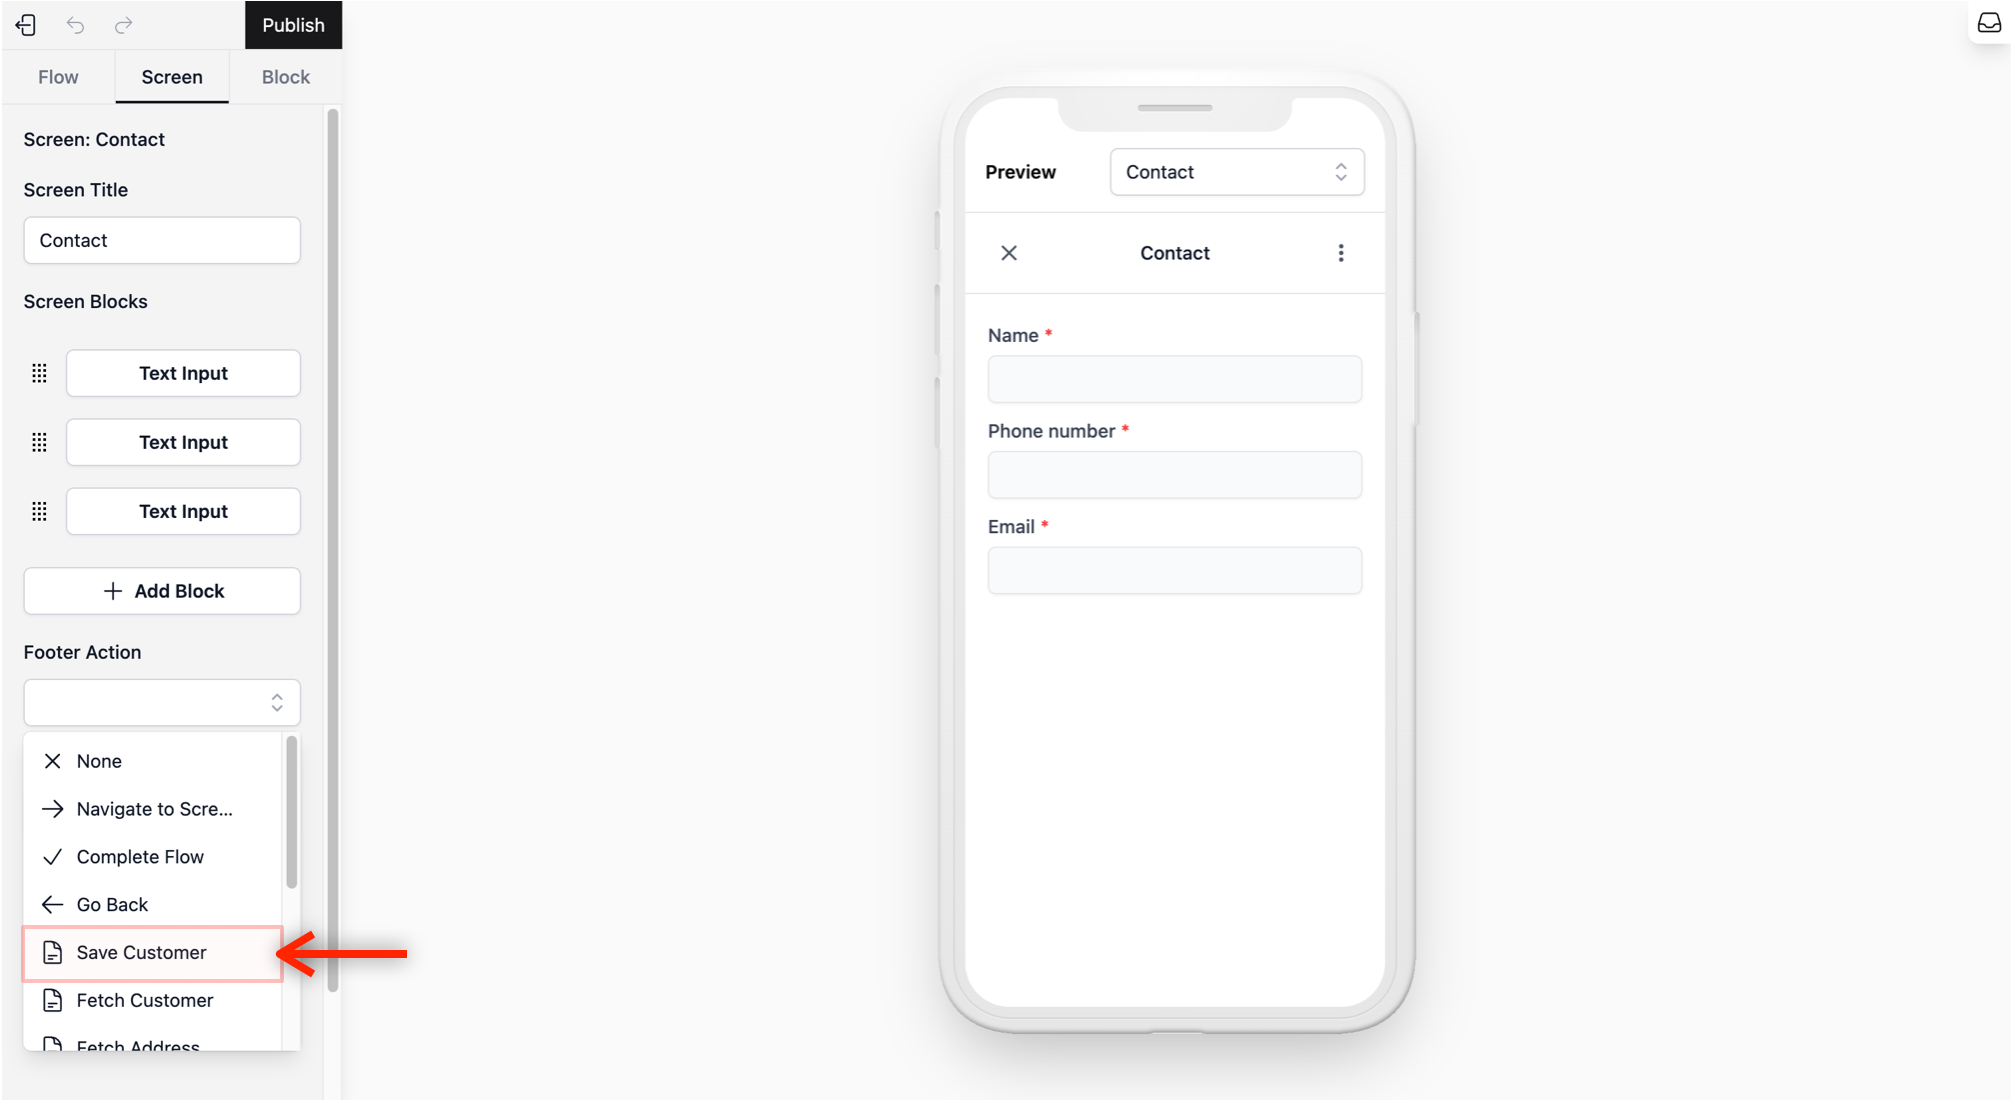
You may notice that there is currently no button for the customer to click to go to the next page. We need to add a Footer Action to link this screen to the next one.
Under the Screen Tab, do the following:
- Footer Action: Select Save Customer. This ensures that all the info you just collected (Name, Phone number, Email) is saved to your customer database.
-
Next Screen: Leave this as it is. The system automatically knows to go to the next screen you created.
-
Action Label: The name of the button that leads to the next page/last page. Leave as default to show “Continue” for your customers or give it a meaningful name.
Setup the Address Screen
Now we will configure where the customer wants their items picked up.
Add Information Fields
We will add a mix of input fields and smart links to make entering an address easy for your customers.
- From the Flow Tab, select your Address Screen.
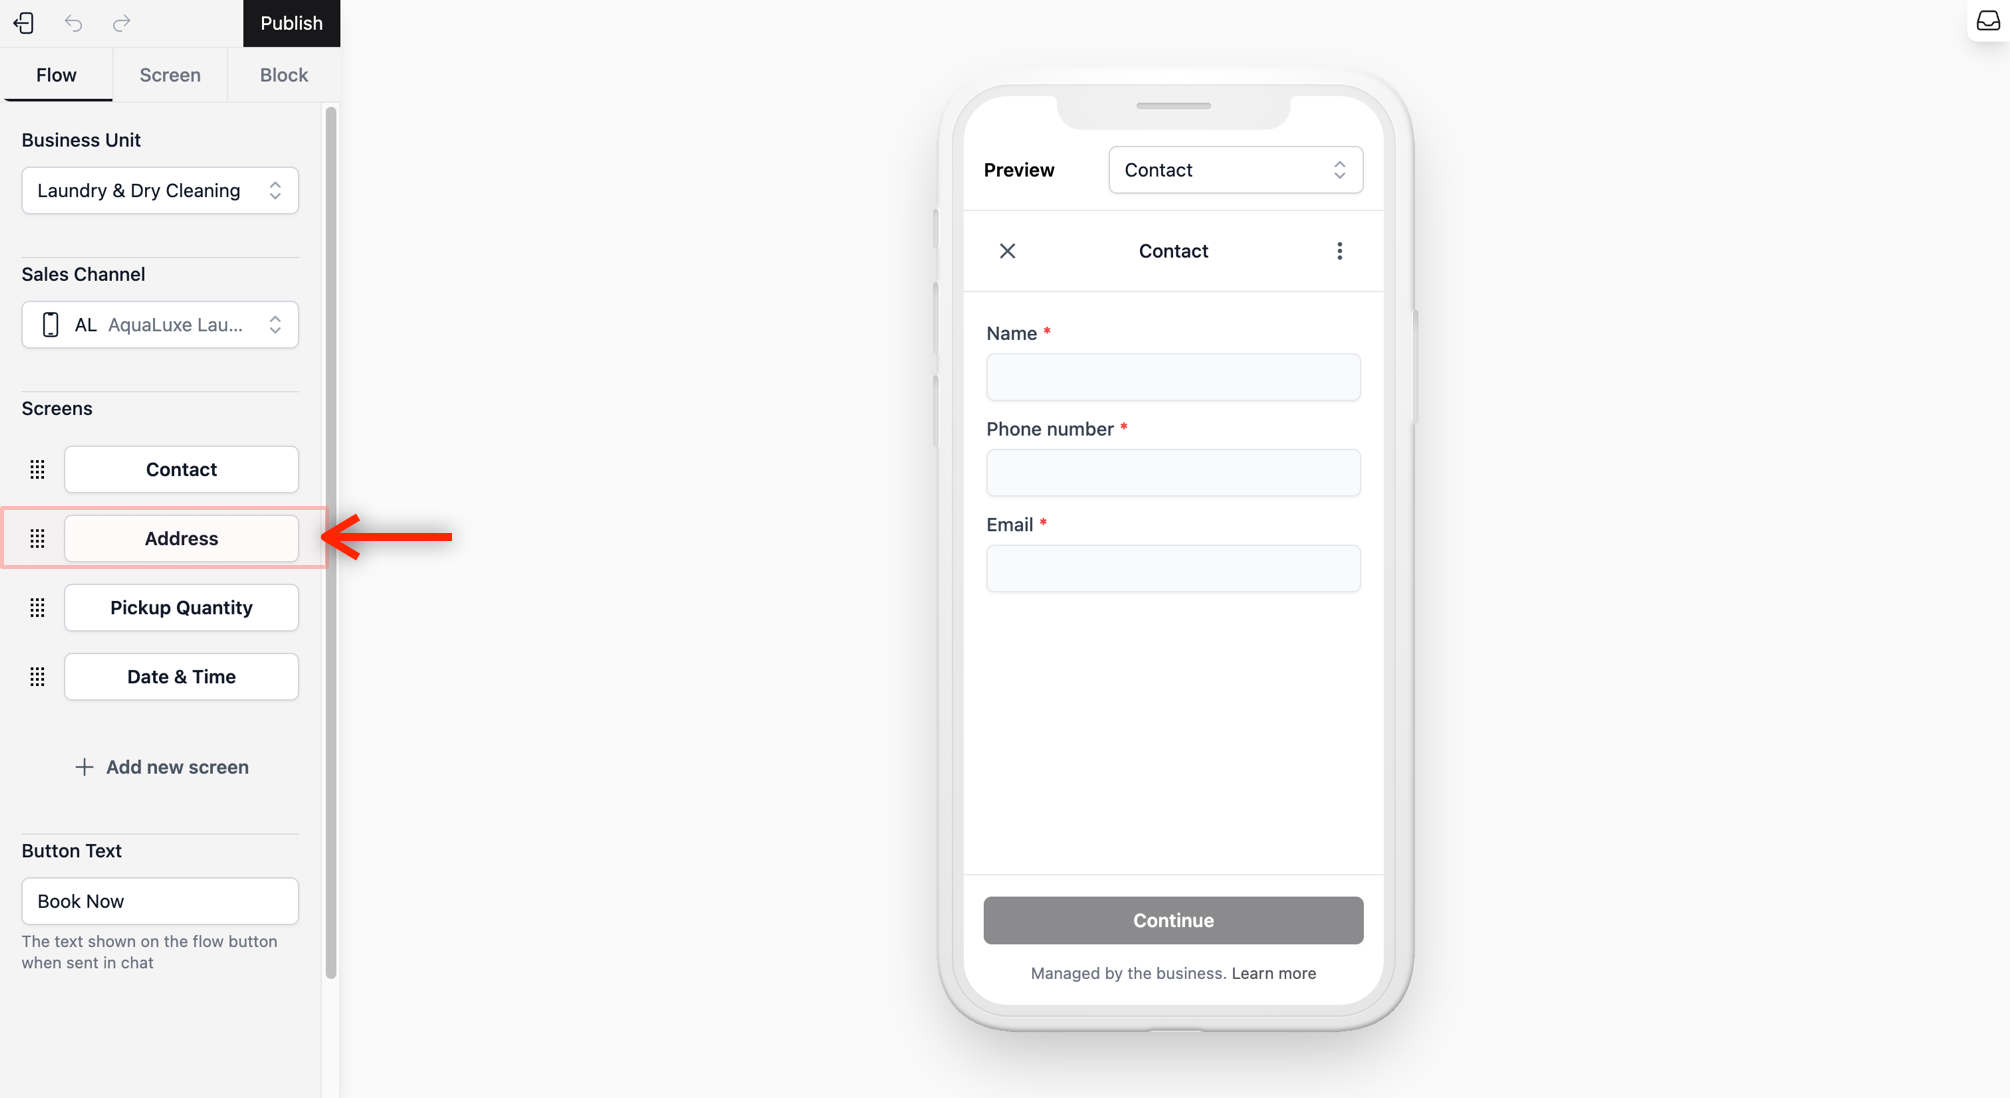
Postal Code: We use this to store the location in the database so returning customers don’t have to re-type it.
-
From Screen Tab, click + Add Block → Text Input.
-
Input Data Field: Select Address Postal Code.
-
Label: Give it a meaningful name or leave it by default.
-
Required: Select Always Required.

Get Address Link: This allows the customer to simply tap a link to auto-fill their street name, which prevents typos and speeds up the booking.
-
From Screen Tab, click + Add Block → Embedded Link.
-
Link Text: This is the name of the link the user will see. Give it a meaningful name such as “Find address by postal code,” or something related to what happens when the link is pressed.
-
Action Type: Select Fetch Address. This pulls the street name based on the postal code entered above).

Address Type (Optional): Knowing the building type helps your team know if they need to clear security (Condo/Office) or look for a specific house (Landed). Depending on your country or local operations, Address Types like HDB, Condo, Landed, or Office may be essential for logistics.
- Since this is a custom data, you will need to set this up. Head over to Configuring Data Fields to create a new data field. Create a new field called “Address Type” and choose Options as the Data Type. Use the + Add option button to add the options, such as: HDB, Condo, Landed, Office.

-
From Screen Tab, click + Add Block → Dropdown.
-
Input Data Field: Select the Address Type data field you just created.
-
Label: Leave as “Address Type” or a name of your choice.
-
Default Value: Set this to your most common type (e.g., “HDB”) or leave it blank.
-
Required: Select Always Required.
-
Visibility: Select Conditional. In the pop-up window, set When to Address geo location. This ensures the field only appears once a valid address is generated from the link. Set Operator to Has Value since we want this field to appear when we are able to find the location based on the link when the user clicks on it. Click OK when done.
-
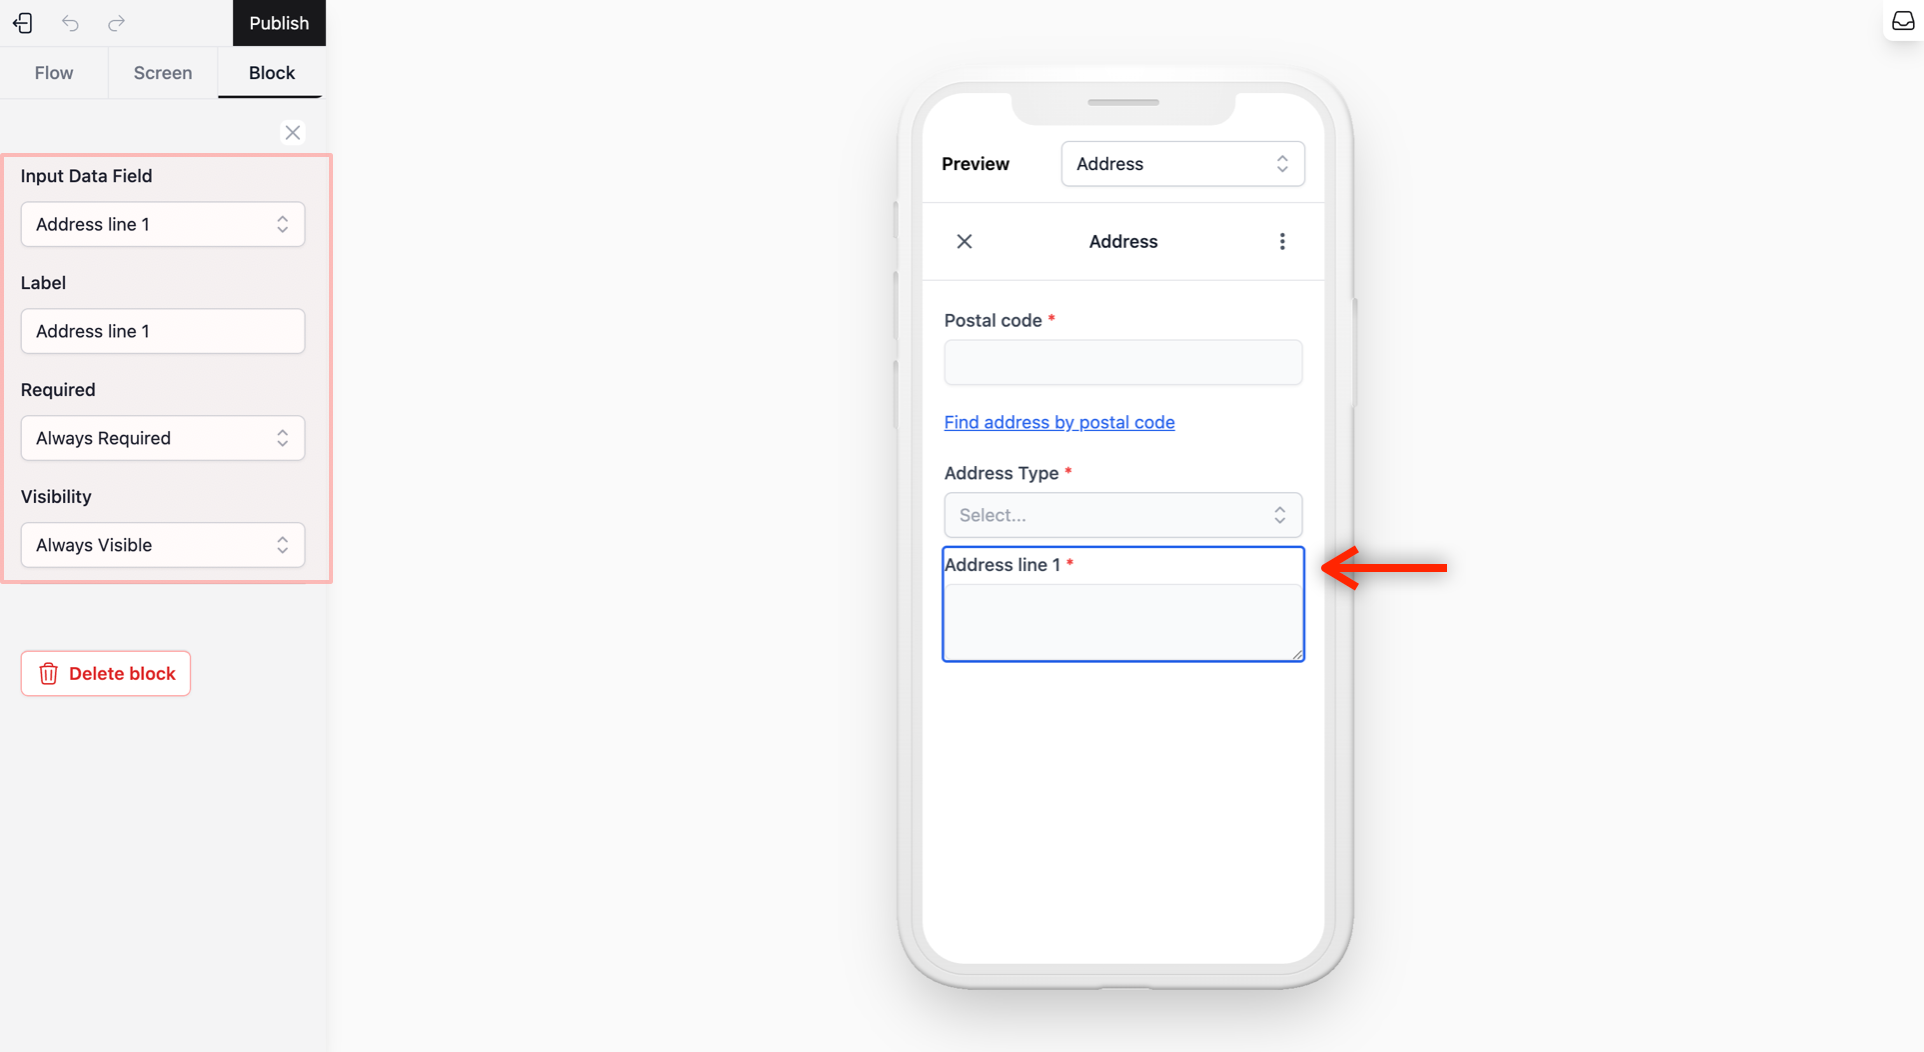
Address Line 1: This captures the main street and building name generated from the postal code link.
-
From Screen Tab, click + Add Block → Text Area.
-
Input Data Field: Select Address Line 1.
-
Label: Leave as “Address Line 1” or a name of your choice.
-
Required: Select Always Required.
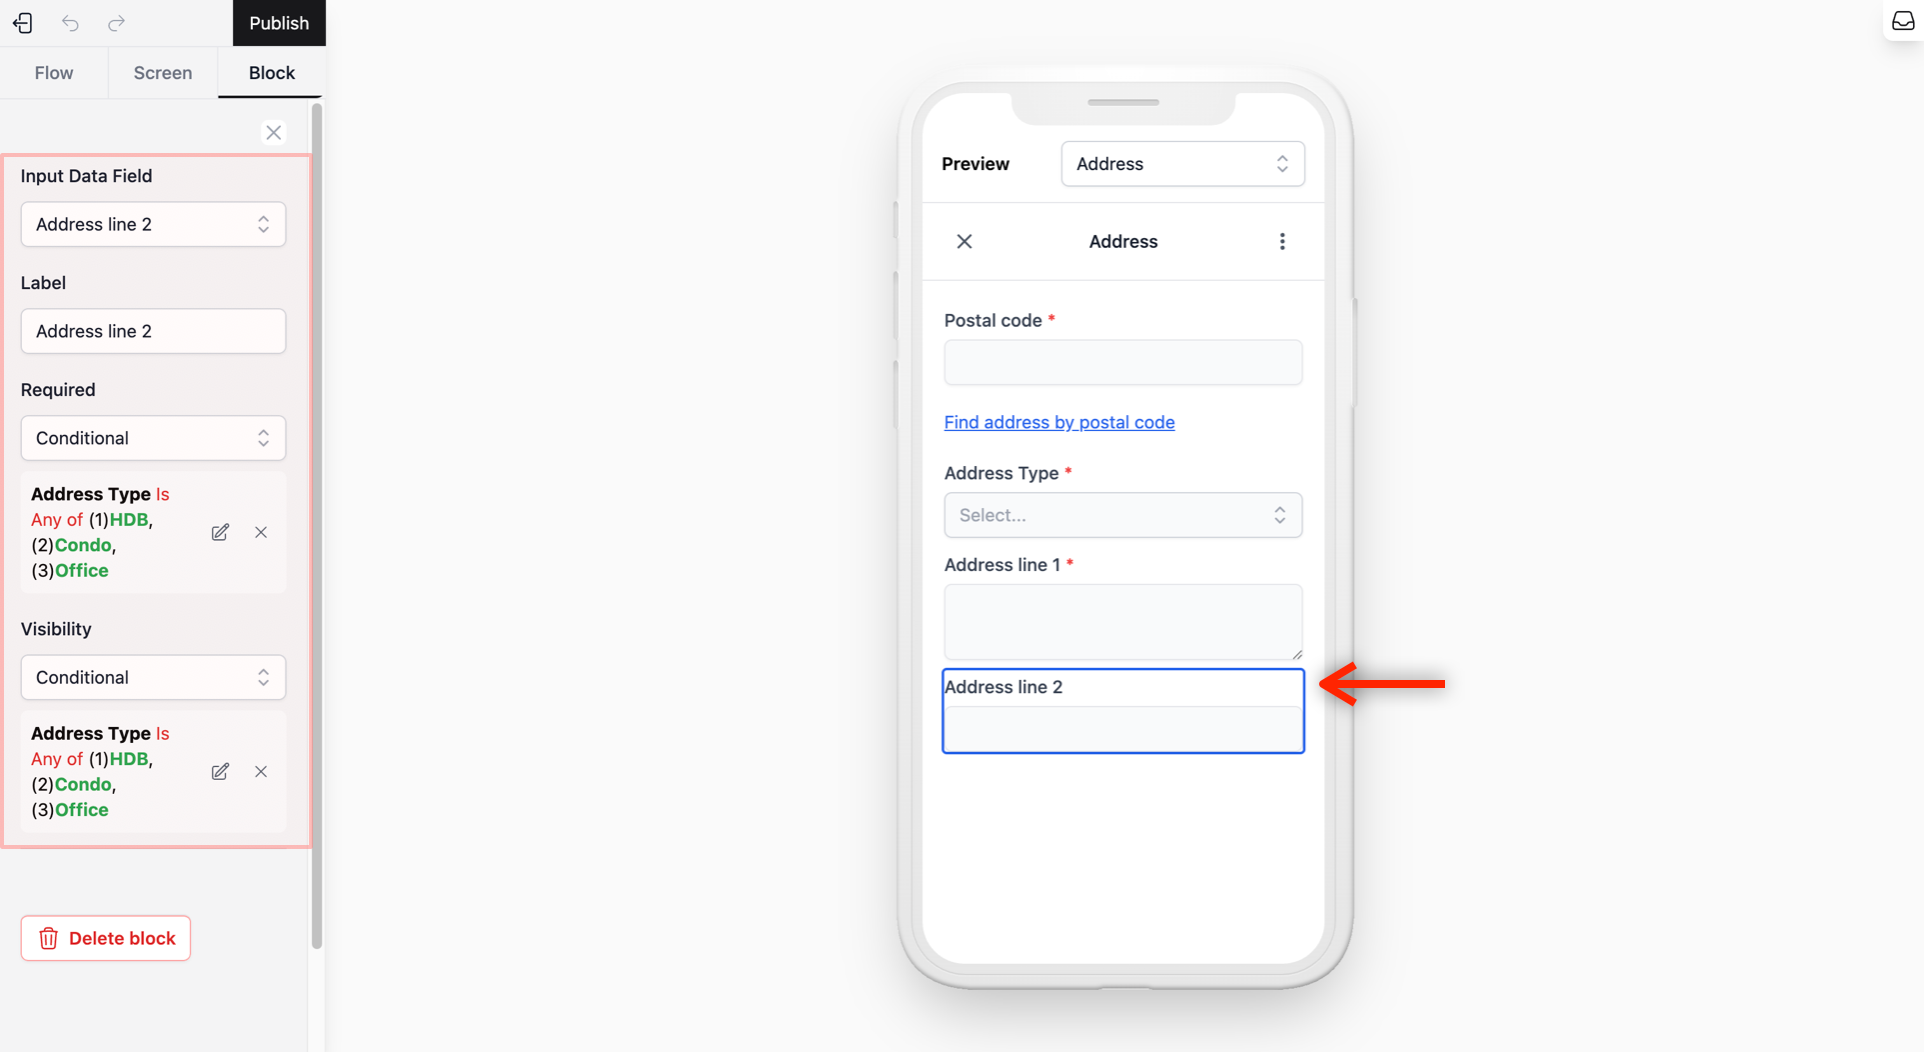
Address Line 2 (Optional): This is for specific details like unit numbers or floor levels. While optional for some, you might require this for high-rise buildings but want to hide it for Landed properties to keep the form clean.
-
From Screen Tab, click + Add Block→ Text Input.
-
Input Data Field: Select Address Line 2.
-
Label: Leave as “Address Line 2” or a name of your choice.
-
Required & Visibility: To filter this based on the address type we set up earlier, set both to Conditional. From the pop-up window, set When to Address Type, Operator to Is Any Of, and Value to HDB, Condo, and Office. (This hides the field for “Landed” selections). Click OK when done.
Configure the Progress Button
Finally, specify what happens after the customer completes their address.
Under the Screen Tab, do the following:
-
Footer Action: Select Save Address. This remembers the selection so it can auto-populate for the customer the next time they book.
-
Next Screen & Action Label: Leave these as they are to let the system handle the transition.

Setup the Pickup Quantity Screen
This section is optional. It is very useful if you want to know exactly how many items to expect before your logistic team heads out for a pickup. Knowing the volume in advance helps your logistics team plan the space in their vehicle more efficiently.
However, you can also use this screen to ask any other question you might need for your business. For example, you could ask about “Special Instructions” or “Type of Service.” It is a simple way to get extra details from your customer before they finish.
Add Information Fields
Before you set up this screen, you need to create a list of choices for your customer (like “1 item” or “2 items”).
- Just like you did for the Address Type, go to Configuring Data Fields to create a new data field. Create a new data field called “Pickup Quantity” and choose Options as the Data Type. Add your choices, such as “1 item only” and “2 items.”

-
Once you have set up the data field, head back to your mini app.
-
From the Flow Tab, select the Pickup Quantity screen.
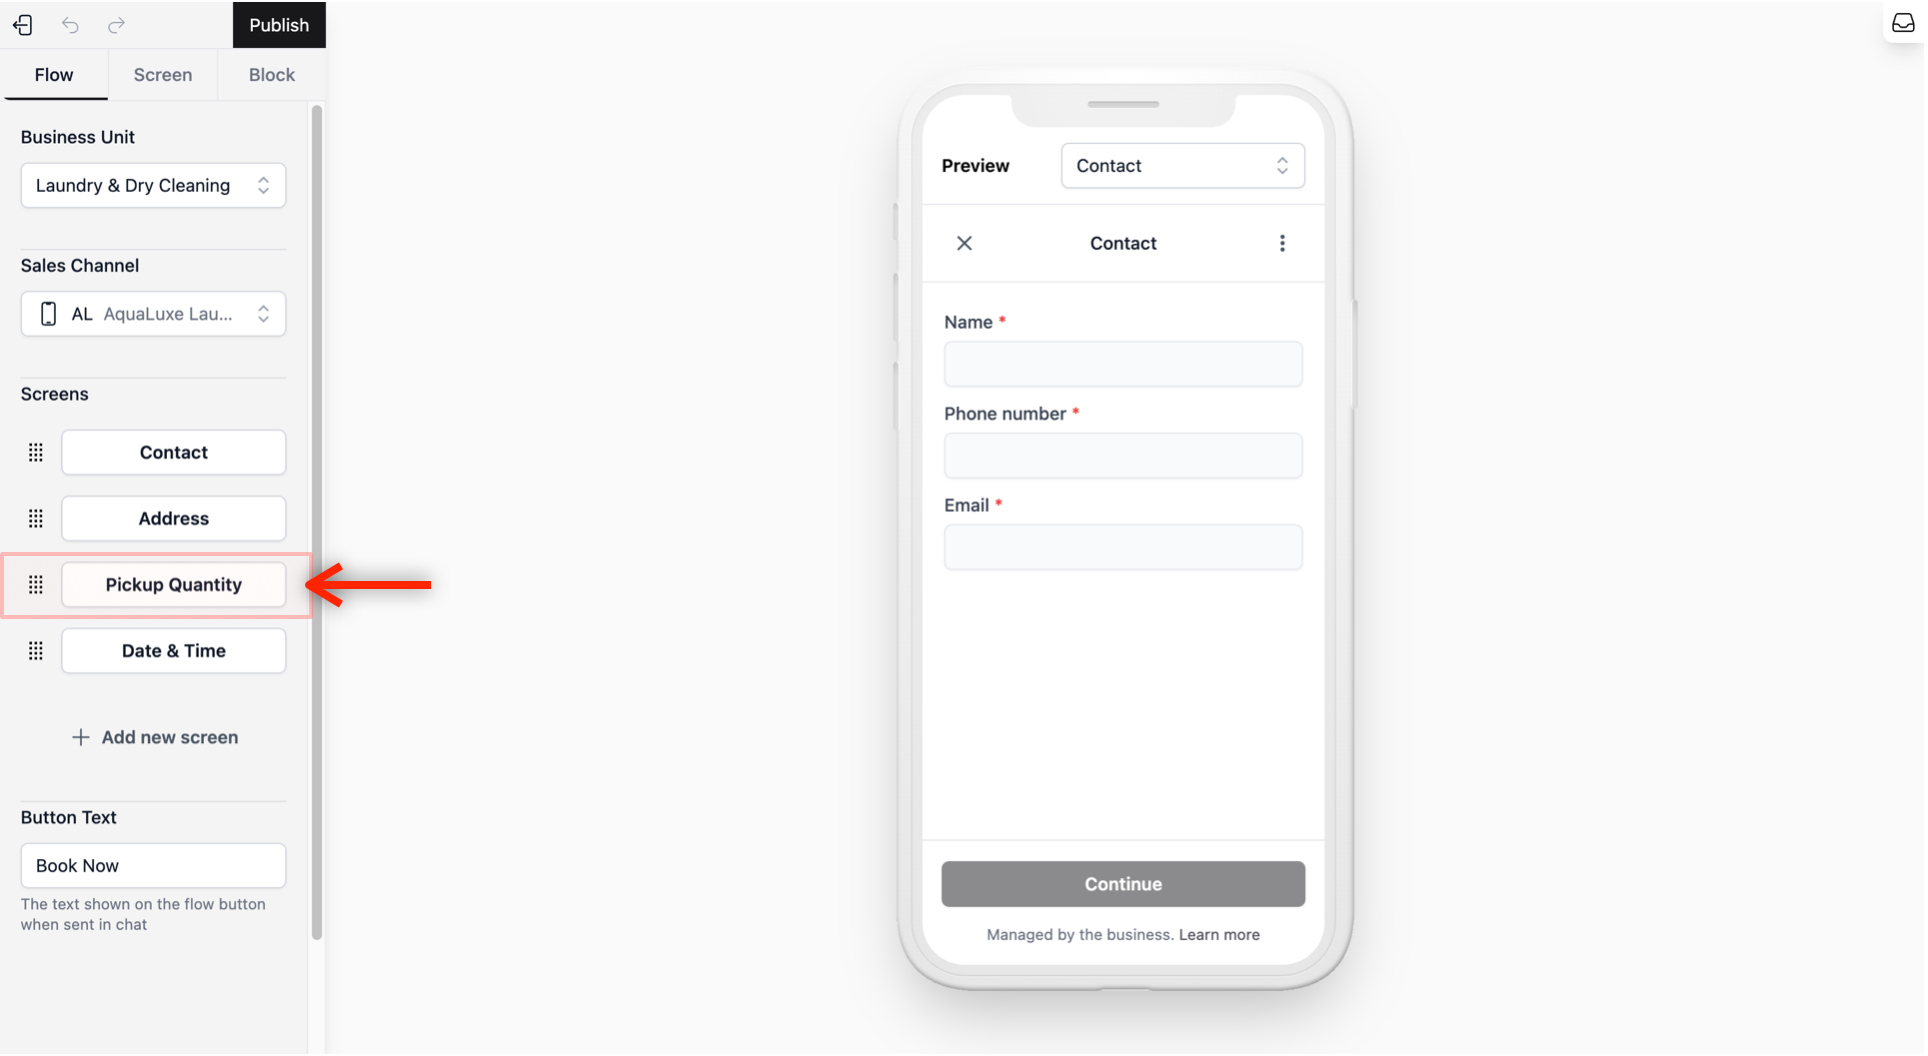
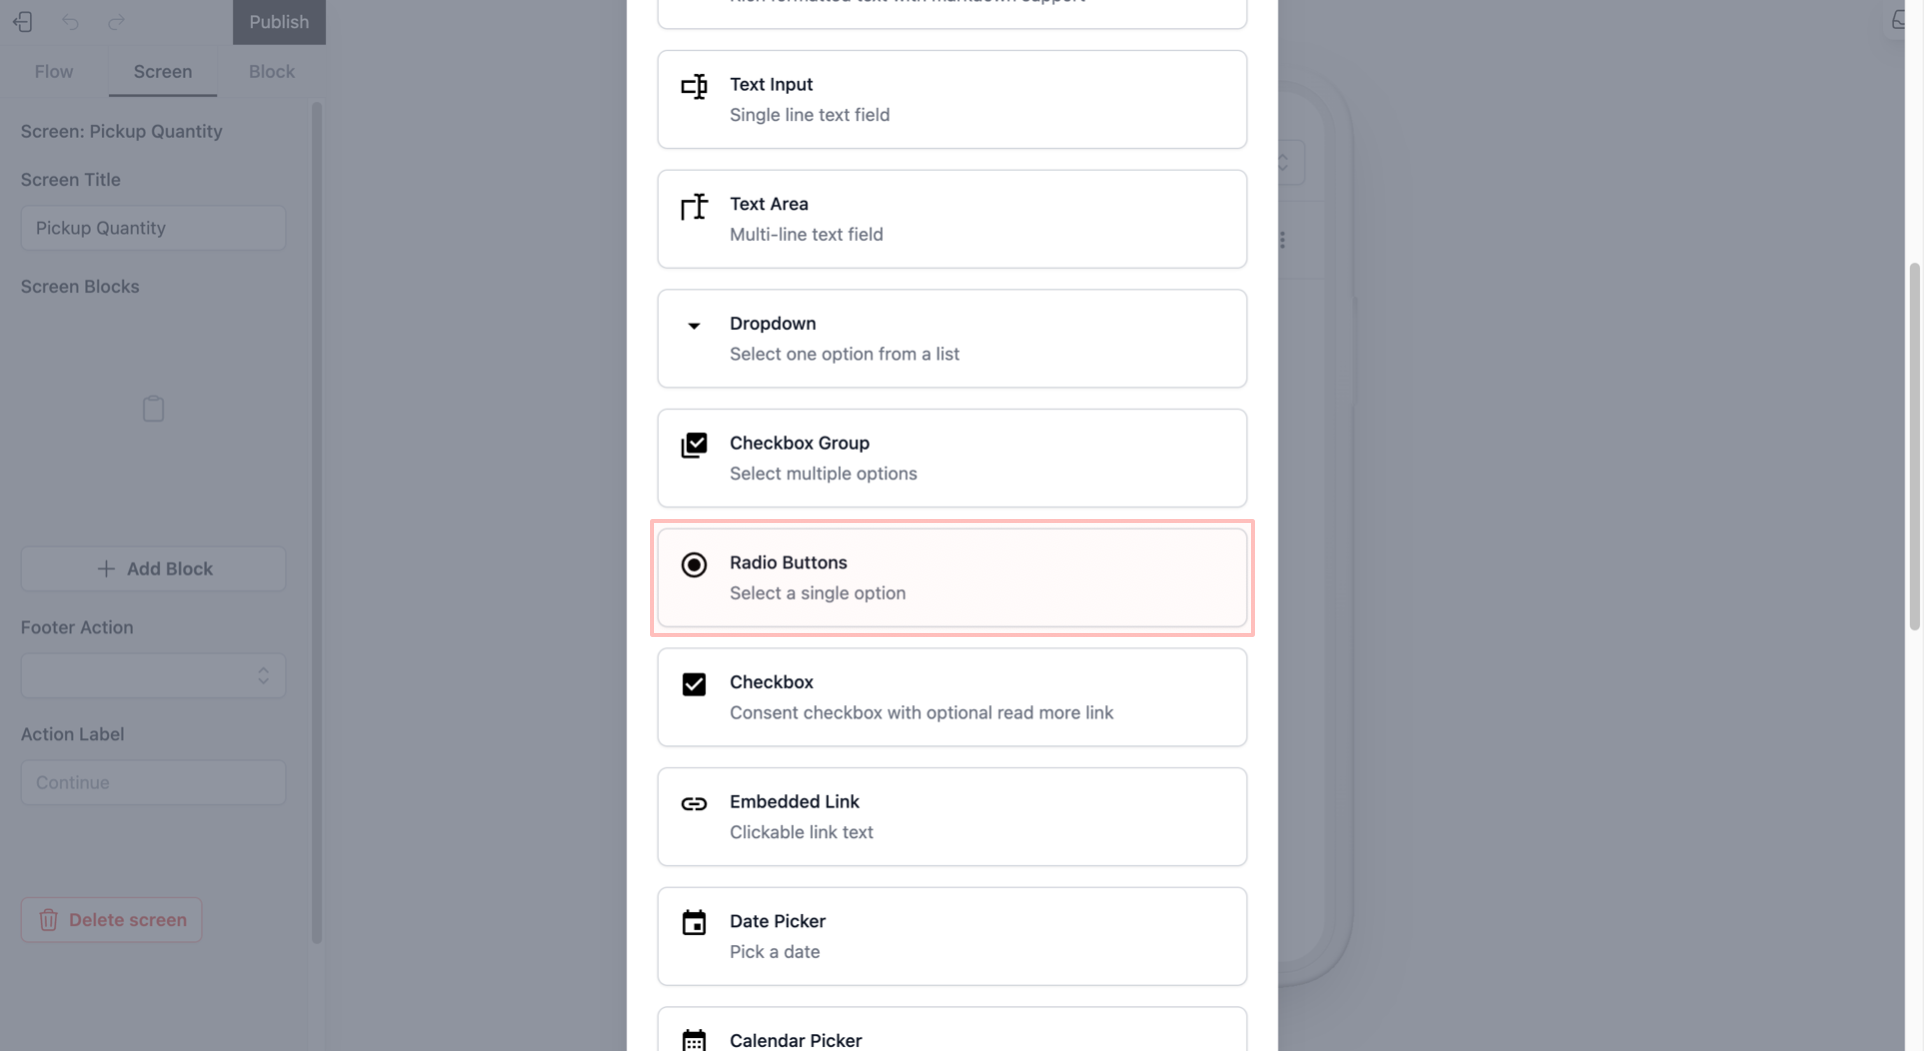
- Click the + Add Block button and select Radio Buttons. Since radio buttons show all the choices at once, this makes it easy for the customer to see all the available options and select one. This is much faster than typing for them.
-
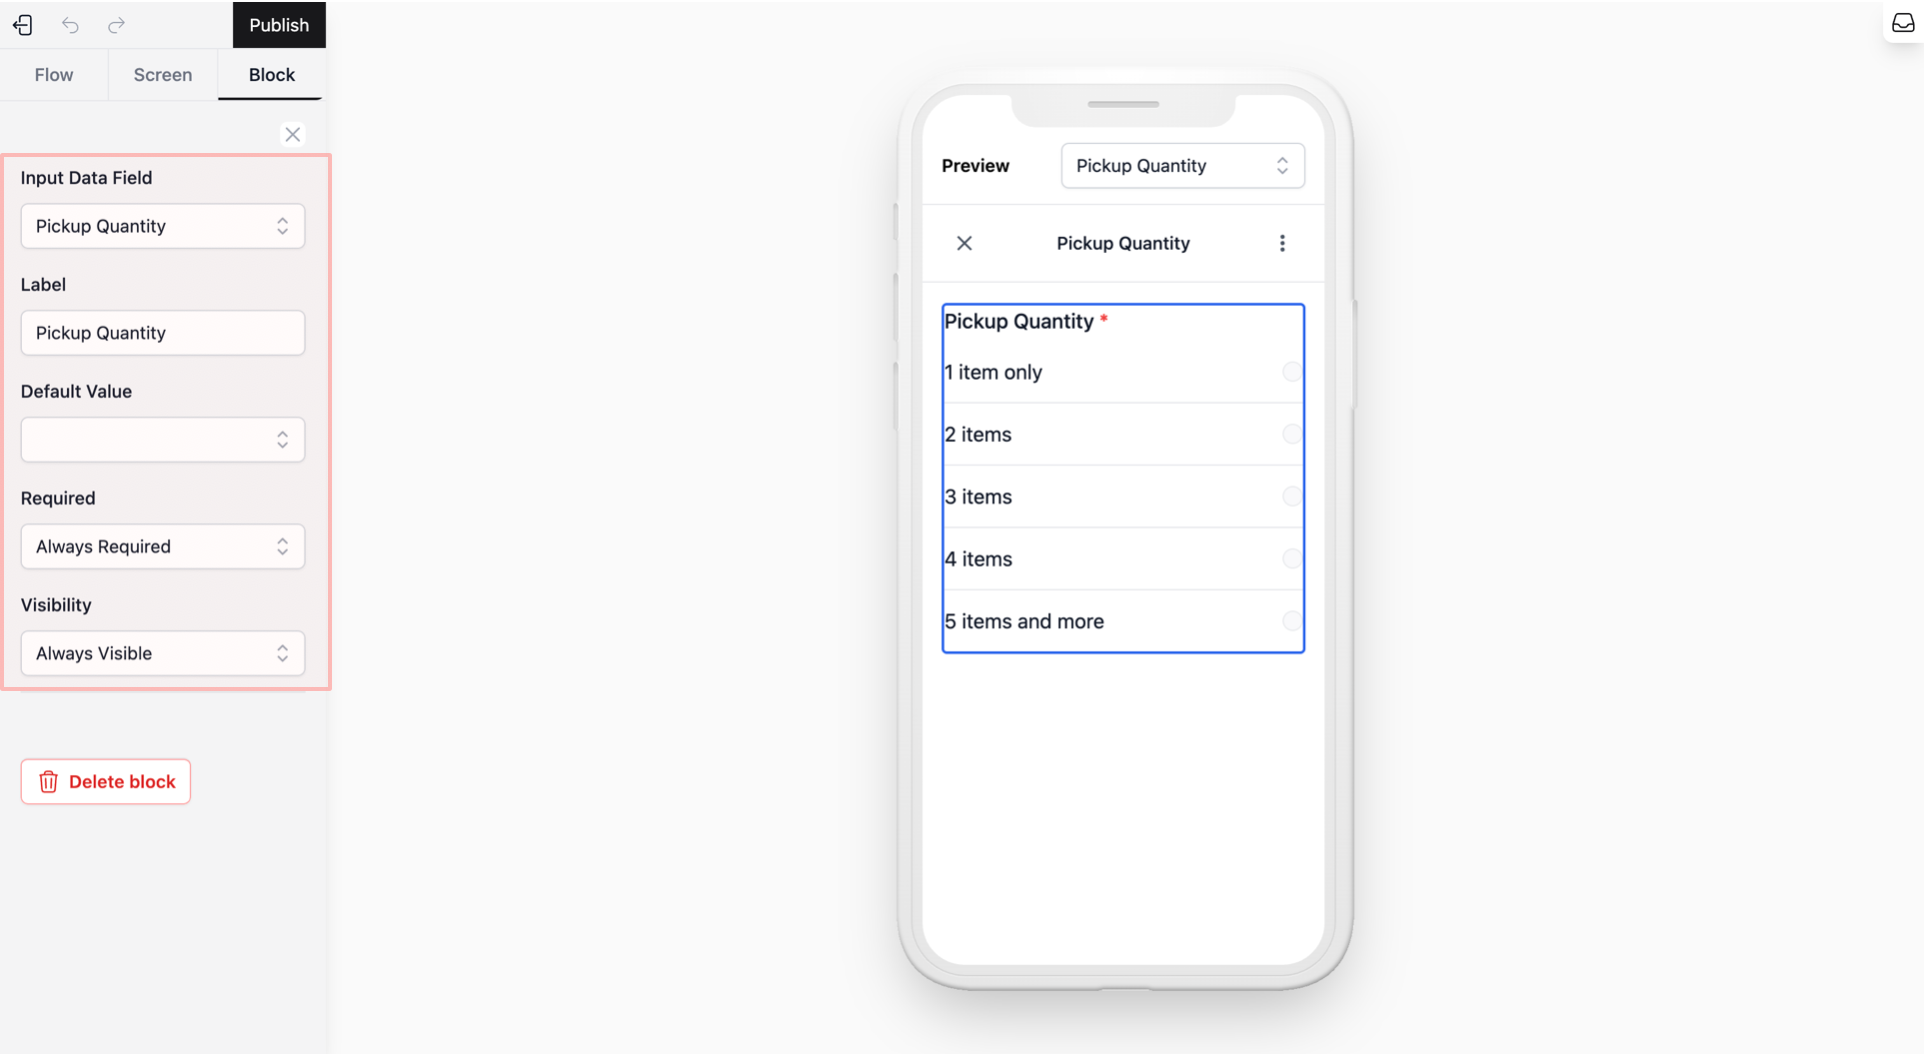
In the Block Tab, fill in these settings:
-
Input Data Field: Select the Pickup Quantity data field you just created.
-
Label: You can leave it as it is or give it a meaningful name such as “How many items?” etc..
-
Default Value: You can pick the most common number or leave it blank.
-
Required: Select Always Required.
-
Configure the Progress Button
Once again, specify what page the customer should see after they pick a quantity.
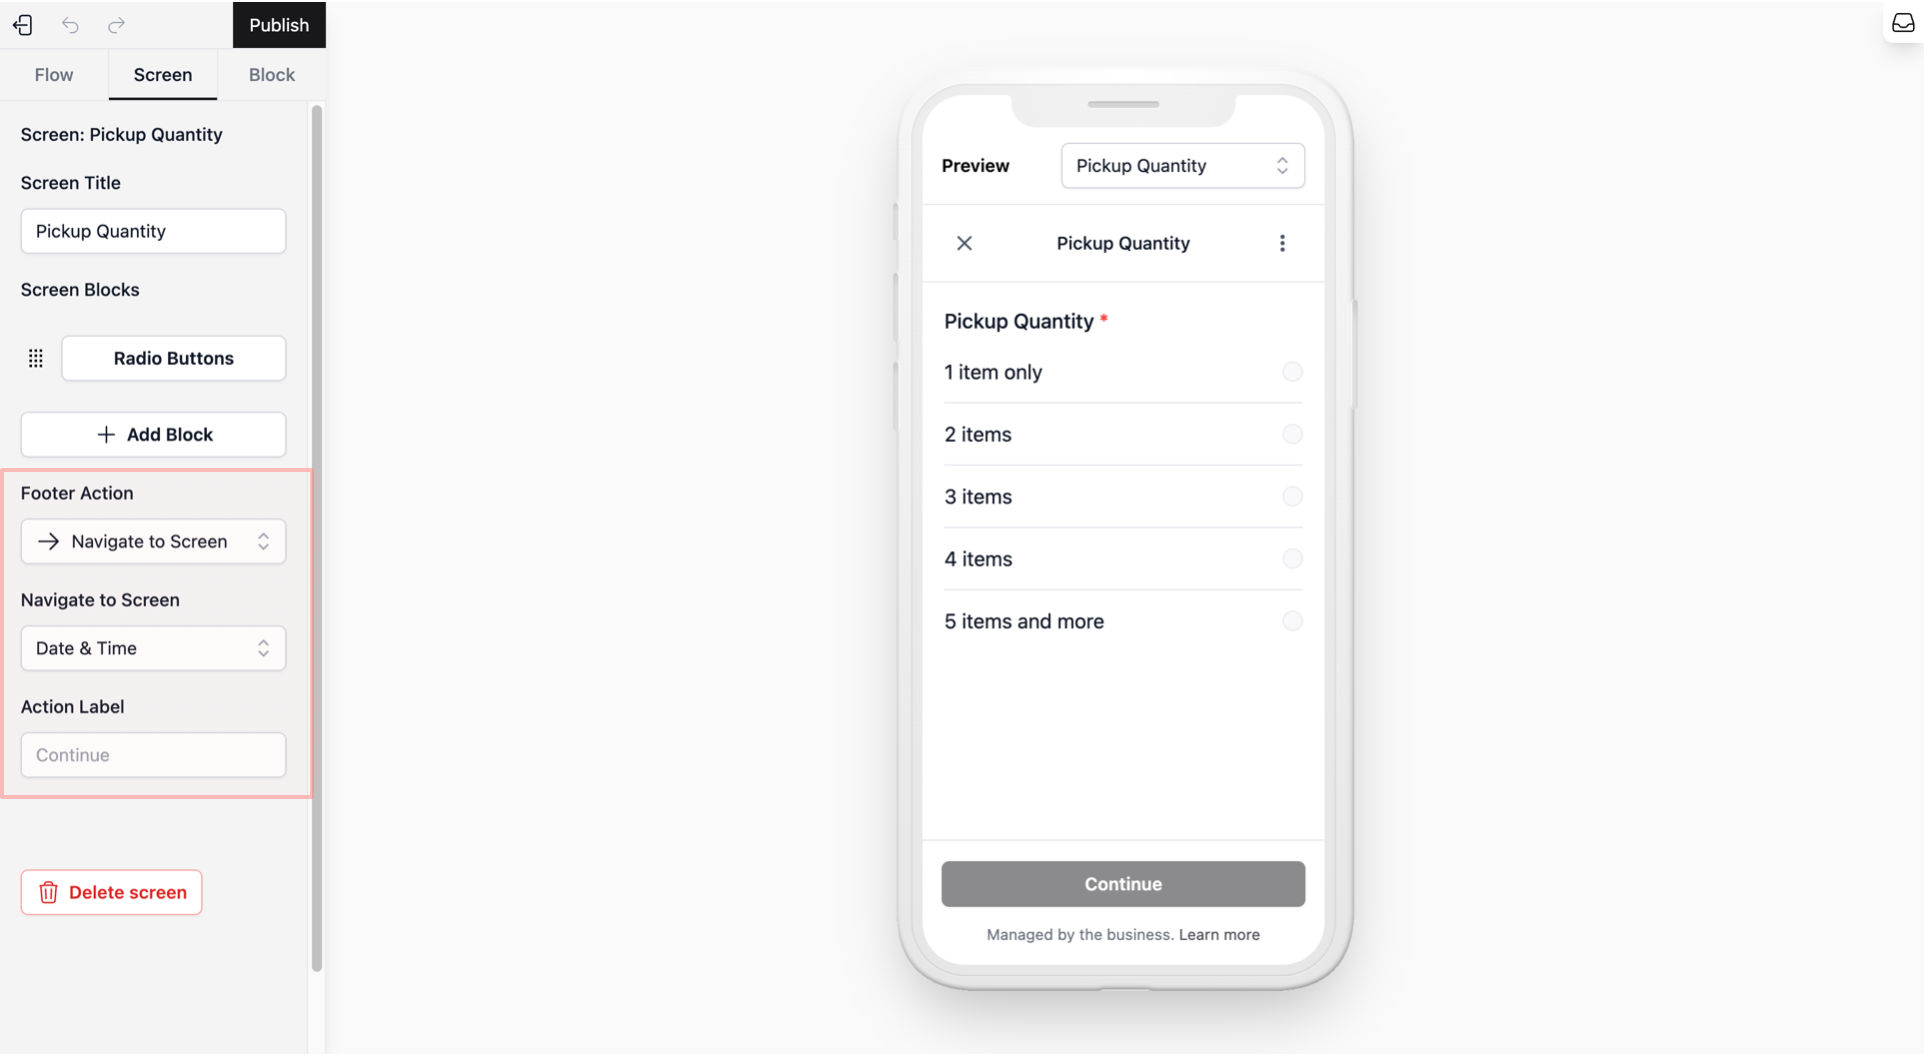
Under the Screen Tab, do the following:
-
Footer Action: Select → Navigate to Screen. Since we don’t need it to do update/create anything in the system, simply select Navigate to Screen.
-
Navigate to Screen: From the list, select the next page, Date & Time. This tells the system to move the current screen to the next.
-
Action Label: You can leave it as “Continue.” or use what you have been using so far to progress to the next screen.
Setup the Date & Time Screen
This is the final step where your customer picks when they want you to arrive. Getting this right ensures your team can manage their schedule and the customer knows exactly when to expect you.
Add Information Fields
From the Flow Tab, select your Date & Time screen.
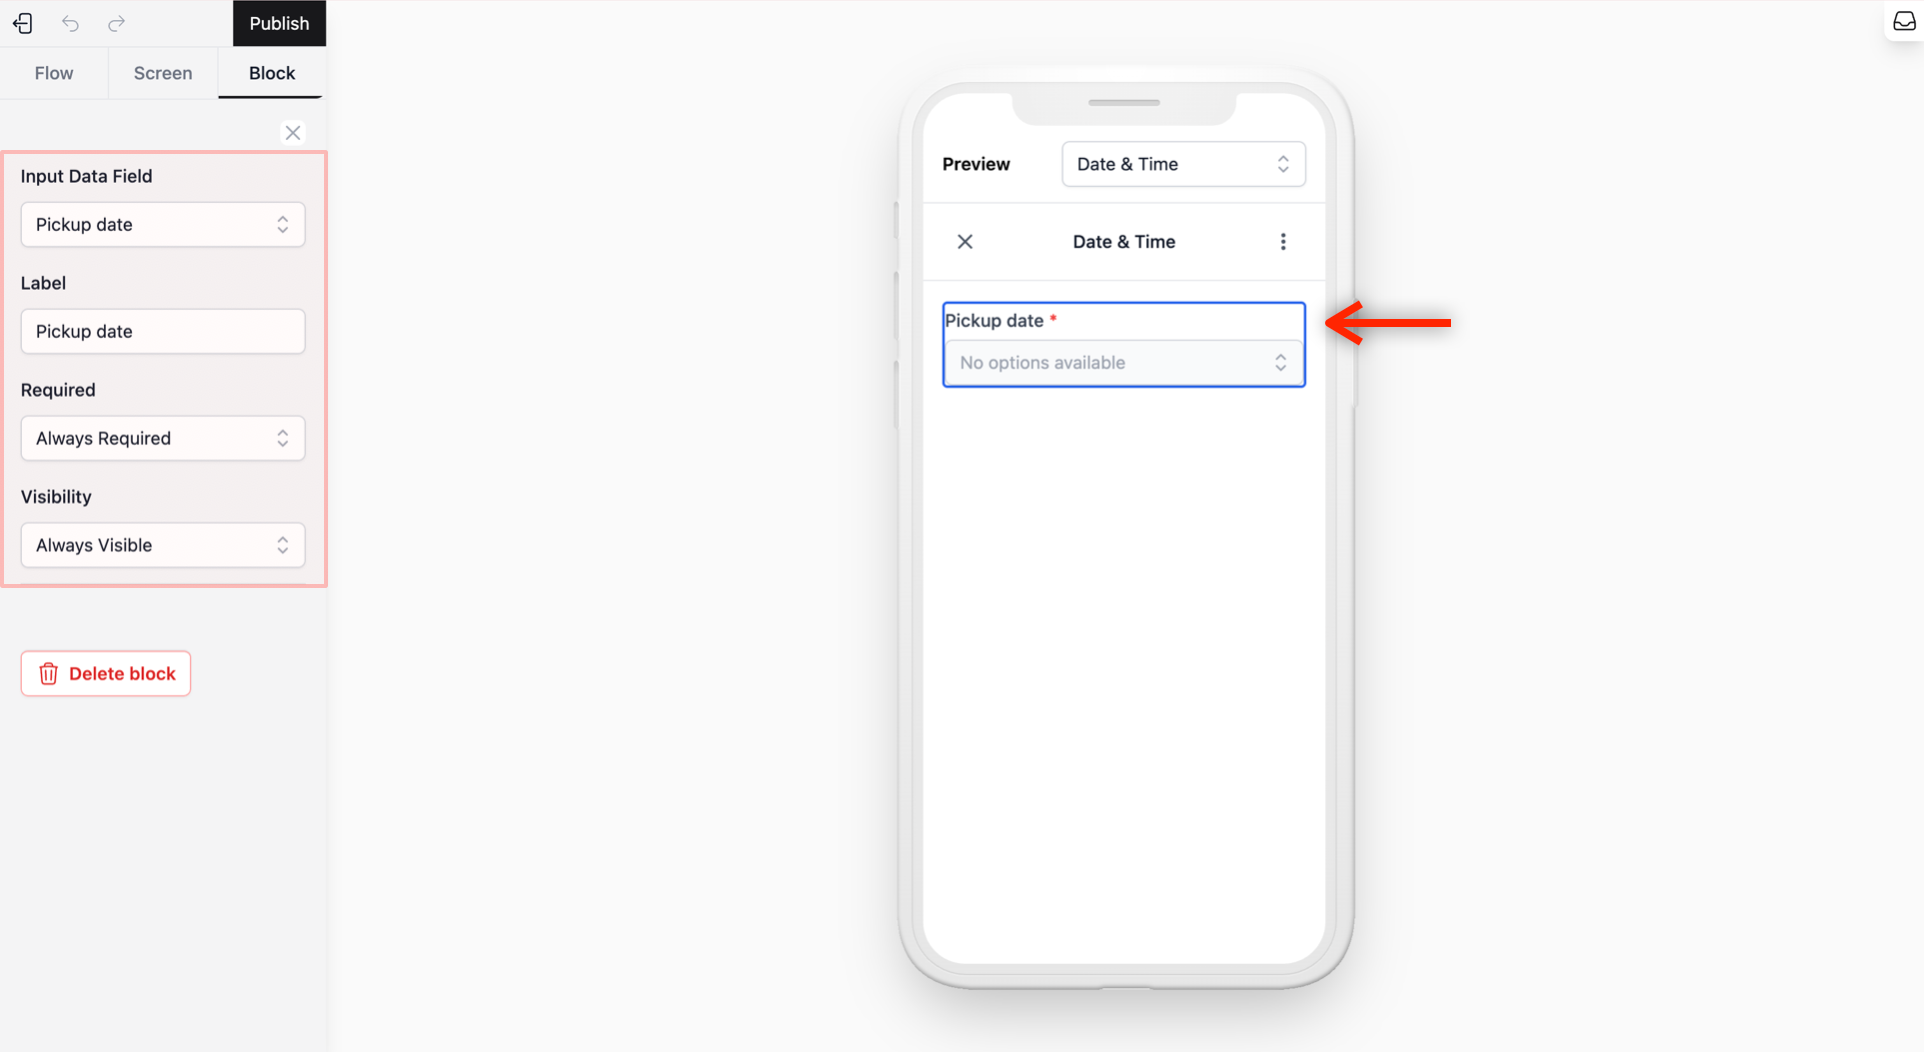
Pickup date: This allows the customer to see the available dates and choose one that fits your schedule.
-
From the Screen Tab, click + Add Block → Dropdown.
-
Input Data Field: Select Pickup date.
-
Label: Leave it as default or give it a meaningful name like “Select Date.”
-
Required: Select Always Required.
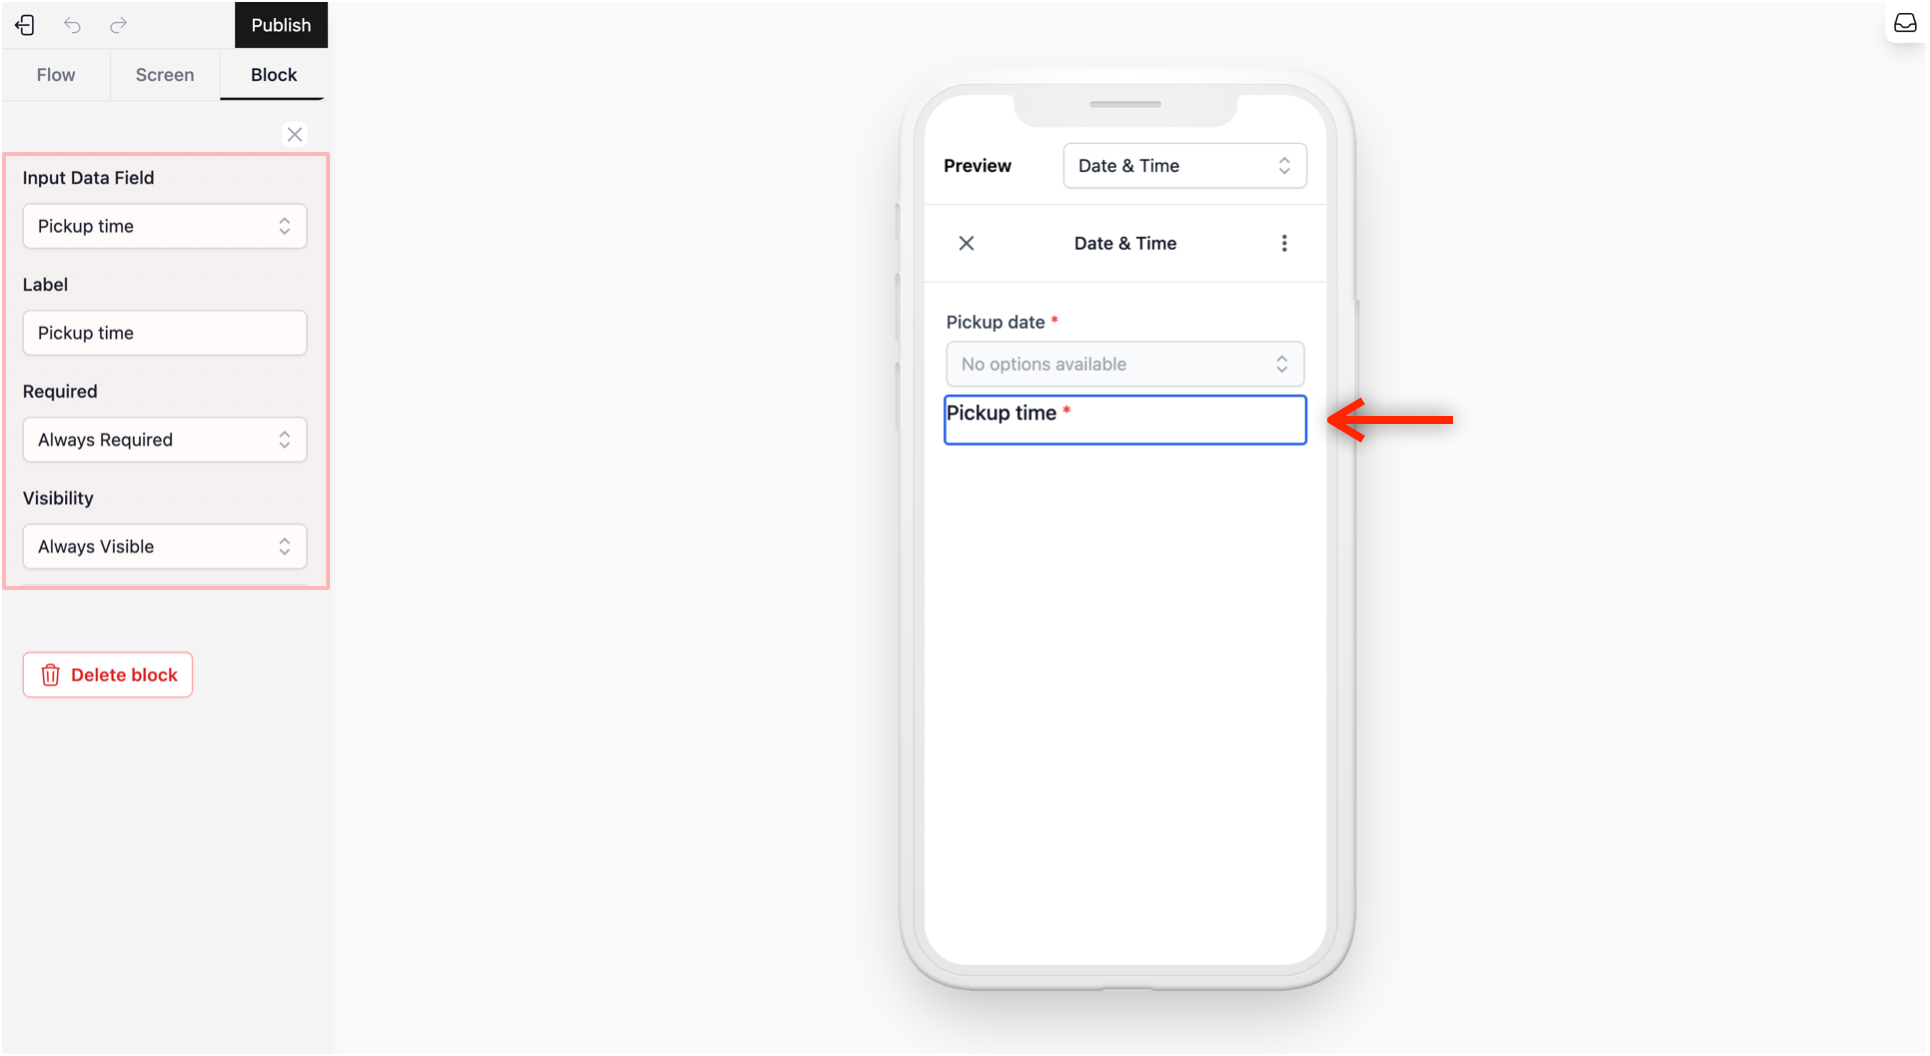
Pickup time: Once the date is chosen, we want to list the available time slots and let the customer select one specific time slot based on the available ones.
-
From the Screen Tab, click + Add Block → Radio Buttons.
-
Input Data Field: Select Pickup time.
-
Label: Leave it as default or give it a meaningful name like “Select Time.”
-
Required: Select Always Required.
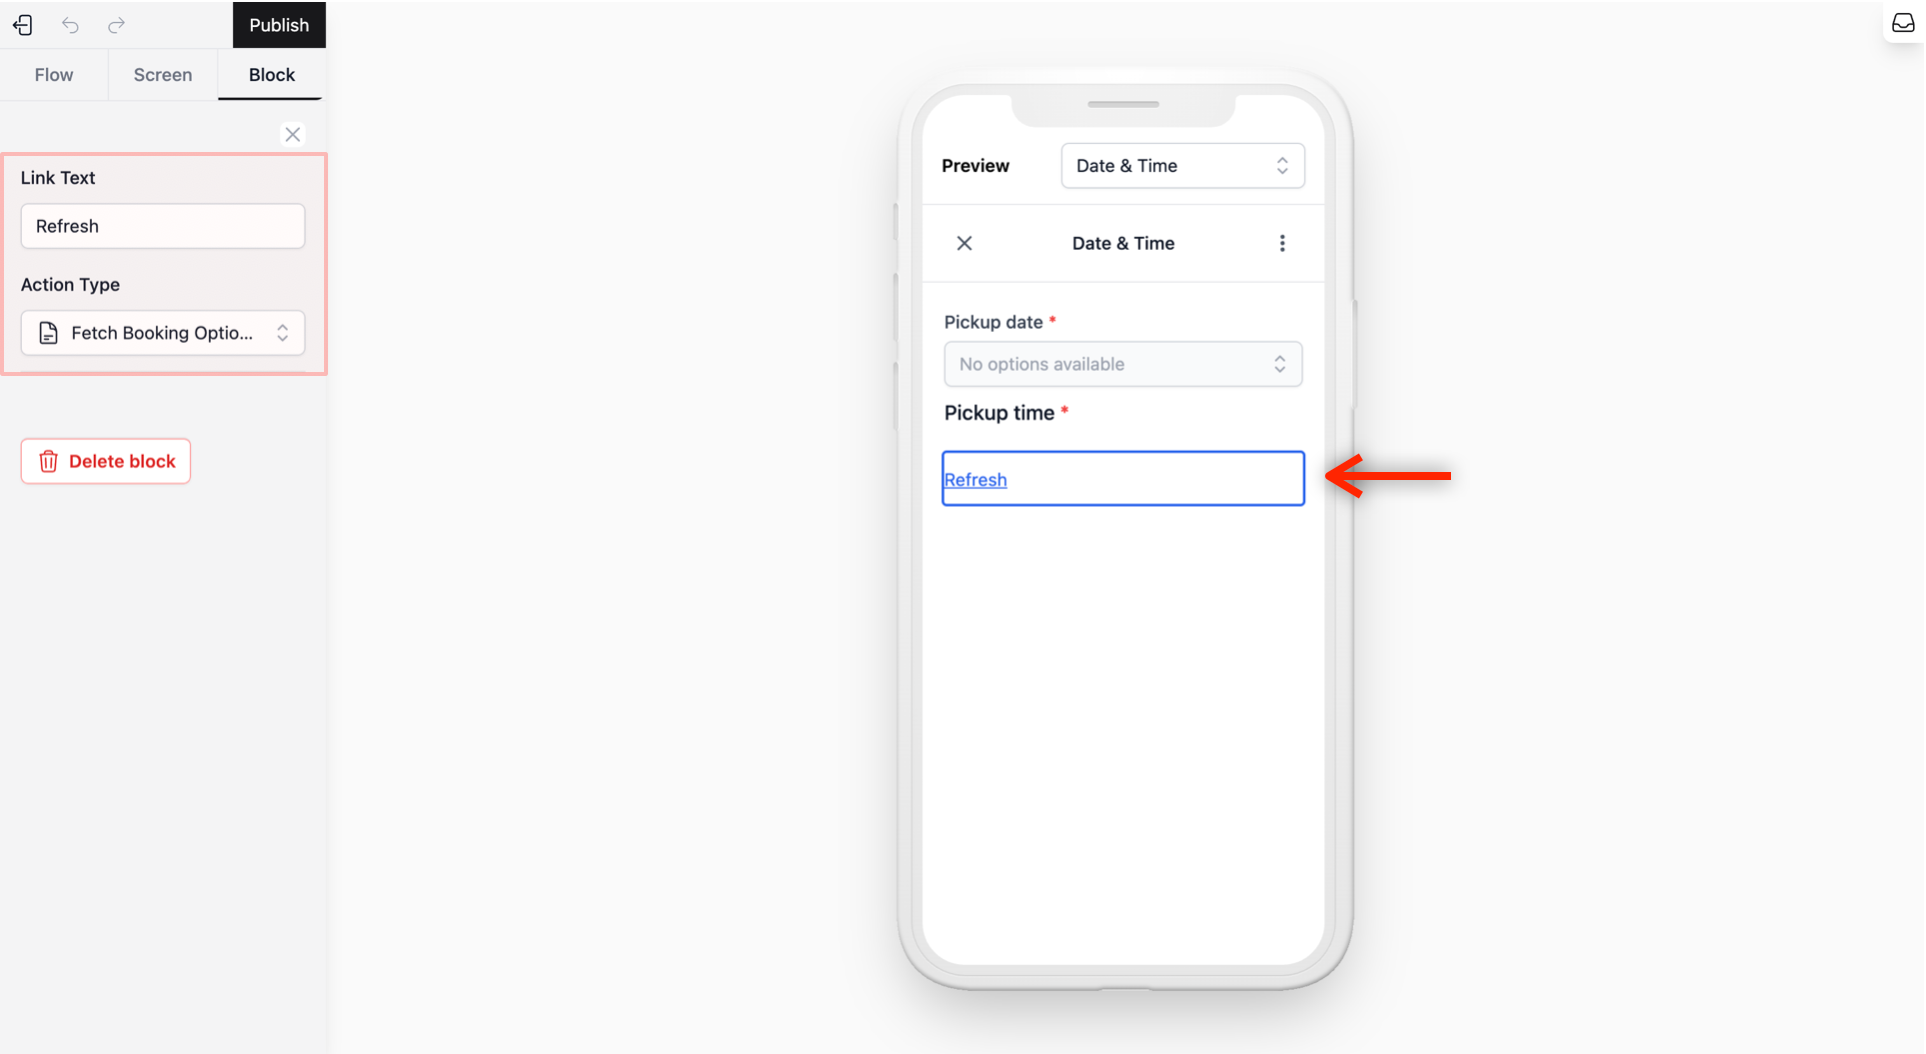
Refresh Link: This allows the customer to update the screen to see the most current available slots.
-
From the Screen Tab, click + Add Block → Embedded Link.
-
Link Text: Name this “Refresh” or any name that tells the customer this will update the list when they click on this link.
-
Action Type: Select Fetch Booking Options. This will update the Pickup date and Pickup time fields to show the latest availability when the customer taps on the link. This is useful if a time slot was just taken by someone else while they were filling out the form.
Configure the Progress Button
Now we set the final action to turn this form into a real order for your business.
Under the Screen Tab, do the following:
-
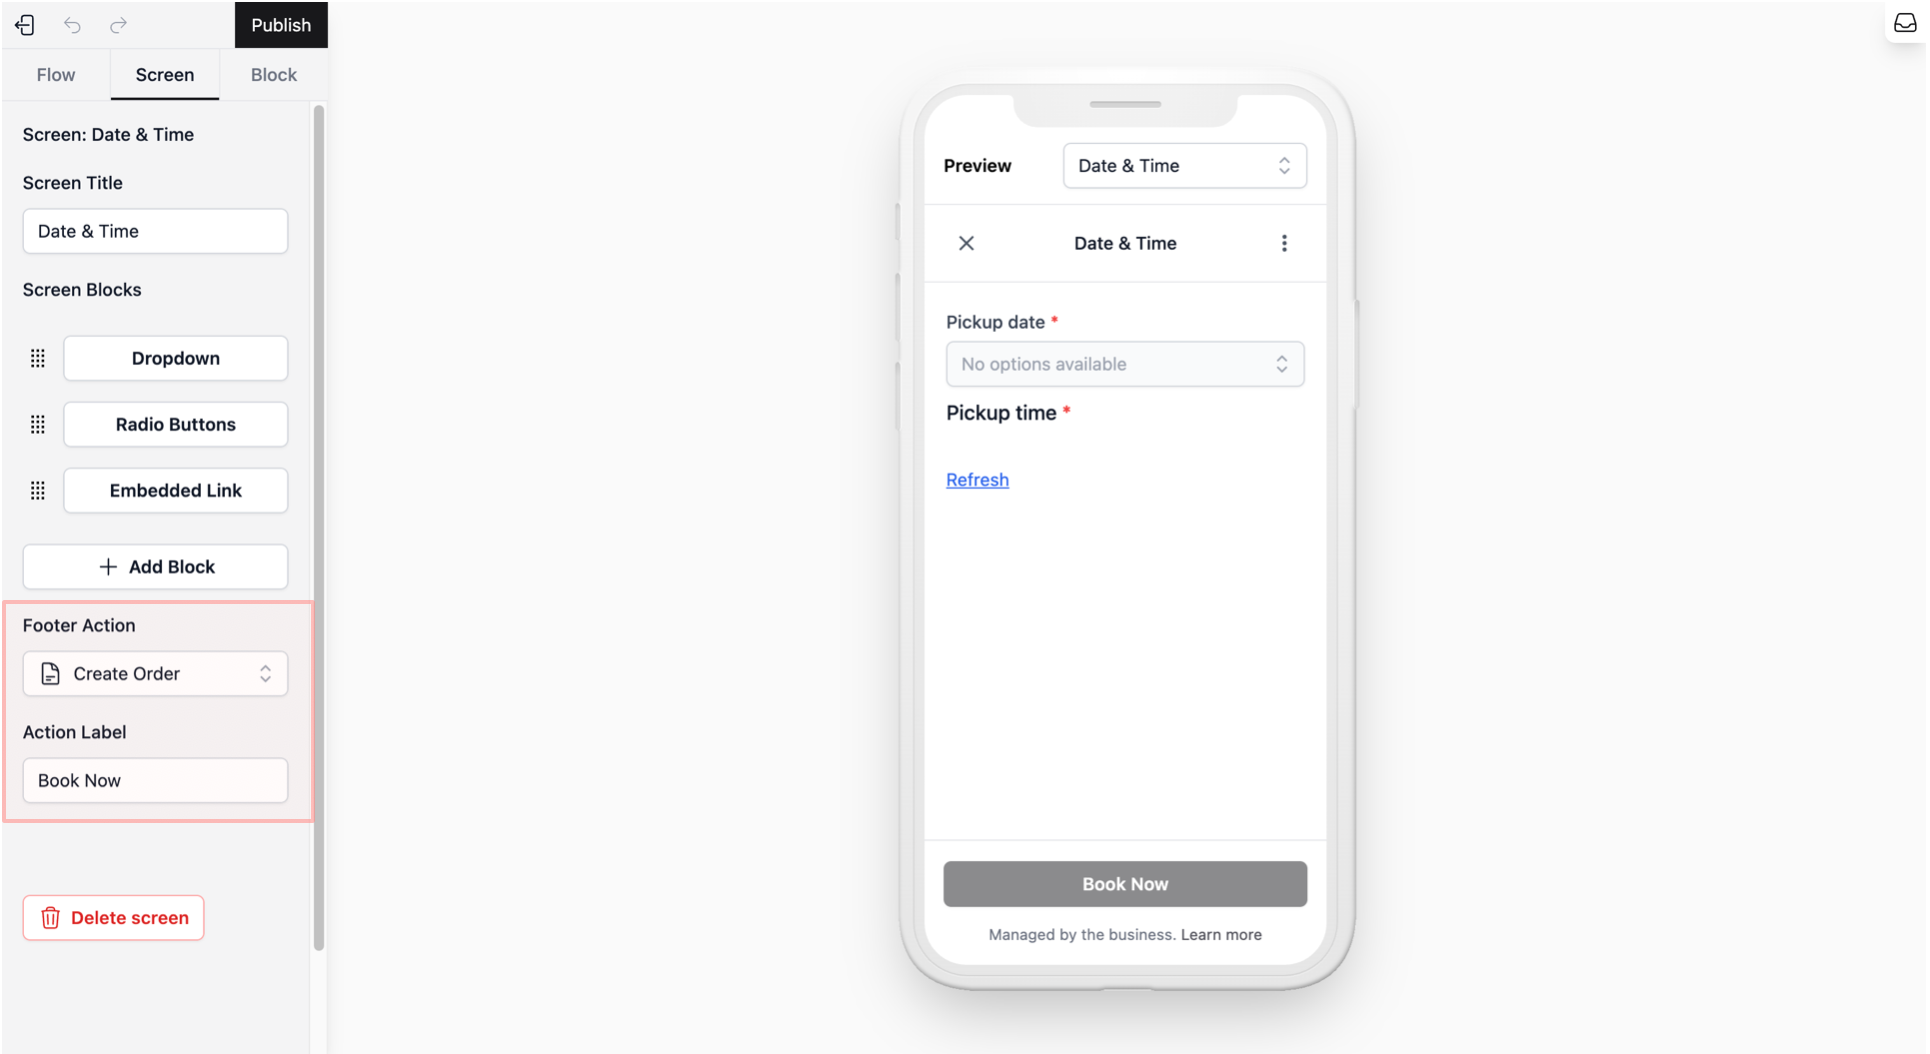
Footer Action: Select Create Order.
-
Why? As this is the final step, when the customer clicks this, it creates a new Sales Order in your system automatically.
-
How to find your orders: You can find these bookings by heading to the top navigation bar, clicking Sales, and selecting Orders. You will see the dashboard where all the orders placed through your WhatsApp booking form will appear at. Click here to learn more about Sales Orders.
-
-
Action Label: The system will show “Complete” by default, but you can change this to something like “Book Now.”
Publish Your Mini App
Once you are happy with how your booking form looks in the preview, you need to Publish it. This makes the form live so your customers can actually start booking on WhatsApp.
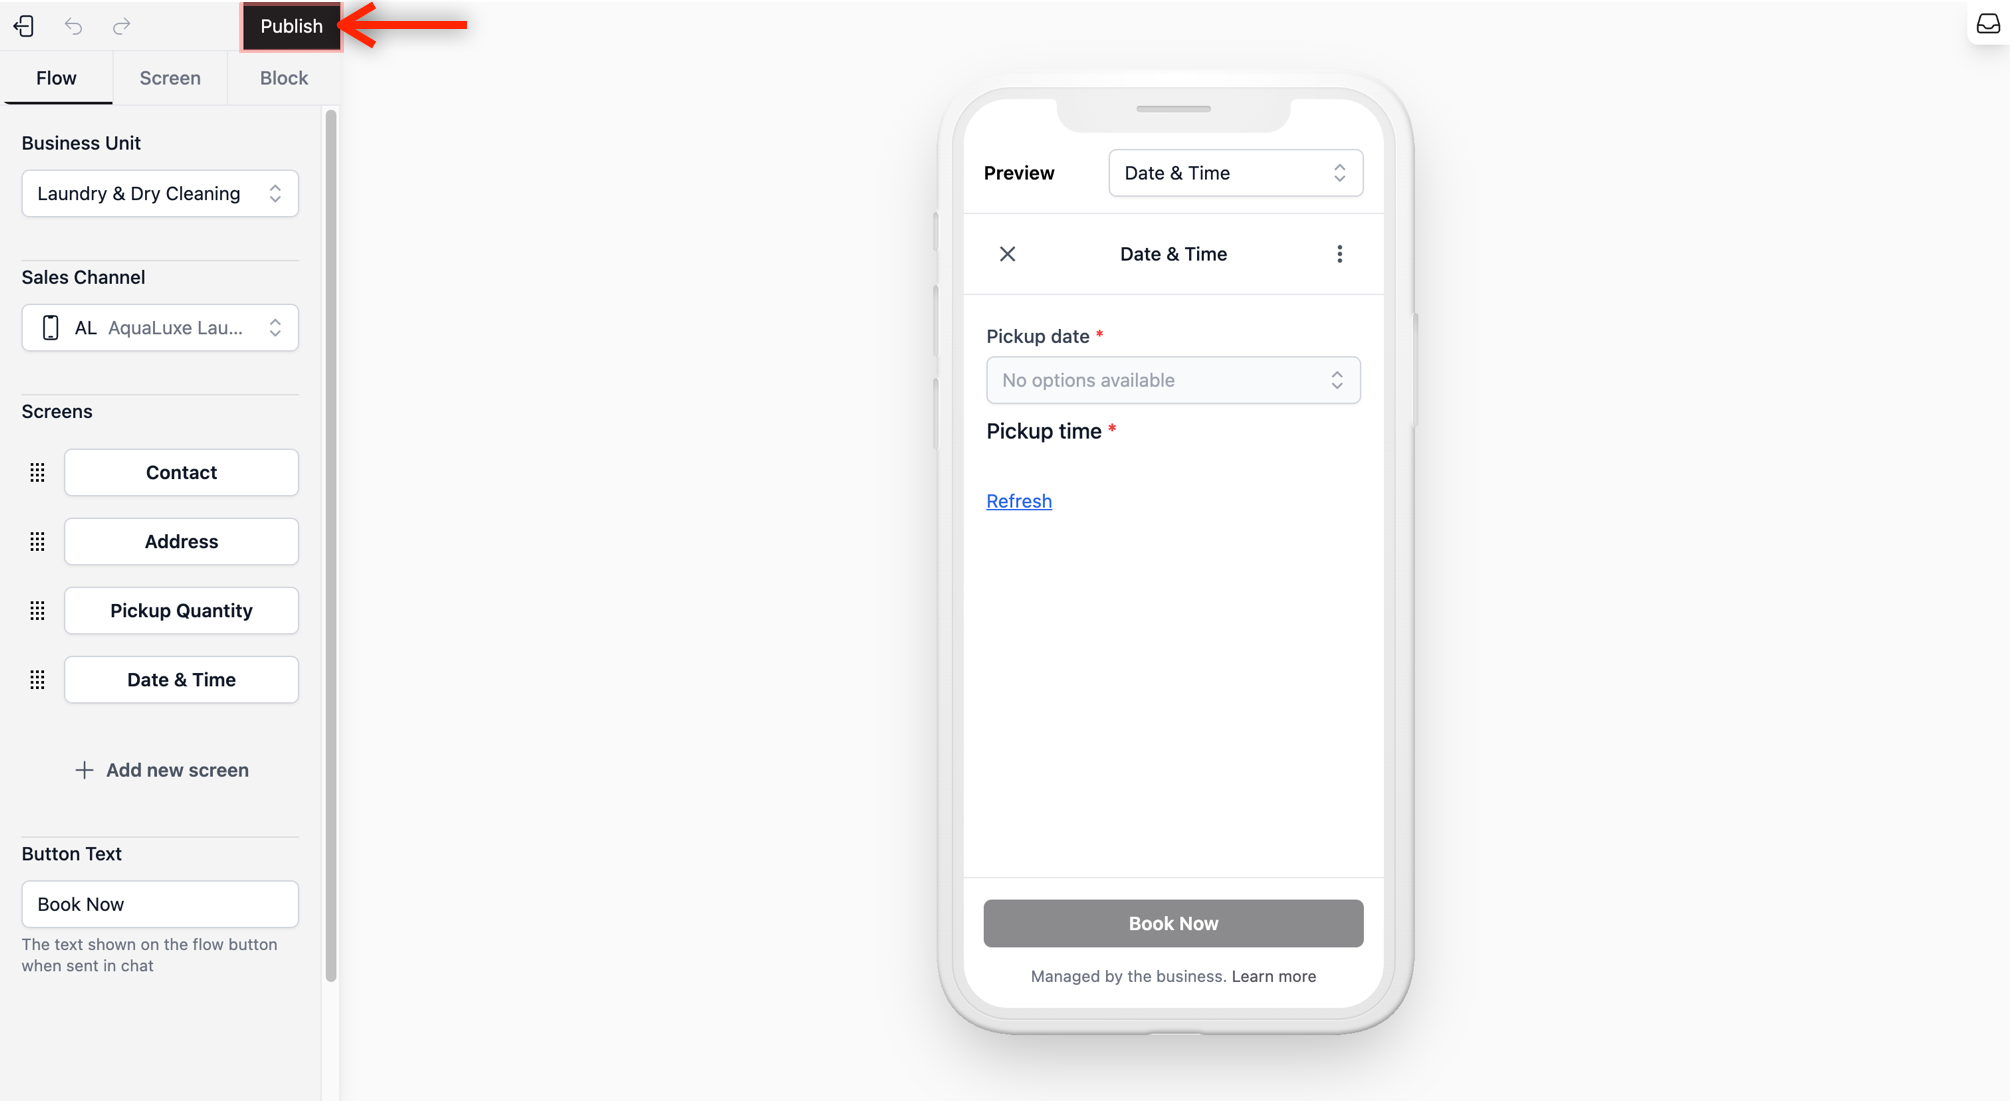
- Click the Publish Button: Look at the top right corner of the editor and click the Publish button.
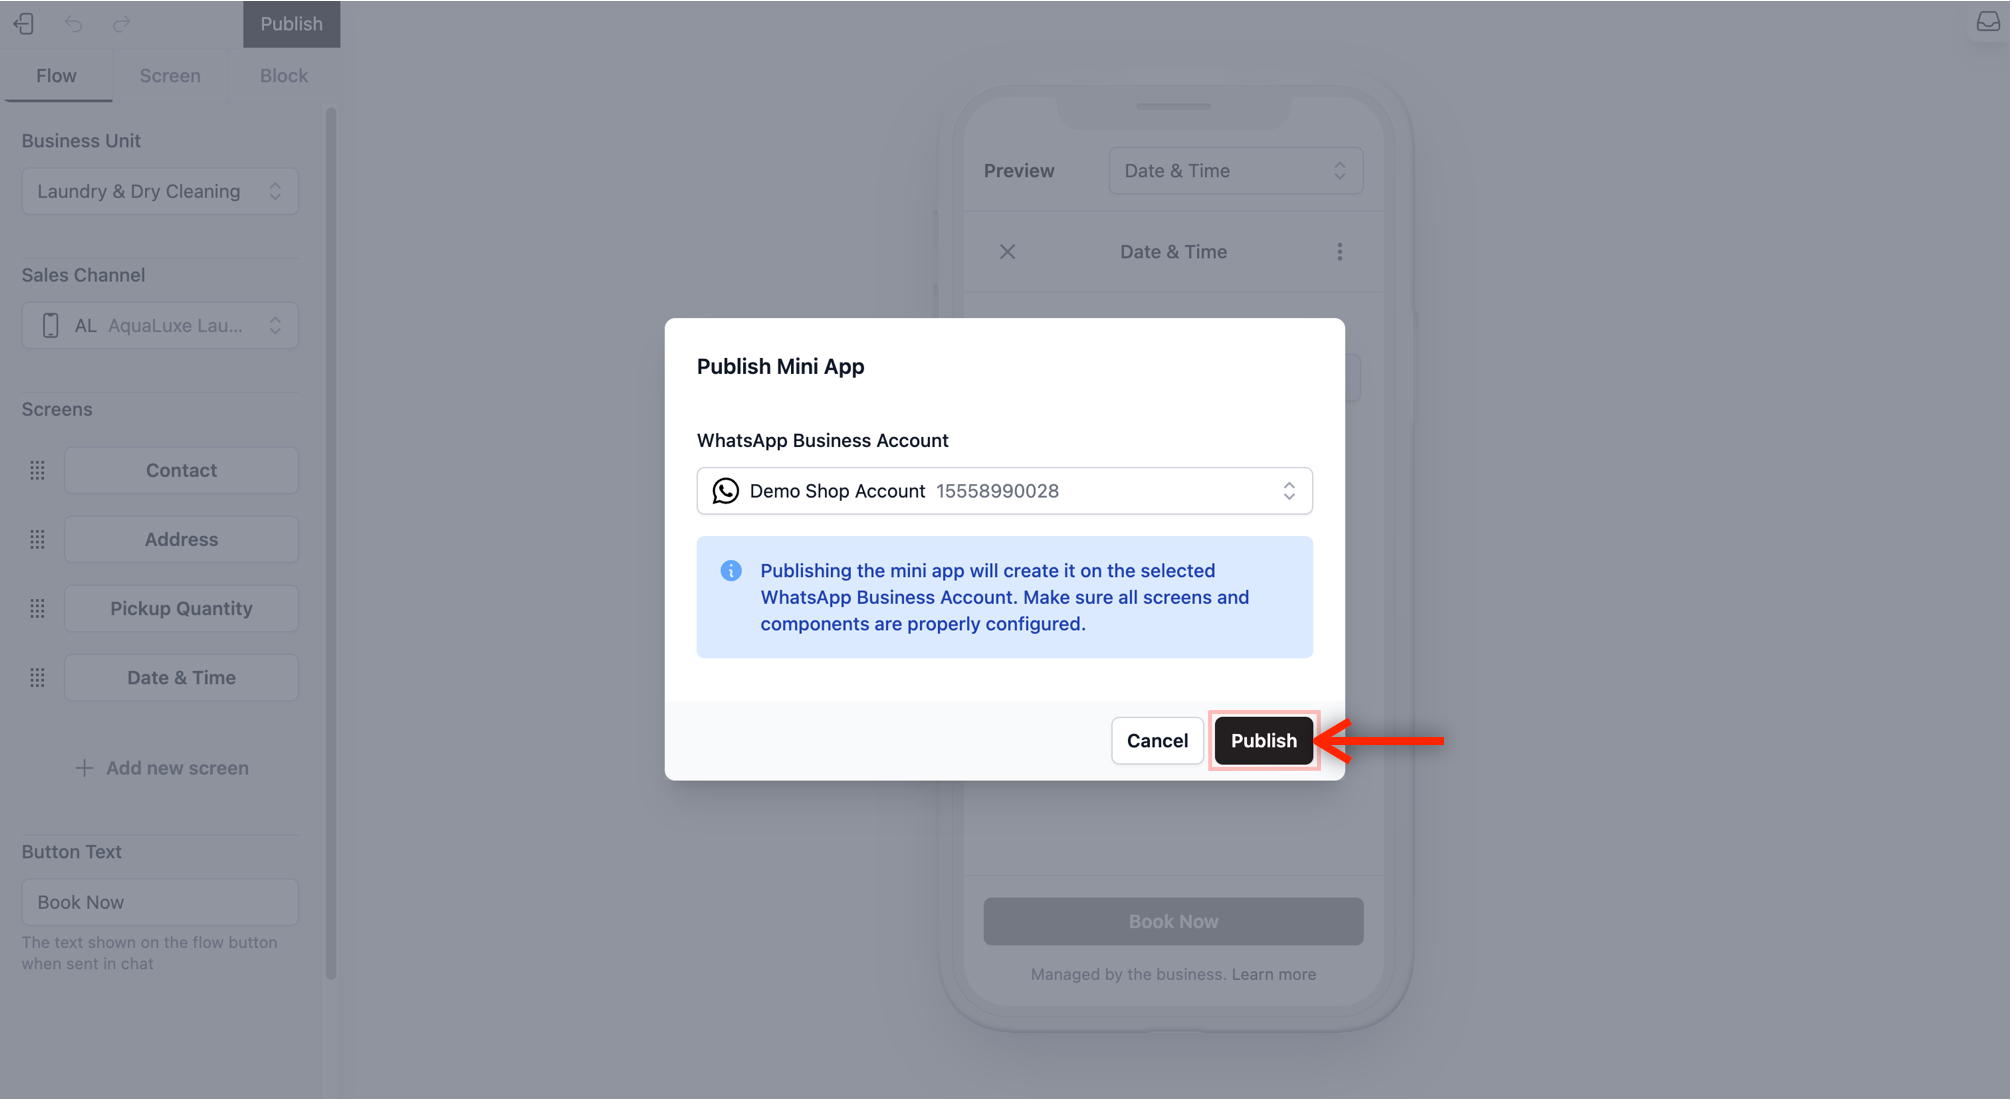
- Confirm the Action: A pop-up window will appear asking you to confirm. Click the Publish button inside that window again.
- Check the Status: After a few moments, the system will refresh and take you back to the main Mini Apps page.
- Look for your Mini App in the list. You should now see a status that says Published.
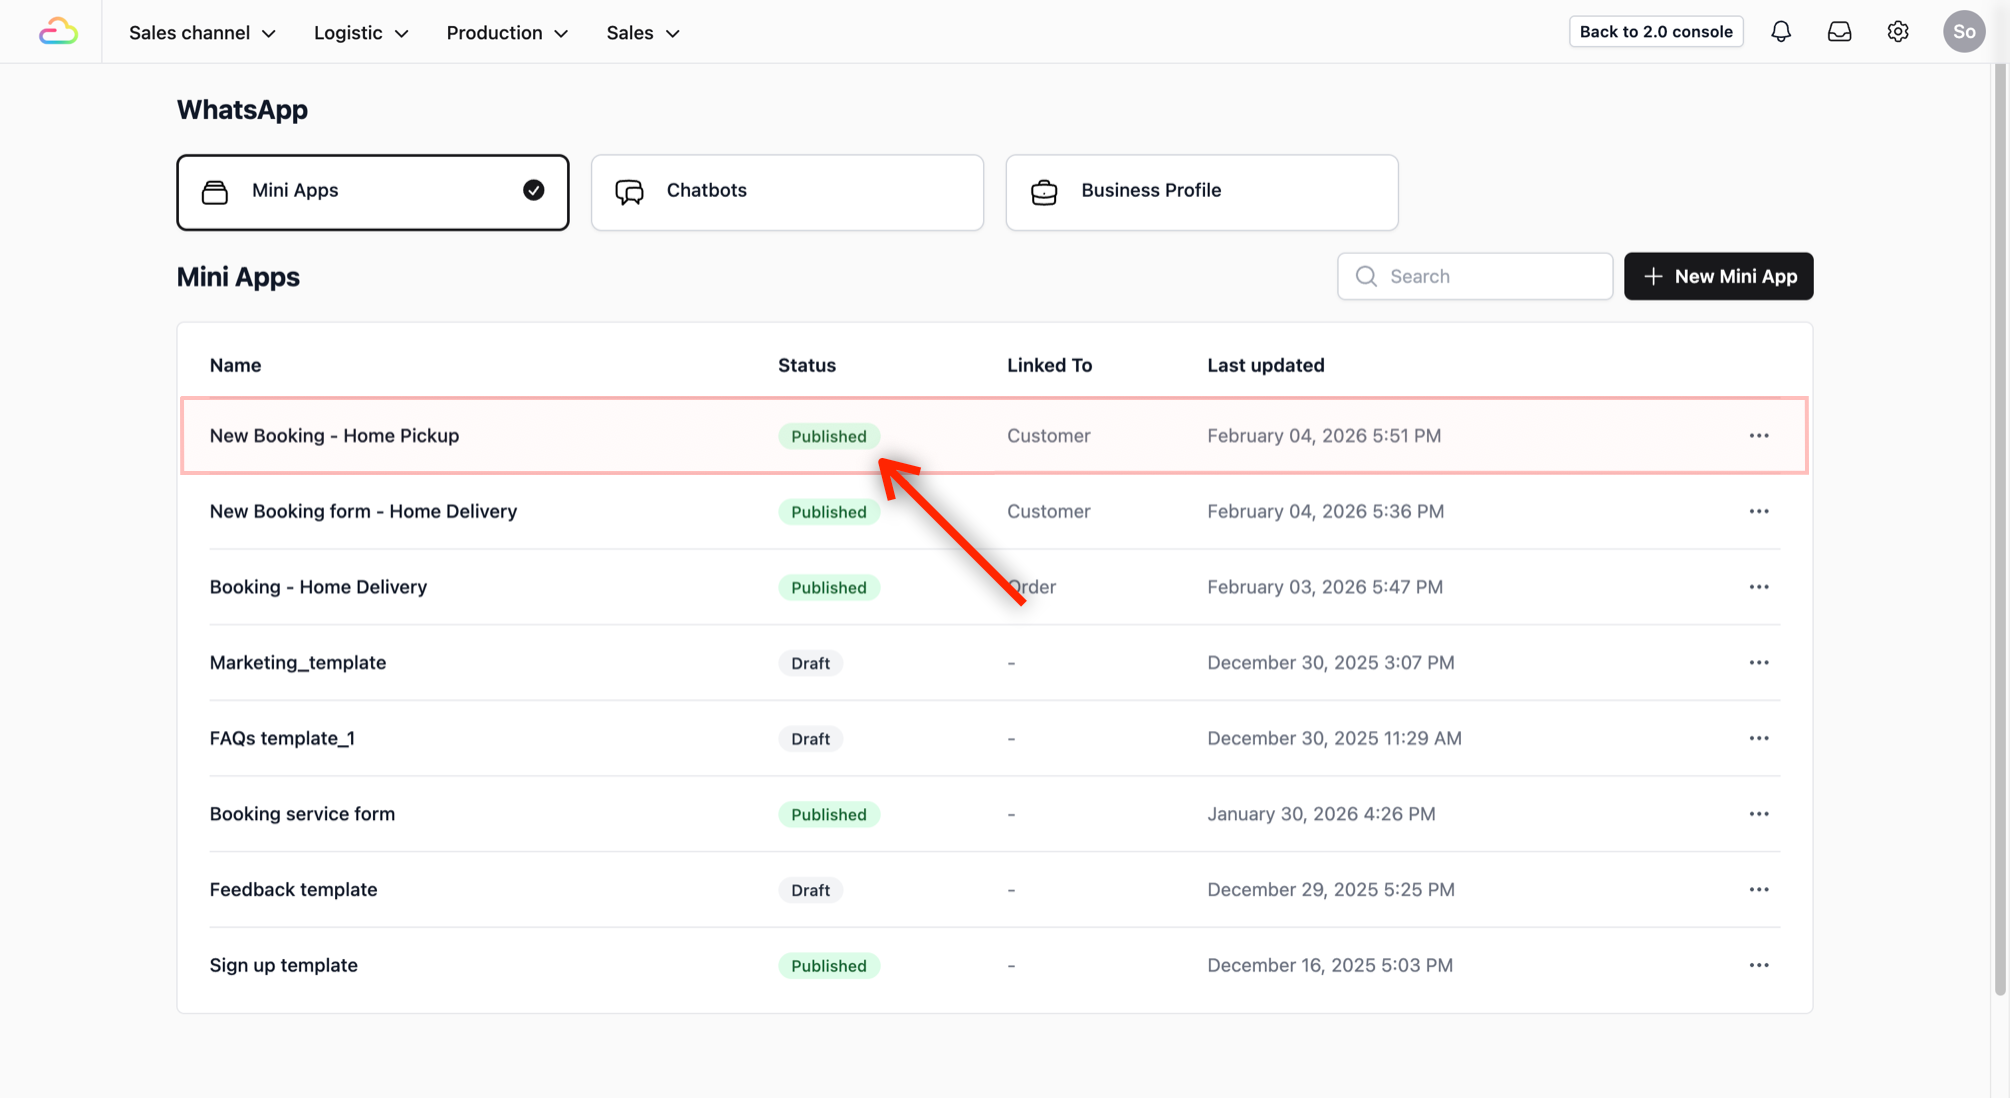
What does this mean? Your Mini App is now officially “live.” You can start using it to guide your customers to book their home pickups through WhatsApp. All the information they enter will now flow directly into your Sales Orders dashboard.
To get started, check out the guide: Sending Your Mini Apps to Customers →