
Before You Start
If this is your first time using Mini Apps, read What is a Mini App? first. It explains what a Mini App does and what your customer sees inside WhatsApp. Then return here to learn how to edit one.
The Two Sides of the Editor
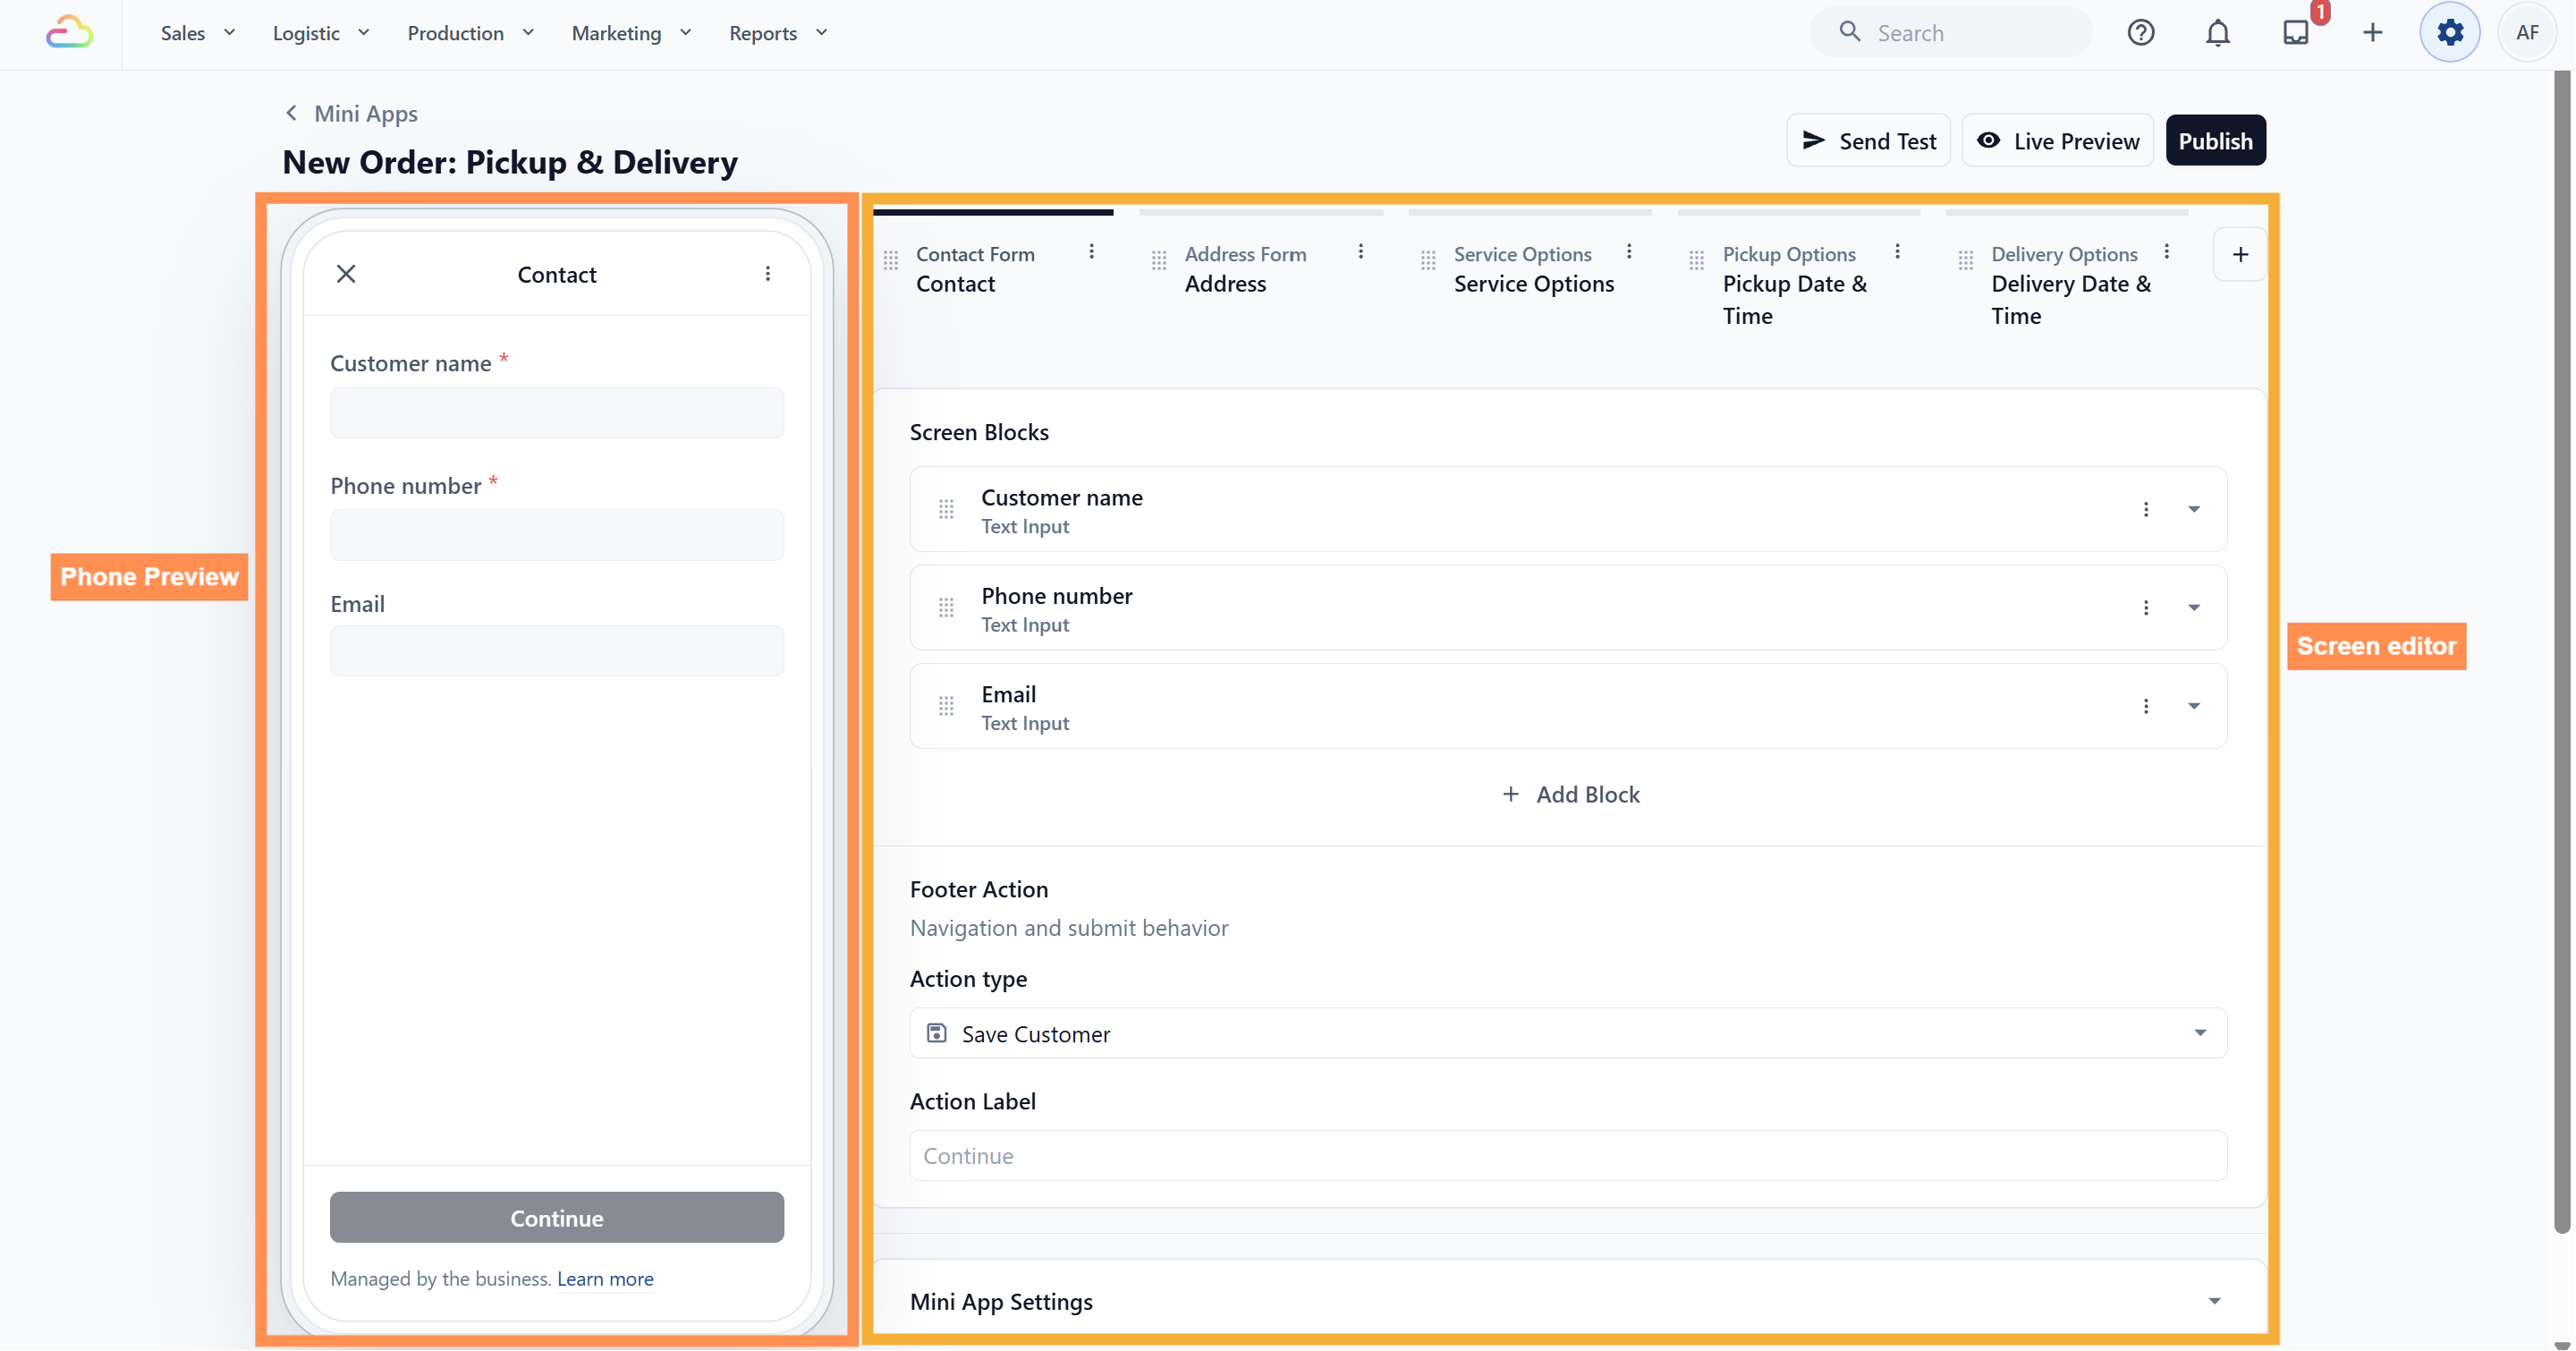
The left side is a live preview of a mobile phone. It shows exactly what your customer will see.
The right side is where you build the form.
Screens
Across the top of the right side you will see your screens laid out in order, like steps in a progress bar. Each screen is one page your customer fills in before tapping to continue.
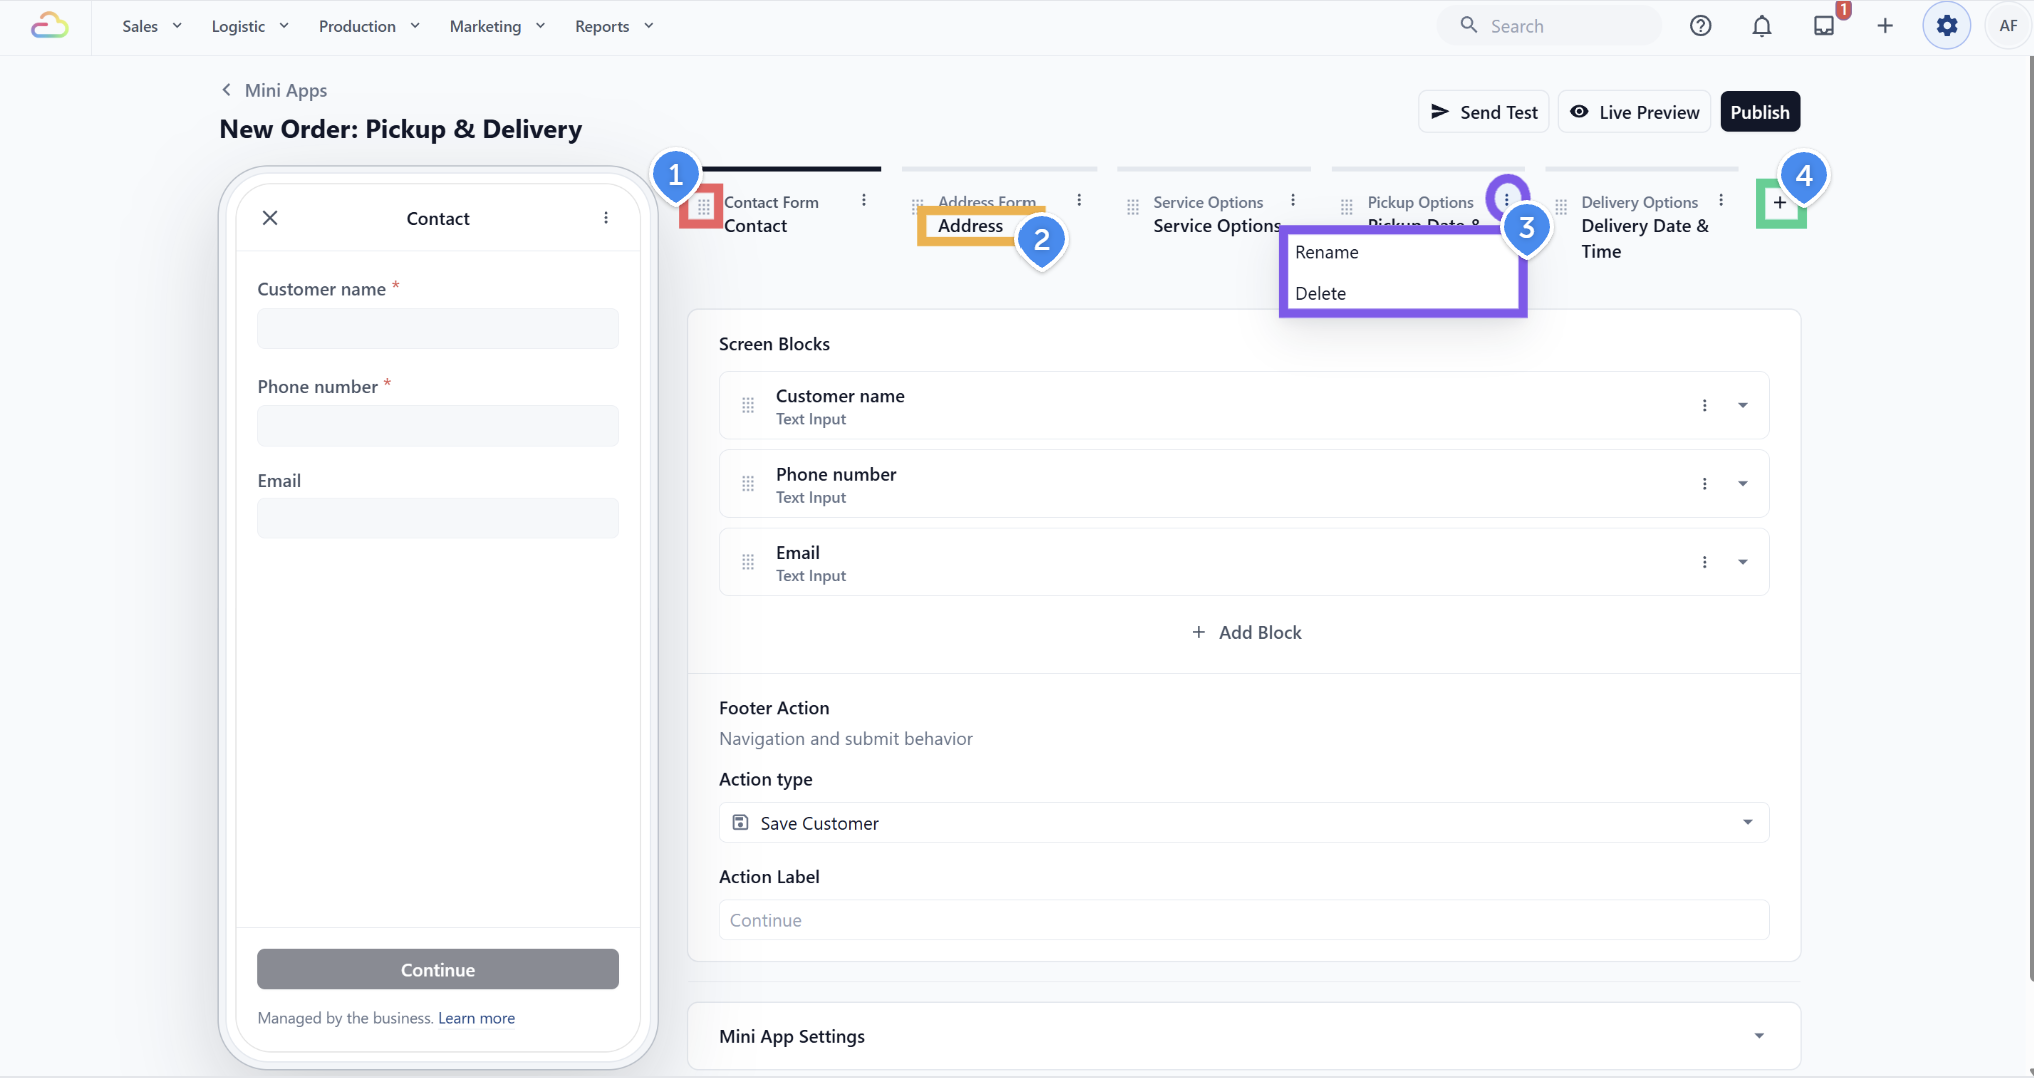
- To change the order, grab a screen by its drag handle and slide it left or right.
- To rename a screen, double click its name and type the new one.
- To rename or delete a screen from a menu instead, click the ⋮ icon on that screen.
- To add a screen, click the + at the end of the row.
Adding a Screen
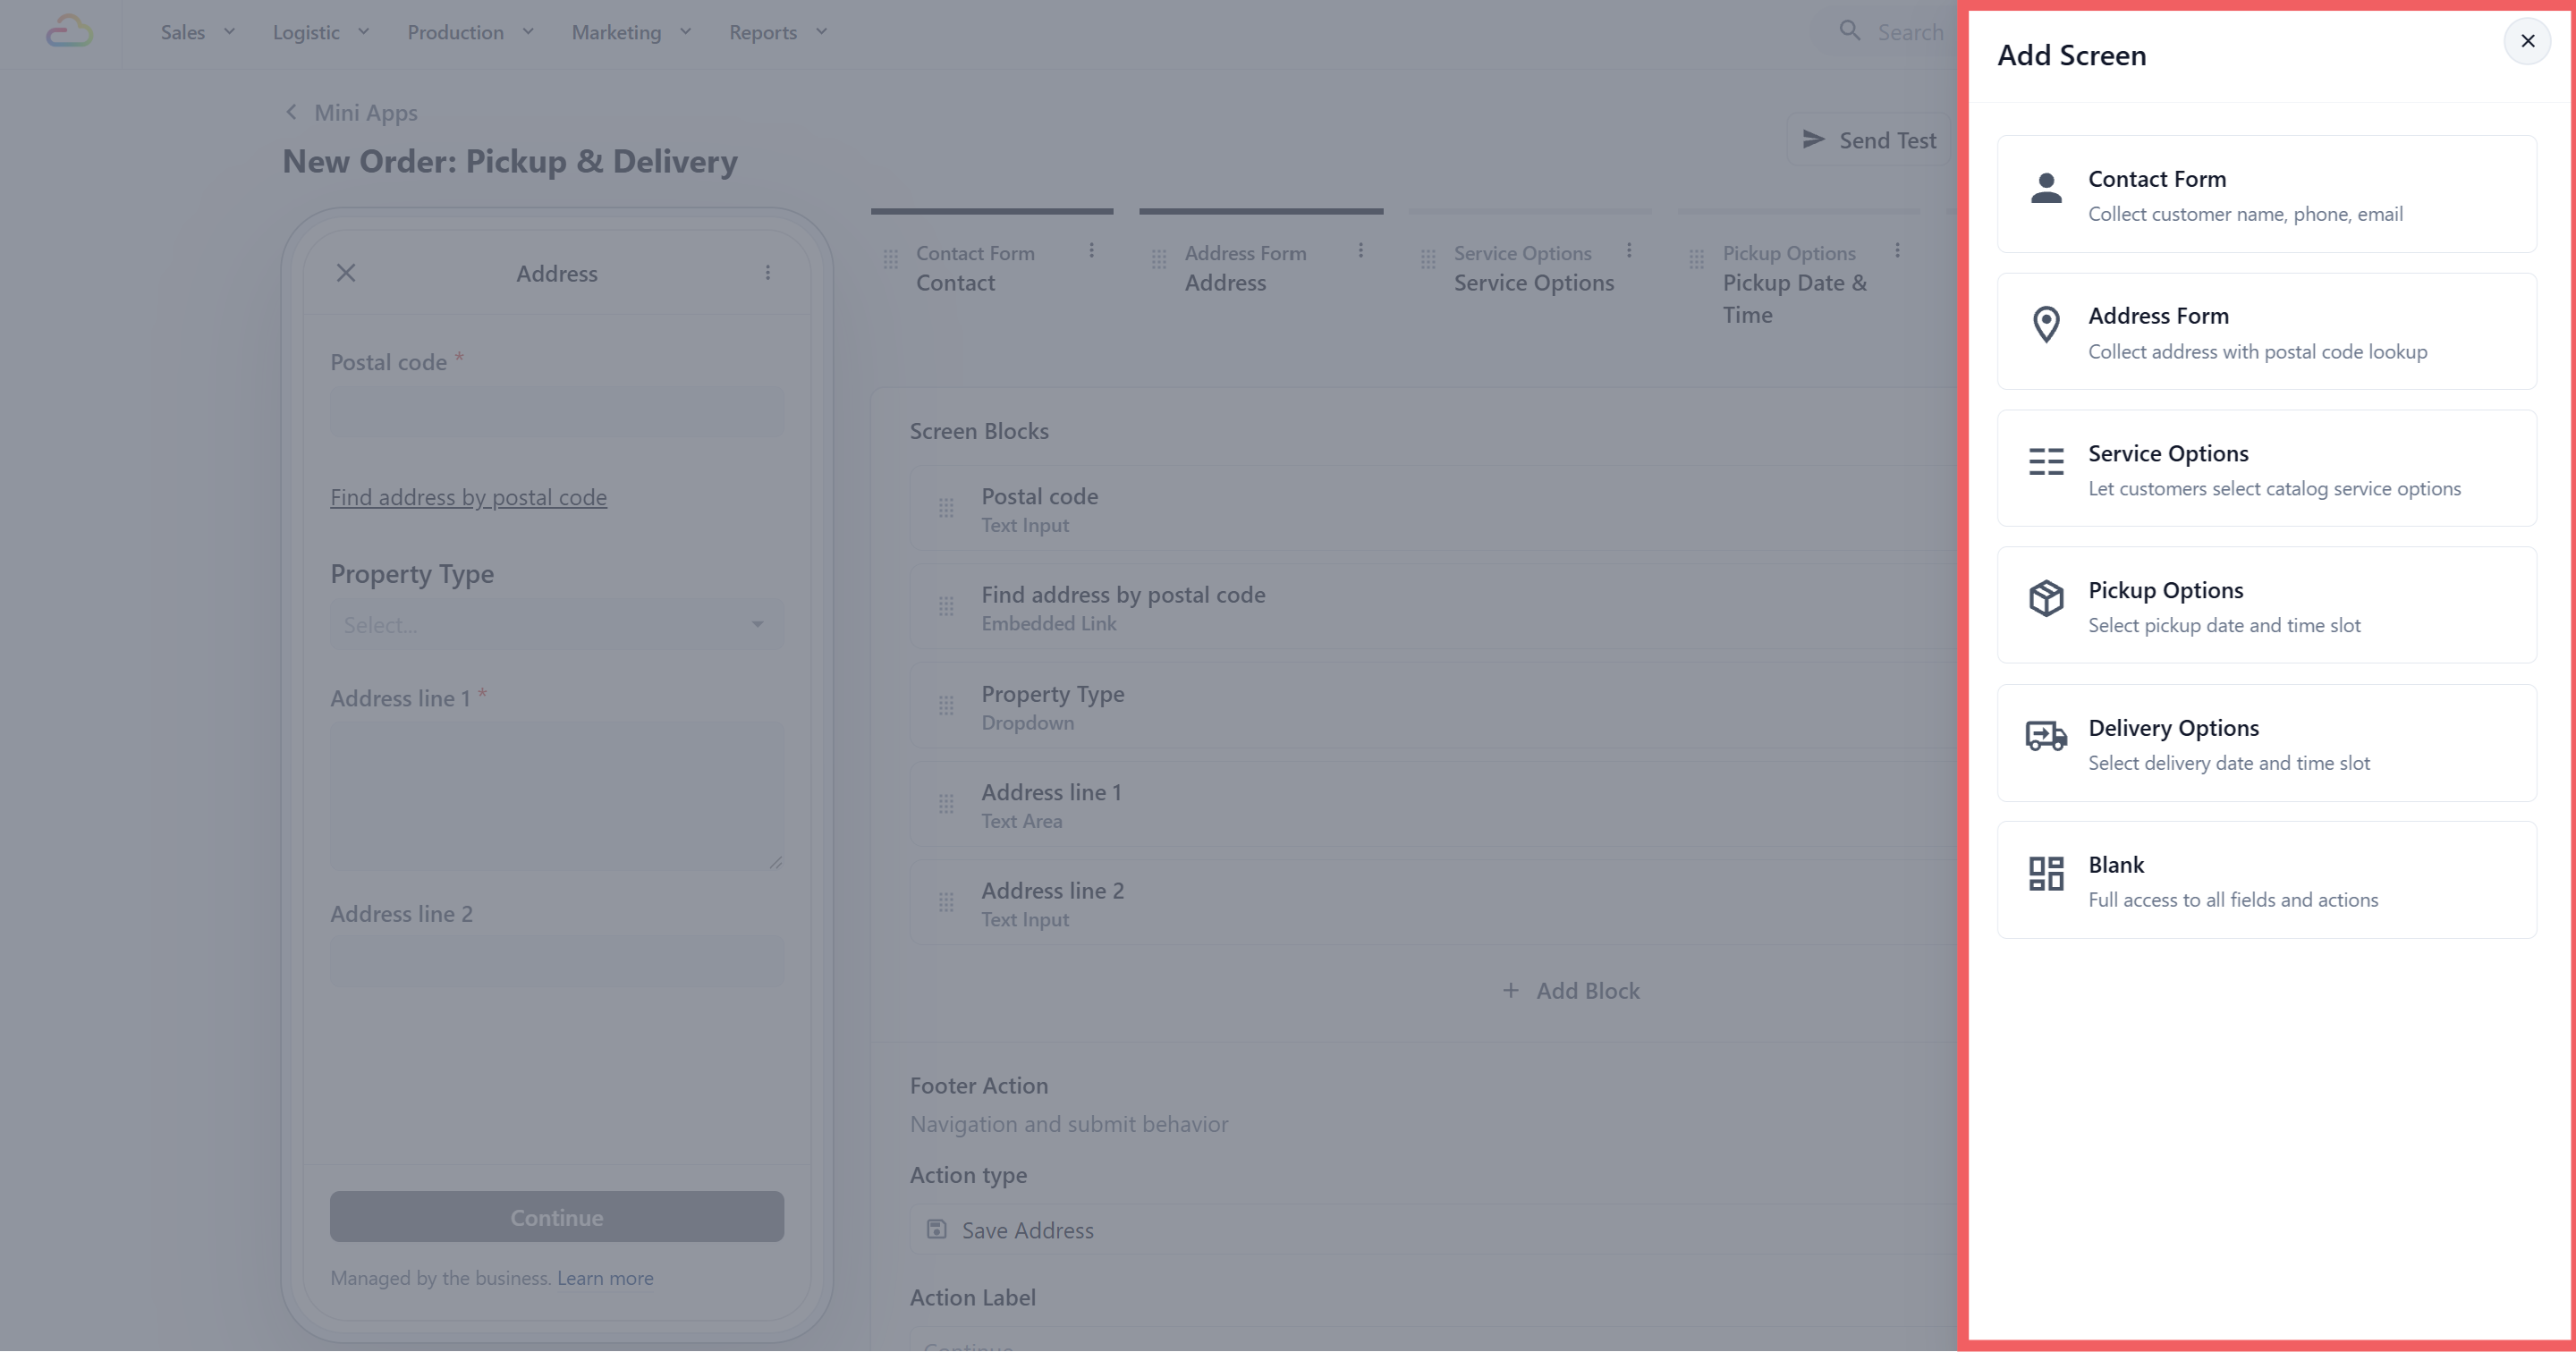
When you click +, you get six choices.
| Choose this | What it does | The screen is named |
|---|---|---|
| Contact Form | Collects customer name, phone number and email | Contact |
| Address Form | Collects the address, with postal code lookup | Address |
| Service Options | Lets the customer pick the services they want, priced from your catalog | Service Options |
| Pickup Options | Lets the customer pick a pickup date and time slot | Pickup Date & Time |
| Delivery Options | Lets the customer pick a delivery date and time slot | Delivery Date & Time |
| Blank | An empty screen you build yourself | Whatever you type |
Blocks
Inside every screen is a list of blocks. A block is one field or question the customer answers, for example their name or their phone number. Click the arrow icon ( ⌄ ) next to any block to open its settings.
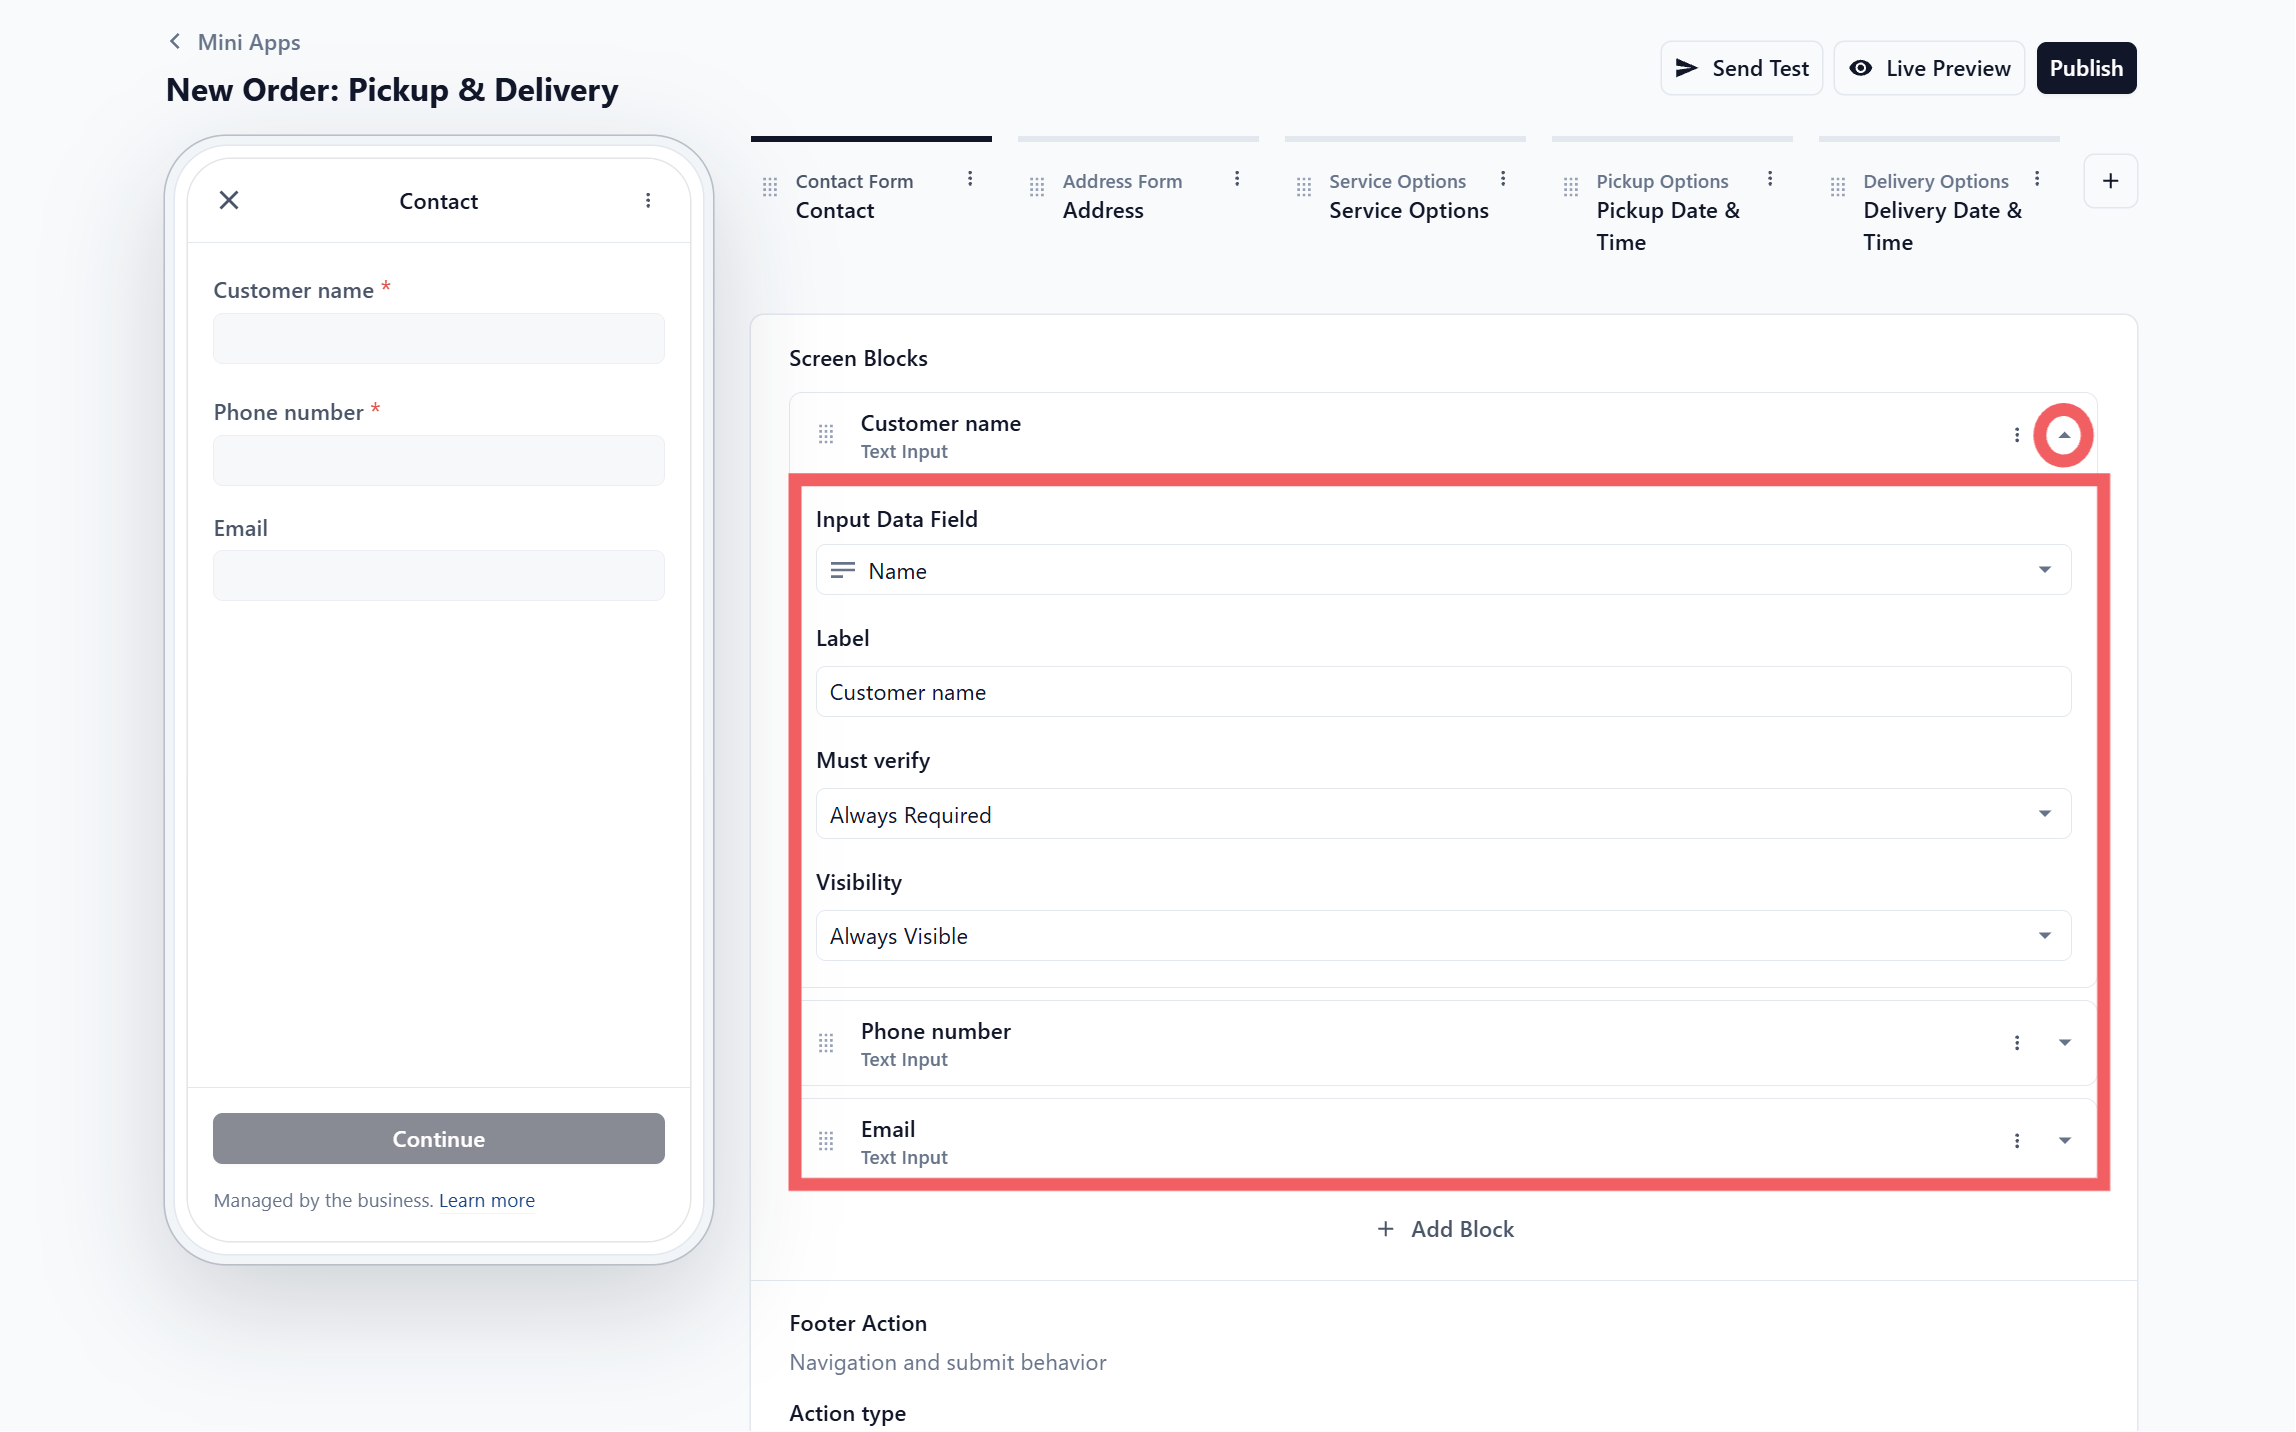
Input Data Field links the block to a field in EasyBiz, so the system knows where to save the answer. For example the Customer name block saves to the Name field on the customer profile. You create your own fields in Settings, Library section, Custom Fields.
Label is the text the customer reads on their phone. You can change it freely without affecting where the answer is saved.
Required
| Pick this | What happens |
|---|---|
| Always Required | The customer cannot continue until they answer |
| Not Required | The customer can skip it |
| Conditional | It is only required when a condition you set is true |
Visibility
| Pick this | What happens |
|---|---|
| Always Visible | Every customer sees this block |
| Conditional | The block only appears when a condition you set is true, for example show a unit number only when the customer picks HDB or Condo |
How Conditional Visibility Works
When you choose Conditional, set these three parts:
- When-> Choose the question or field that EasyBiz should check.
- Operator-> Choose how EasyBiz should check the answer.
- Value-> Choose the answer that makes the condition true.
| Operator | Simple meaning |
|---|---|
| Is | The answer must be exactly this value. |
| Is Not | The answer must not be this value. |
| Is Any of | The answer can match any one of the values you choose. |
| Has Any of | For a question that allows several answers, at least one selected answer must match. |
| Has Value | The customer has entered or selected an answer. |
| Is Empty | The customer has not entered or selected an answer. |
EasyBiz only shows the operators that work with the field you chose, so you may not see every option in this table.
Footer Actions
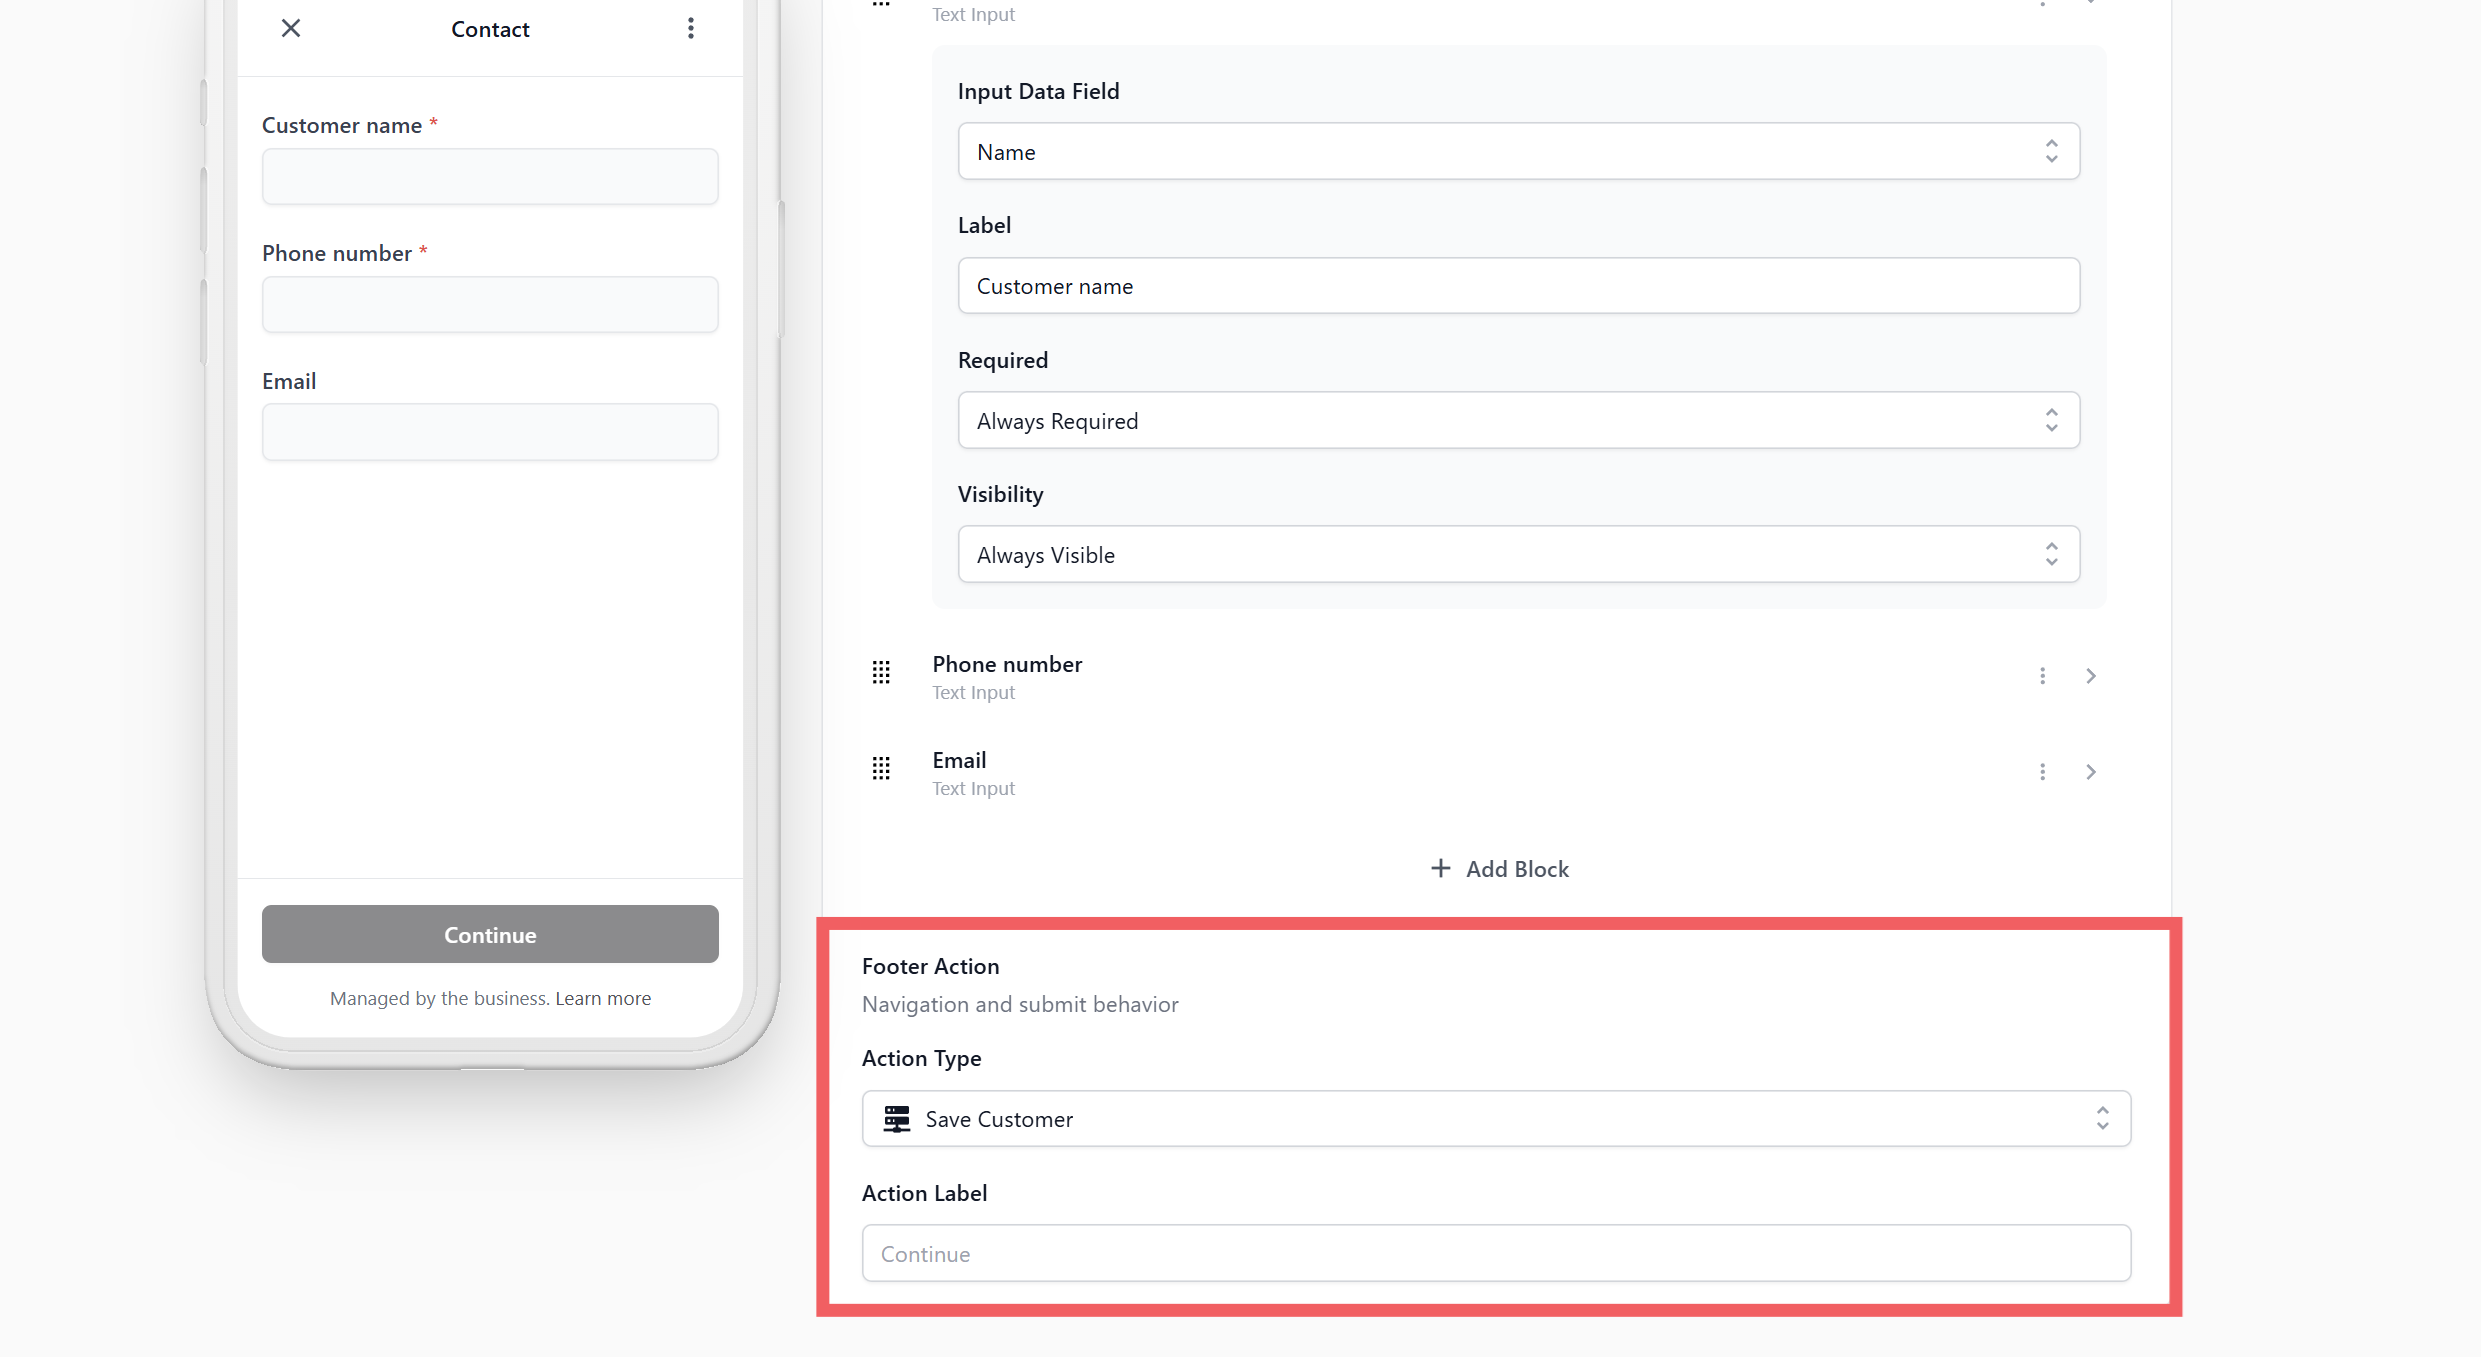
At the bottom of each screen is the Footer Action. This is the button your customer taps to move forward, and it decides what EasyBiz does at that moment.
It has two settings:
- Button Label is the wording your customer sees on the button, such as Continue, Book Pickup, or Confirm Reschedule.
- Action Type decides what EasyBiz actually does when they tap it.
Changing the Button Label only changes the words on the button. It does not change what the button does.
The Action Types
EasyBiz only offers the Action Types that make sense for the screen you are on, so you will not see every option on every screen.
| Action Type | What happens when the customer taps it | When to use it |
|---|---|---|
| Next | Moves to the following screen without saving anything | A middle screen that only needs to move the customer along. |
| Save Customer | Creates or updates the customer profile, then moves on | A Contact screen. |
| Save Address | Saves the address to that customer, then moves on | An Address screen, after the customer details have been saved. |
| Schedule Job | Books the pickup or delivery on an order that already exists, then closes the form | The last screen of a Schedule Delivery or Reschedule Mini App. |
| Create Order | Creates a new order in EasyBiz and closes the form | The last screen of a New Order Mini App. |
| Fetch Booking Options | Reloads the available dates and time slots without leaving the screen | Rarely needed here — the Refresh link already on the date screens does this for you. |
| Complete Flow | Closes the form without saving anything | A thank you or information screen at the very end. |
| Go Back | Sends the customer to the previous screen | When you want to give them an extra way back. |
What Each Screen Offers
| Screen | Action Types you can choose |
|---|---|
| Contact | Next, Complete Flow, Save Customer |
| Address | Next, Complete Flow, Save Address |
| Service Options | Next, Complete Flow, Create Order |
| Pickup Date & Time | Next, Complete Flow, Fetch Booking Options, Schedule Job, Create Order |
| Delivery Date & Time | Next, Complete Flow, Fetch Booking Options, Schedule Job, Create Order |
| Blank | Every Action Type, including some advanced ones most shops never need |
Publish and Test
- Click the black Publish button at the top right of the editor.
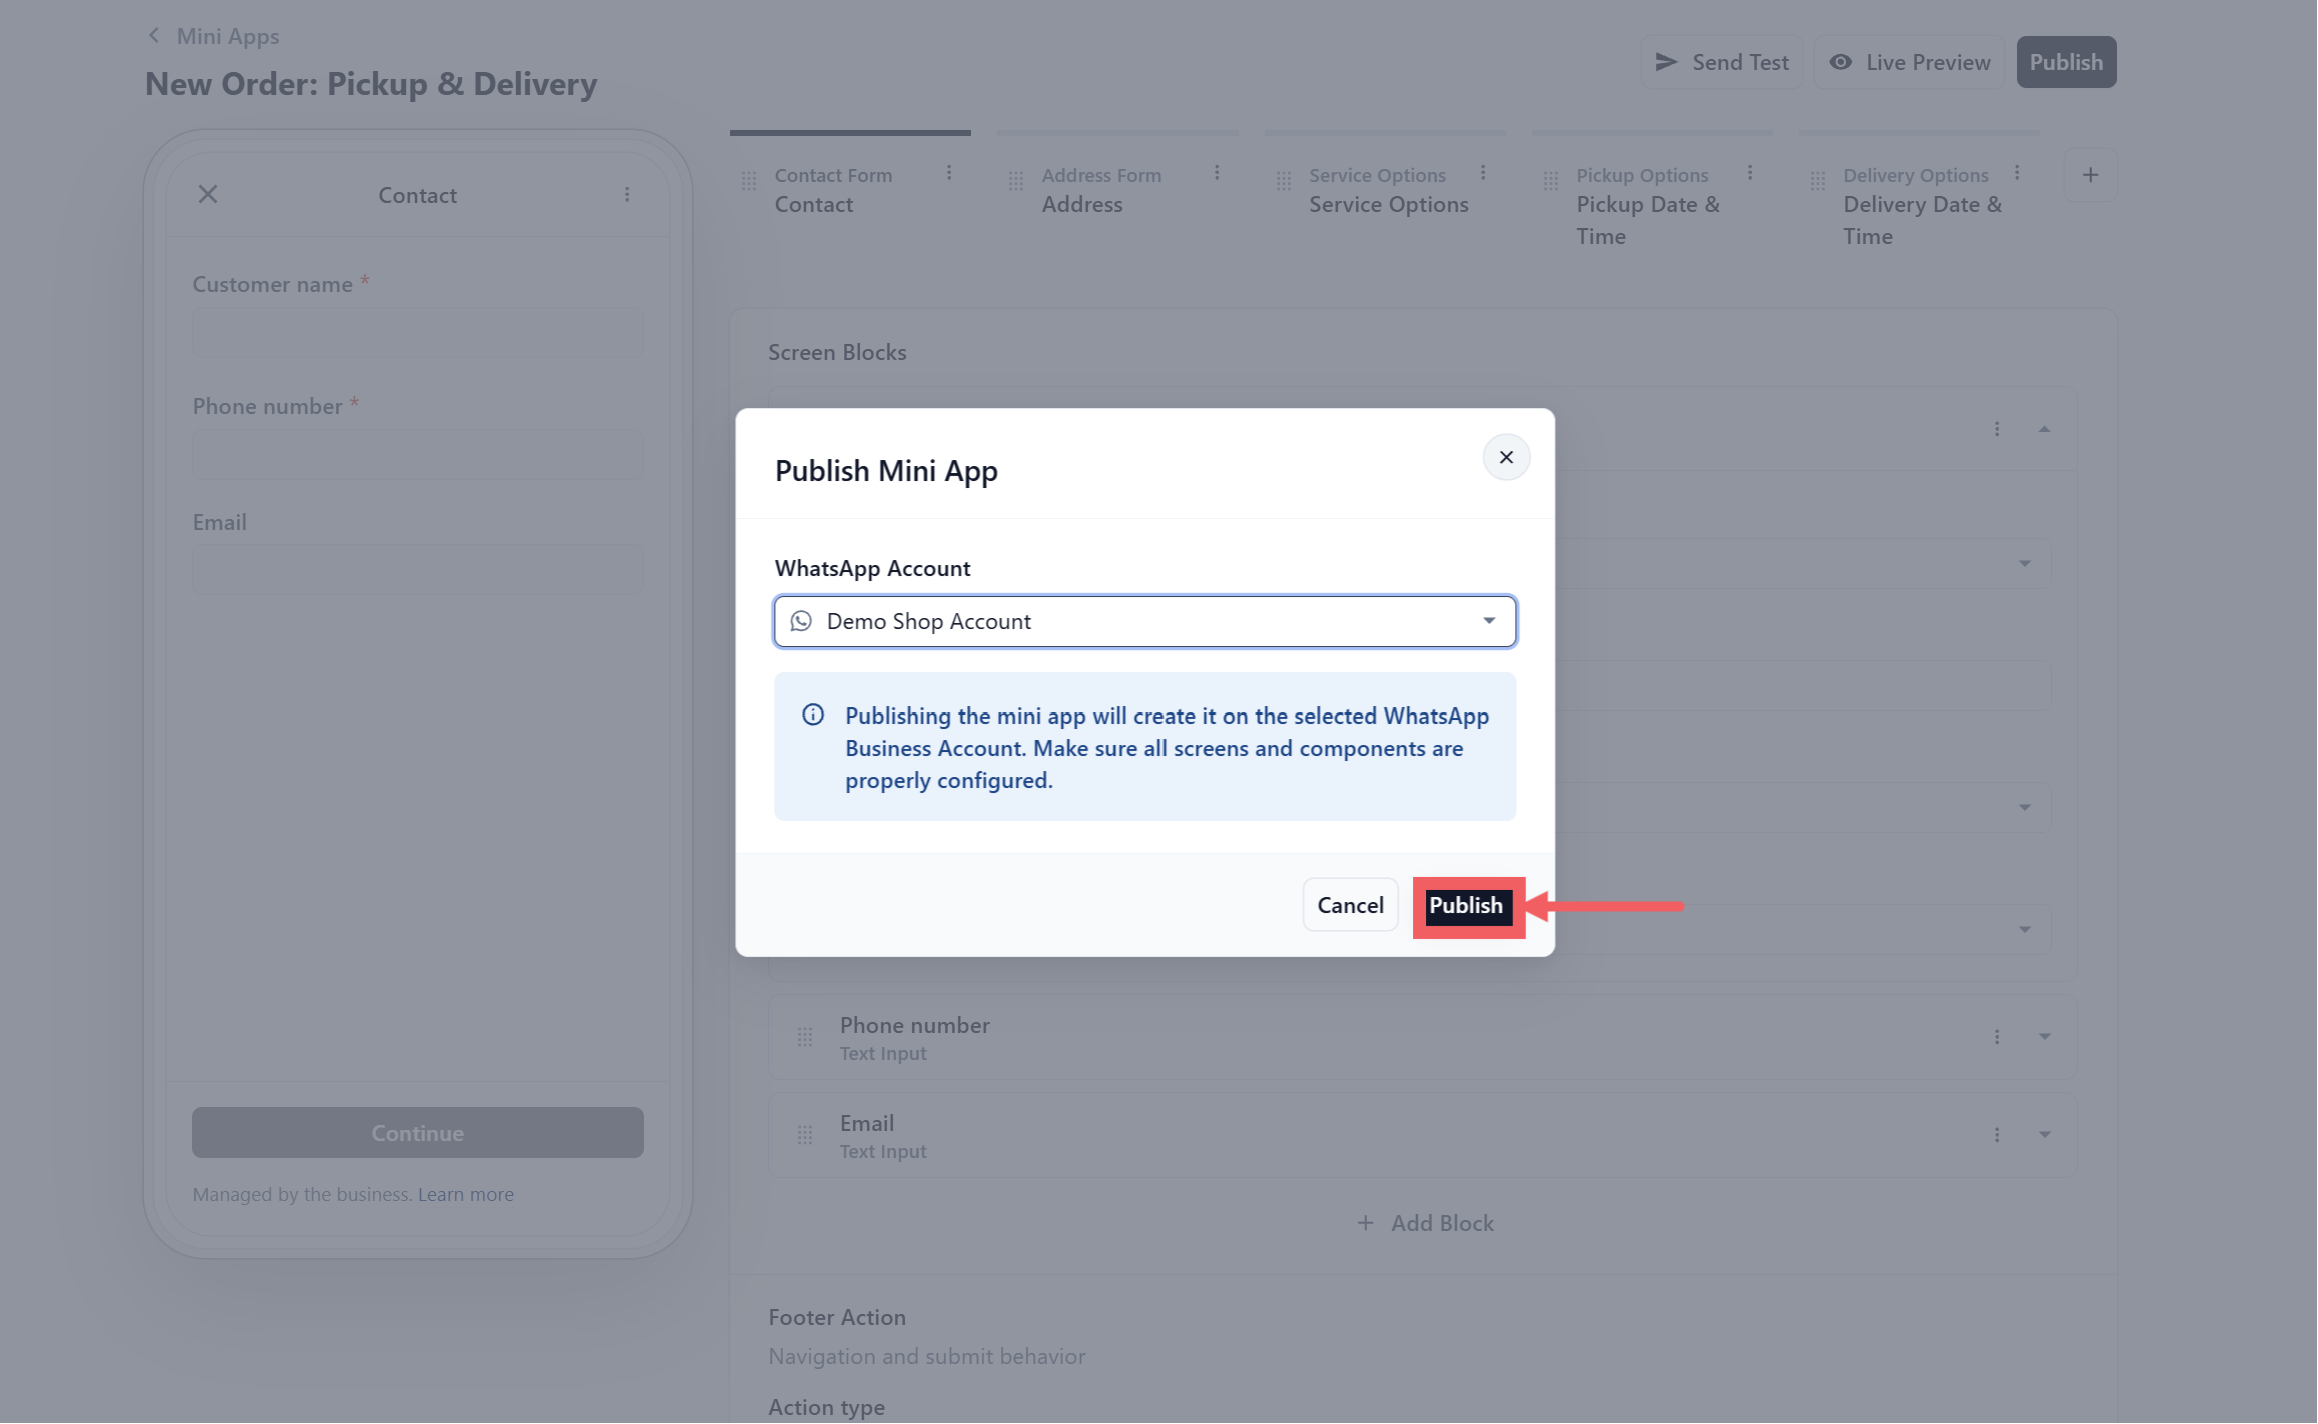
- Check that the correct WhatsApp Business Account is selected, then click Publish again to confirm.
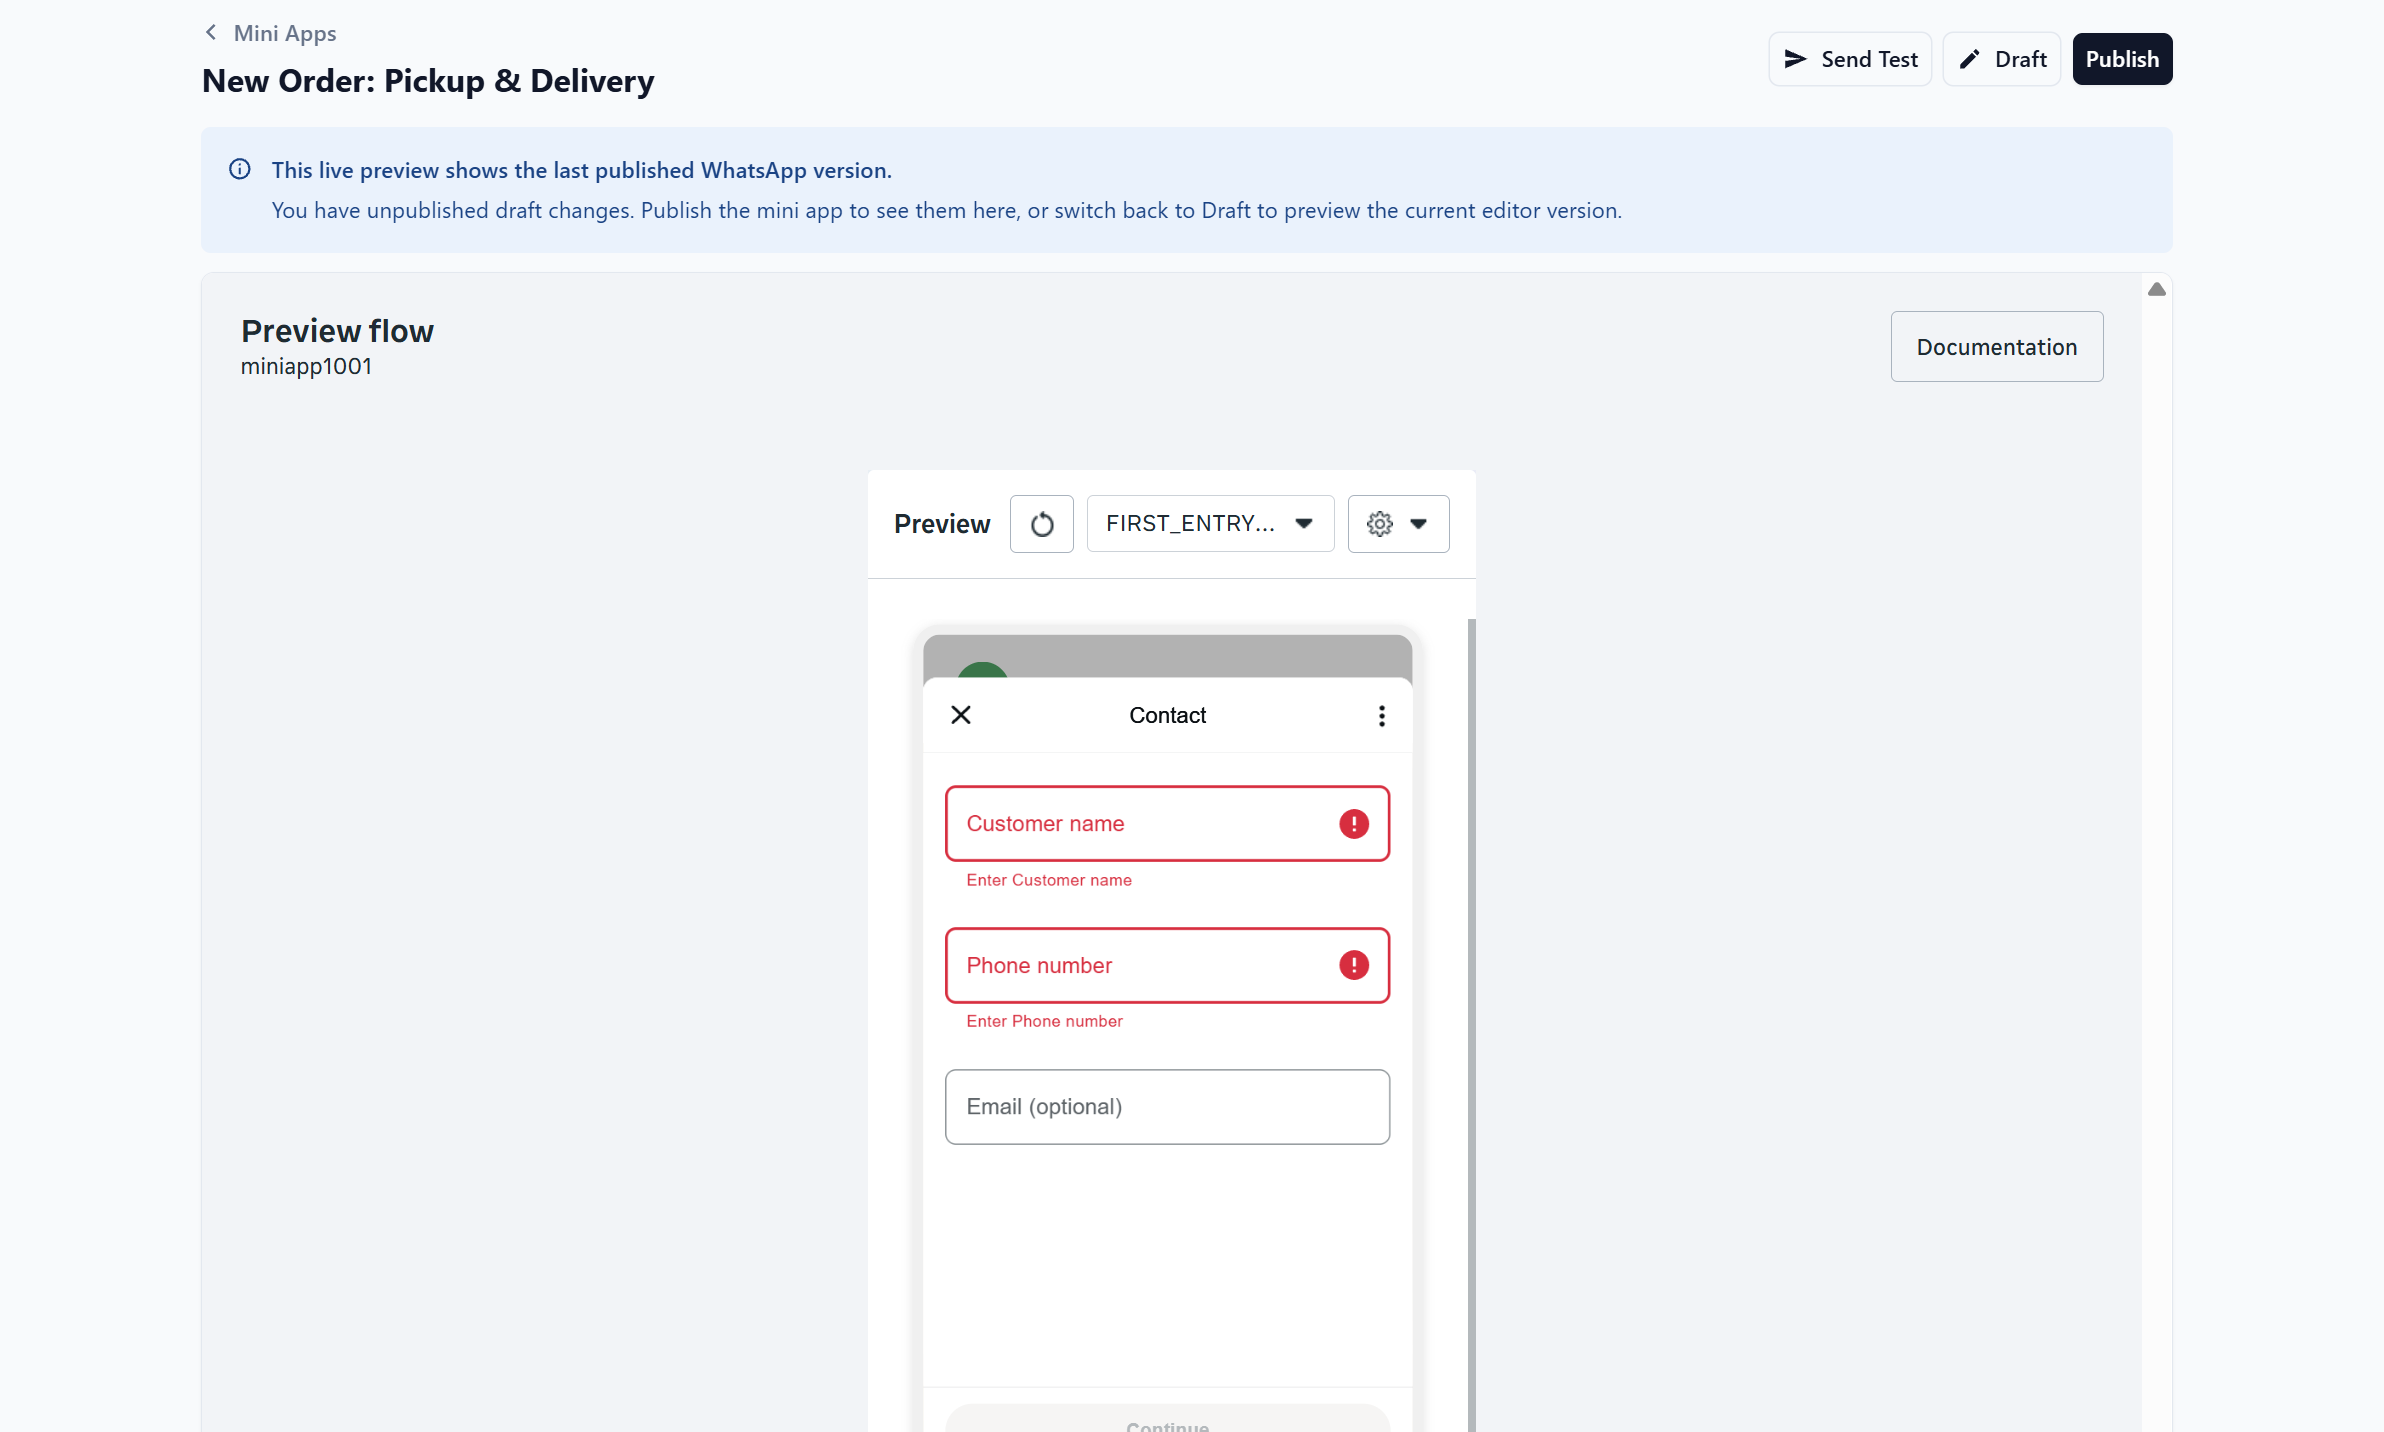
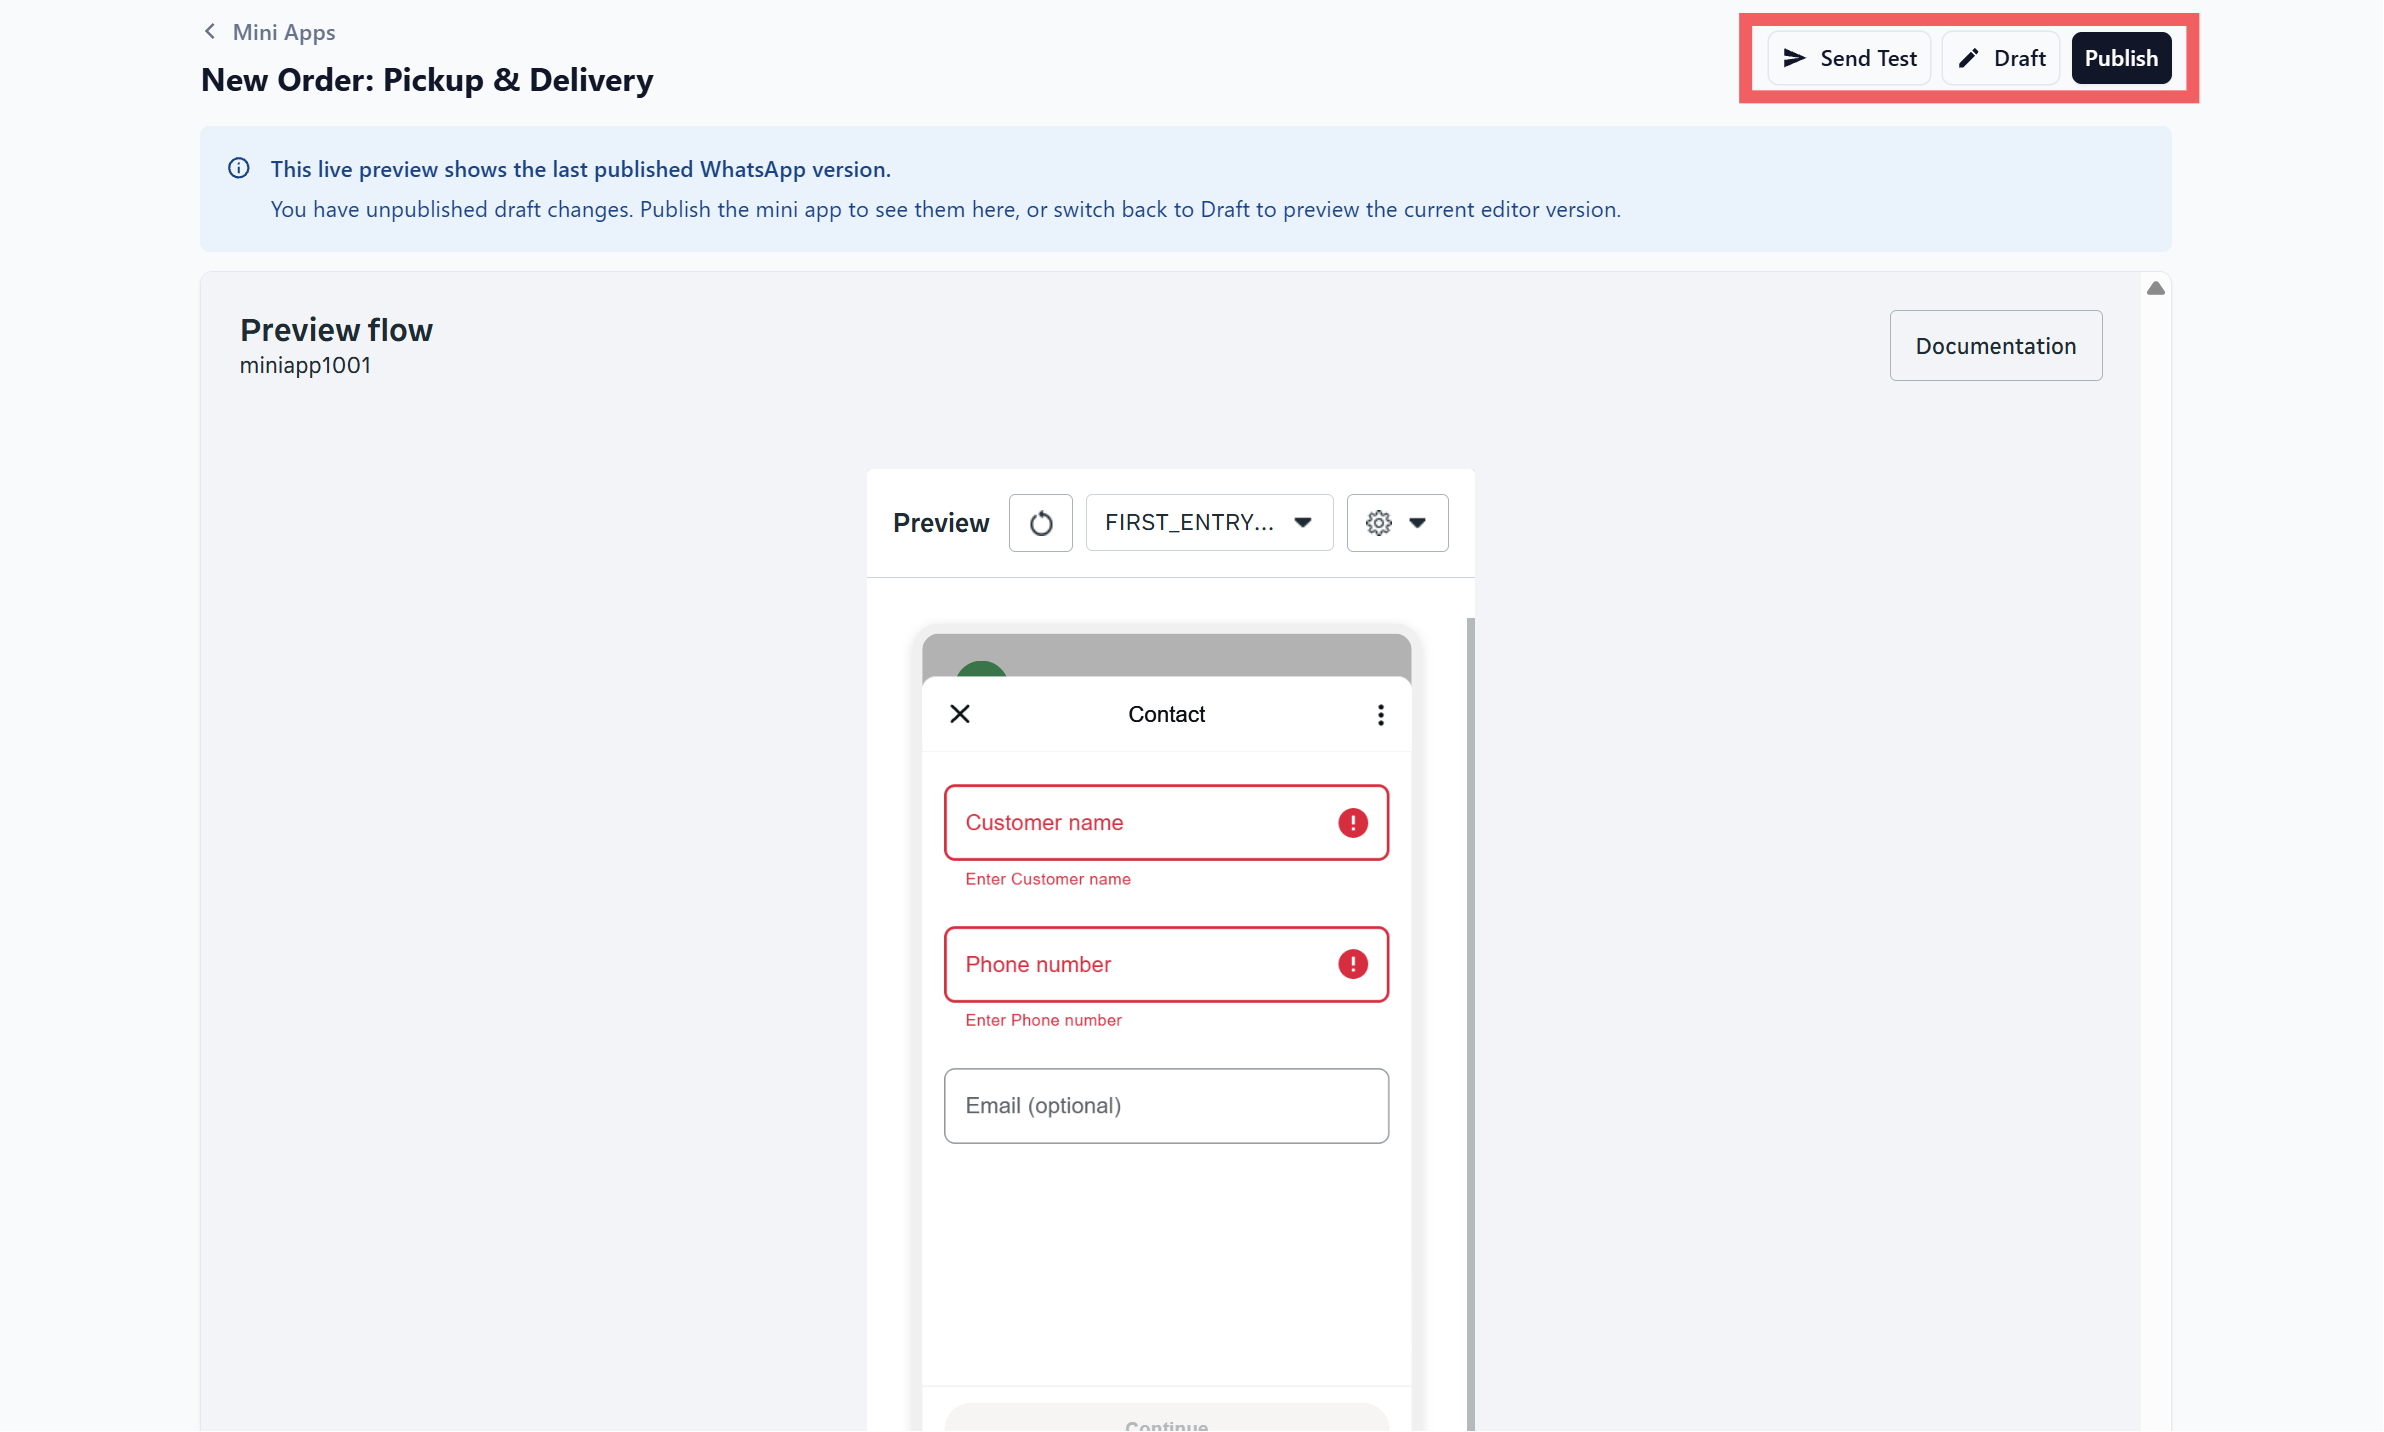
- You are taken to the Live Preview screen, where you have three options.
| Button | What it does |
|---|---|
| Send Test | Sends the form to a phone number you choose, so you can fill it in like a real customer |
| Draft | Takes the Mini App back to editing mode |
| Publish | Makes the Mini App live and ready to send to customers |
FAQs
Do I need to publish again every time I make a small change?
Yes. Your edits stay in draft until you publish. Customers keep seeing the last published version until then.
If I put a Mini App back to Draft, do customers who already have it lose it?
No. Draft takes you back to editing mode. Customers continue using the last published version until you publish your new changes.
Why can I not drag or delete the block on a Service Options screen?
That block is built into the screen and is managed by EasyBiz. You can still reorder and choose which individual service options appear inside it.
Can I change what a Footer Action does?
Yes, but only to the actions allowed on that screen type. A Contact screen will not offer Create Order, for example.
What is the difference between Required and Visibility?
Visibility decides whether the customer sees the question at all. Required decides whether they can continue without answering it. A hidden question is never required.
I created a custom field but it does not appear in the Input Data Field list. Why?
Custom fields only appear on Blank screens and on blocks that accept them. Contact, Address, Pickup Options and Delivery Options screens are limited to their own built in fields.
Where do I create a new field to save an answer into?
Go to Settings, Library section, Custom Fields. Custom Fields used to sit under a different section, so older notes may point you to the wrong place.
Can two Mini Apps use the same custom field?
Yes. A custom field is created once and can be used in as many Mini Apps and screens as you like.
Does the phone preview show real prices and time slots?
The preview shows the layout, not live data. Use Send Test after publishing to see real dates, time slots and prices.
What's Next
Now that you know how the editor works, pick your template and follow the setup guide, starting with Setting Up a New Order: Pickup & Delivery Mini App.