
Before you start
- You need the Professional plan. See Understanding Your Subscription and Billing.
- You need a published Online Store. Item pages show on your Online Store only, not in the Mobile App. See Edit, Preview and Publish Your Online Store.
- The business unit must make work orders. A work order is the job card your team works through for one item, task by task. See Configuring Work Orders.
- This is for business units where customers bring the same item back for care, such as bag repair, shoe care or leather care. A laundry unit that cleans everyday clothes doesn't need it.
Choose your setup
| Level | Fits shops like | What you set up | Read these sections |
|---|---|---|---|
| Easy | One bag repair shop that wants to send each customer a link to follow their bag | Save customer items, switch on the Item page, publish. Staff share the link from the order page. Customers see Received and Ready | Step 1: Save your customers' items, Step 2: Switch on the Item page, Step 3: Publish your store, What staff do on each visit |
| Intermediate | A shop that shows customers each step, with before and after photos and a note | Everything in Easy, plus the steps and item details each unit shows, and photos and notes on each visit | Choose what each business unit's items show, Choose what this visit shows |
| Advanced | A shop that wants customers to come back on time, with a QR on every item | Everything in Intermediate, plus aftercare and next care on your service options, Remind me, and the QR on your labels | Add aftercare and next care to your service options, Print the QR on the item's label, How Remind me works |
With the Easy setup alone, every item gets its page and QR, and customers see where it is. You can add steps, photos, aftercare and reminders later.
Where it works
- Console and POS: staff open the item's page from the work order on the order page, and share its link or QR. Saved items show first in the catalog when staff take an order for that customer.
- Labels and work order slips: the item's QR can print on them.
- Online Store: customers open the item's page from the link or QR, or from View beside the item on their order page.
- Email and app notifications: a customer who taps Remind me gets an email when the item is due for care, and a notification if they have your Mobile App.
Why set it up
Bag and shoe customers often message to ask "Is my bag ready?" or "What did you do to it?". With an item page, they open the link and see it for themselves. Every visit stays on the same page, with your team's photos and notes, so the customer sees the care you have given the item over time. Next care and Remind me bring them back when the item is due, without your staff chasing them.
If you skip it, nothing changes for your shop: orders and work orders work as before, and customers follow their order on the order page only.
Step 1: Save your customers' items
Saving customer items gives each item a customer brings in, such as a handbag, its own record under the customer's account, with its photo and details. That record is what gets the page.
- Click the ⚙️ Settings icon in the top-right corner.
- Under the Company & business structure section, click Business Units.
- Open the business unit, for example Bag Repair.
- Click the Production tab and find Work Orders.
- Check that Create a work order for each service item is on. Save customer items shows only when it is.
- Turn on Save customer items.
- Click Save. You see "Work order settings updated".
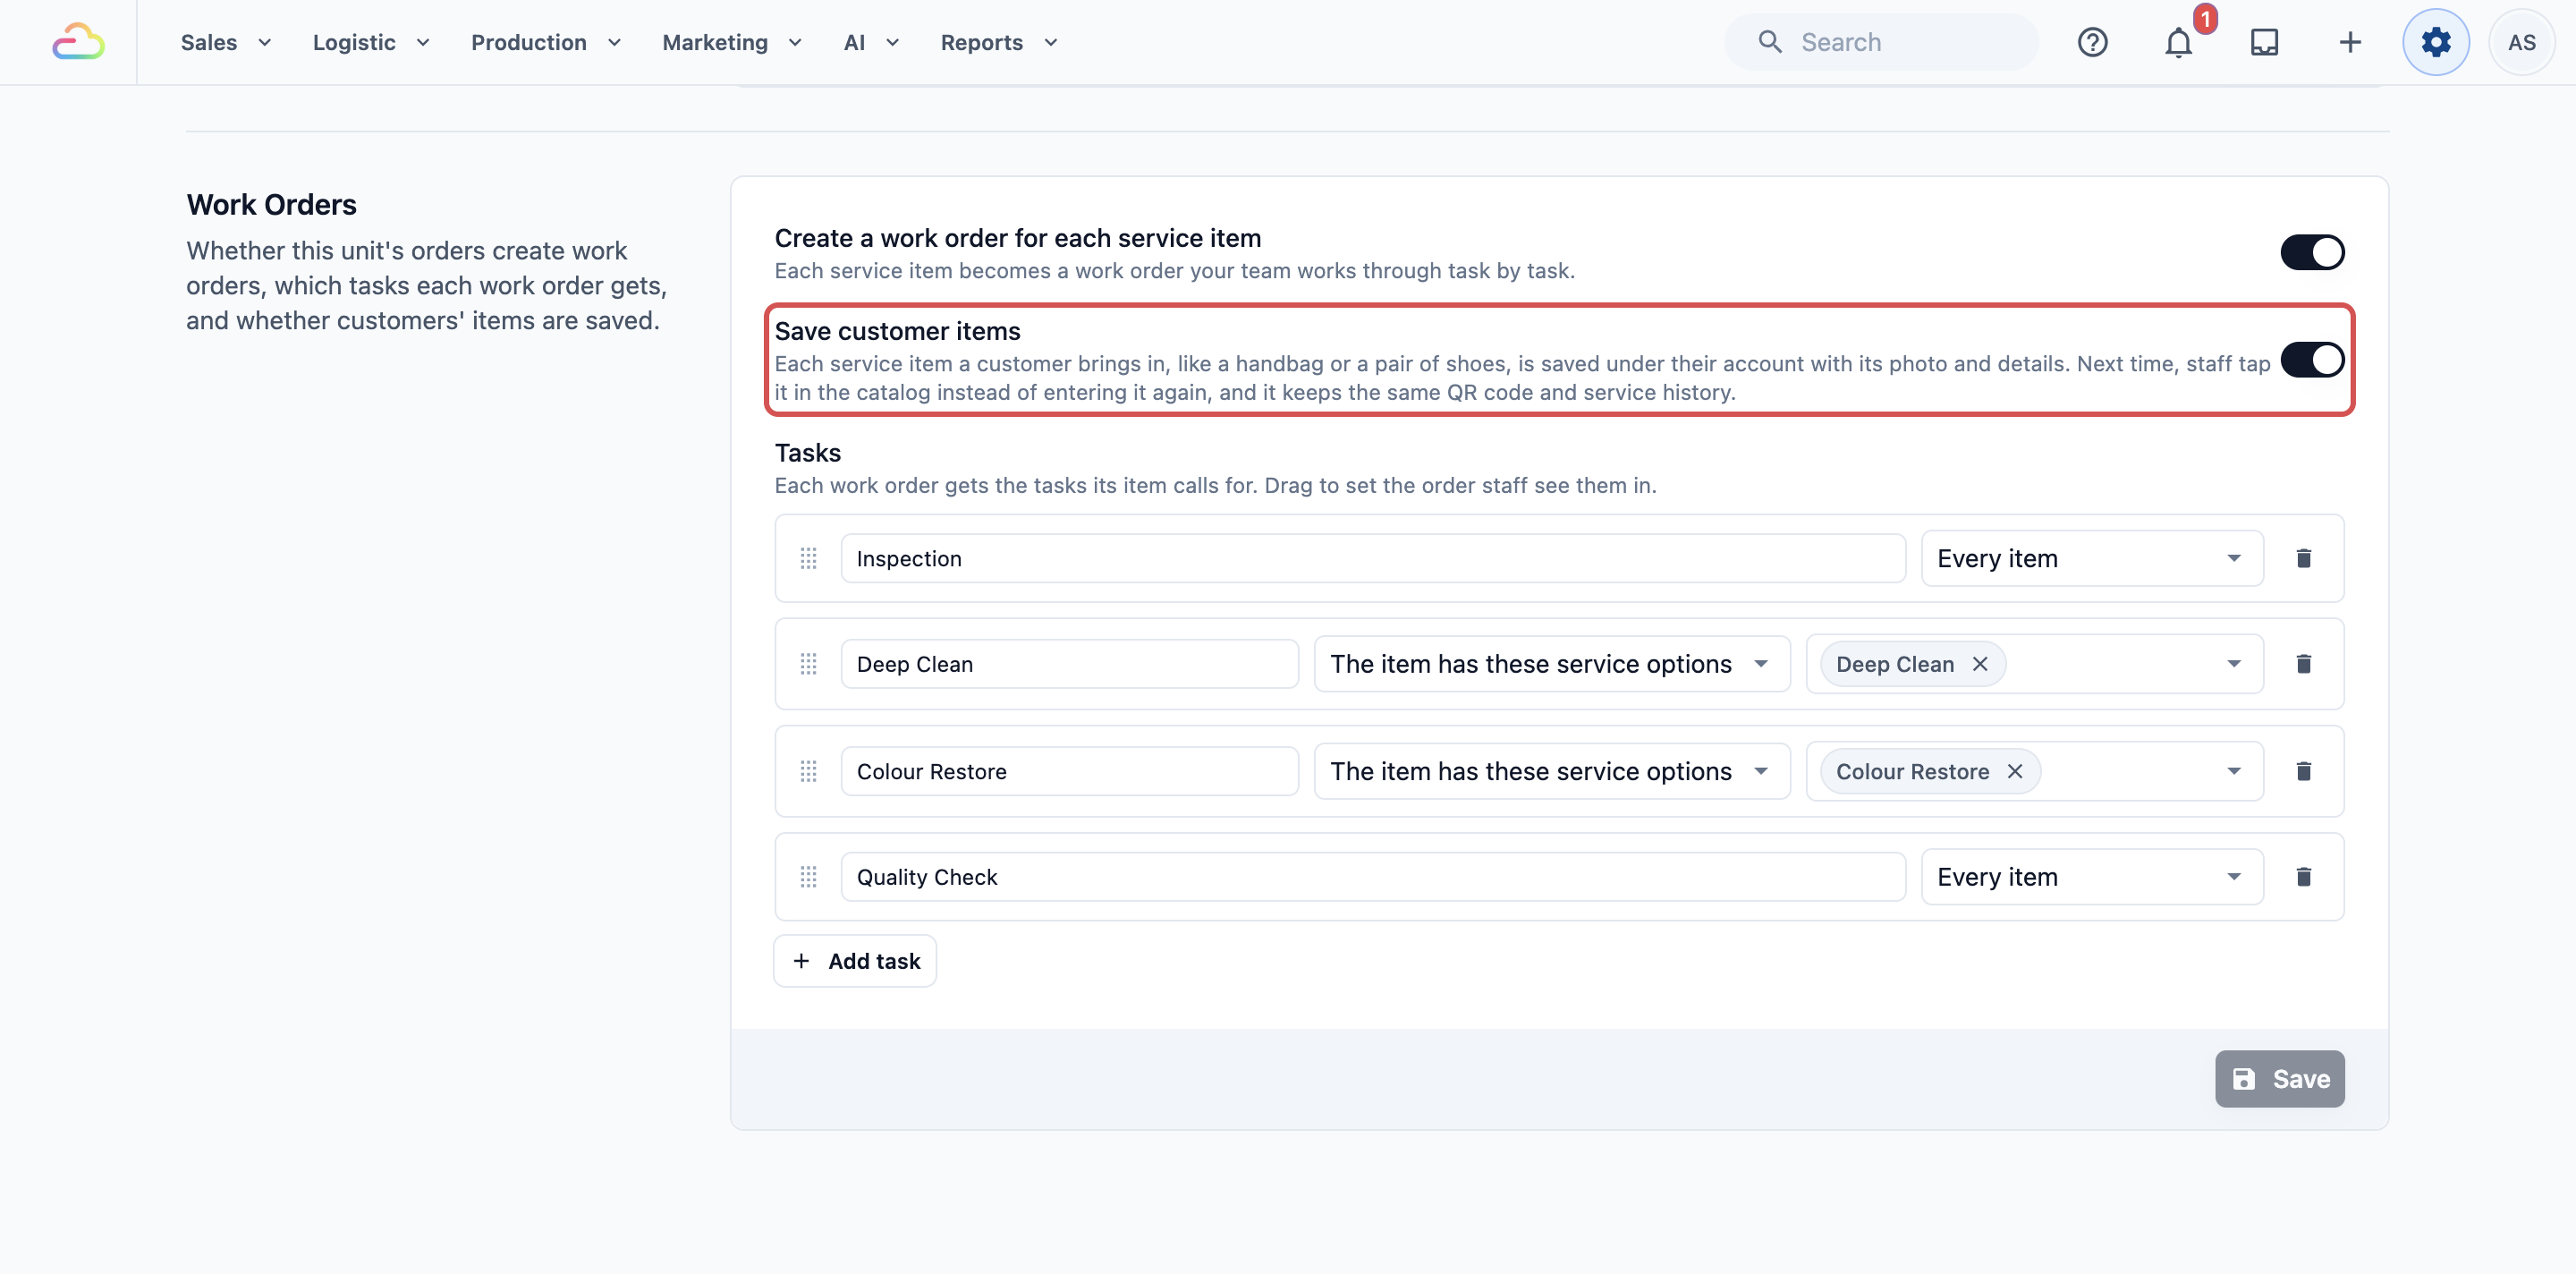
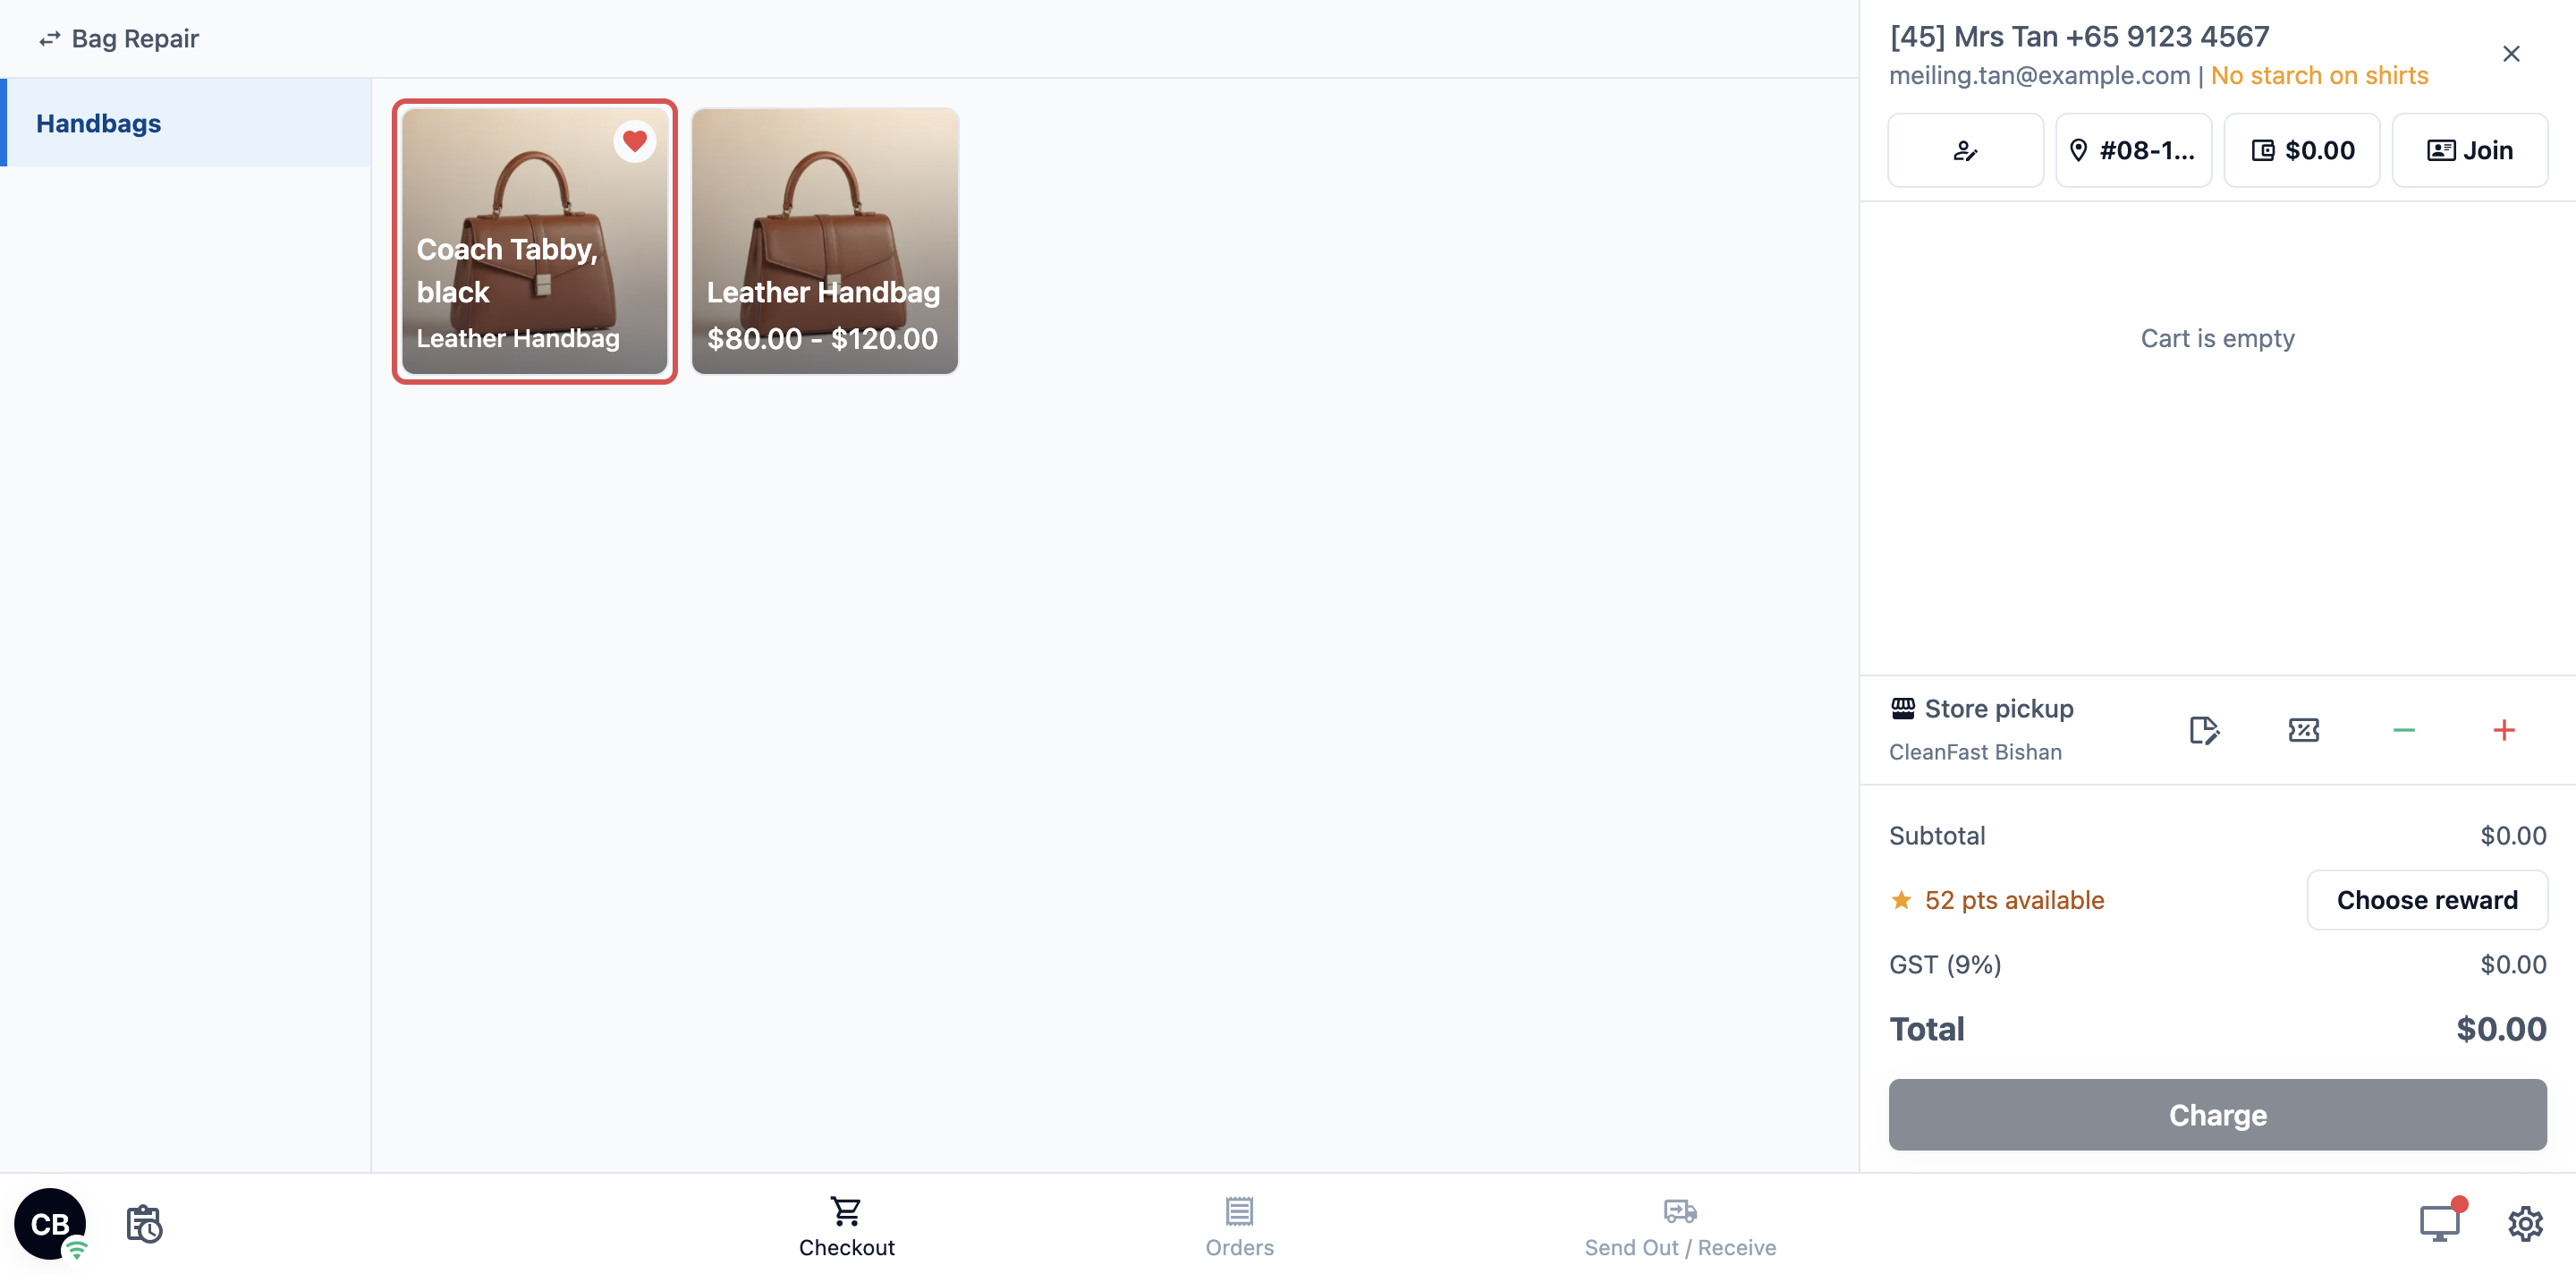
If you turn this on, each new work order in this unit for an order with a customer becomes a visit of that customer's item. Next time the customer comes in, staff pick the customer, and their saved items show first in the catalog in the POS and Console, each with its photo and a red heart. Staff tap the item instead of entering it again, and it keeps the same QR and service history.
Turn it on for each business unit that needs it. Your Laundry unit can stay off while Bag Repair is on.
Step 2: Switch on the Item page
- Click the ⚙️ Settings icon in the top-right corner.
- Under the Sales channels section, click Online Store & Mobile App.
- On the store card, click Edit Online Store & Mobile App. With only one product on, it says Edit Online Store.
- Under Pages, click Item page. It shows Hidden while it is off, and Web only because it is on your Online Store only.
- Turn on Give each item a page.
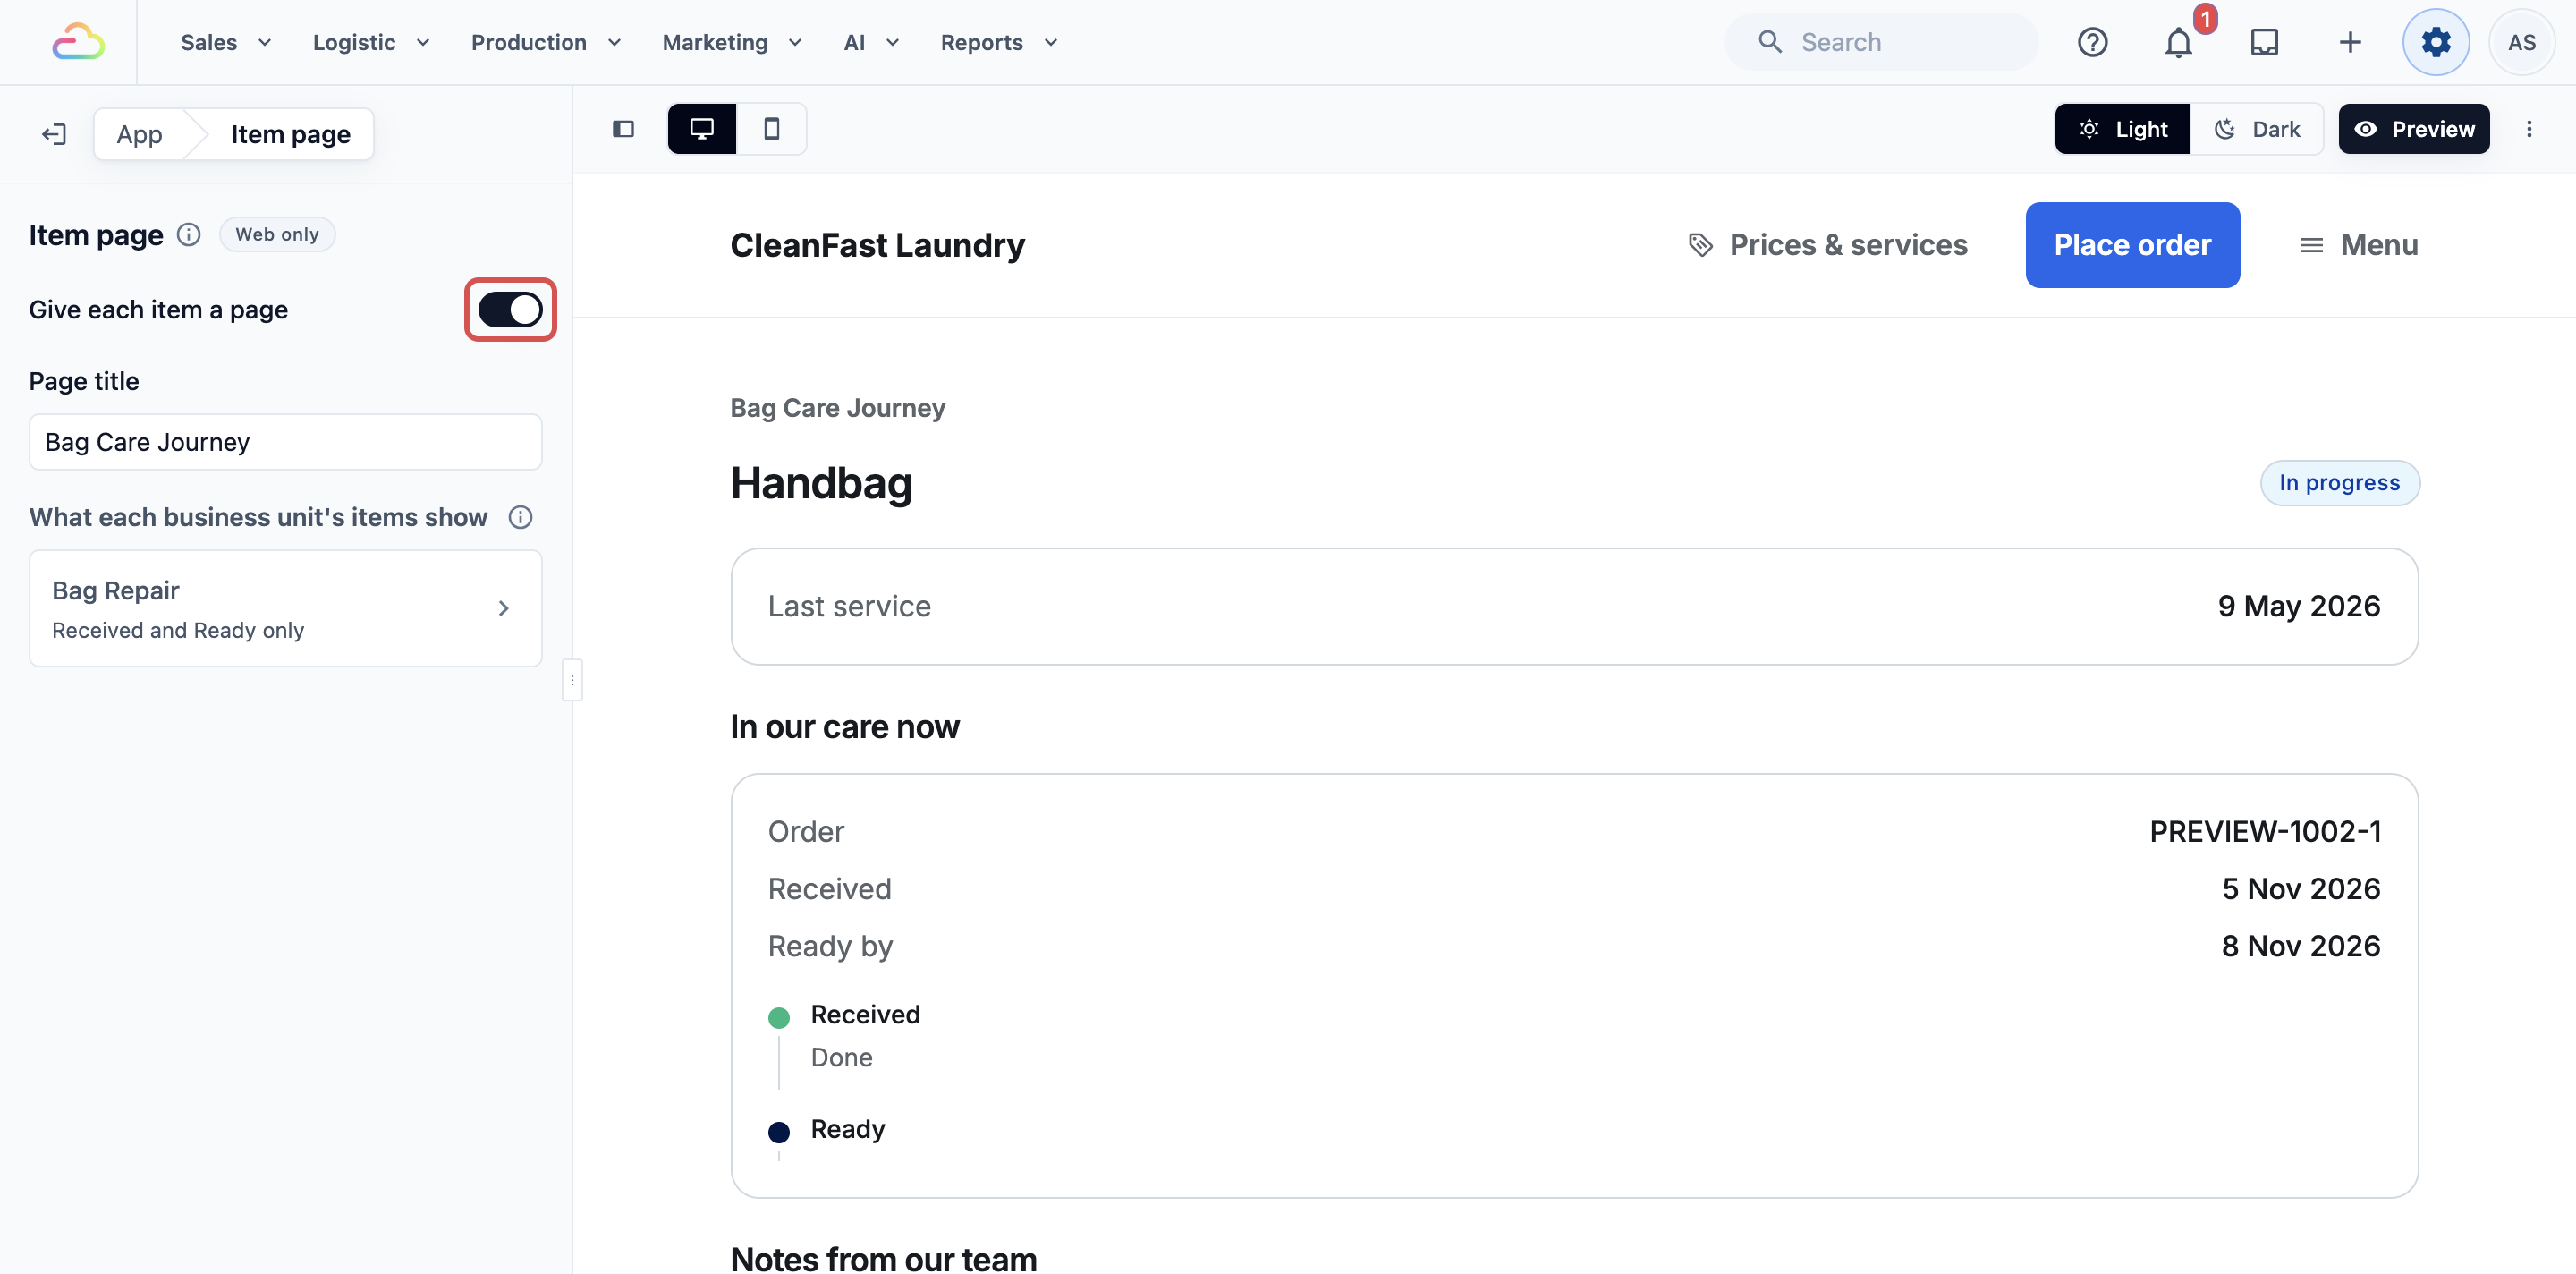
Page title (optional): the line shown above the item's name, up to 60 characters. For example, Bag Care Journey. Leave it empty to show the item's name only.
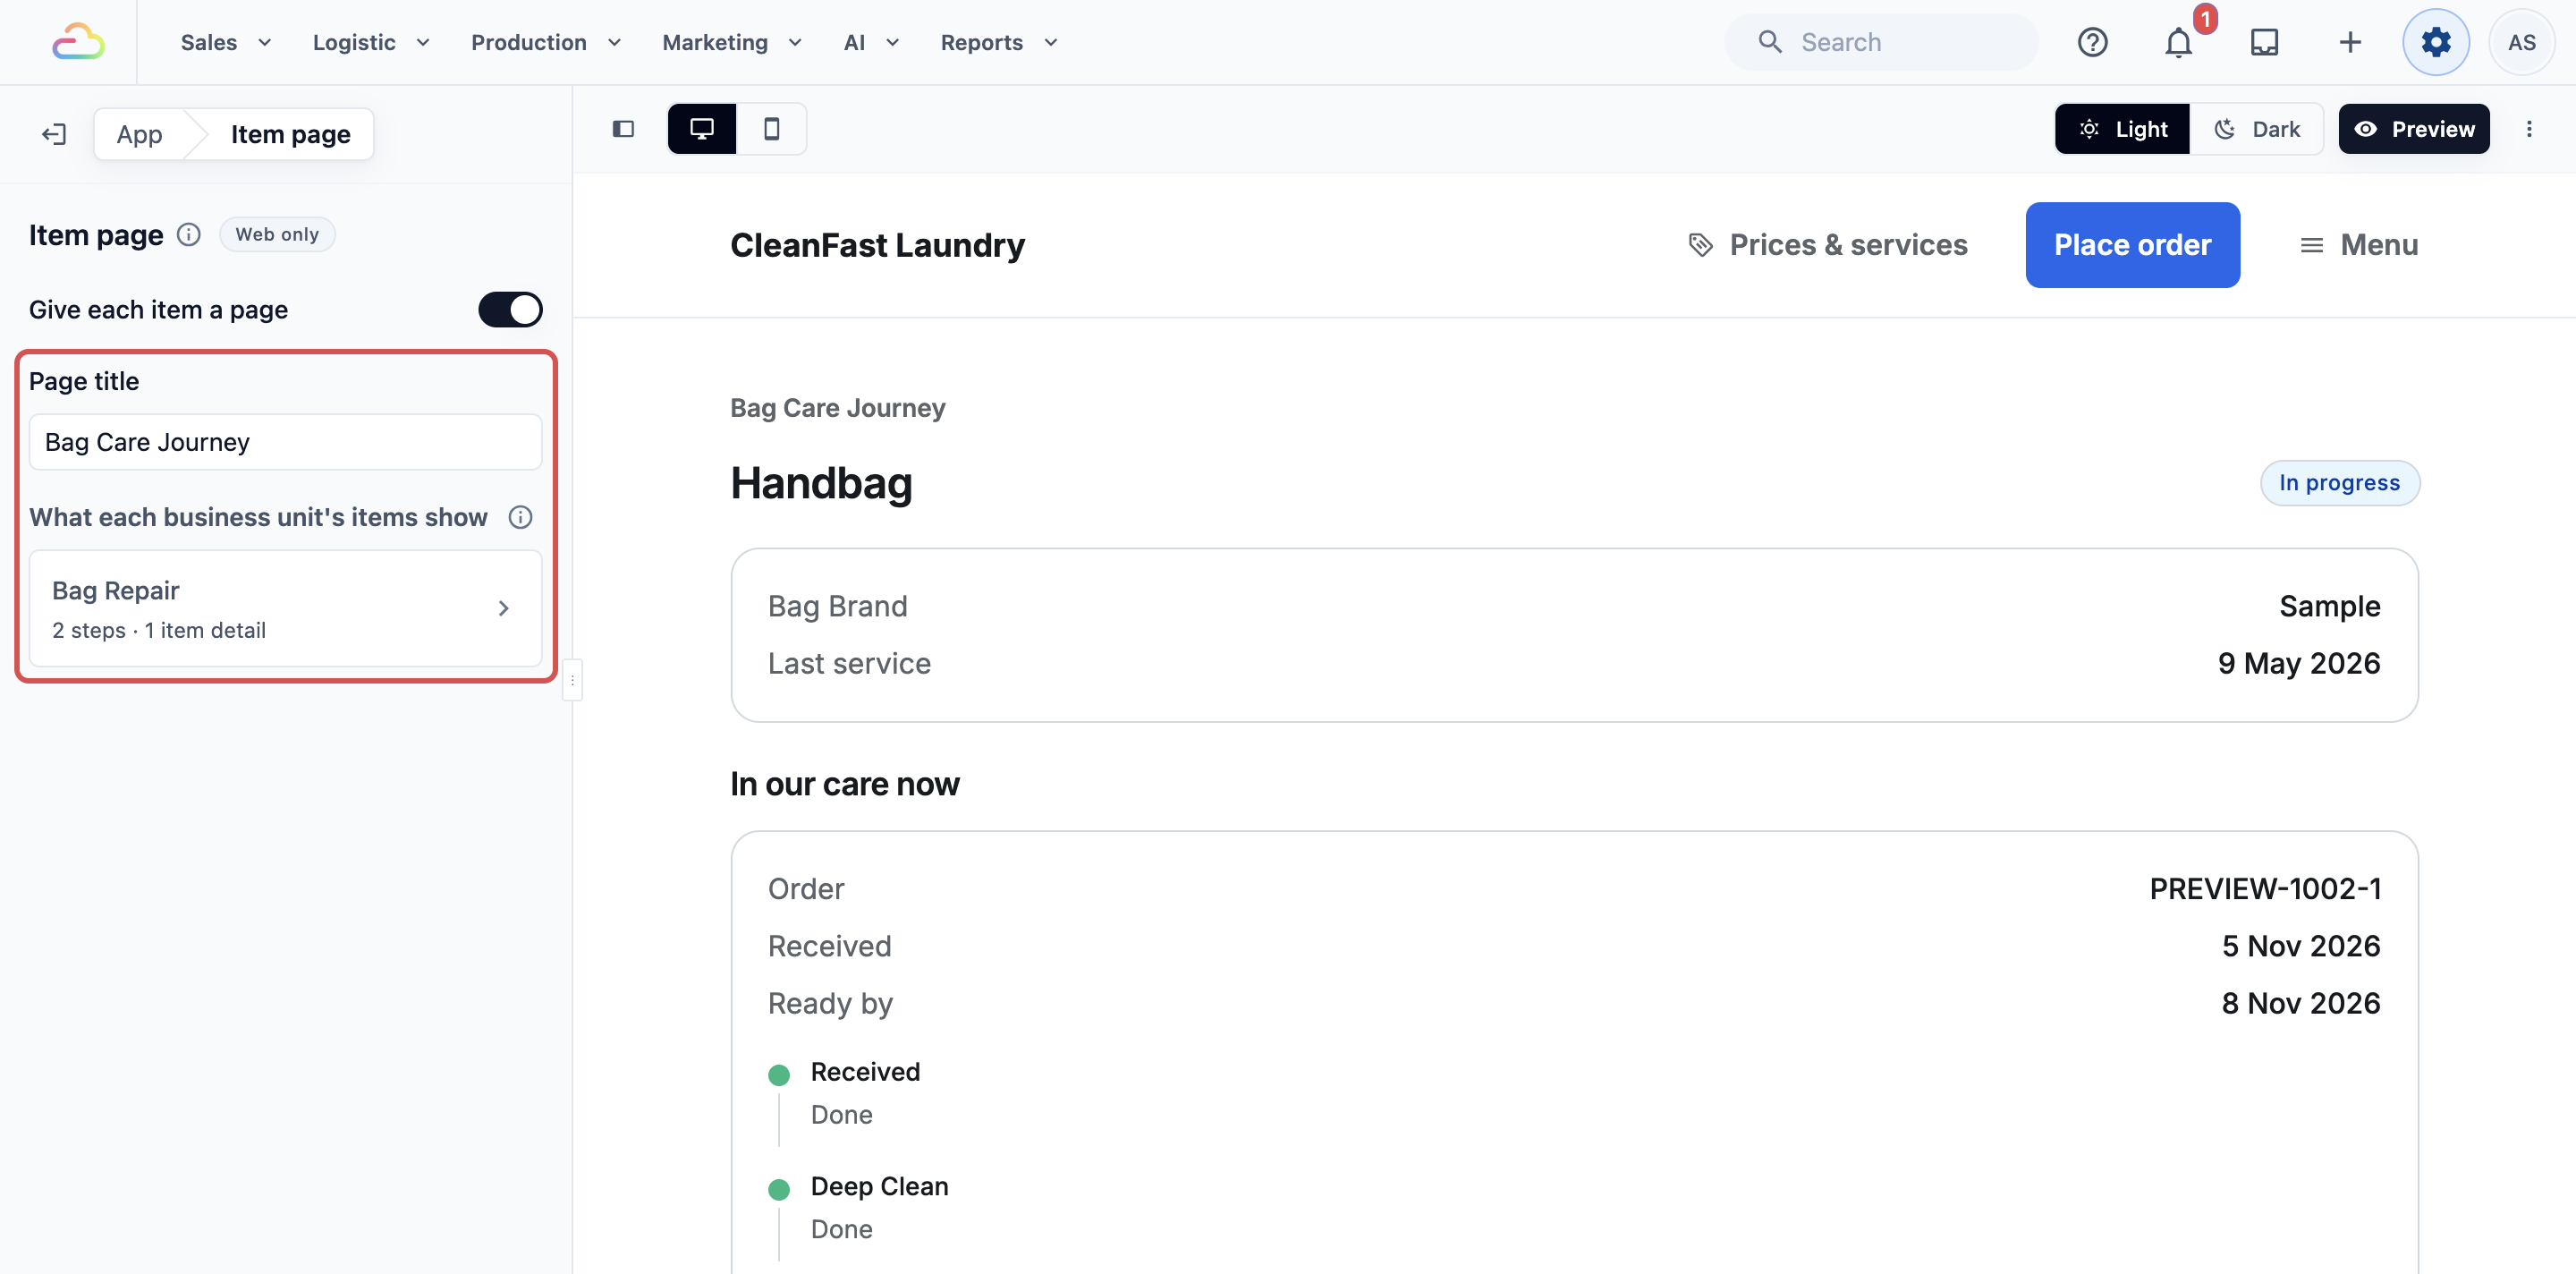
What each business unit's items show: lists every business unit that saves customer items, with what its items' pages show, for example "2 steps · 1 item detail". A unit with nothing chosen shows "Received and Ready only".
If no business unit saves customer items yet, the list says "No business unit saves customer items yet. Turn on Save customer items in a business unit's Production settings first." Go back to Step 1.
Choose what each business unit's items show
For Intermediate and Advanced setups:
- Under What each business unit's items show, click the business unit, for example Bag Repair.
- In Steps shown, pick the work order tasks customers see, for example Deep Clean and Colour Restore.
- In Item details shown, pick the item's own details customers see, for example Brand.
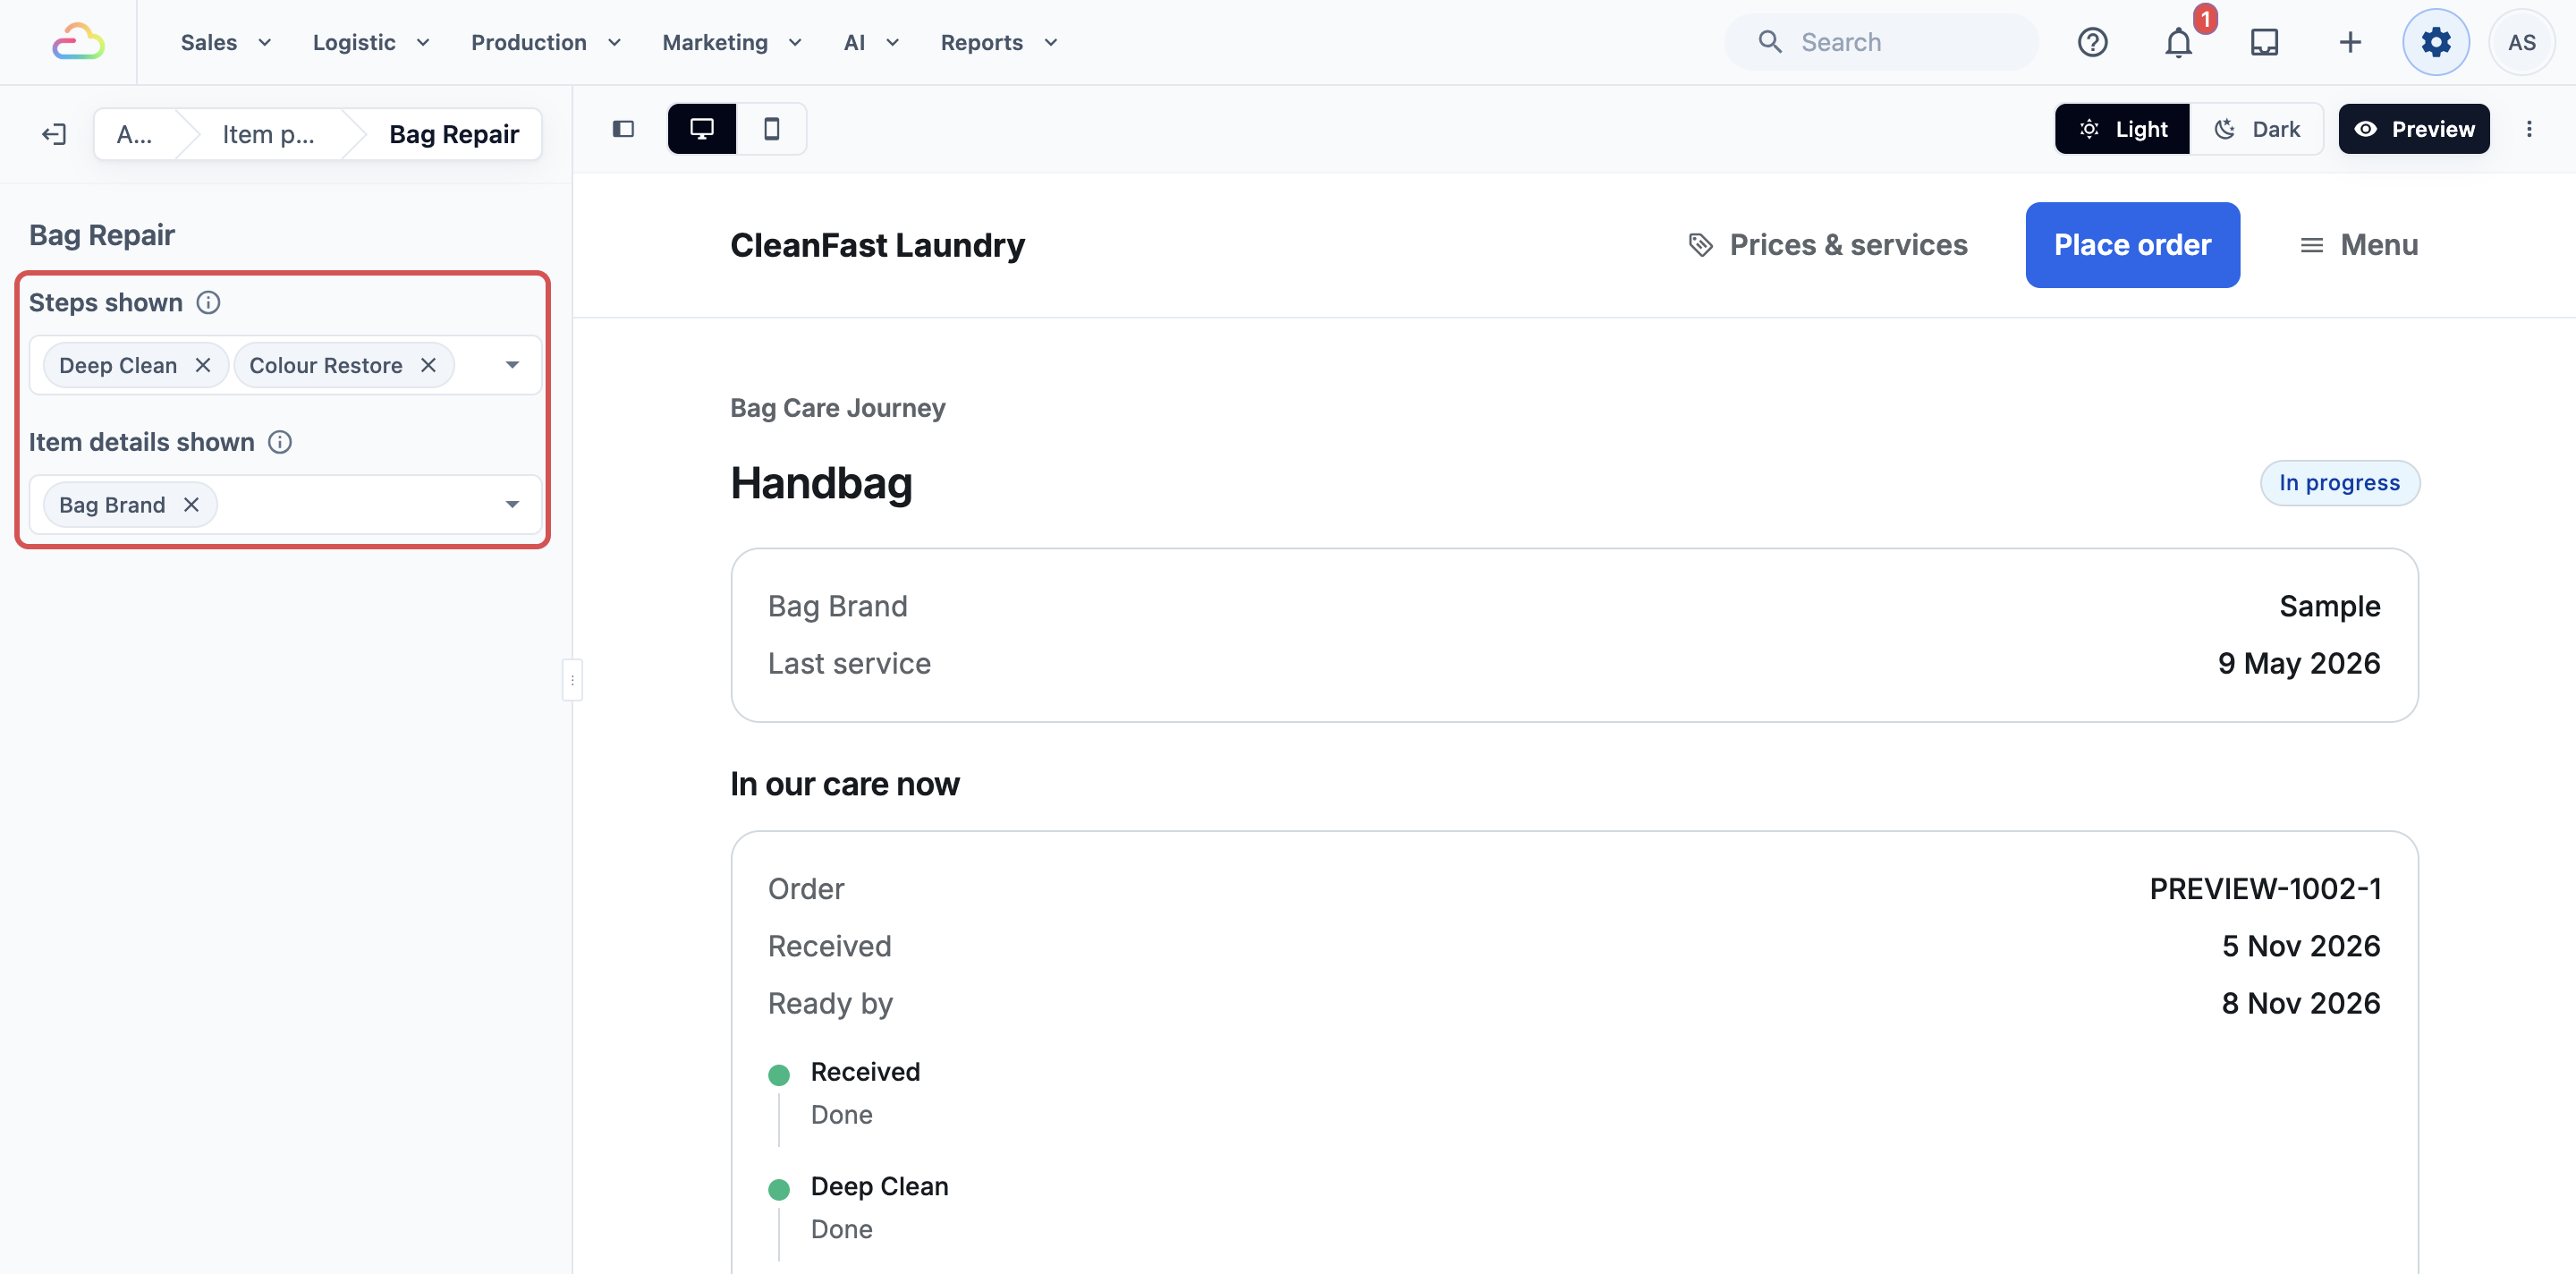
Steps shown
| What you pick | What customers see |
|---|---|
| None | Received and Ready only |
| One or more tasks | Received, then each task you picked, ticked off when your team finishes it, then Ready. They follow your unit's task order |
A task shows only on items that have it. Tasks you don't pick, such as Inspection, stay for your staff only. You can pick up to 20.
Item details shown: the details your staff enter for the item, such as its brand or material. Details you don't pick stay for your staff only. You can pick up to 10.
Step 3: Publish your store
The Item page settings save as you go, but customers see them only after you publish.
- Click Preview and check the item page.
- Click Publish.
See Edit, Preview and Publish Your Online Store.
Add aftercare and next care to your service options
For Advanced setups. Aftercare and next care are set once on each service option, so every item that has that service shows them.
- Click the ⚙️ Settings icon in the top-right corner.
- Under the Catalog & Pricing section, click Service Options.
- Open the service option, for example Deep Clean.
- Fill in the fields below, then save.
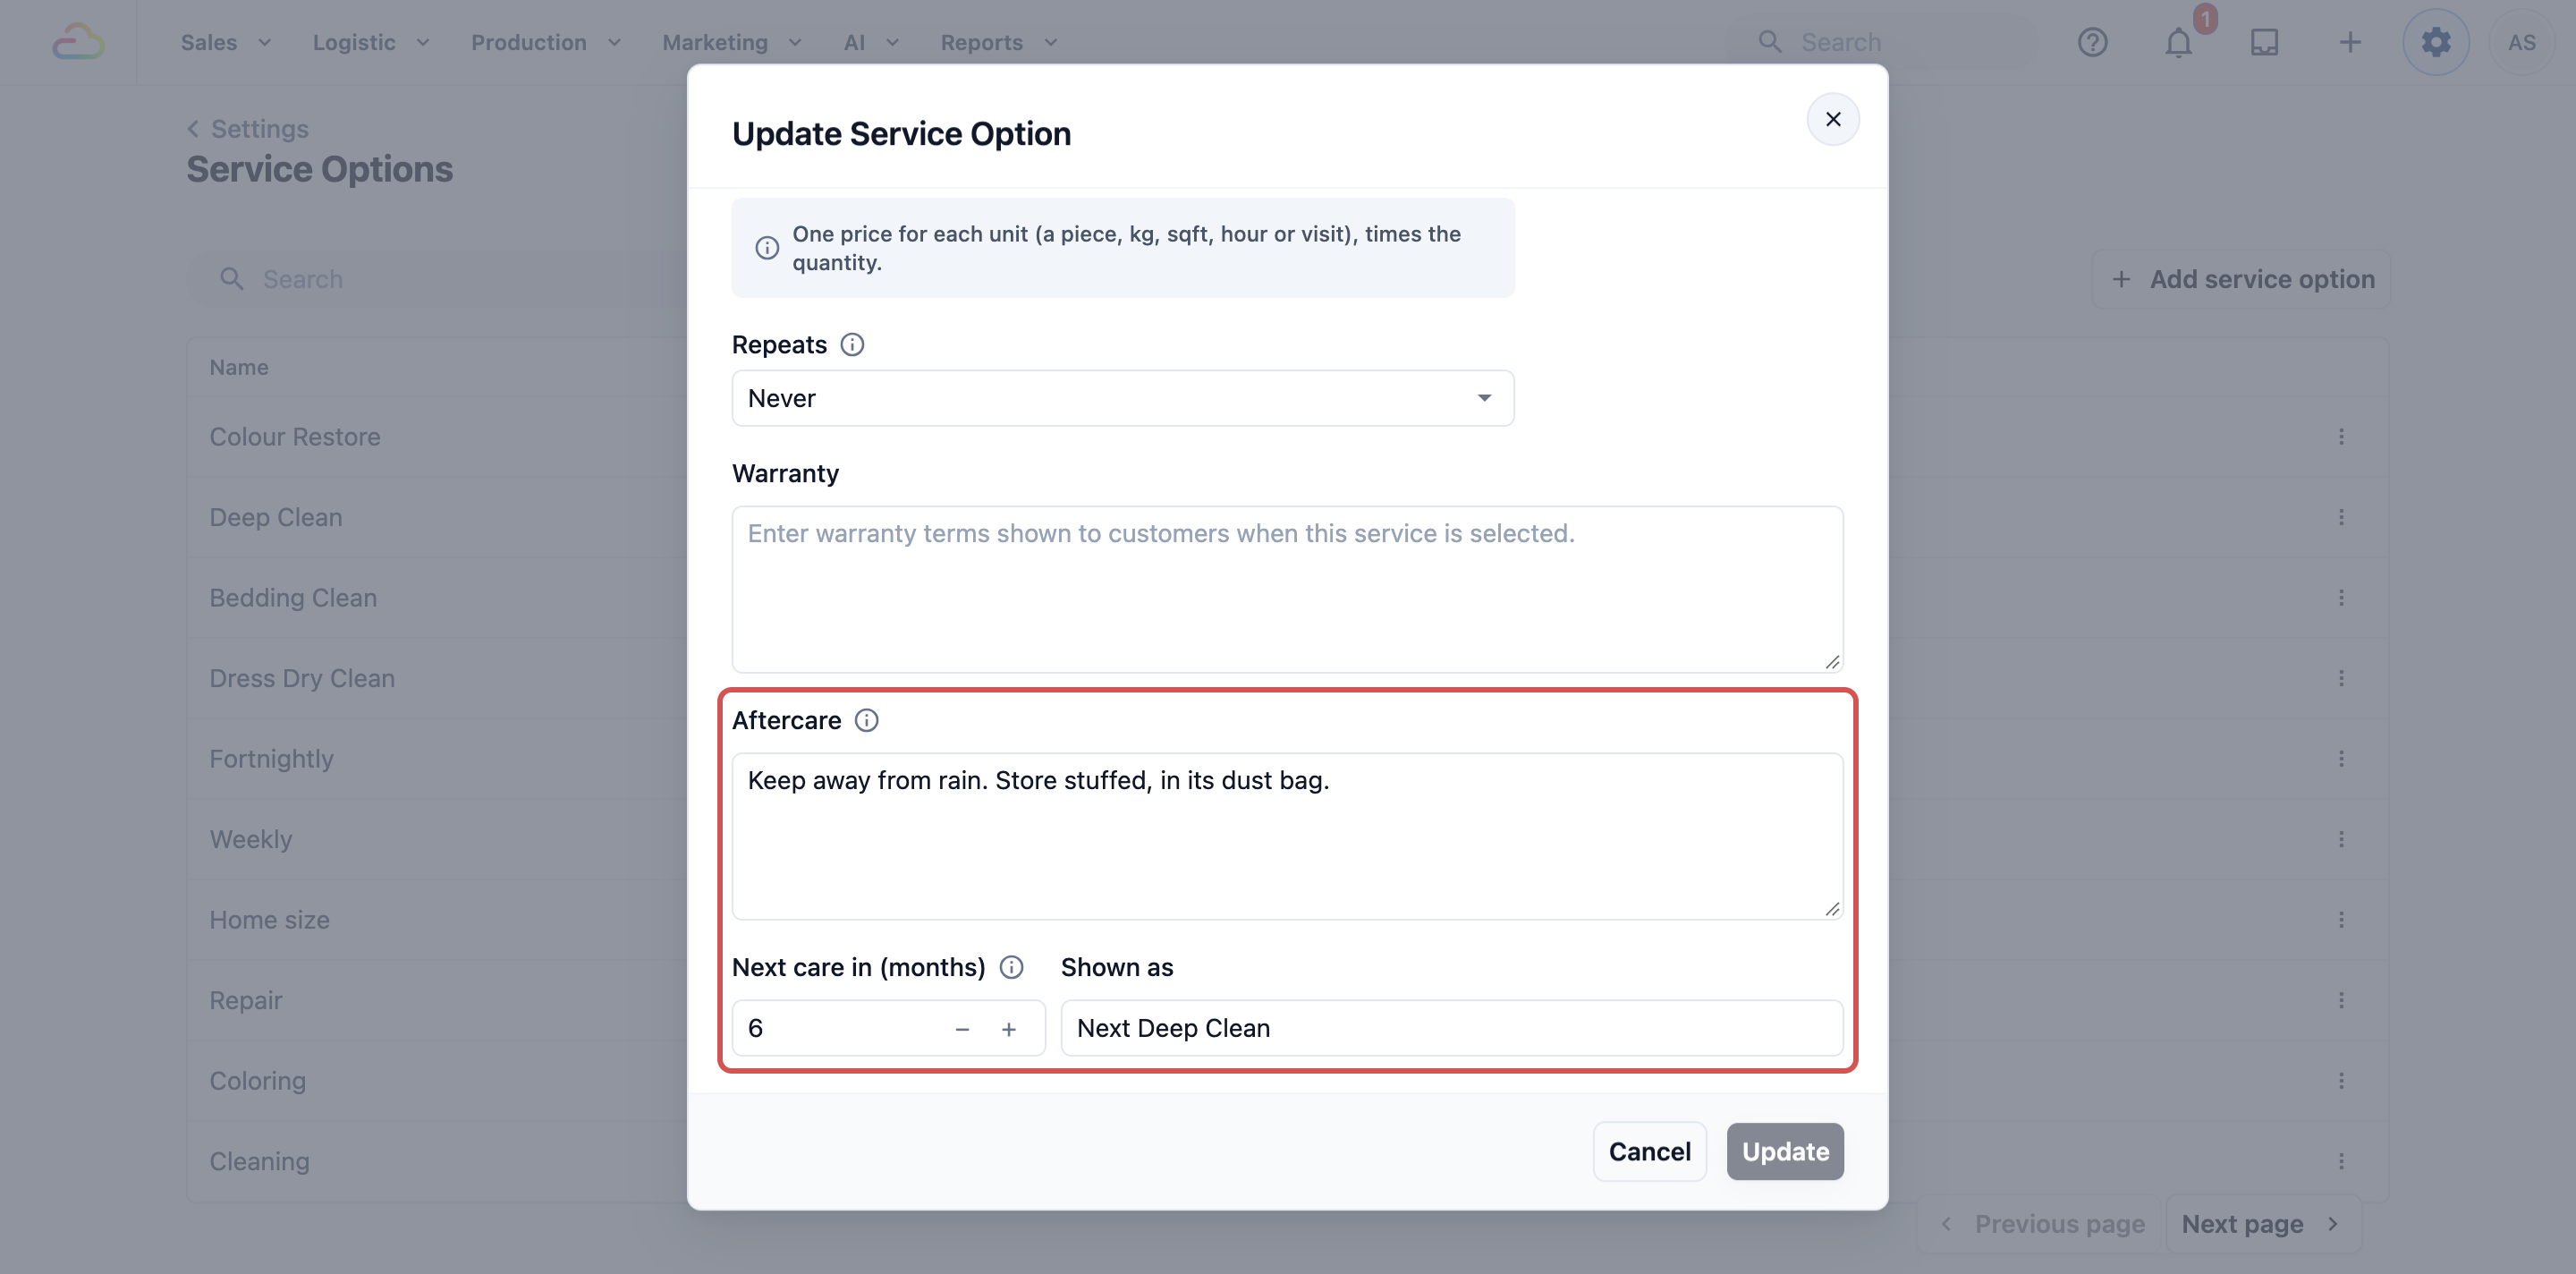
Aftercare: the care advice customers see on the item's page after this service. For example, "Keep away from rain. Store stuffed, in its dust bag."
Next care in (months)
| Leave empty | Type a number |
|---|---|
| The item page recommends no next care for this service | The item page recommends this service again that many months after the work was done, for example 6 |
Shown as: the name customers see for that next care, for example Next Deep Clean.
Next care is what makes Remind me show on the item's page. Without it, customers see Book again only. See Setting Up Service Options.
What staff do on each visit
Items start on their own. Each new work order in a unit that saves customer items gets its item and QR when the order is created. Your staff don't need to do anything for the Easy setup except share the link.
Share the link or QR
- Open the order. See Finding and Working on an Order.
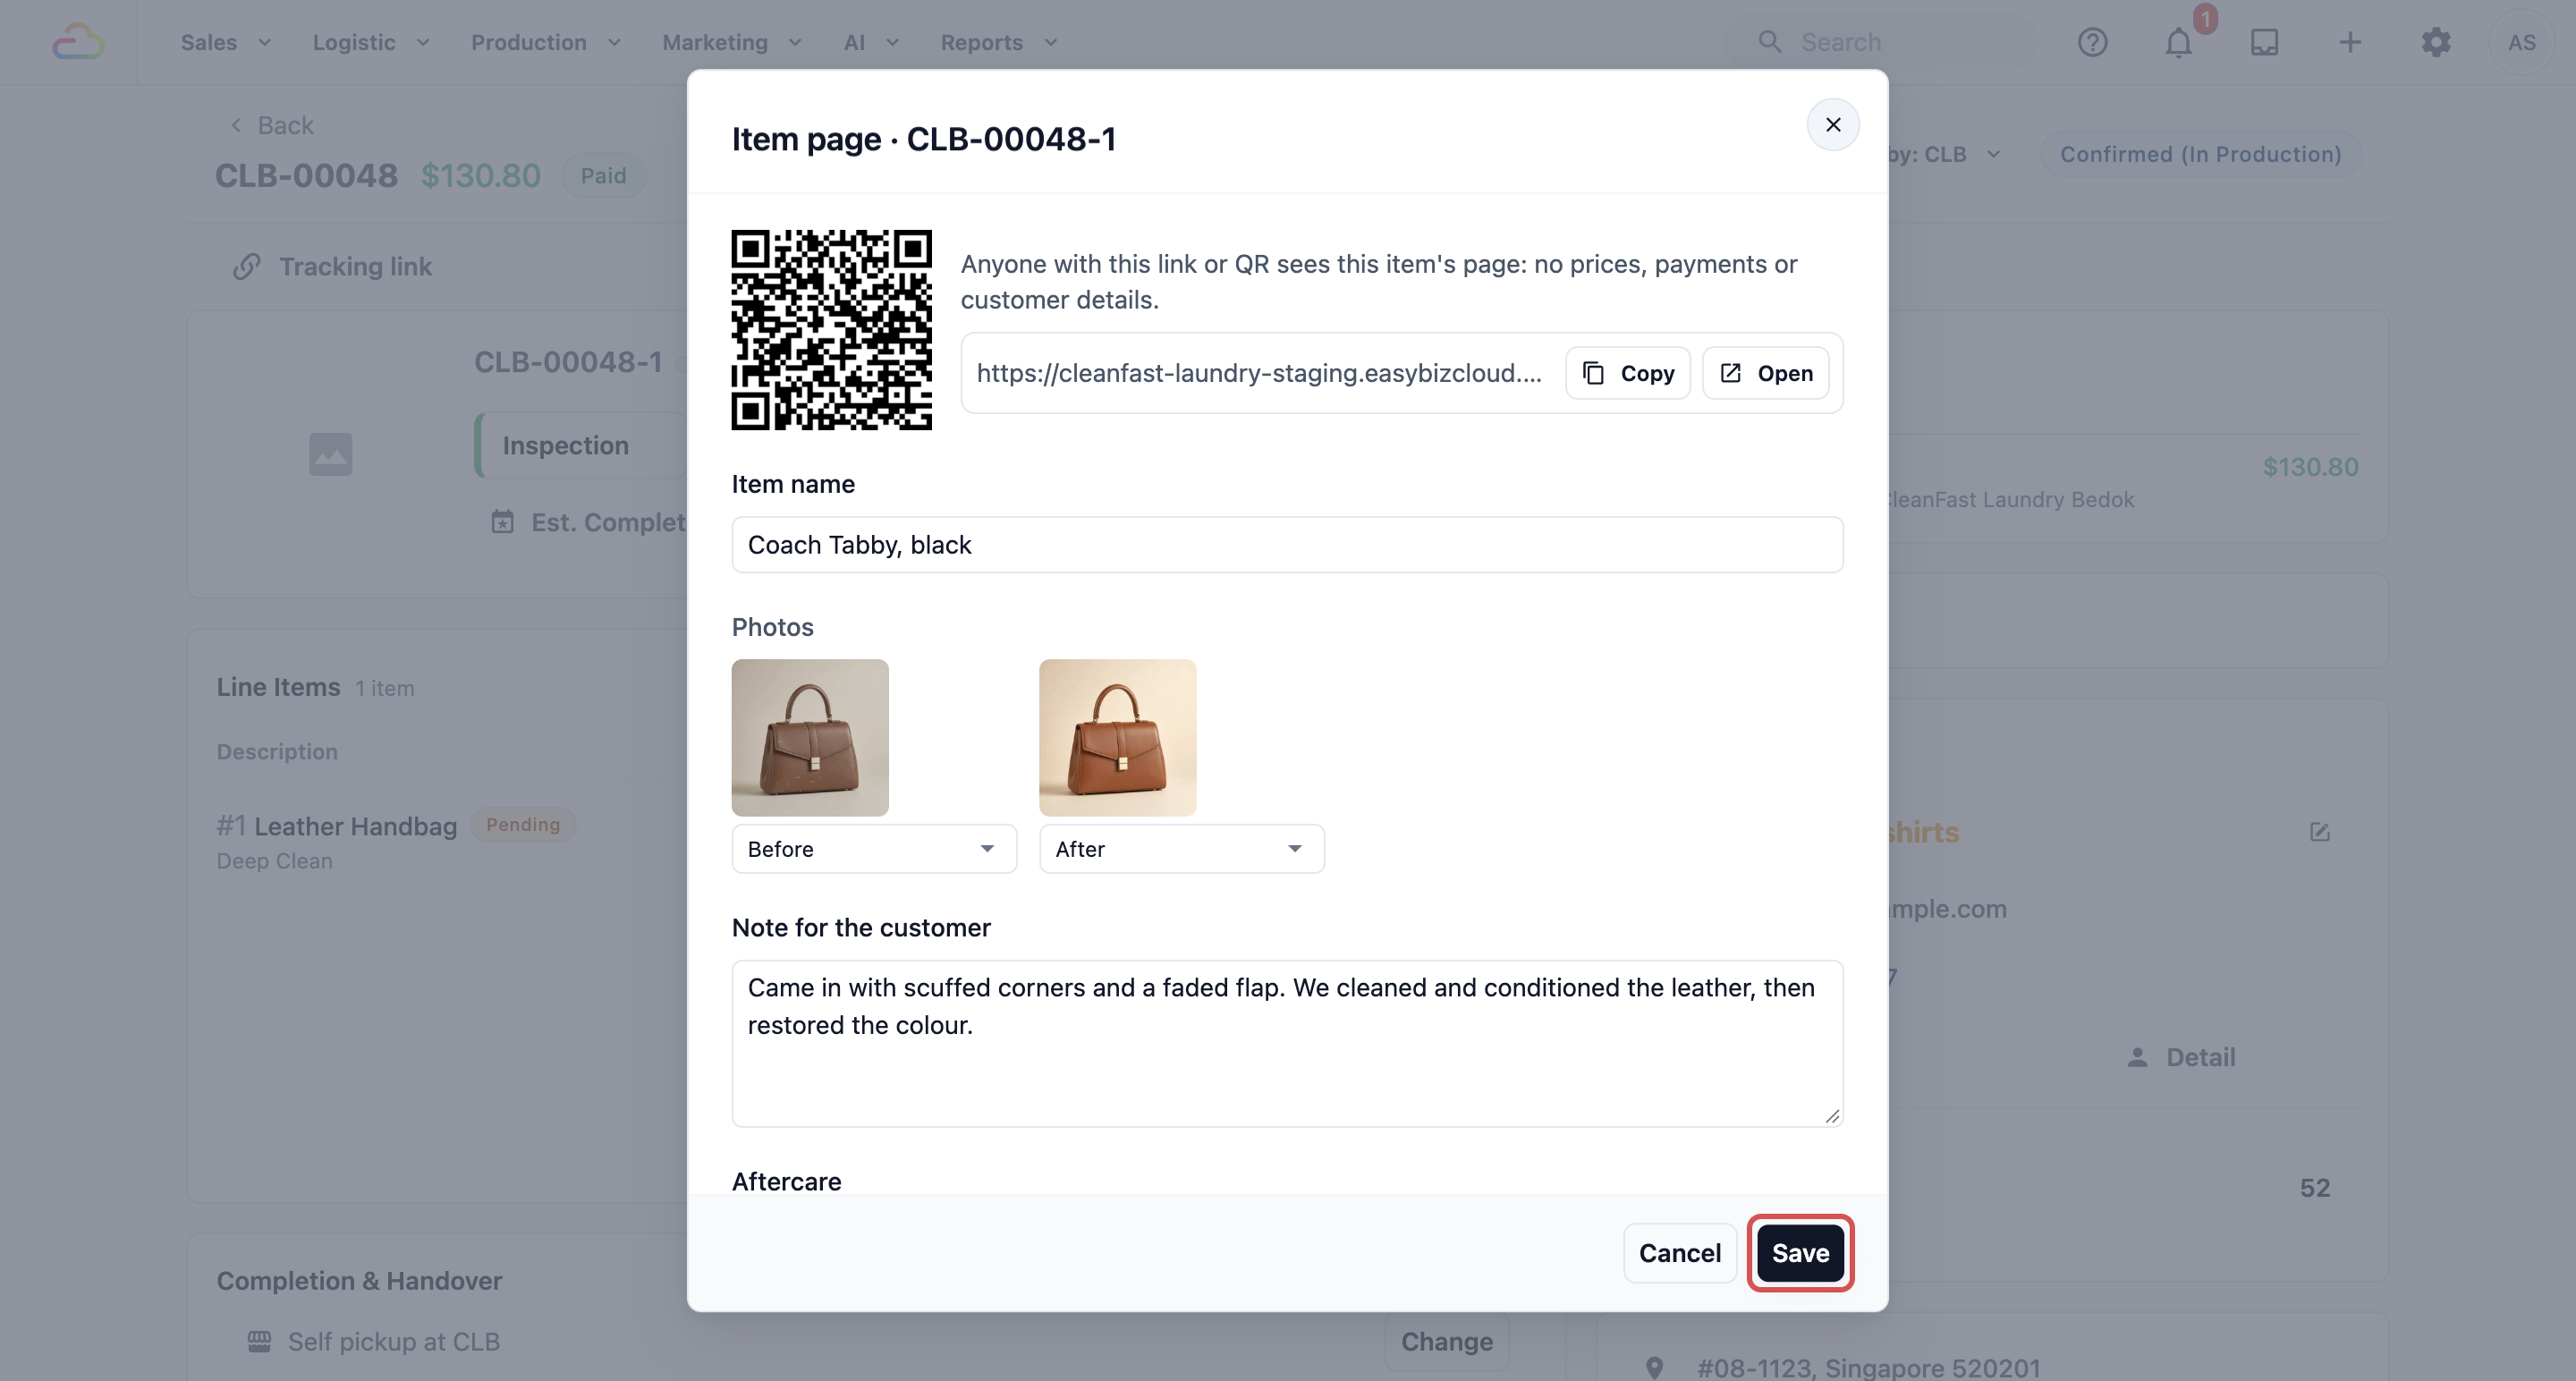
- In the order's work orders, click the Item page icon on the item's work order. The Item page window opens with the work order number, for example "Item page · J8-07326-2".
- Show the QR for the customer to scan, or click Copy to send the link by WhatsApp. Open shows the page as customers see it.
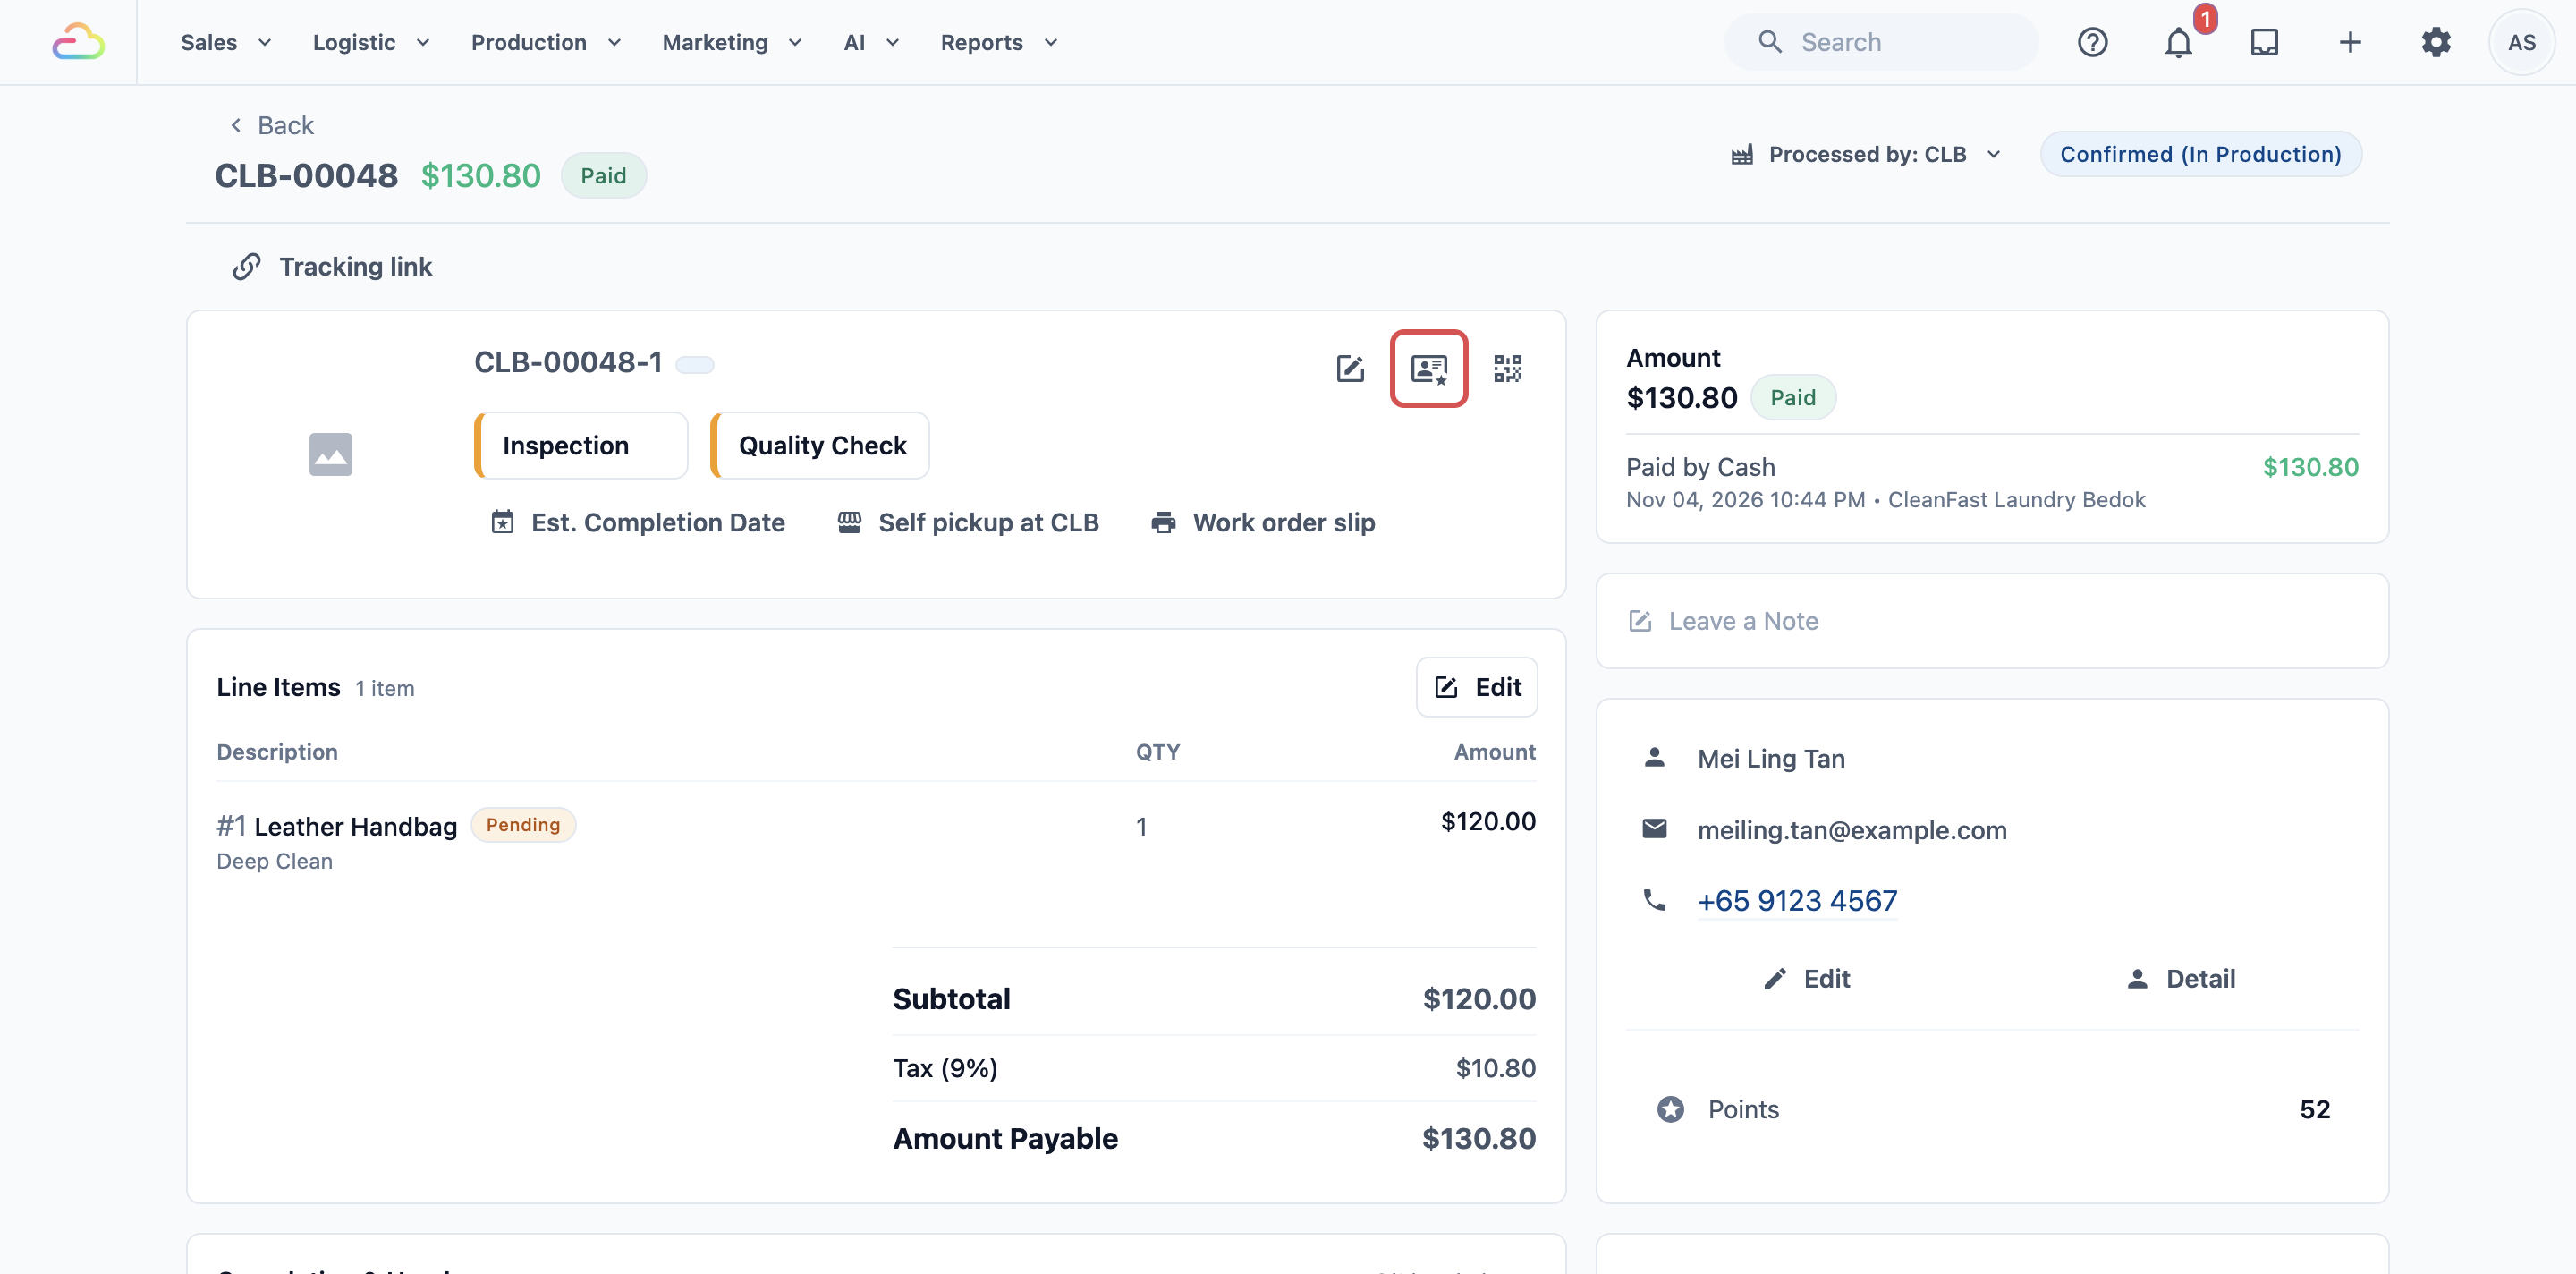
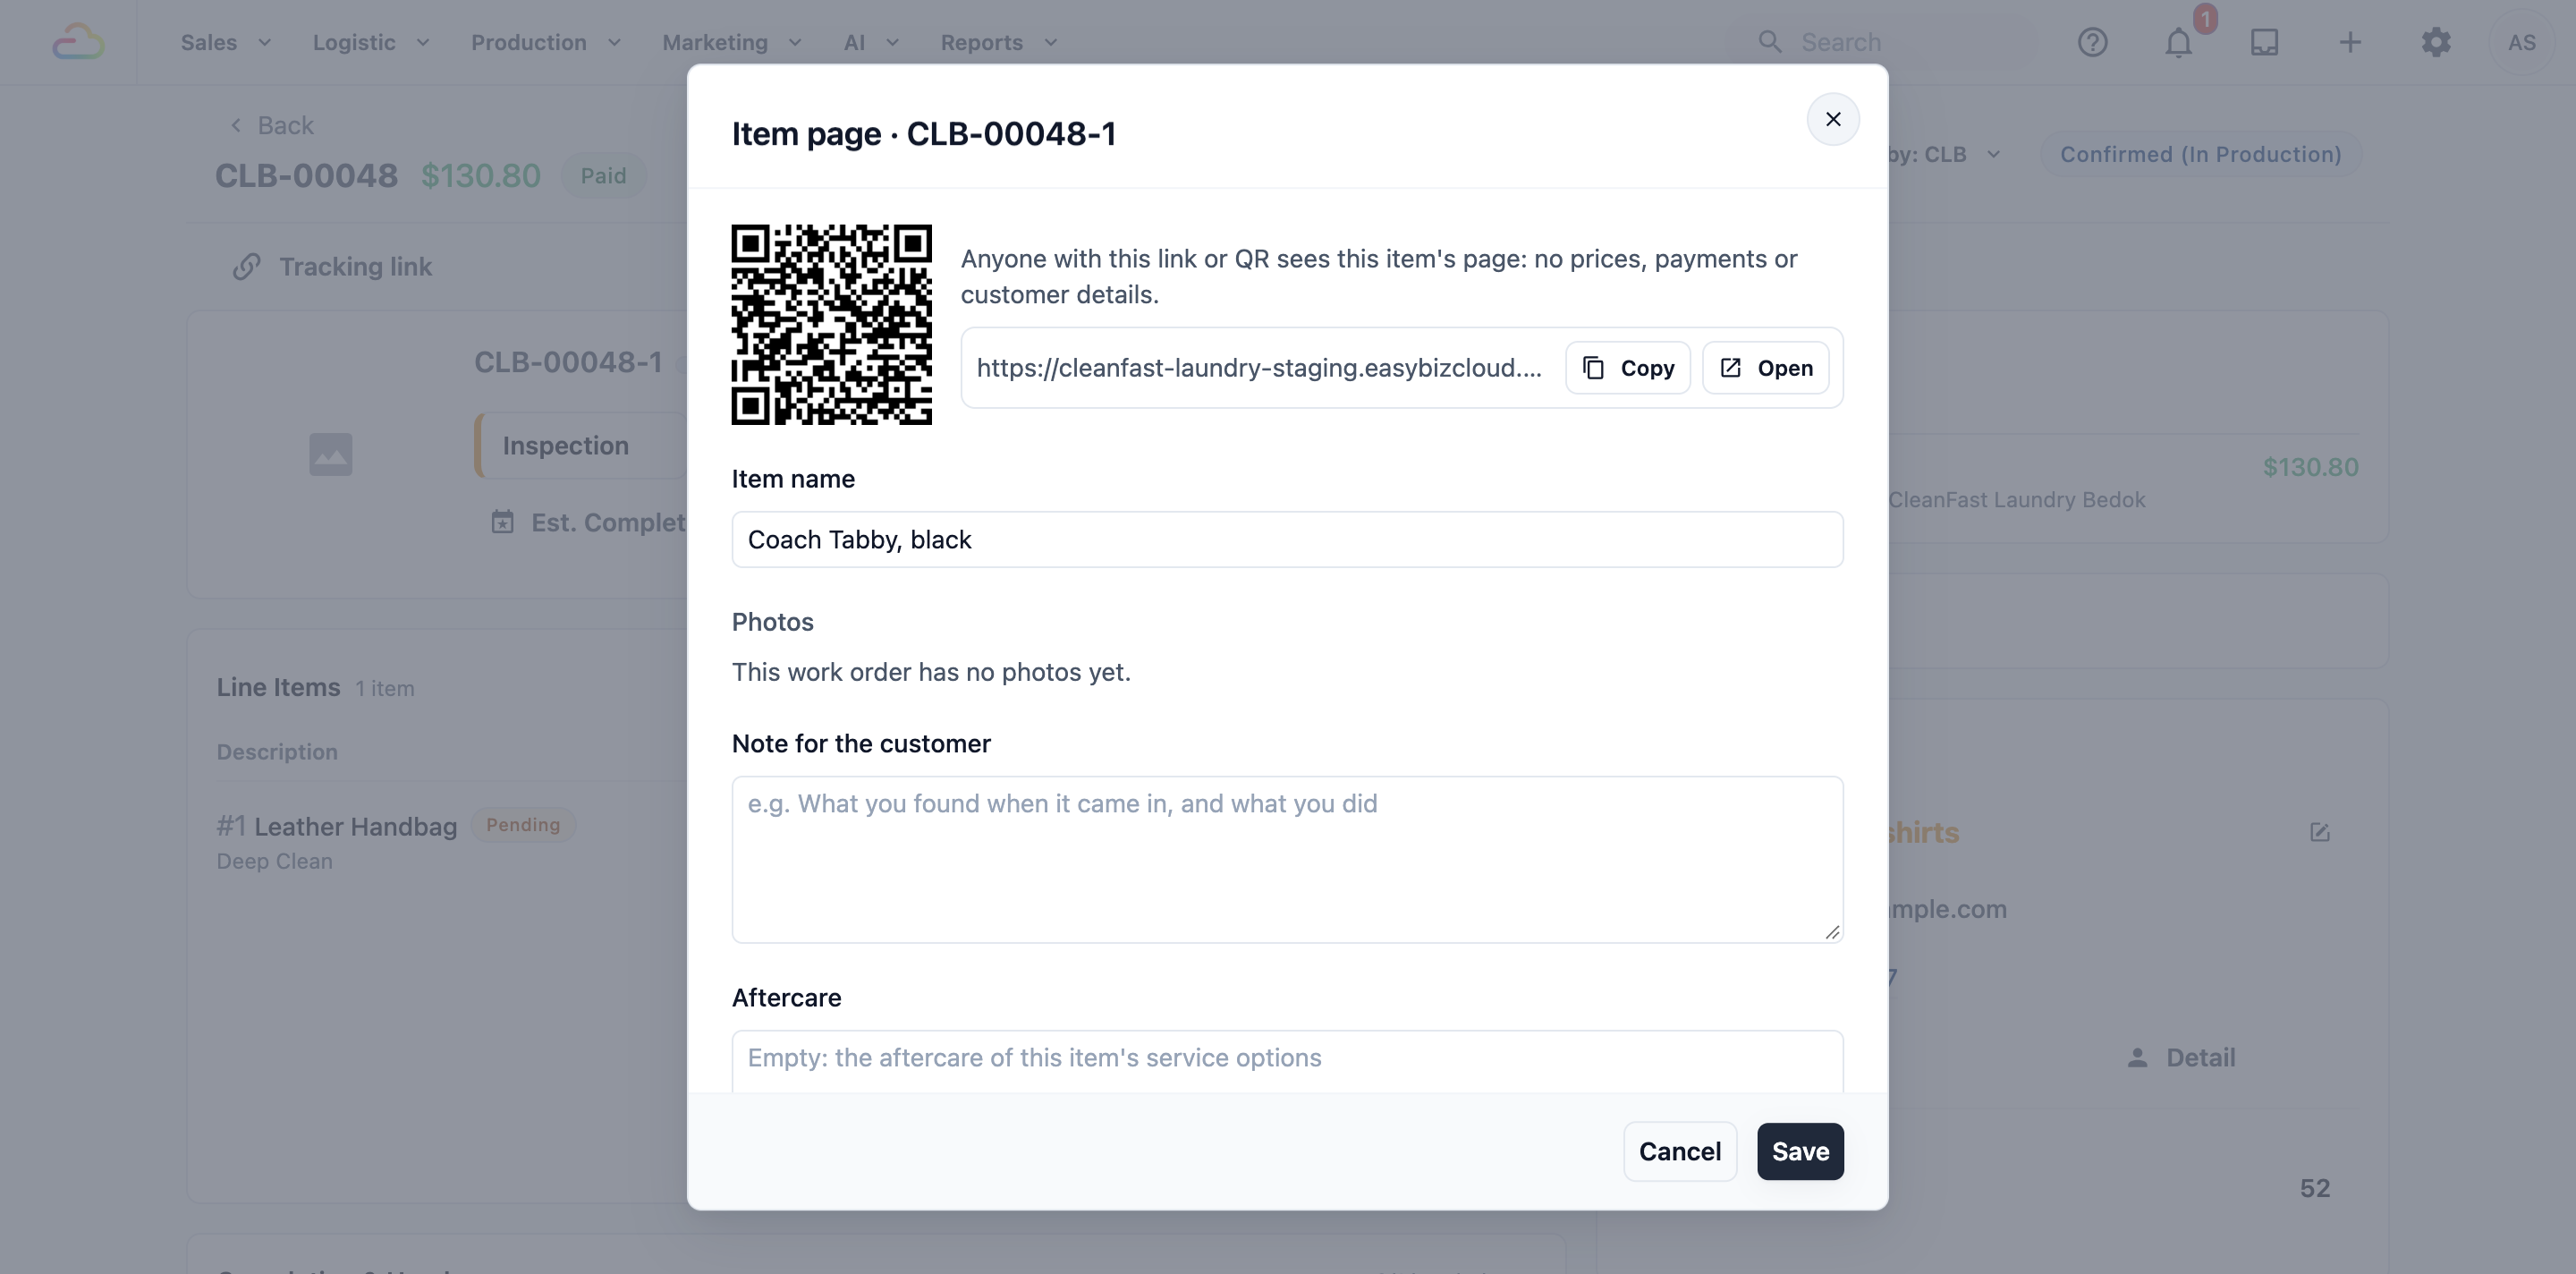
Anyone with the link or QR sees the item's page. It shows no prices, payments or customer details.
If the item has no page yet, the window says "Save to give this item its page, link and QR." Click Save and open it again.
Which item is this? shows when the customer has other saved items in this unit. If they brought this item before, pick it, so its page keeps every visit in one place. Pick A new item for an item they haven't brought before.
Item name: the name customers see, up to 80 characters. For example, "Coach Tabby, black".
Choose what this visit shows
For Intermediate and Advanced setups. These choices are for this visit only.
Photos: each photo on the work order, with where it shows.
| Shown in | What it means |
|---|---|
| Not shown | Your staff see it, customers don't |
| Before | How the item came in |
| Behind the scenes | Your team at work on it |
| After | The finished result |
If the work order has no photos, it says "This work order has no photos yet."
Note for the customer: what you found when the item came in and what you did. Customers see it under Notes from our team.
Aftercare: leave it empty to use the aftercare from the item's service options, or type your own for this item.
Recommended next care: counted from the service options once the item is done. Click Add next care to set your own instead: a name such as Next Deep Clean, and the month. You can add up to 5.
Click Save. You see "Item page saved".
Print the QR on the item's label
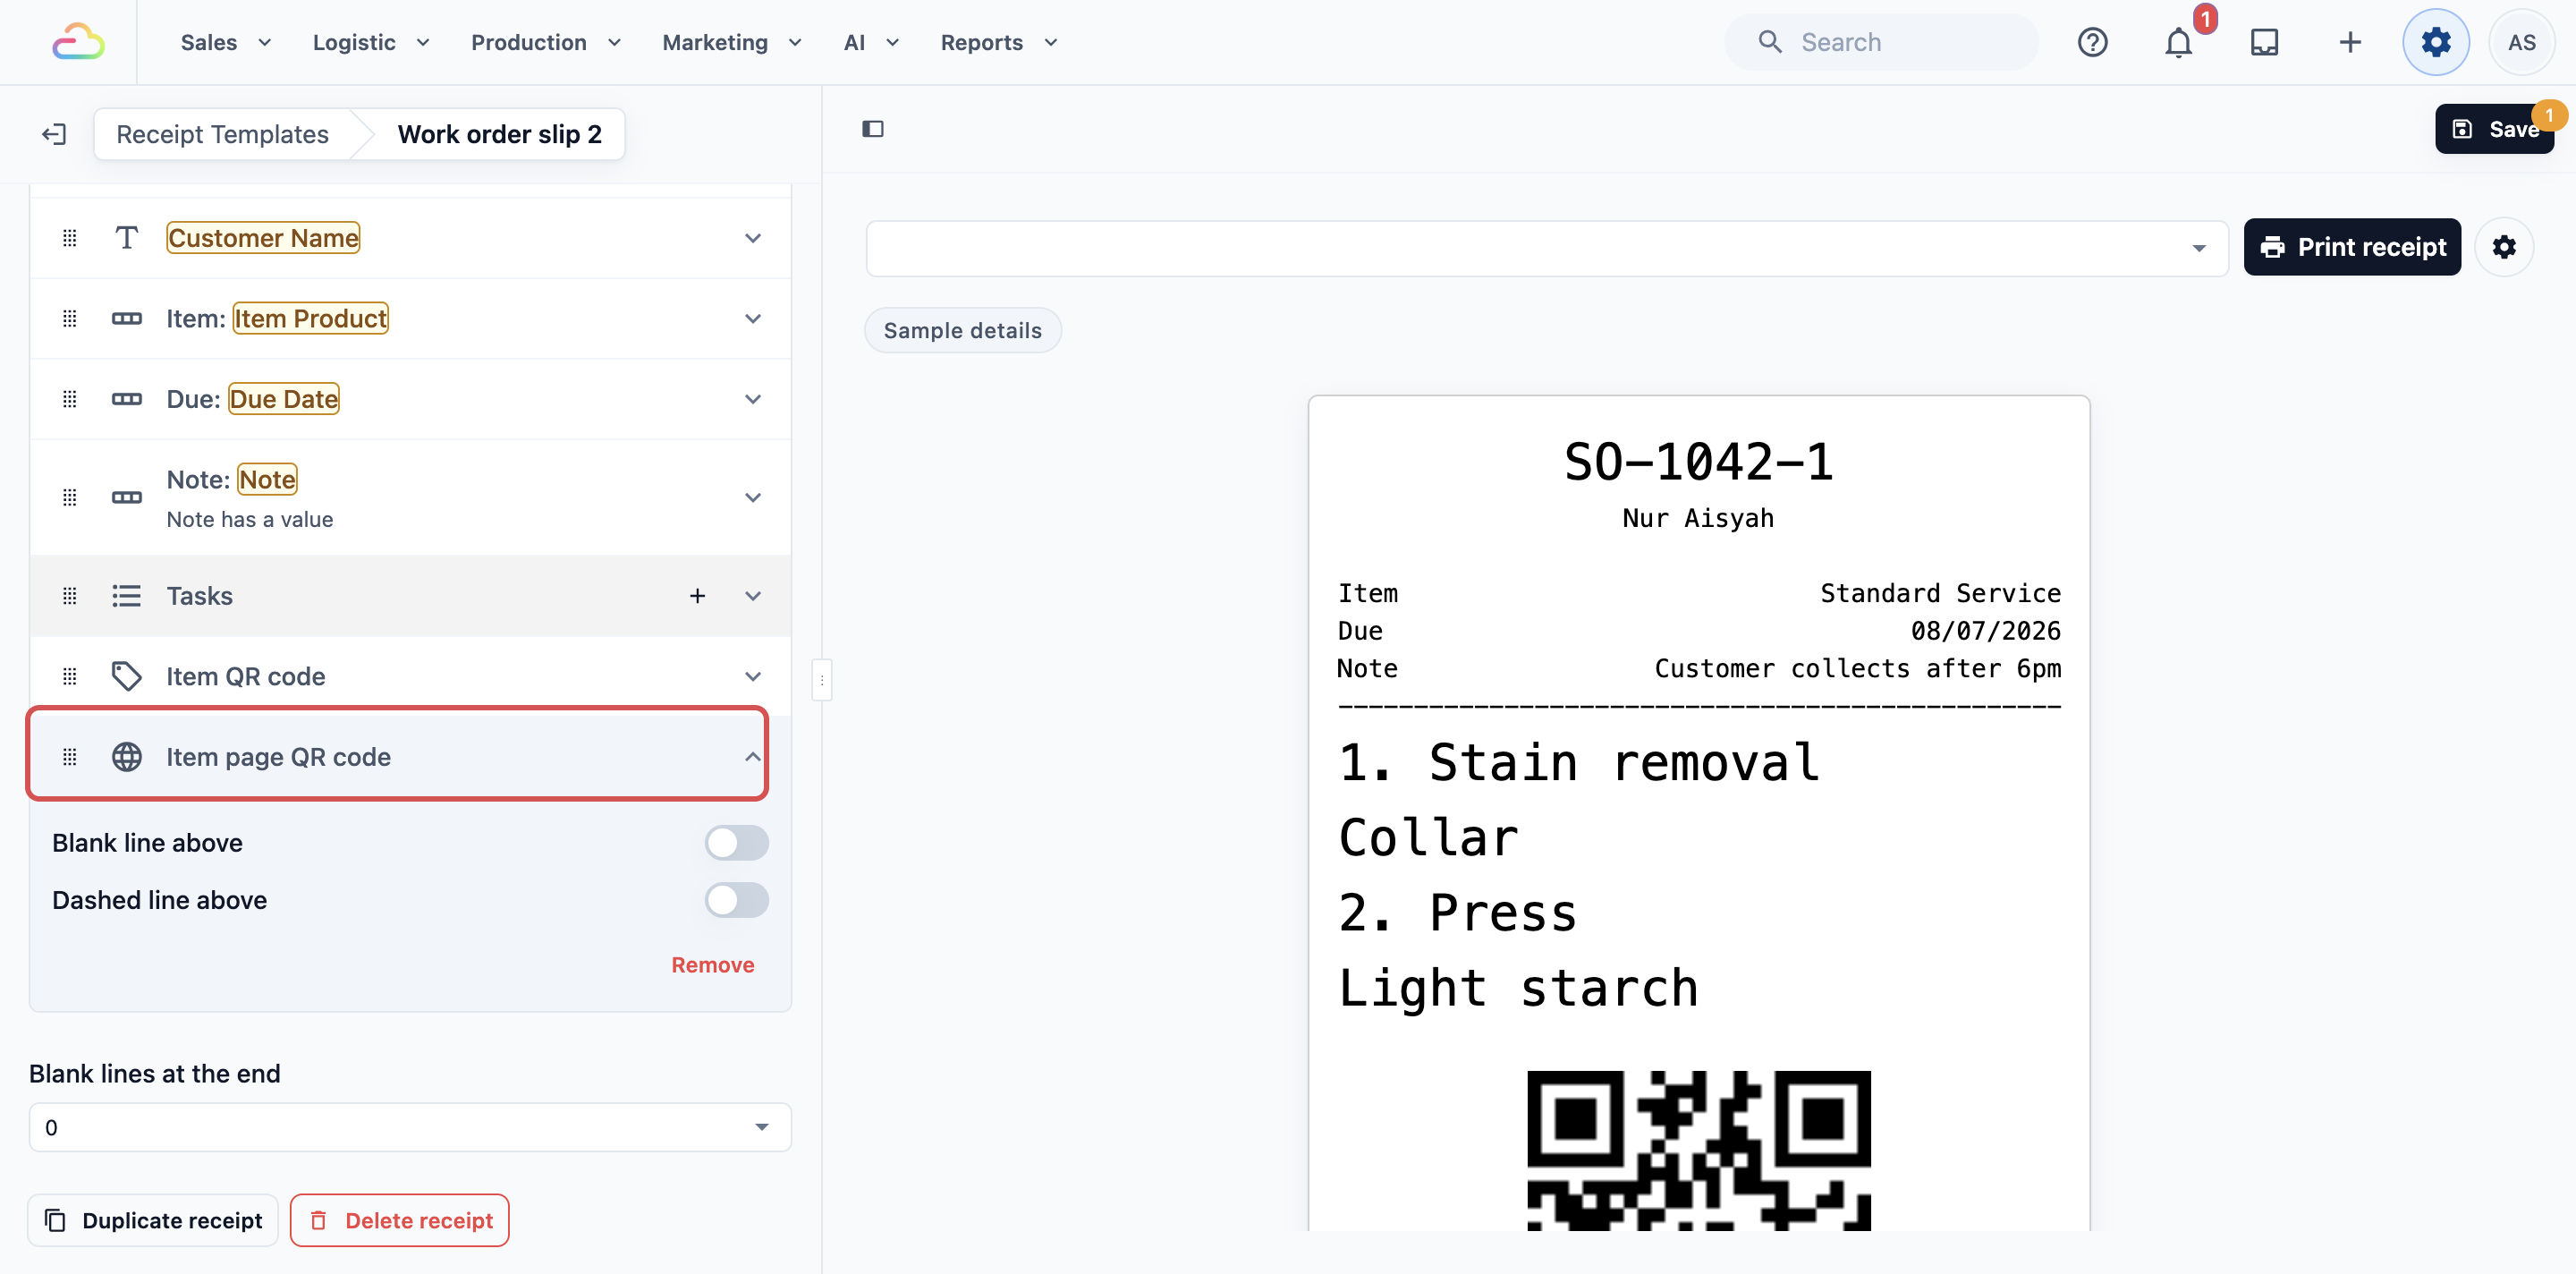
For Advanced setups. Add Item page QR code to your item label or work order slip template. It prints the item's page link as a QR, the same QR on every visit, so a tag on the bag works for life. Your staff's own scan code stays on the label as before.
See Setting Up Your Item Labels and Setting Up Your Work Order Slips.
What customers see
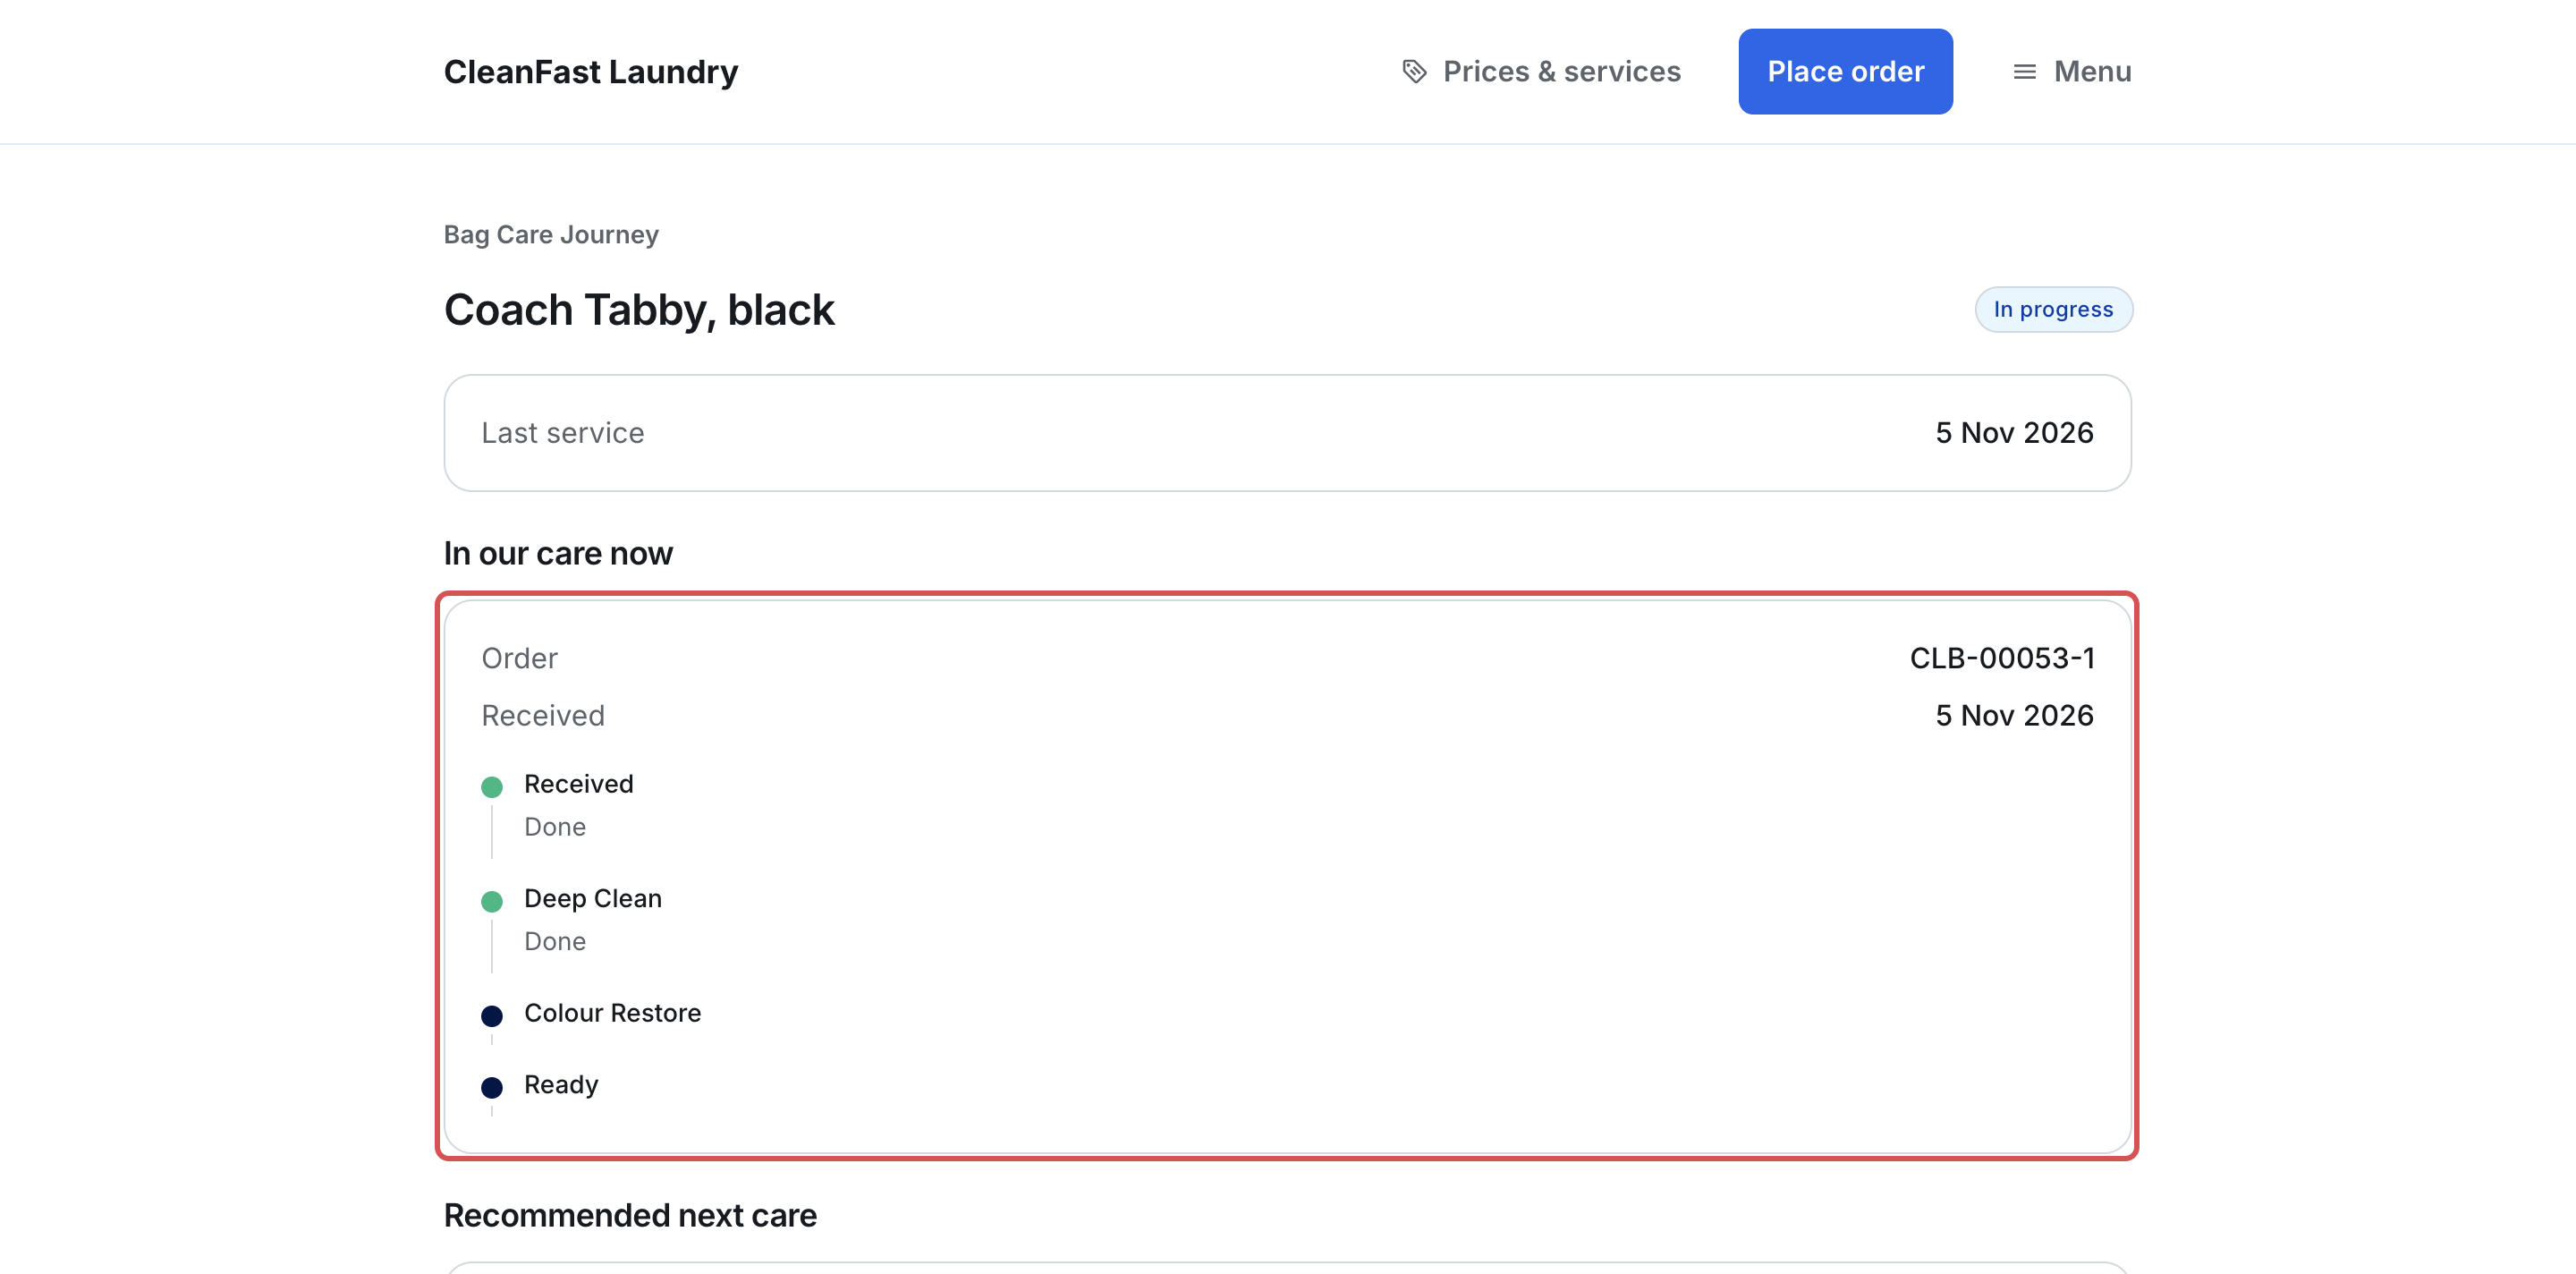
The item's page opens on your Online Store, from the link, the QR or View beside the item on their order page.
| Part | What it shows |
|---|---|
| Top | Your page title, the item's name and its status: Received, In progress or Done, with the item's photo |
| Details | The item details you chose, such as Brand, and Last service, the day its last visit was done |
| In our care now | While the item is with you: Order, Received, Ready by, and Progress with Received, your chosen steps ticked off as they are done, and Ready. Then Notes from our team and the photos under Before, Behind the scenes and After |
| Recommended next care | What it needs next and when, with Remind me and Book again |
| Aftercare | Your care advice from the last finished visit |
| Service history | Each past visit, newest first, with its services, notes and photos |
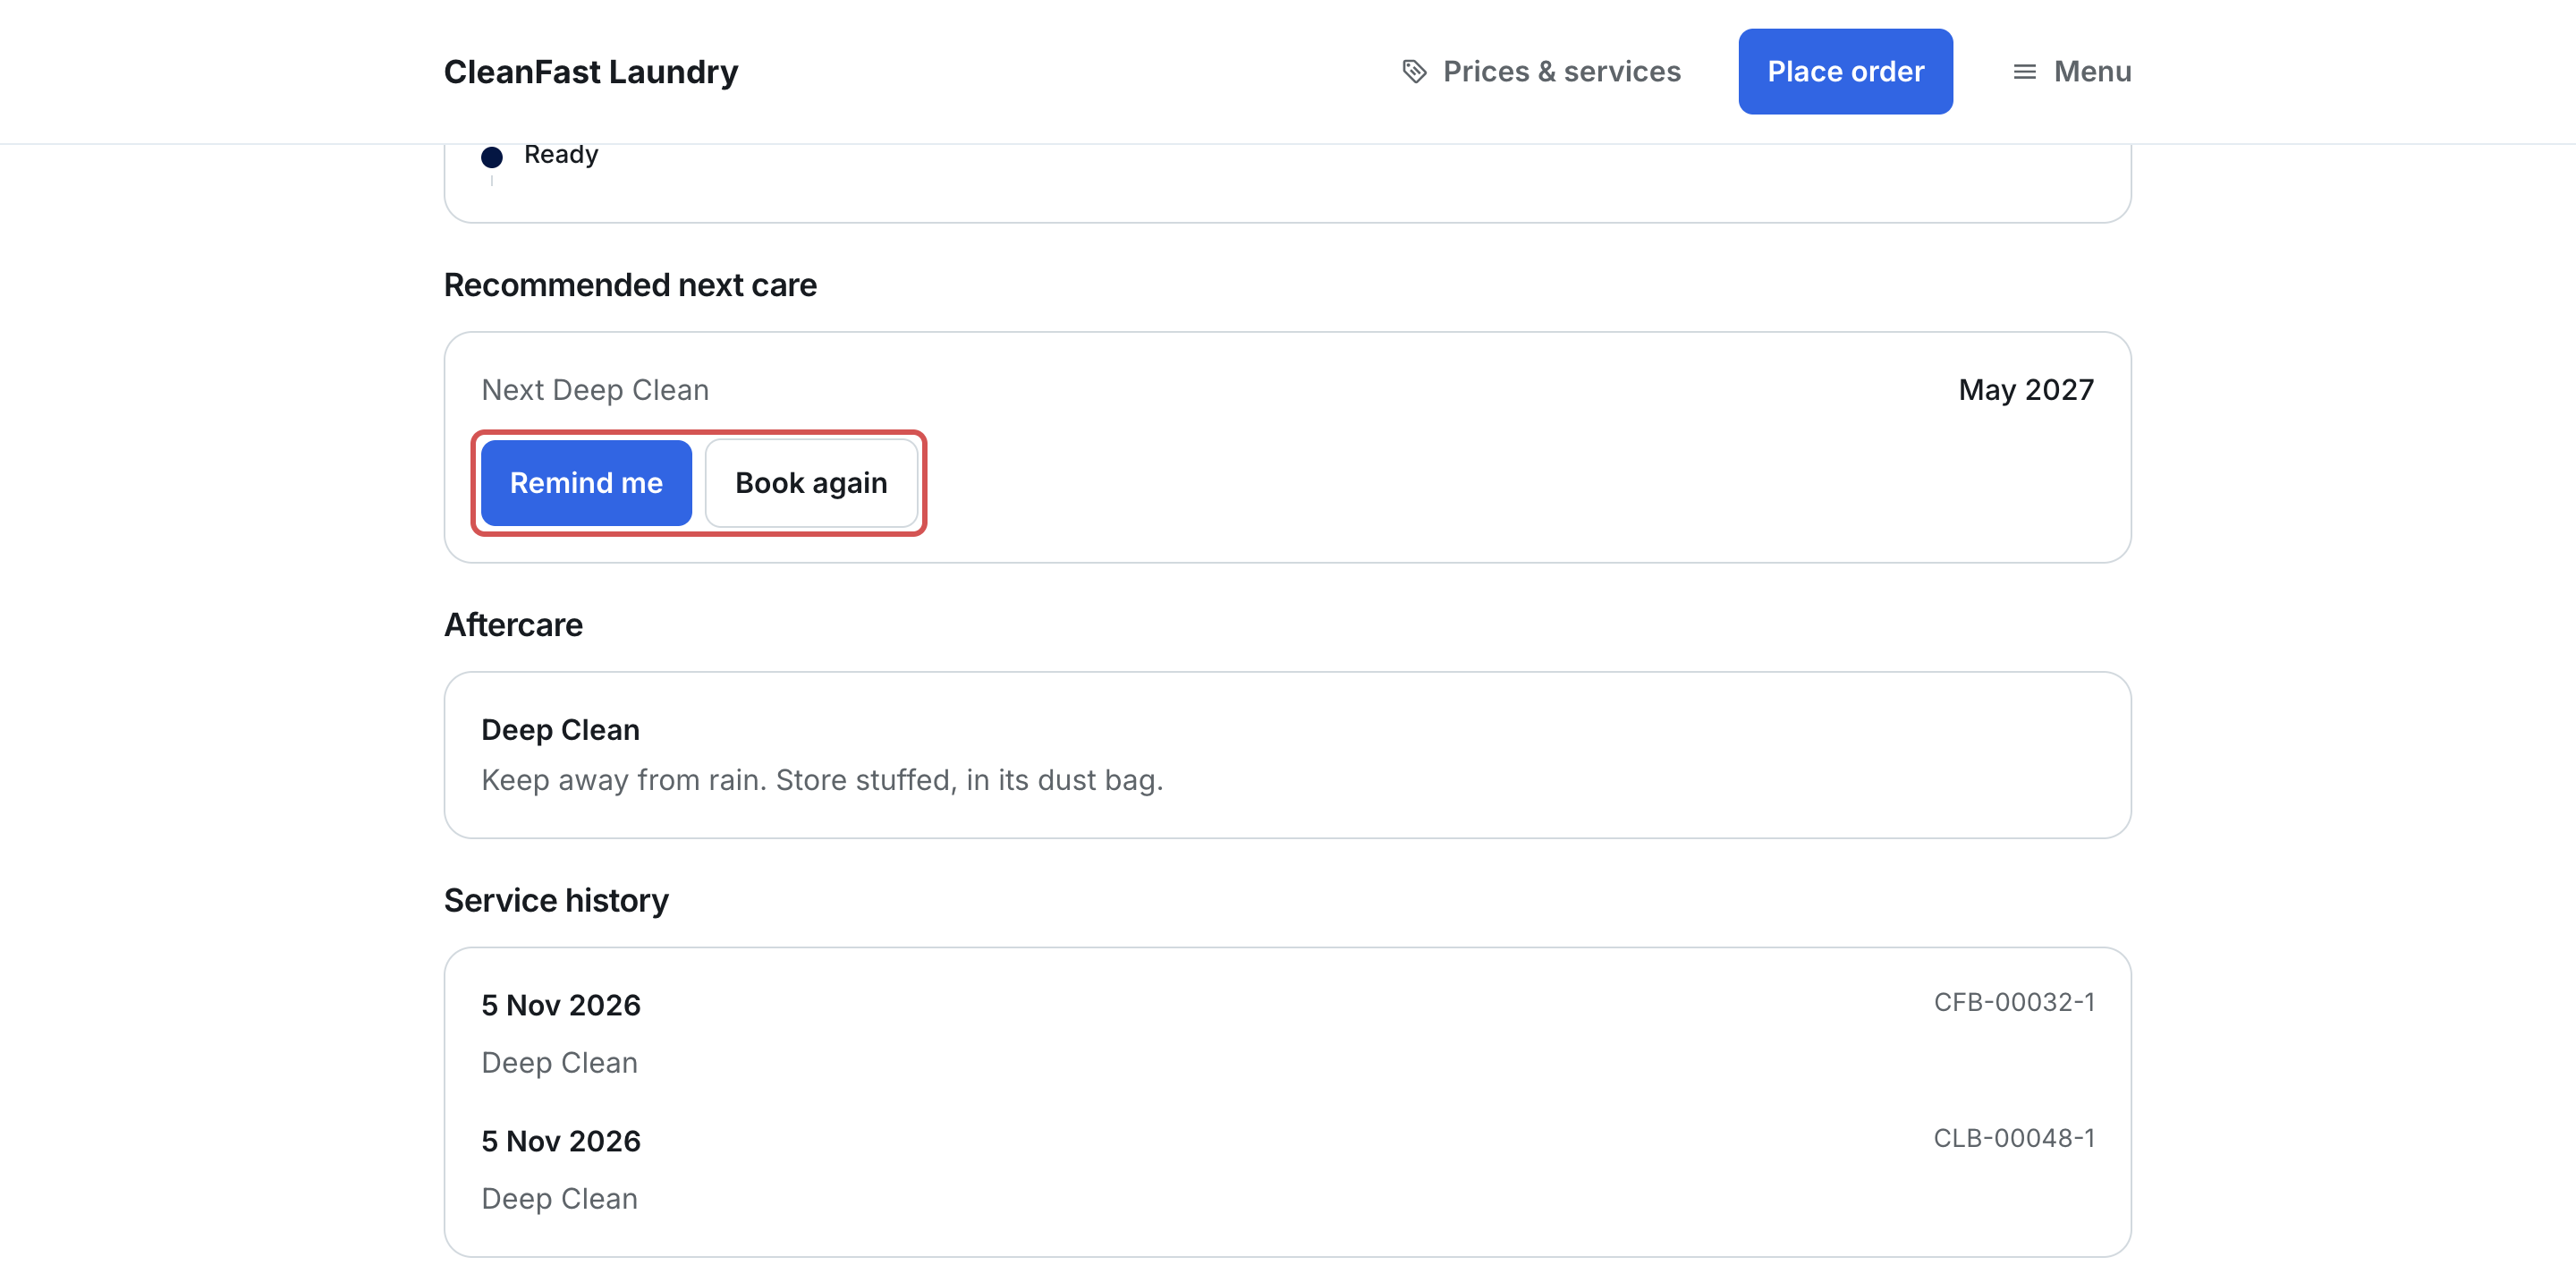
Book again opens a new booking in that business unit, and that order's item joins this page.
If the link is old or wrong, customers see "Item not found. This link may be out of date. Ask the shop to send it again."
How Remind me works
- The customer taps Remind me under Recommended next care. The page shows "We'll remind you on" and the date: the first day of the month the next care is due, for example 1 Nov 2026. If that month has already started, it is the next day.
- That morning, your store sends the customer the Item care reminder email, with a link to the item's page. If they have your Mobile App, they get a notification too.
- If the customer books the item in again before then, no reminder is sent.
The reminder goes to the customer the item belongs to, by the email on their account. A customer with no email and no app gets no reminder.
Example setup
CleanFast Laundry turns on Save customer items for its Bag Repair unit only. In the store editor, the Item page has Page title Bag Care Journey, Steps shown Deep Clean and Colour Restore, and Item details shown Brand. The Deep Clean service option has Next care in (months) 6, shown as Next Deep Clean, and aftercare "Keep away from rain. Store stuffed, in its dust bag."
First visit: on 14 May 2026, Ms Tan drops off her black Coach handbag at CleanFast Tampines for Deep Clean and Colour Restore. The item label prints with the item's QR. Staff WhatsApp her the link. She sees Received, then Deep Clean ticked on 16 May. On 22 May the bag is done, with Before and After photos and a note: "Light scuffs on the corners, recoloured to match."
Between visits: the page shows Recommended next care: Next Deep Clean, Nov 2026. Ms Tan taps Remind me and sees "We'll remind you on 1 Nov 2026." On 1 Nov she gets the reminder email.
Second visit: on 4 Nov 2026 she brings the bag to CleanFast Jurong. Staff pick her account, tap her saved Coach handbag at the top of the catalog, and add Deep Clean. The same QR opens the same page, now showing In our care now with Ready by 11 Nov, and the May visit under Service history.
FAQs
We are on the Standard plan. Can we use item pages?
No. On Standard, Save customer items and Give each item a page can't be turned on, and you see "Customer items come with the Professional plan." with See plans. If you move from Professional to Standard, item pages stop opening for customers.
What about items that came in before we turned this on?
Work orders made before you turned on Save customer items have no item yet. Open the work order's Item page icon and click Save to give it its page, link and QR. Work orders after that get theirs on their own.
A customer brought back their bag, but staff added it as a new item. How do we fix it?
Open the new work order's Item page icon, choose the earlier bag in Which item is this? and click Save. The visit moves to that bag's page, and the QR printed for this visit opens the earlier bag's page too. Only the same customer's items in the same business unit can be picked.
Why isn't the item page in our Mobile App?
The item page is on your Online Store only, so it shows Web only in the editor. Customers open it in their phone's browser from the link or QR, without signing in. If they have your app, Remind me still sends them a notification.
Can customers see prices or who owns the item?
No. The page shows no prices, payments or customer details, because the QR stays on the item and anyone who scans it can see the page. Prices stay on the customer's own order page.
Will my staff's label scanning still work?
Yes. Staff scanners keep using the work order code on the label, which is different for each visit. The item page QR is for customers and doesn't open anything in your staff apps.
Do I need next care on my service options?
No. Without it, the page shows the item's progress, photos and history, with Book again. Add next care only if you want customers to see when the item needs care again and to tap Remind me.
What's Next
Your customers' items now have a page and QR for life, and your team shares them from the order page. Next, add the finishing touches every page of your store shares: Setting Up Your Announcement Bar, Footer and Languages.