
Your staff complete a short checklist for each item when they pack it, and every service item gets its own job card with tasks.
A business unit's Production tab decides how the work on each item is organised. It has 3 sections: Packing, how finished orders are packed, including which groups of products are packed on their own; Packing Flows, the checks staff complete for an item when they pack it; and Work Orders, which turns each service item into a job card with its own tasks. Packing checks make sure no item leaves without a photo or a quality check, so you spend less time handling complaints. Work orders show your workshop exactly what is left to do on each bag, shoe or garment, so nothing is forgotten when staff change shifts. Both sections are optional, so you set up only what your shop needs.
Before You Start
- Finish Asking for Details on Each Item, so your items carry the details staff collect at the counter.
- Packing checks are built in Flows. If you are new to flows, read Introduction to Flows first.
- To create work order tasks by service option, such as Recolour, set up your service options in your catalog first. See Choosing What You Sell and Your Prices.
- You need admin access to Settings. If your team uses limited admin roles, you need Production settings to change the Production tab, and Library & templates to build flows.
- Packing flows and work orders work on every order, with or without a customer. Saving customer items needs a customer on the order.
- Moving from the older version? Packing steps used to be set up as Procedures. Those now sit under Procedures (Legacy) in Settings. Build your packing steps again as a flow and pick it on the Production tab, because that is the flow the Packing screen uses.
Where to Find the Production Tab
- Click the ⚙️ Settings icon in the top-right corner.
- Under the Administration section, click Business Units.
- Click your business unit, for example Laundry & Dry Cleaning.
- Click the Production tab.
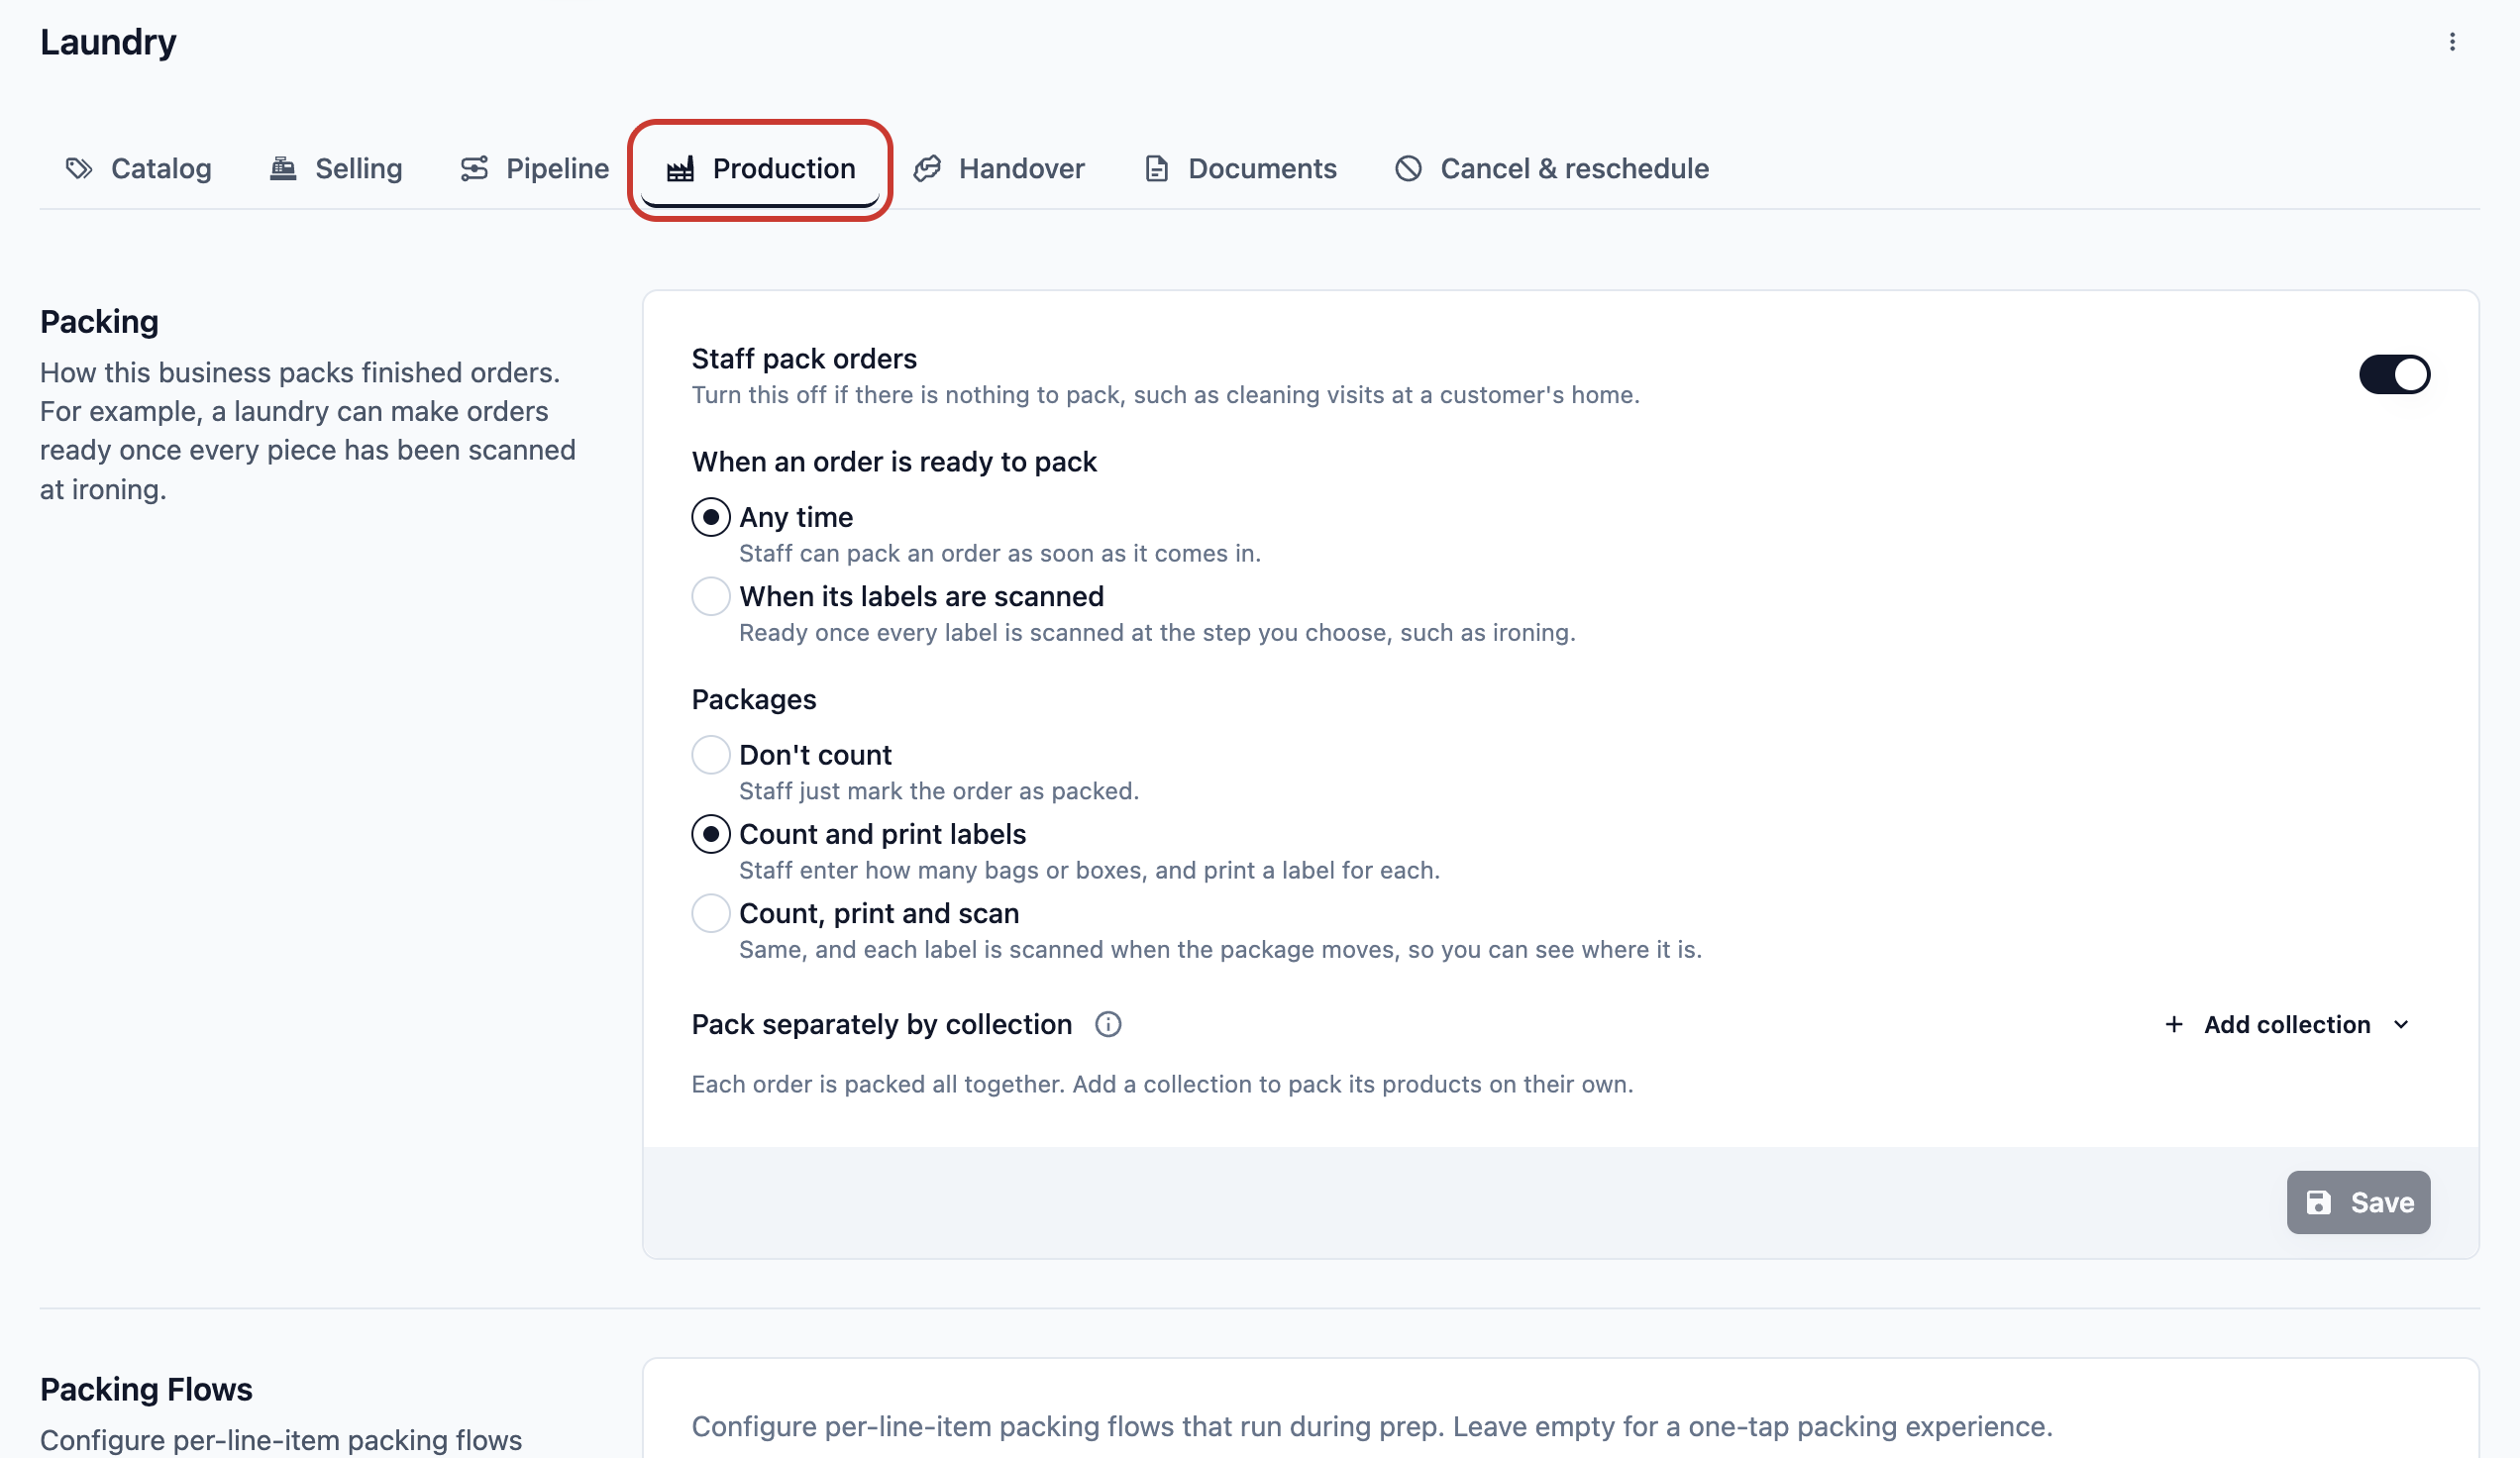
The tab has 3 sections:
- Packing: how staff pack finished orders, and which collections of products they pack on their own.
- Packing Flows: the checks staff complete for an item when they pack it.
- Work Orders: whether each service item becomes a work order, and which tasks it gets.
The Production tab is about the work on each item, while the Pipeline tab sets the stages of the whole order, such as At Shop and Ready for Collection, as explained in Tracking Every Order from Drop-Off to Collection.
Pack Collections Separately
Use this only if parts of an order are finished at different times. For example, a laundry washes clothing and linen on different lines, so staff want to pack the clothing as soon as it is done and the linen later, each in its own bags.
You choose which collections are packed on their own. A collection is a group of your products, such as Clothing or Linen. To create one and put products in it, see Adding Collections.
- On the business unit's Production tab, go to the Packing section.
- Make sure Staff pack orders is turned on.
- Next to Pack separately by collection, click Add collection and choose a collection, for example Clothing.
- Add each other collection you pack on its own, for example Linen.
- Drag the collections into the order staff should pack them.
- Click Save.
You see “Packing settings updated”.
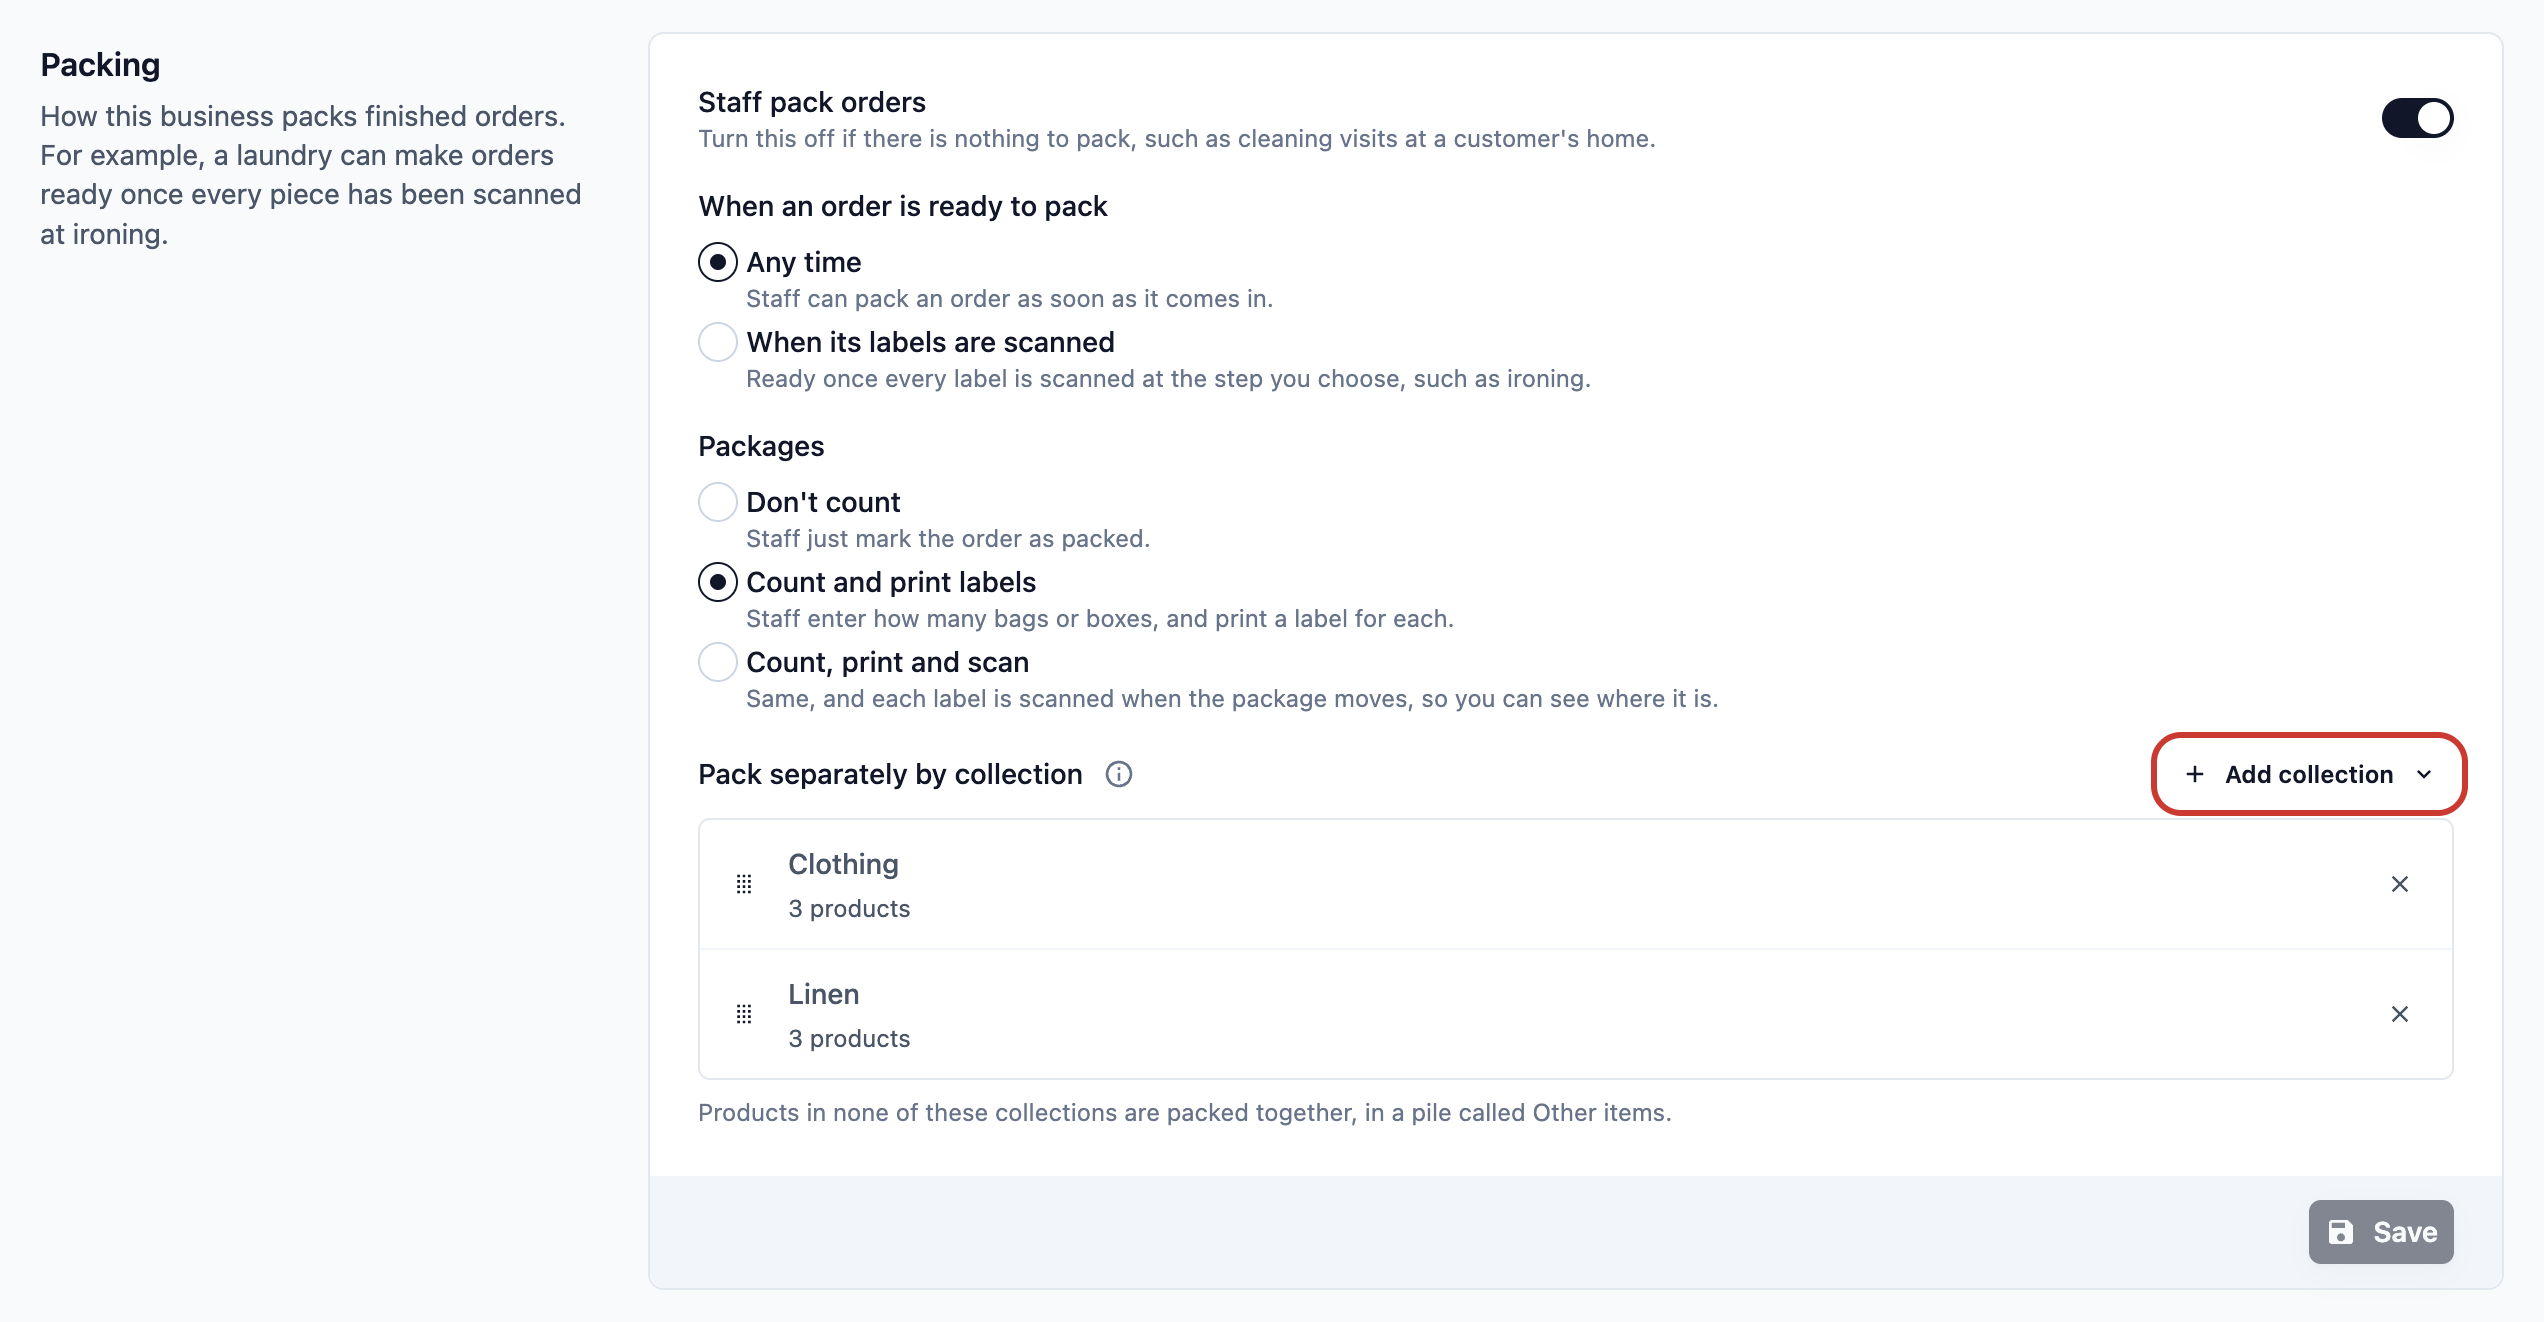
From then on, staff pack each new order of this business unit one collection at a time:
- A product in one of the collections is packed with that collection.
- A product in more than one of them is packed with the first one listed. The page names these products, so you can check they go where you expect.
- A product in none of them is packed with the rest, in a group called Other items.
To pack each order all together again, remove every collection from the list with the ✕ beside it, then click Save. Orders taken before you added the collections are still packed all together. If staff add an item to one of them afterwards, the new item is packed with its collection and the earlier items stay together as Other items.
Build a Packing Flow
A flow is a set of steps staff go through on screen, one after another. A packing flow runs when staff pack an item. For example, staff take a photo of the folded shirt, then enter how many bags it went into.
Use this only if you want staff to record something when they pack. If you leave Packing Flows empty, staff pack items by ticking them and tapping Pack, with no checks asked.
Create the flow
- Click the ⚙️ Settings icon in the top-right corner.
- Under the Library section, click Flows.
- Click Add Flow.
- In Flow type, choose Work-order operation. This is the type for packing flows.
- Leave Used by on Staff. Packing flows are for staff only.
- Under Start from a template, click Blank Flow.
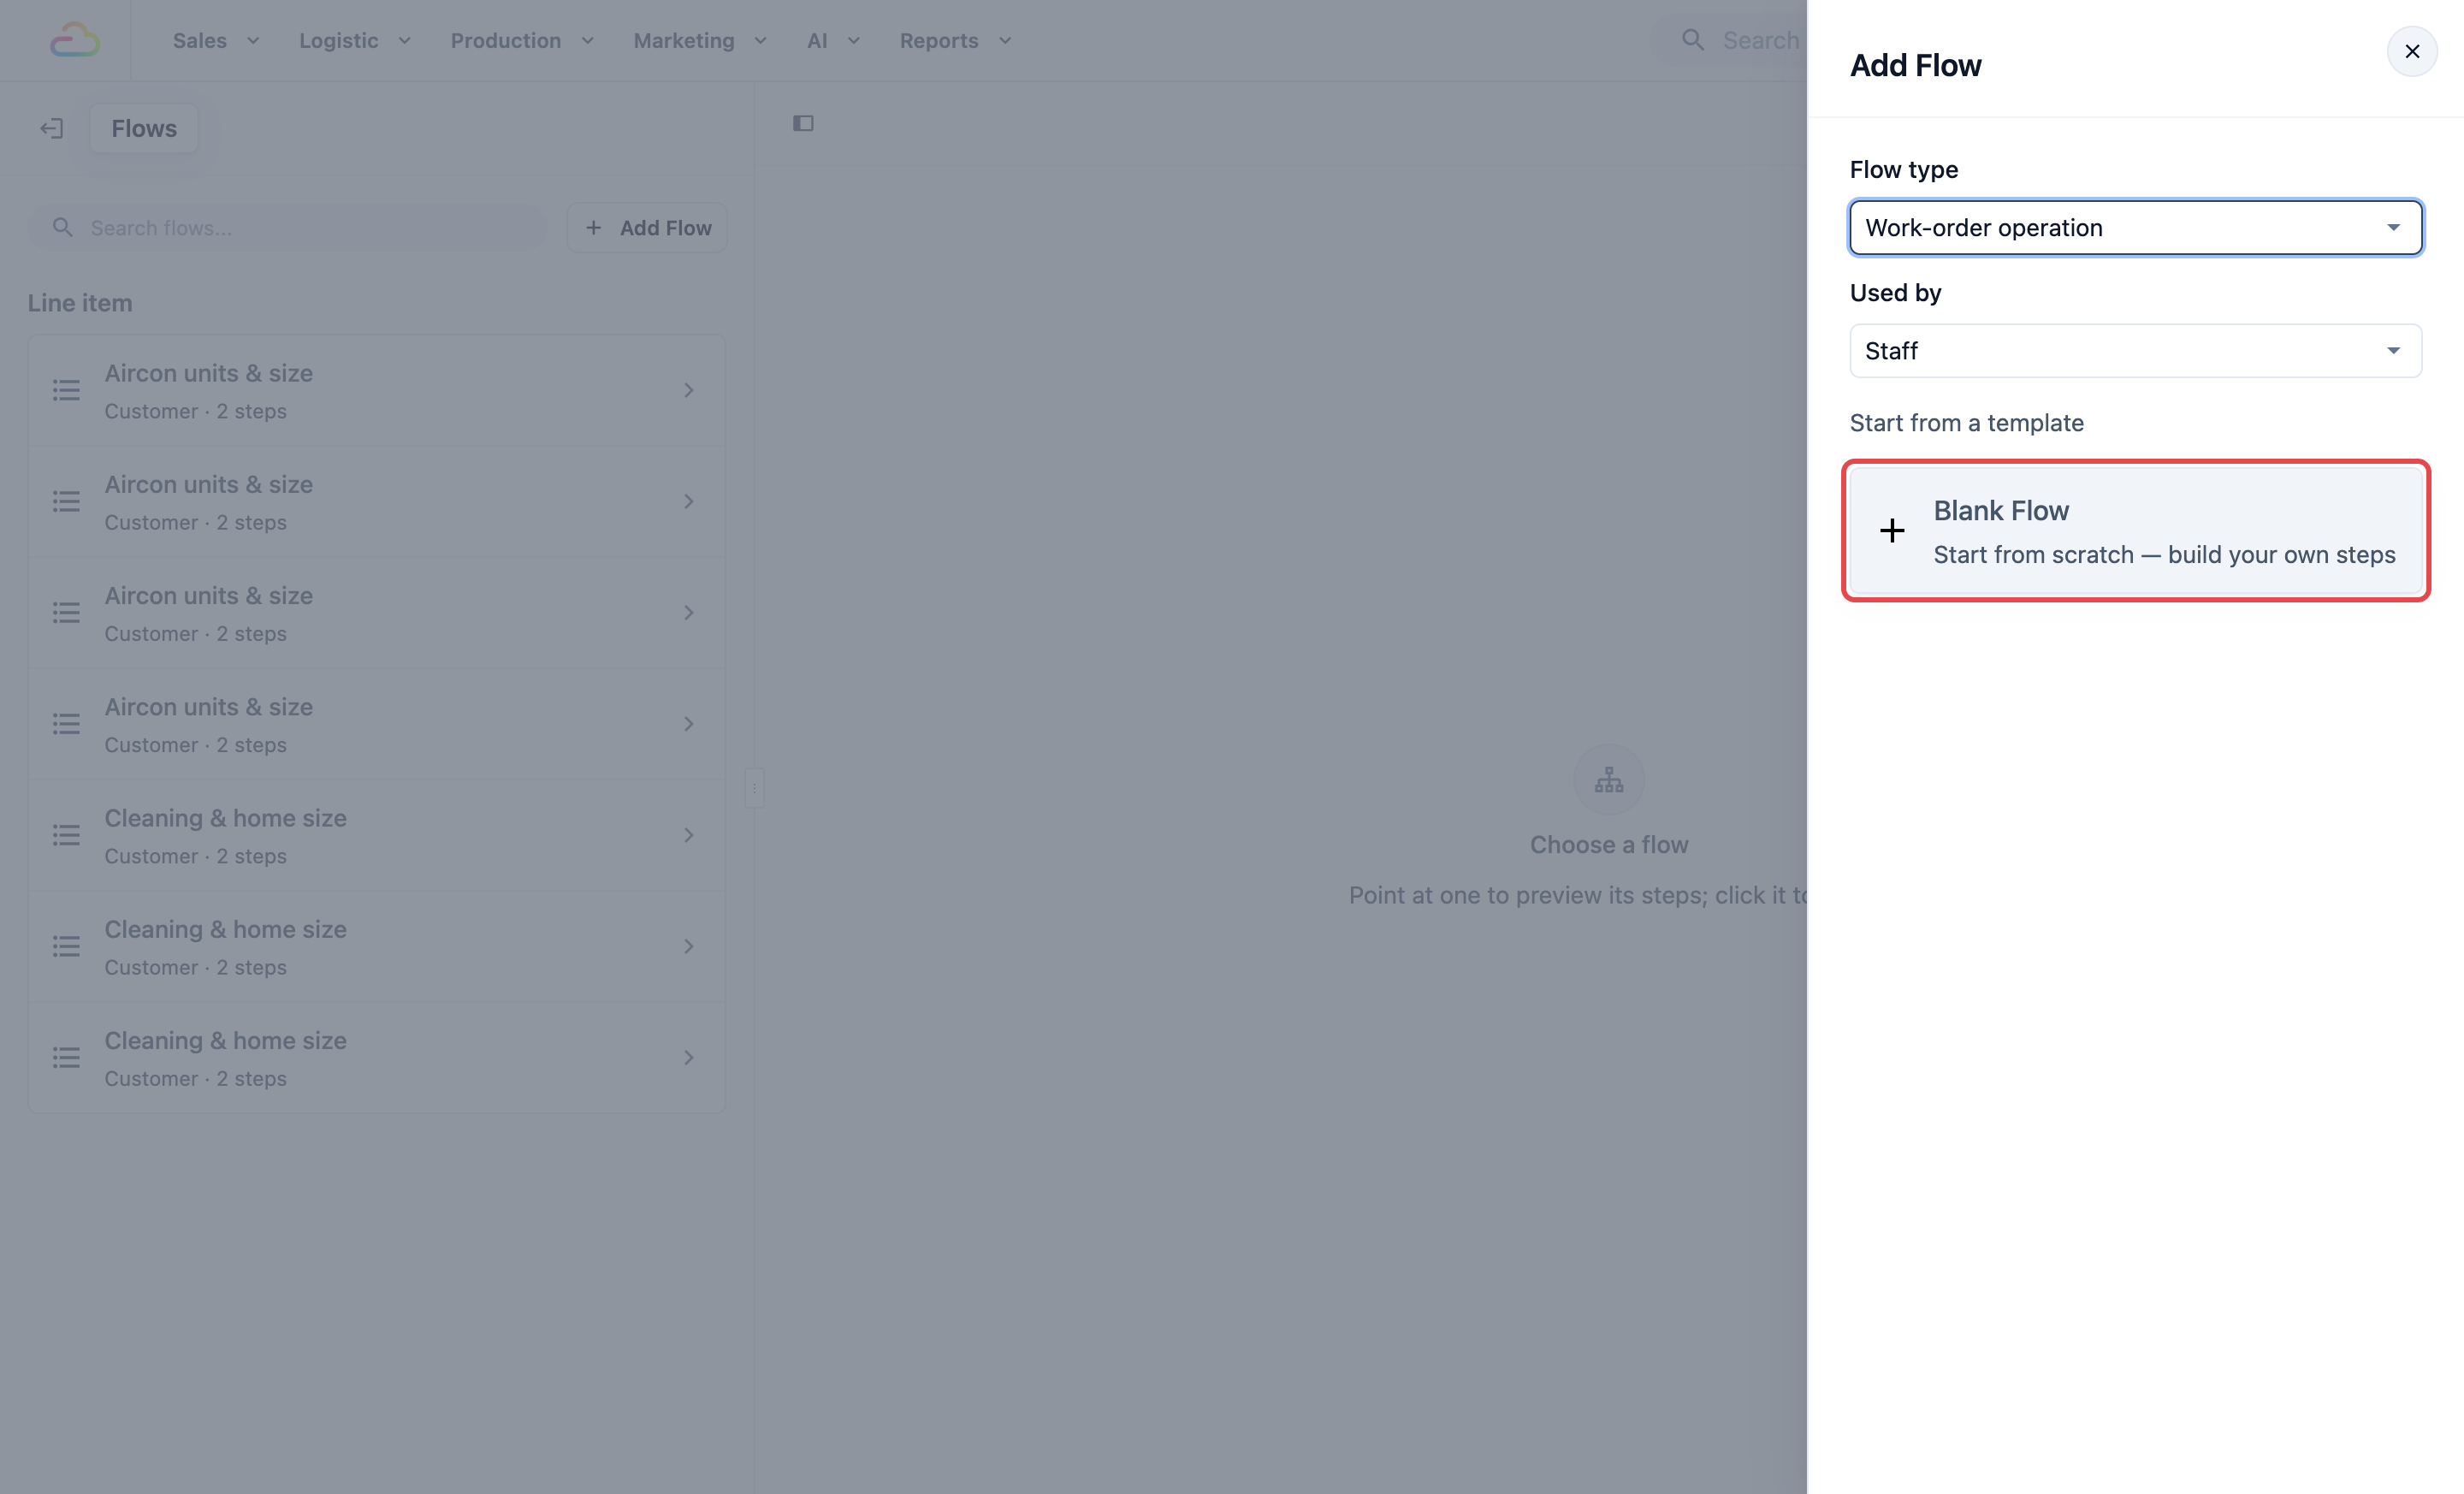
- In Flow Name, type a name your staff will recognise, for example Pack and Check.
- Click Create.
You see “Flow created”, and your new flow opens.
Flow type
| Option | What it is for |
|---|---|
| Order intake | Steps staff or customers complete when an order is taken |
| Line item | Steps for each item at checkout, covered in the previous article |
| Work-order operation | Steps staff complete on an item in the back room, including packing. Choose this one |
| Close of day | Steps at the end of the day, such as signing off the day's takings |
Add the steps
- Click Add Step.
- In the Add a step window, pick a step, for example Take Photos. You can also search, for example “photos”.
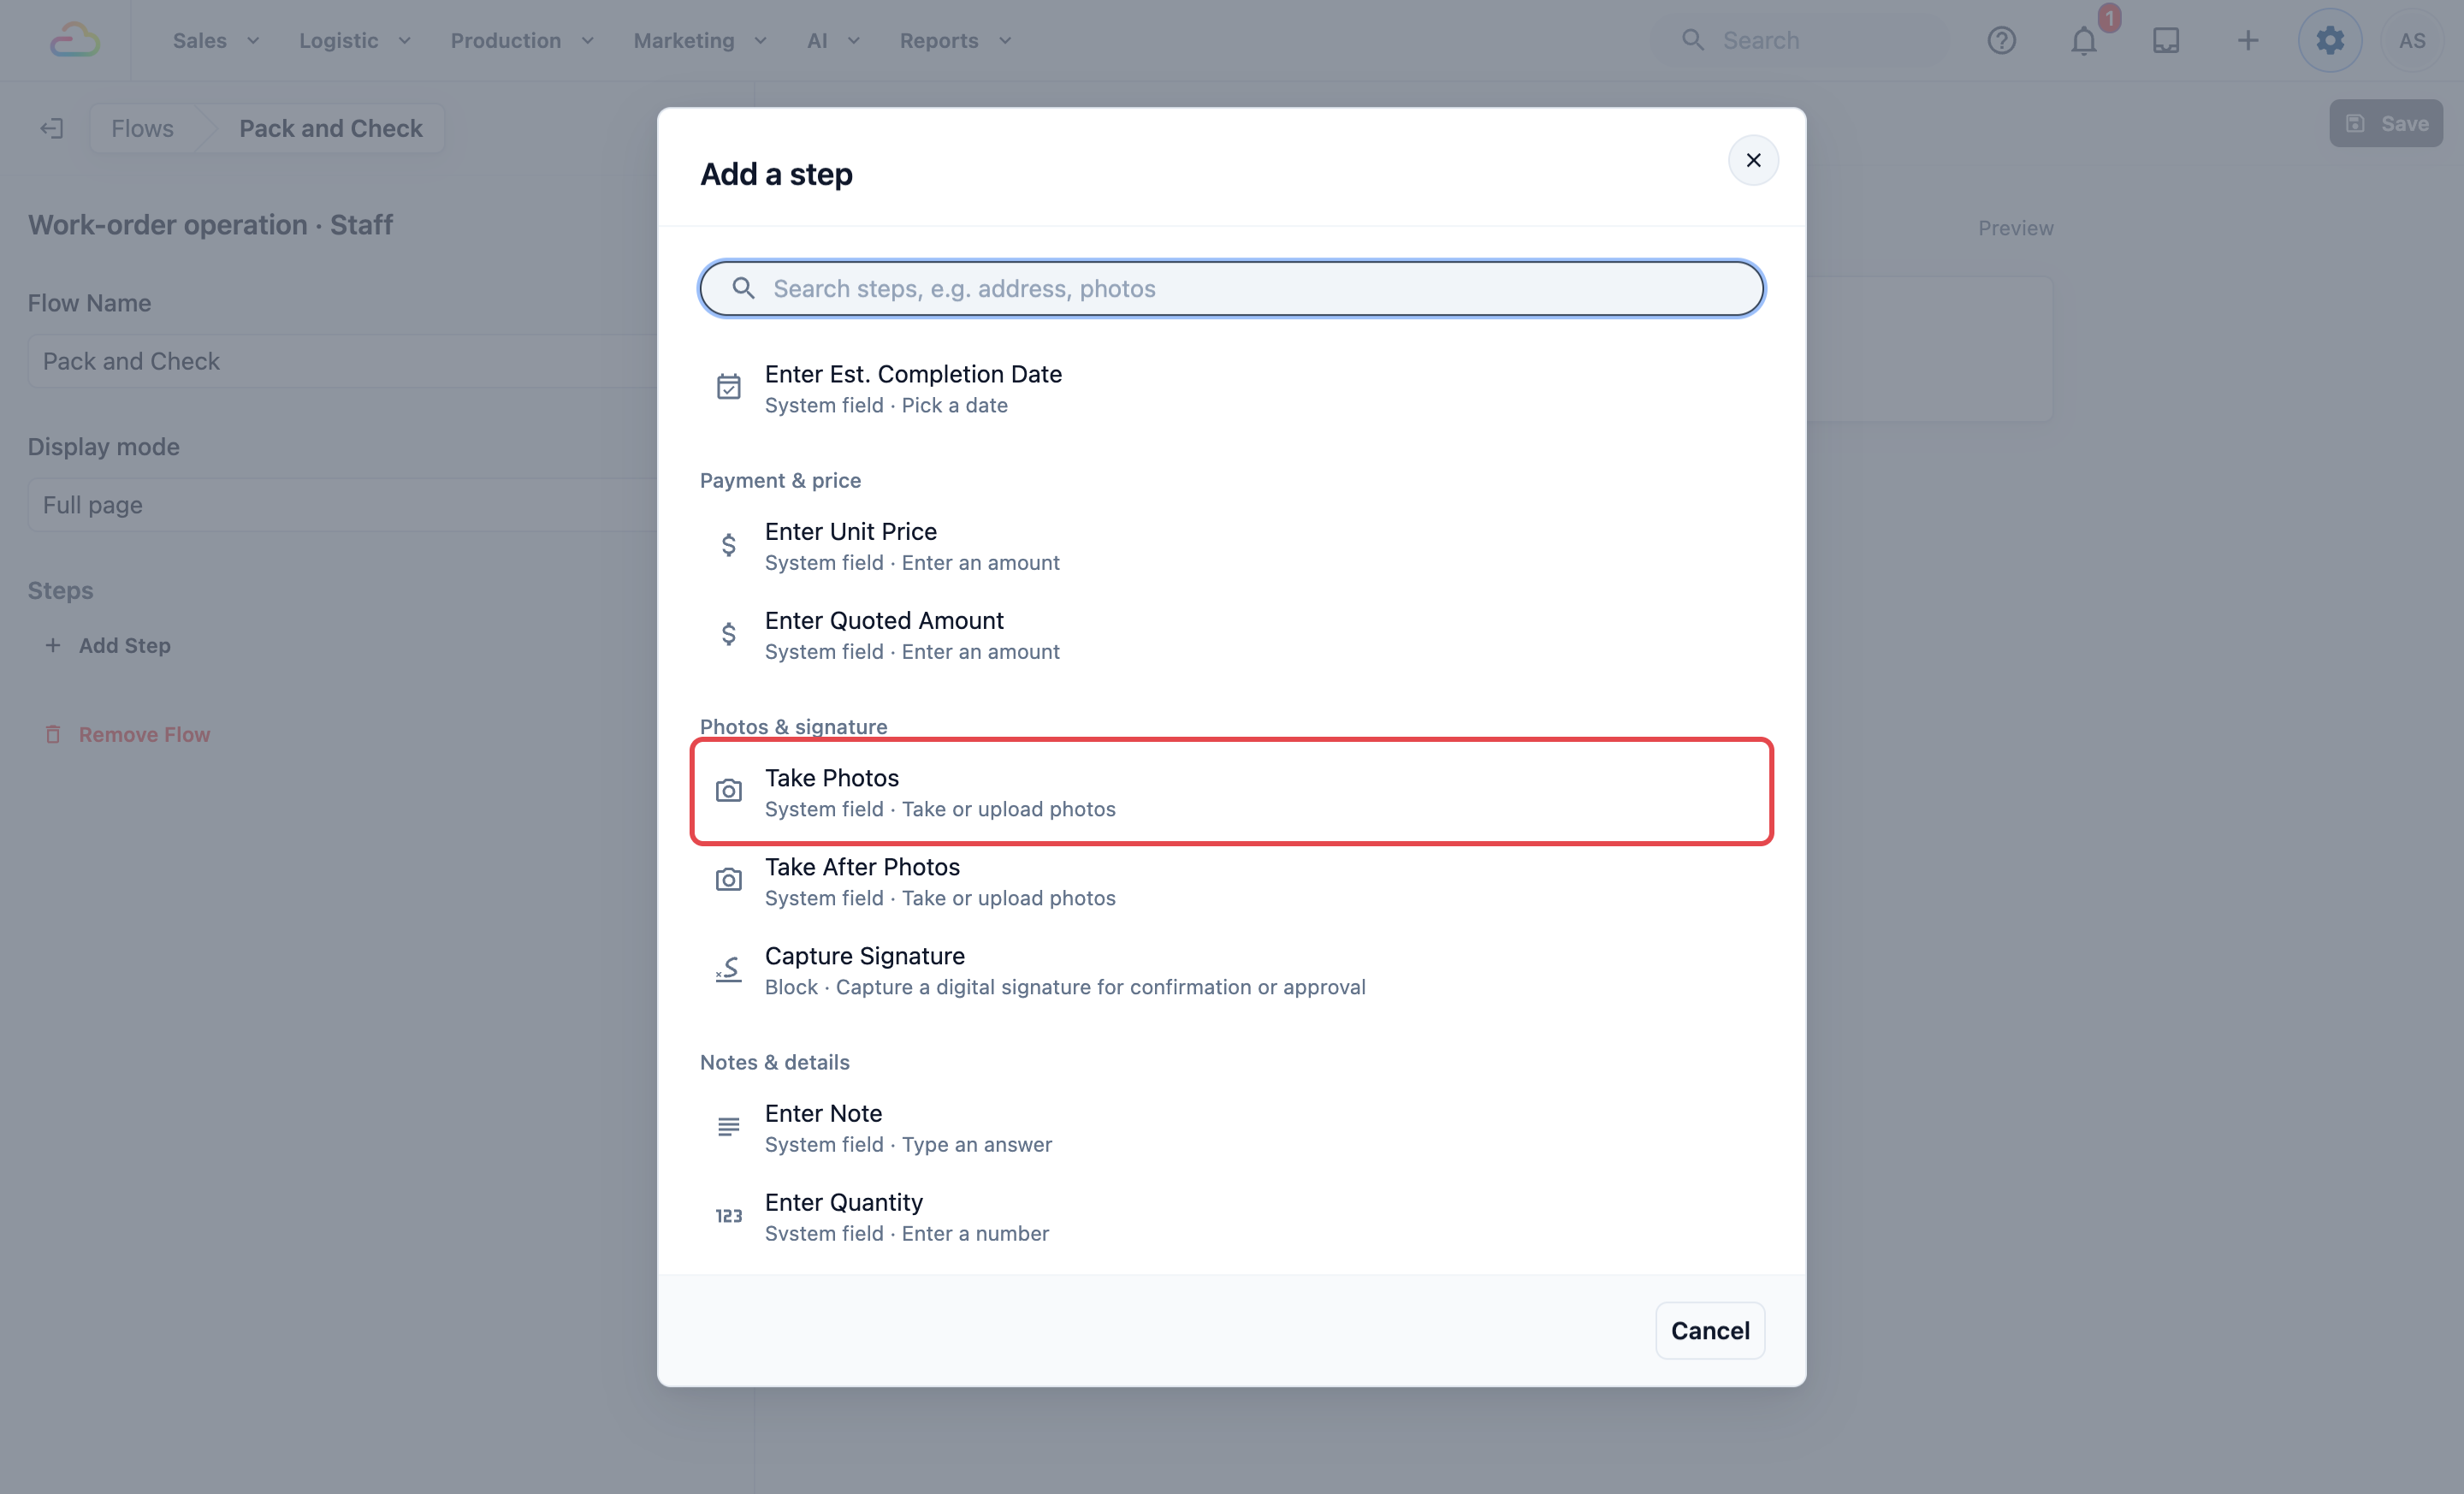
- Click the step to open it, and choose its Process Method.
- Repeat for each step. Drag the steps into the order staff should complete them.
- Click Save at the top of the page.
You see “Flow saved”.
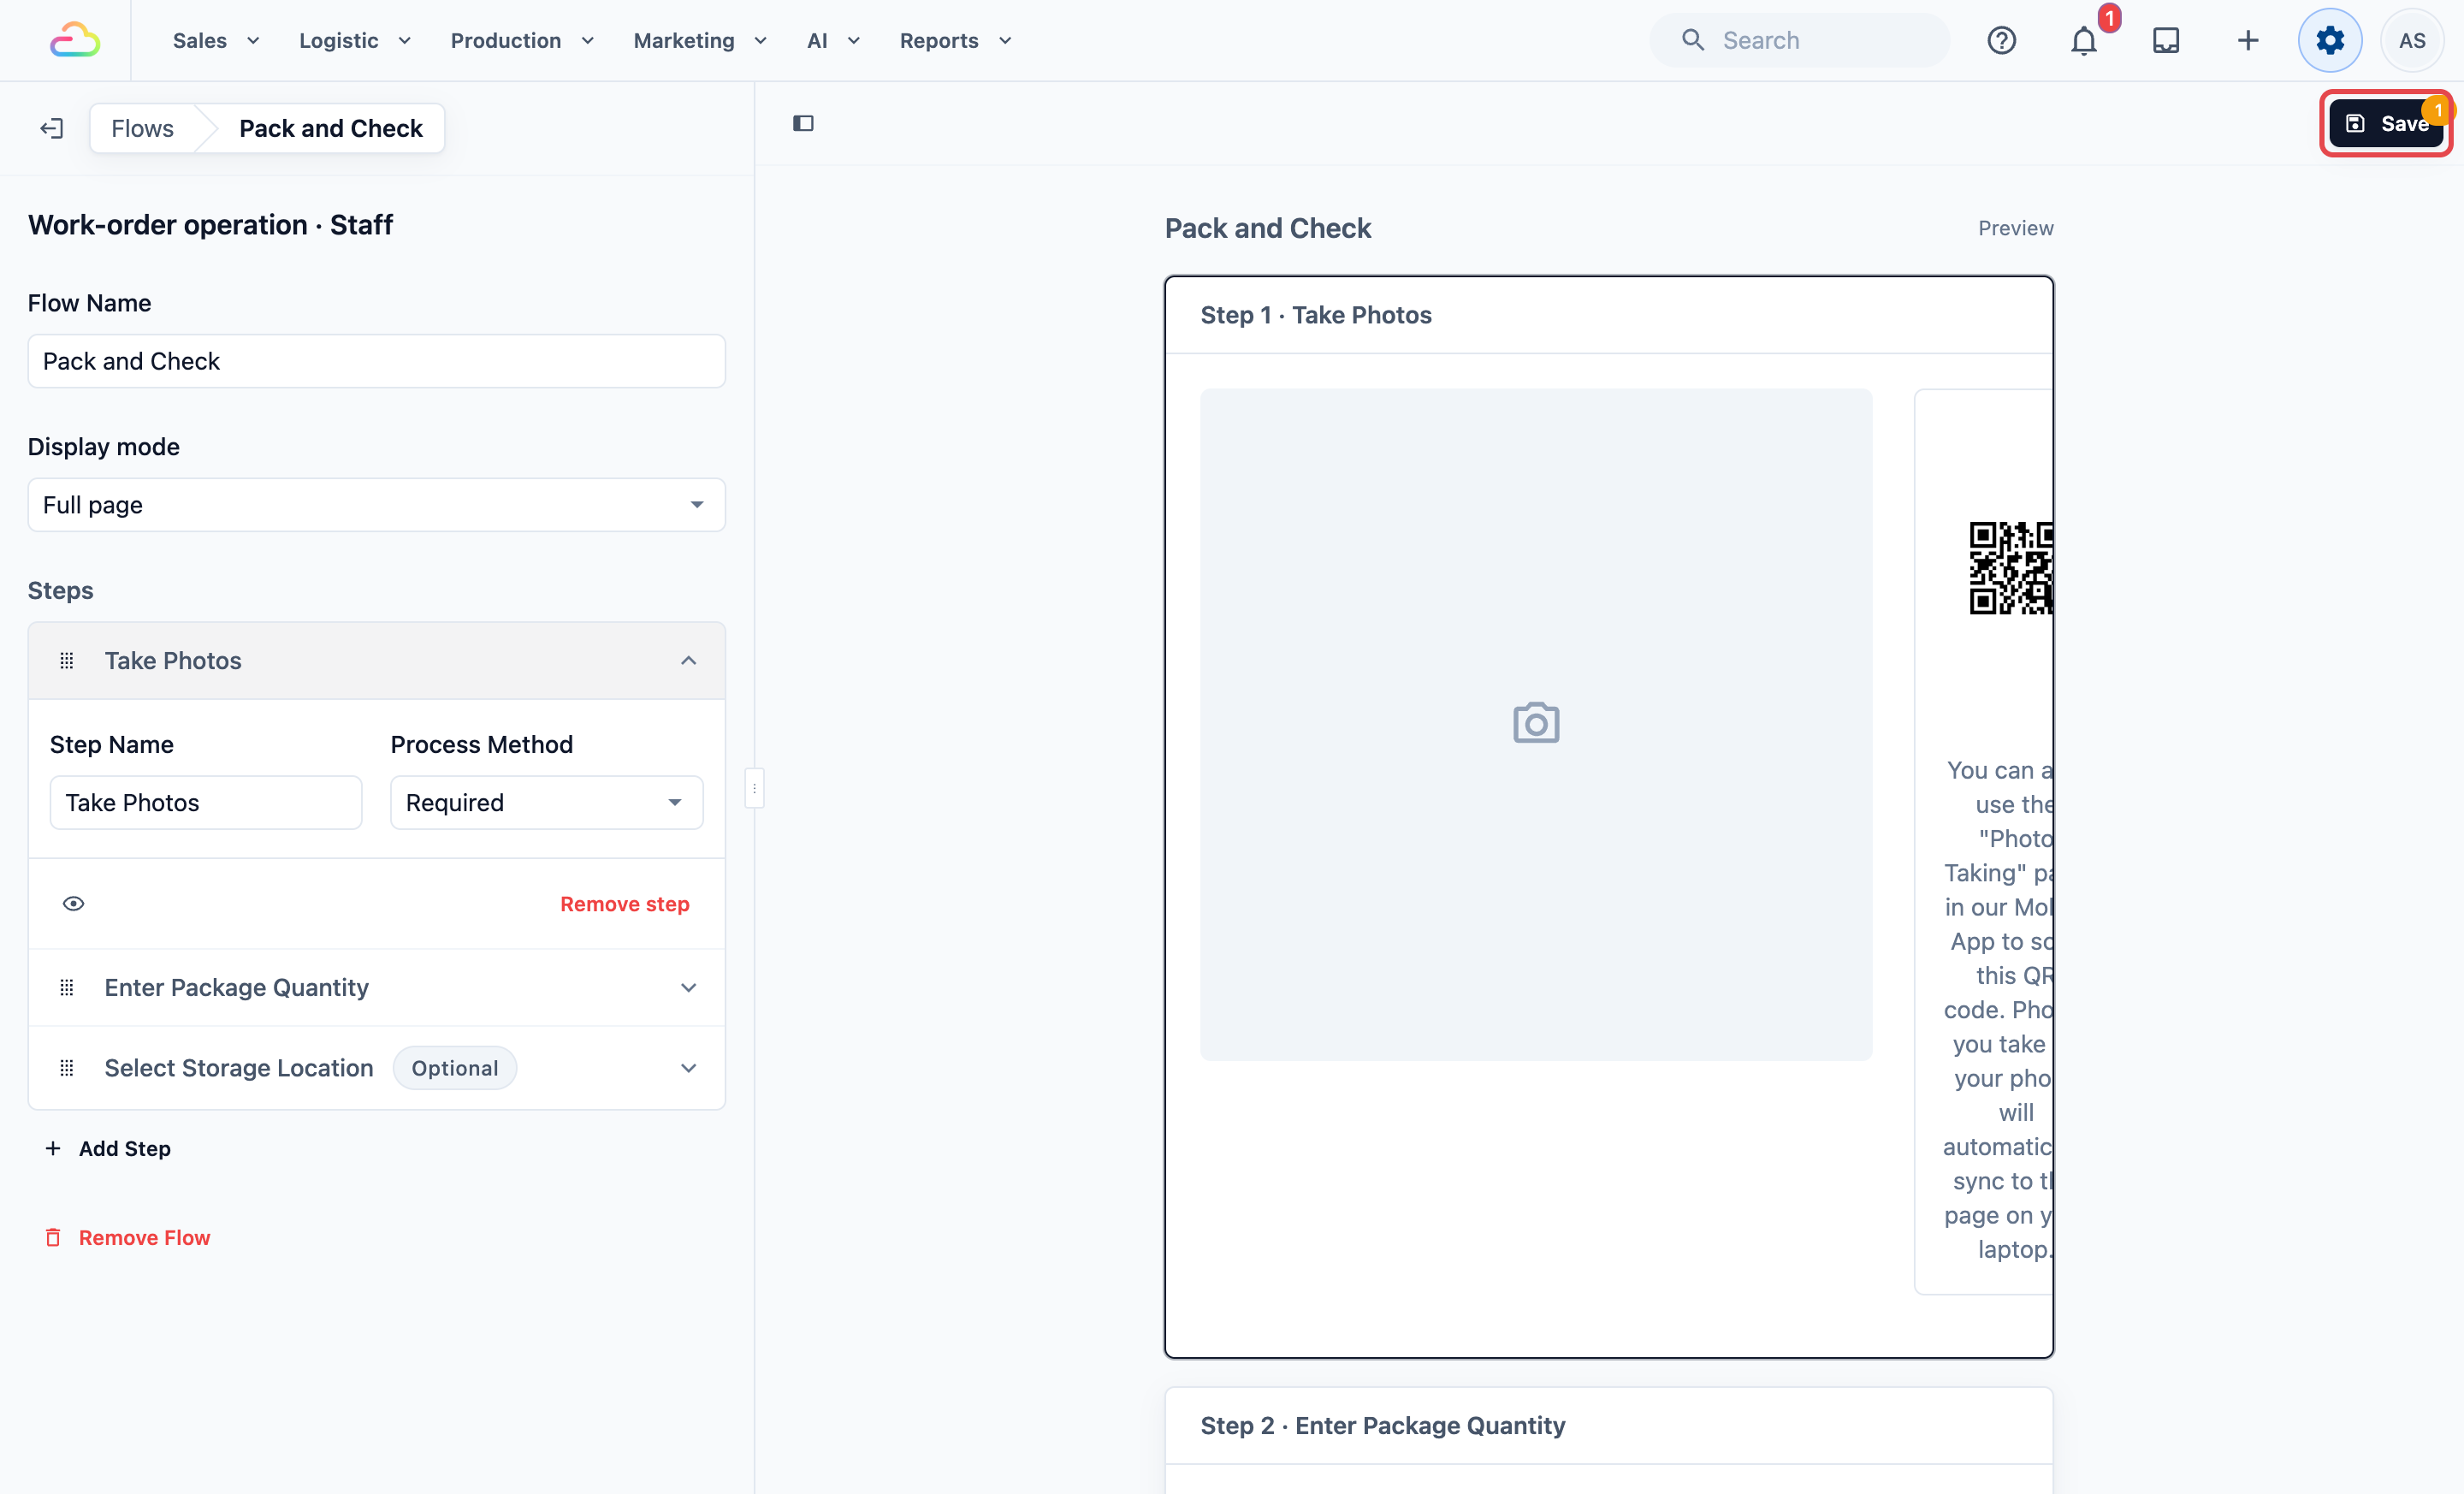
Steps that work well for packing include:
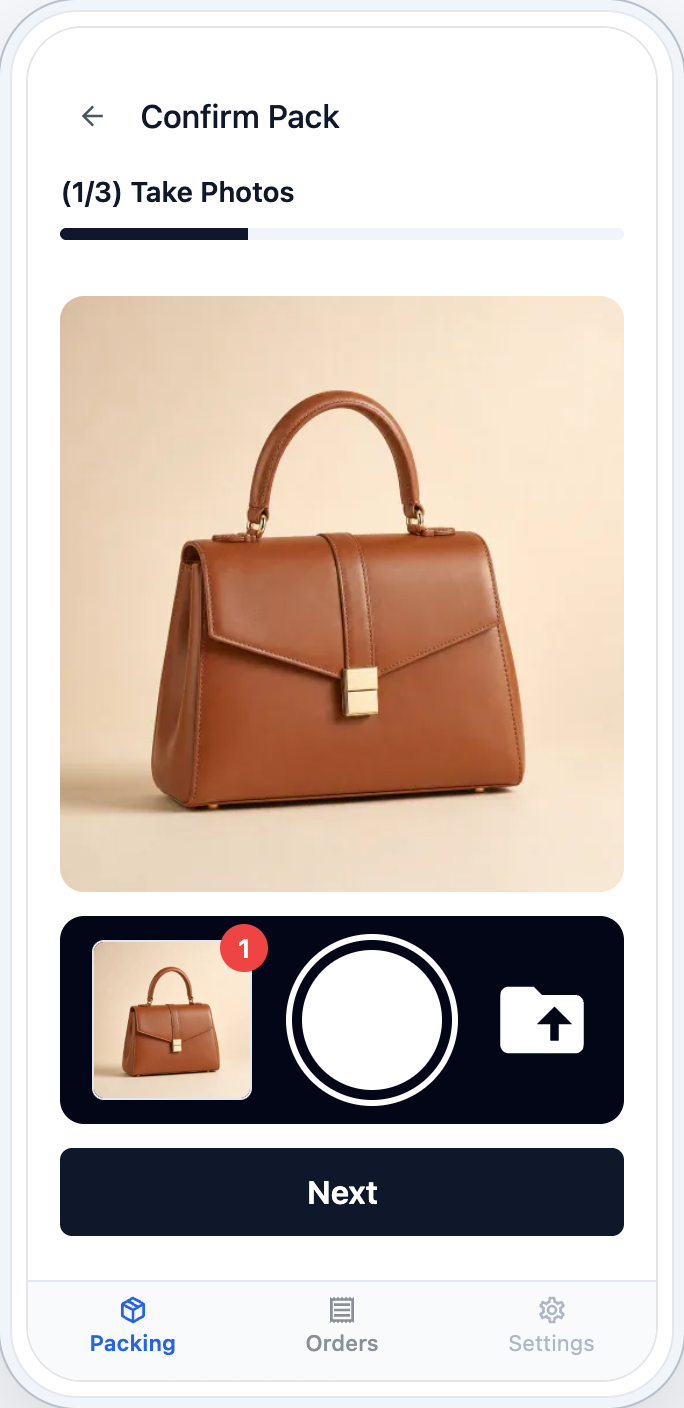
- Take Photos or Take After Photos: a photo of the finished item.
- Enter Package Quantity: how many bags or boxes the item went into.
- Select Storage Location: the rack or shelf where the packed item waits.
- Enter Note or Signature: a remark, or a sign-off by the packer.
- Your custom fields: any check you created yourself, such as a quality tick.
Process Method
| Option | What it means for staff |
|---|---|
| Required | Staff must complete the step before they can finish packing |
| Optional | Staff see the step and can skip it |
| On demand | The step is kept aside, and staff open it only when they need it |
Display Mode
| Option | What staff see |
|---|---|
| Full page | Each step fills the screen |
| Inline dialog | The steps open in a smaller window over the current screen |
Pick the Packing Flow for Your Business Unit
- Click the ⚙️ Settings icon in the top-right corner.
- Under the Administration section, click Business Units.
- Click your business unit, then click the Production tab.
- Under Packing Flows, open the Add Line Item Flow list and choose your flow, for example Pack and Check.
- In Apply To, choose which items use the flow.
- Click Save.
You see “Packing flows updated”.
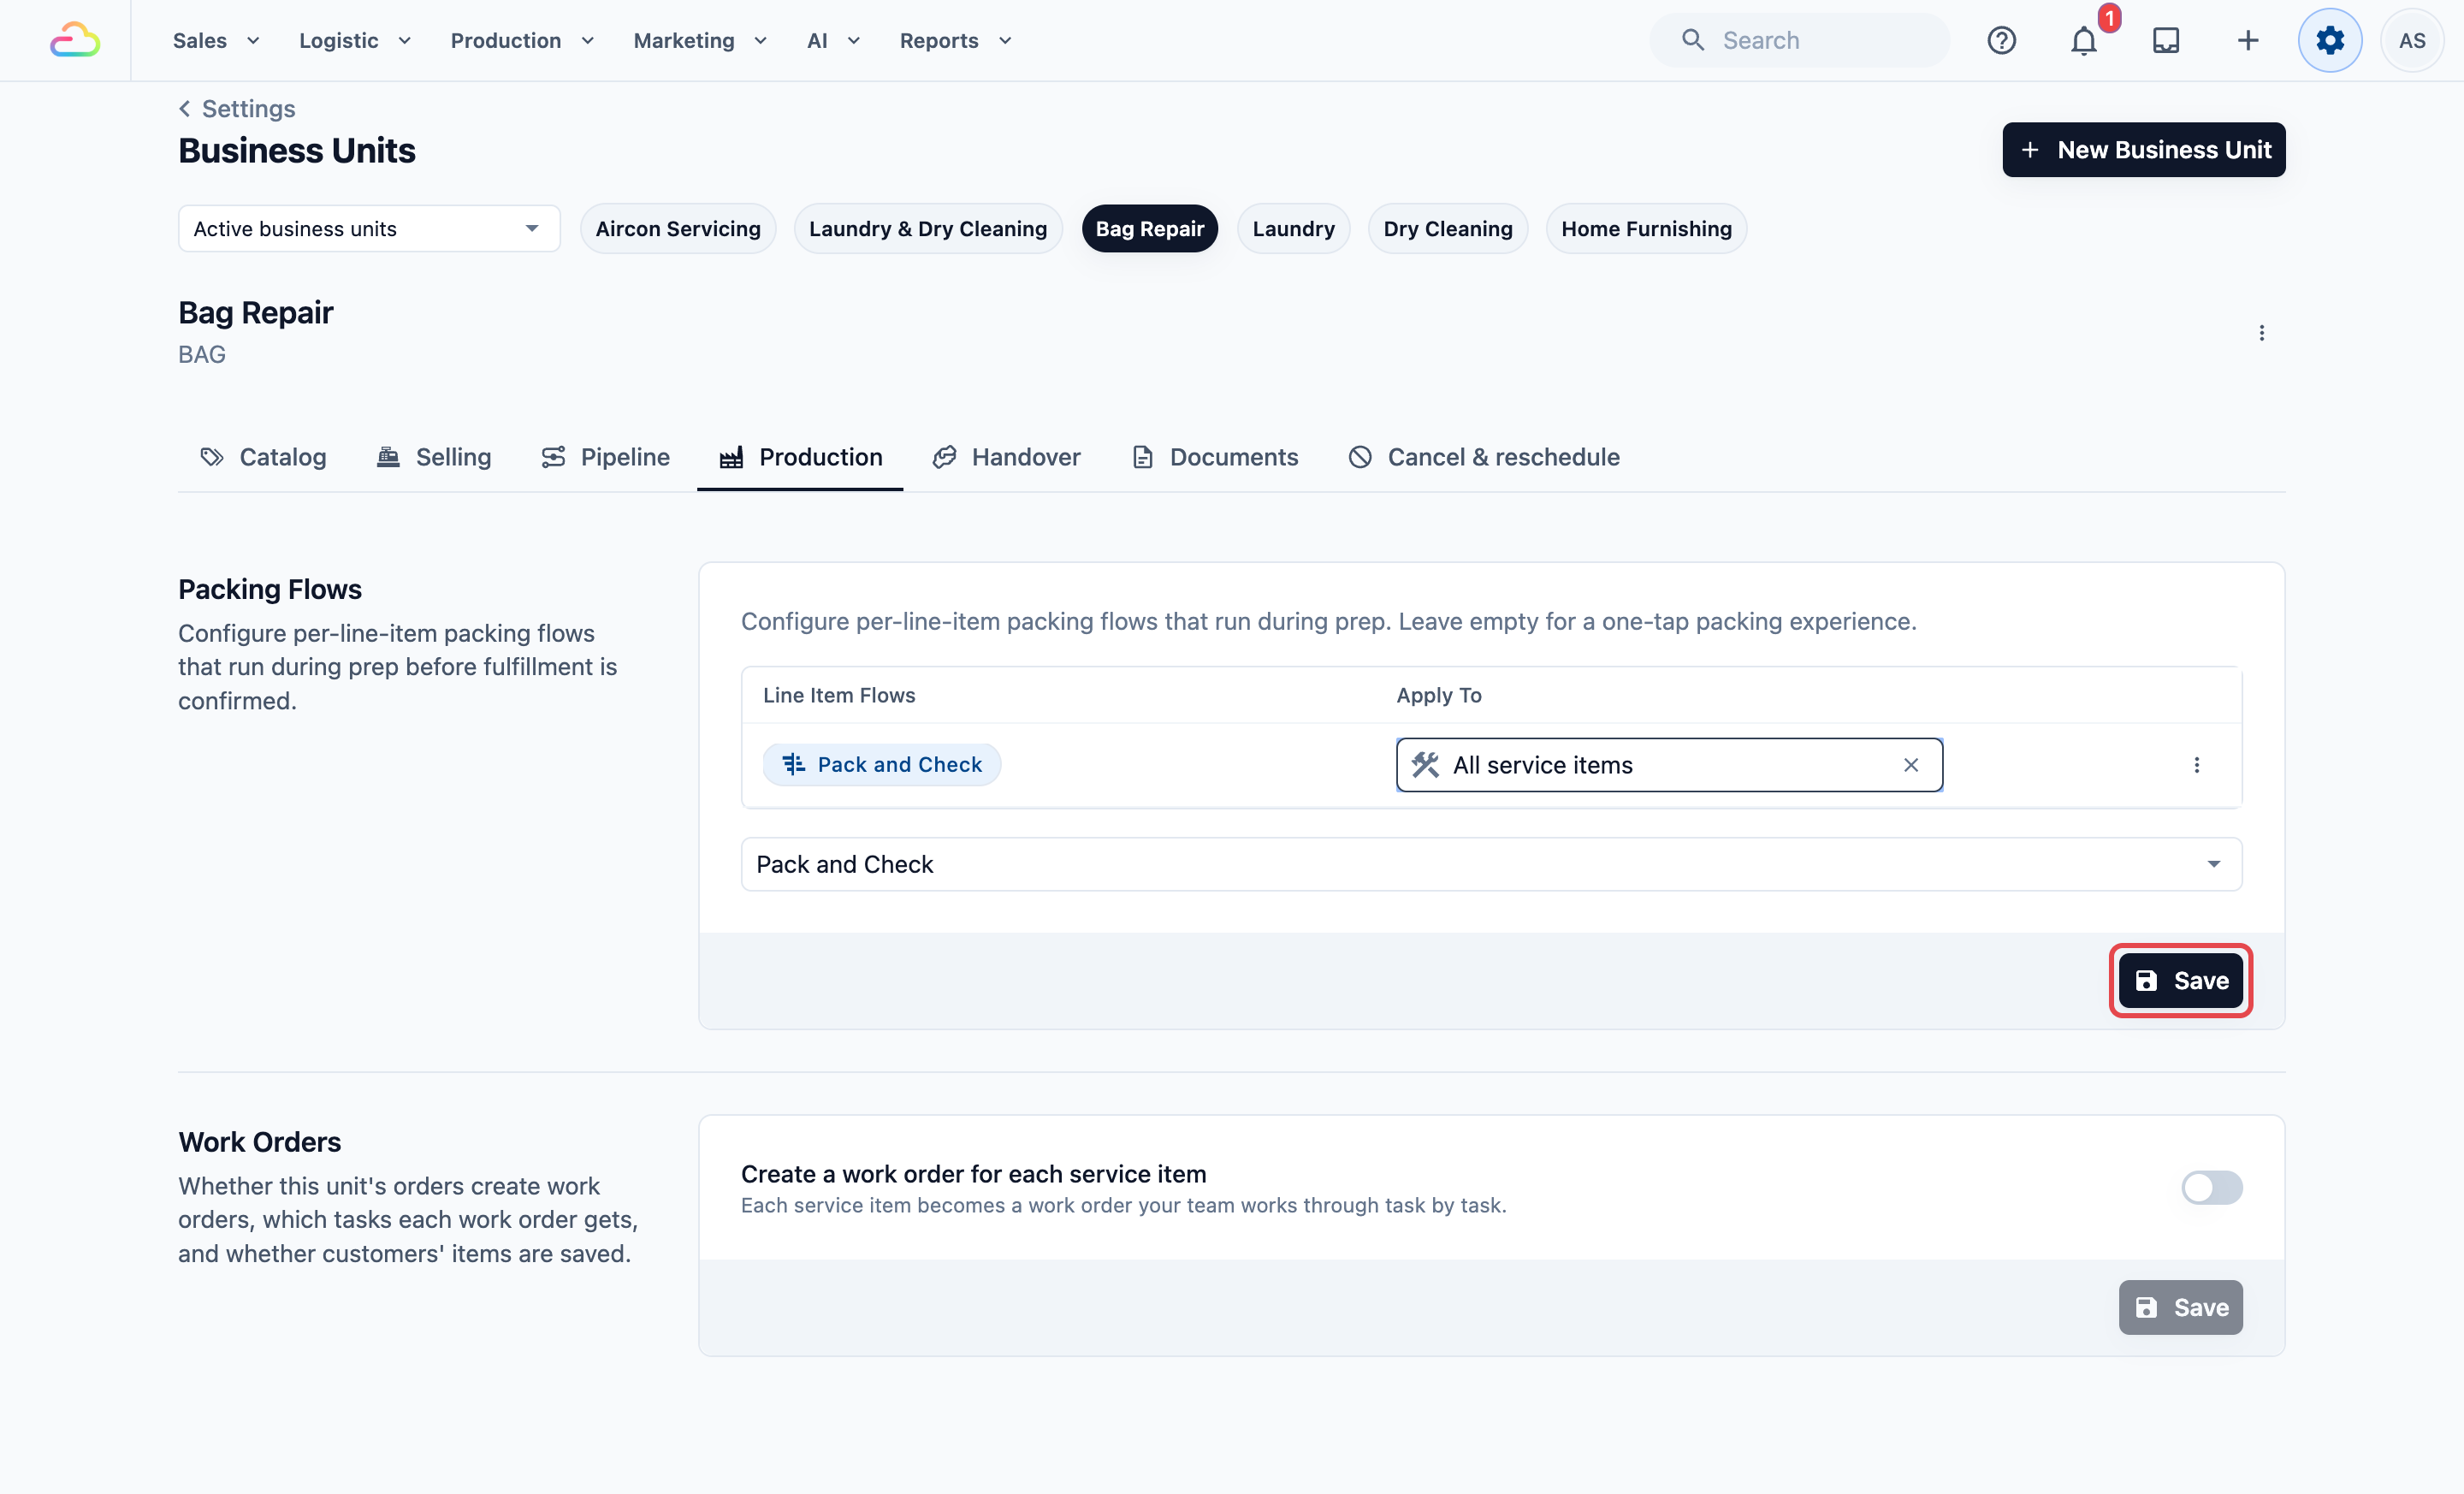
Apply To
| Option | Which items use the flow |
|---|---|
| All items (left empty) | Every item on the order. The list marks it as (default) |
| All service items | Items you clean or repair, such as shirts or handbags |
| All retail products | Products you sell, such as detergent or shoe care kits |
If you add more than one flow, each item uses the first flow in the list that fits it. Add your narrower flow, such as All service items, before an All items flow.
To stop using a flow, open its menu in the list, click Remove, then click Save.
Turn Service Items into Work Orders
A work order is the job card for one item, such as one handbag or one pair of shoes. It lists the tasks your team works through, one by one. Work orders suit repairs and high-value items. If you leave them off, no work orders are created, and you follow the order only through its Pipeline stages.
Turn work orders on
- On the business unit's Production tab, go to the Work Orders section.
- Turn on Create a work order for each service item.
- Under Tasks, click Add task.
- In Task name, type the task, for example Inspect.
- Choose when the task is created. A new task starts on The item has these service options.
- If you chose The item has these service options, choose the options in Select service options, for example Recolour.
- Repeat for each task. Drag the tasks into the order staff should see them.
- Click Save.
You see “Work order settings updated”.
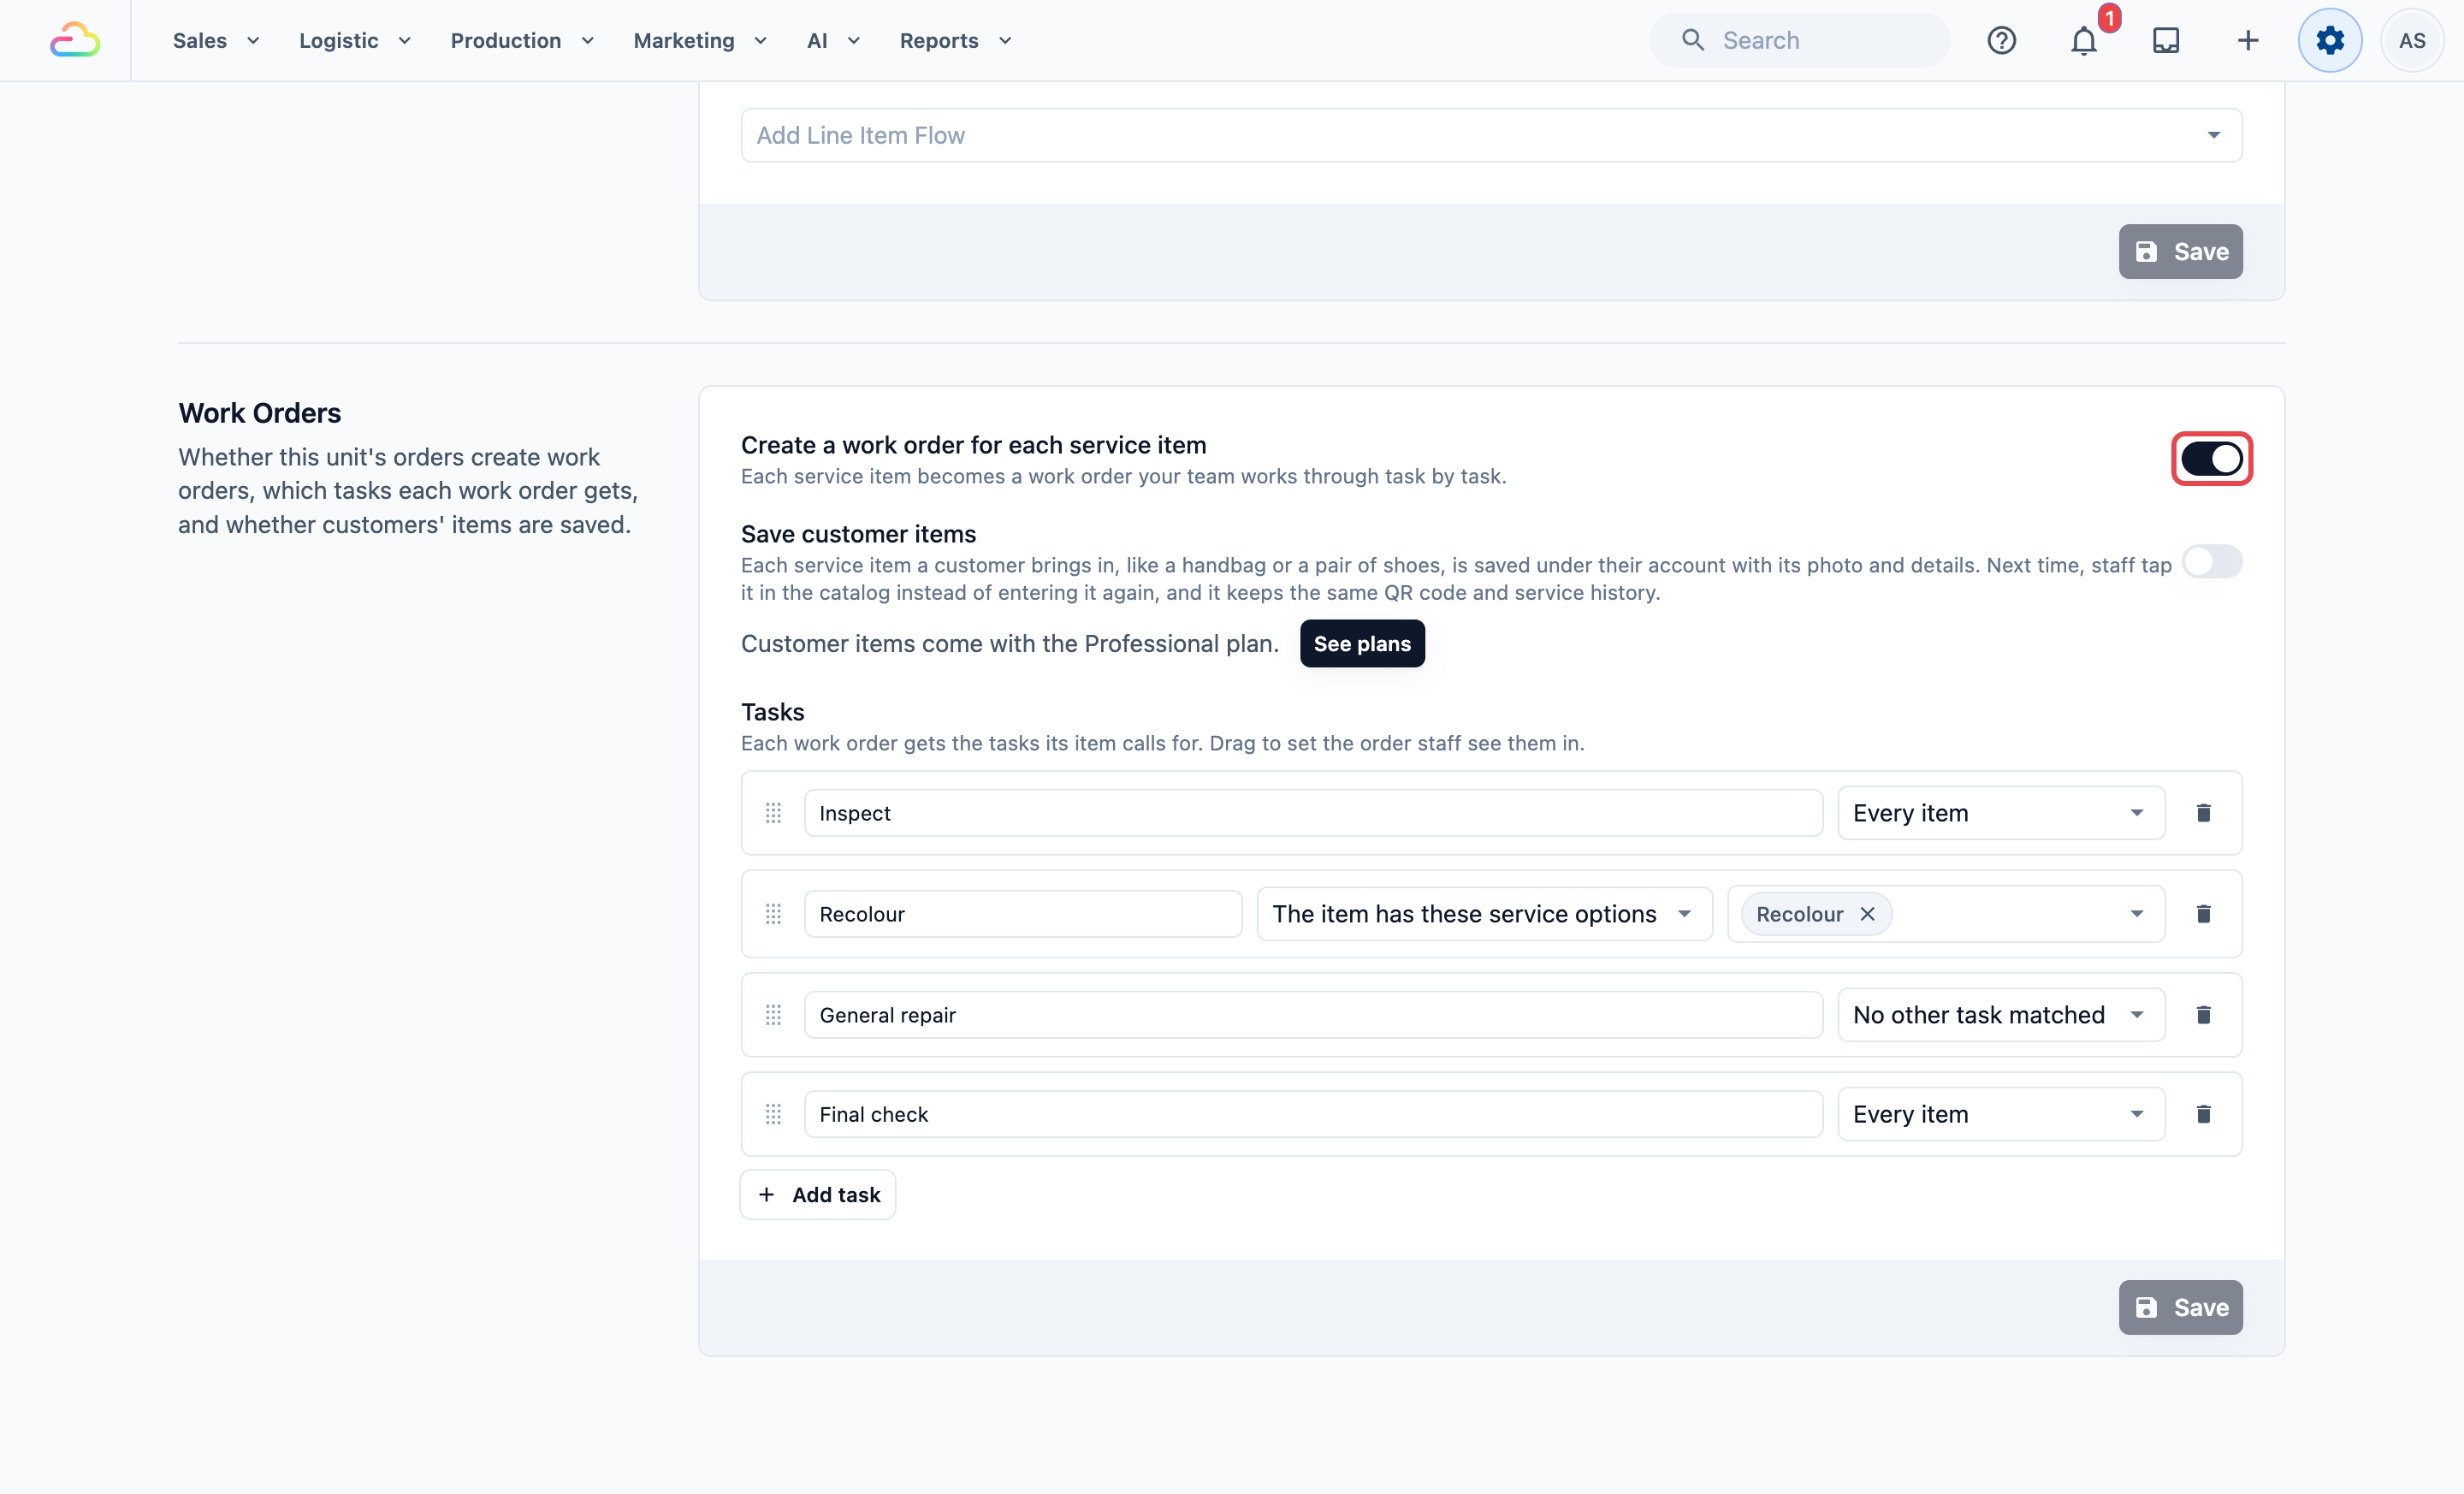
When the task is created
| Option | What it means |
|---|---|
| The item has these service options | The work order gets this task for each chosen service option on its item, such as Recolour |
| Every item | Every work order gets this task once, such as Final check |
| No other task matched | The work order gets this task for each service option that no other task covers. Use it as a catch-all, such as General repair. You can have only one |
Save customer items
When work orders are on, you also see Save customer items. Turn it on to save each item a customer brings in, such as a handbag, under their account with its photo and details. Next time, staff tap the item in the catalog instead of entering it again, and it keeps its QR code and service history. This needs the Professional plan and a customer on the order.
Messages you may see
| Message | What to do |
|---|---|
| Add at least one task, or stop creating work orders. | Add a task, or turn the switch off |
| Give every task a name. | Type a Task name for each task |
| Choose service options for every task created by service options. | Choose at least one service option for that task |
| Only one task can be created when no other task matched. | Change all but one of those tasks to another choice |
Orders taken from now on get work orders. Orders taken before keep what they had.
See your work orders
- In the top navigation bar, click the Production dropdown, then click Work Orders.
- Click a work order to see its tasks.
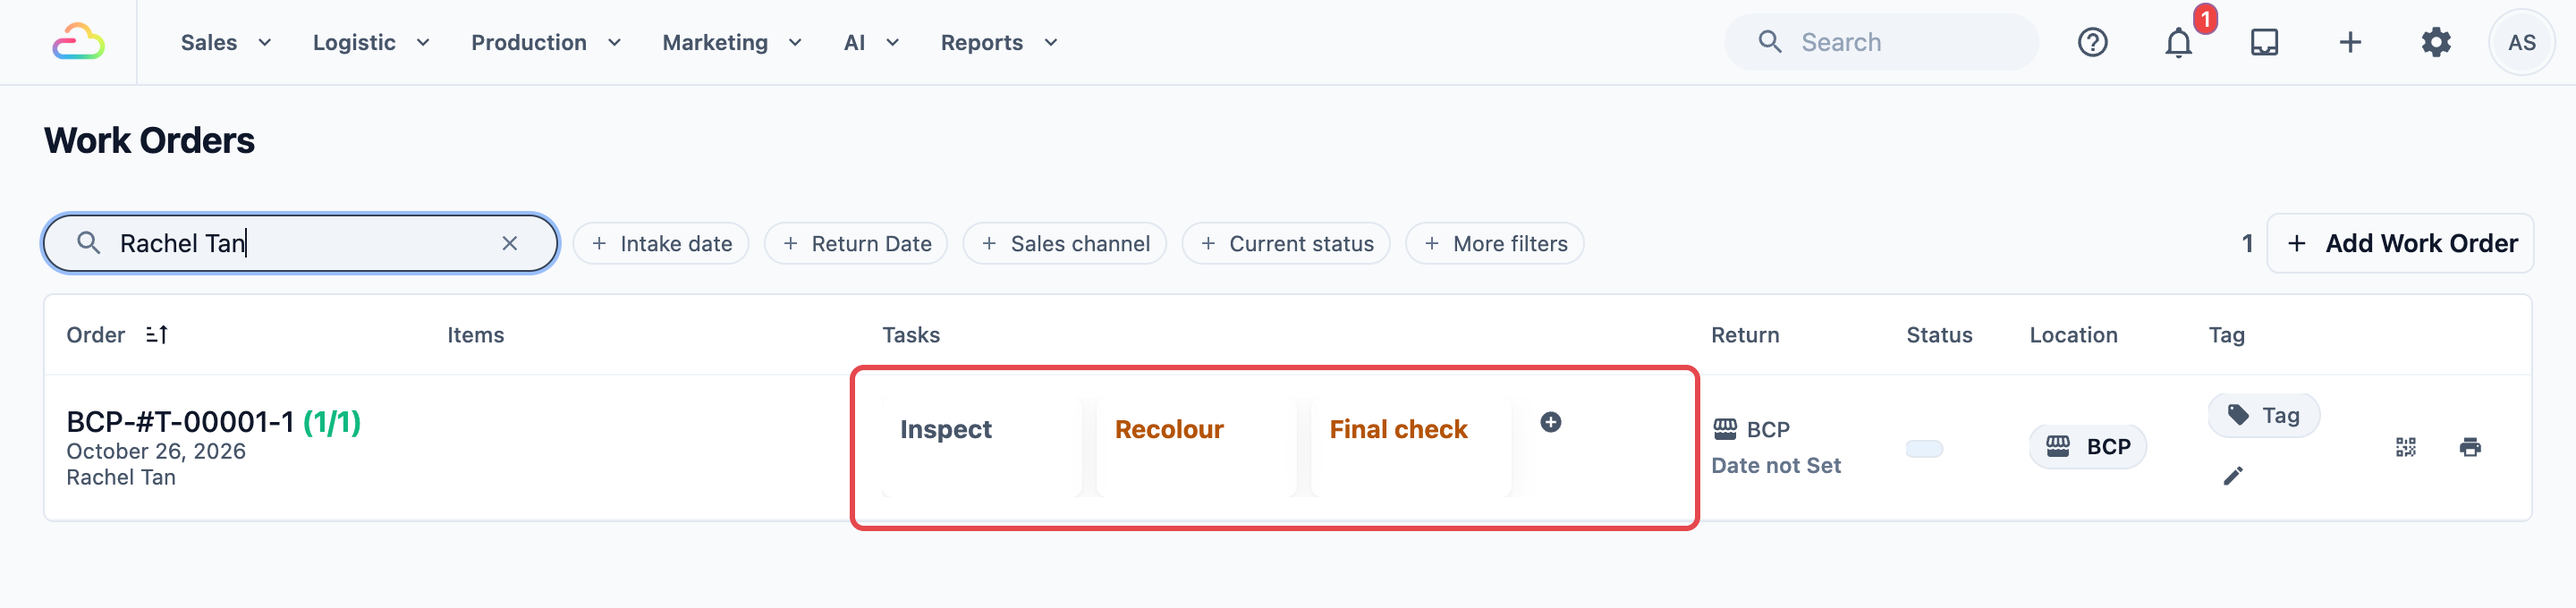
The slip that prints for each work order is chosen on the unit's Documents tab. See Setting Up Your Work Order Slips. For running work orders day to day, see Configuring Work Orders.
Example: BagCare Pro
BagCare Pro cleans and recolours handbags. Each bag needs its own job card, and the owner wants a photo of every finished bag before it goes back to the customer. The owner sets up the Bag Repair unit like this:
- Packing Flows: a Pack and Check flow with Take Photos (Required) and Enter Package Quantity (Required), applied to All service items.
- Create a work order for each service item: on.
- Tasks: Inspect (Every item), Recolour (The item has these service options: Recolour), General repair (No other task matched) and Final check (Every item).
A customer drops off a bag for recolouring. Its work order gets 3 tasks: Inspect, Recolour and Final check. When the workshop finishes them, staff pack the bag, take its photo and enter 1 package.
What Staff See When Packing
Staff pack on the Packing page of the EasyBiz Workflow app or the POS. They open the order, and each item that still needs packing shows as a row.
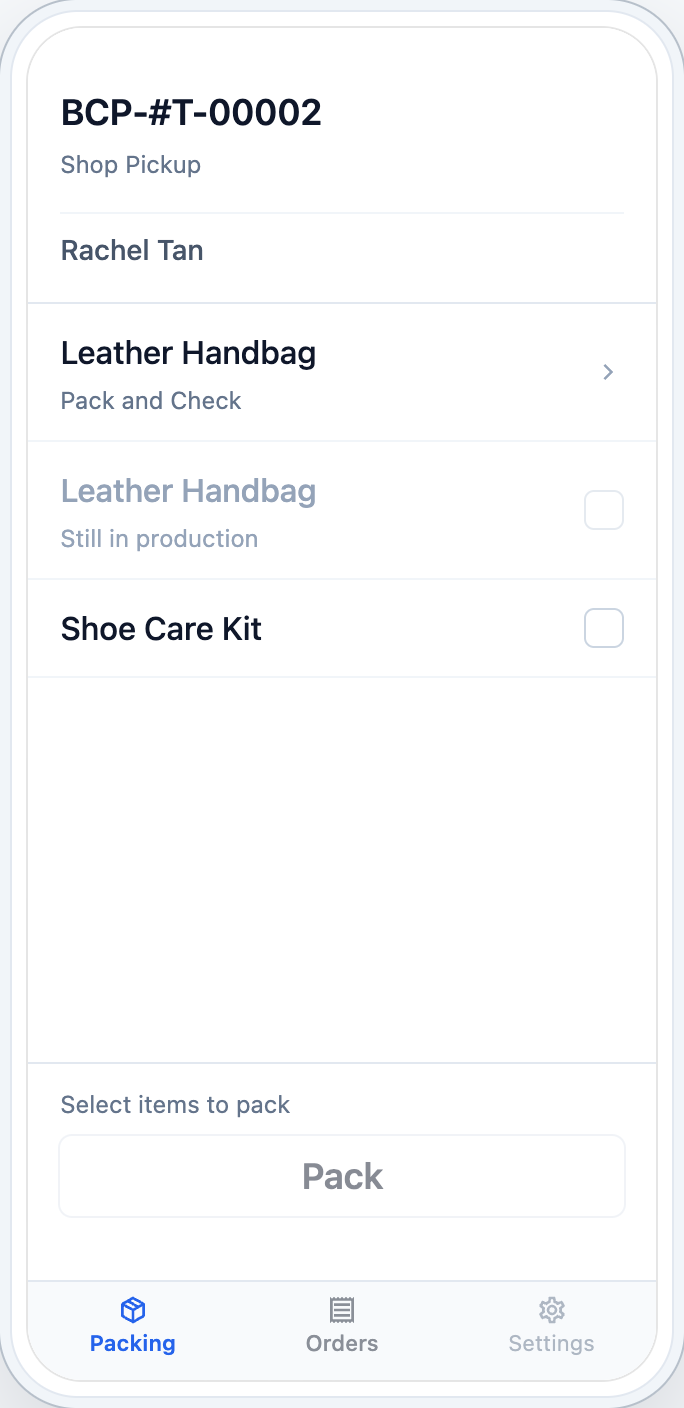
- Items with a packing flow show an arrow. Staff tap the item, and its flow opens under Confirm Pack. The item is packed when they finish the last step.
- Items without a packing flow show a tick box. Staff tick them and tap Pack, which shows how many are ticked.
- Service items still being worked on show Still in production and cannot be packed until their work order is finished.
- Packed items move to the Fulfillments list on the same page. When every item is packed, the page shows Nothing to pack.
- Collections packed separately show as groups, each under its collection's name, such as Clothing, Linen and Other items. Staff pack one group at a time, and each group gets its own packages.
FAQs
A product went into the wrong group at packing. Why?
It is in more than one of the collections you pack separately, so it goes with the first one on the list. Take it out of one of the collections, or change the order of the list. The new group applies to orders taken after you save.
Do I need both packing flows and work orders?
No. Each one works on its own. A laundry that only wants a photo of every bag can use a packing flow alone, and a repair shop can use work orders without any packing checks.
Does packing an order charge the customer's saved card?
It can. When every item on an order is packed, an order with a saved card and an amount due is charged then. Orders taken at the POS do not keep a card, so packing does not charge them.
Why can't my staff tap an item on the Packing screen?
It shows Still in production because its work order still has tasks to finish. Once the workshop completes them, the item can be packed.
I changed my packing flow. What happens to items already packed?
Nothing changes for them. Staff see the new steps the next time they pack an item.
I changed the work order tasks. Do old work orders change?
Work orders get their tasks from your settings when their order is taken or edited. Tasks staff added by hand are never changed.
Will my customers see the packing steps?
No. Work-order operation flows are for staff only, so customers never go through them.
What's Next
You have set up the checks staff complete when they pack, and the job cards your workshop works through. Next, choose what staff and drivers do when an order changes hands, such as at collection or delivery, in Choosing What Staff and Drivers Do at Handover.