Your customers see the same terms in every email, PDF and receipt, and tick the checkboxes you need before they collect.
## Before You Start
- You need access to the Console's ⚙️ Settings.
- Set up the places you want your policies to show first, or come back to them later: [Setting Up Your Customer Emails](/docs/setting-up-your-customer-emails), [Setting Up Your Invoice and Order PDFs](/docs/setting-up-your-invoice-and-order-pdfs) and [Setting Up Your Order Receipt](/docs/setting-up-your-order-receipt).
- For checkboxes at handover on the customer screen, pair a customer screen with your POS.
- If you set this up before: this article has moved into its own Policies group after Email. Your policies and checkboxes stay as they are.
## Choose your setup
| **Level** | **Fits shops like** | **What you set up** | **Read these sections** |
| --- | --- | --- | --- |
| Easy | One counter that emails receipts and invoices | One policy, picked in your emails and PDFs | [Where to find it](#where-to-find-it), [Write a policy](#write-a-policy), [In an email](#in-an-email), [In a PDF](#in-a-pdf) |
| Intermediate | Shops that print order receipts and hand items back at the counter | Everything in Easy, plus a policy on the printed receipt and a checkbox at handover | [On a printed order receipt](#on-a-printed-order-receipt), [On the customer screen at handover](#on-the-customer-screen-at-handover), [Set up customer acknowledgements](#set-up-customer-acknowledgements), [See what a customer ticked](#see-what-a-customer-ticked) |
The Easy path works on its own: your terms go out with every email and PDF you pick them in. You can add receipts and checkboxes later.
## Overview
Policies are your terms and conditions, refund rules and other shop rules. You write each one once, and it shows wherever you pick it: emails, PDFs, printed receipts and checkboxes. Customer acknowledgements are checkboxes customers tick to agree, such as "I confirm I have received the listed items". The order keeps a record of what they ticked, so you have proof if a customer later disputes a lost or damaged item. When you change a policy's words, every place that shows it uses the new words from then on.
---
## Where your customers see your policies
A policy shows nowhere until you switch it on in a place. Each place is switched on separately.
| **Place** | **What the customer sees** | **Where you switch it on** |
| --- | --- | --- |
| Emails | The policy's name and full text at the end of the email | ⚙️ Settings › **Emails**, open the email, **Policies** |
| PDFs (invoice, receipt, quotation) | The policy's name and full text at the end of the PDF | ⚙️ Settings › **PDF Template**, open the PDF, **Policies** |
| Printed order receipt | The policy's text at the bottom of the receipt, with its name above it if you choose | ⚙️ Settings › **Receipt template**, open the receipt, **Bottom**, add a **Policy** part |
| Checkbox when an order is taken | A checkbox at order review on the customer screen, with **View details** to read the policy | **Customer acknowledgements** › **When an order is taken**, **Policy shown with it** |
| Checkbox at handover | A checkbox at handover on the customer screen, POS and Console, with **View details** to read the policy | **Customer acknowledgements** › **When items are handed over**, **Policy shown with it** |
---
## Where to find it
1. Click the ⚙️ Settings icon in the top-right corner of the Console.
2. Under the **Library** section, click Policies.
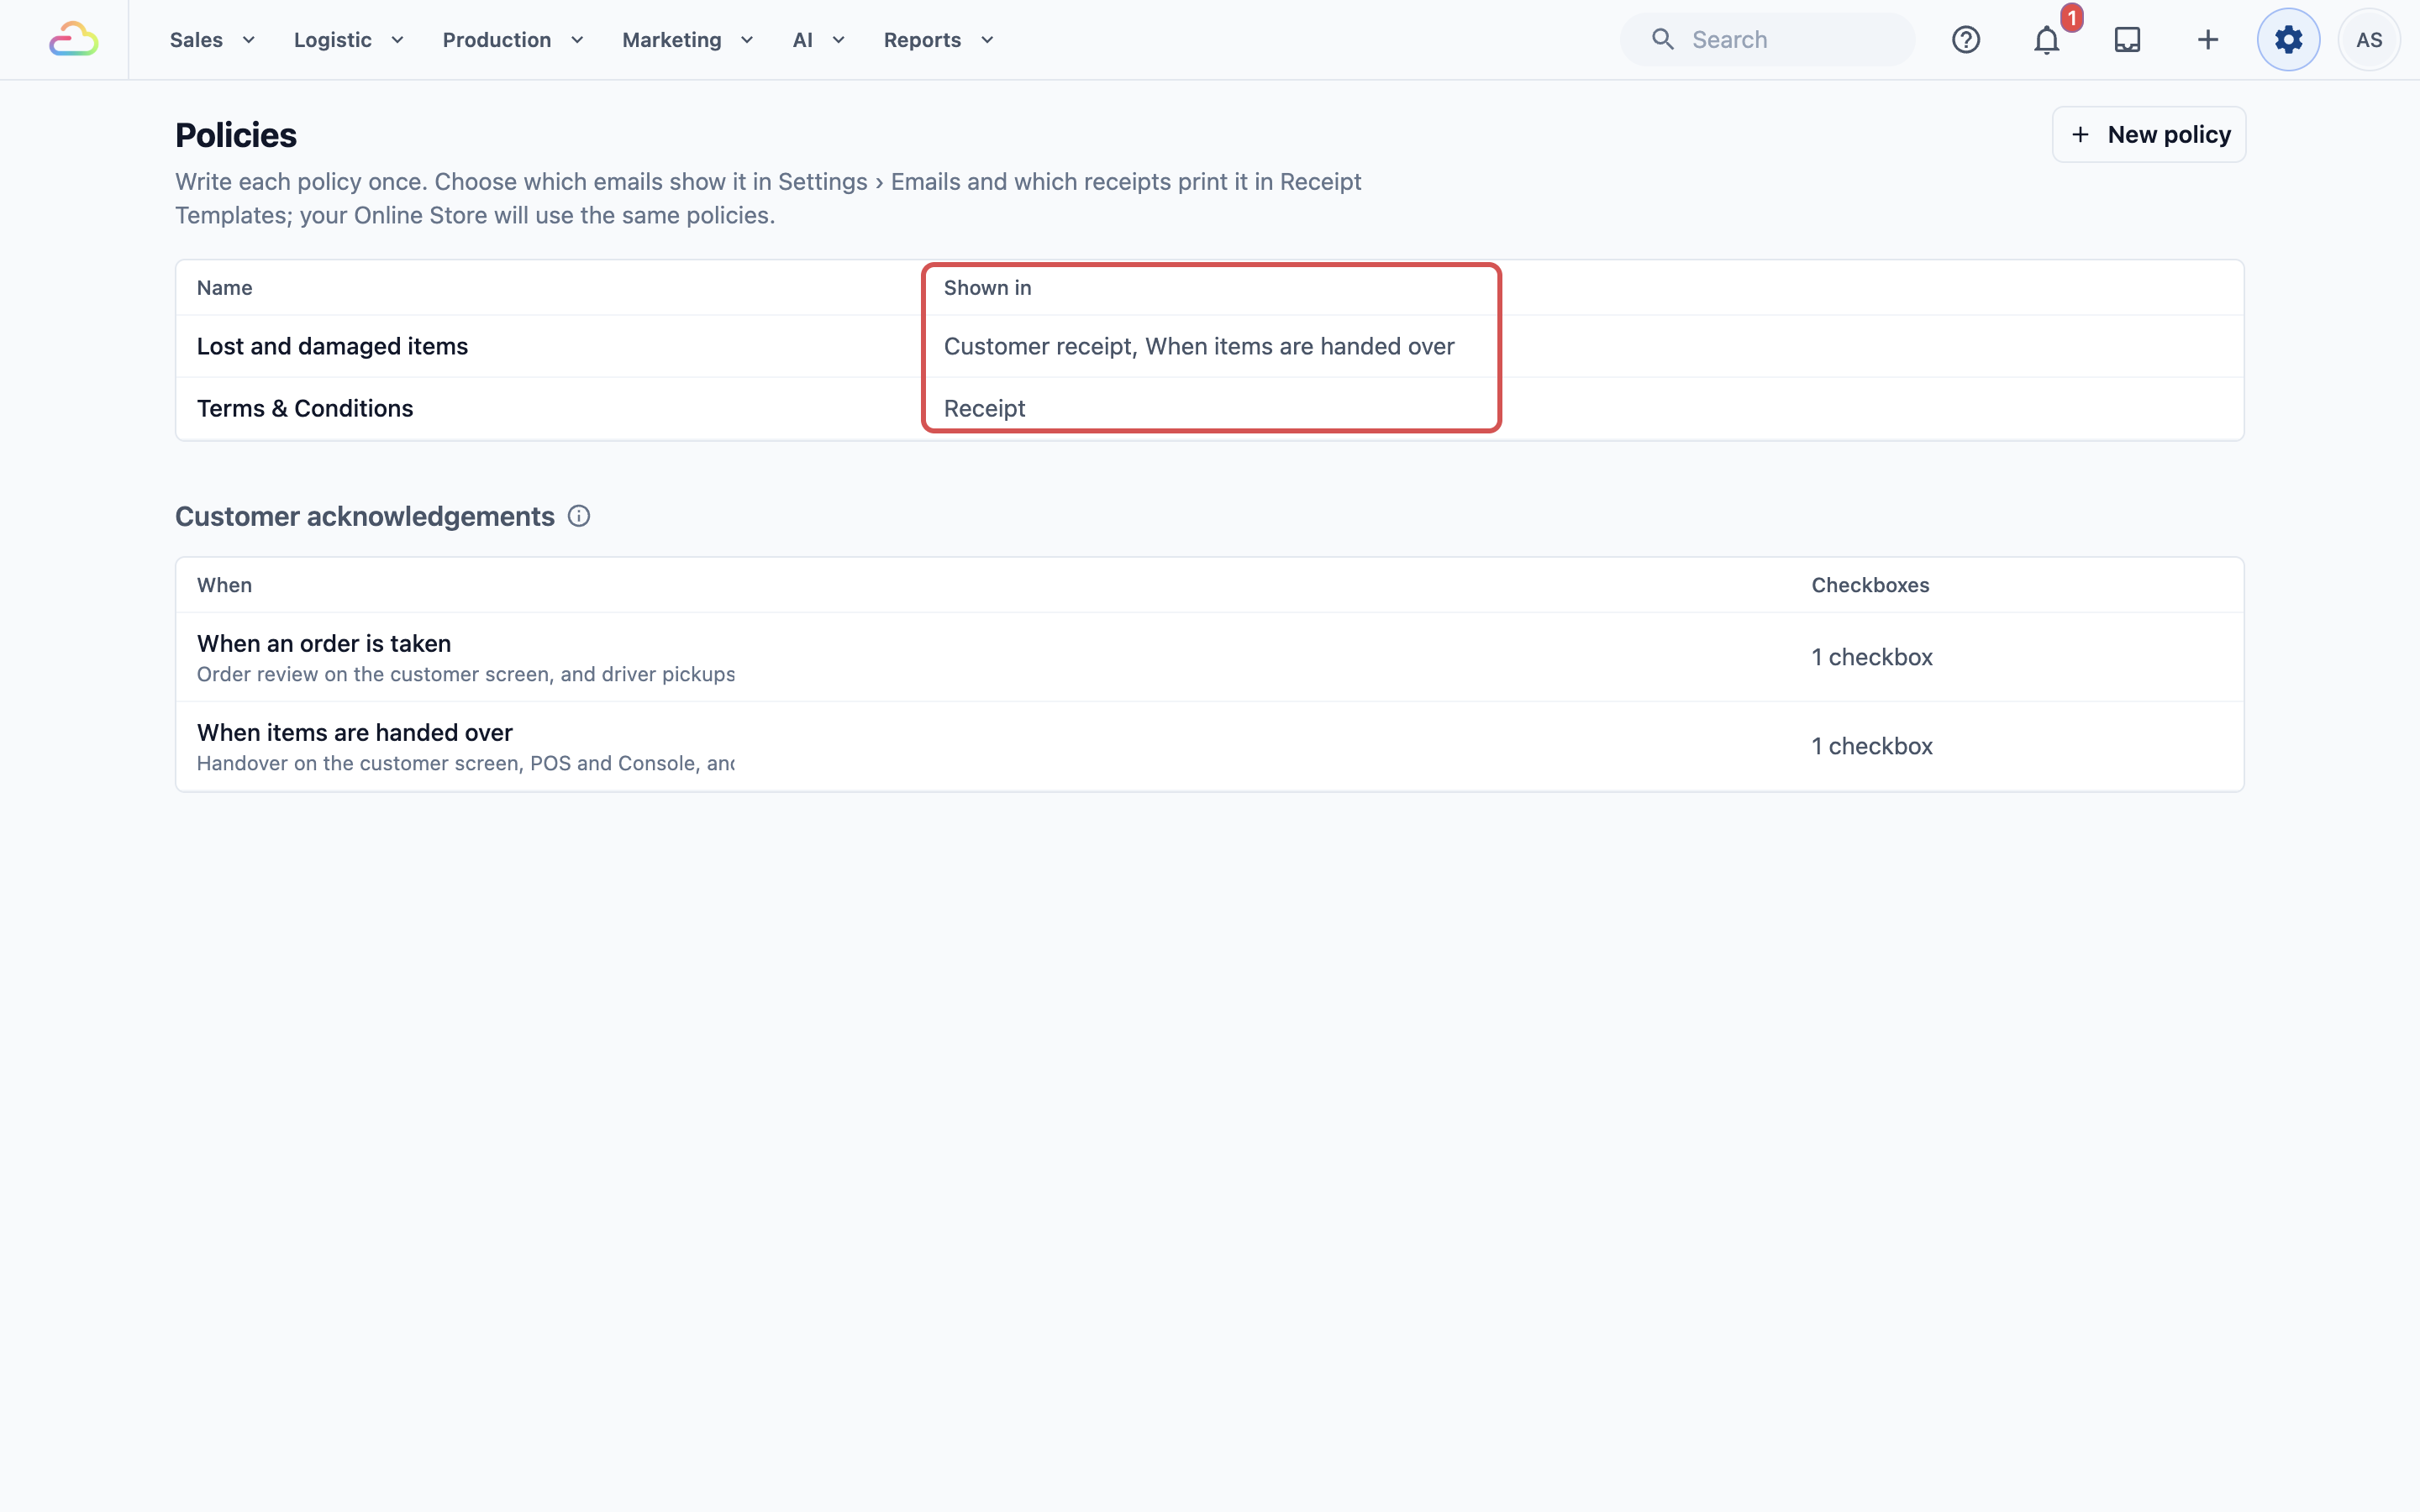
The page lists your policies. The **Shown in** column lists the emails, printed receipts and checkboxes that show each one. PDFs are not listed there. "Not shown yet" means no email, receipt or checkbox shows it.
---
## Write a policy
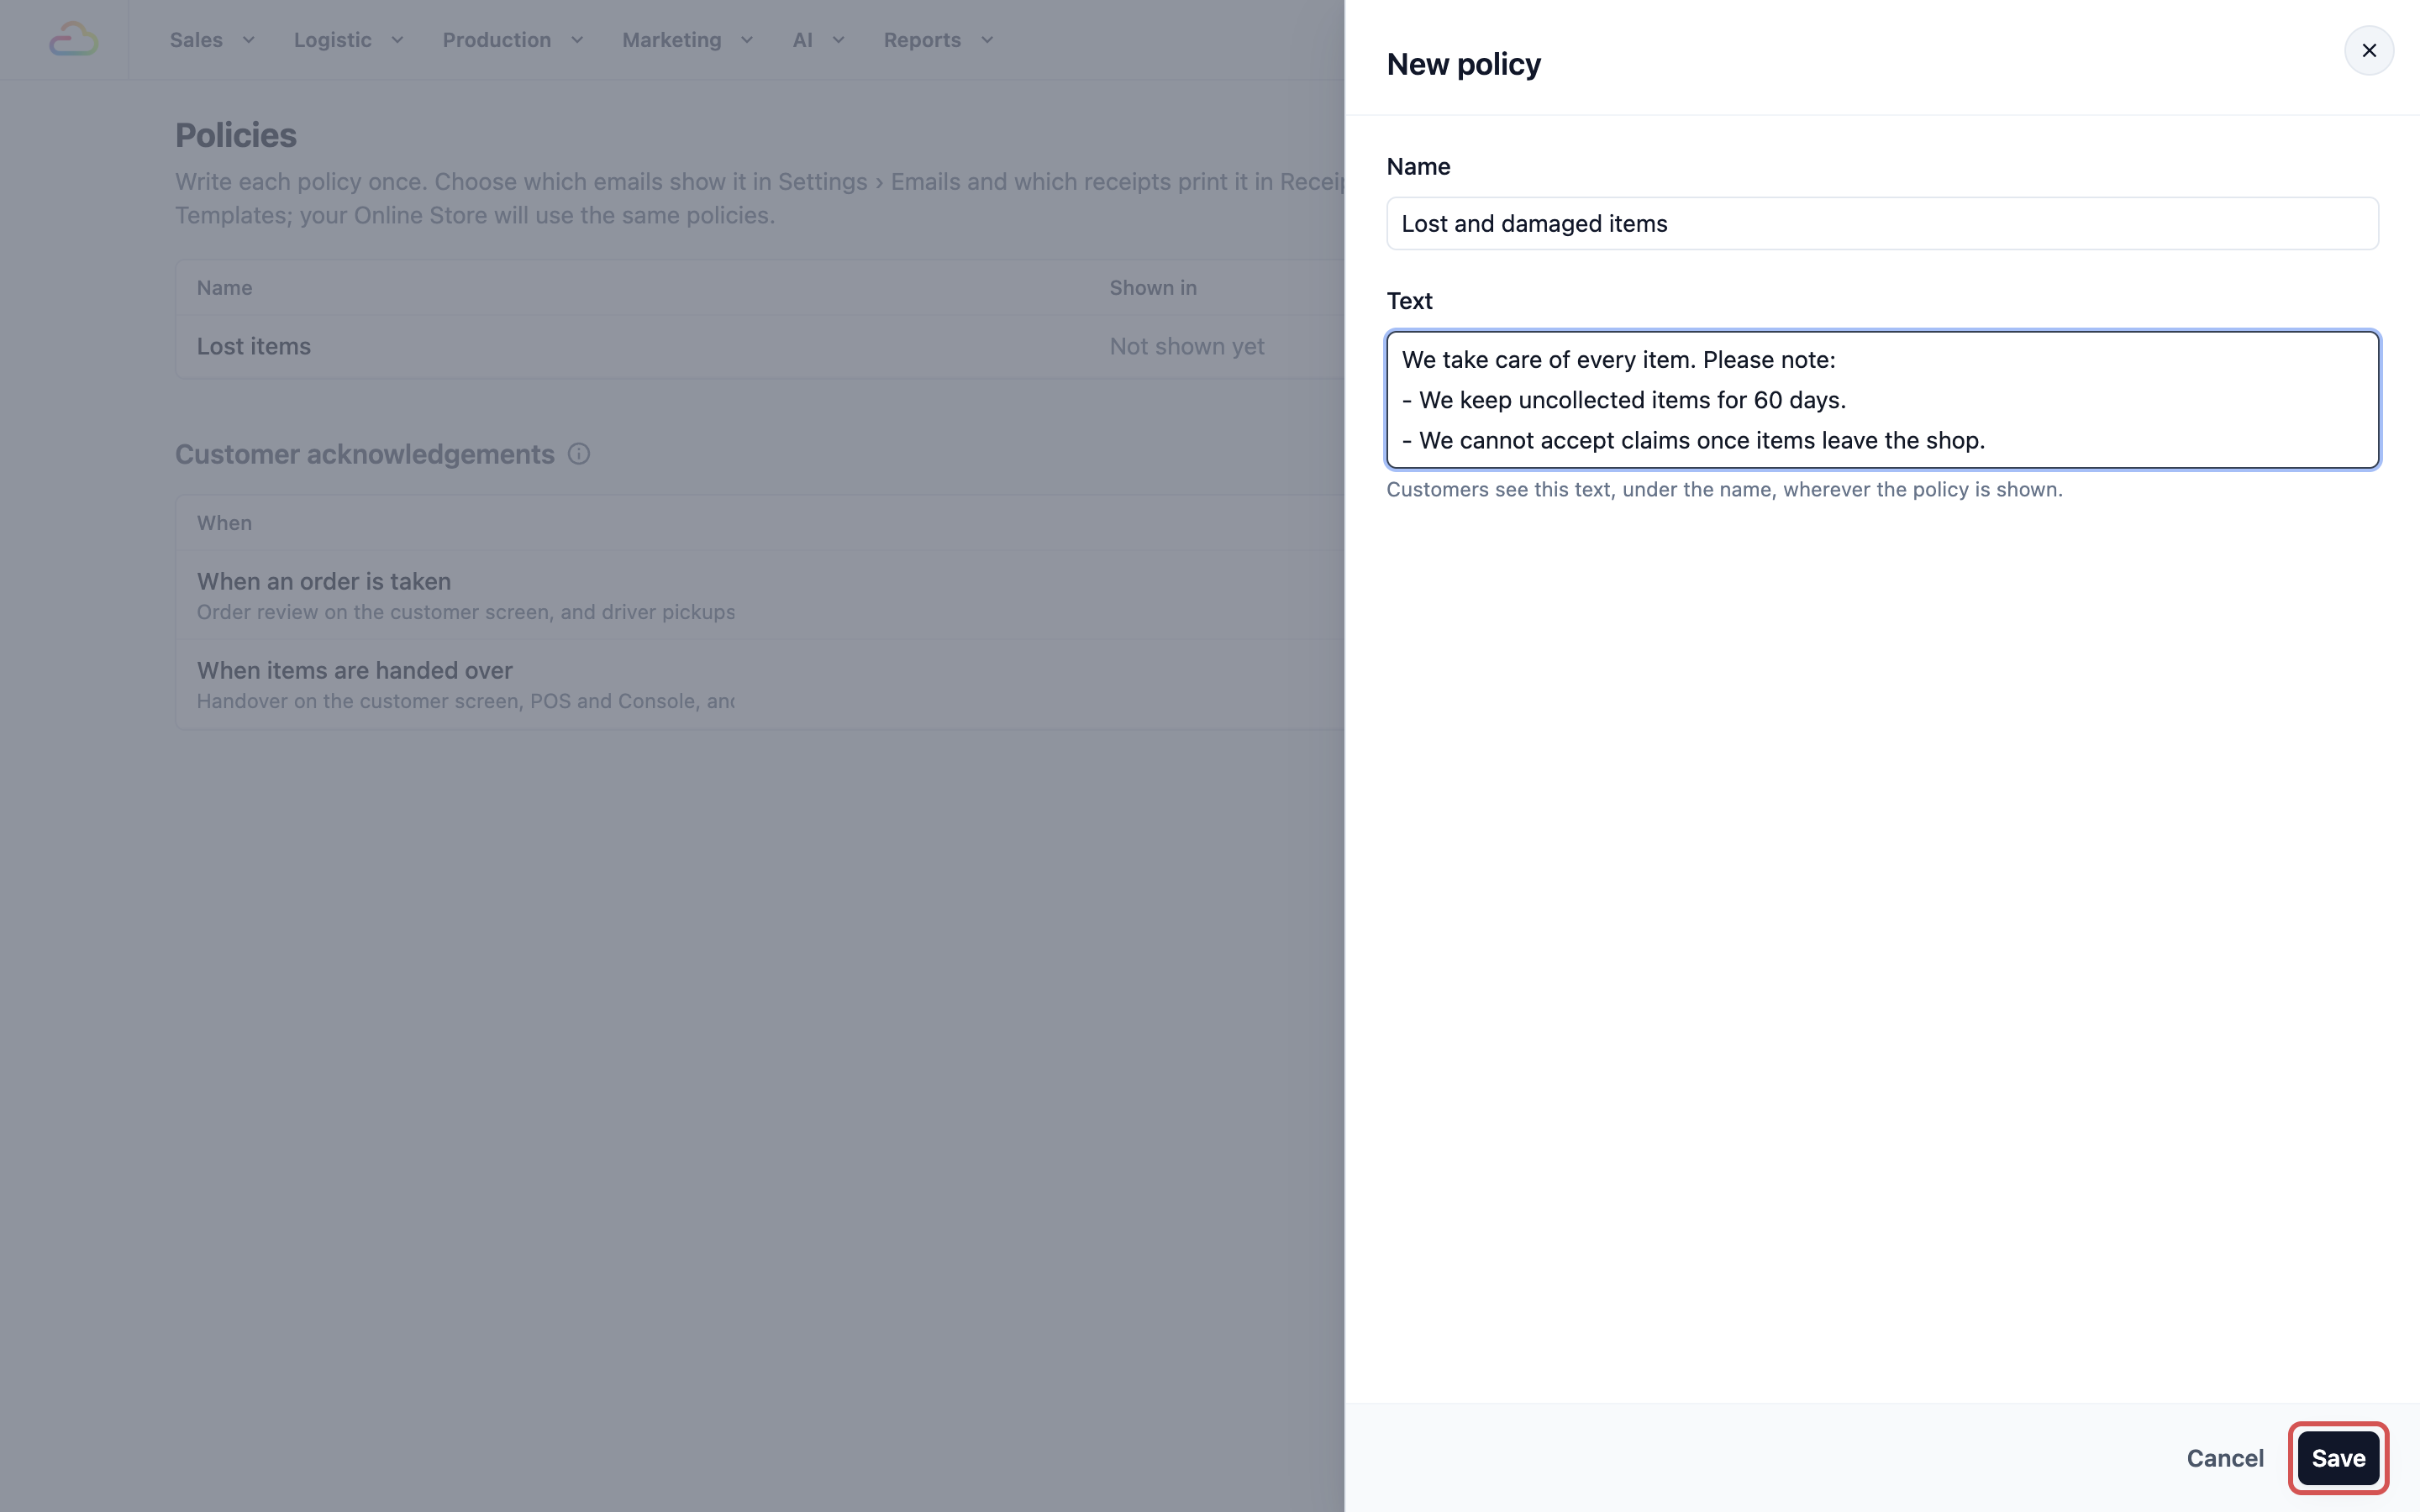
1. Click New policy.
2. In **Name**, type its title, for example "Terms & Conditions" or "Lost and damaged items".
3. In **Text**, write the policy. Customers see this text, under the name, wherever the policy is shown.
4. Click Save. You will see "Policy saved".
Keep each policy about one thing, such as one for refunds and one for lost items. Then you can print only the one that fits, such as the lost-item rules on your receipt.
---
## What your customers see
Here is what CleanFast Laundry's customers see once each place is switched on.
### In an email
The policy shows in full at the end of the email, below a line, with its name above its text. If you pick several policies, they show in the order you picked them.
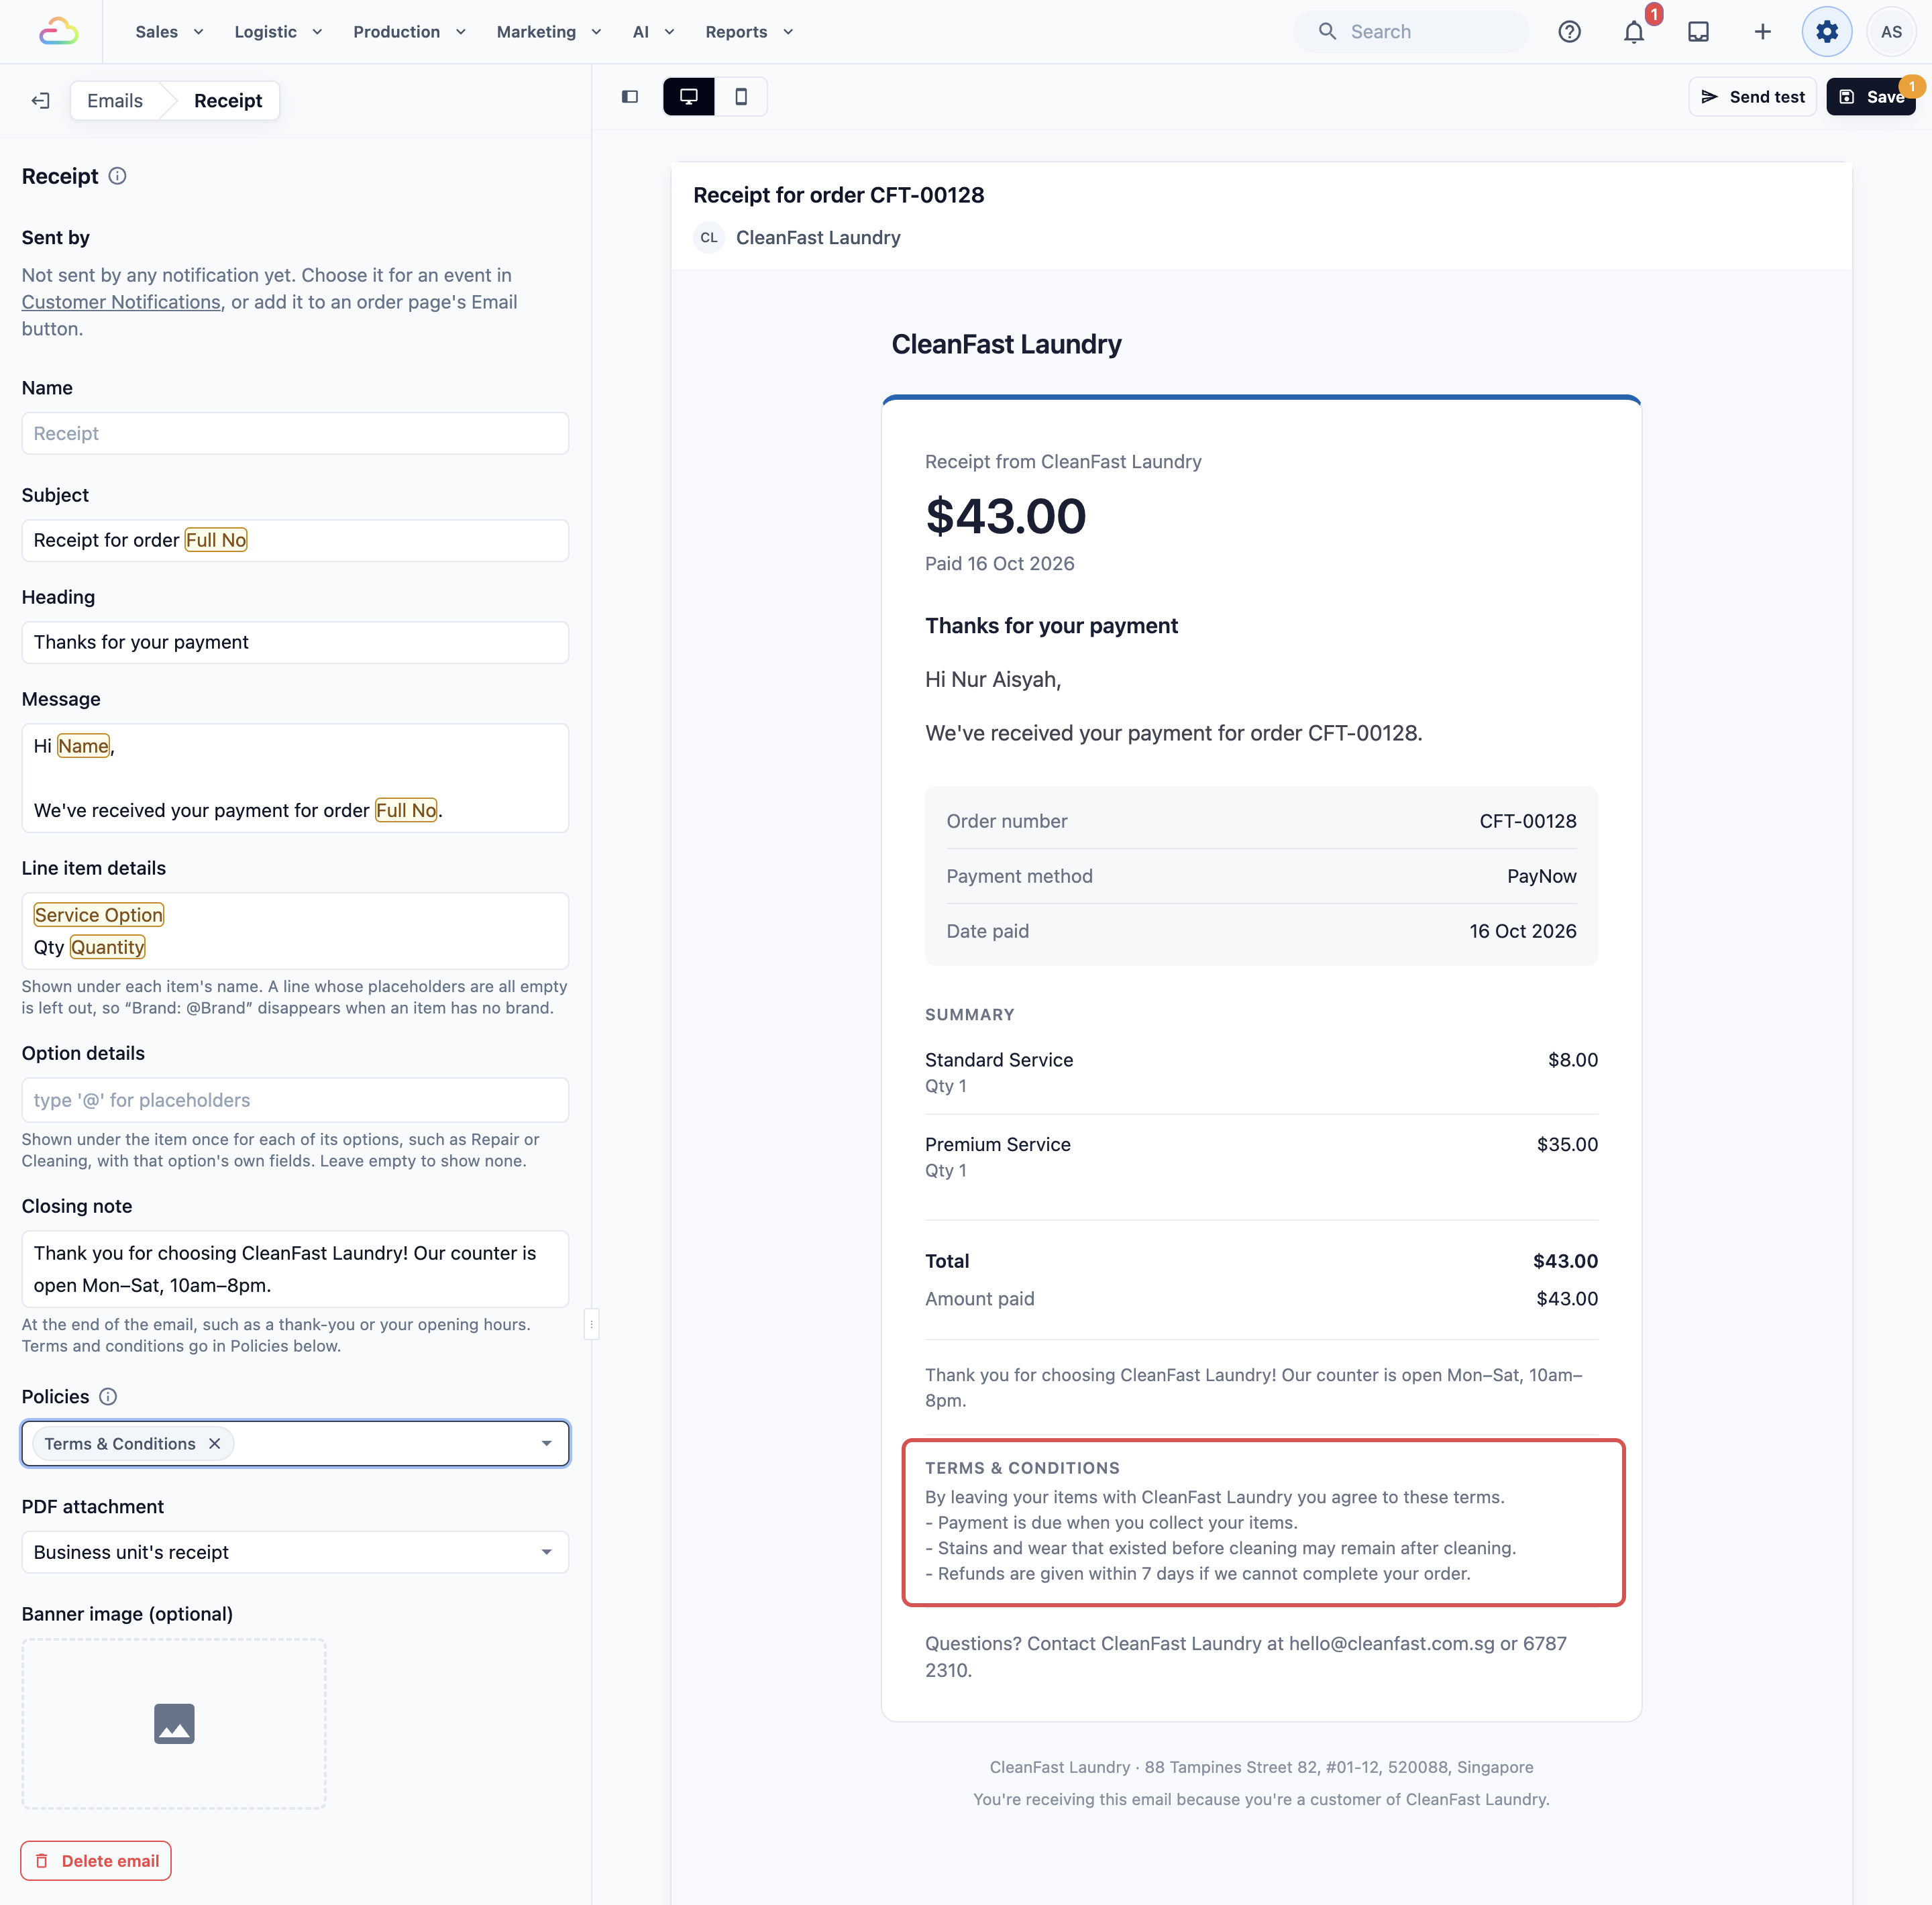
To switch it on, open the email in ⚙️ Settings › **Emails** and pick the policy in **Policies**. See [Setting Up Your Customer Emails](/docs/setting-up-your-customer-emails).
### In a PDF
The policy prints in full at the end of the PDF, under its name. This works on invoices, receipts, quotations and monthly invoices, and on a PDF attached to an email or a WhatsApp message.
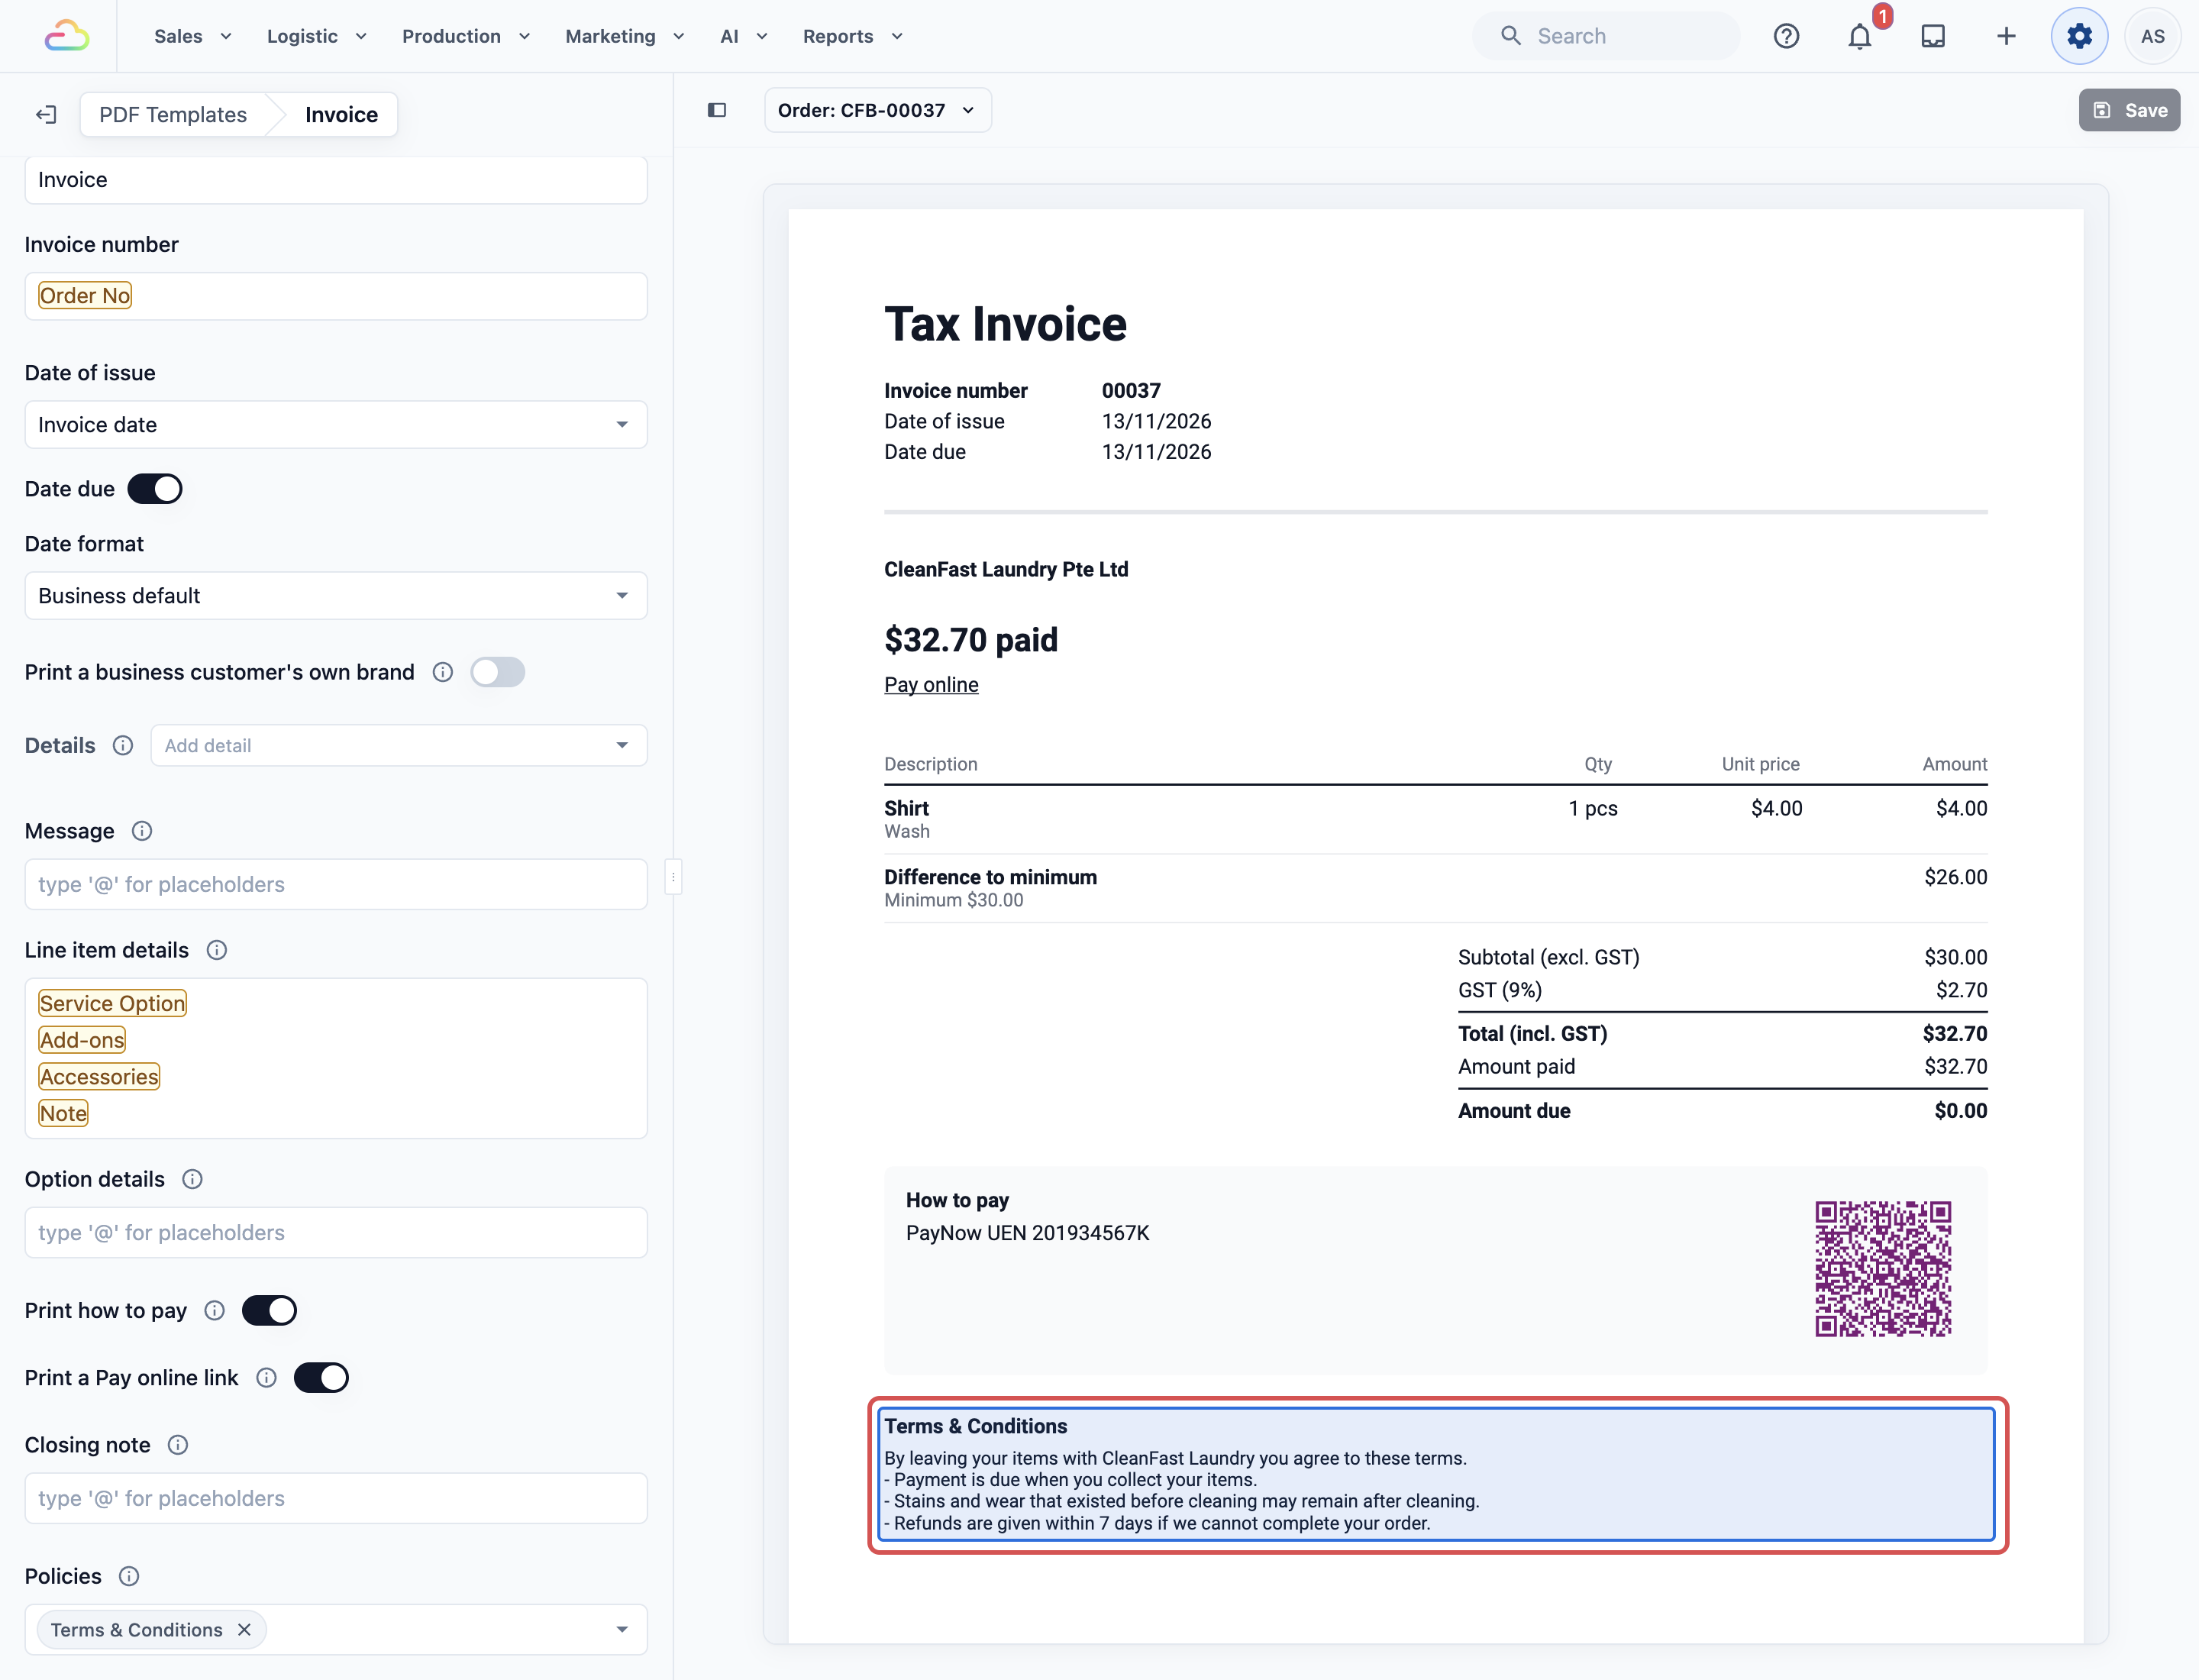
To switch it on, open the PDF in ⚙️ Settings › **PDF Template** and pick the policy in **Policies**. See [Setting Up Your Invoice and Order PDFs](/docs/setting-up-your-invoice-and-order-pdfs).
### On a printed order receipt
The policy prints at the bottom of the receipt. A receipt printer prints plain text in one style, so bold, italics and links in your policy are left out. Each paragraph prints on its own line, and each list item prints as a line starting with "-" or its number.
The policy's name prints above the text, in bold, when **Print its name above it** is on. It is on when you add the part. Turn it off to print only the text.
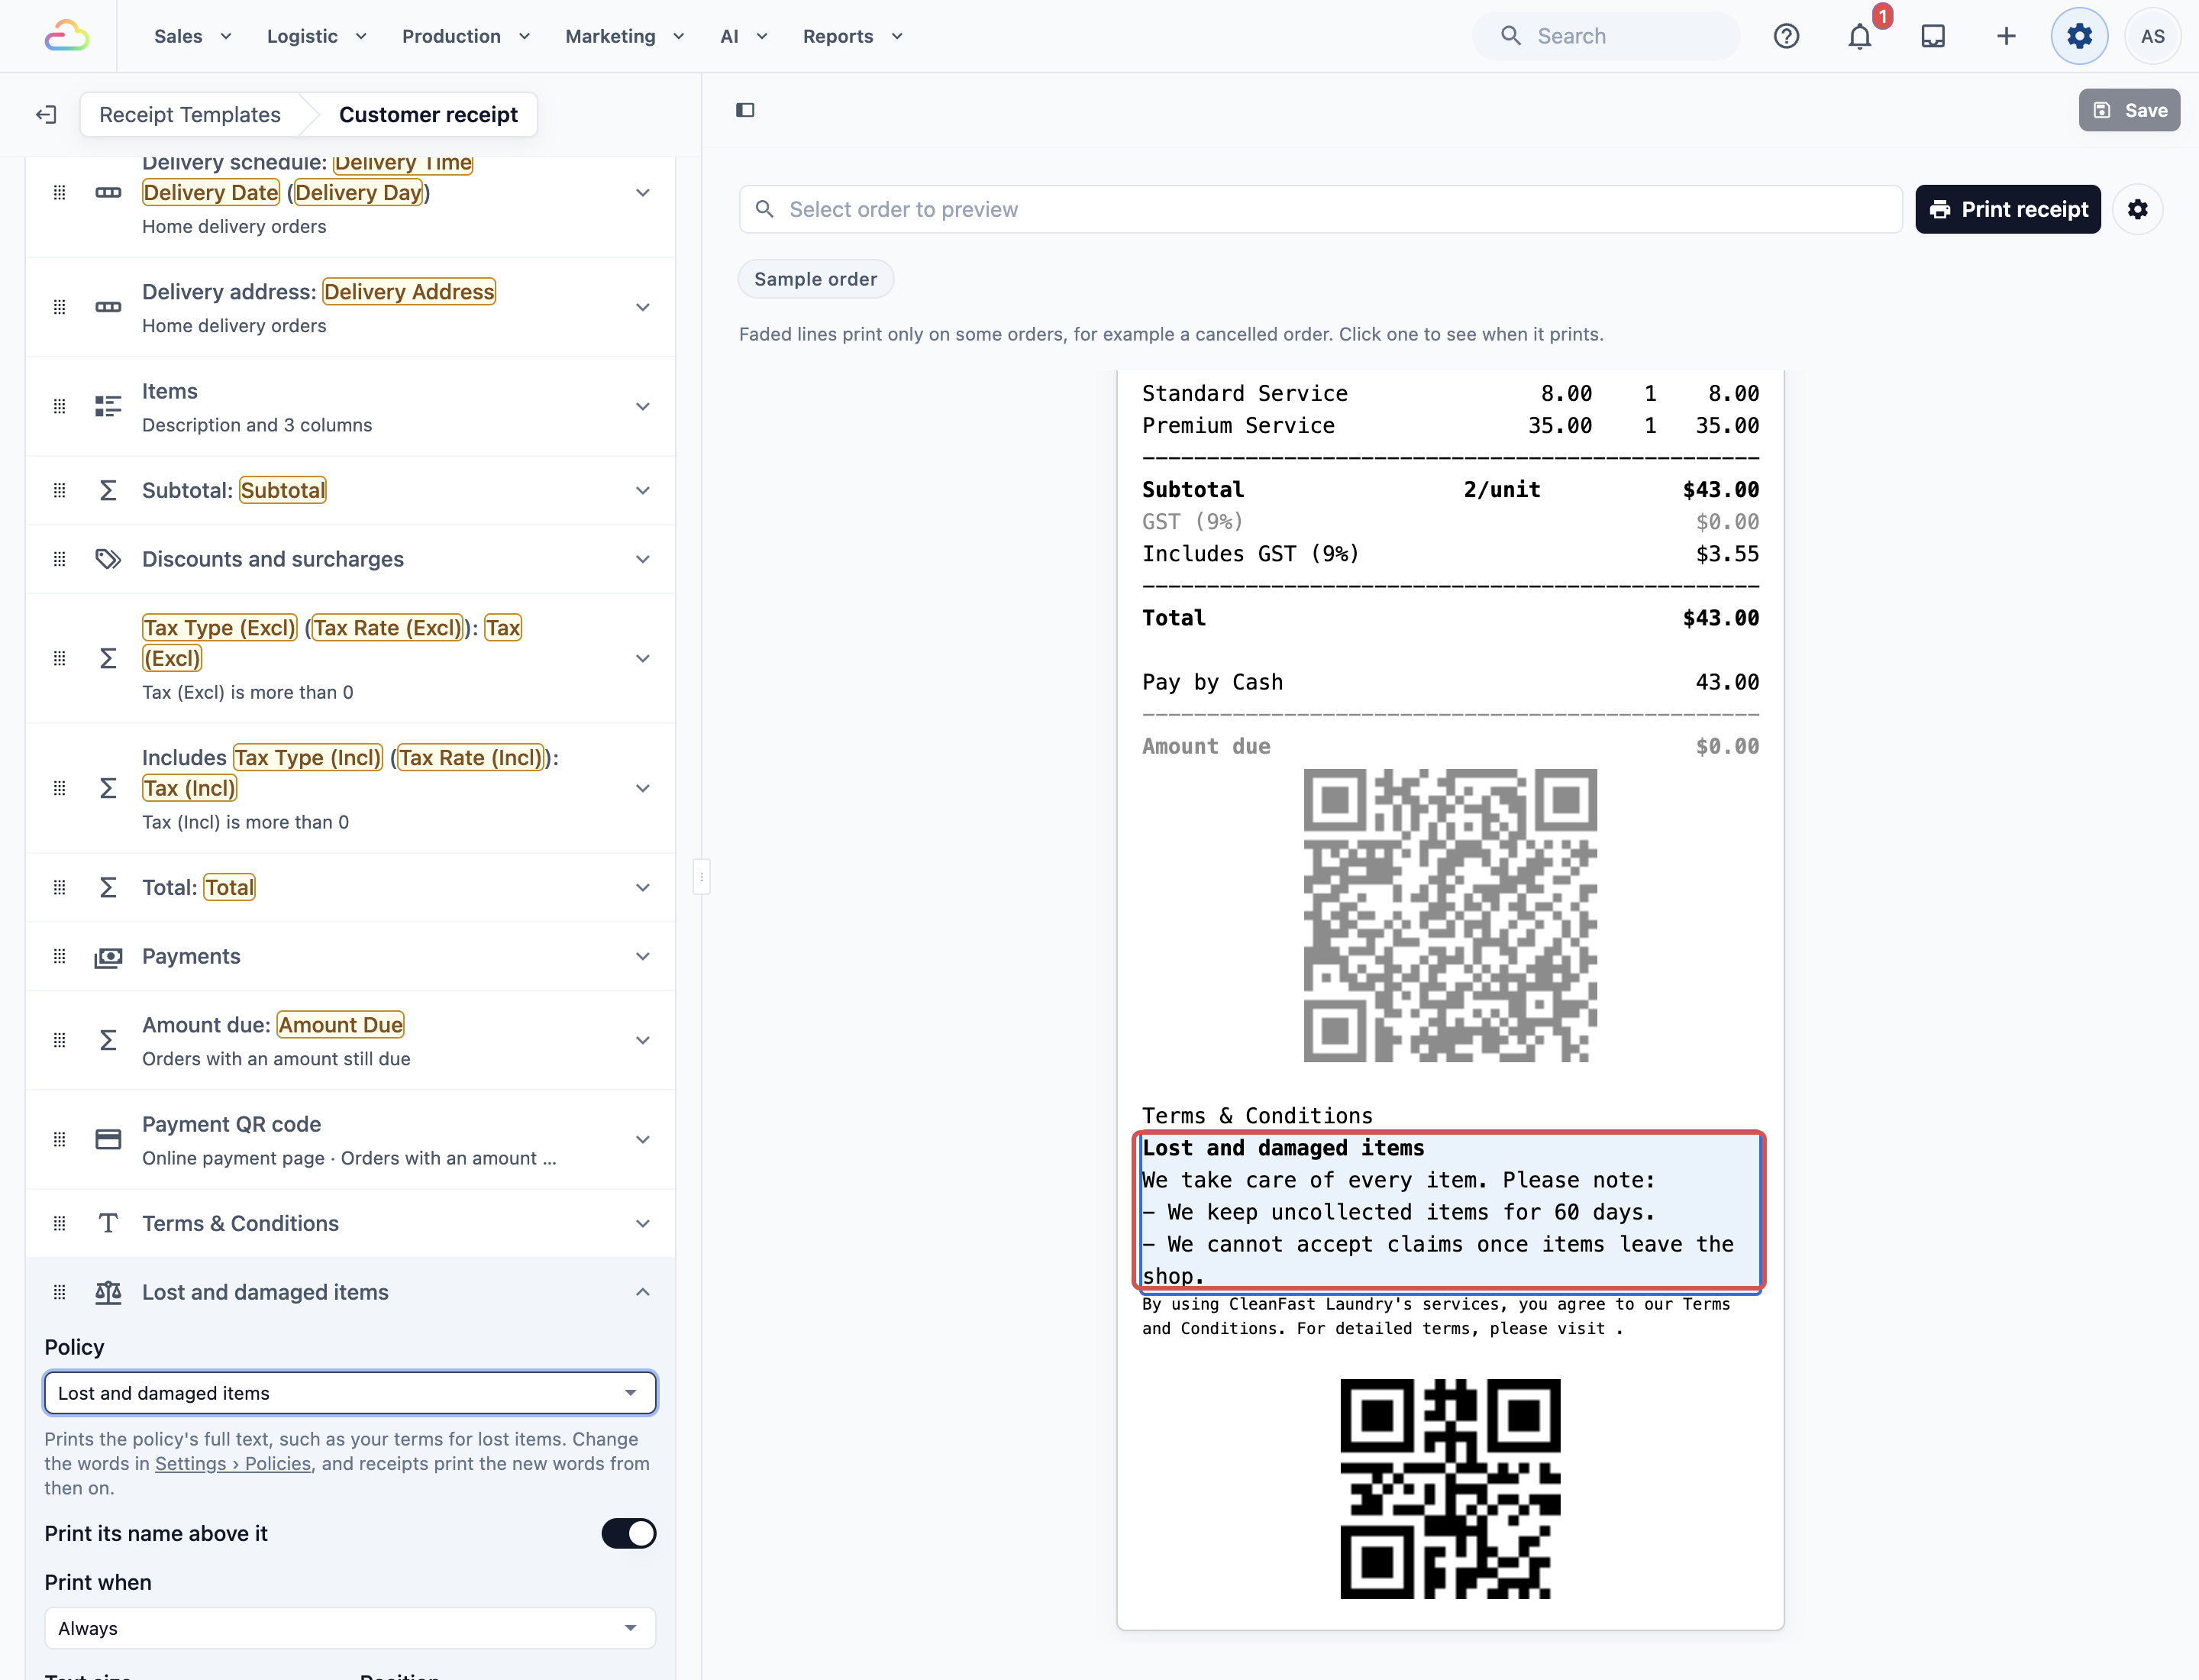
To switch it on, open the receipt in ⚙️ Settings › **Receipt template**, click **Bottom**, click **Add** and choose **Policy**, then pick the policy. See [Setting Up Your Order Receipt](/docs/setting-up-your-order-receipt).
### On the customer screen at handover
When staff hand items over, the customer screen shows each checkbox. A red * marks a required one. Under a checkbox with a policy, the customer taps **View details** to open **Acknowledgement details**, which shows the policy's name and full text, and then taps **Close** to tick the box.
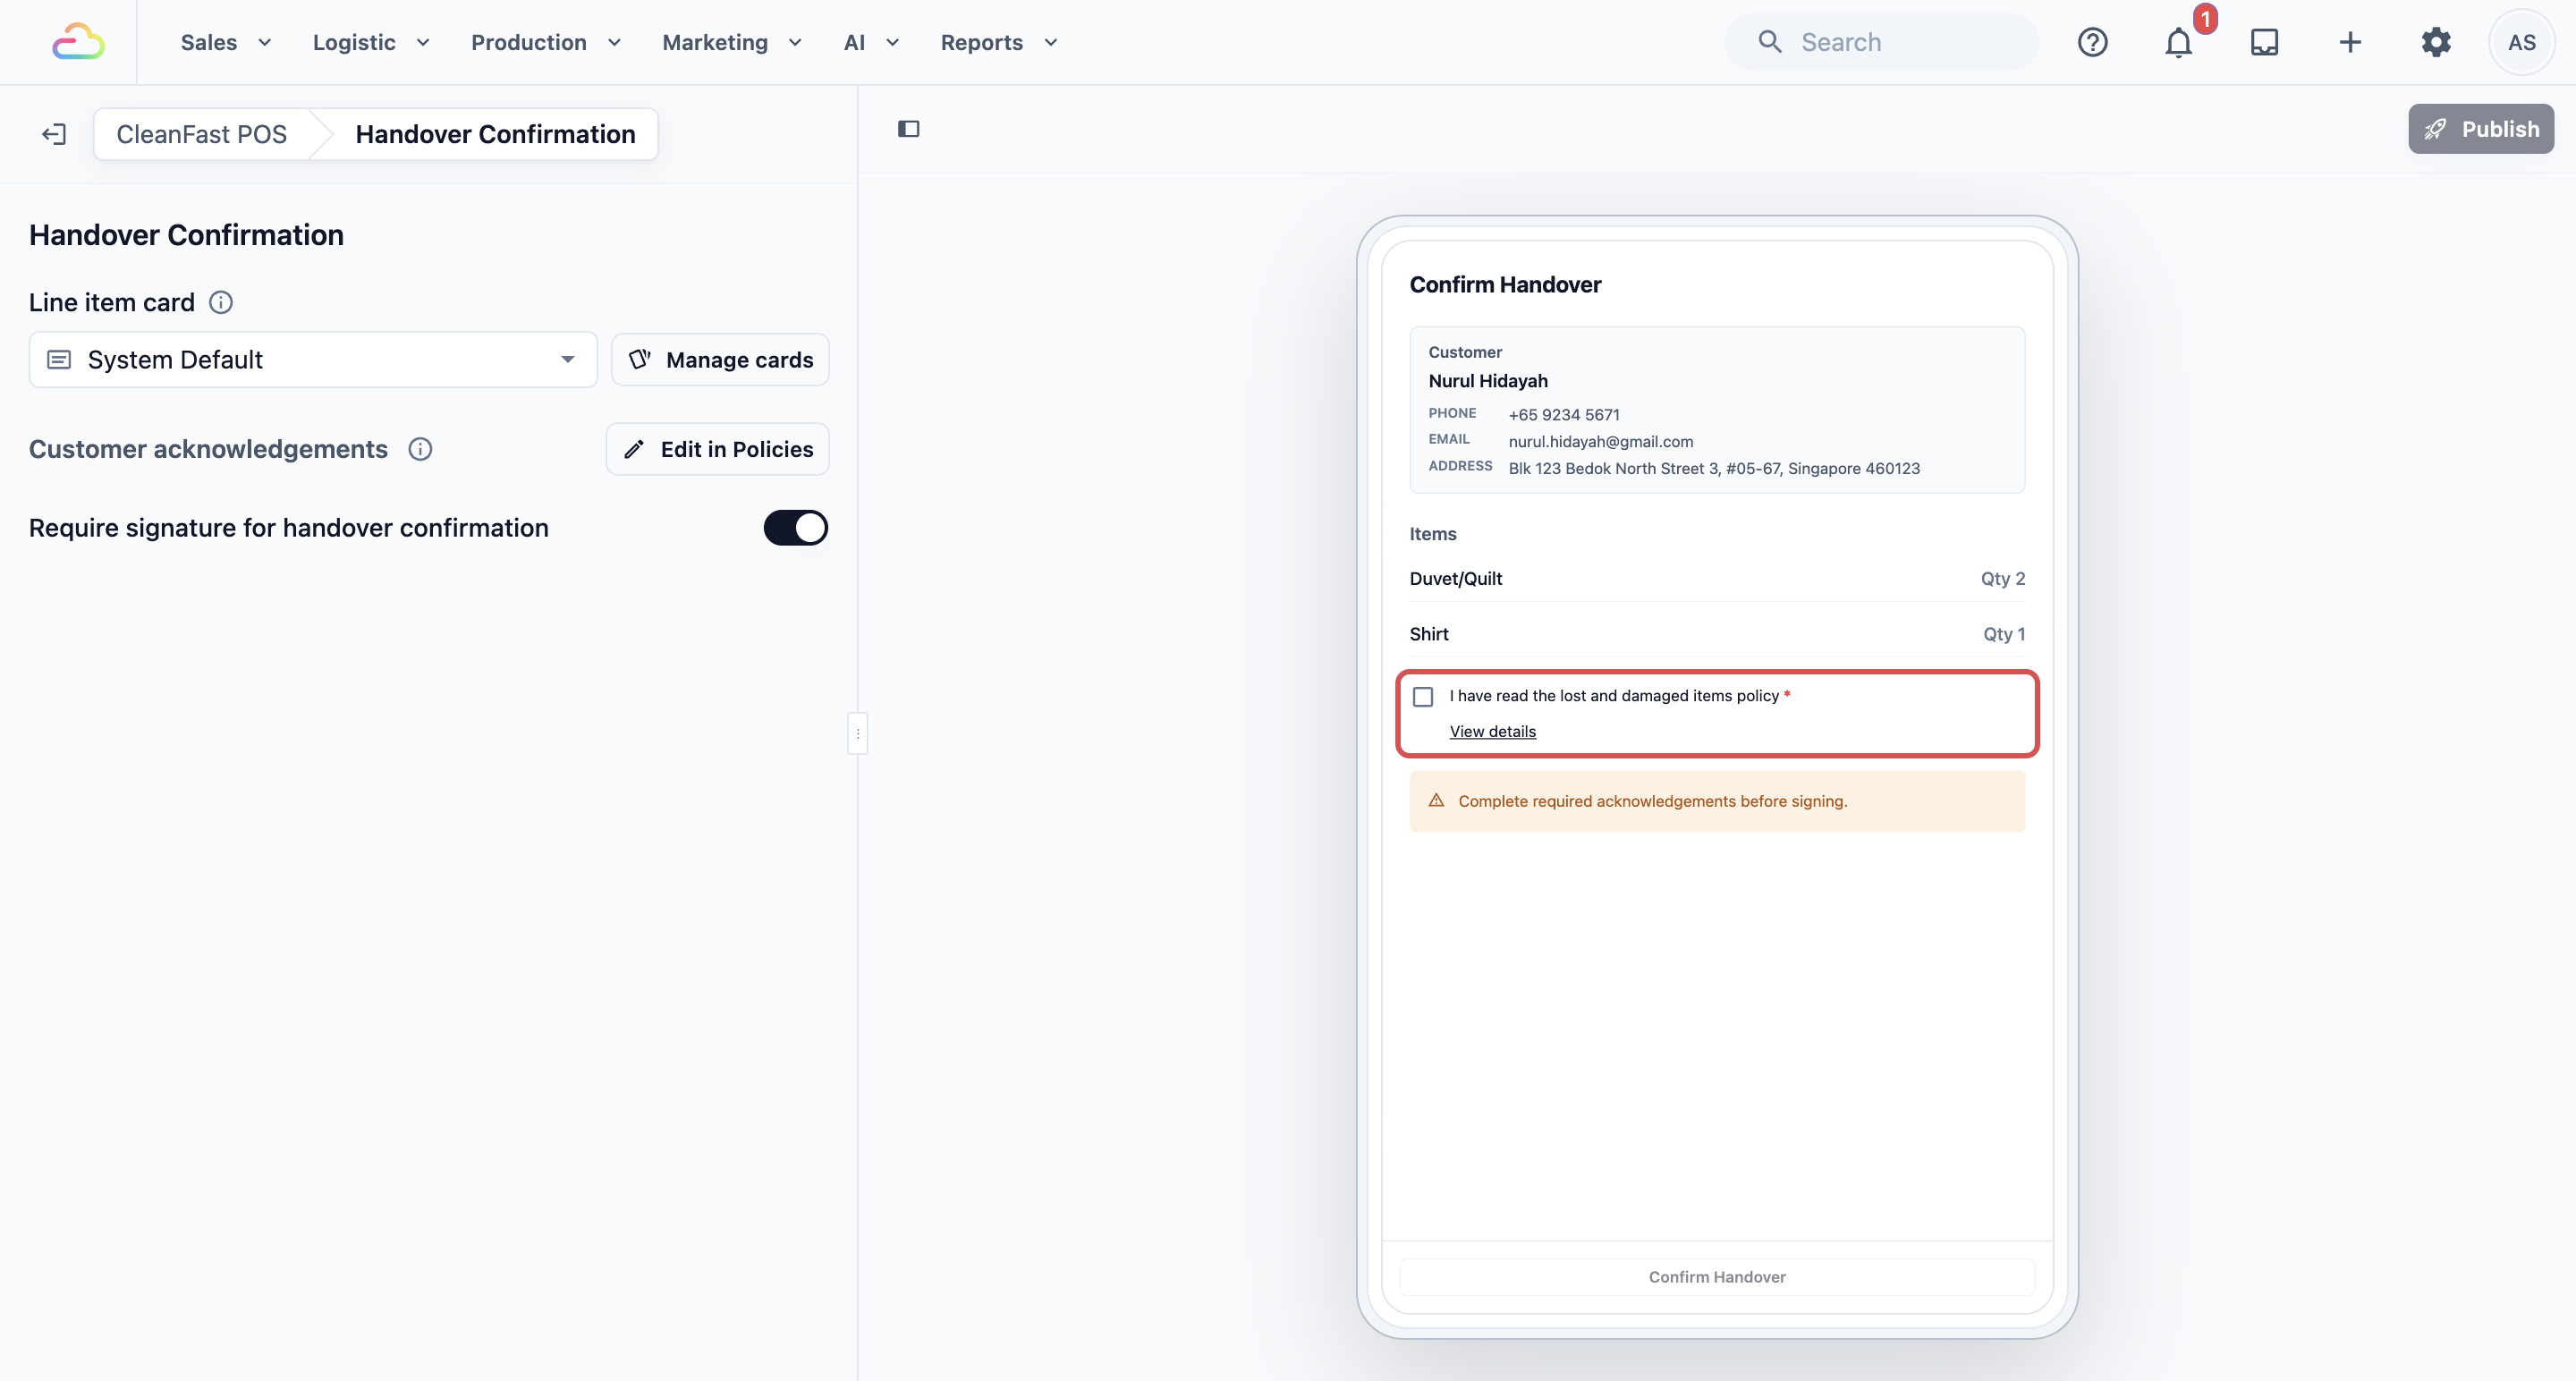
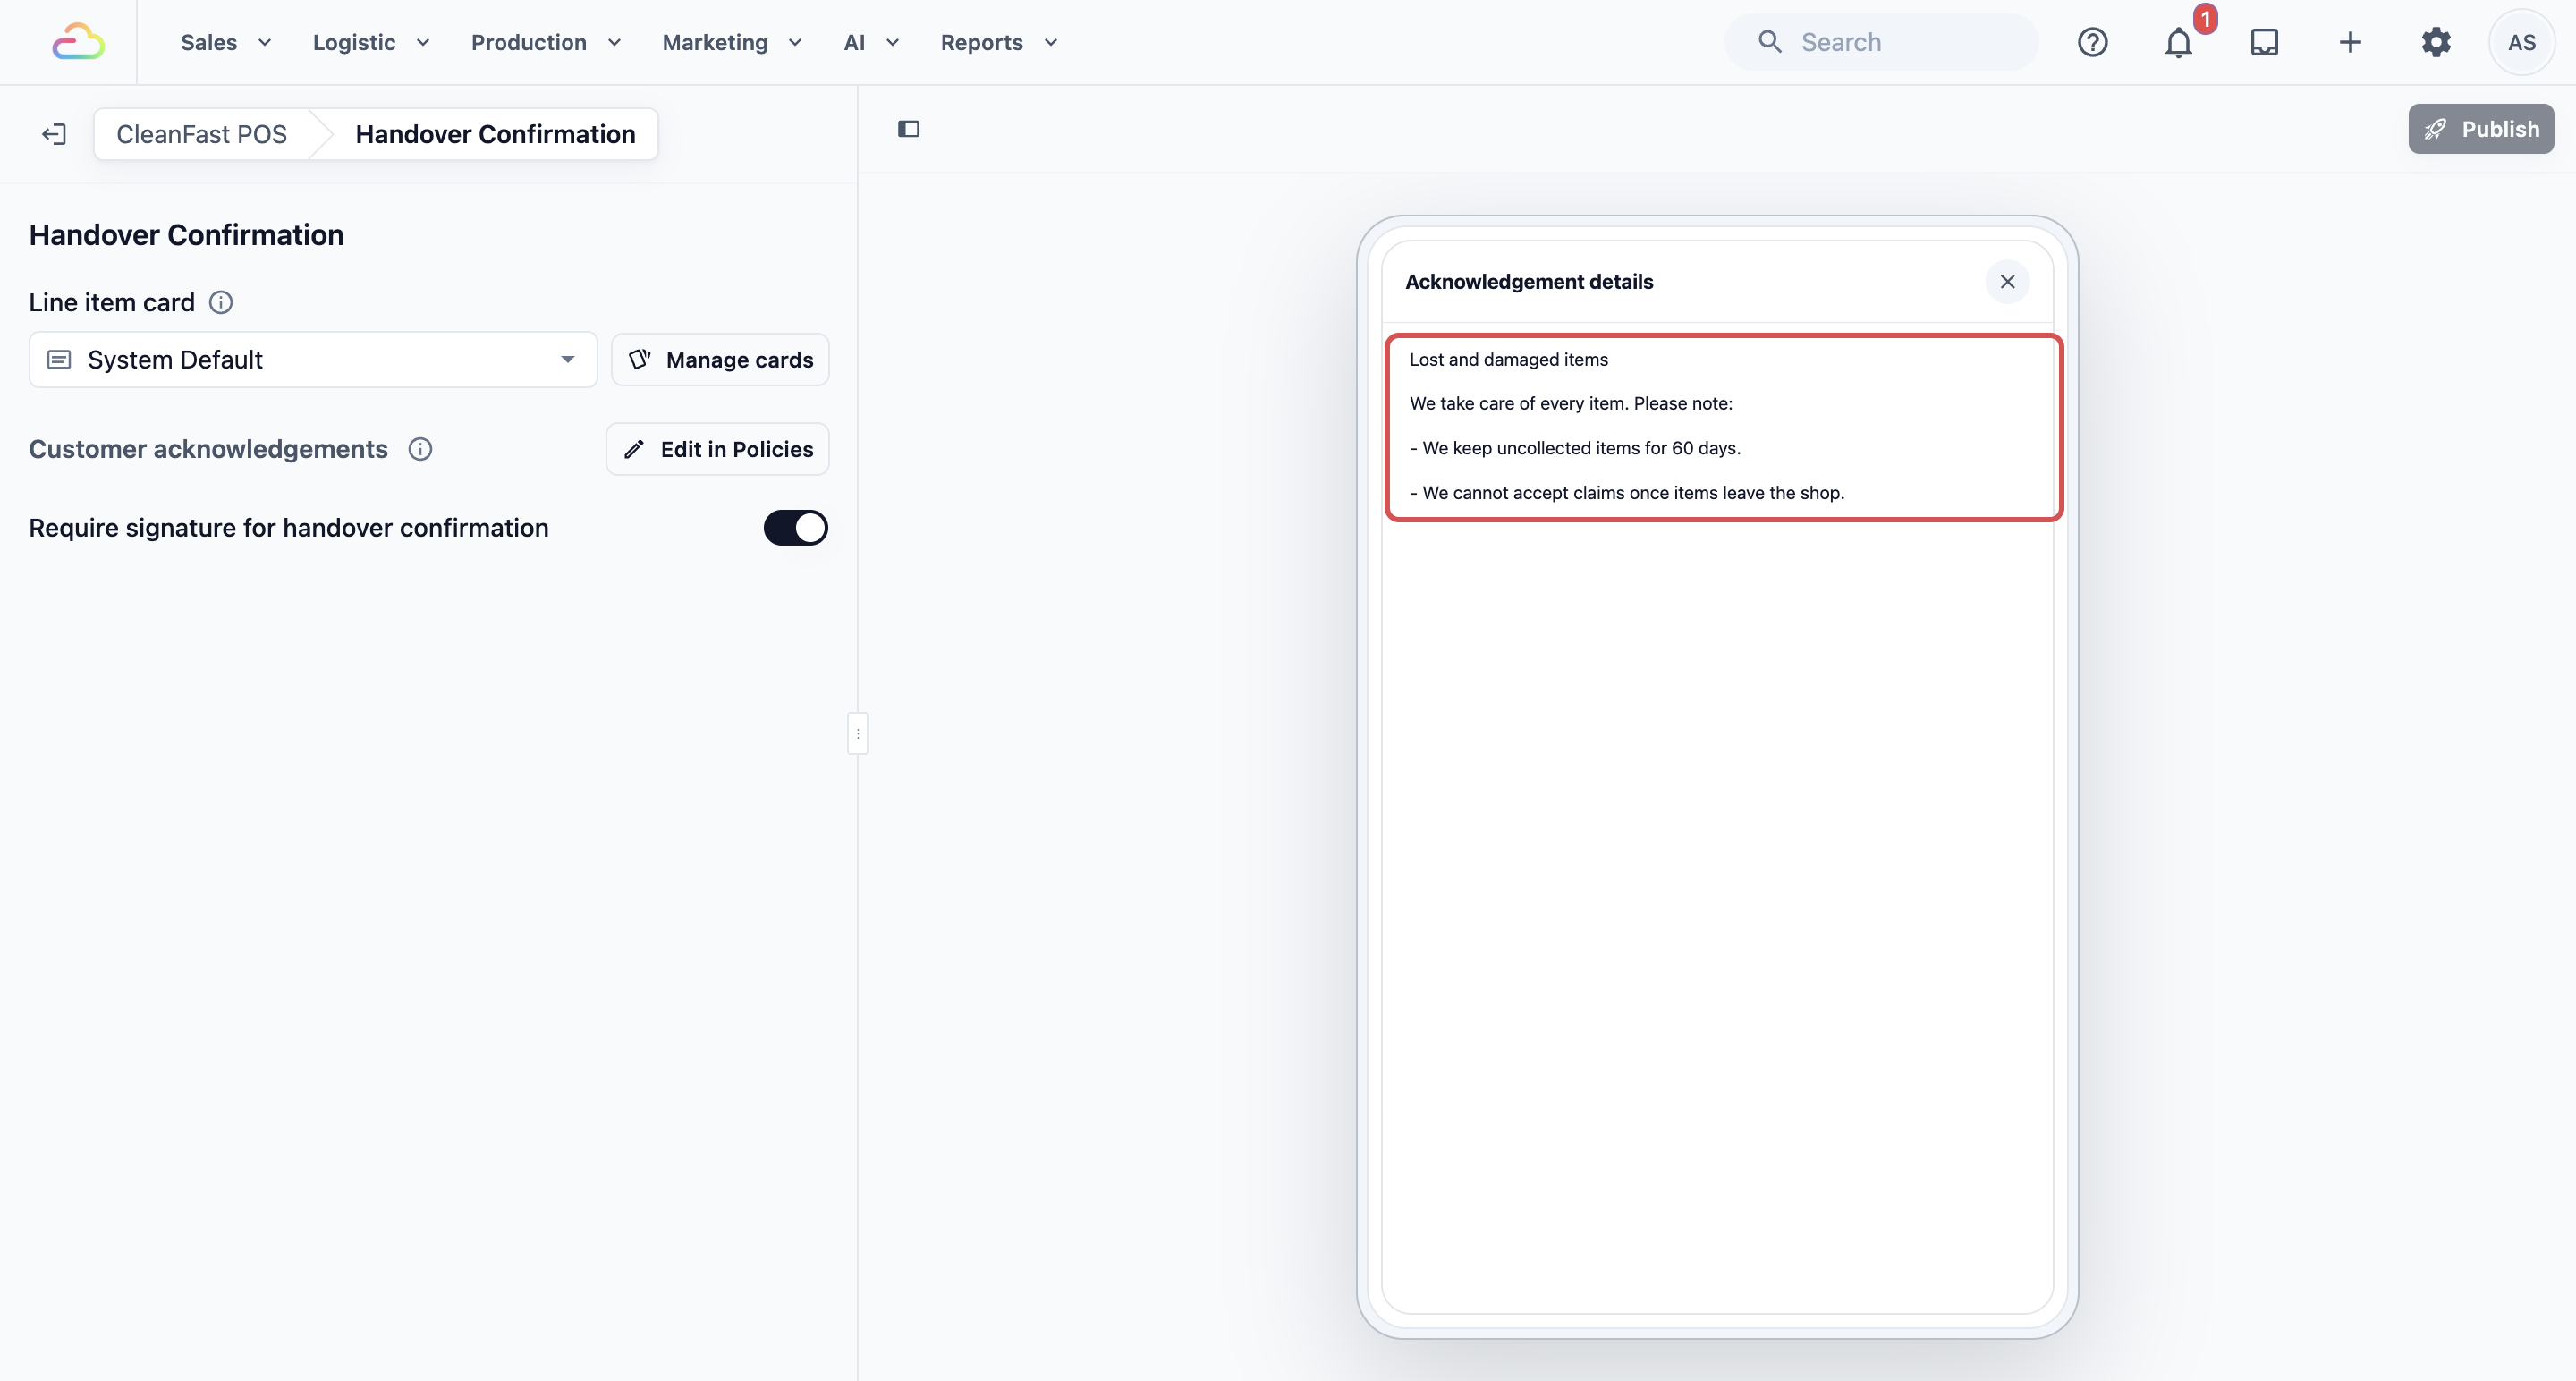
The same checkboxes show at order review on the customer screen when an order is taken. To switch them on, see [Set up customer acknowledgements](#set-up-customer-acknowledgements).
---
## Set up customer acknowledgements
Customer acknowledgements are checkboxes customers tick before they go on. The order keeps a record of what they ticked. For example: "I confirm I have received the listed items."
There are 2 moments. Each has its own list of checkboxes:
| **When** | **Where customers tick it** |
| --- | --- |
| When an order is taken | Order review on the customer screen |
| When items are handed over | Handover on the customer screen, POS and Console |
To set up the checkboxes for a moment:
1. On the Policies page, under **Customer acknowledgements**, click **When an order is taken** or **When items are handed over**.
2. Click Add acknowledgement. Pick a ready-made checkbox, such as **Received listed items**, **Items in good condition** or **Authorized collector**, or pick **Custom** to write your own.
3. Open the checkbox to change it:
- **Content shown before checkbox**: extra text the customer reads in **View details**, before the policy, such as a short summary. Type **@** to add an order detail.
- **Checkbox text**: what the customer agrees to, such as "I confirm the items are in good condition at collection."
- **Policy shown with it**: lets the customer open one of your policies from the checkbox before they tick it.
- **Purpose**: what the checkbox records, such as Collection acknowledgement.
- **Required**: customers must tick it before they can go on.
4. Drag the checkboxes into the order you want them shown.
5. Click Save. You will see "Acknowledgements saved".
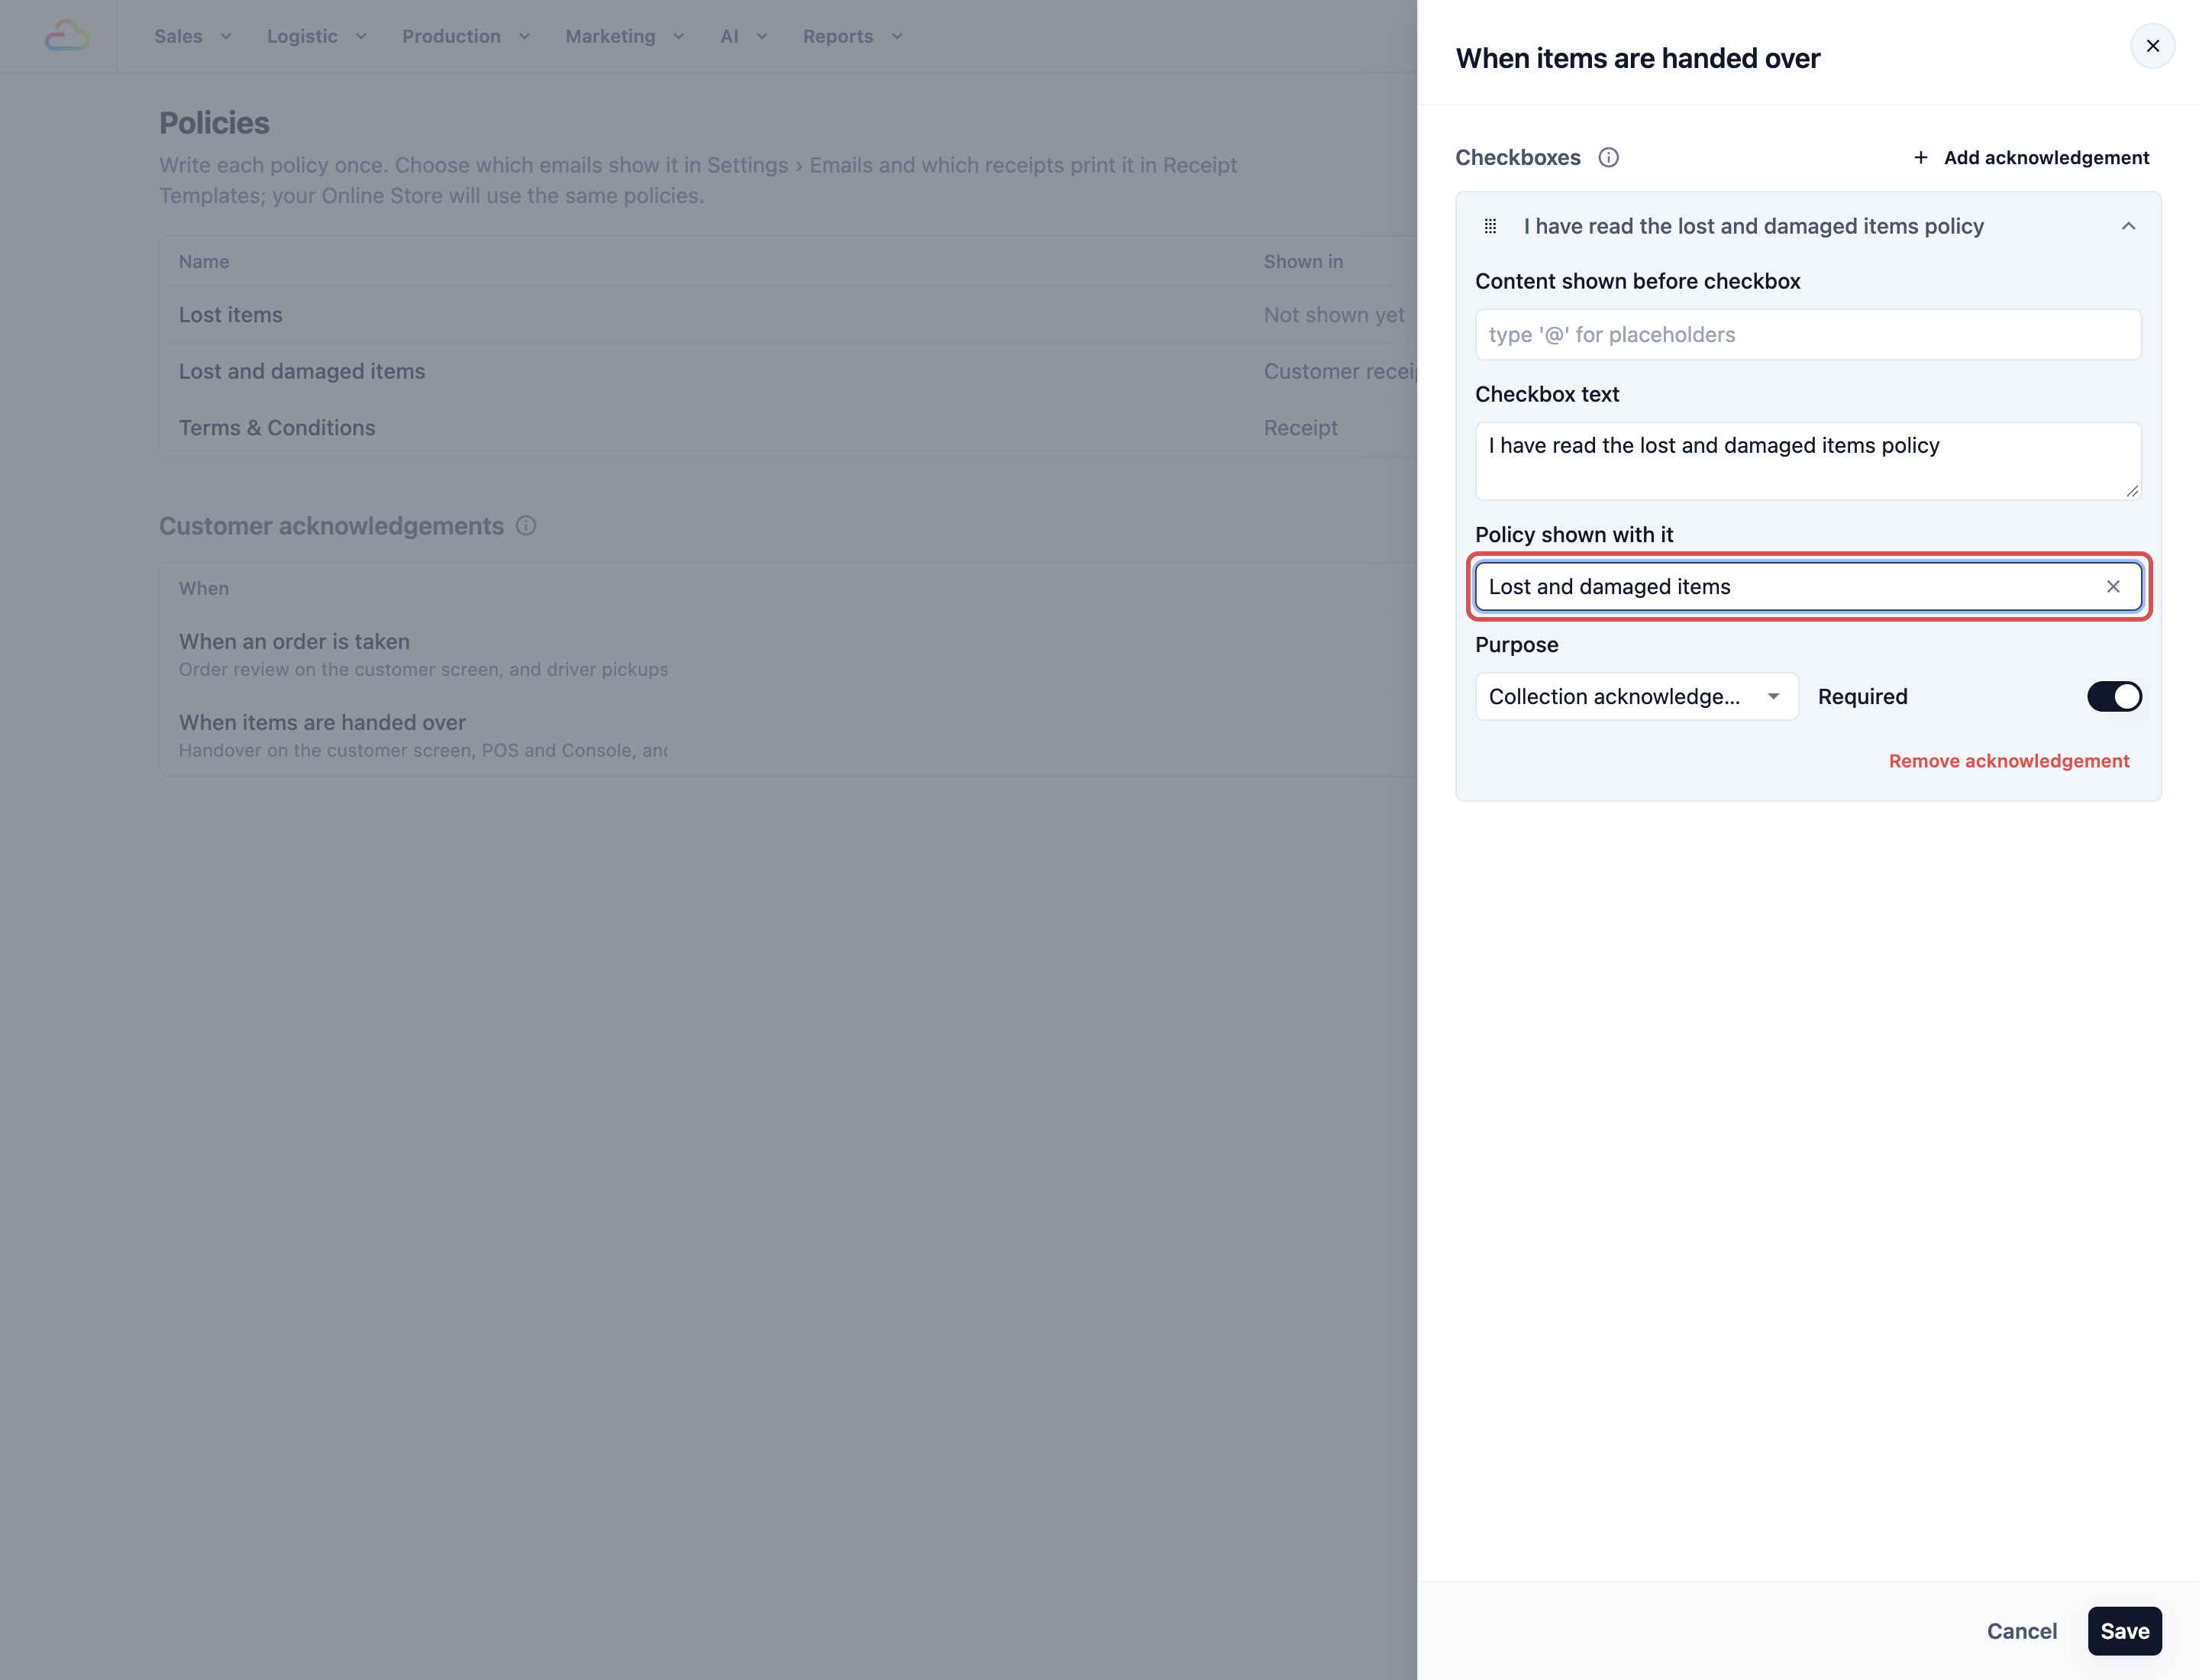
If you leave a moment's list empty, customers see no checkboxes at that moment.
---
## See what a customer ticked
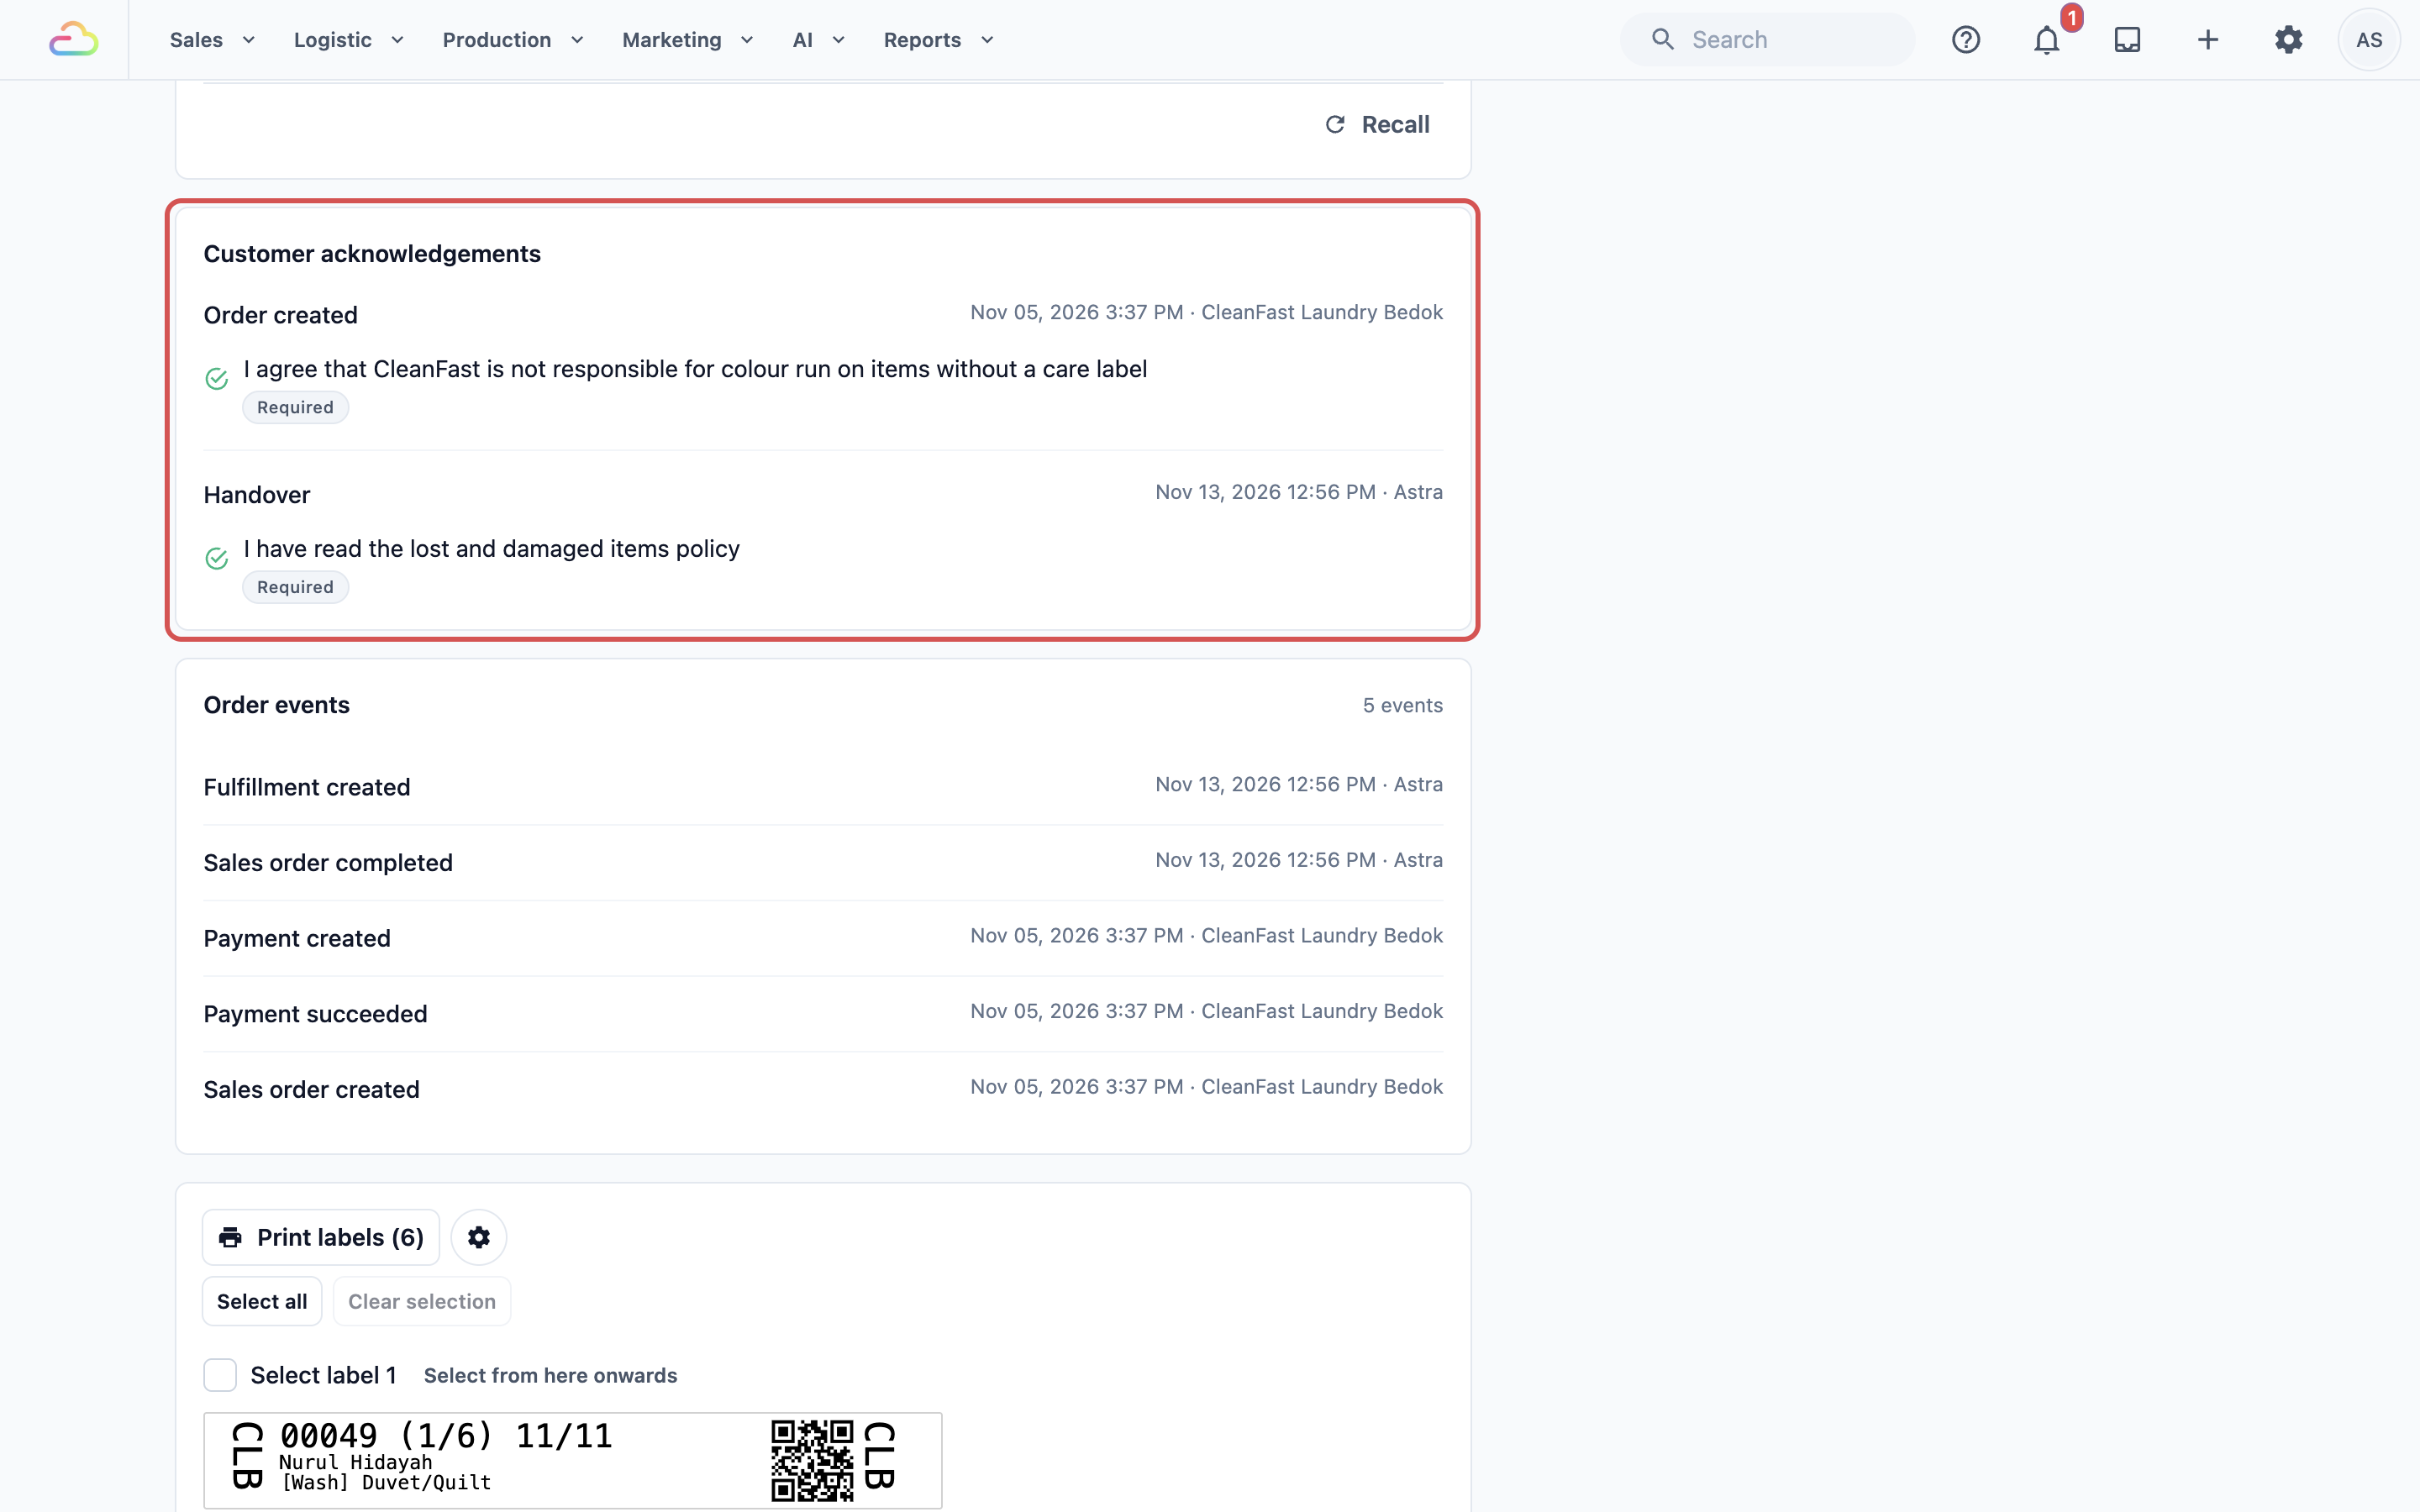
Open the order. Under **Customer acknowledgements**, the order page shows each moment, such as Order created, Pickup, Delivery or Handover, with the checkboxes the customer ticked, any marked "Not ticked", and their signature if they signed.
---
## Example setup
CleanFast Laundry has 2 POS shops, in Tampines and Jurong.
1. They write "Terms & Conditions" and pick it in **Policies** in the Receipt email and the Invoice PDF. Every payment email and invoice now ends with their terms.
2. They write "Lost and damaged items": "We keep uncollected items for 60 days. Please check your items at collection. We cannot accept claims once items leave the shop."
3. They add "Lost and damaged items" to the **Bottom** of their order receipt, with **Print its name above it** on.
4. Under **When items are handed over**, they add a **Custom** checkbox, "I have read the lost and damaged items policy", link "Lost and damaged items" in **Policy shown with it** and turn on **Required**.
Now a customer collecting at Tampines ticks the checkbox on the customer screen before staff can finish the handover. The Policies page shows both policies with their places in **Shown in**.
---
## Managing it later
**Edit a policy**: open it, change it and click Save. Every email, PDF, receipt and checkbox that shows it uses the new words from then on, and your printed receipts update by themselves. Past orders keep the exact text the customer saw and ticked, so your records stay as they were.
**Delete a policy**: open it, click Delete at the bottom, then click Delete again to confirm. Emails, PDFs and checkboxes stop showing it. A receipt that printed it prints nothing in its place, and the receipt editor shows "Deleted policy", so pick another policy for that receipt or remove the part.
---
## FAQs
**Will my policies show on my Online Store?**
> Not from this page. Your Online Store footer has its own **Privacy policy link** and **Terms link**, which point to a web page with your terms. Set them in the Online Store editor's **Footer** section: see [Setting Up Your Announcement Bar, Footer and Languages](/docs/setting-up-your-announcement-bar-footer-and-languages).
**Do policies go out on WhatsApp?**
> Not in the WhatsApp message itself. When a WhatsApp message attaches your invoice or receipt PDF, the policies picked in that PDF print at the end of it. For your full terms, link them in the message or send them by email.
**Why does a policy say "Not shown yet"?**
> No email, printed receipt or checkbox shows it yet. The **Shown in** column does not list PDFs, so a policy picked only in a PDF still says "Not shown yet" while it prints on that PDF.
**Can a checkbox be optional?**
> Yes. Turn off **Required**. Customers can then go on without ticking it, and the order records it as "Not ticked".
**If I change my terms, will old orders show the new words?**
> No. Each order keeps the text the customer ticked at the time. New emails, PDFs and receipts use the new words.
**Do I need customer acknowledgements if my terms are already on the receipt?**
> Only if you want proof that the customer agreed. A printed policy tells customers your terms. A ticked checkbox records on the order that they accepted them.
---
## What's Next
You have written your policies, chosen where customers see them and set the checkboxes they tick at order and handover. To choose when your emails and messages go out, see [Setting Up Customer Notifications](/docs/setting-up-customer-notifications).