## Before You Start
You need a POS app already set up. See [Create Your POS App](/docs/create-your-pos-app).
If you plan to accept cards, GrabPay, or PayNow through Stripe, you also need to connect Stripe first. The Stripe section in this article walks you through that.
---
## How this page works with your POS app's Payment block
Two pages work together to decide what staff sees at the counter:
| Page | What it controls |
| --- | --- |
| Payment methods tab (this page) | Which methods are available to your POS — Stripe sub-methods, custom methods like NETS or Bank Transfer, and Cash Drawer Management |
| POS app's Payment block | Which available methods appear at the counter, and in what order |
Configure this Payment methods tab first. Then open the Payment block in your POS app to choose which available methods show up at the counter and arrange them. The Payment block is covered in [Create Your POS App](/docs/create-your-pos-app#payment).
Turning a method on here does not put it at the counter by itself. You also need to add it to the Payment block on your POS app. If a method is missing at POS, that's the first place to check.
---
## Where to find your payment methods
1. Click the ⚙️ Settings in the top-right corner.
2. Under the **Sales Channels** section, click Point of Sale.
3. Click the Payment methods tab at the top.
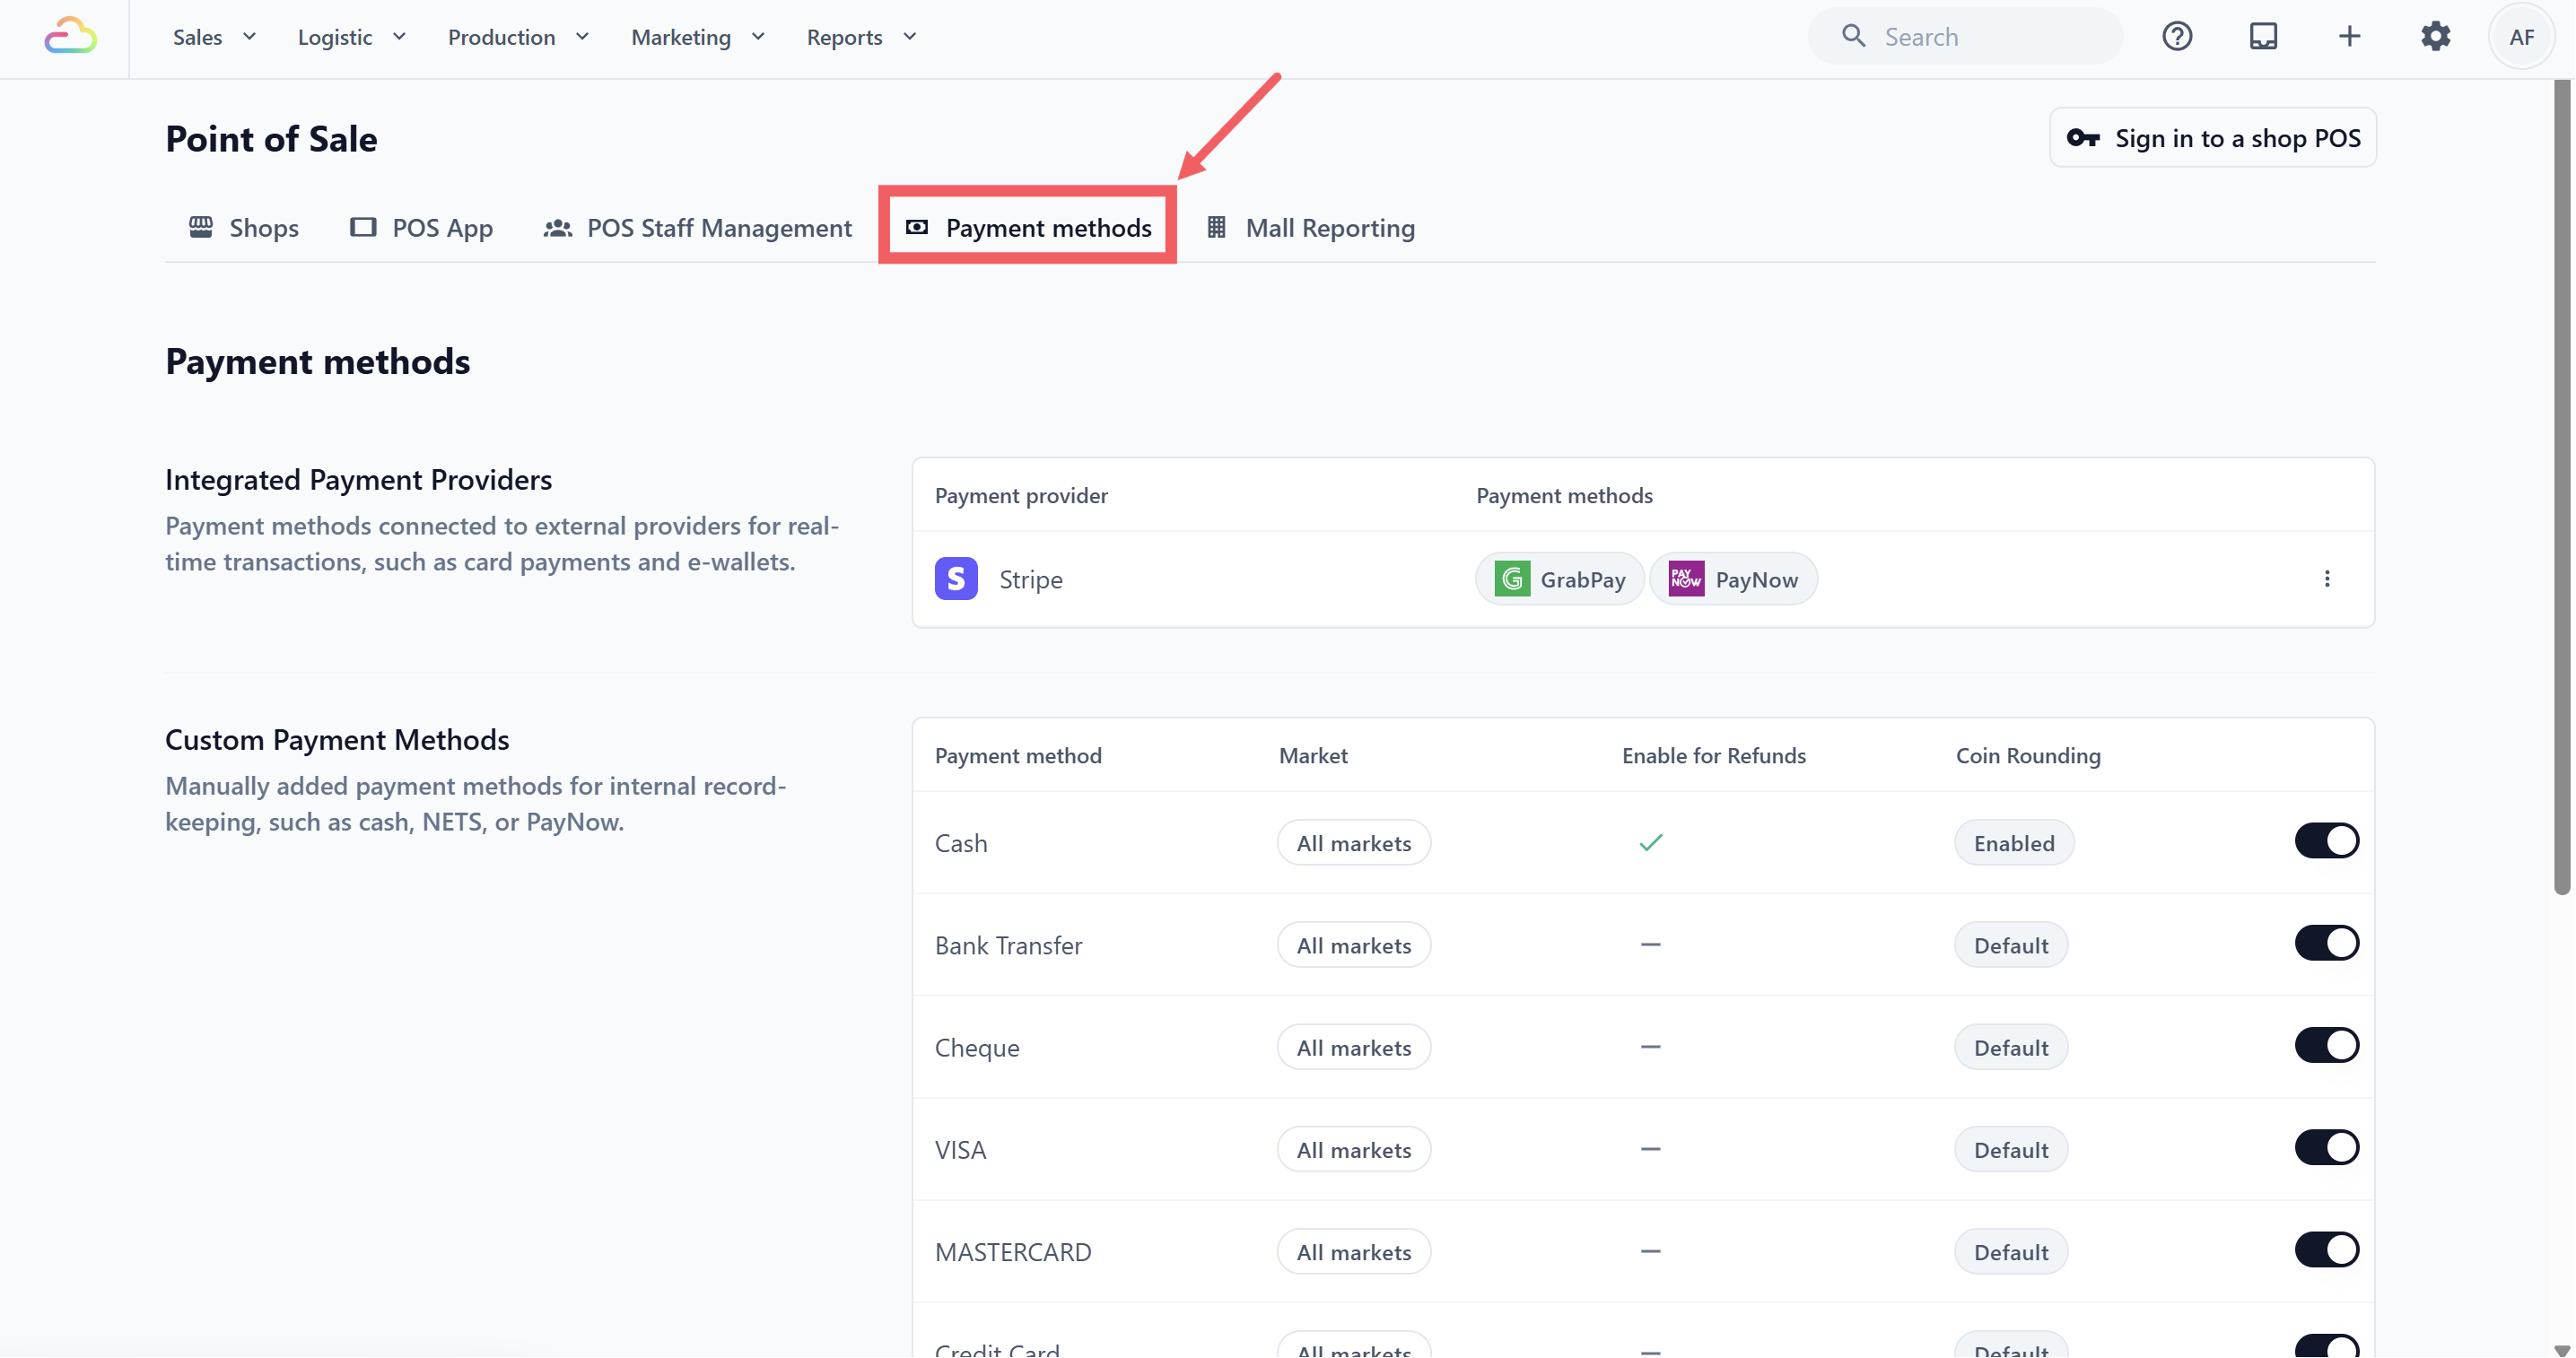
You will see three sections: **Integrated Payment Providers**, **Custom Payment Methods**, and **Cash Drawer Management**.
---
## Setting up Integrated Payment Providers
Integrated Payment Providers process card and e-wallet payments through an external service. Today, this section shows **Stripe** only. If you only take cash and manual card or bank payments, you can skip this section.
### Connect Stripe first
Before Stripe payment methods can be used at POS, connect Stripe from the Integrations page.
1. Click the ⚙️ Settings in the top-right corner.
2. Under the **Administration** section, click Integrations.
3. Find Stripe and click Connect.
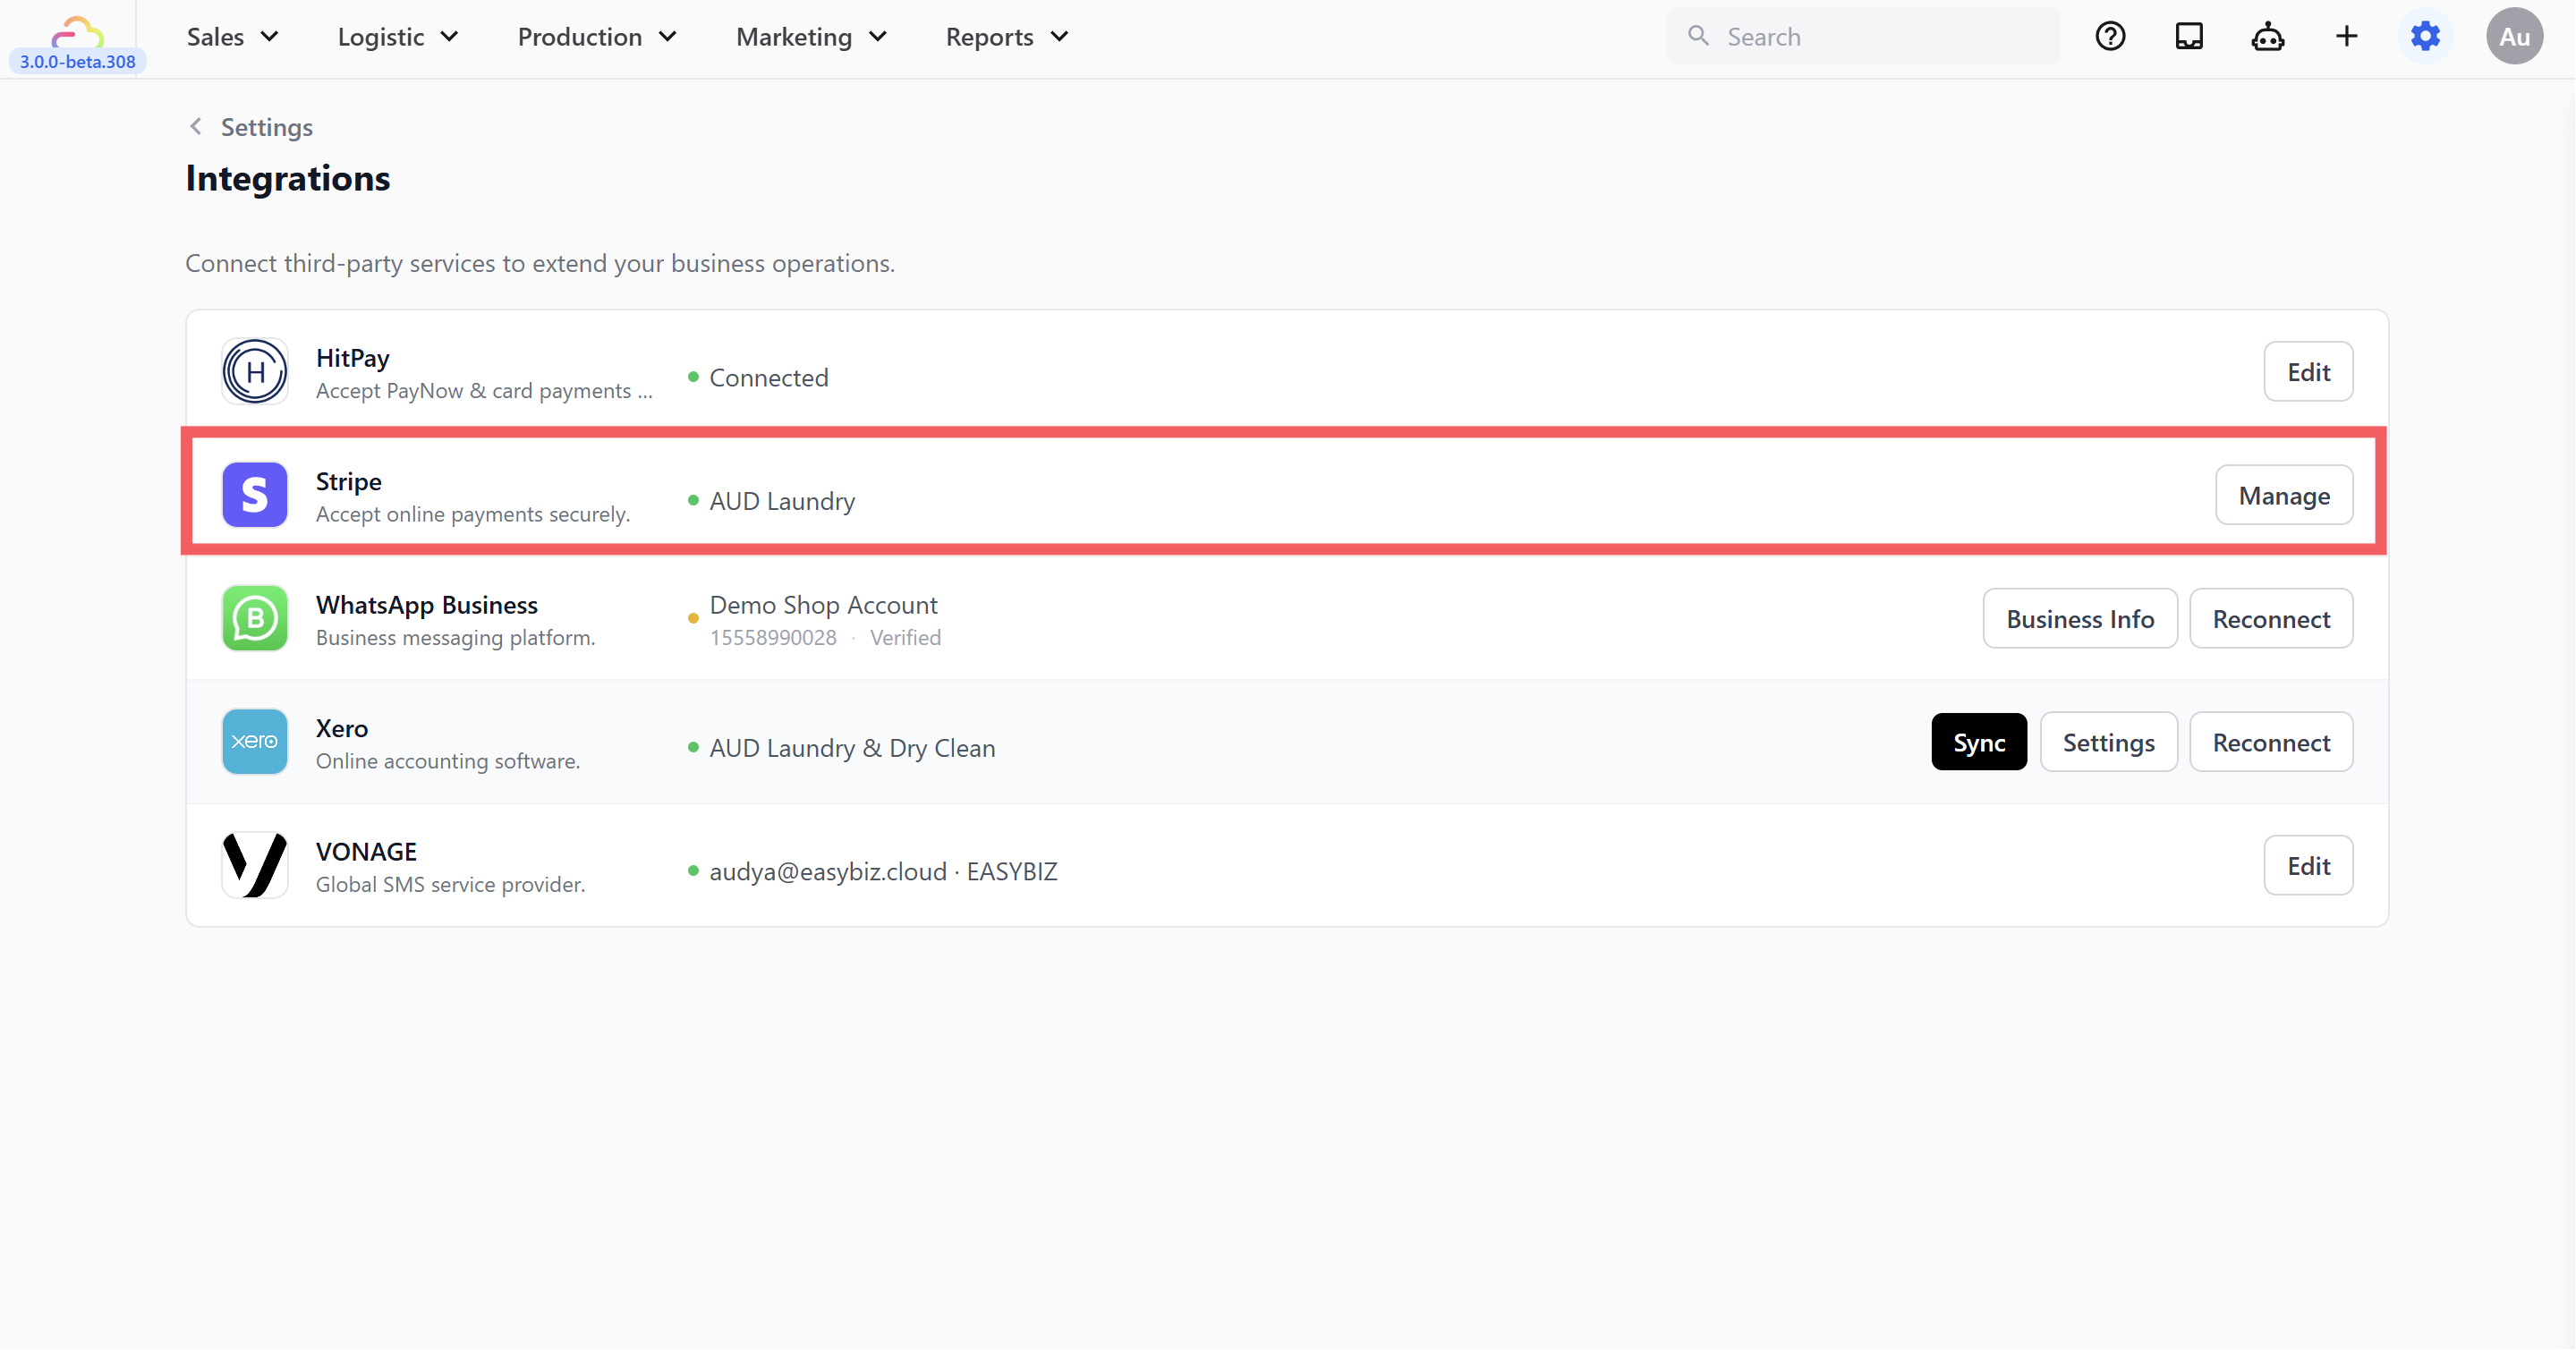
You will be sent to Stripe's own onboarding page to enter your business and bank details. Once you finish on Stripe's side, you will be returned to the Integrations page in EasyBiz with Stripe marked as Connected.
### Choose which Stripe methods are available at POS
Once Stripe is connected, pick which Stripe methods (such as PayNow or GrabPay for Singapore accounts) become available to add to your POS app's Payment block.
1. Go back to **⚙️** Settings **→ Sales Channels** section **→** Point of Sale **→** Payment methods tab.
2. On the Stripe row in Integrated Payment Providers, click the ••• three-dots and Edit.
3. Toggle on each method you want available at POS.
4. Click Save.
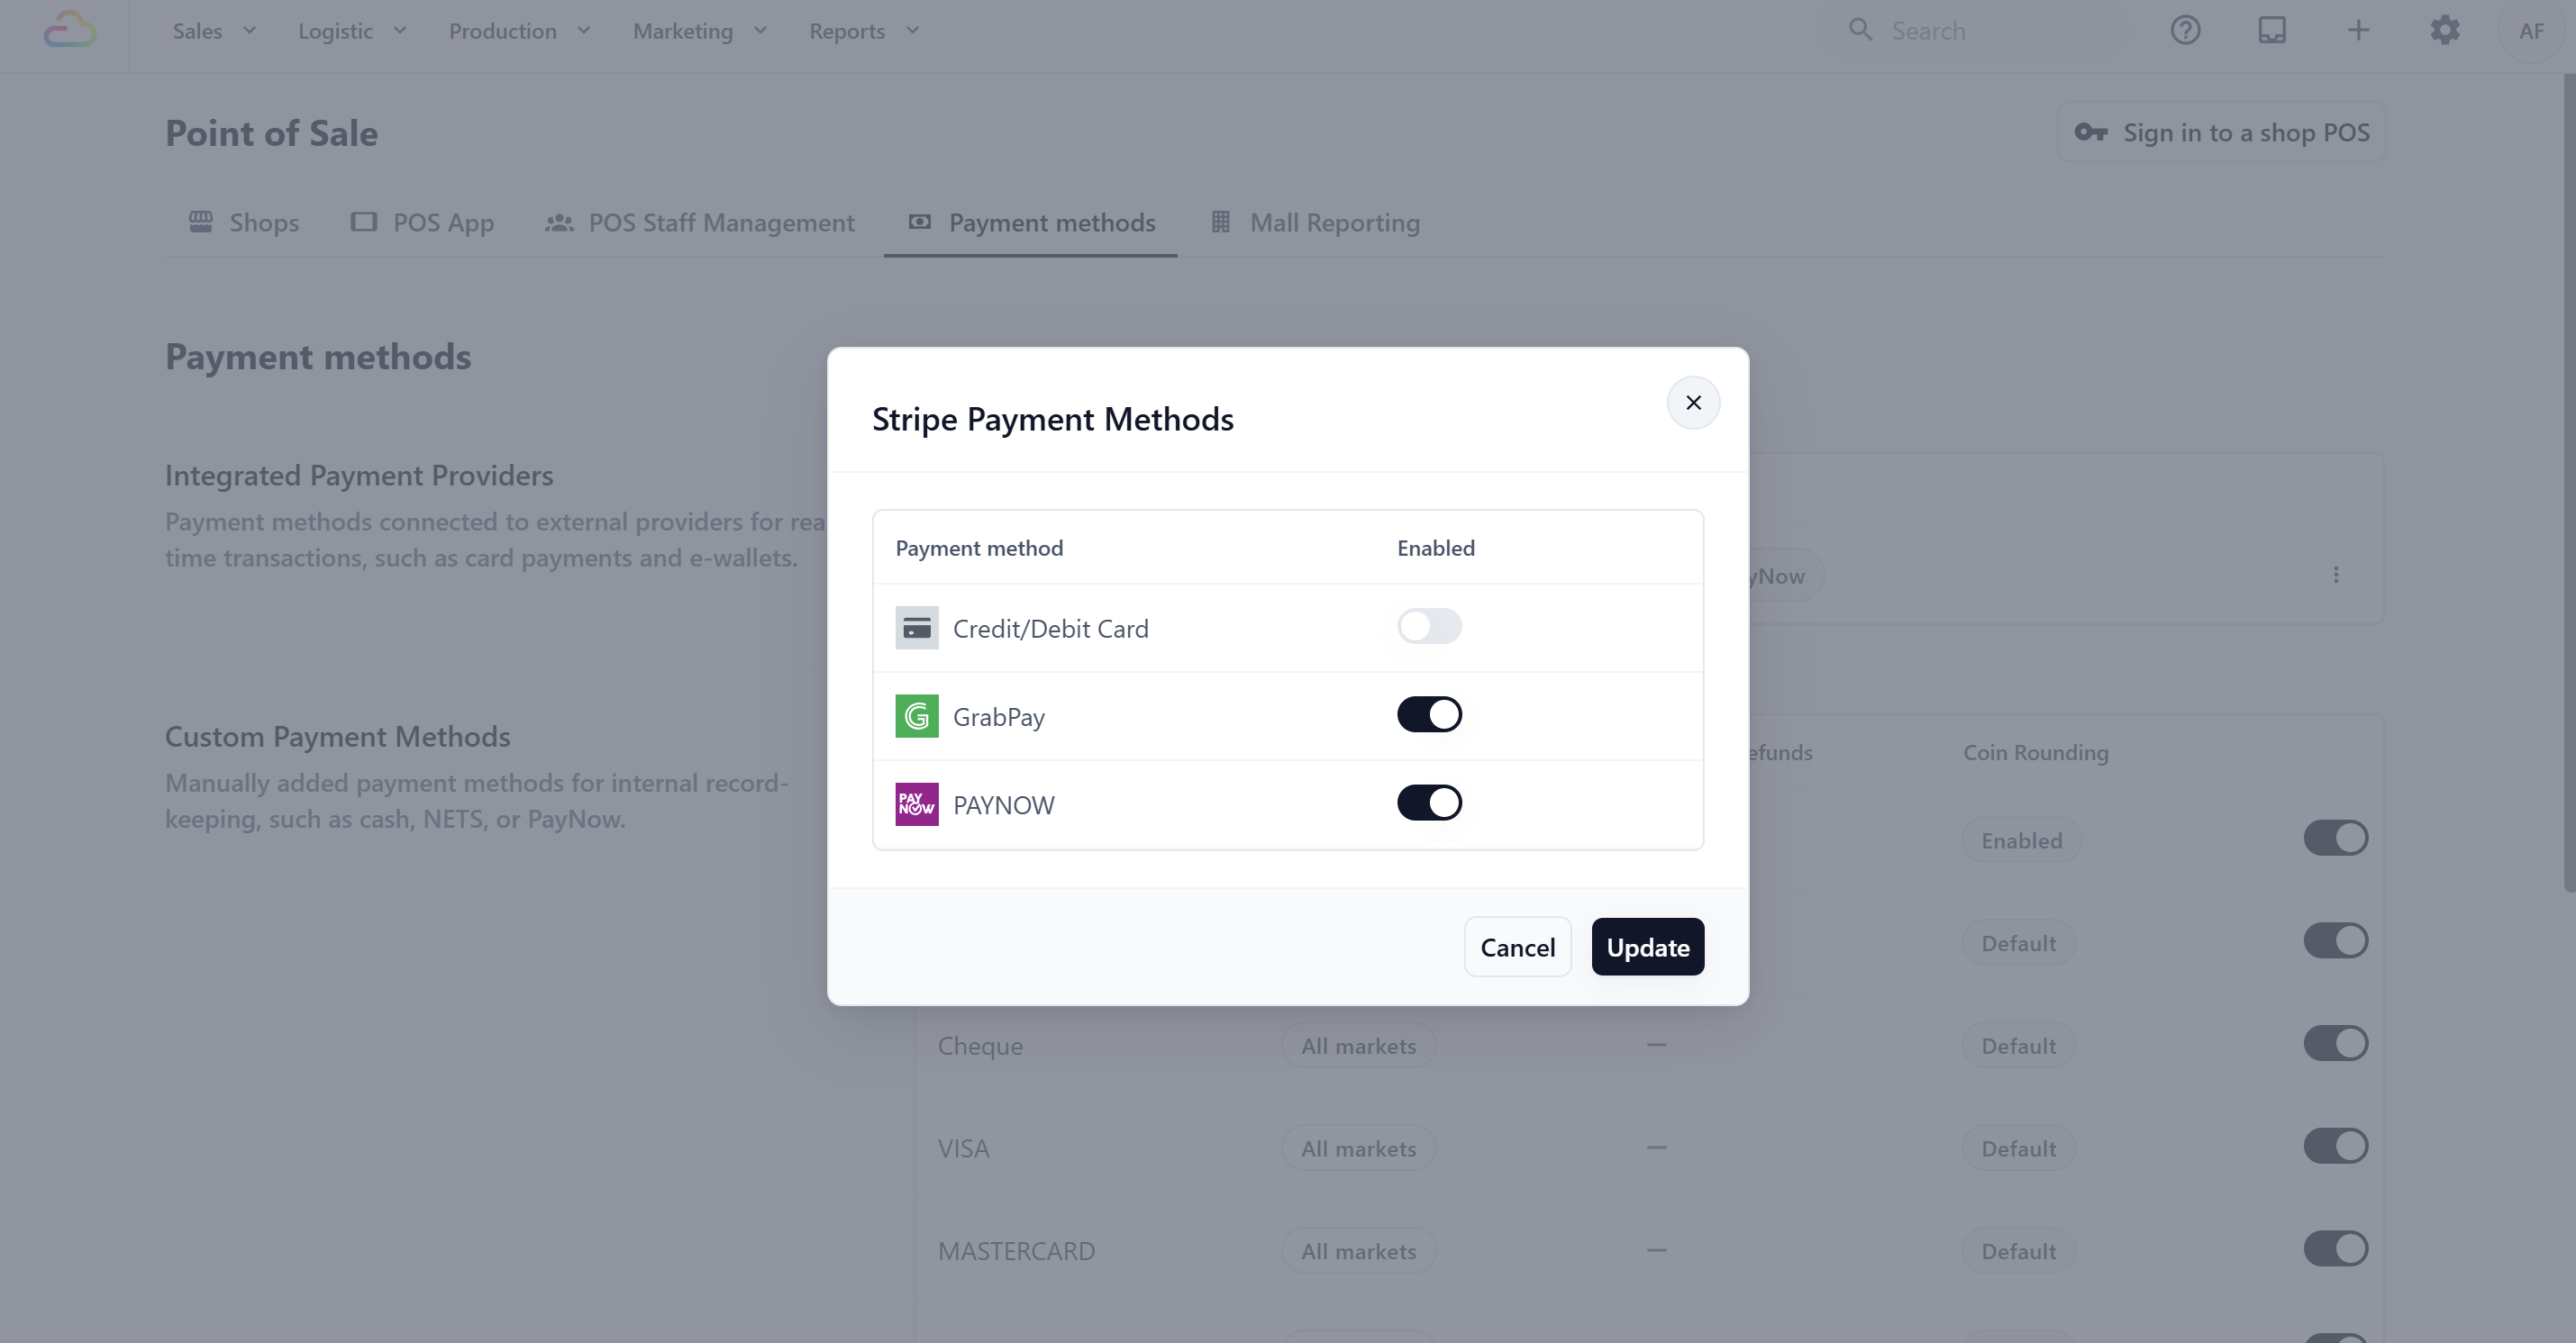
All Stripe method toggles start off, even after Stripe is connected. You turn each one on individually. If Stripe is not yet connected, the toggles in the dialog are greyed out.
Stripe Card is for online flows and does not appear at the POS counter. Use PayNow or GrabPay for in-person Stripe payments.
If Stripe is disconnected after methods have been added to your Payment block, those methods will fail at checkout. Always come back here to disable them if you disconnect Stripe.
---
## Setting up Custom Payment Methods
Custom Payment Methods are for payments handled outside EasyBiz but recorded at POS. Examples are cash, bank transfers, cheques, or card payments processed on a separate bank terminal sitting next to your counter.
Your account starts with several common methods already set up, such as Cash, Bank Transfer, and the major card brands.
The toggle on each row controls whether the method is available at POS. Turning it off hides the method from your POS app's Payment block selector but does not delete it.
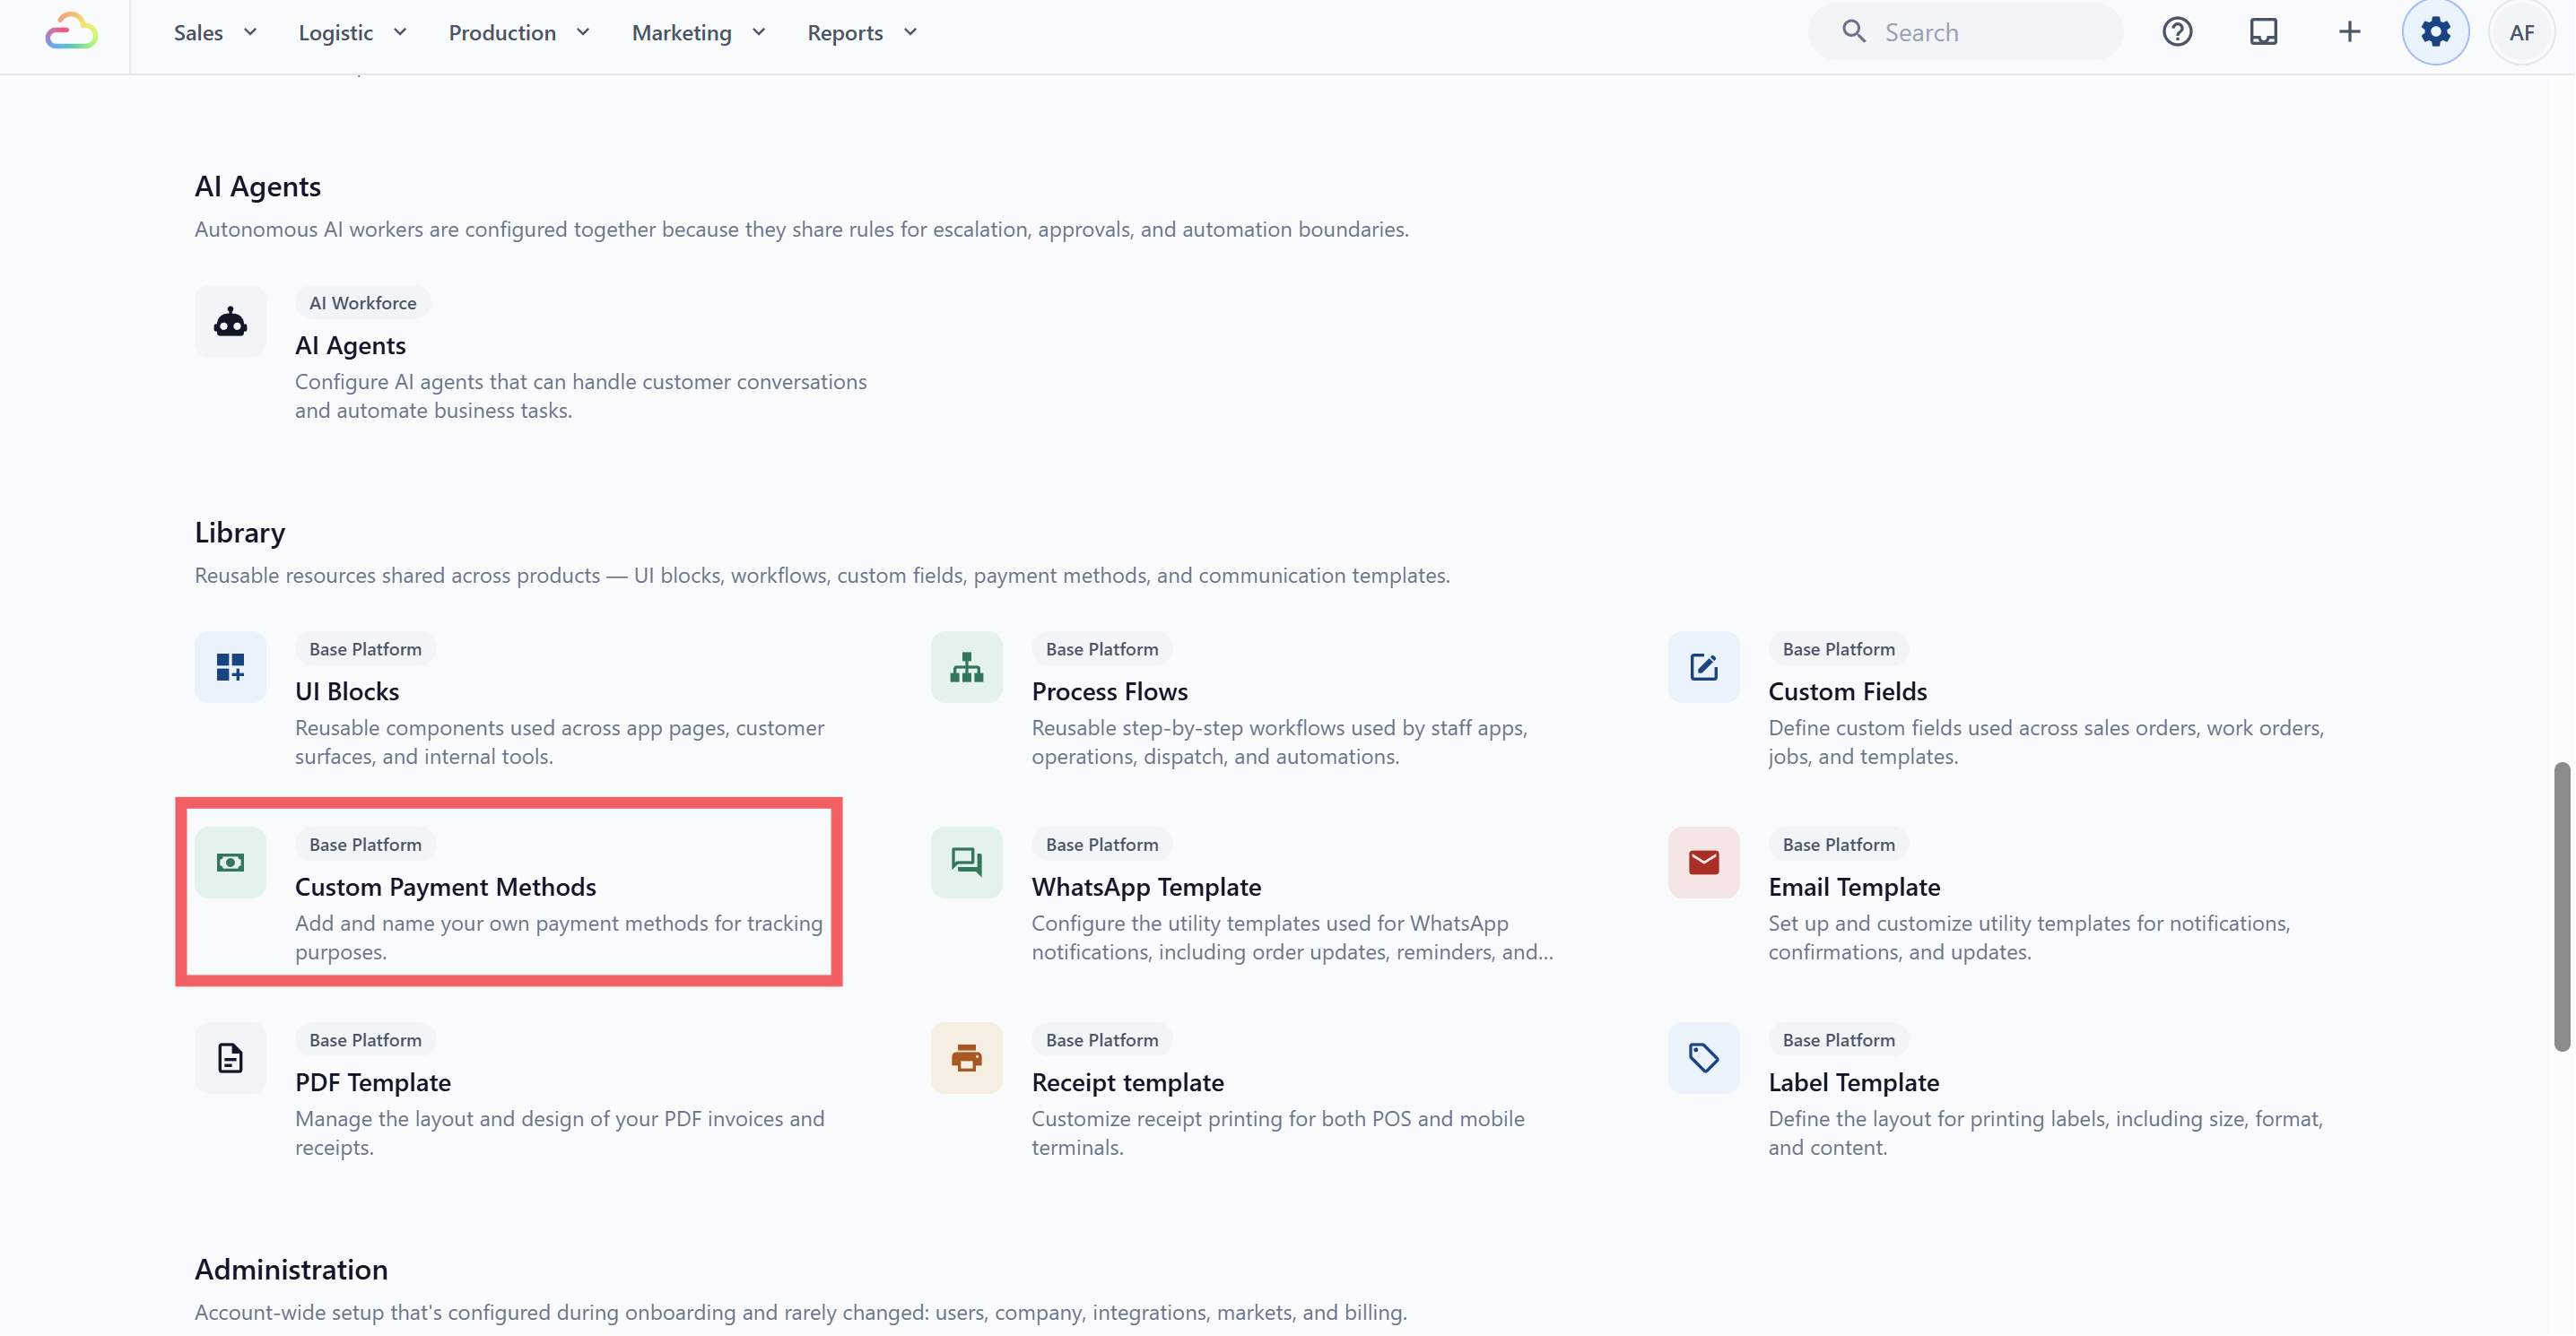
To add new methods or change existing ones, click **Manage custom payment methods**. This opens **⚙️** Settings**→ Operations →** Custom Payment Methods, which shows the same list with full edit and delete controls.
A laundry shop in Singapore accepts payment from customers using NETS through their bank's standalone terminal. They add a Custom Payment Method called "NETS", staff process the card on the bank terminal, then select NETS in EasyBiz POS to record the sale.
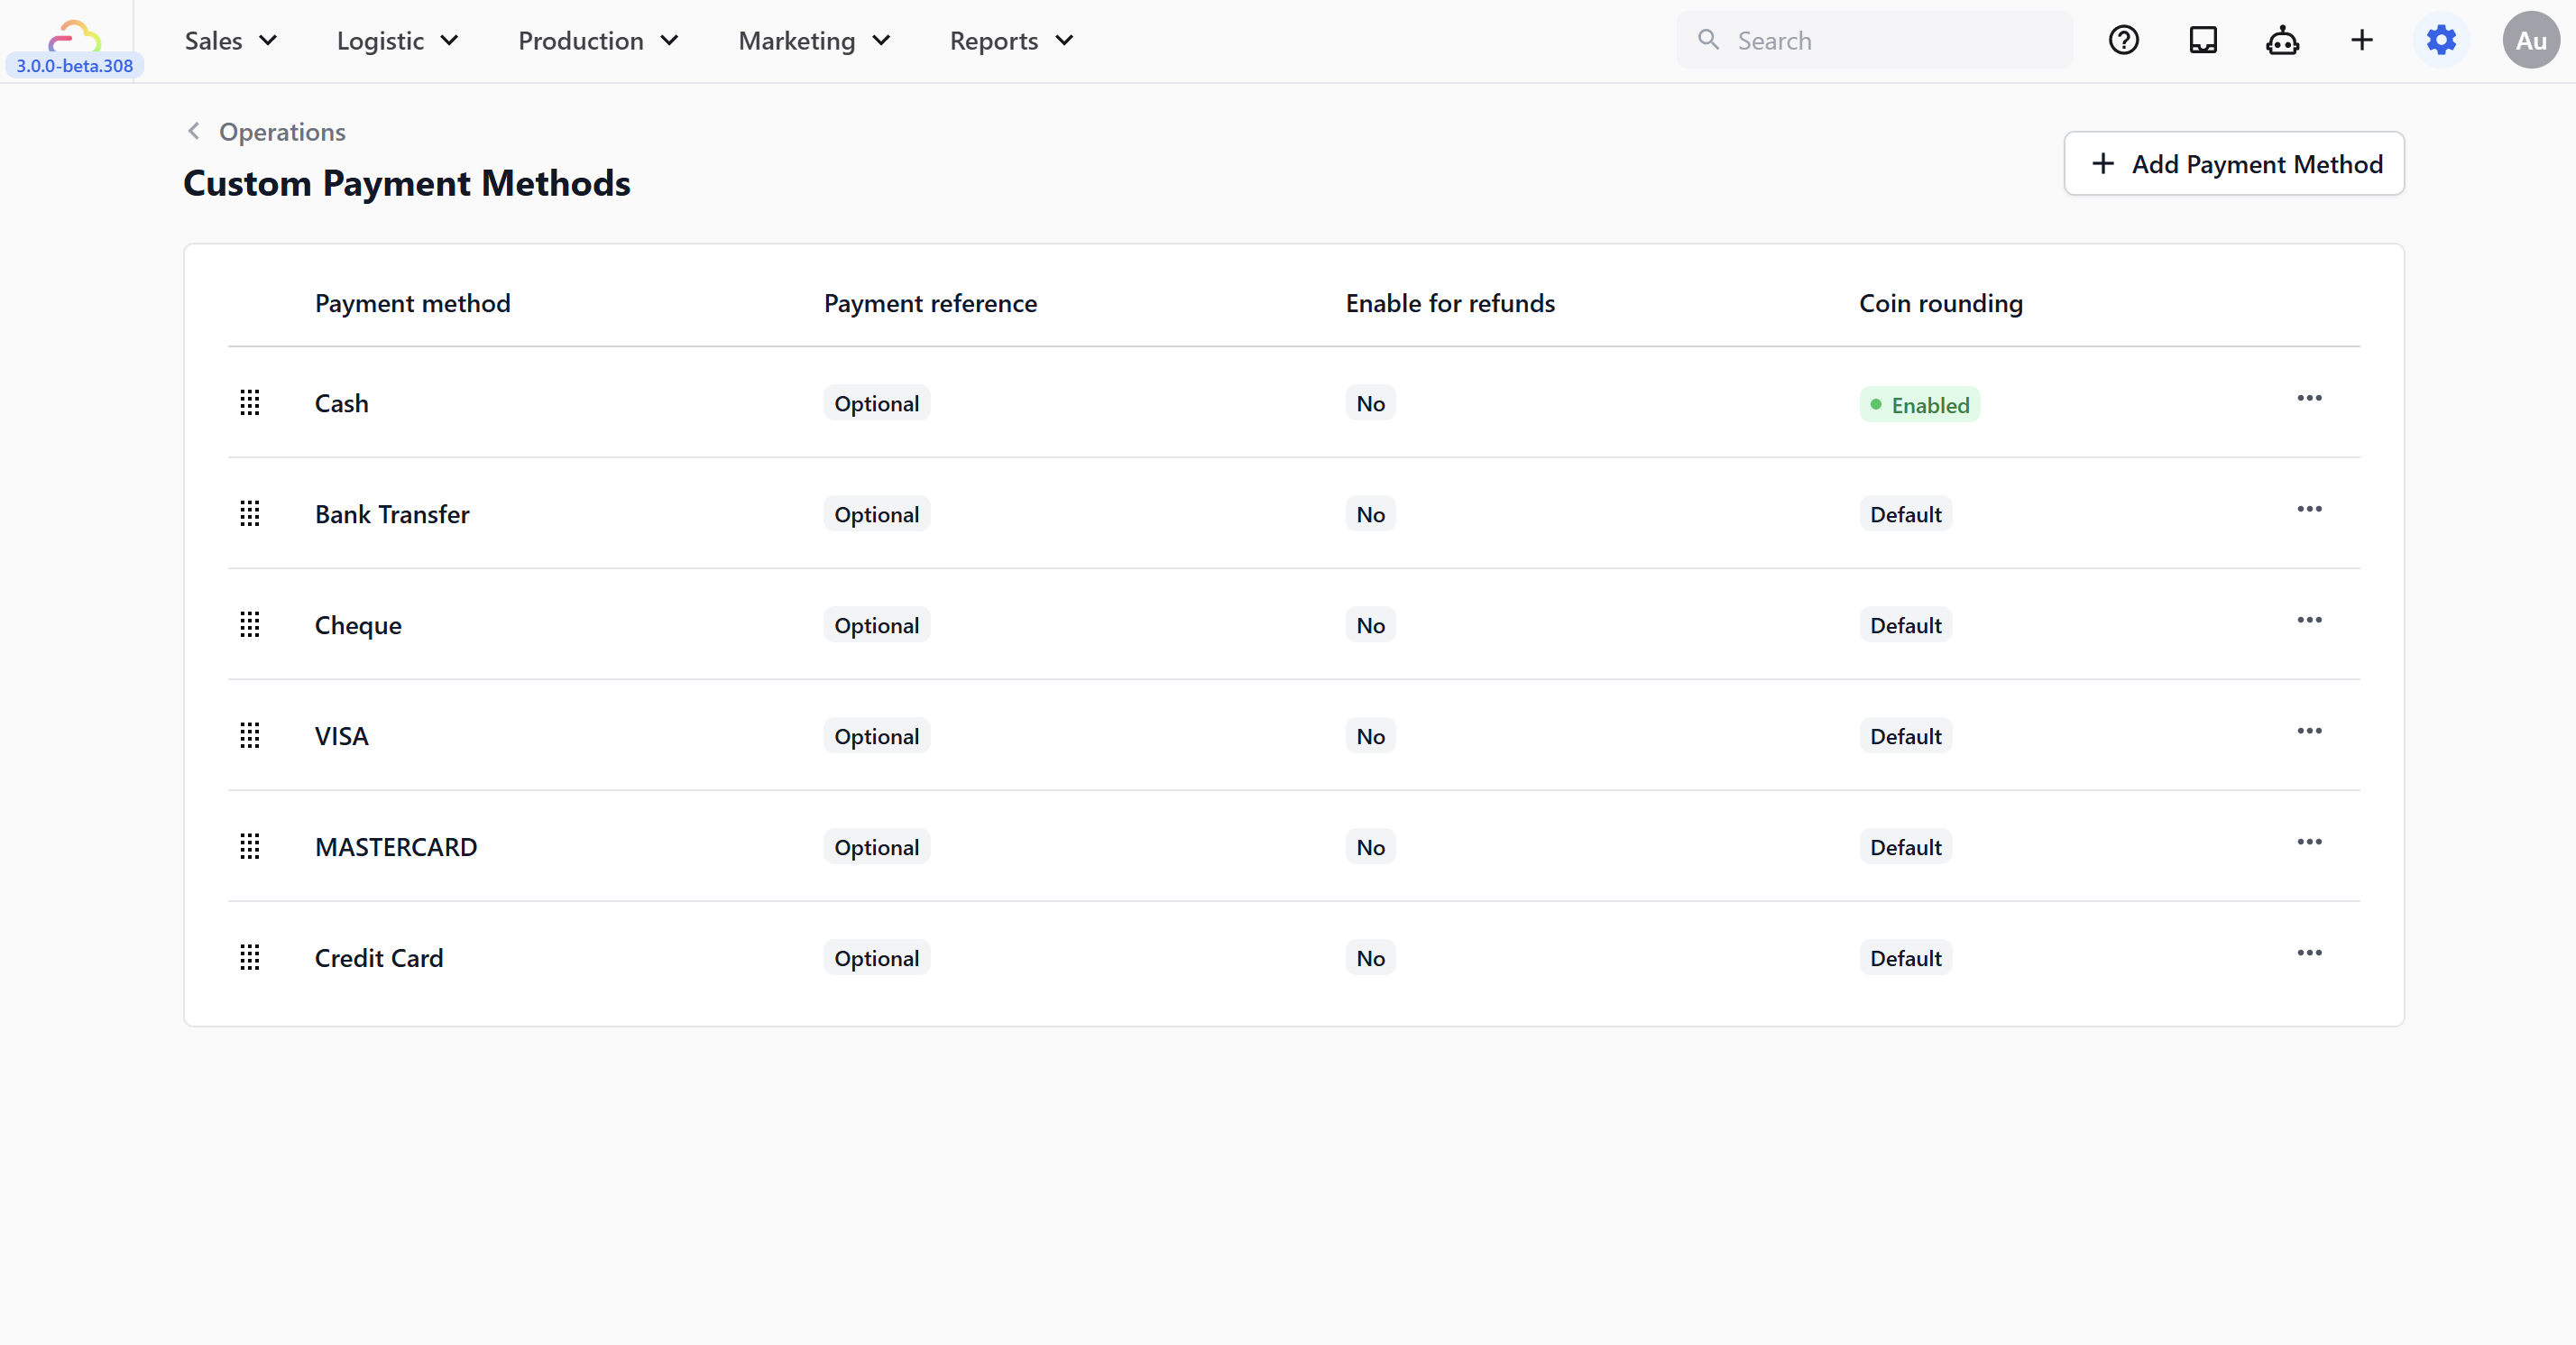
### Configuring a payment method
Click + Add Payment Method to create a new one, or click the three dots on a row and choose **Edit** to change an existing one. Both dialogs have the same fields. Only the button at the bottom is different (Add or Update).
- **Icon → ** Optional. Pick an icon shown next to the method name at POS to help staff spot it quickly.
- **Payment method name → ** Type the name your staff will see at POS. Keep it short and clear.
- **Mandatory payment reference → ** Turn this on if staff must enter a reference (like a transfer ID, terminal approval code, or cheque number) before confirming the payment. They will not be able to complete the sale without filling in the reference.
Recommended for Bank Transfer so your team always logs the bank's transaction reference for reconciliation.
- **Enable for Refunds → ** Turn this on if this method can also be used when issuing refunds.
- **Coin rounding → ** Turn this on for cash-style rounding. When on, two more fields appear: **Coin increment** and **Rounding direction**.
- **Coin increment**
| Pick this | Result |
| --- | --- |
| 5 | Rounds the total to the nearest 5 cents |
| 10 | Rounds the total to the nearest 10 cents |
- **Rounding direction**
| Pick this | Result |
| --- | --- |
| Nearest | Rounds up or down to the closest increment, whichever is nearer |
| Up | Always rounds up to the next increment |
| Down | Always rounds down to the previous increment |
A total of $12.43 with a 5-cent increment rounds to $12.45 if Nearest, $12.45 if Up, and $12.40 if Down.
Coin rounding here is per payment method (typically used on Cash so the till does not deal in 1-cent coins). It is separate from the company-wide rounding under **⚙️** Settings **→ Administration →** Company**→ Rounding**, which controls the precision of order totals. The two settings do not override each other.
If a method has been used on past orders, disable it instead of deleting it. Past orders will keep working either way, but a deleted method shows up as a plain label without an icon on old receipts and reports.
---
## Cash Drawer Management
Cash Drawer Management lets your staff start a cash session, record cash movement, and close the day with an expected-versus-actual count. Turn the toggle on to activate this at POS. For the full staff flow at the counter, see [Set Cash Drawer on Your POS](/docs/set-cash-drawer-on-your-pos).
### Float Adjustment
Float Adjustment sets the starting cash amount left in the drawer after each session closure. This is the cash your staff begins the next shift with.
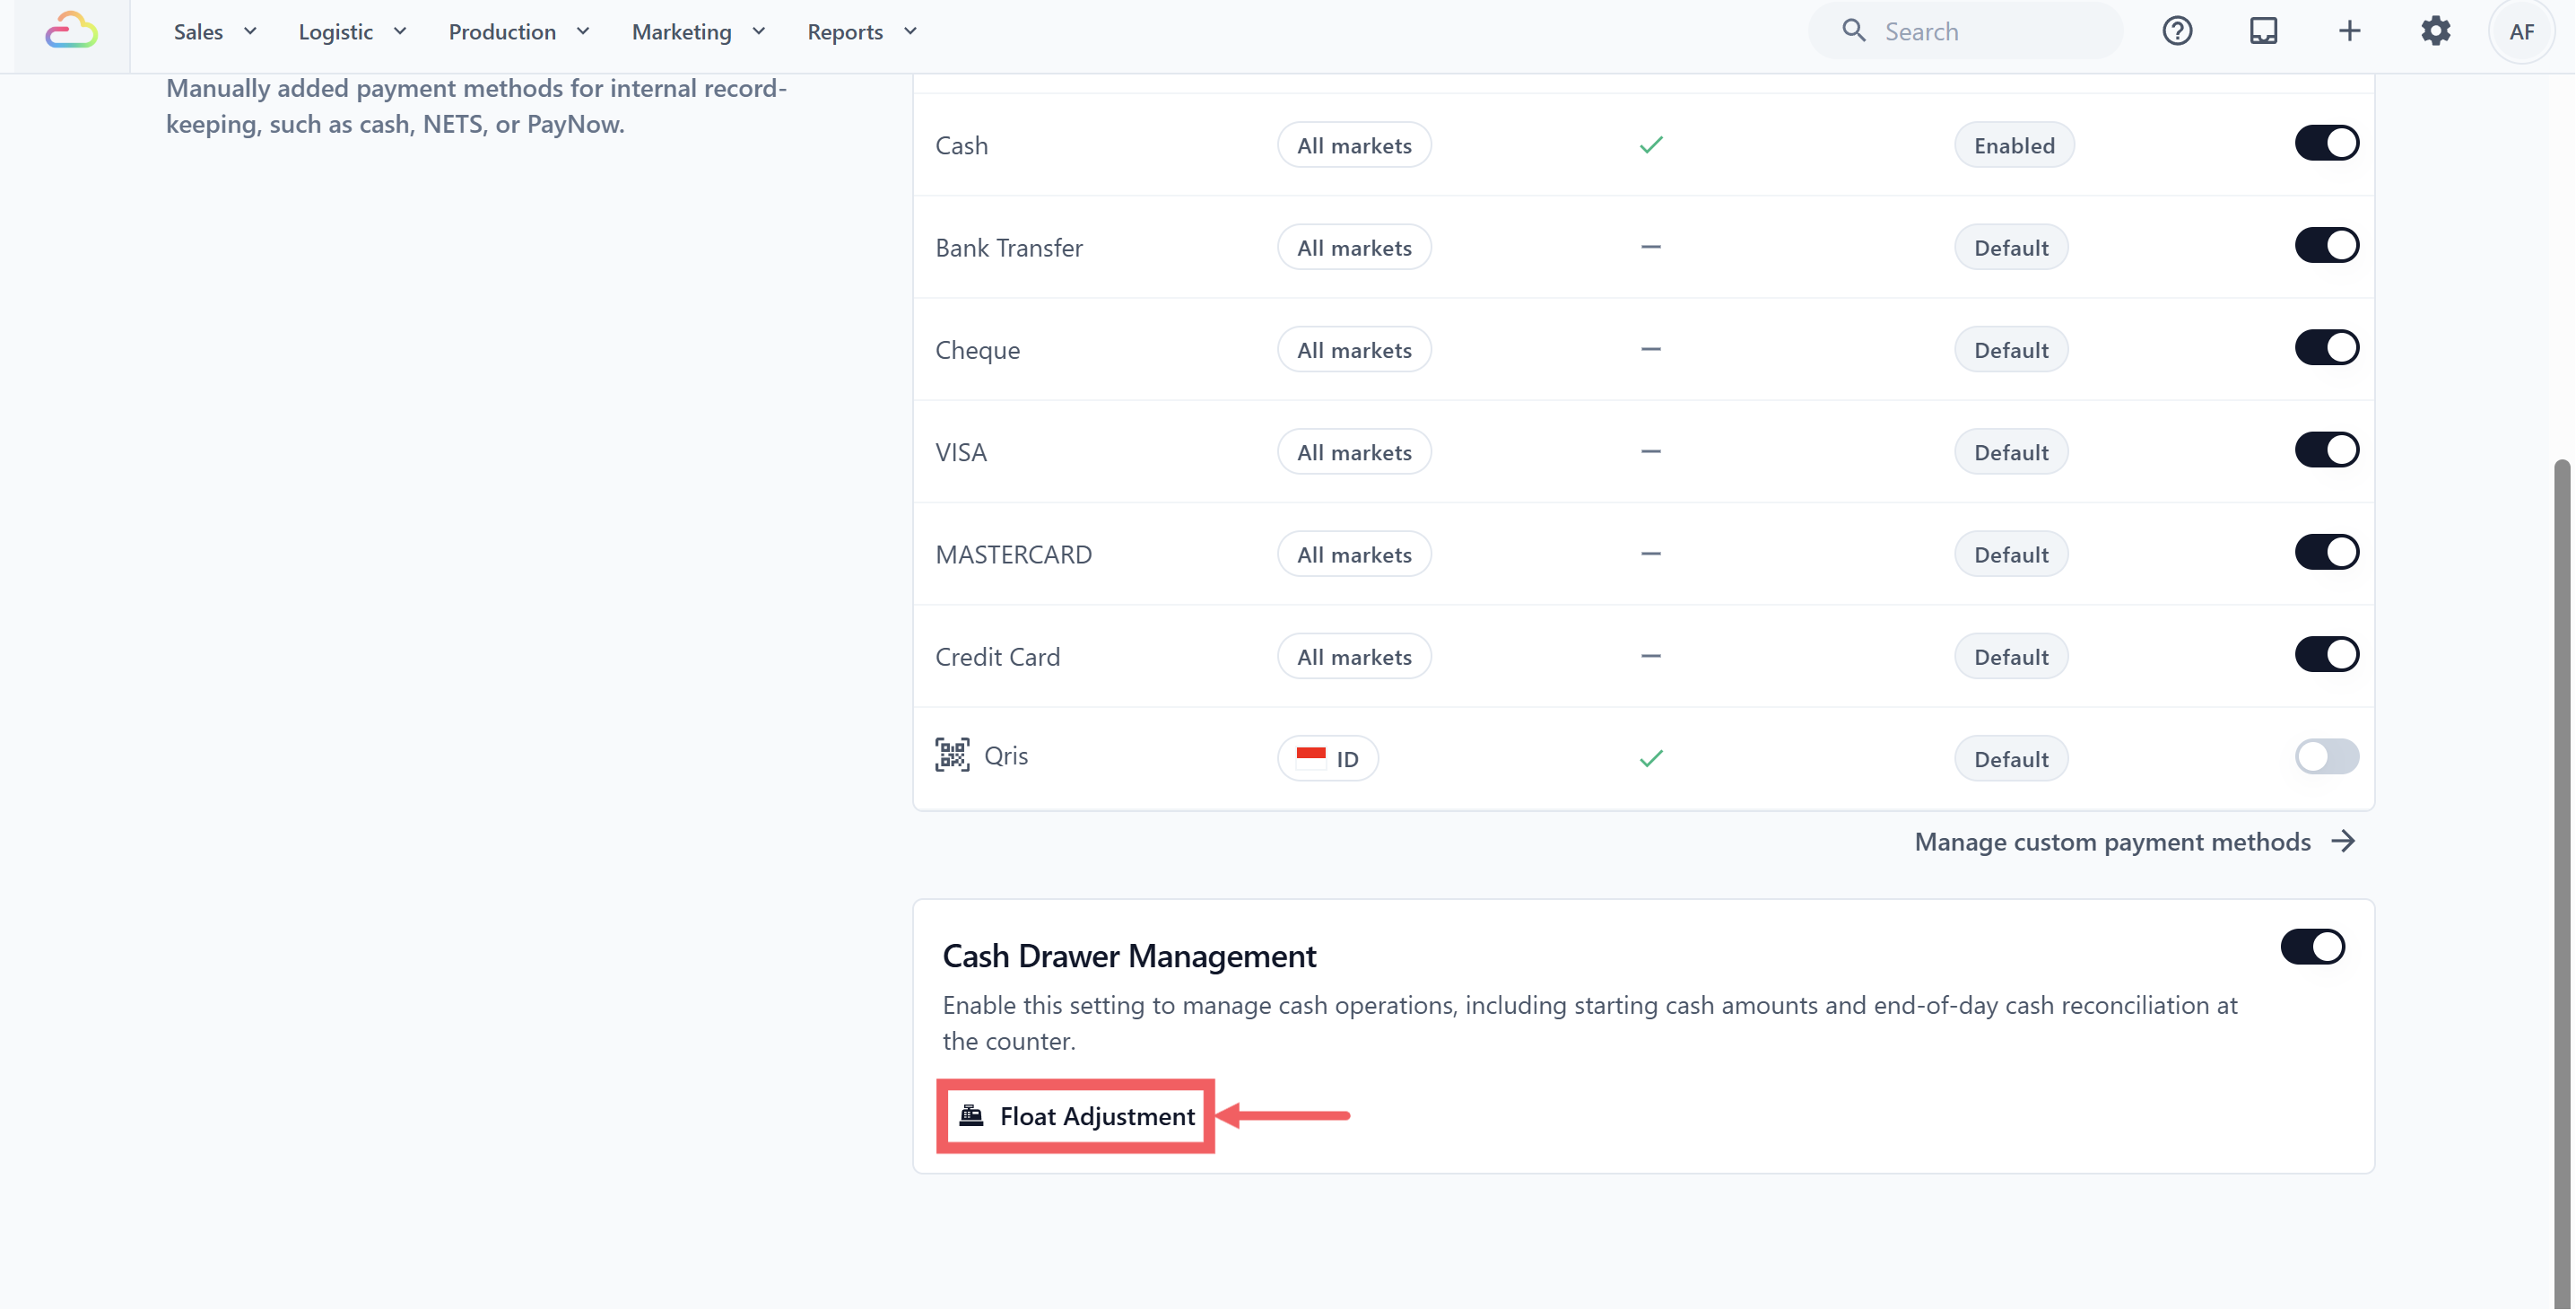
A "float" is the small amount of cash you keep in the till at all times so staff can give change to customers, even before the first sale of the day.
Click **Float Adjustment** to open the dialog. You will see:
- **Enable Float Adjustment** toggle
- **Float Amount** field for a global amount across all locations
- **Set by location** to set a different amount per POS location
If you set a per-location amount, it overrides the global Float Amount for that location. Locations without a per-location amount fall back to the global one.
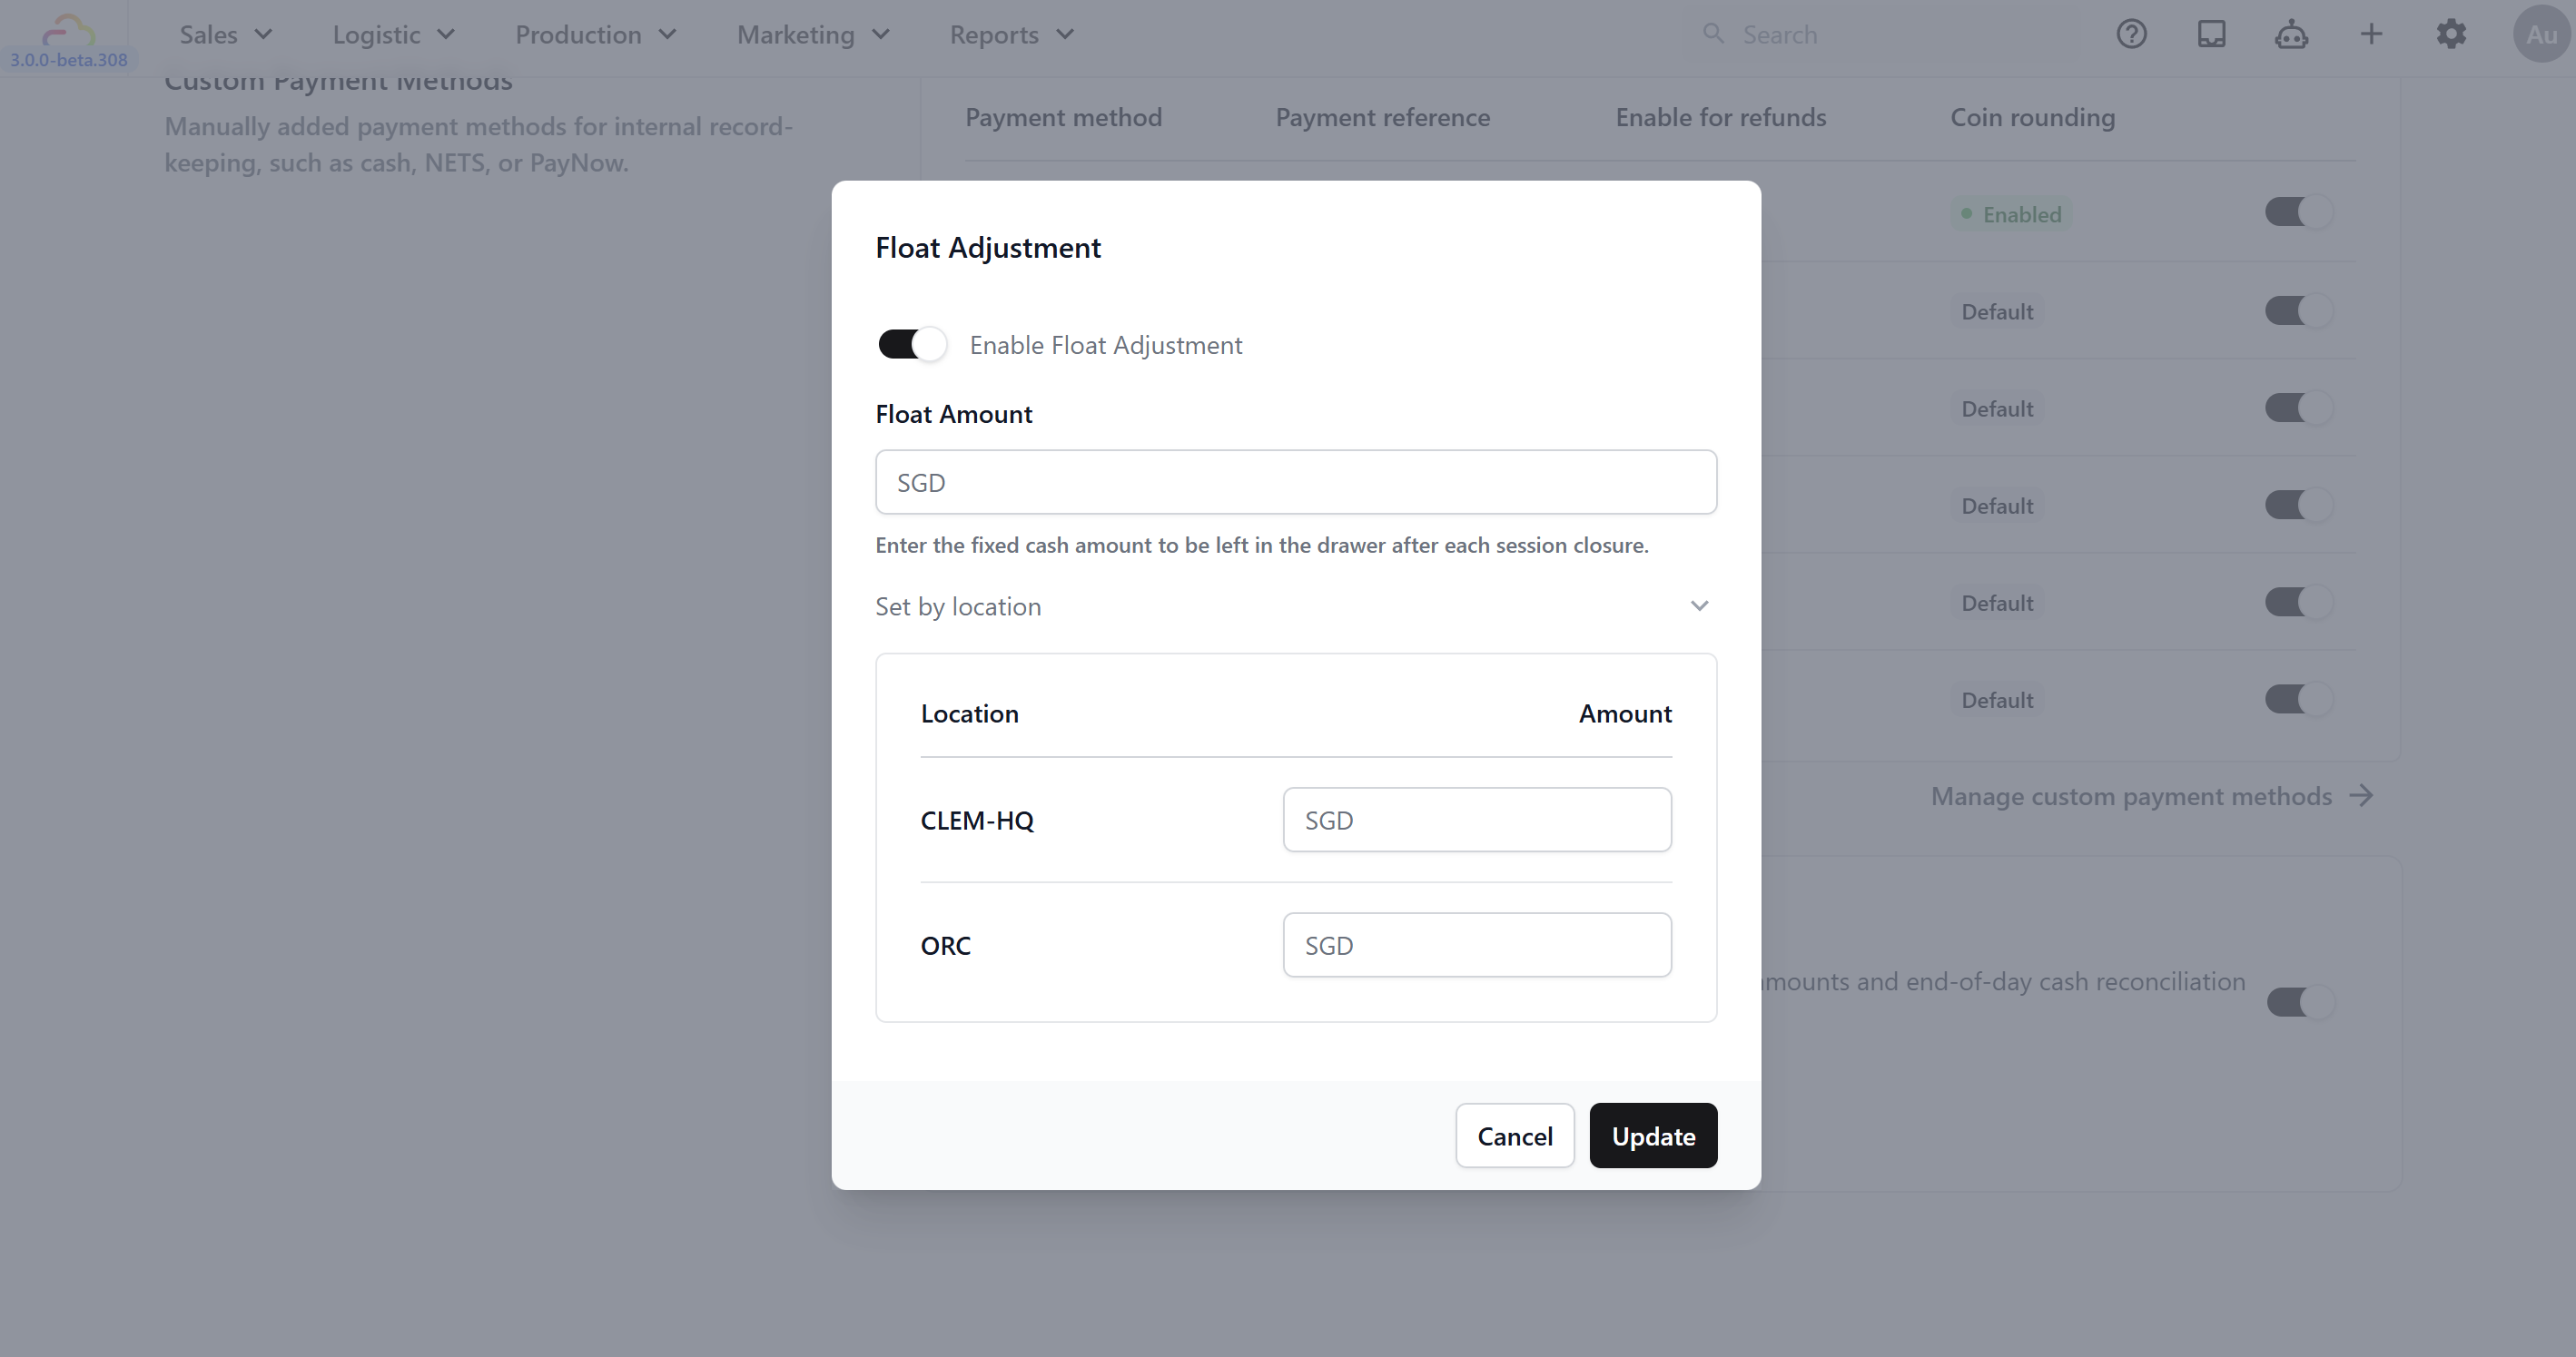
The location list comes from your POS Locations (the locations that hold a POS license). Locations that do not have POS will not appear here.
---
## FAQs
**Do I need to set up Stripe before I can use POS?**
> No. POS works fine with cash and any custom payment methods you add. Connect Stripe only when you want to accept PayNow or GrabPay at the counter.
**I enabled a method on this tab but it's not showing at POS, what's missing?**
> Open your POS app's Payment block in **⚙️ Settings icon → Staff Apps → Apps** and add the method to the list there. This Payment methods tab decides what is available; the Payment block decides what staff actually sees at the counter.
**Can I have different payment methods at different locations?**
> The list of custom payment methods is shared across your whole account. To show a different set of buttons at each counter, configure the Payment block on each POS app separately.
**Can I delete Cash from my payment methods?**
> No. Cash is locked and cannot be deleted. You can disable it using the row toggle if your shop does not accept cash, but the method itself stays.
**What happens if I disconnect Stripe later?**
> Past Stripe payments stay in your order history. Any Stripe methods left in your Payment block will fail when staff try to collect payment, so disable them on this tab and remove them from the Payment block until Stripe is reconnected.
**Does Cash Drawer Management affect my Close of Day Report?**
> Yes. When Cash Drawer Management is on, the cash totals from each session feed into the Close of Day Report. It does not affect Time Clock.
---
## What's Next
Now that your payment methods are available, continue to [Sign in to your POS](/docs/sign-in-to-your-pos) to connect your POS device and start taking orders at the counter.