## When to Use Utility Templates
Use Utility templates whenever you are sending a message in response to something the customer or your team has just done:
- A new booking has just been made → send Order confirmation
- Your driver could not reach the customer for pickup → send Pick up failed
- The customer's items are clean and ready → send Ready for collection or Delivery complete
- An invoice has been generated → send Order invoice
- The customer has paid → send Order receipt
- An order needs to be cancelled → send Order cancelled
Takes about 10–15 minutes to set up your first template. You only do it once — after that it sends automatically every time.
Utility templates can be sent at any time, even if the customer has not messaged you in weeks. They are not subject to the 24-hour window because they are tied to a specific event in your system.
Write Utility templates in a factual, notification-style tone. The moment your message contains anything promotional. Even one line, Meta will reclassify it as Marketing after review.
---
## Pre-Built Templates Available
EasyBiz provides 13 ready-made Utility templates so you do not have to start from scratch. Each one is already written in the correct Utility style.
| Template | What it sends | Pre-built buttons |
| --- | --- | --- |
| Welcome | New account created confirmation | None |
| Order confirmation | Booking confirmed with pickup and delivery details | Track order |
| Pick up failed | Pickup attempt unsuccessful | Reschedule, Call us |
| Pick up rescheduled | Pickup time has been changed | None |
| Pick up complete | Items have been collected | Track order |
| Delivery failed | Delivery attempt unsuccessful | Reschedule, Call us |
| Delivery rescheduled | Delivery time has been changed | None |
| Delivery complete | Order has been delivered | Call us |
| Ready for collection | Order ready for store pickup with address | Directions |
| Collected | Customer collected their order | None |
| Order invoice | Invoice available with amount due | Make payment |
| Order receipt | Payment received with PDF receipt | None |
| Order cancelled | Order successfully cancelled | View order detail |
Start with Order confirmation, Pick up complete, and Ready for collection. These three cover the most critical moments in your customer's journey and will immediately reduce the number of "Is my order ready?" messages your team receives every day.
---
## Creating a Utility Template
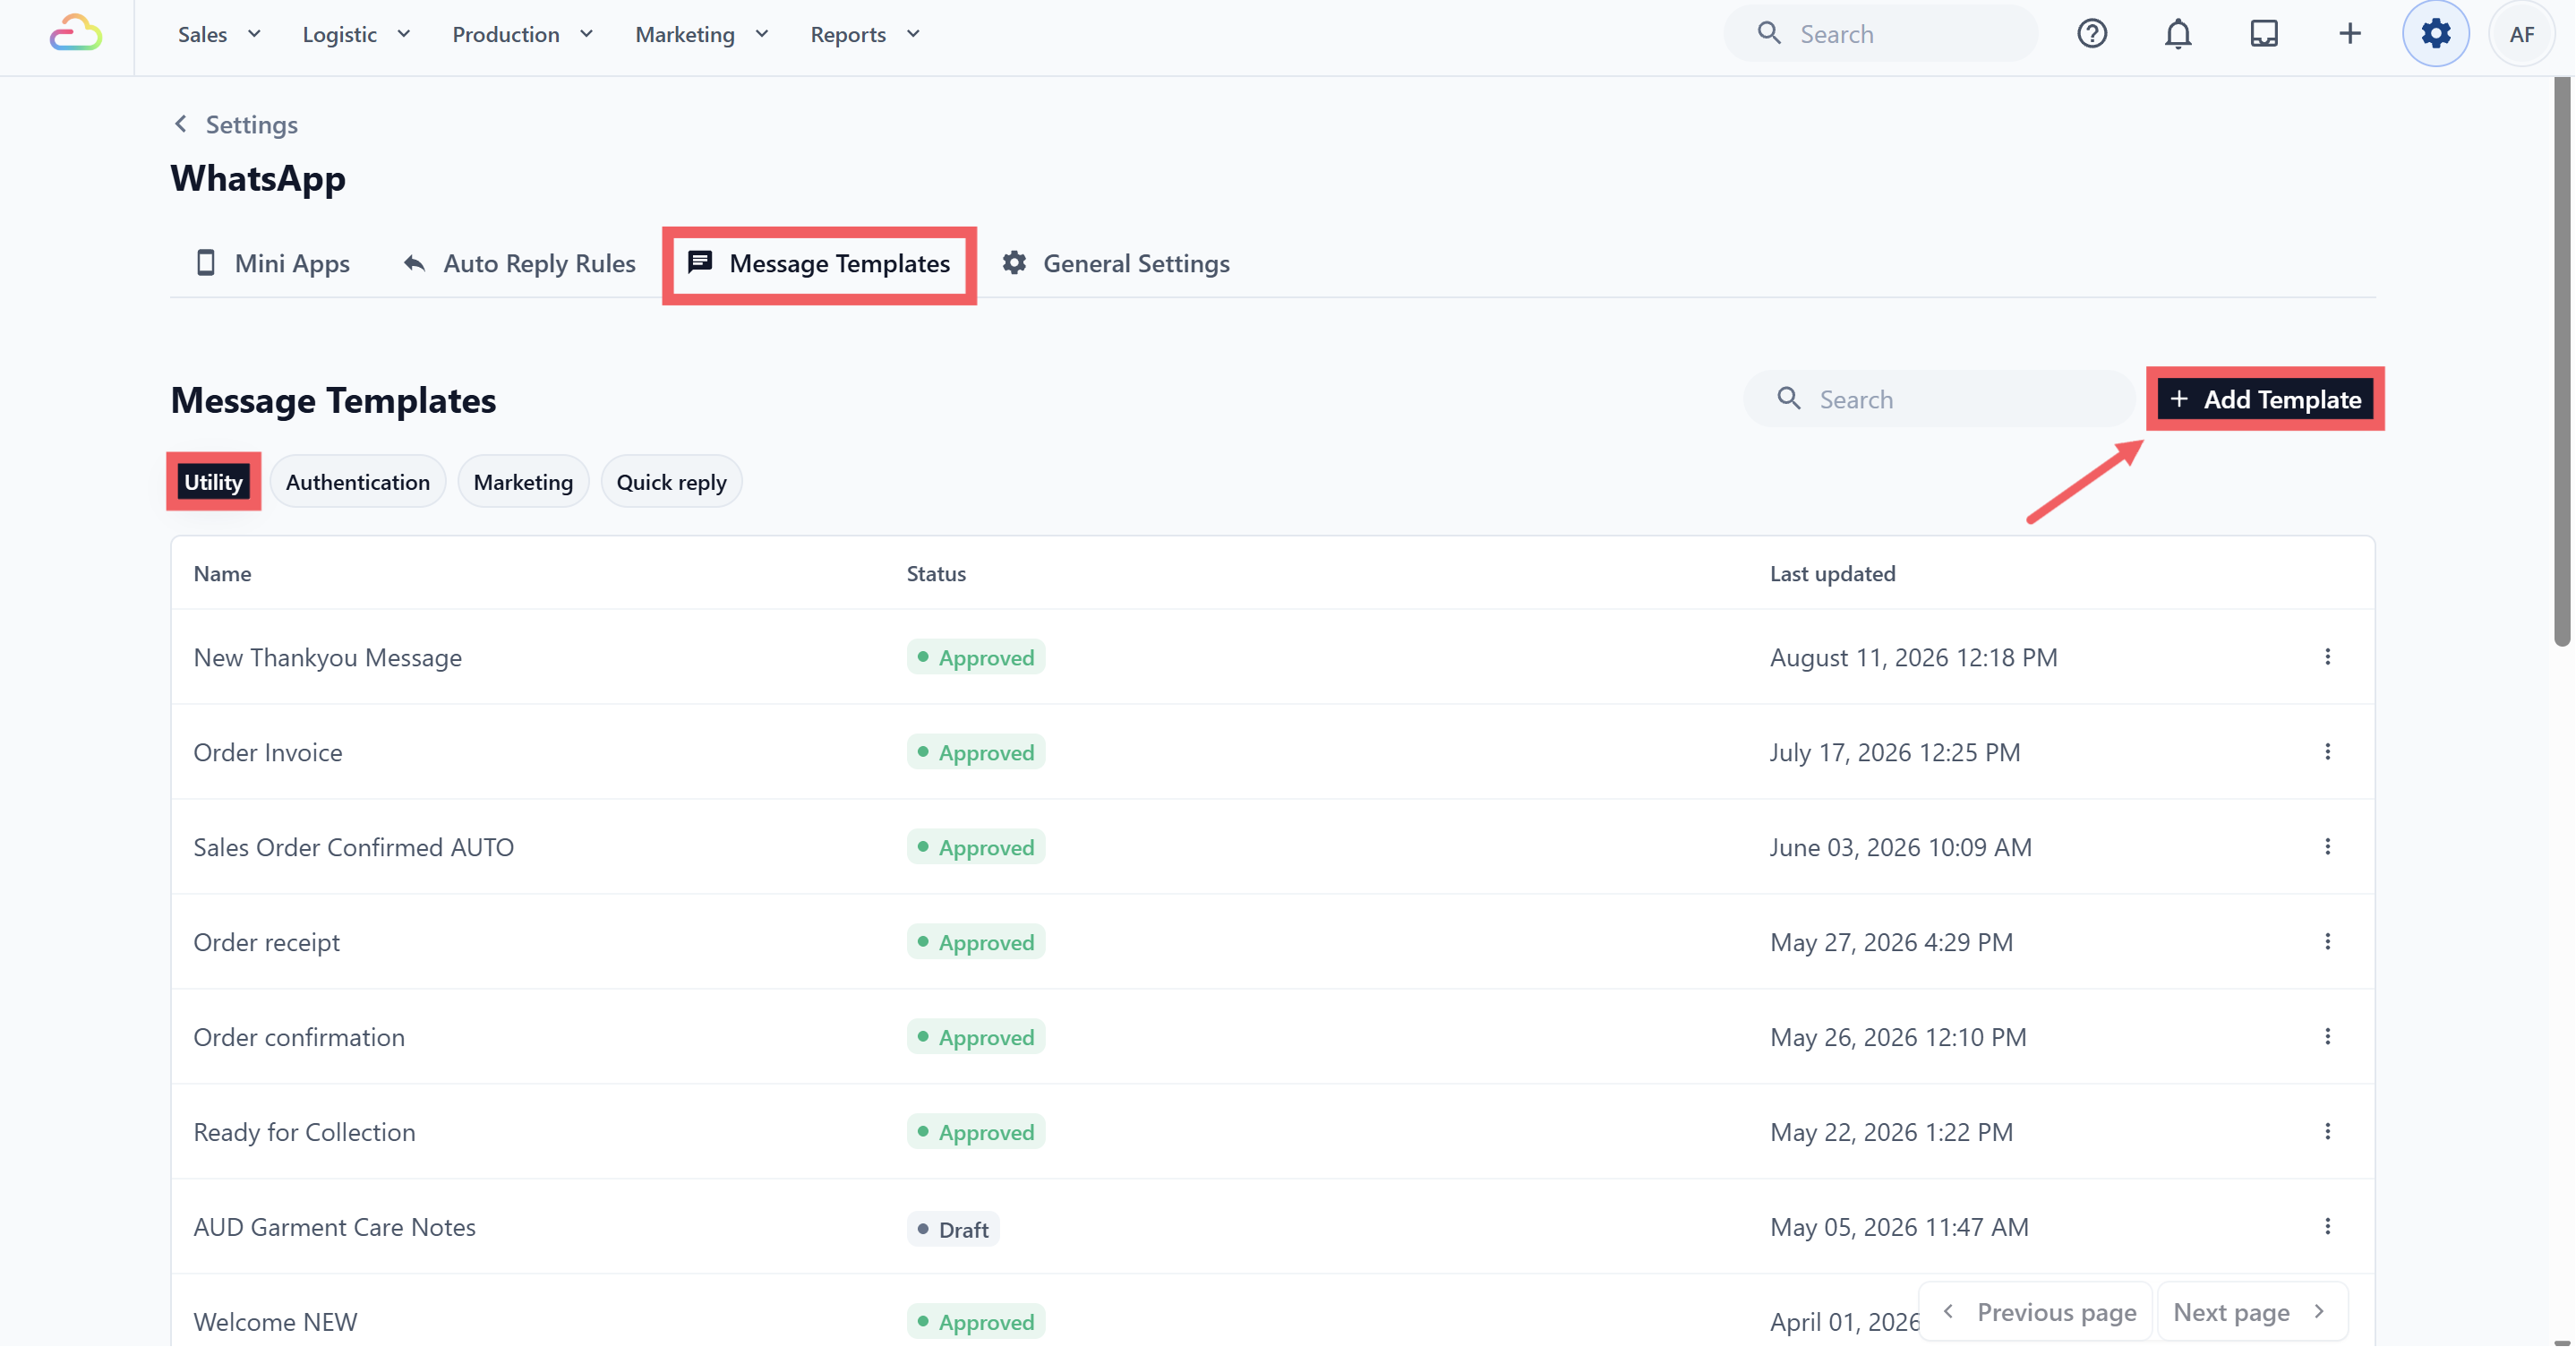
1. Click the Utility tab then click + Add Template, a dialog titled "New WhatsApp Template" will appear.
2. Fill in the template details:
- **Template name** — An internal label for your team (e.g. Order Confirmed, Collection Ready). Not shown to customers.
- **Auto-move deal to stage** — Optional. Automatically moves the customer to a stage in your sales pipeline when this template is sent. Leave as None if you are not using Deals. [Learn more about Deals](/docs/introduction-to-deals)
- **Default reply status**
- Replied — Marks the conversation as done and removes it from your Pending list.
- Pending — Keeps it in your Pending list so your team remembers to follow up.
3. Click a pre-built template card to select it. A blue border appears around the selected card. The Create button is greyed out until you have selected one. Click Create and the editor will open with the template pre-loaded and ready for you to customize.
4. Click Create to open the template editor
The pre-built template text is a starting point, it is fully editable. Once the editor opens, replace the sample wording with your own message. The structure (placeholders, buttons, layout) is what you are reusing, not the exact words.
---
## Configuring the Template in the Editor
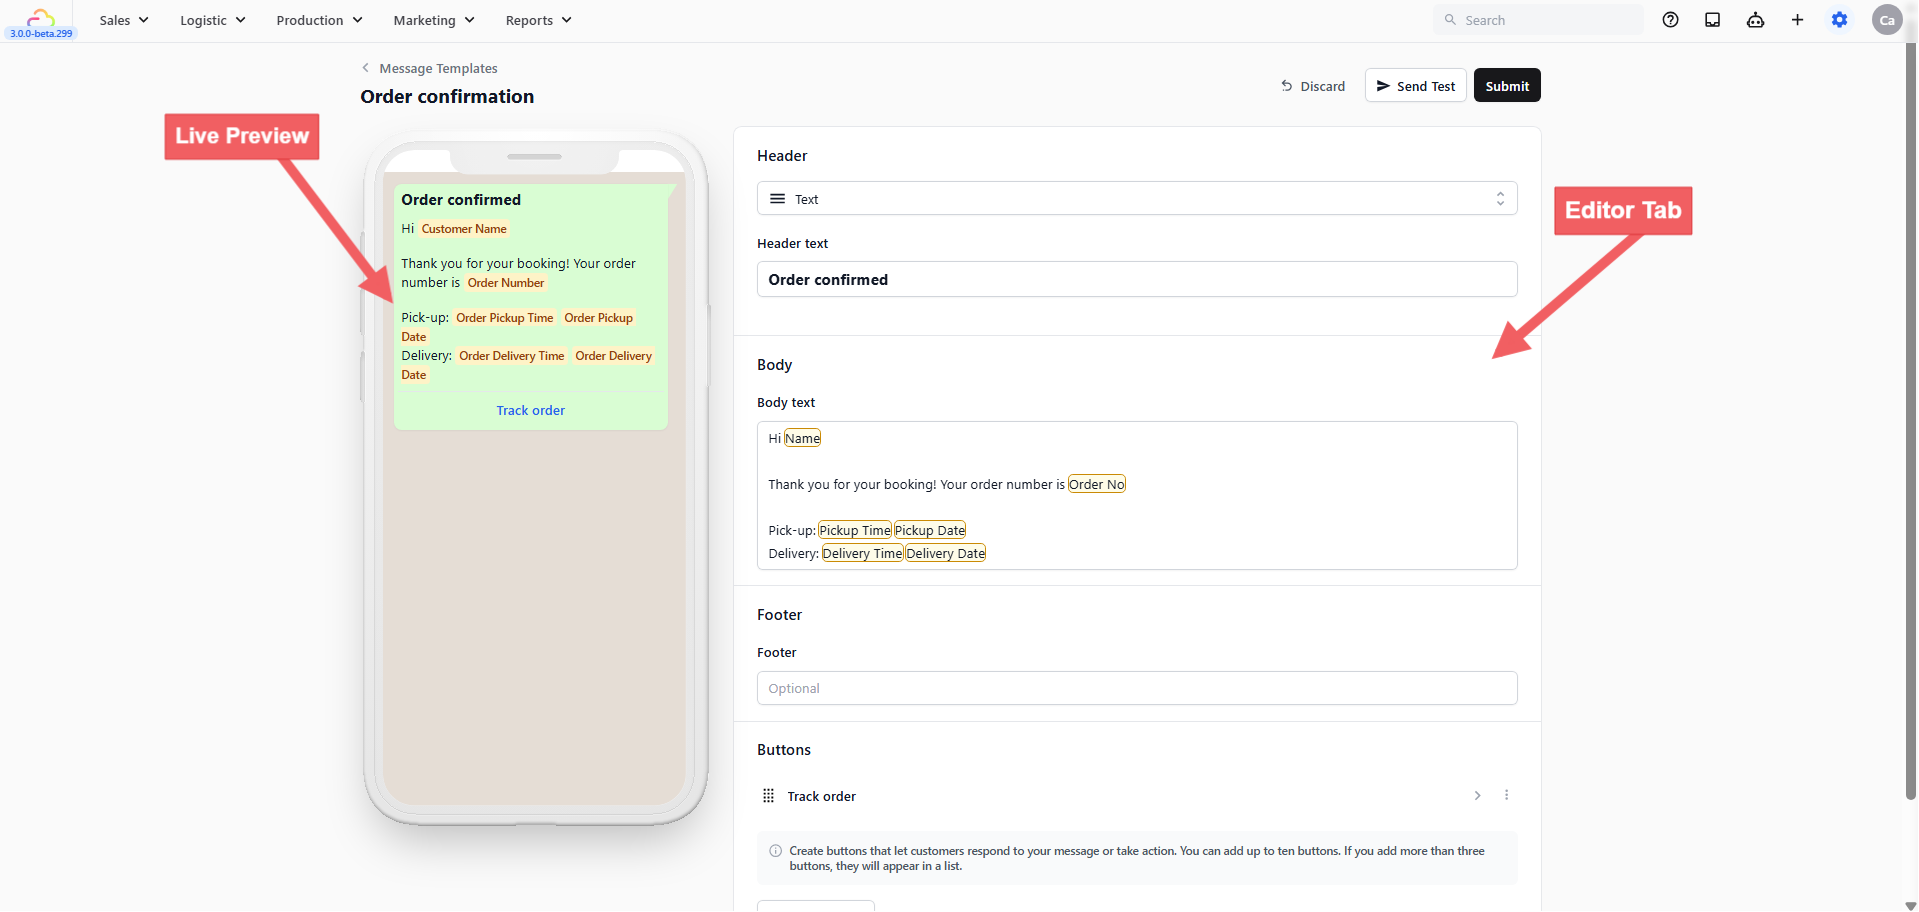
The editor shows a live preview on the left that updates as you type. Configure the template using the sections on the right:
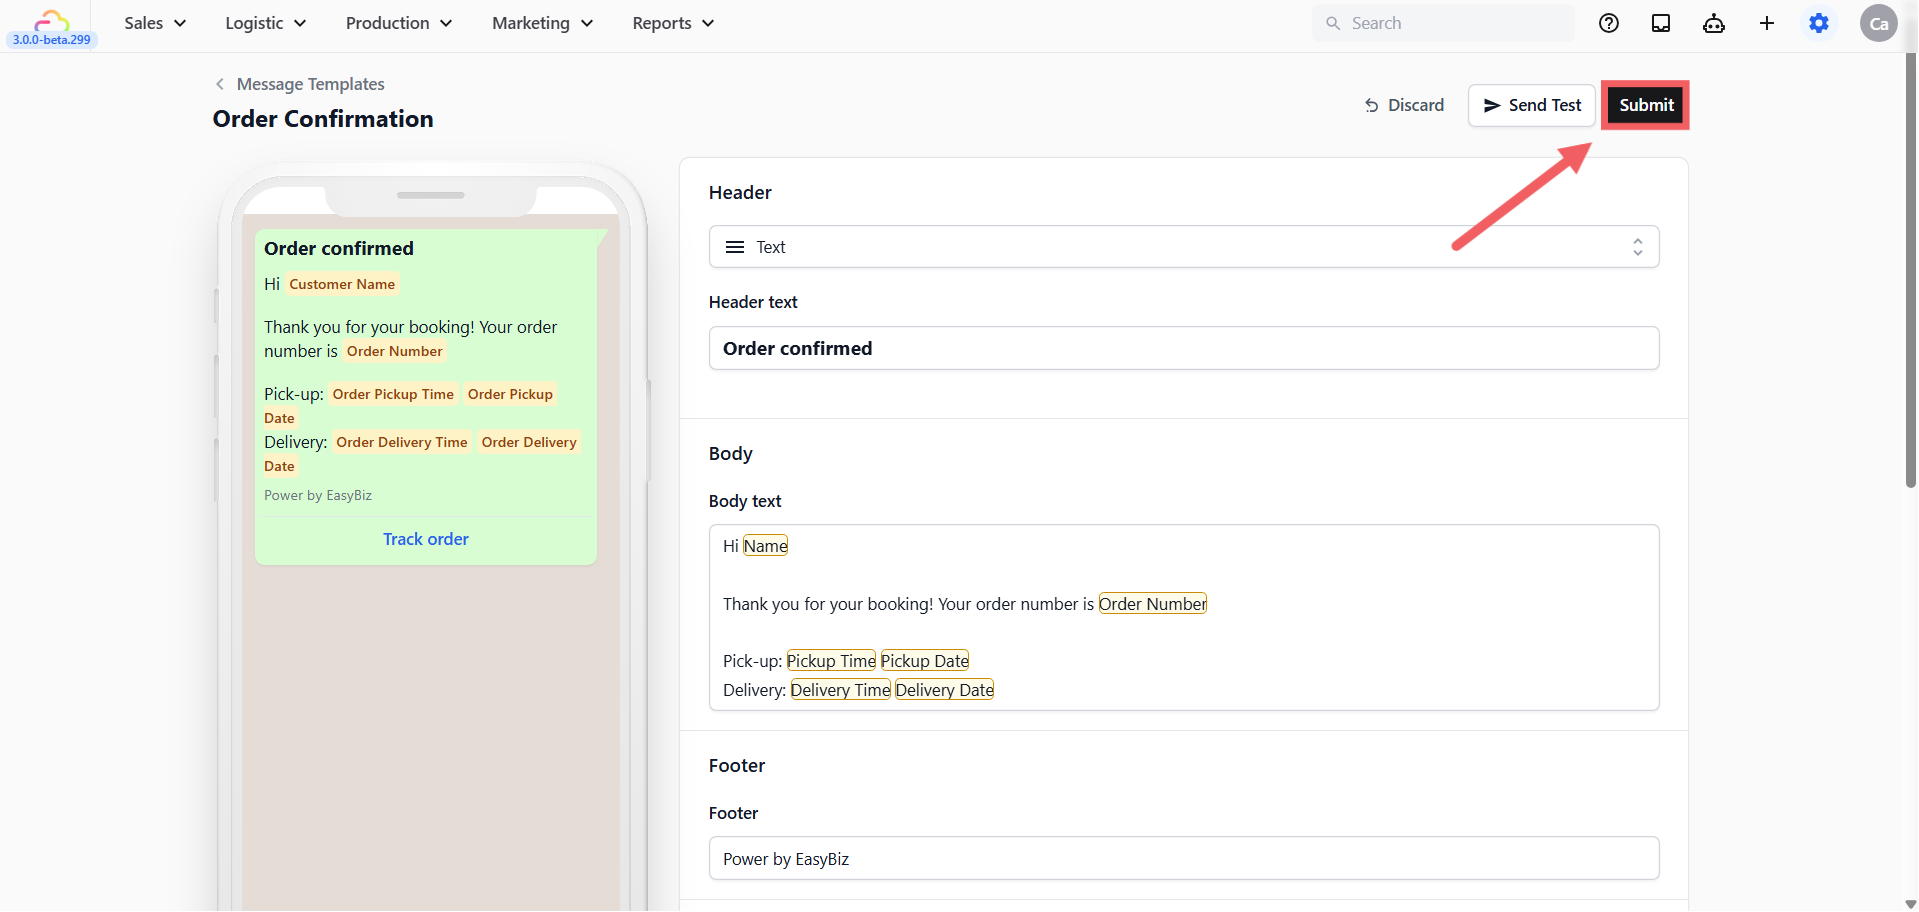
At the top right of the editor you will see three buttons
- **Discard** → reverts your draft back to the last published version of this template.
- **Send Test** → lets you preview how the message looks on a real device
For Utility and Marketing templates, Send Test only becomes available after Meta has approved the template. If you click it before approval, the account selector will be empty. Once approved, use Send Test to verify everything looks correct before sending to customers.
- **Submit** → submit your template to Meta for review
### Header
Appears at the very top of the message. Options:
- None — No header
- Text — A short bold title (e.g. Your Order Is Confirmed!)
- Image — A photo or banner
- Document — A PDF attachment
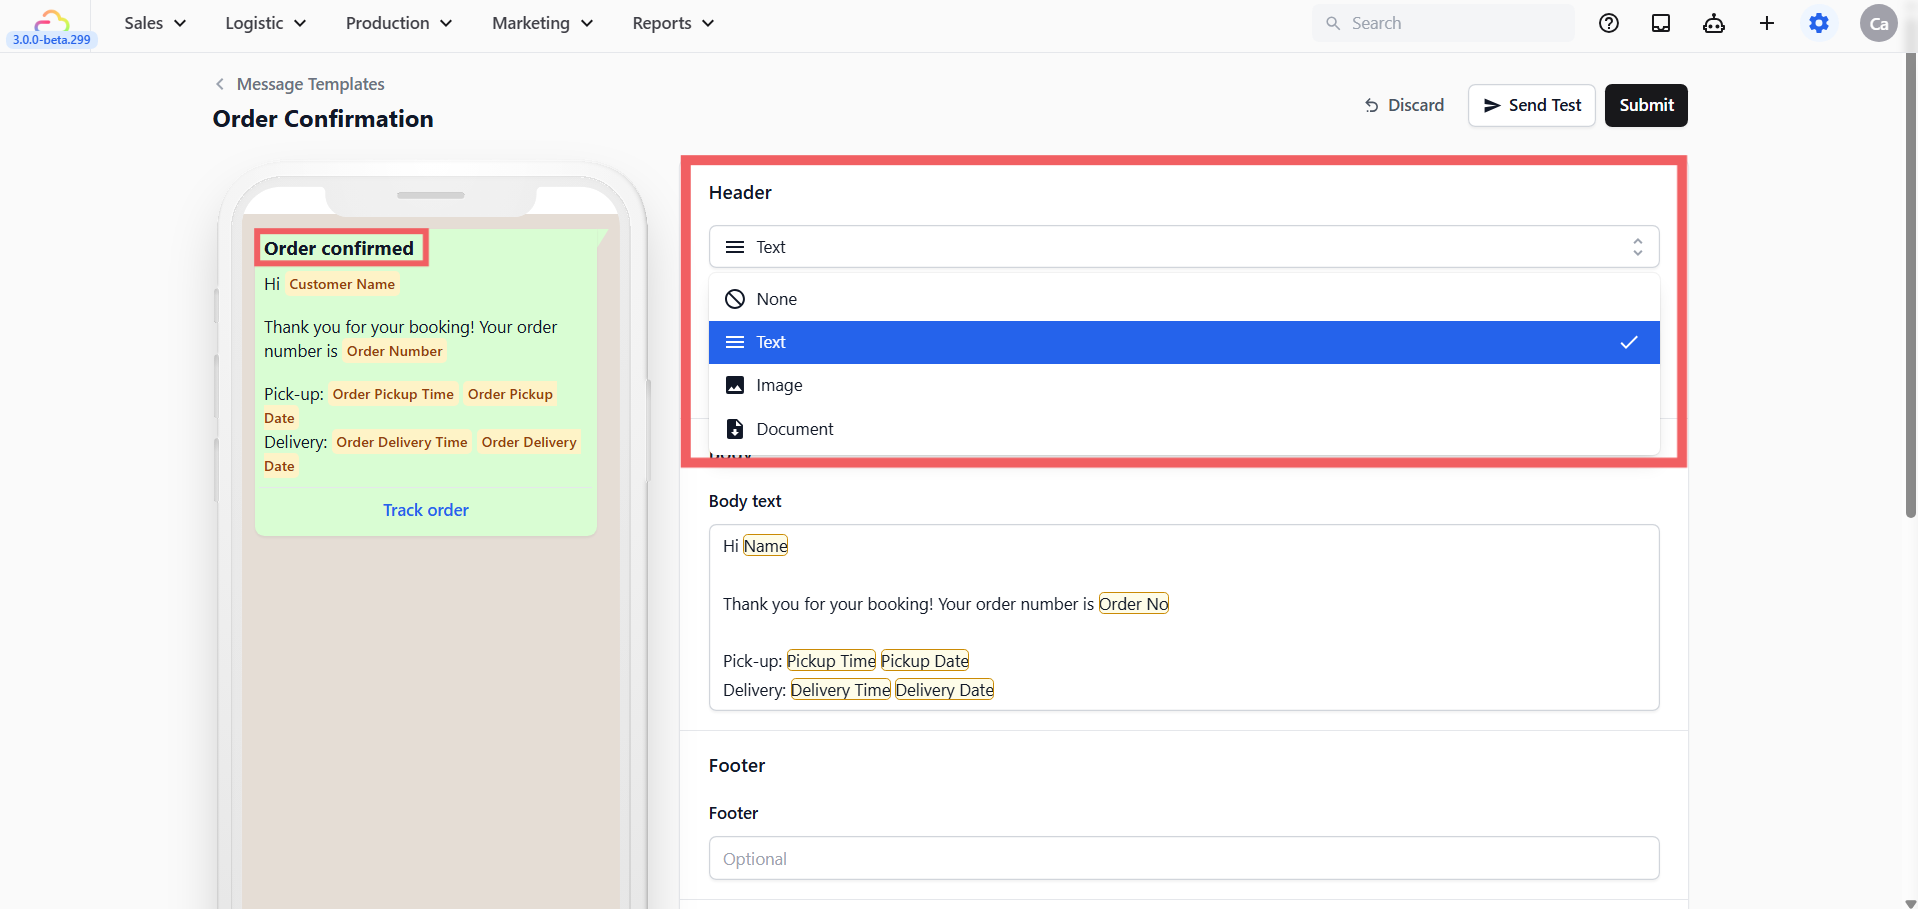
When you select Image or Document as your header type, a "Samples for header content" section appears below the header fields. This is where you upload a sample image or PDF so WhatsApp can review your template with real content. Without a sample, your template may be rejected. Upload any relevant image or sample PDF — it does not have to be the final file.
### Body
The main message your customer reads. Keep it short and factual.
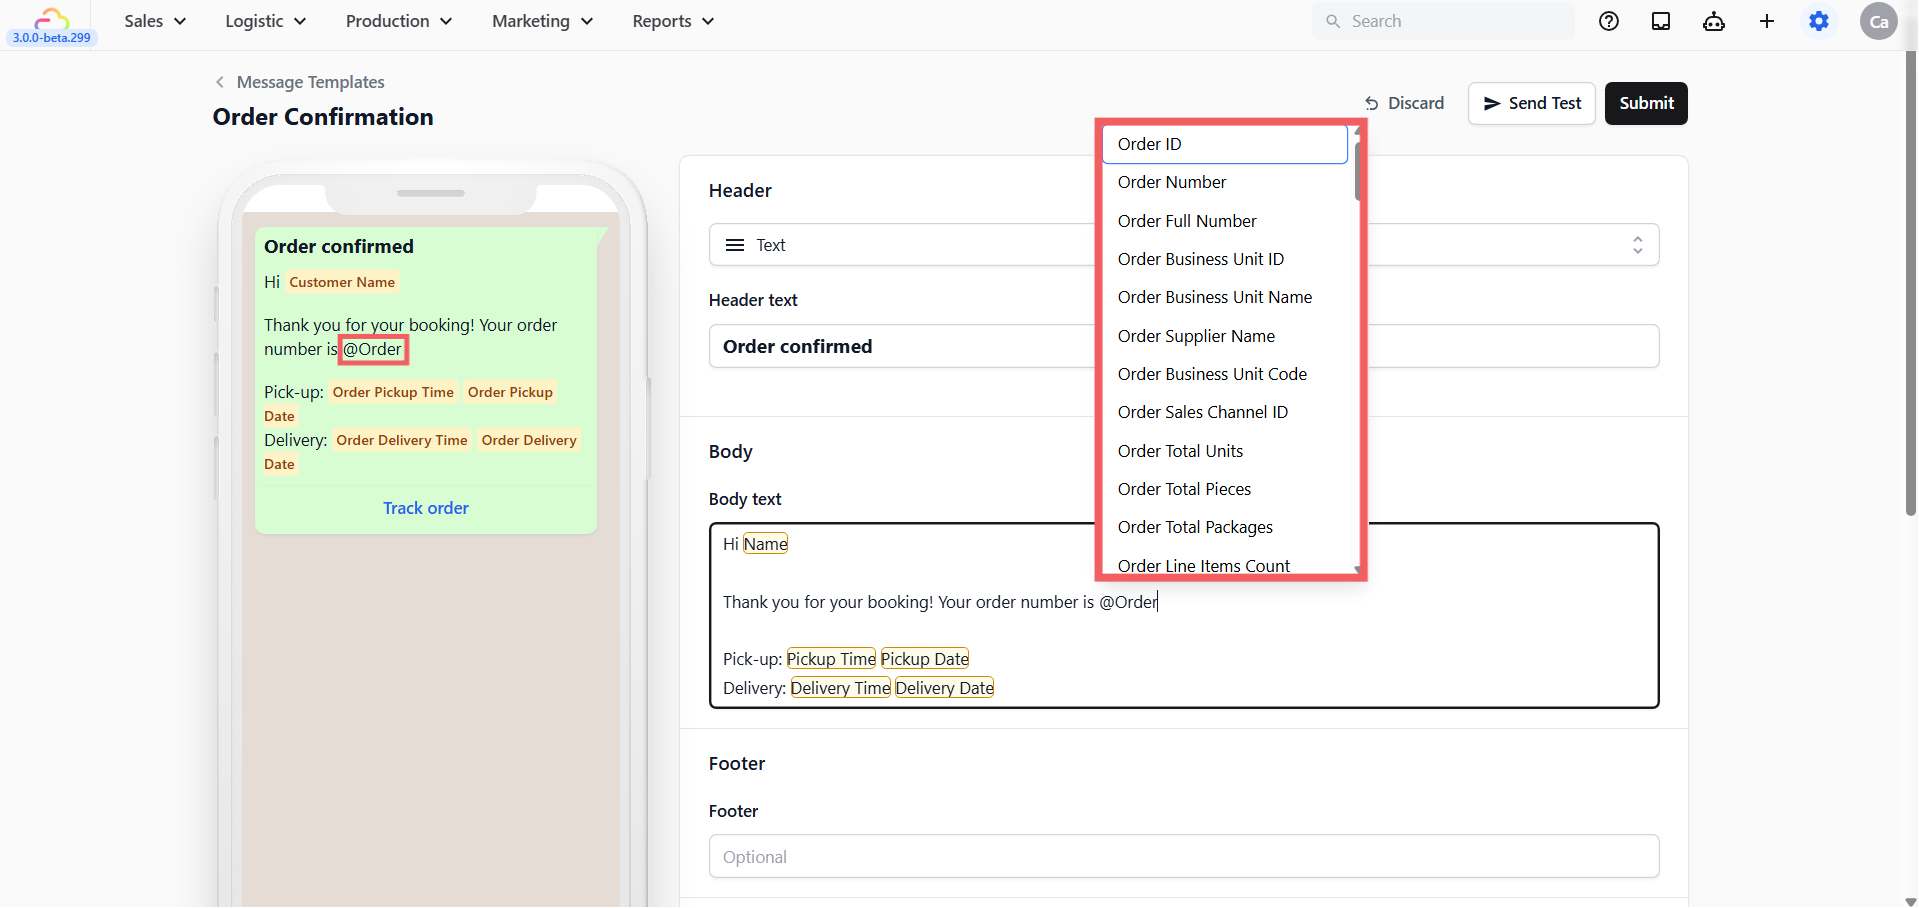
To personalise the message, type @ in the Body field and a dropdown list of available placeholders will appear, Click any one to insert it into your message. EasyBiz fills these in automatically with real information when the message is sent. Some commonly used placeholders:
- `@Customer Name` — e.g. Sarah
- `@Order Number` — e.g. #00234
- `@Order Pickup Date` — e.g. Wednesday, 9 April
- `@Order Pickup Time` — e.g. 10:00 AM – 12:00 PM
- `@Order Delivery Date` — e.g. Friday, 11 April
- `@Order Delivery Time` — e.g. 2:00 PM – 5:00 PM
- `@Order Amount Due` — e.g. SGD 45.00
These are just the most commonly used ones. The system has many more available — customer email, customer phone, store name, order date, order subtotal, and more. Type `@` in the Body field to see the full list and pick exactly what you need.
If you are not sure where to begin, start with Order confirmation, Pick up complete, and Ready for collection. These three cover the most important moments in a customer's order journey — and once set up, they alone will cut down the "Is my order ready?" messages your team gets every single day.
Your message cannot end with a placeholder. Always add at least one word or punctuation mark after the last placeholder. Do not use too many placeholders in one template, WhatsApp limits the number allowed.
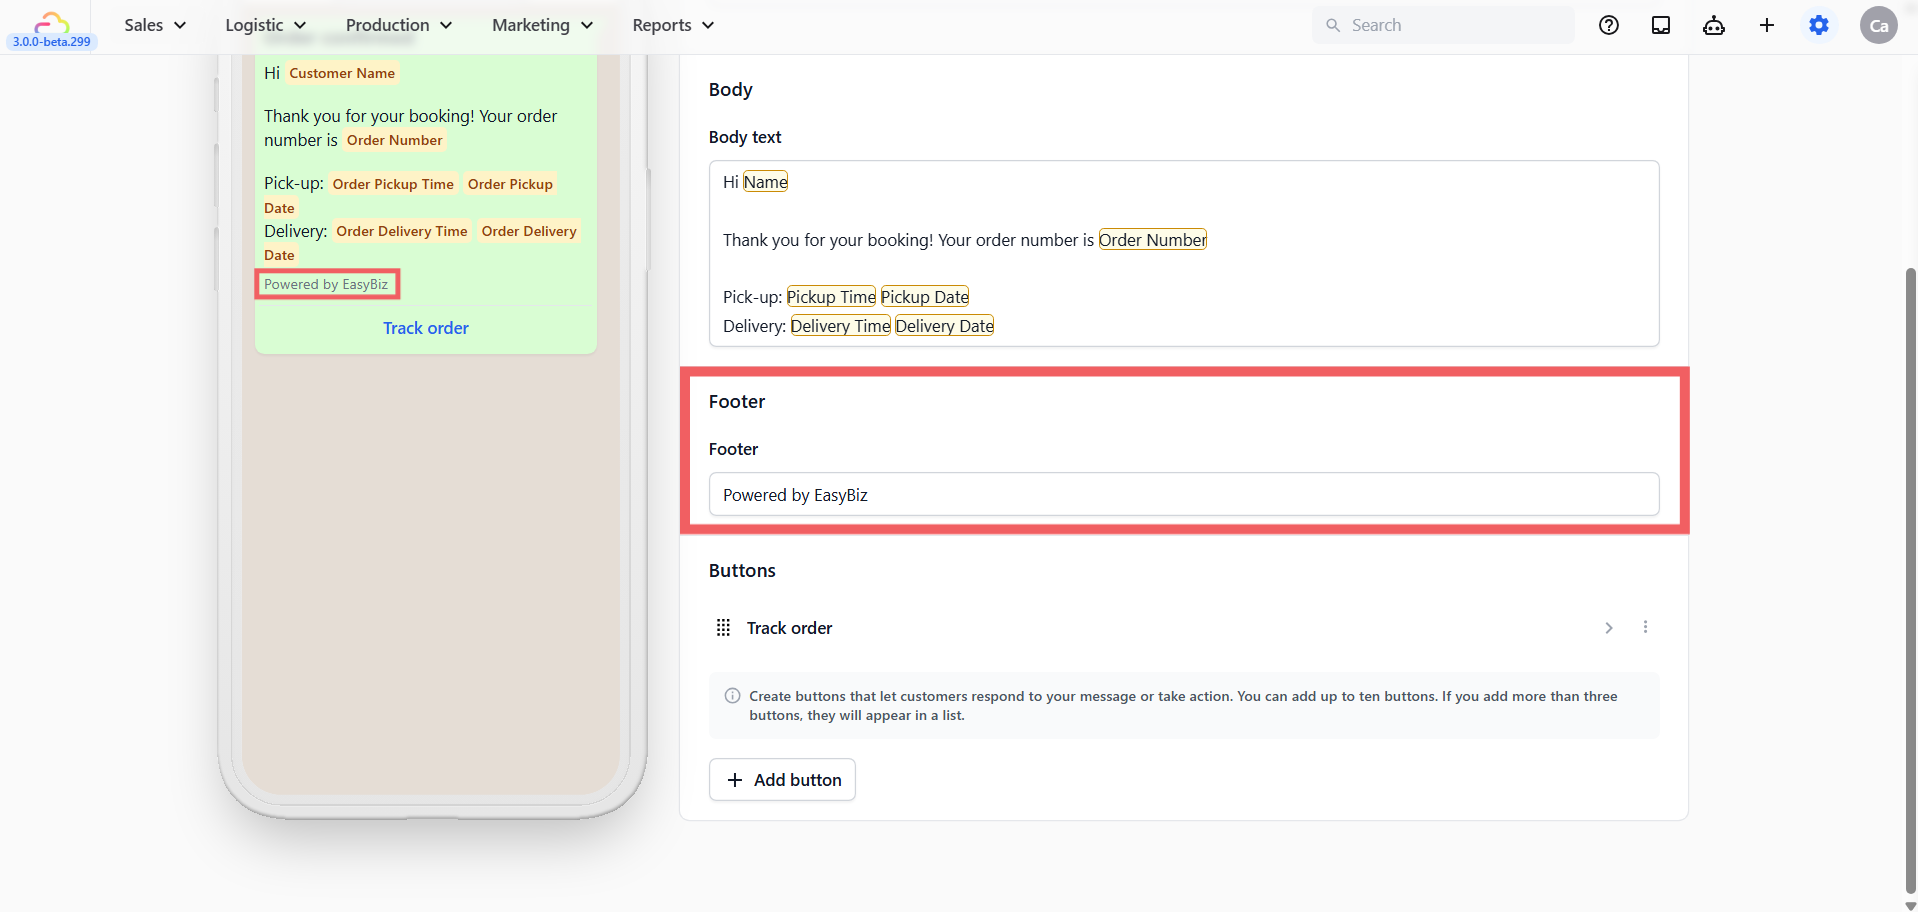
### Footer
A short closing line below the body. Use it for your business name or a brief note. Cannot contain placeholders.
### Buttons
Buttons appear below the message as tappable links. Click + Add button and choose:
- **Quick reply** → A tappable reply button the customer can tap (e.g. "Yes, I'm interested", "Stop Promotion").
- **Visit website** → Opens a webpage. Choose Static (same URL for everyone) or Dynamic (URL changes per customer). For most businesses, Static is all you need.
- **Call phone number** → Dials a number you enter.
- **Open Mini App** → Opens a booking or order form inside WhatsApp. Select which Mini App to link. [Learn more about Mini Apps](/docs/what-is-a-mini-app)
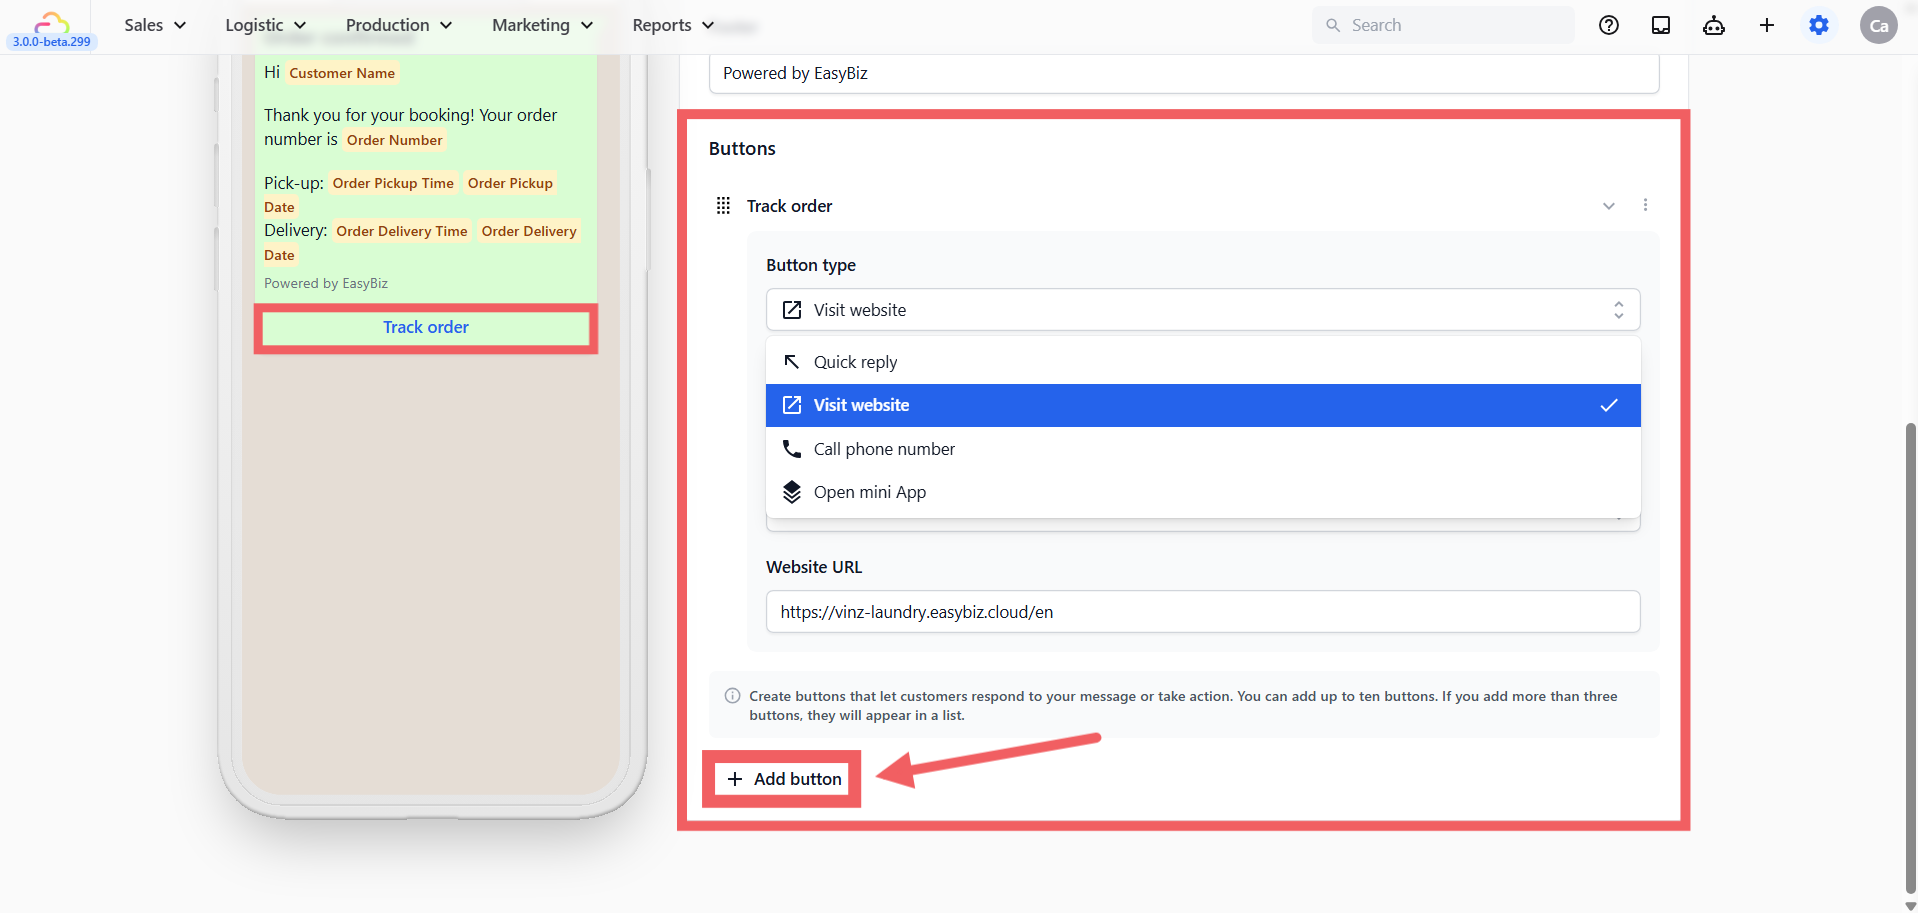
You can add up to 10 buttons. If you add more than 3, they automatically appear as a scrollable list. **Drag and drop** to reorder.
---
## Submitting for Approval
When you are happy with your template, click Submit at the top right.
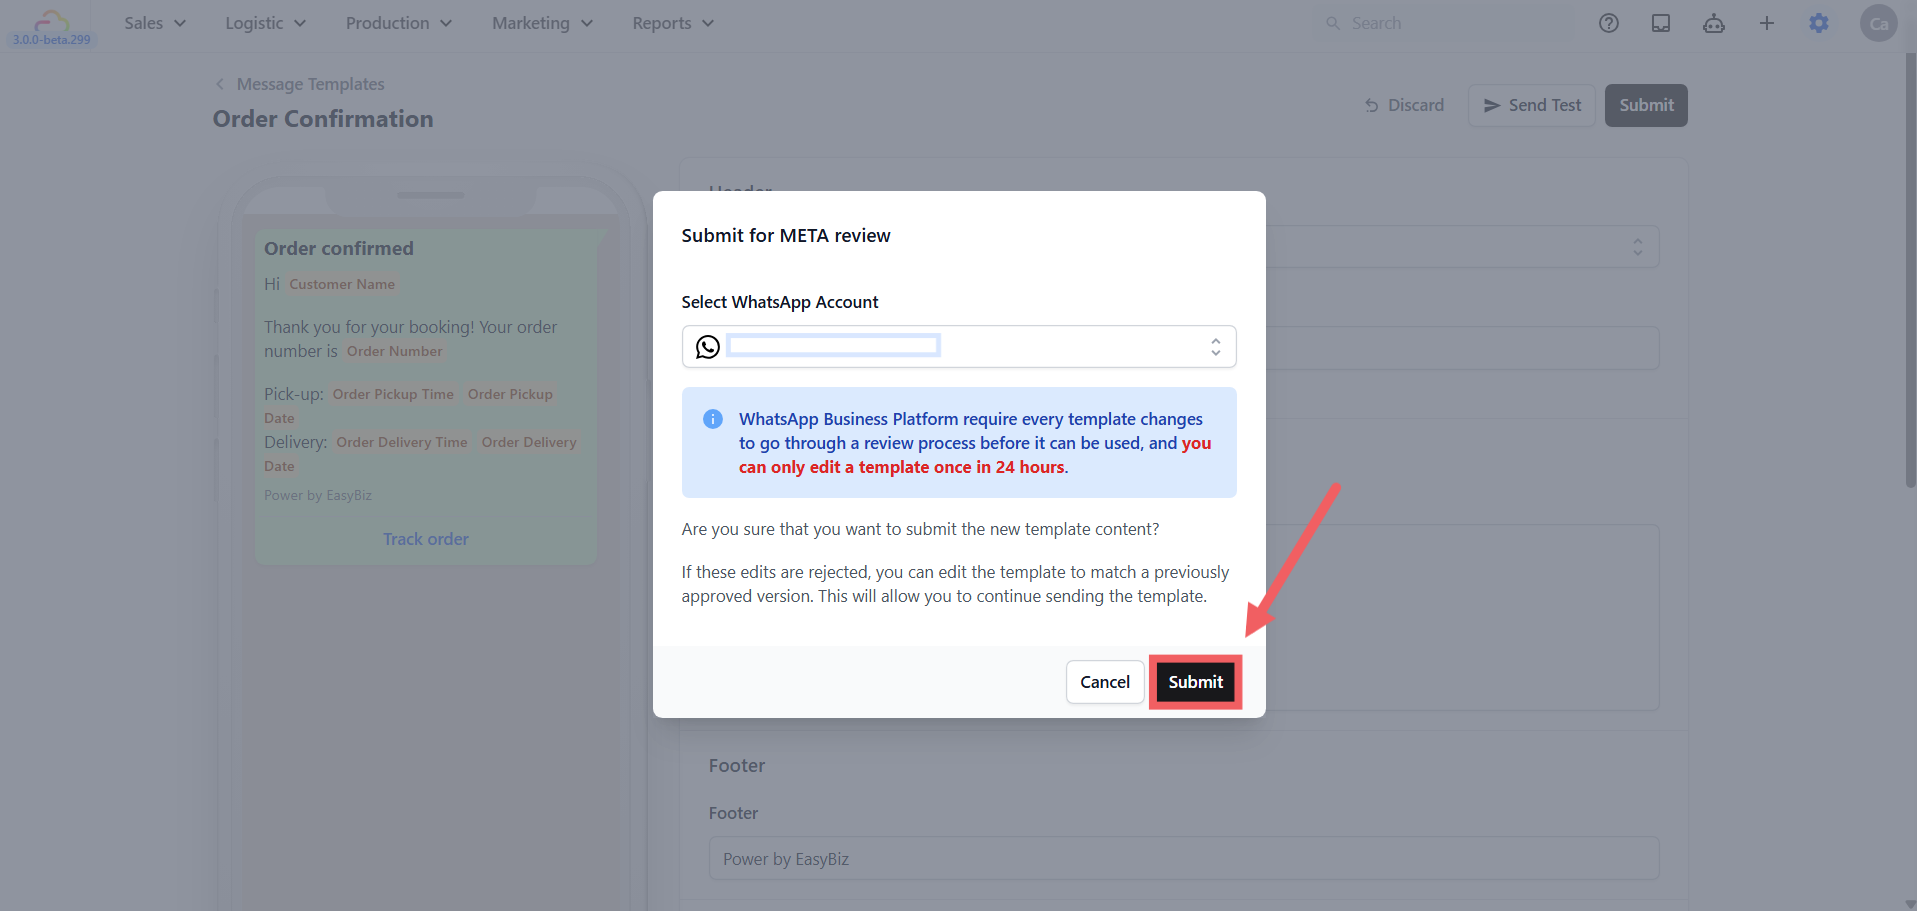
Select your WhatsApp Business Account and click Submit. Meta review usually takes a few minutes but can take up to 24 hours.
After submitting, you can return to the template list where the status will show as **Pending**. Once Meta approves it, the status will change to **Approved** and the template is ready to send to customers.
If your template does not appear in the Utility tab after approval, check the Marketing tab. Meta may have reclassified it based on your wording.
---
## How to Send Your Utility Template
Once your template is approved, there are two ways to send it.
### Send directly from the template list
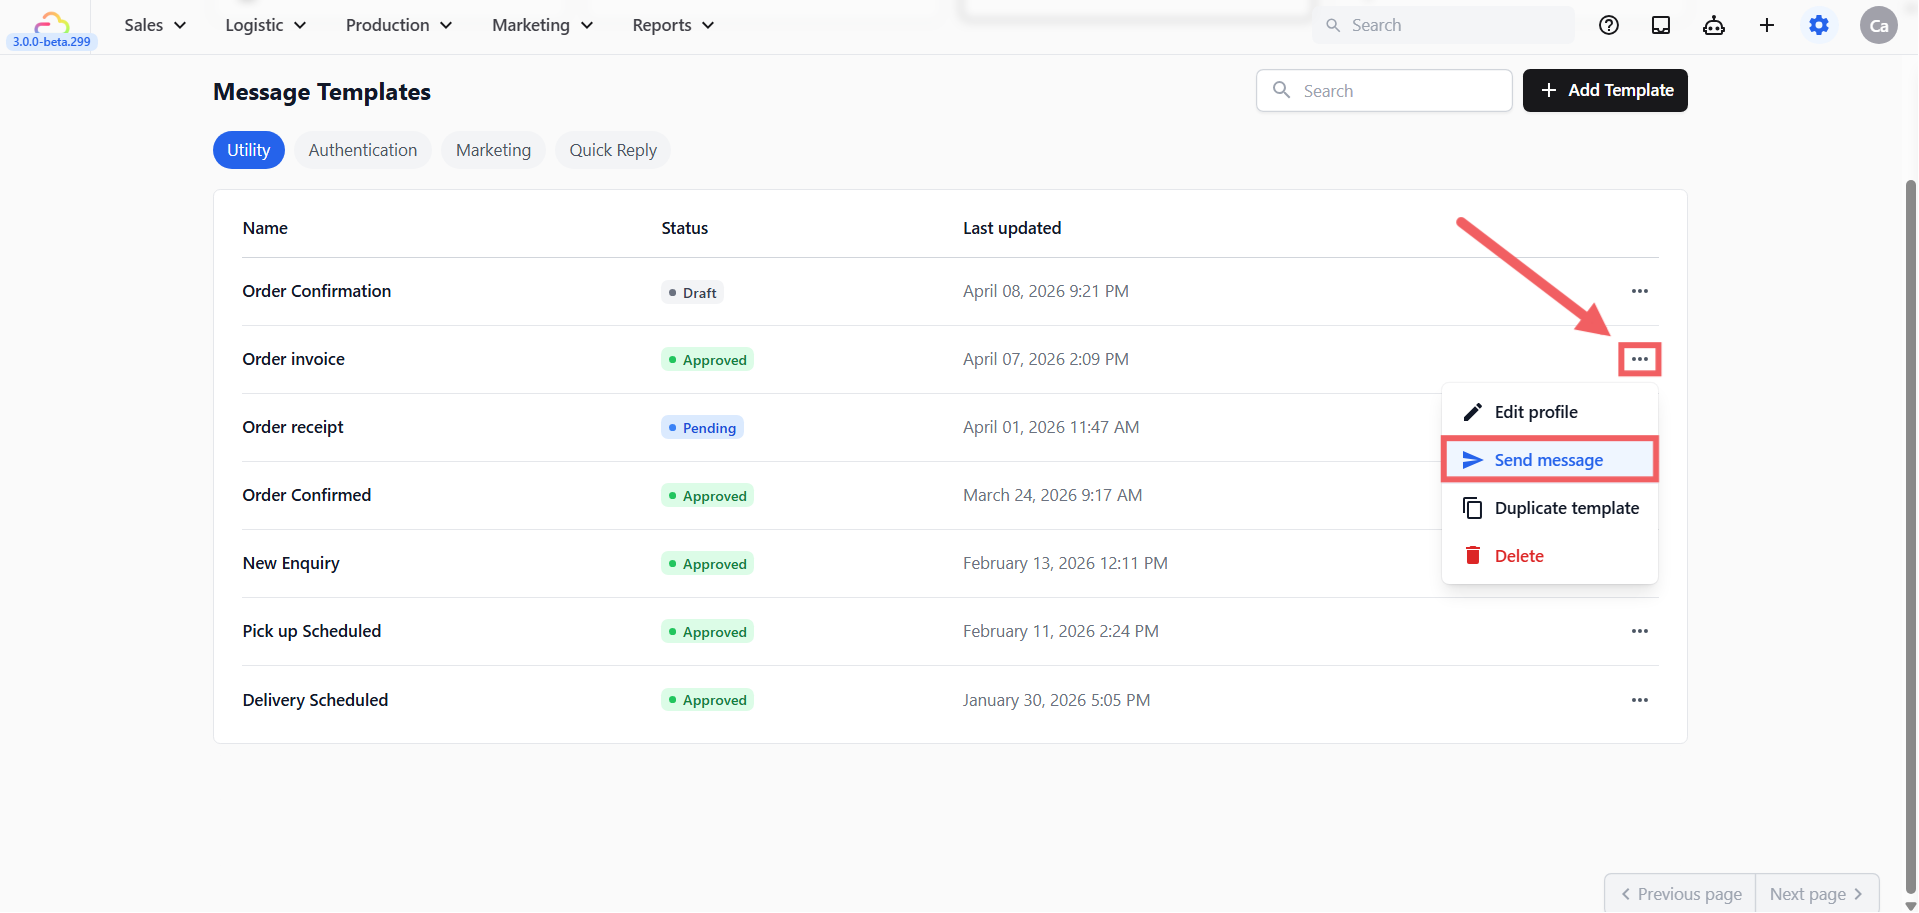
1. Go to the Message Templates page and click the Utility tab
2. Find the template you want to send
3. Click the ⋮ three-dot menu on the right of that template row
4. Click Send message and a dialog will appear
5. If your template contains placeholders like `@Customer Name` or `@Order Number`, EasyBiz will ask you to confirm the details before sending. Templates with no placeholders will send immediately.
6. Click Send
### Send from the inbox
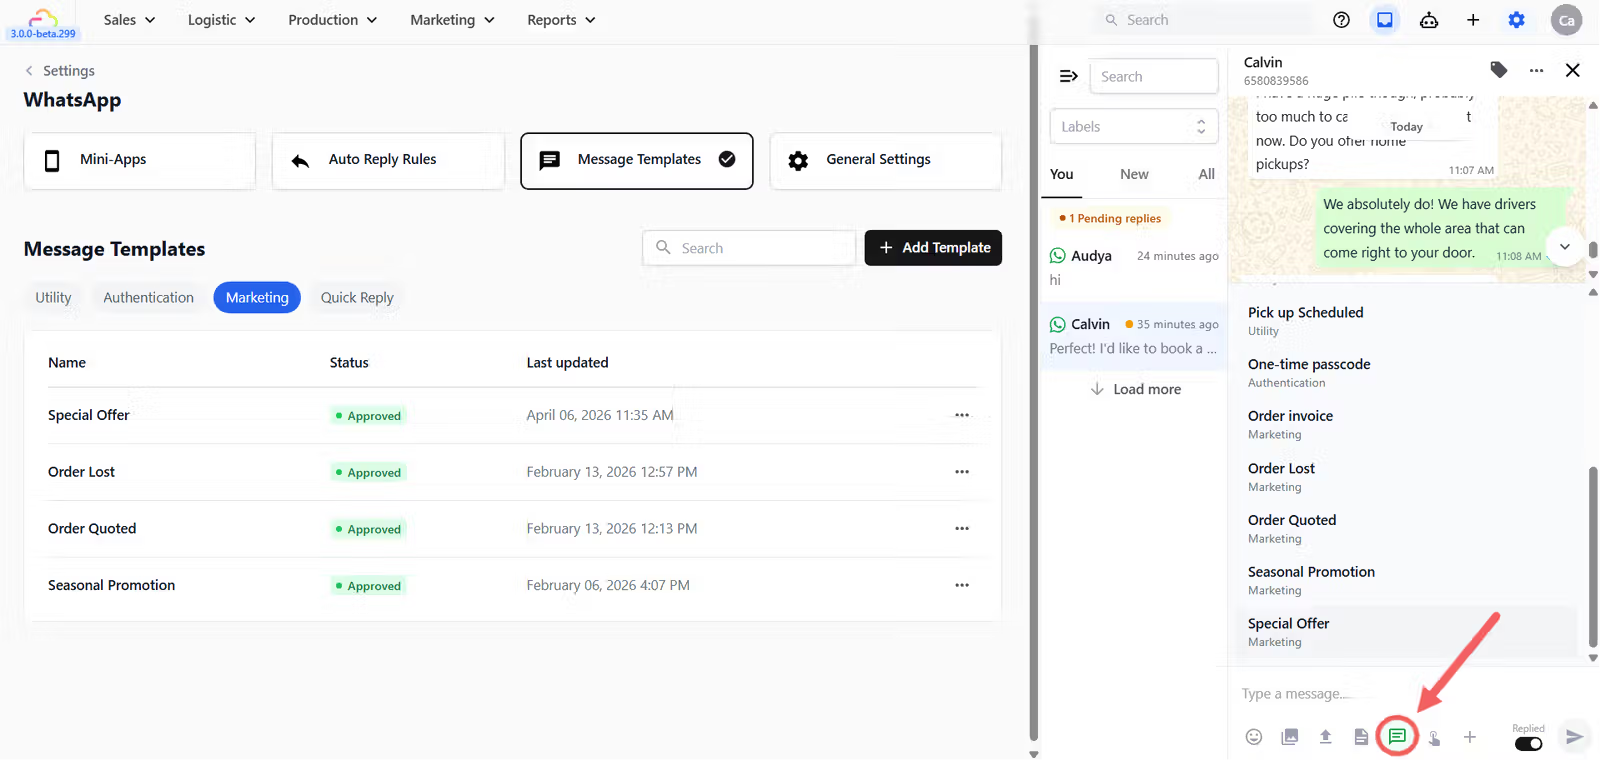
1. Open your WhatsApp Inbox and select the customer
2. Below the typing area, click the Template icon (it looks like a message bubble 💬)
3. Select your approved Utility template
4. If your template contains placeholders like `@Customer Name` or `@Order Number`, EasyBiz will ask you to confirm the details before sending. Templates with no placeholders will send immediately.
5. Click Send
---
## Keeping Your Templates in the Utility Category
If customers suddenly stop receiving your messages — don't panic. This is likely `Error 131049`, WhatsApp's way of flagging messages that too many recipients are ignoring. Utility templates are far less likely to trigger this block because they respond to real customer actions, not unsolicited outreach.
If you see `Error 131049`, stop using that template. Create a new one as Utility, follow these tips, and resubmit:
1. **Tie every message to a specific customer action.** "Your order #1234 is confirmed" is Utility. "Don't forget to book again!" is Marketing.
2. **No promotional content anywhere — not even one line.** Adding "Enjoy 10% off your next visit!" to a receipt moves the entire template to Marketing.
3. **Be specific, not generic.** Vague messages with no order details or context are automatically classed as Marketing.
4. **Avoid open-ended questions.** "Let us know if you need help" or "Any questions?" signal engagement intent to Meta's system.
5. **Write like a system notification.** Order number, status, date, amount. Just the facts.
You can only edit a submitted template once every 24 hours. If your template is rejected, you can edit it to match a previously approved version to keep it active.
---
## What's Next?
Now that your utility templates are ready, continue to [Setting Up Marketing Templates](/docs/setting-up-marketing-templates) to create promotional messages you can send to opted-in customers.