Your Tampines staff type a phone number, find the customer's order in seconds, and see what is paid, what is ready and what still needs doing.
## Before You Start
- **Your POS app:** you need a POS app with an Orders page. A new POS app has one already. See [Creating Your POS App and Using the Editor](/docs/create-your-pos-app).
- **Jobs (Home Cleaning, pickups and deliveries):** the Jobs section shows visits, pickups and deliveries only once booking is set up. See [Setting Up Booking Options](/docs/setting-up-booking-options).
- **Completion & Handover:** the Completion & Handover section shows collection and delivery steps only once they are set up. See [Setting Up Completion and Handover](/docs/setting-up-completion-and-handover).
- **Access:** you need a Console login that can manage the Point of Sale.
If you set this up before: the order card now comes from a card in **Settings › Cards**, and the order details are now set as sections in two columns, each with its own switch.
## Overview
The Orders page is where your staff look up every order their shop has taken. The order list sits on the left, and the order a staff member opens shows on the right. You decide which tabs sit above the list, what each order card shows, and which parts of an order staff see when they open it. You also decide whether staff can find orders taken at your other shops. Every change waits for Publish, so nothing changes at the counter until you are ready.
**Where it works**
- **Console:** you choose the Orders page settings in the POS app editor and see them in the live preview.
- **POS:** your staff see the order list and order details on the Orders tab of every device signed in with this app.
Orders is not a Pro page, so it works on Standard POS and Professional POS. The Pro pages, Inbox and WhatsApp Broadcasts, need Professional POS. Like every page type, Orders can be added once per app.
---
## Why set it up
A customer at the counter wants their order now, not after staff scroll through yesterday's sales. Good tabs take staff straight to the orders that matter, such as the ones still unpaid or the ones going out for delivery. The right sections show staff what they need when they open an order, and nothing they don't.
If you leave everything as it is, the Orders page still works. Staff see two tabs, **All** and **Unpaid**, and only this shop's orders. Check **Search all sales channels** if customers ever collect at a different shop from where they dropped off.
---
## Where to find it
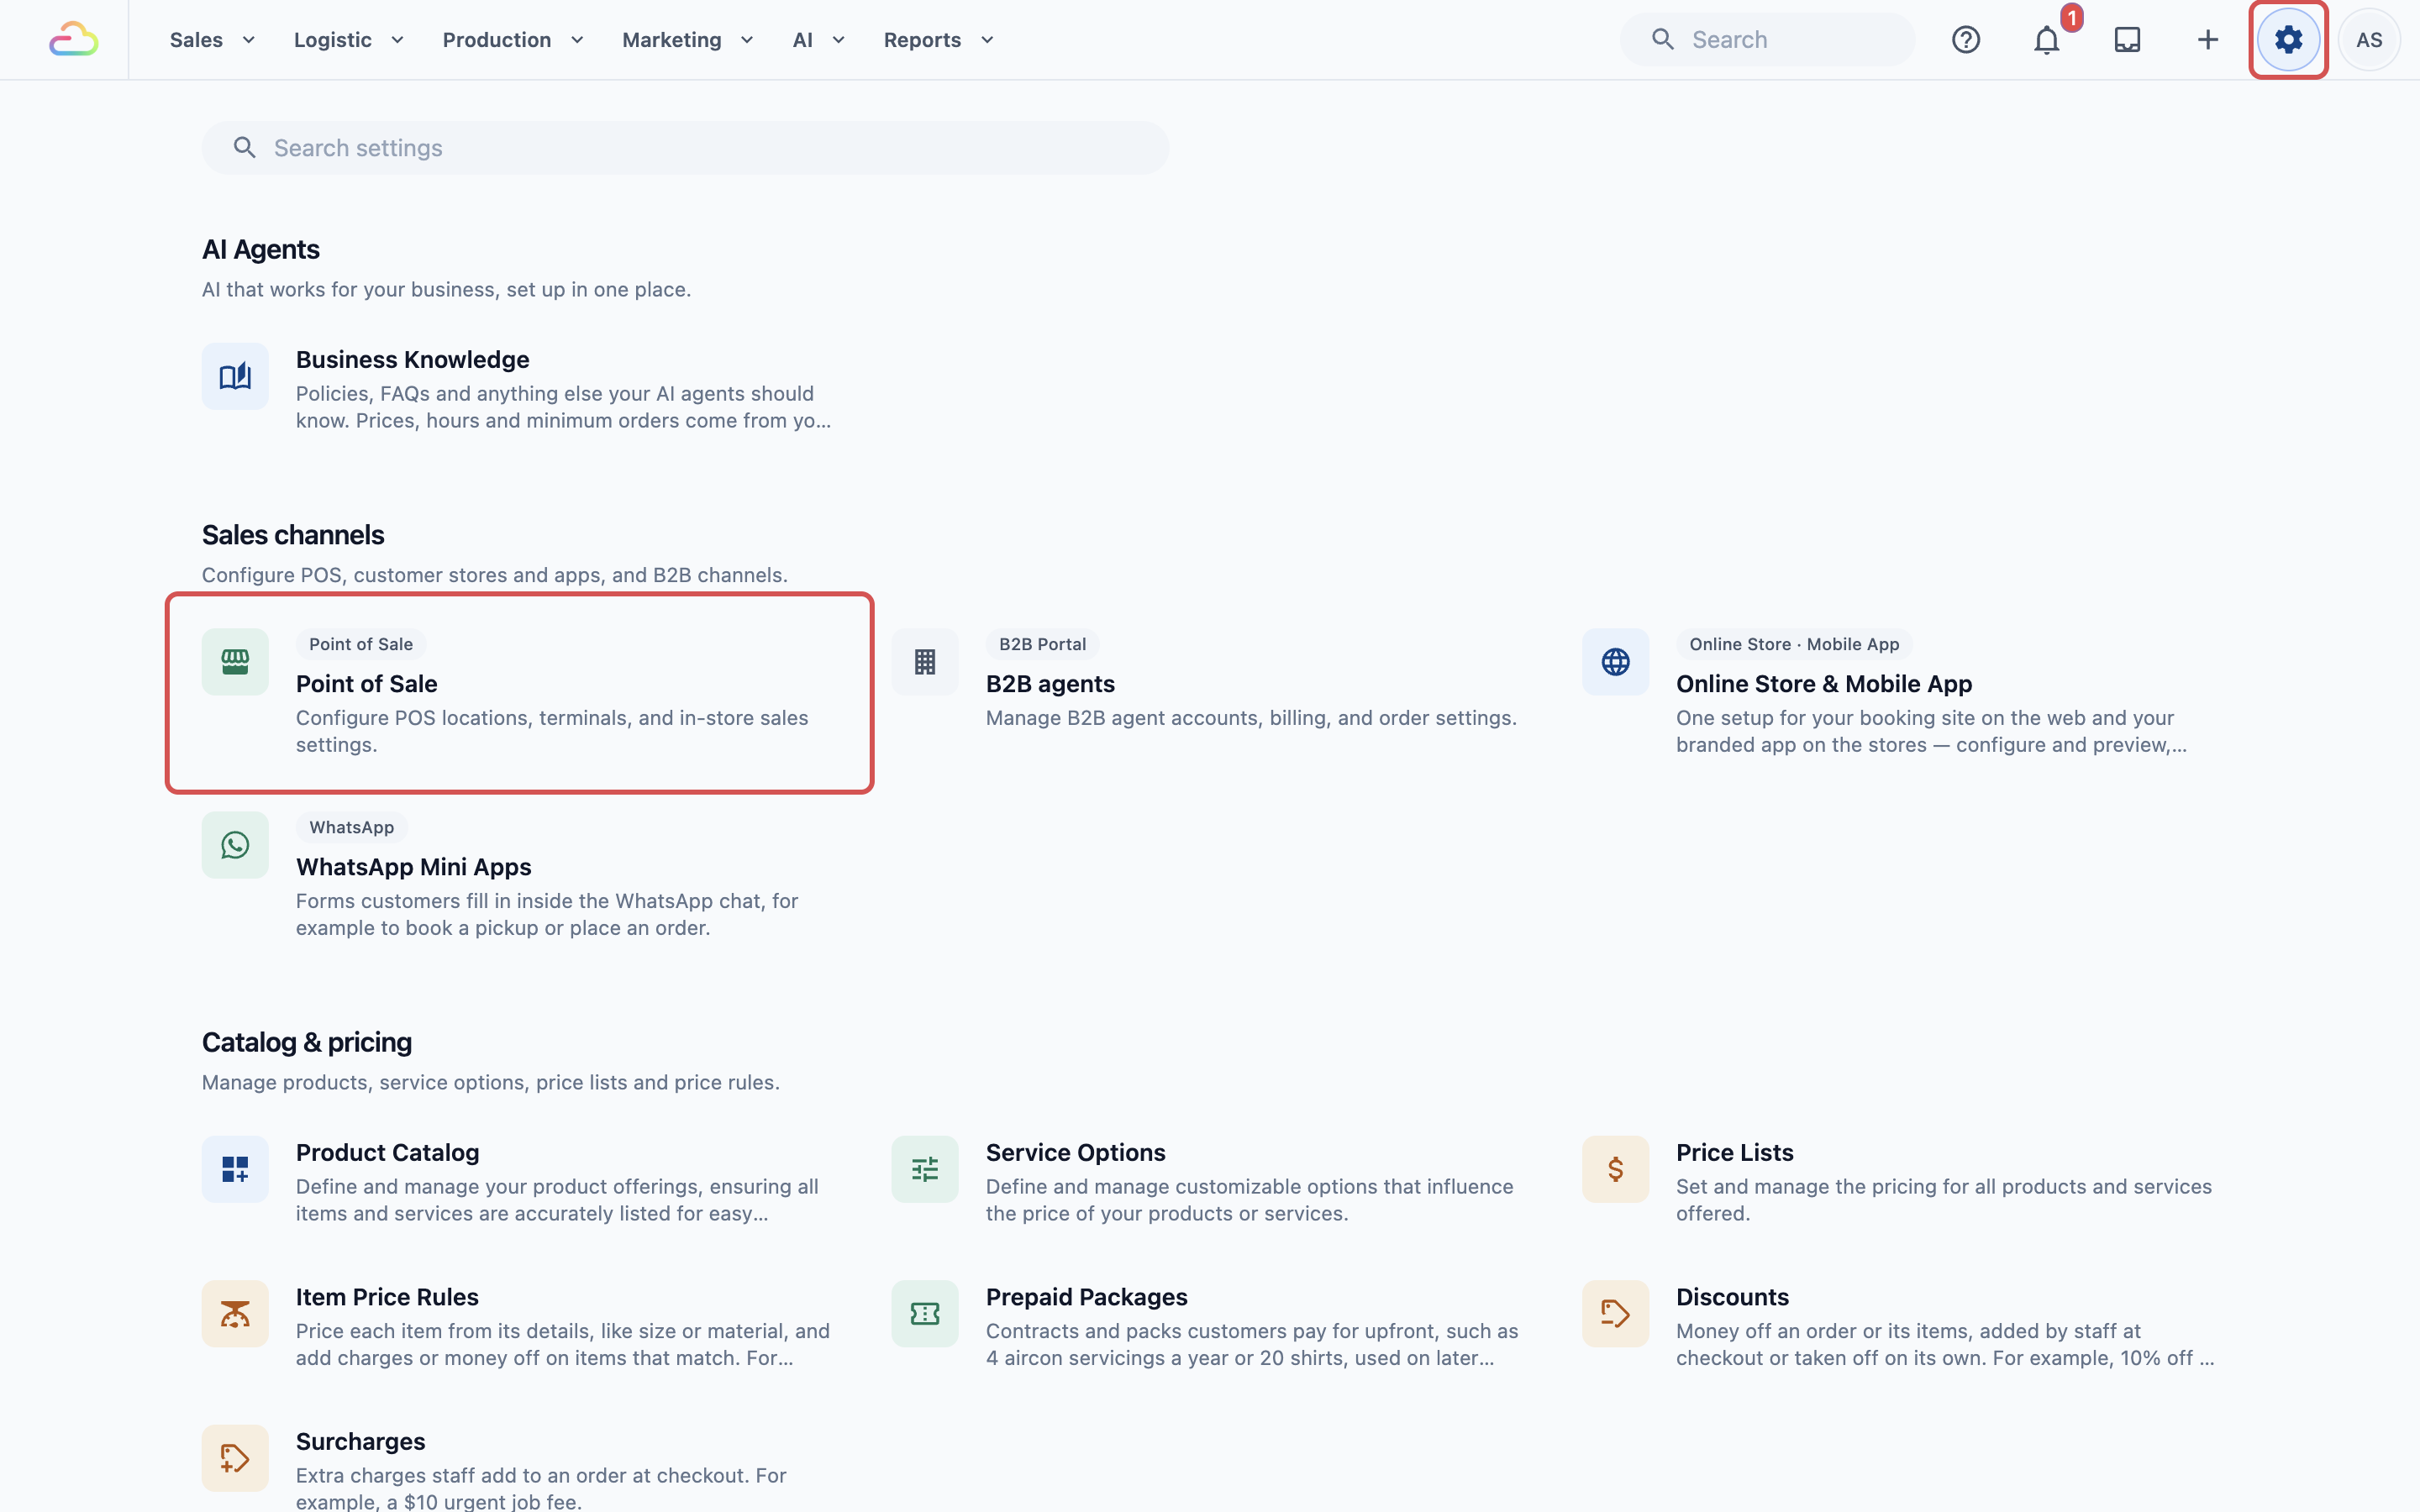
1. Click the ⚙️ Settings icon in the top-right corner.
2. Under the **Sales Channels** section, click **Point of Sale**.
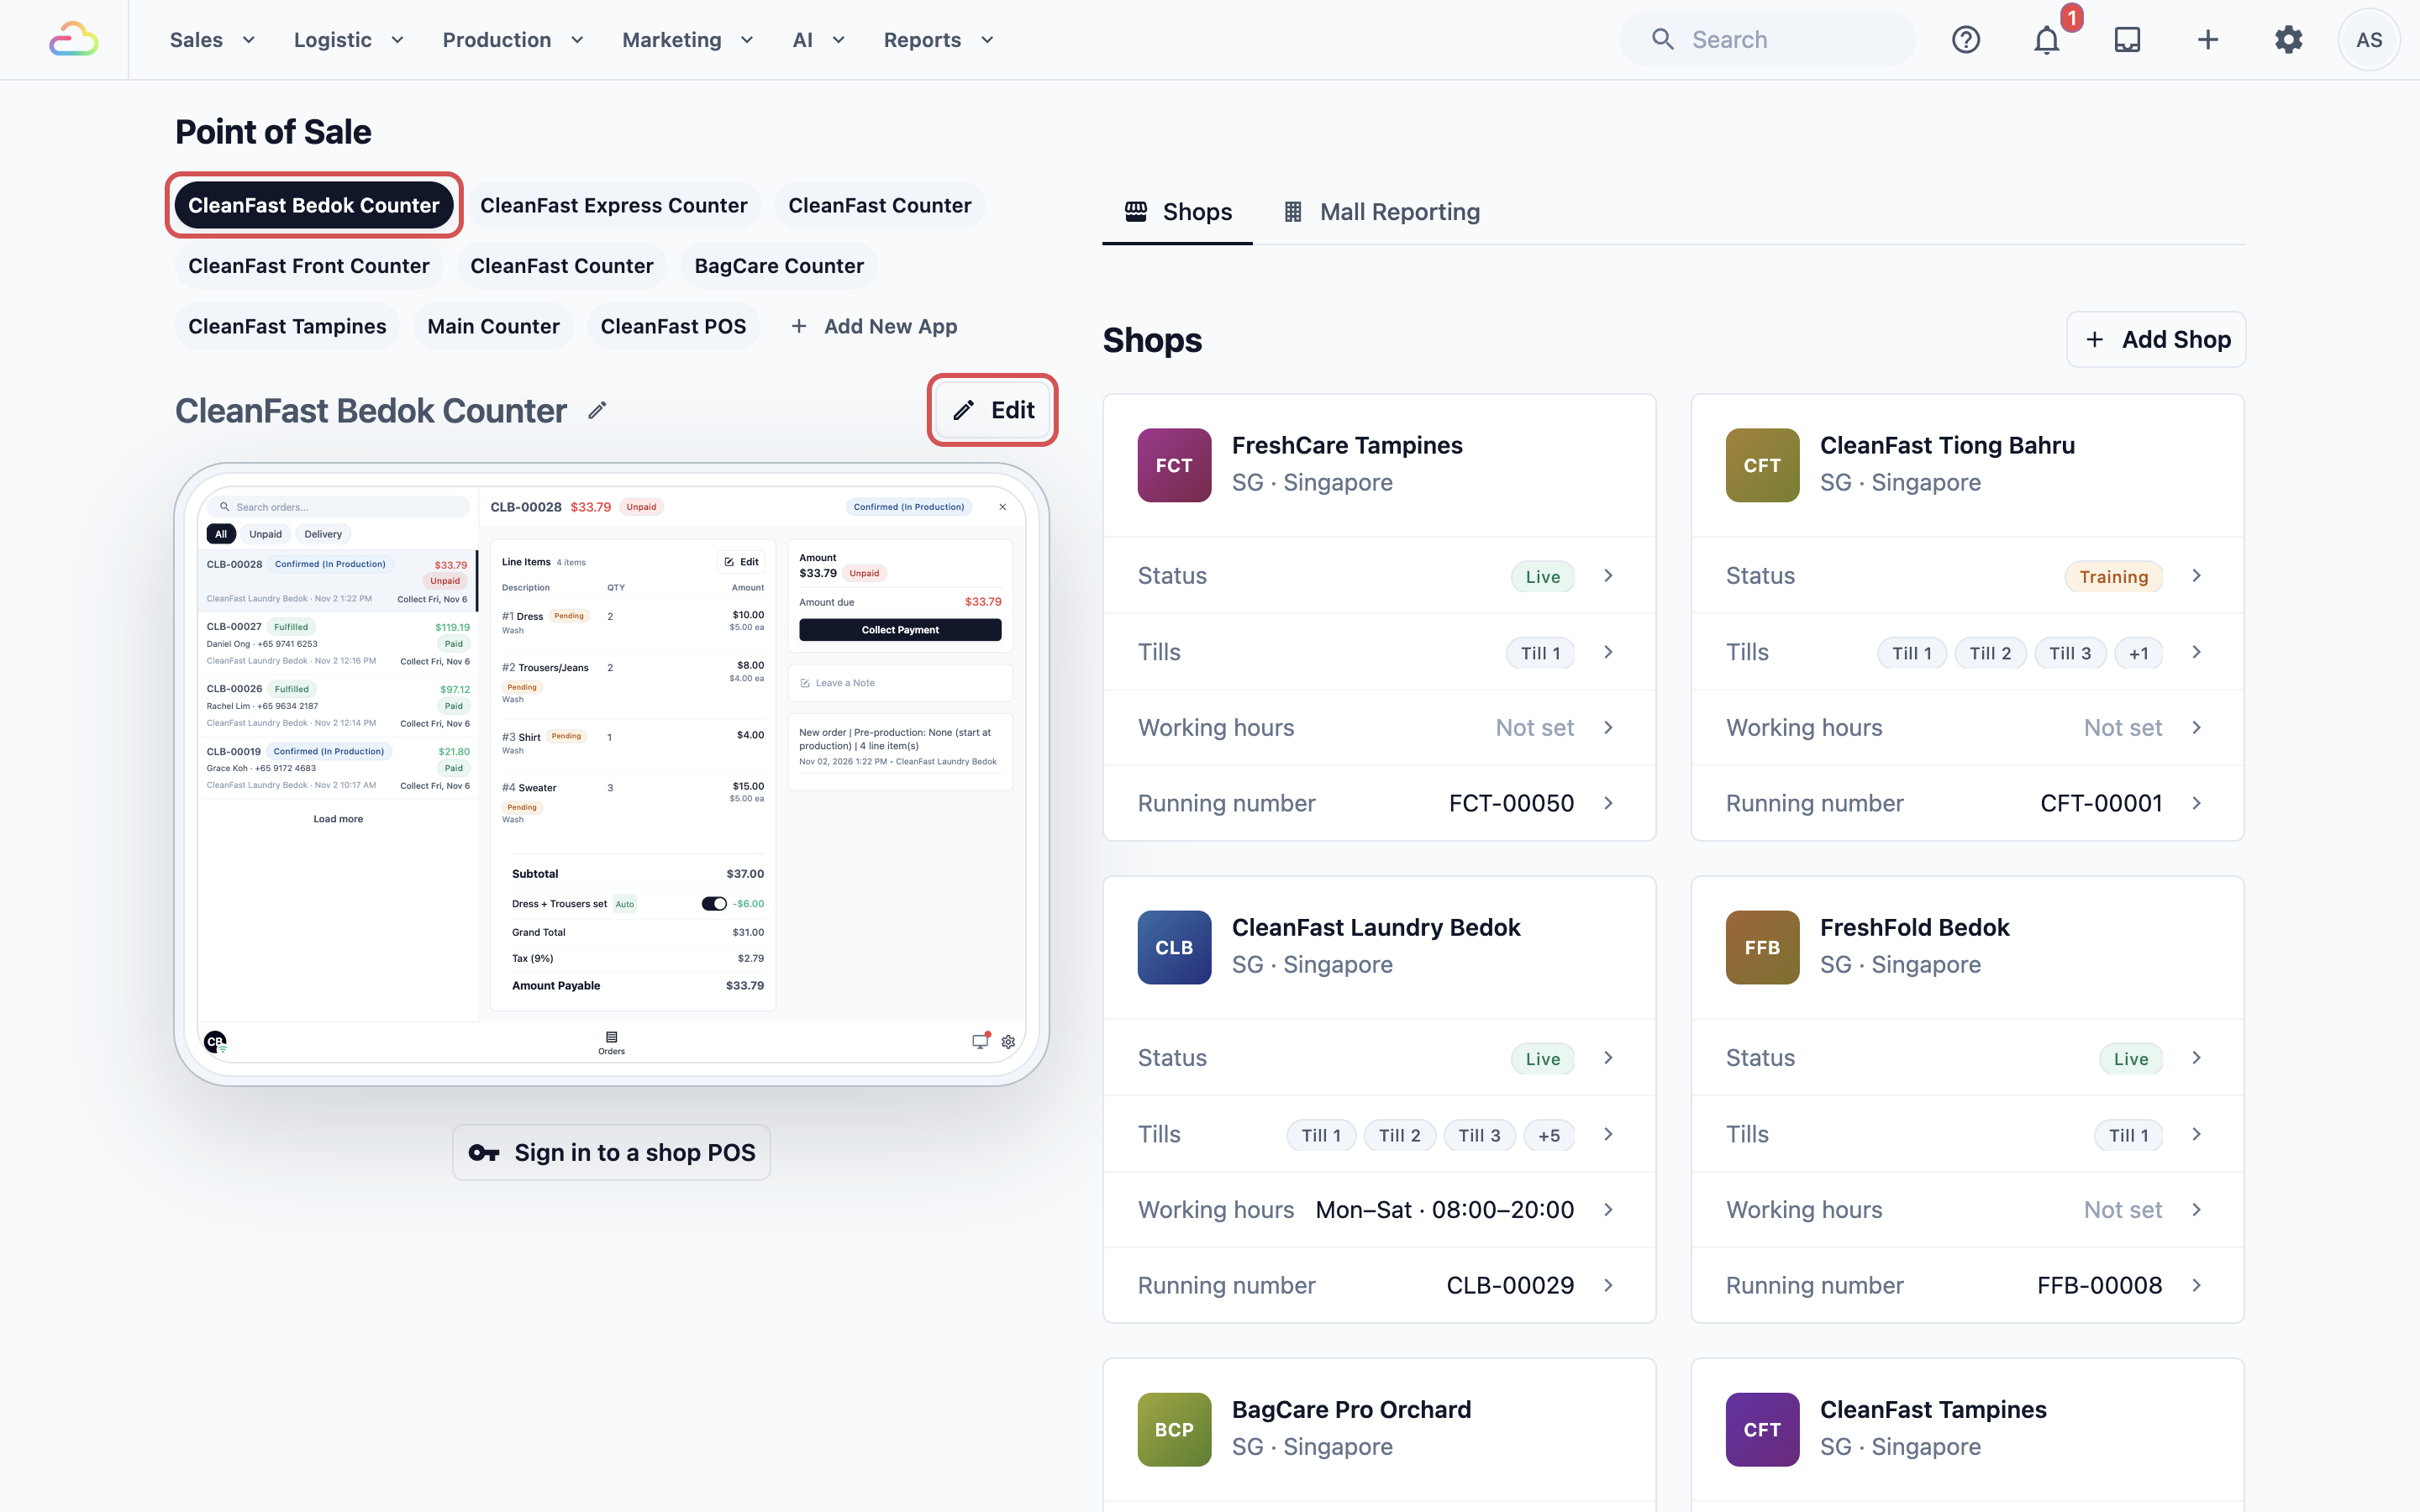
3. Under **POS Apps**, click your app, then click Edit.
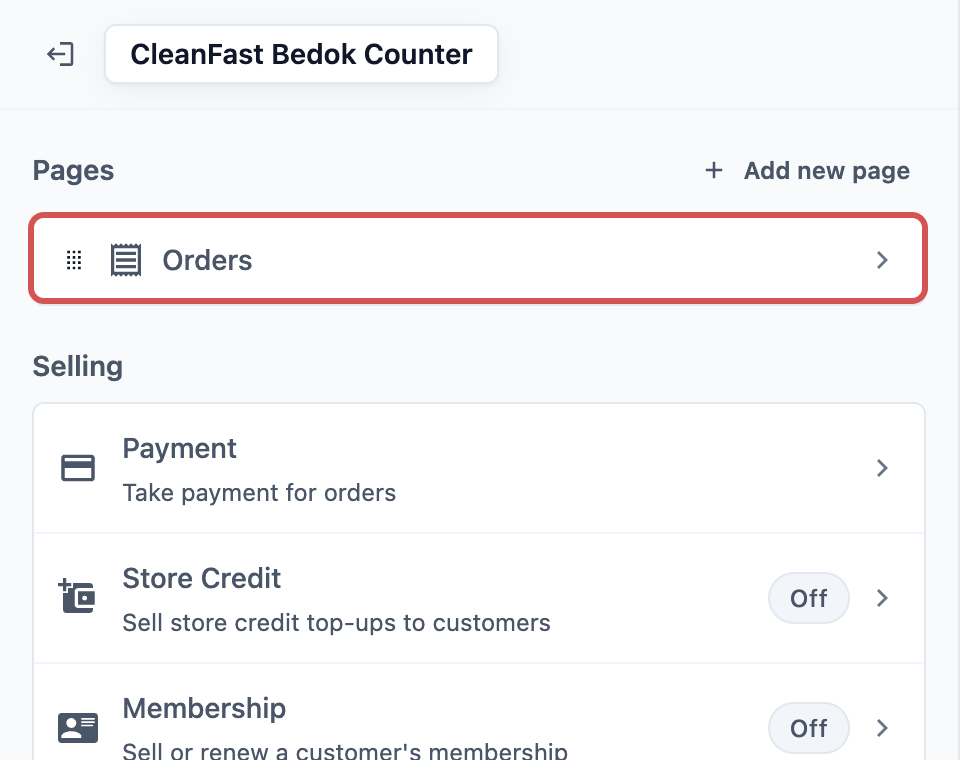
4. Under **Pages**, click **Orders**.
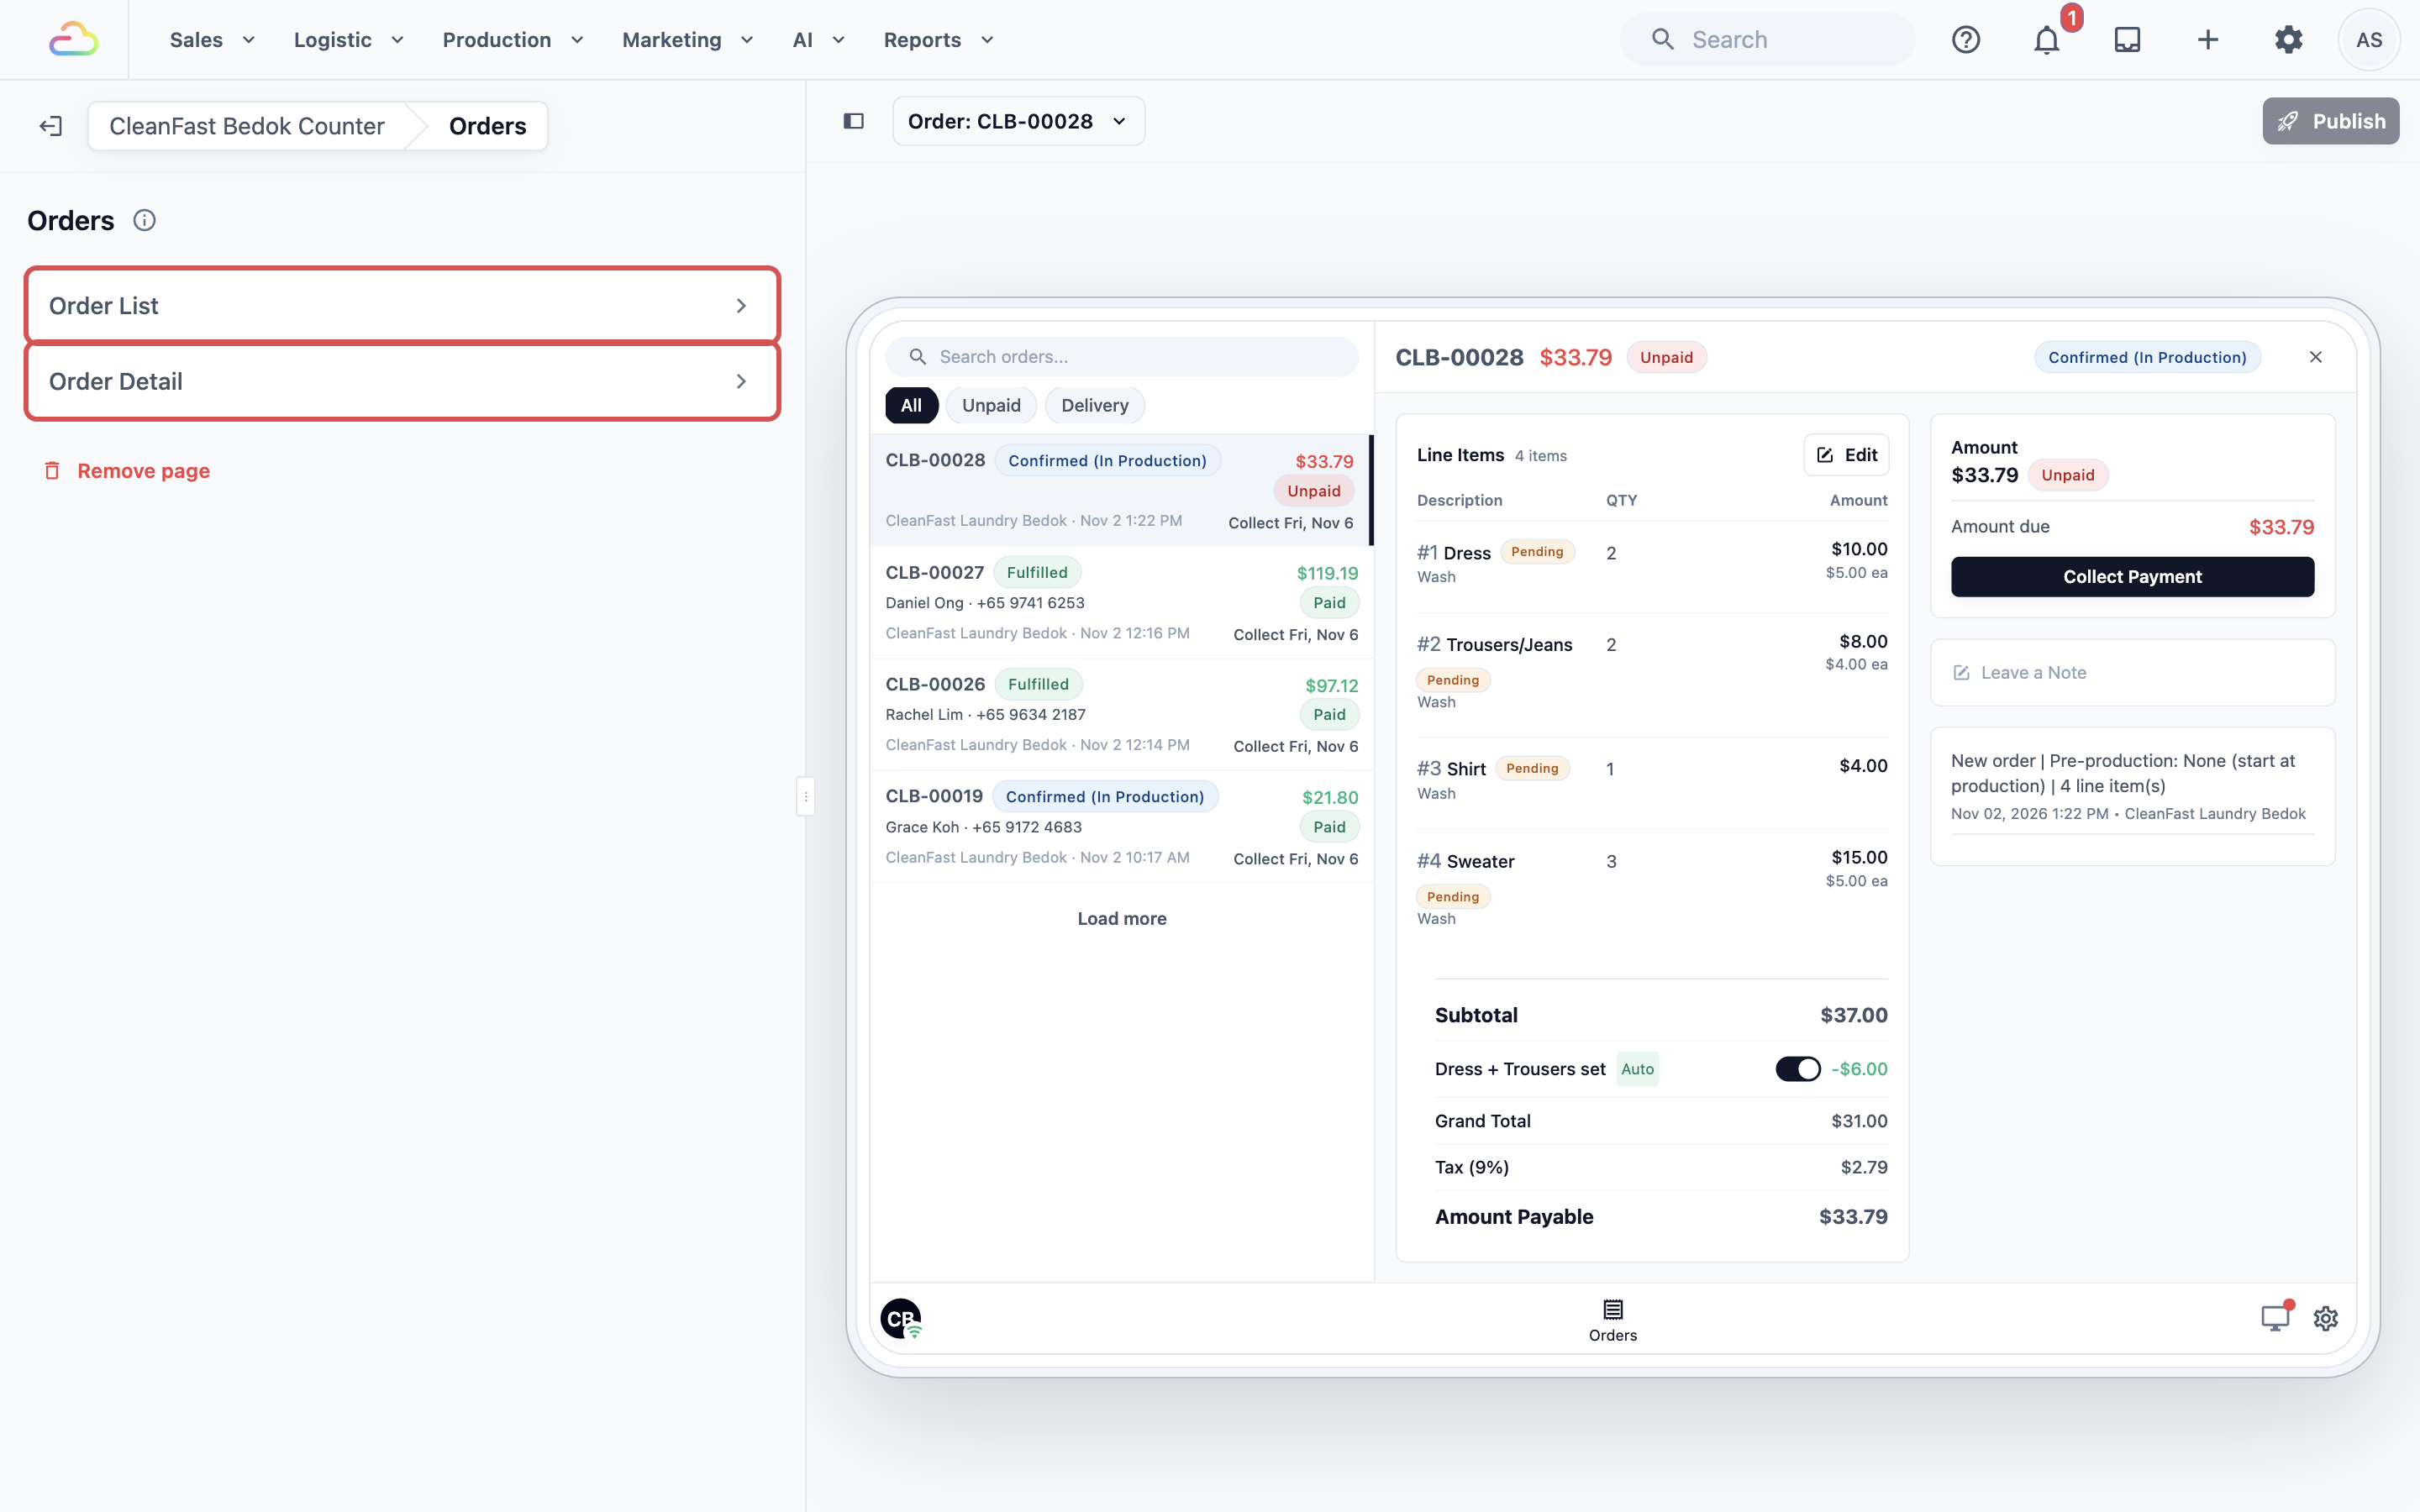
The Orders page lists two rows: **Order List** and **Order Detail**. Click a row to see its settings. The preview on the right shows the Orders screen as staff will see it.
---
## Setting it up
### Order List
The order list is the left side of the Orders screen. Staff search it by order number, customer name or phone, and tap a tab to narrow it down.
1. On the Orders page, click **Order List**.
2. Choose the settings below.
3. Click Publish when you have finished both rows on this page.
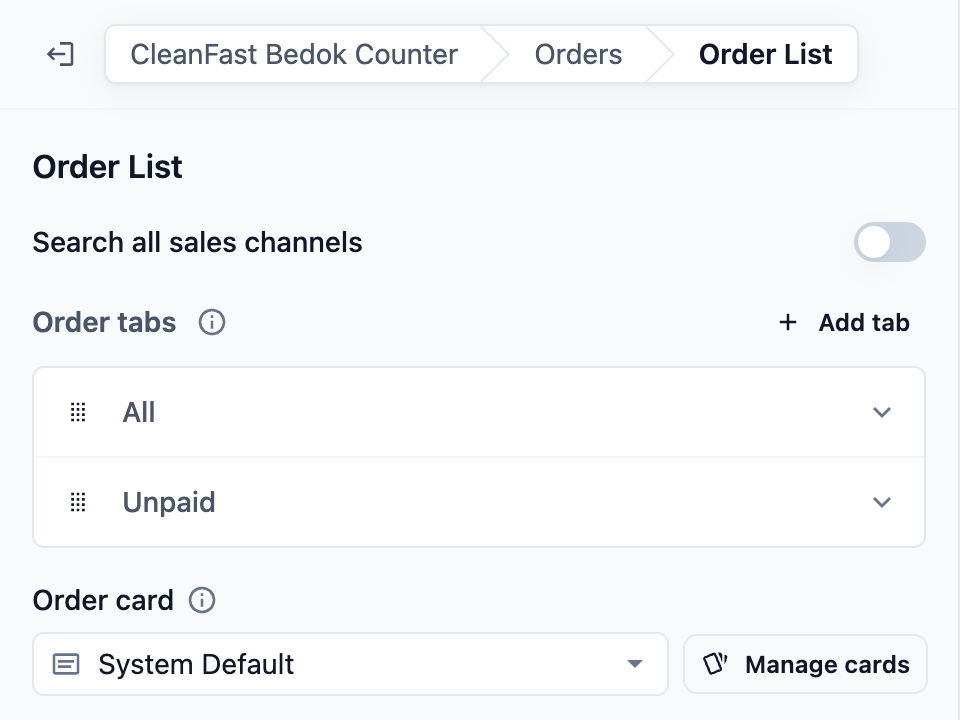
- **Search all sales channels**
A sales channel is one place where you take orders, such as your Tampines shop, your Jurong shop or your Online Store. Without a search, the list always shows this shop's orders: the ones taken here and the ones sent here for the customer to collect.
If you turn this on, a search finds orders from every sales channel. For example, a customer who dropped off at Jurong can collect at Tampines, and Tampines staff find the order by typing the phone number. If you leave it off, a search finds only this shop's orders. It is off by default.
- **Order tabs**
Tabs are shortcuts above the order list, so staff find the right orders in one tap. A new app starts with two tabs: **All**, which shows every order, and **Unpaid**, which shows orders that are unpaid or partly paid.
To add a tab:
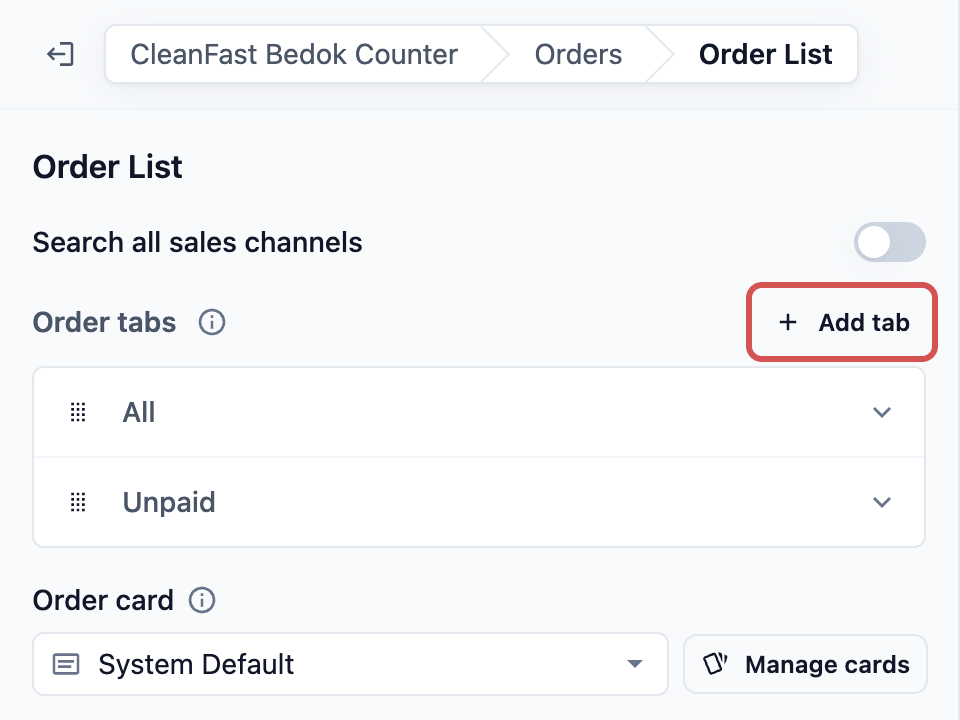
1. Next to **Order tabs**, click Add tab. A tab called New tab opens.
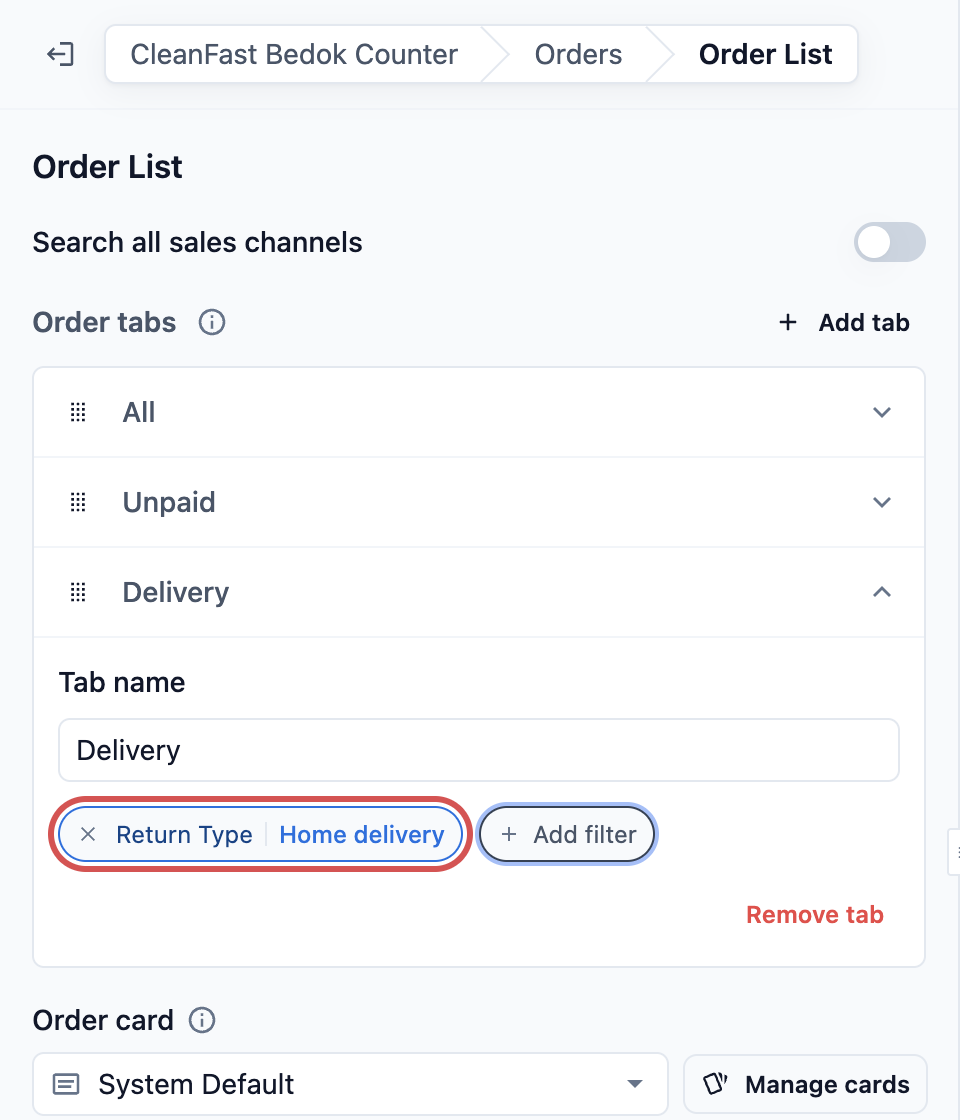
2. Under **Tab name**, type the name staff will see, such as Delivery.
3. Add one or more filters to choose which orders the tab shows.
| **Filter** | **What the tab shows** |
| --- | --- |
| Status category | Orders at one or more stages: Draft, Quoted, Confirmed, Fulfilled or Cancelled. |
| Payment status | Orders that are Unpaid, Partially Paid or Paid. |
| Workflow status | Orders at one or more of your own workflow steps, such as Ready for collection. These are the steps you set for your business units. |
| Return type | Orders going back to the customer by **Home delivery**, or collected by the customer as **Self pickup**. |
| Sales channel | Orders taken at one sales channel. The list already shows only this shop's orders, so this filter matters when staff search with **Search all sales channels** on. |
| Mix and match | Use several filters in one tab. The tab shows only orders that match all of them, for example Unpaid orders going out by Home delivery. |
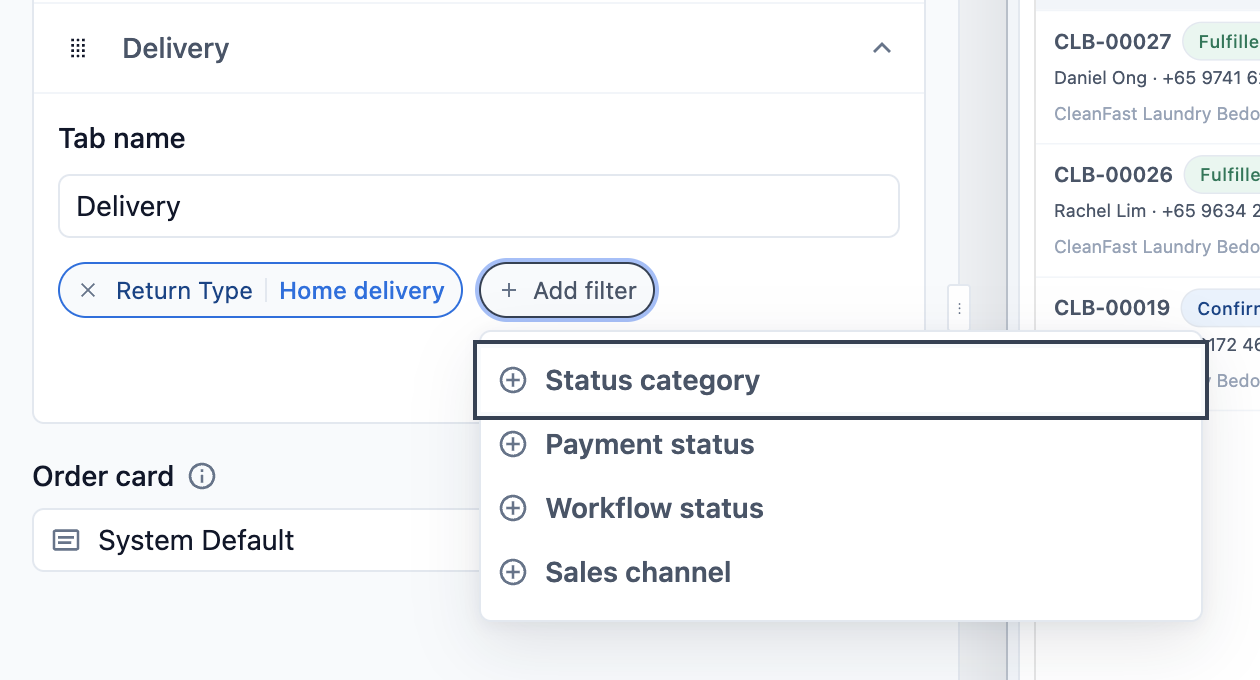
A tab with no filters shows every order, like **All**. To remove a filter from a tab, click its ✕.
To change the order of the tabs, drag a tab up or down by its handle. The first tab is the one staff see when they open the Orders page.
To remove a tab, open it, click Remove tab, then click Remove tab again in **Remove this order tab?**. One tab always stays, so the last tab can't be removed.
- **Order card**
The order card decides what each order in the list shows, such as the customer's name, the total and the collection date. Keep **System Default**, or choose a card you made in **Settings › Cards**. Click Edit card to change the card you picked, or Manage cards to add one.
**When no order is open**
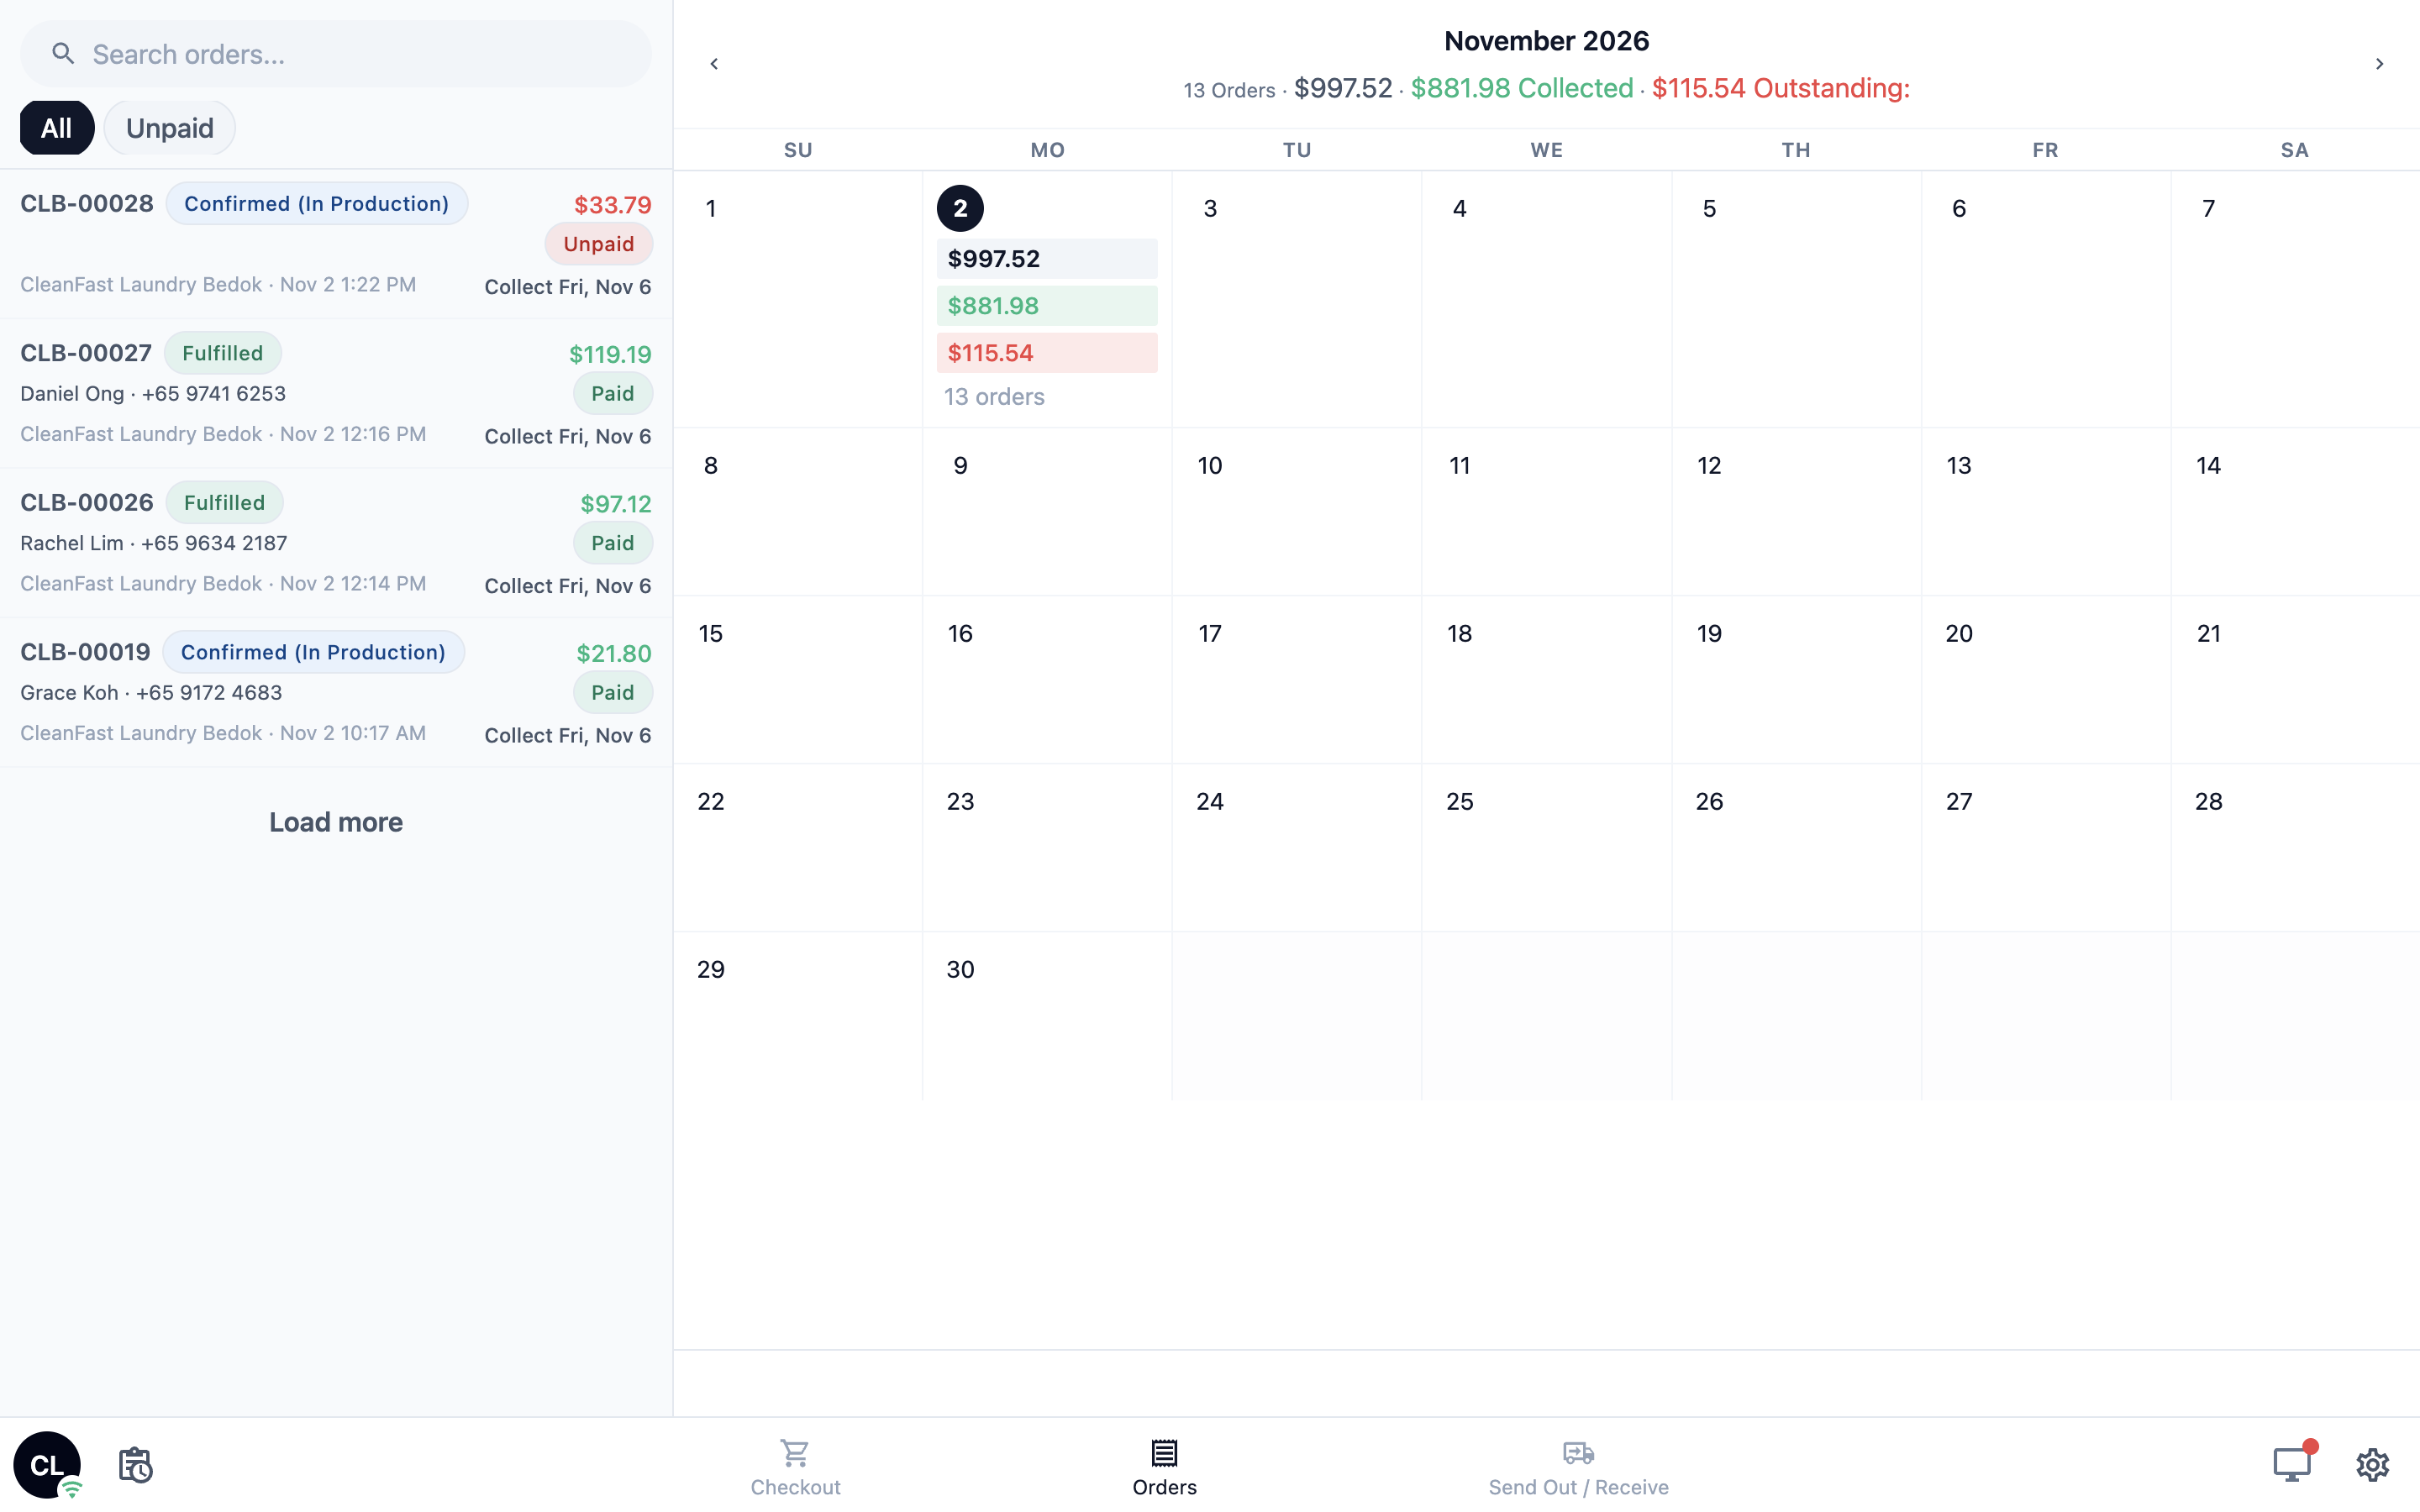
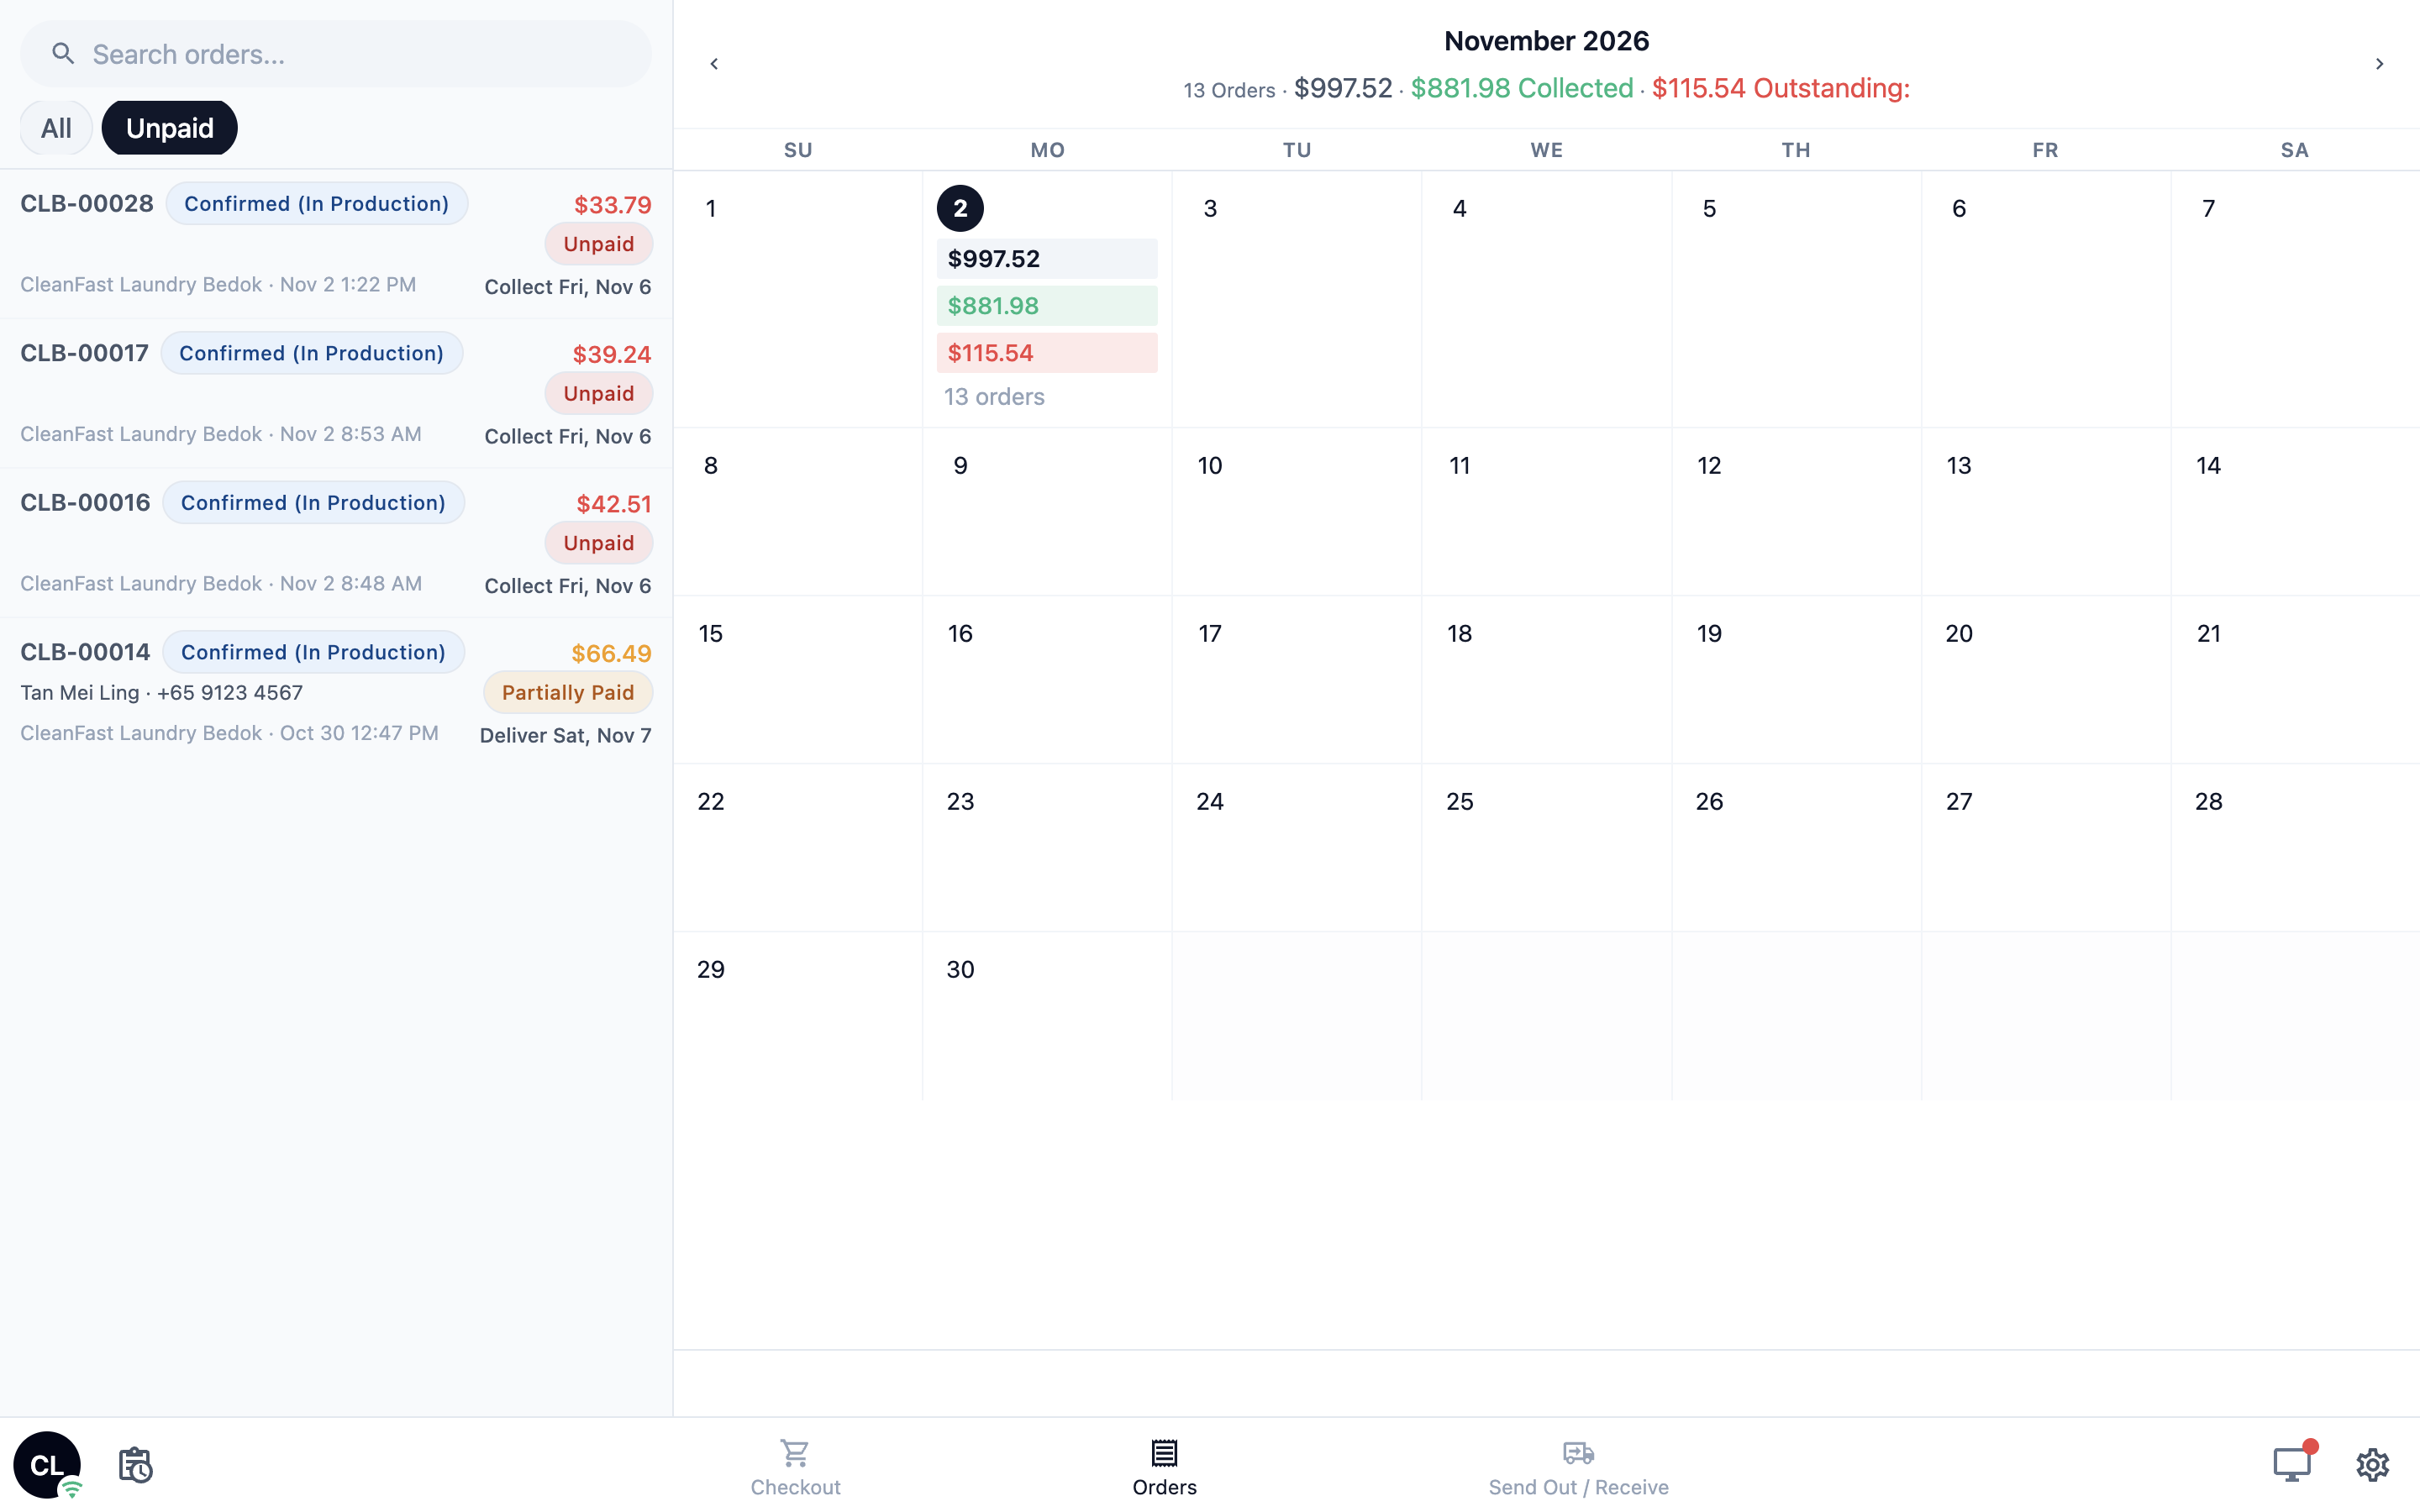
Until staff tap an order, the right side of the Orders screen shows a Sales Calendar: this month, with the day's sales total in each date. When staff tap a date, the list shows that day's orders, with the date as a tab. Tapping the ✕ on the date takes them back to the normal tabs.
The Sales Calendar goes by the day each order was taken, not the day it is due for collection or delivery. To see what's due each day, add the **Collection** page to your POS app. See [Offering Home Delivery and Store Pickup at the POS](/docs/offering-home-delivery-and-store-pickup-at-the-pos).
---
### Order Detail
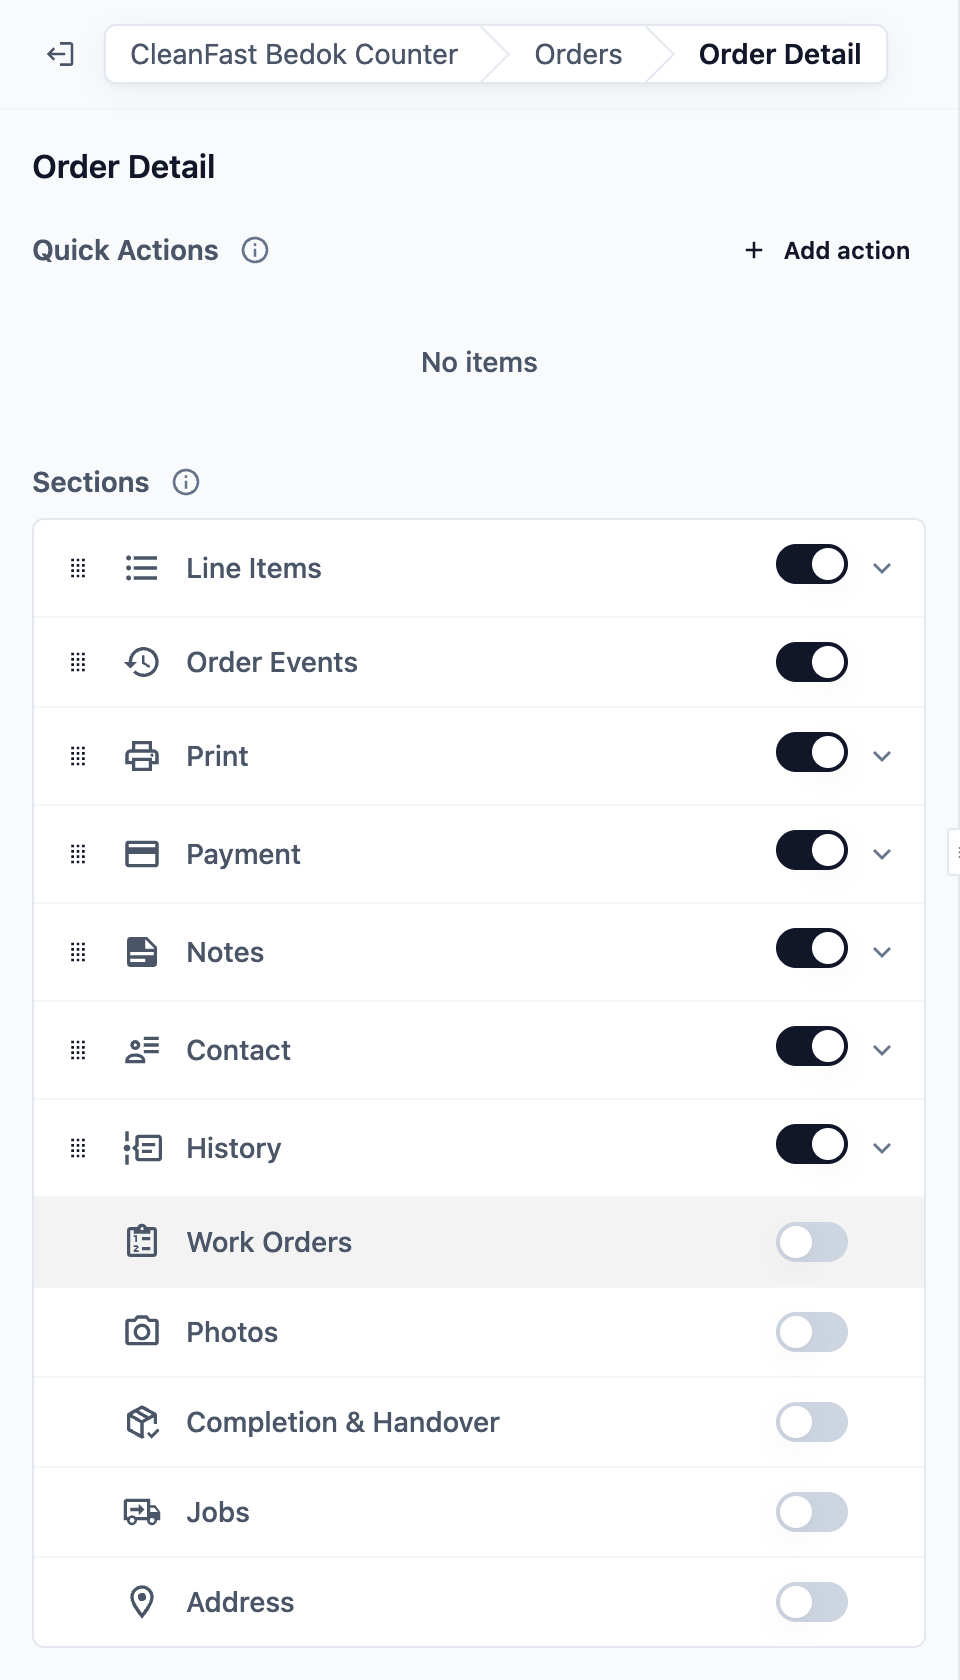
Order Detail is the right side of the Orders screen once staff tap an order. It shows the buttons at the top and the order's sections below.
1. On the Orders page, click **Order Detail**.
2. Set up **Quick Actions** and **Sections** as below.
3. Click Publish when you have finished.
- **Quick Actions**
Quick actions are the buttons at the top of an open order, such as sending the receipt by email. A new app starts with an **Email** button that sends the receipt, plus a **PDF** button for your invoice if you have an invoice template.
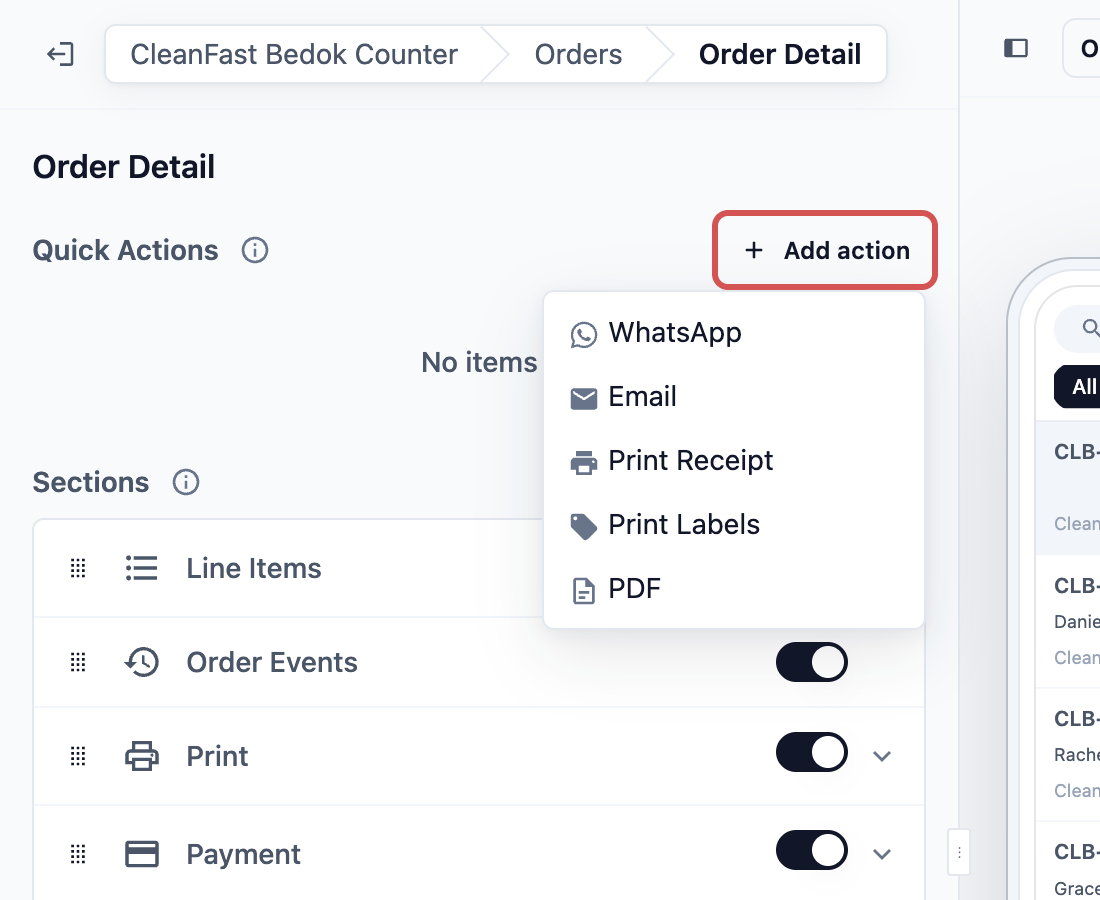
To add one, click Add action and choose an action.
| **Action** | **What staff can do** | **What you choose** |
| --- | --- | --- |
| WhatsApp | Send the customer a WhatsApp message from one of your templates | **WhatsApp Template** |
| Email | Send the customer an email, such as the receipt | **Email Template** |
| Print Receipt | Print a receipt for the order | **Receipt type**, a button name and any **Additional receipts** |
| Print Labels | Print labels for the order's items | Nothing. It uses the label set for the order's business unit |
| PDF | Open a PDF of the order, such as an invoice | A button name and the PDF template |
For **Print Receipt**, the **Sales Order** receipt type prints the receipt set for the order's business unit, so each unit prints its own. The other types (Custom, Work Order, Fulfillment, Handover, Close of Day) always print the receipt you choose here, for example a note for the counter.
Drag the actions to change their order. To take one off, click it, then click Remove Action.
- **Sections**
Sections are the parts staff see when they open an order. Each section has its own switch. If you turn a section on, staff see it in every order they open on this app. If you turn it off, it disappears from the screen, but nothing in the order is deleted.
| **Section** | **What staff see** | **On for a new app** |
| --- | --- | --- |
| Line Items | The items in the order, with quantity and amount | Yes |
| Work Orders | Each work order and how far it has got | No |
| Photos | Photos of the order, and a way to take or upload more | No |
| Order Events | A timeline of what happened to the order | Yes |
| Print | Receipt and label printing, with a preview | Yes |
| Payment | What is paid and what is still due, with the payments made | Yes |
| Completion & Handover | Collection or delivery steps, and proof of handover | No |
| Jobs | The visits, pickups and deliveries linked to the order | No |
| Notes | Order notes and staff comments | Yes |
| Contact | The customer's details and private note | Yes |
| Address | The customer's address | No |
| History | Every change made to the order, in order of time | Yes |
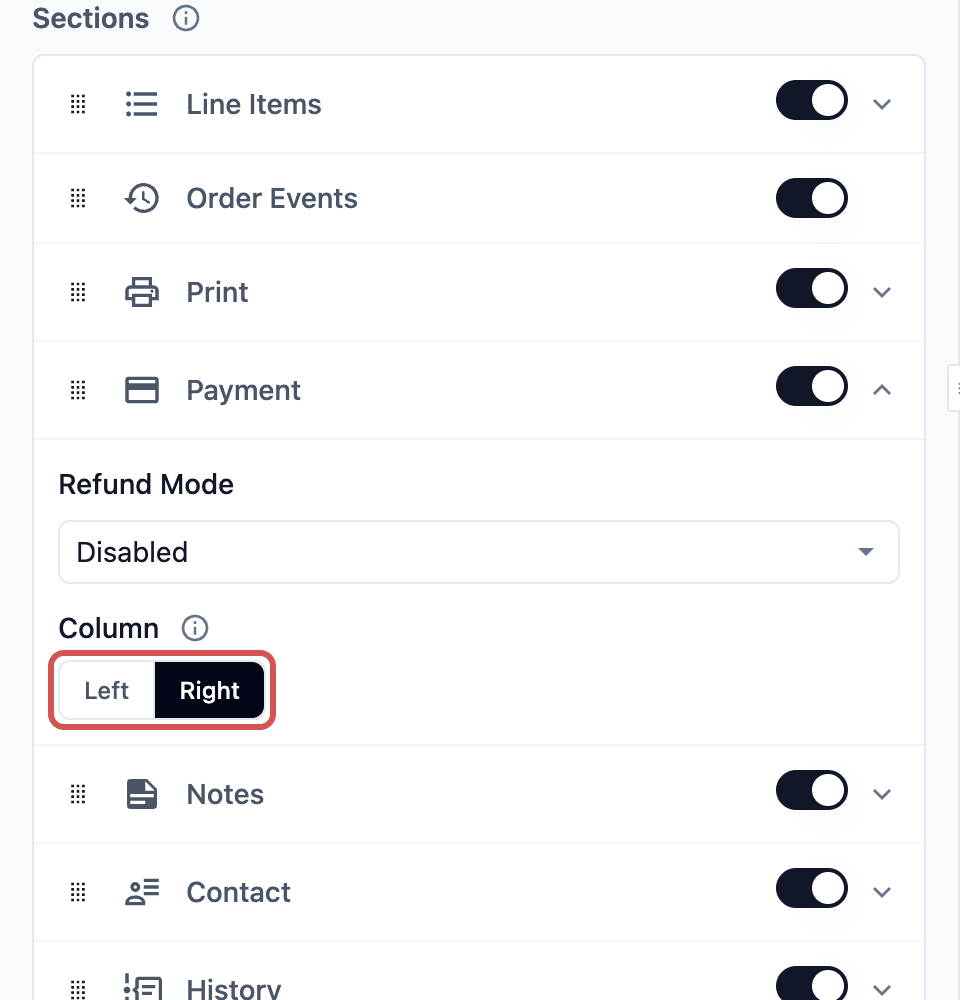
The order detail has two columns. The left column is the wide one, and the right column the narrow one. On a small screen, the right column moves below the left. Line Items, Work Orders, Photos, Order Events and Print always sit on the left. For every other section, click it and choose **Left** or **Right** under **Column**. You can also drag a section up or down, or into the other column when it fits there.
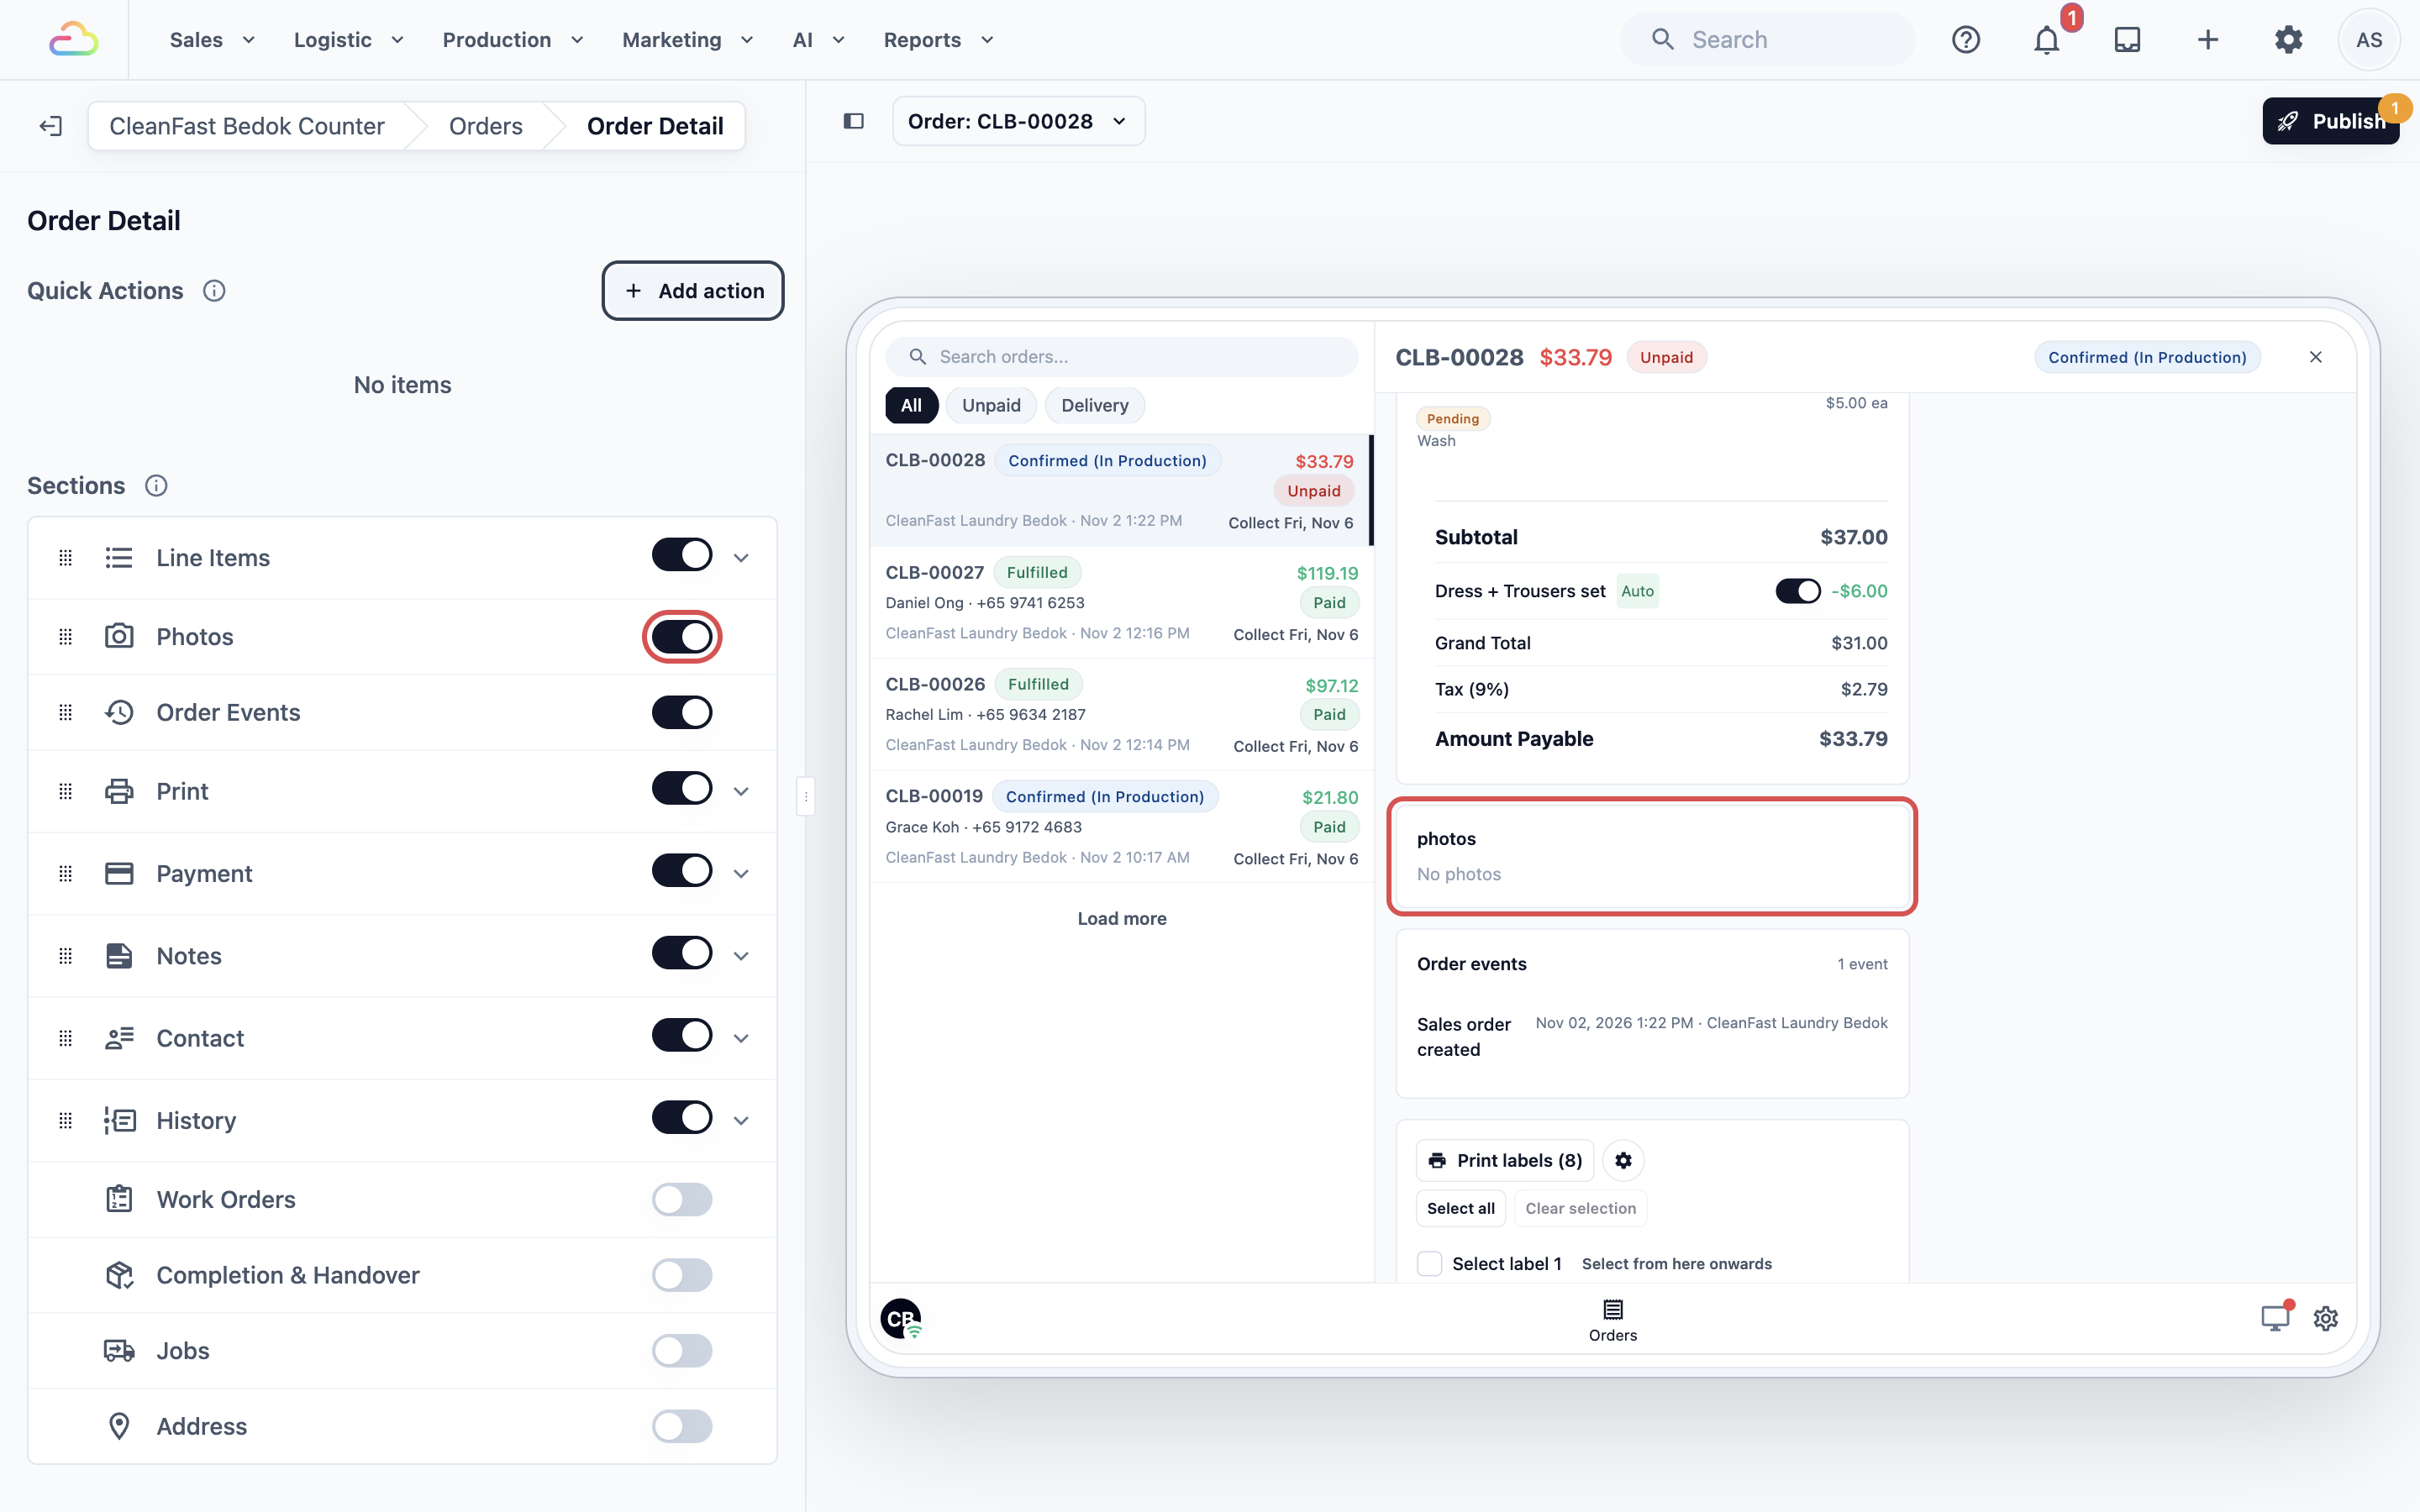
**Section settings**
Four sections have settings of their own. Click the section to open them.
- **Line Items:** choose a **Line item card** to decide what shows under each item, such as its photos and progress. **Enable Sales Return** lets staff take back items from a paid order. If you turn this on, staff see a return option on the line items. It is on for a new app.
- **Work Orders:** choose a **Work order card** to decide what each work order shows, such as its due date and return type.
- **Payment:** **Refund Mode** decides when staff can refund a payment from the POS.
| **Refund Mode** | **What staff can do** |
| --- | --- |
| Disabled | No refunds from the POS. |
| Same Day Only | Refund a payment only on the day it was taken. |
| Unrestricted | Refund a payment at any time. This is the setting for a new app, because customers usually raise a problem at collection, days after they paid. |
- **Print:** **Print types** decides what staff can print from the order: Sales order receipt, Item label and Package label. A new app has Sales order receipt and Item label. Each order prints the receipt and labels set for its business unit.
If Enable Sales Return is on and Refund Mode is Disabled, staff can take back items from a paid order but can't give the money back on the POS. The editor warns you with "Paid returns cannot be refunded in POS until a Refund Mode is selected in the Payment section." See [Processing Refunds and Returns](/docs/processing-refunds-and-returns).
---
## Example setup
CleanFast Laundry sells Laundry and Bag Repair at its Tampines and Jurong shops. Customers often drop off at one shop and collect at the other, and some orders go out by delivery.
| **Setting** | **CleanFast Laundry's choice** |
| --- | --- |
| Search all sales channels | On |
| Order tabs | All, Unpaid, Delivery |
| Delivery tab filter | Return type: Home delivery |
| Order card | System Default |
| Quick Actions | Email (receipt), WhatsApp, Print Receipt |
| Sections turned on | Line Items, Photos, Order Events, Print on the left; Payment, Completion & Handover, Notes, Contact, History on the right |
| Refund Mode | Unrestricted |
They click Publish, then Publish again in **Review your changes**.
Other businesses set the Orders page up differently:
- **Laundry:** turn on **Completion & Handover**, so staff record each collection, and add a **Ready** tab with **Workflow status** set to your ready-for-collection step.
- **Bag Repair:** turn on **Photos**, so staff take pictures of each bag's condition at drop-off and show the customer at collection.
- **Home Cleaning:** turn on **Jobs** and **Address**, so staff see each visit's date and time and where the cleaner is going.
---
## What staff see
After you publish, Tampines staff open the Orders tab. They see the All, Unpaid and Delivery tabs above the list, and the Sales Calendar on the right.
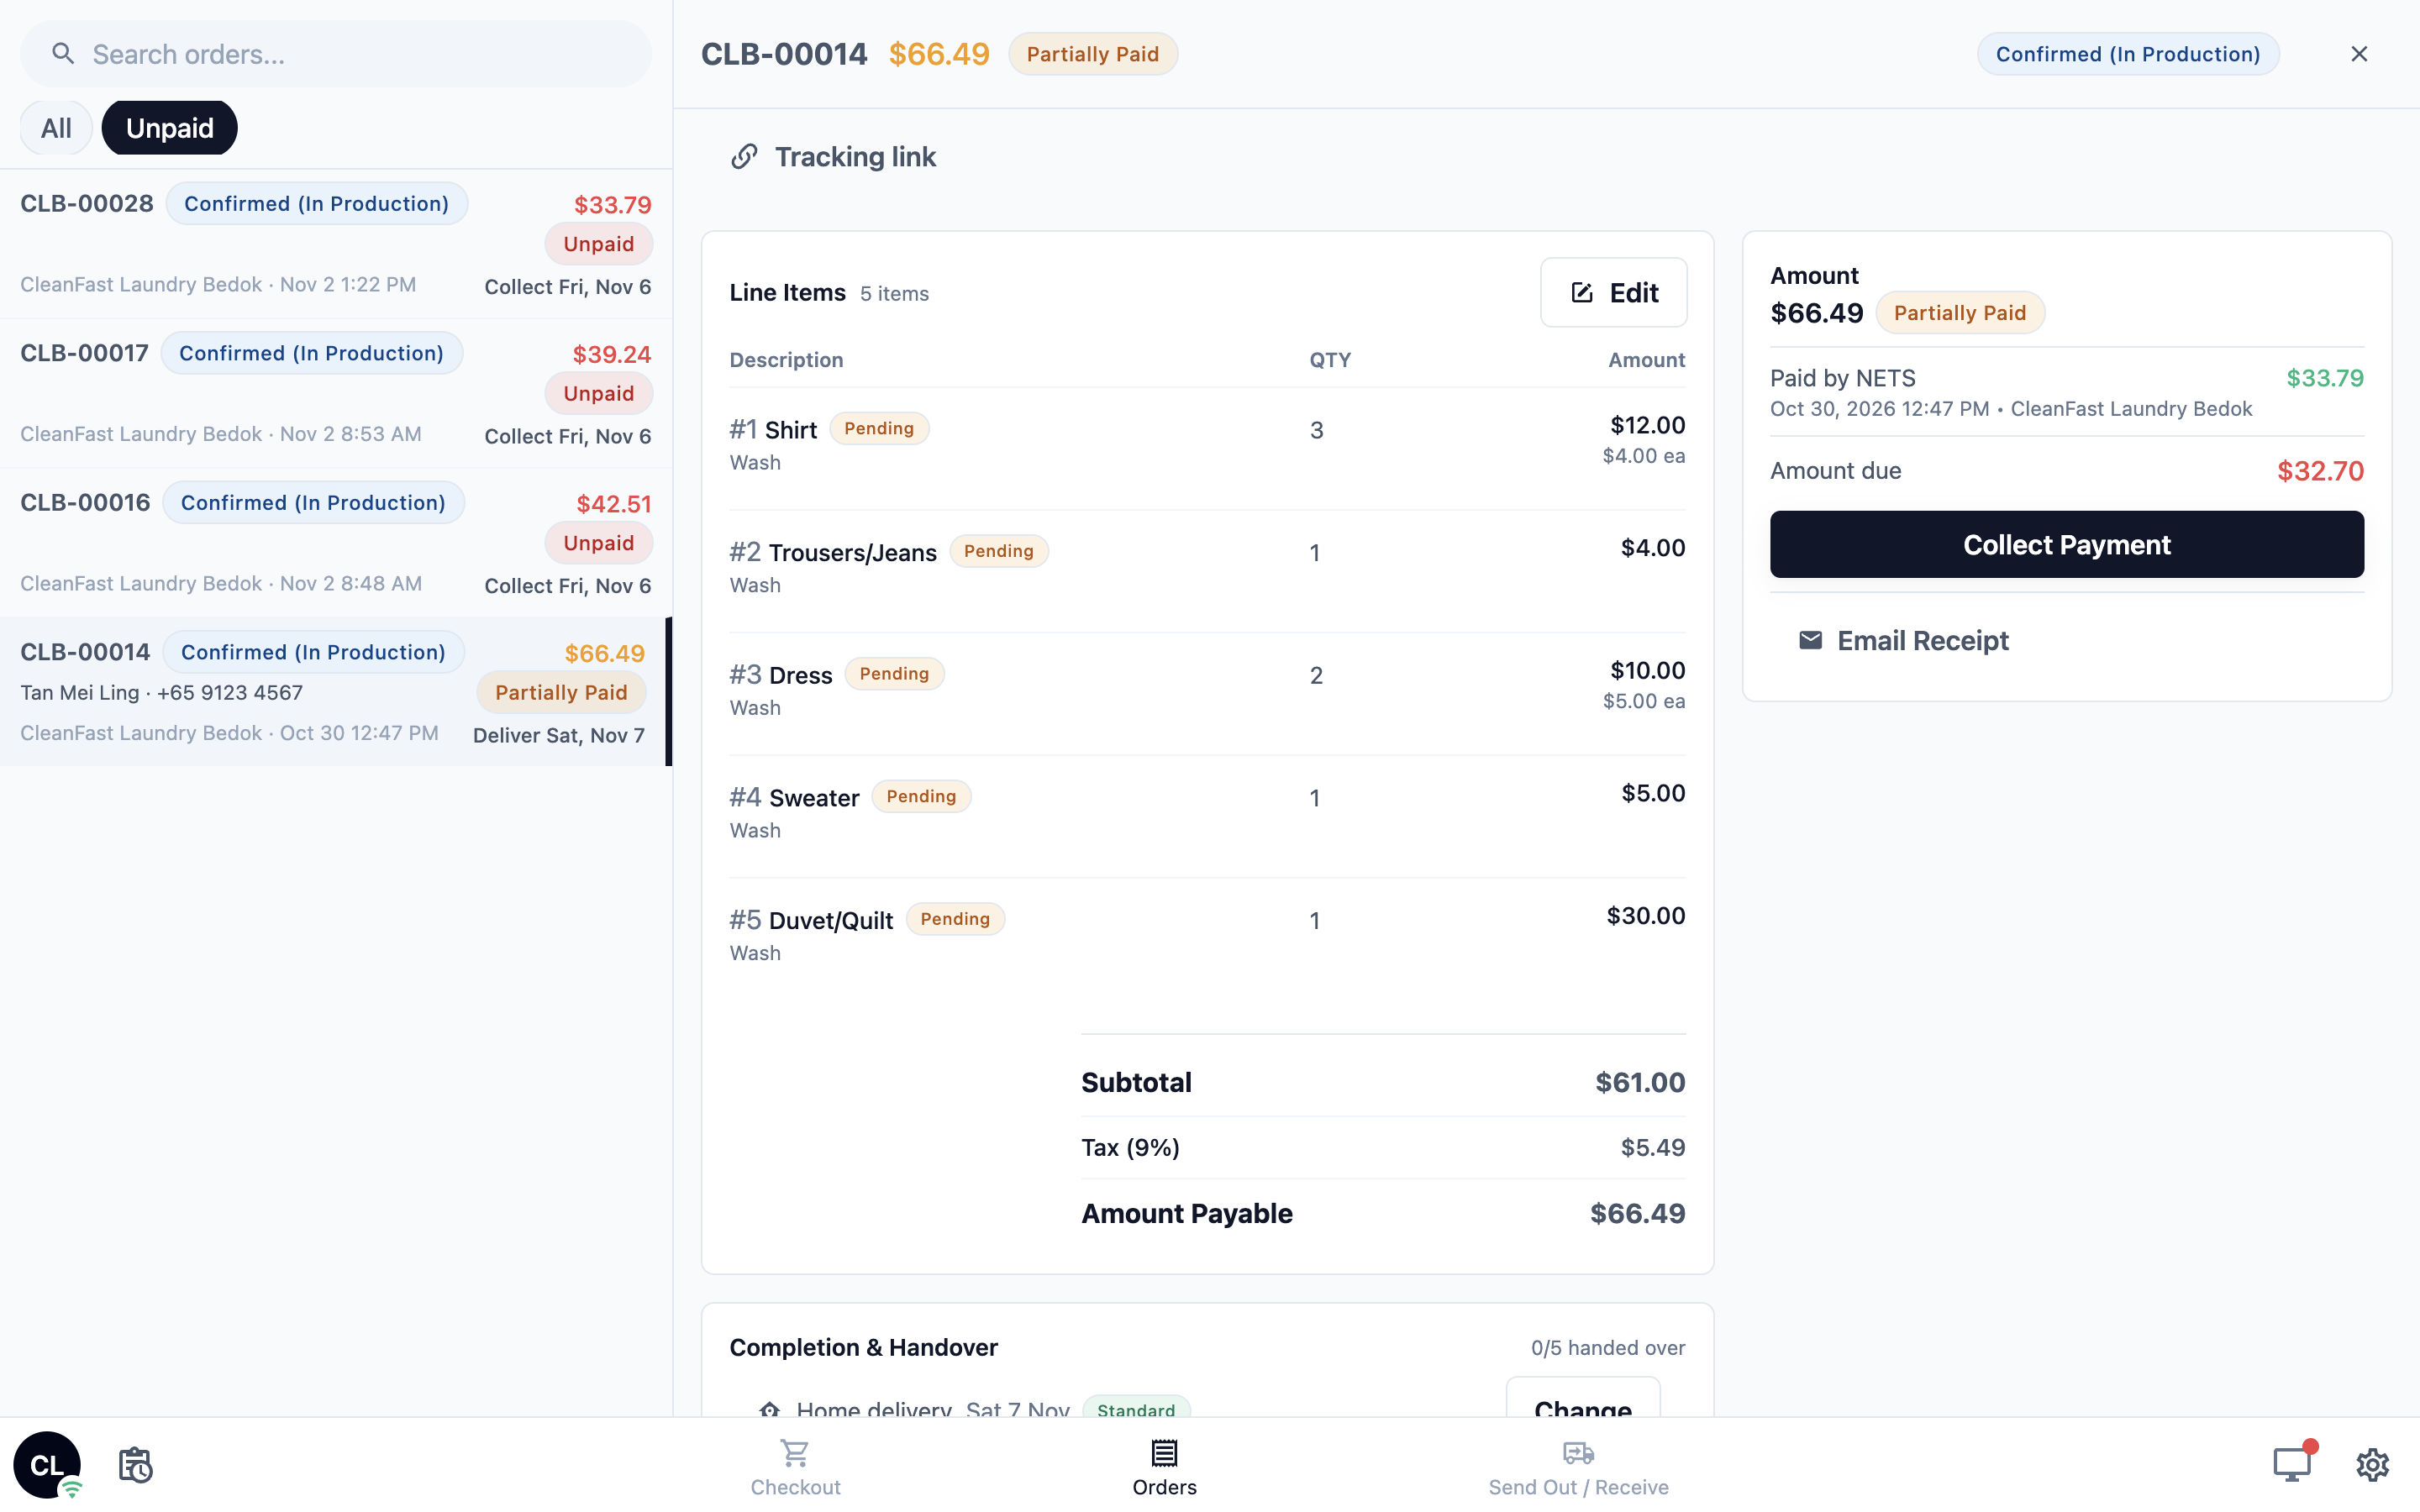
A customer who dropped off at Jurong comes to Tampines. Staff type her phone number in the search, tap her order, and see its items, payment and handover steps.
---
## How it works with other features
- **Pay later:** orders made with Pay Later on the Checkout page land in the **Unpaid** tab, so staff take payment when the customer collects. See [Setting Up the Checkout Page](/docs/setting-up-the-pos-checkout-page).
- **Taking payment:** the payment methods staff see when collecting a balance come from your Payment feature. See [Setting Up Your Payment Methods at POS](/docs/setting-up-your-payment-methods-at-pos).
- **Cards:** the order card, line item card and work order card are shared. If you edit a card in **Settings › Cards**, every page that uses it changes too.
---
## FAQs
**Staff can't find an order taken at another shop.**
> Without a search, the list shows only this shop's orders. Turn on **Search all sales channels** in the Order List row and publish. Staff then find any shop's order by searching its number, the customer's name or phone.
**Can I rename the All tab?**
> Yes. Open the tab under **Order tabs** and type a new **Tab name**. It still shows every order, because it has no filters.
**Staff can't see the photos they took.**
> Check that the **Photos** section is on under **Sections** in the Order Detail row, and that you published. Turning Photos off only hides it; the photos already taken stay with the order.
**Why can't staff refund a return?**
> **Refund Mode** in the Payment section is Disabled, or set to Same Day Only and the payment was taken on an earlier day. Choose Unrestricted if staff should refund at any time. See [Processing Refunds and Returns](/docs/processing-refunds-and-returns).
**Do Online Store orders show on the Orders page?**
> Online Store orders belong to your Online Store sales channel, so a shop's list doesn't show them unless they were sent to that shop for collection. With **Search all sales channels** on, staff find any Online Store order by searching.
**If I turn a section off, does it change past orders?**
> No. Sections only change what staff see when they open an order. Every order keeps its items, payments, photos and notes, and they show again when you turn the section back on.
---
## What's Next
You have set up how staff find orders and what they see when they open one. Next, if you send work to a factory or workshop, set up how staff send orders out and receive them back in [Sending Orders to Your Factory and Back](/docs/setting-up-send-out-and-receive-at-the-pos).
All work done in your shop? Skip to [Tracking Stock at the POS](/docs/set-up-inventory-tracking-on-your-pos). If you also don't sell stocked items or chat with customers on WhatsApp at the counter, go straight to [Setting Up Payment Methods at the POS](/docs/setting-up-your-payment-methods-at-pos).