Your Tampines counter shows Laundry and Bag Repair side by side, asks staff for the customer before every sale, and lets regulars pay when they collect.
## Before You Start
- **Your POS app:** you need a POS app with a Checkout page. A Service POS app has one already. See [Creating Your POS App and Using the Editor](/docs/create-your-pos-app).
- **Something to sell:** at least one business unit needs a price list or catalog. Without one, the catalog on the POS is empty. See [Setting Up Your Business Unit Catalog](/docs/setting-up-business-unit-catalog).
- **Access:** you need a Console login that can manage the Point of Sale.
If you set this up before: the customer setting has moved out of Cart into its own **Contact** row on the Checkout page, and the cart item look now comes from a card in **Settings › Cards**.
## Overview
The Checkout page is where your staff take every new order. Your items show on the left, and the cart with the Charge button shows on the right. You decide which business units staff can sell from, how the items look, whether staff must pick a customer, and which buttons the cart shows. Most shops can keep the standard settings and change only two or three. Every change waits for Publish, so nothing changes at the counter until you are ready.
**Where it works**
- **Console:** you choose the Checkout page settings in the POS app editor and see them in the live preview.
- **POS:** your staff see the catalog and cart on the Checkout tab of every device signed in with this app.
Checkout is not a Pro page, so it works on Standard POS and Professional POS. Like every page type, it can be added once per app.
---
## Why set it up
A Checkout page that fits your shop saves time on every order. Staff see only the business units they sell, find items quickly, and cannot skip steps you care about, such as taking the customer's phone number. Buttons you don't use stay out of the way, so new staff make fewer mistakes.
If you leave everything as it is, Checkout still works. Staff can sell from every business unit, skip the customer, give discounts and leave orders unpaid. That suits many shops, but check the **Contact** row and **Pay later** before you go live.
---
## Where to find it
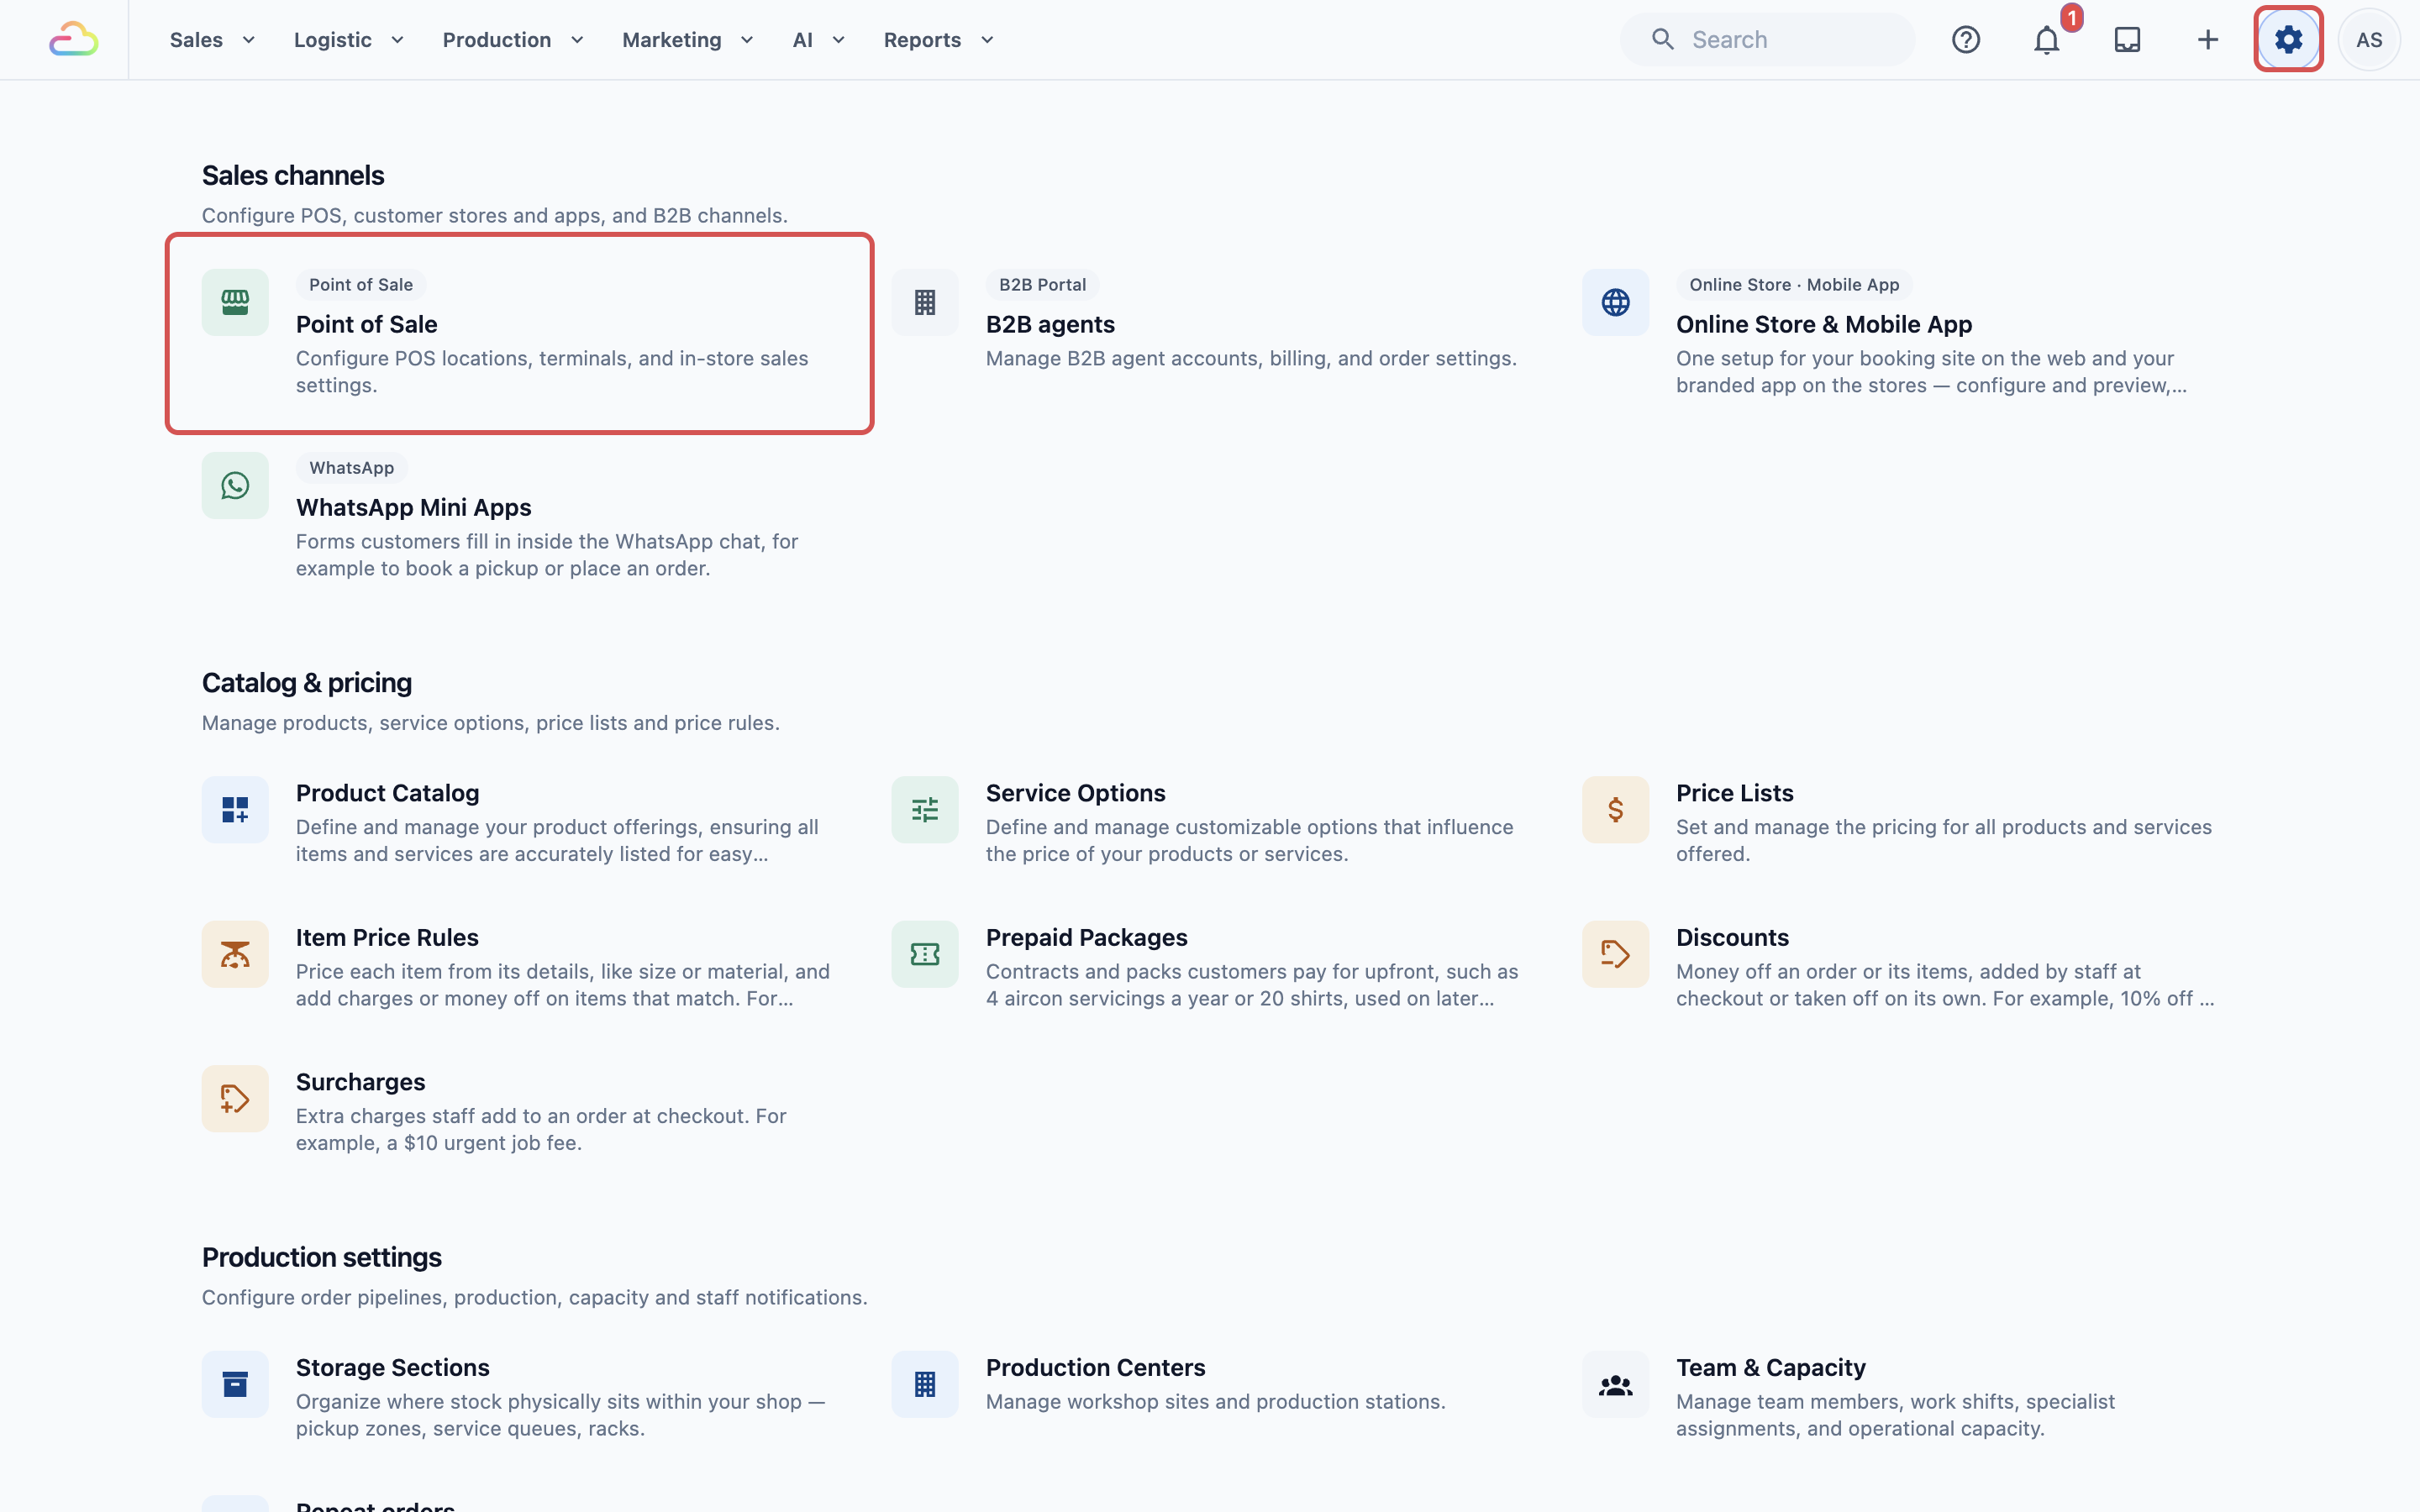
1. Click the ⚙️ Settings icon in the top-right corner.
2. Under the **Sales Channels** section, click **Point of Sale**.
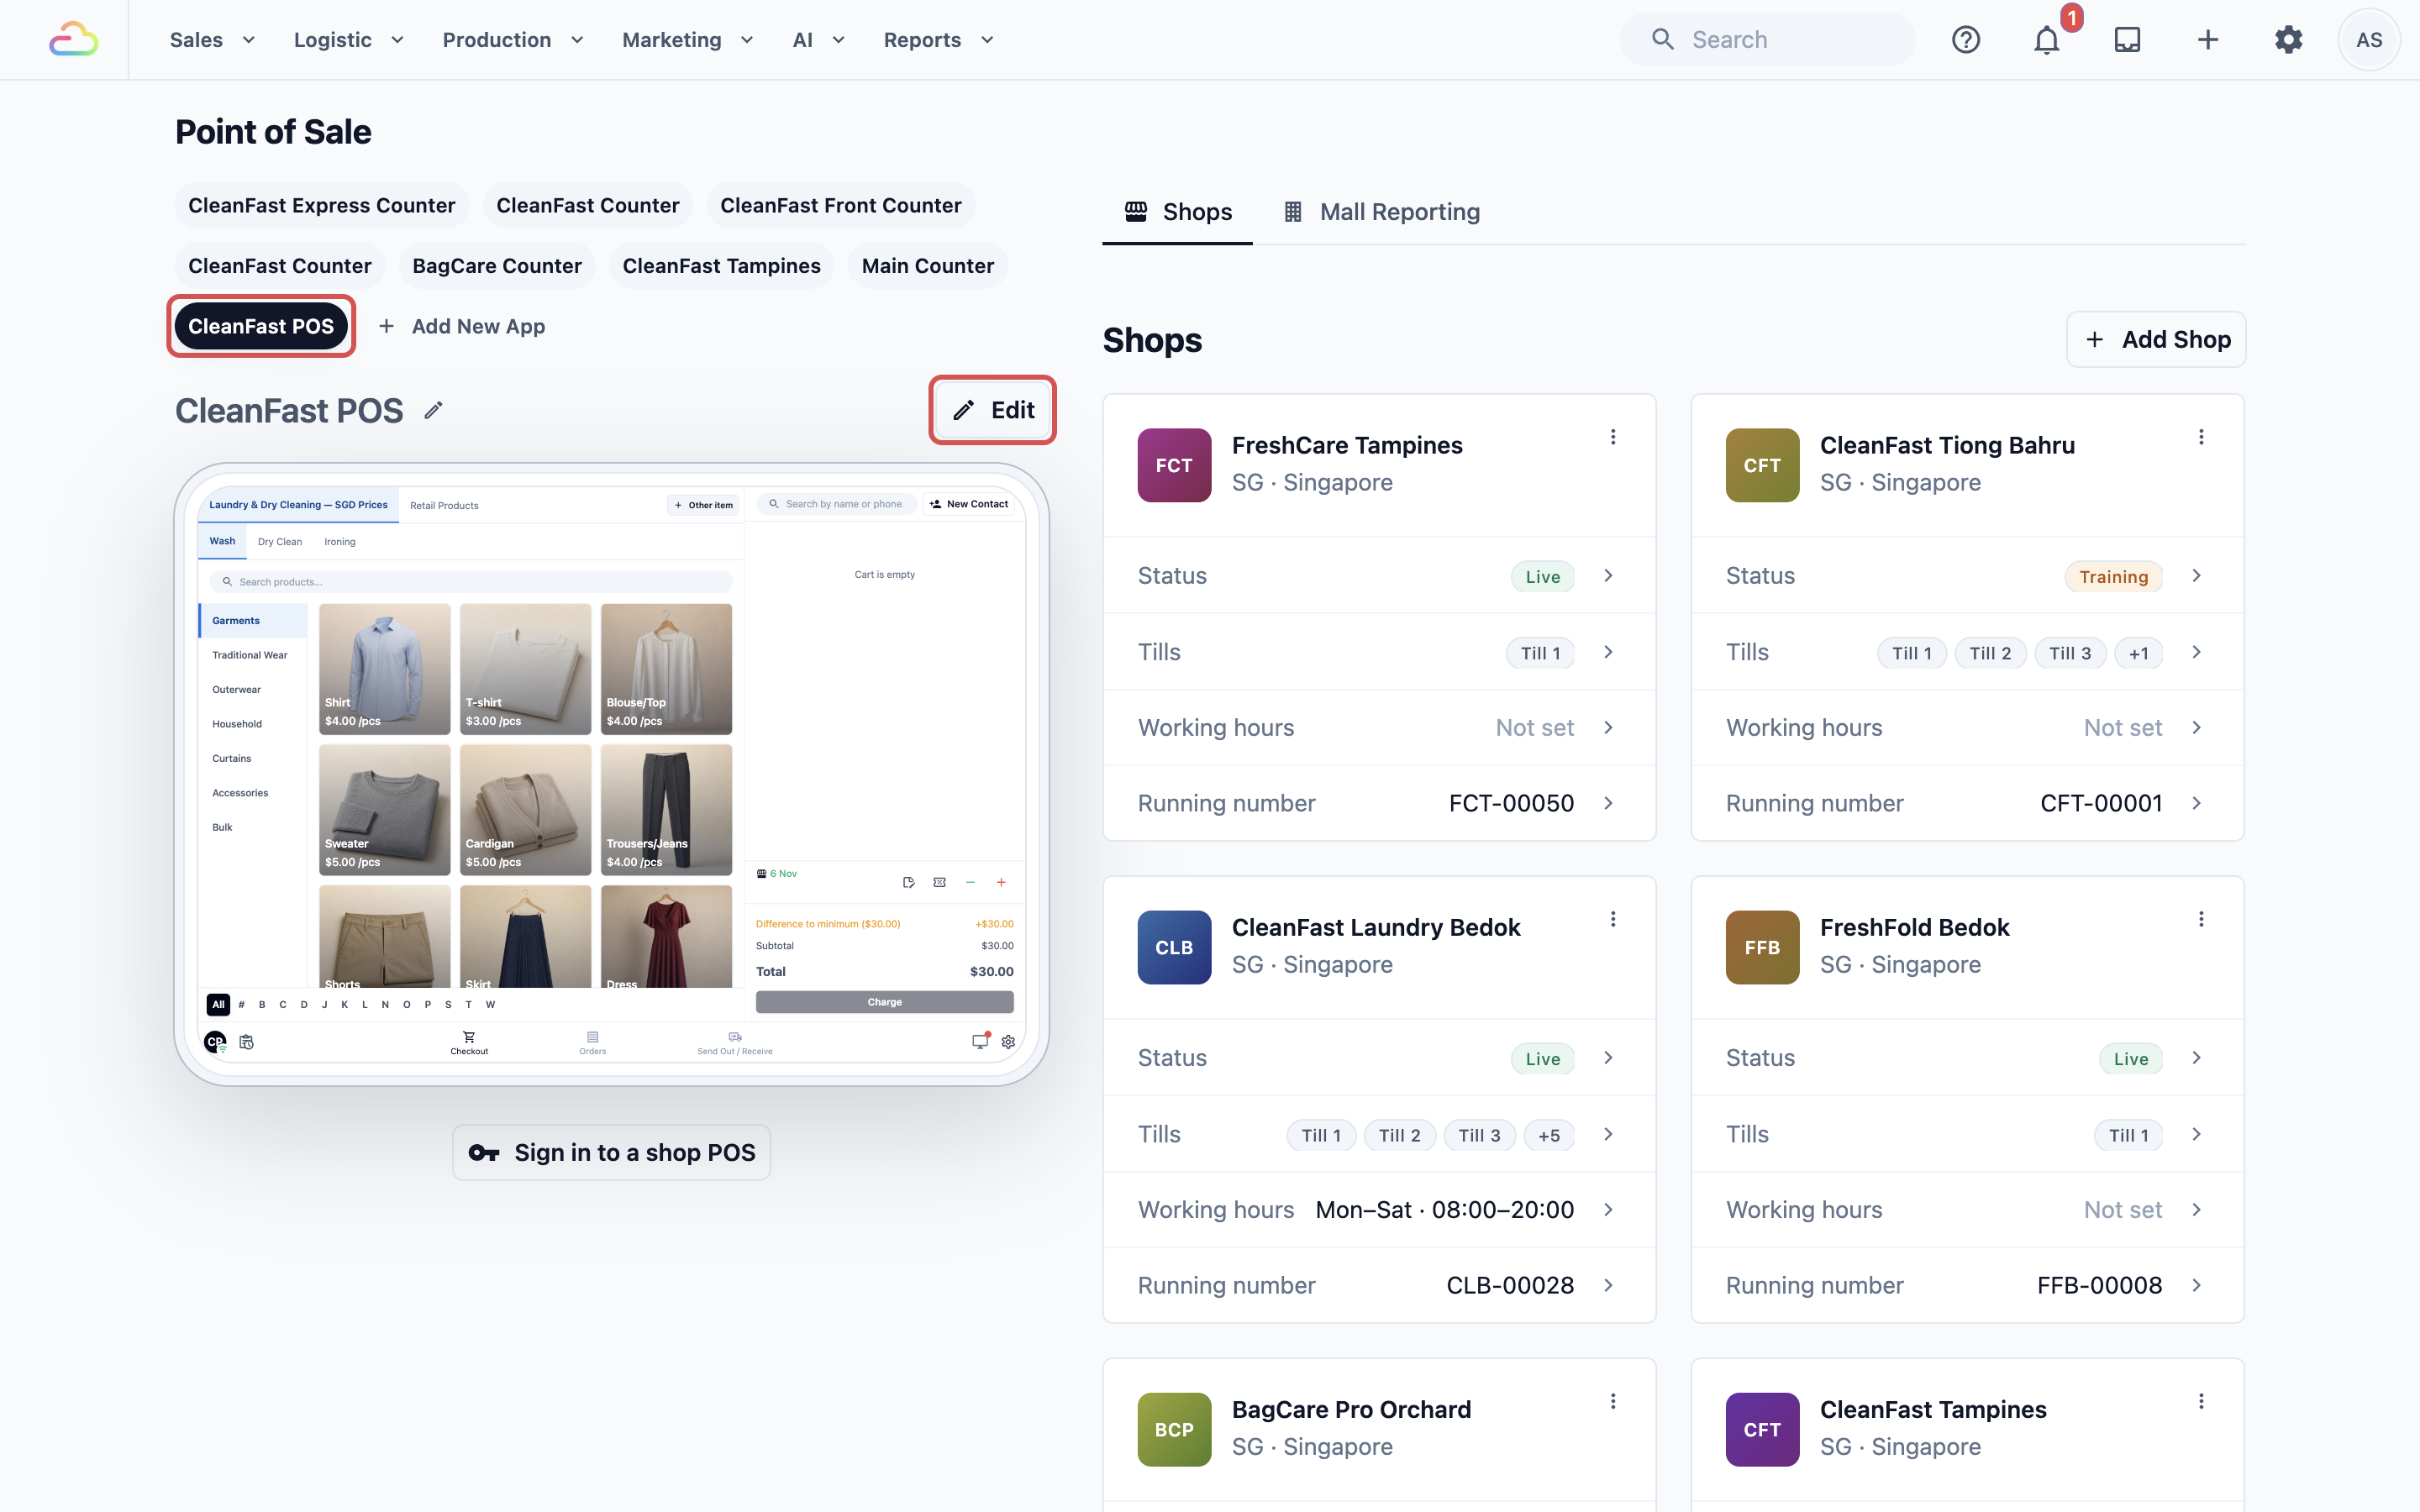
3. Under **POS Apps**, click your app, then click Edit.
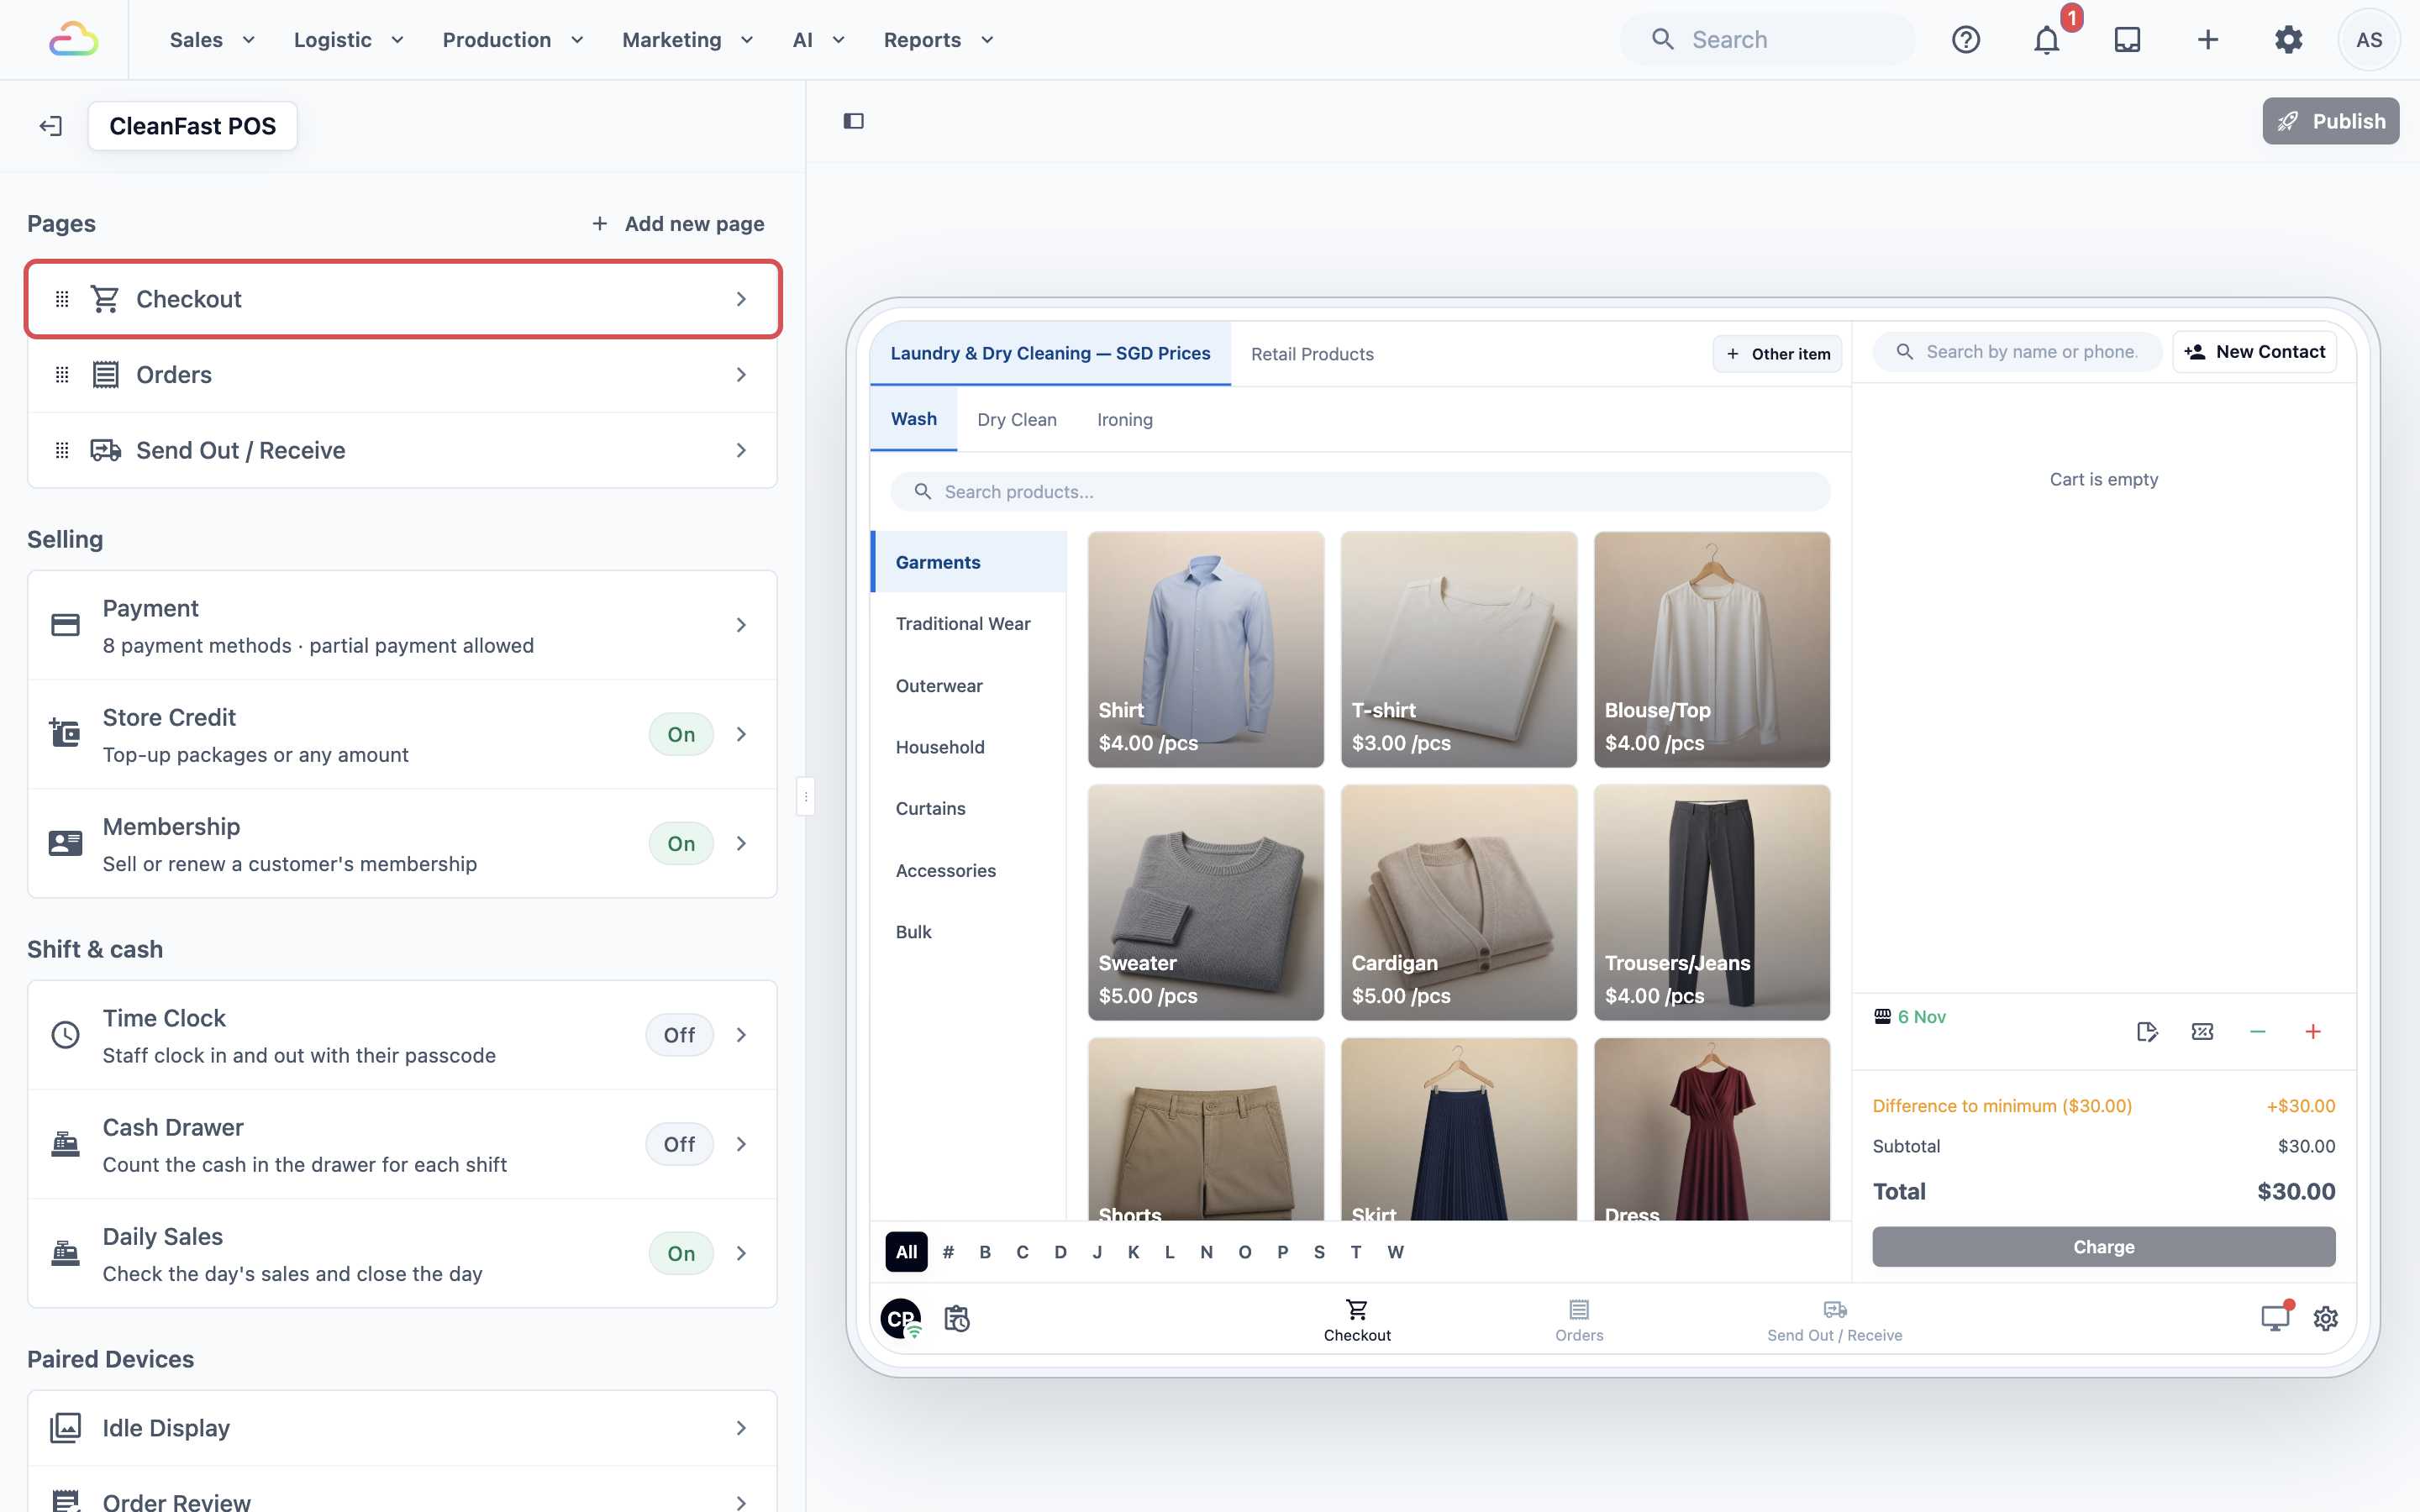
4. Under **Pages**, click **Checkout**.
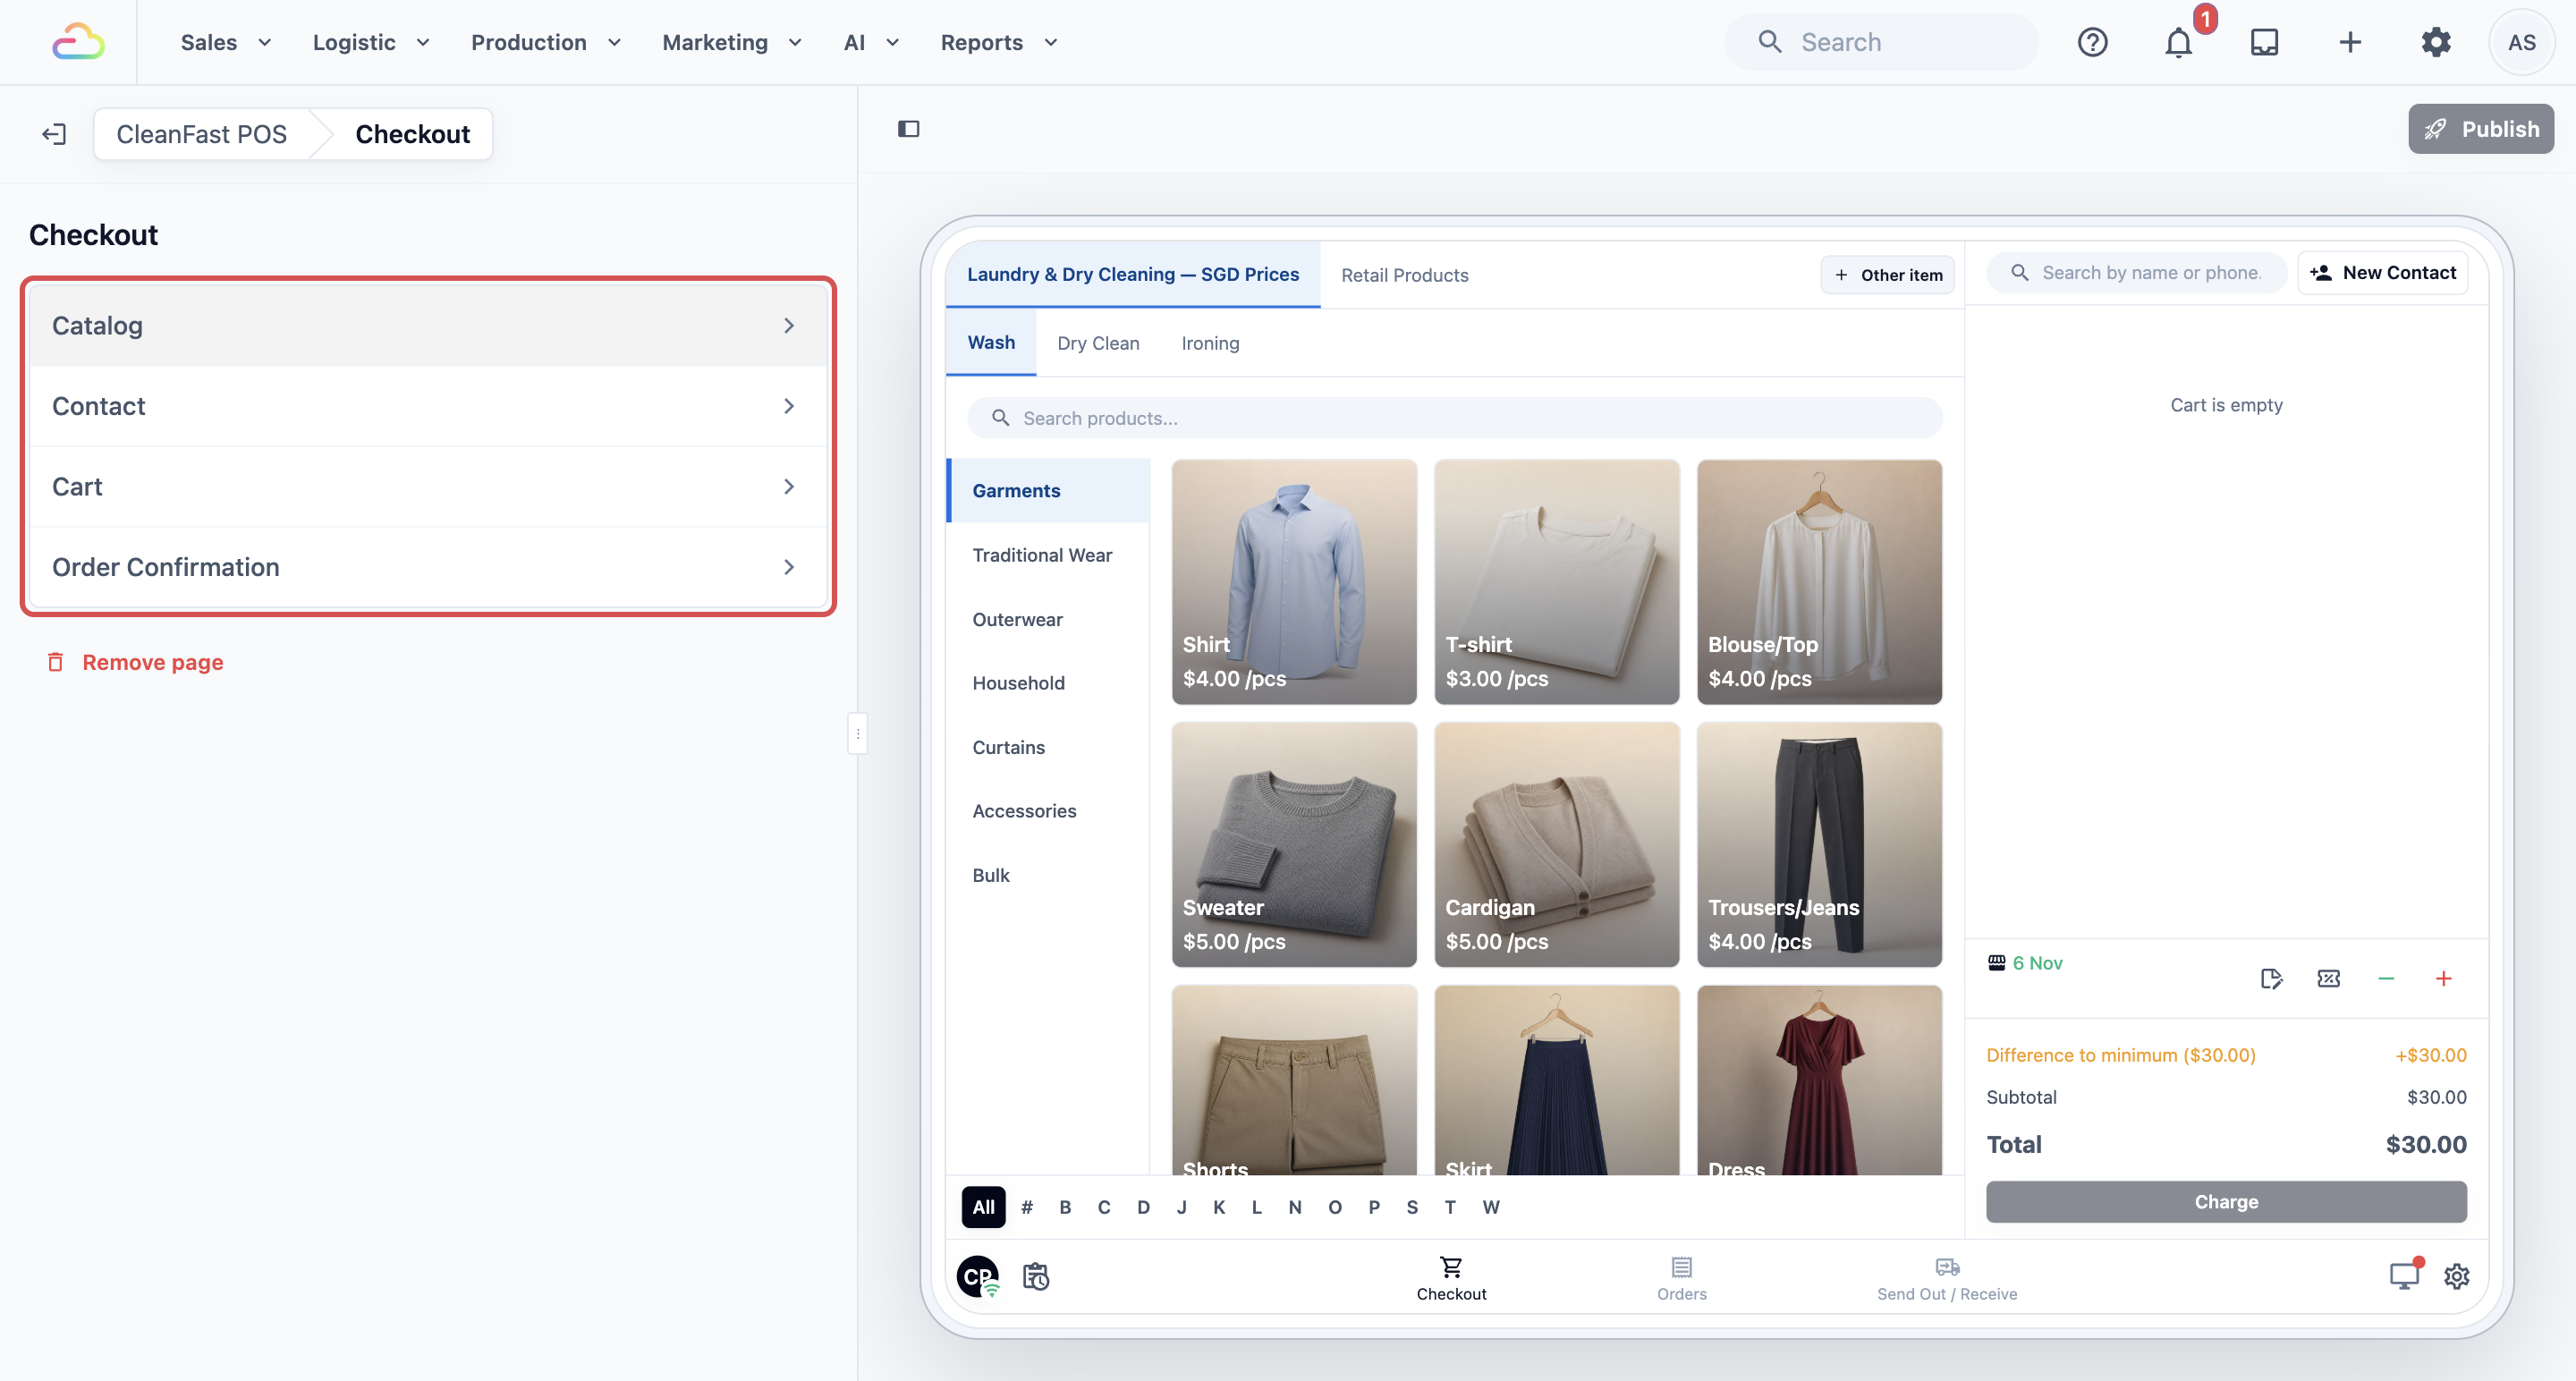
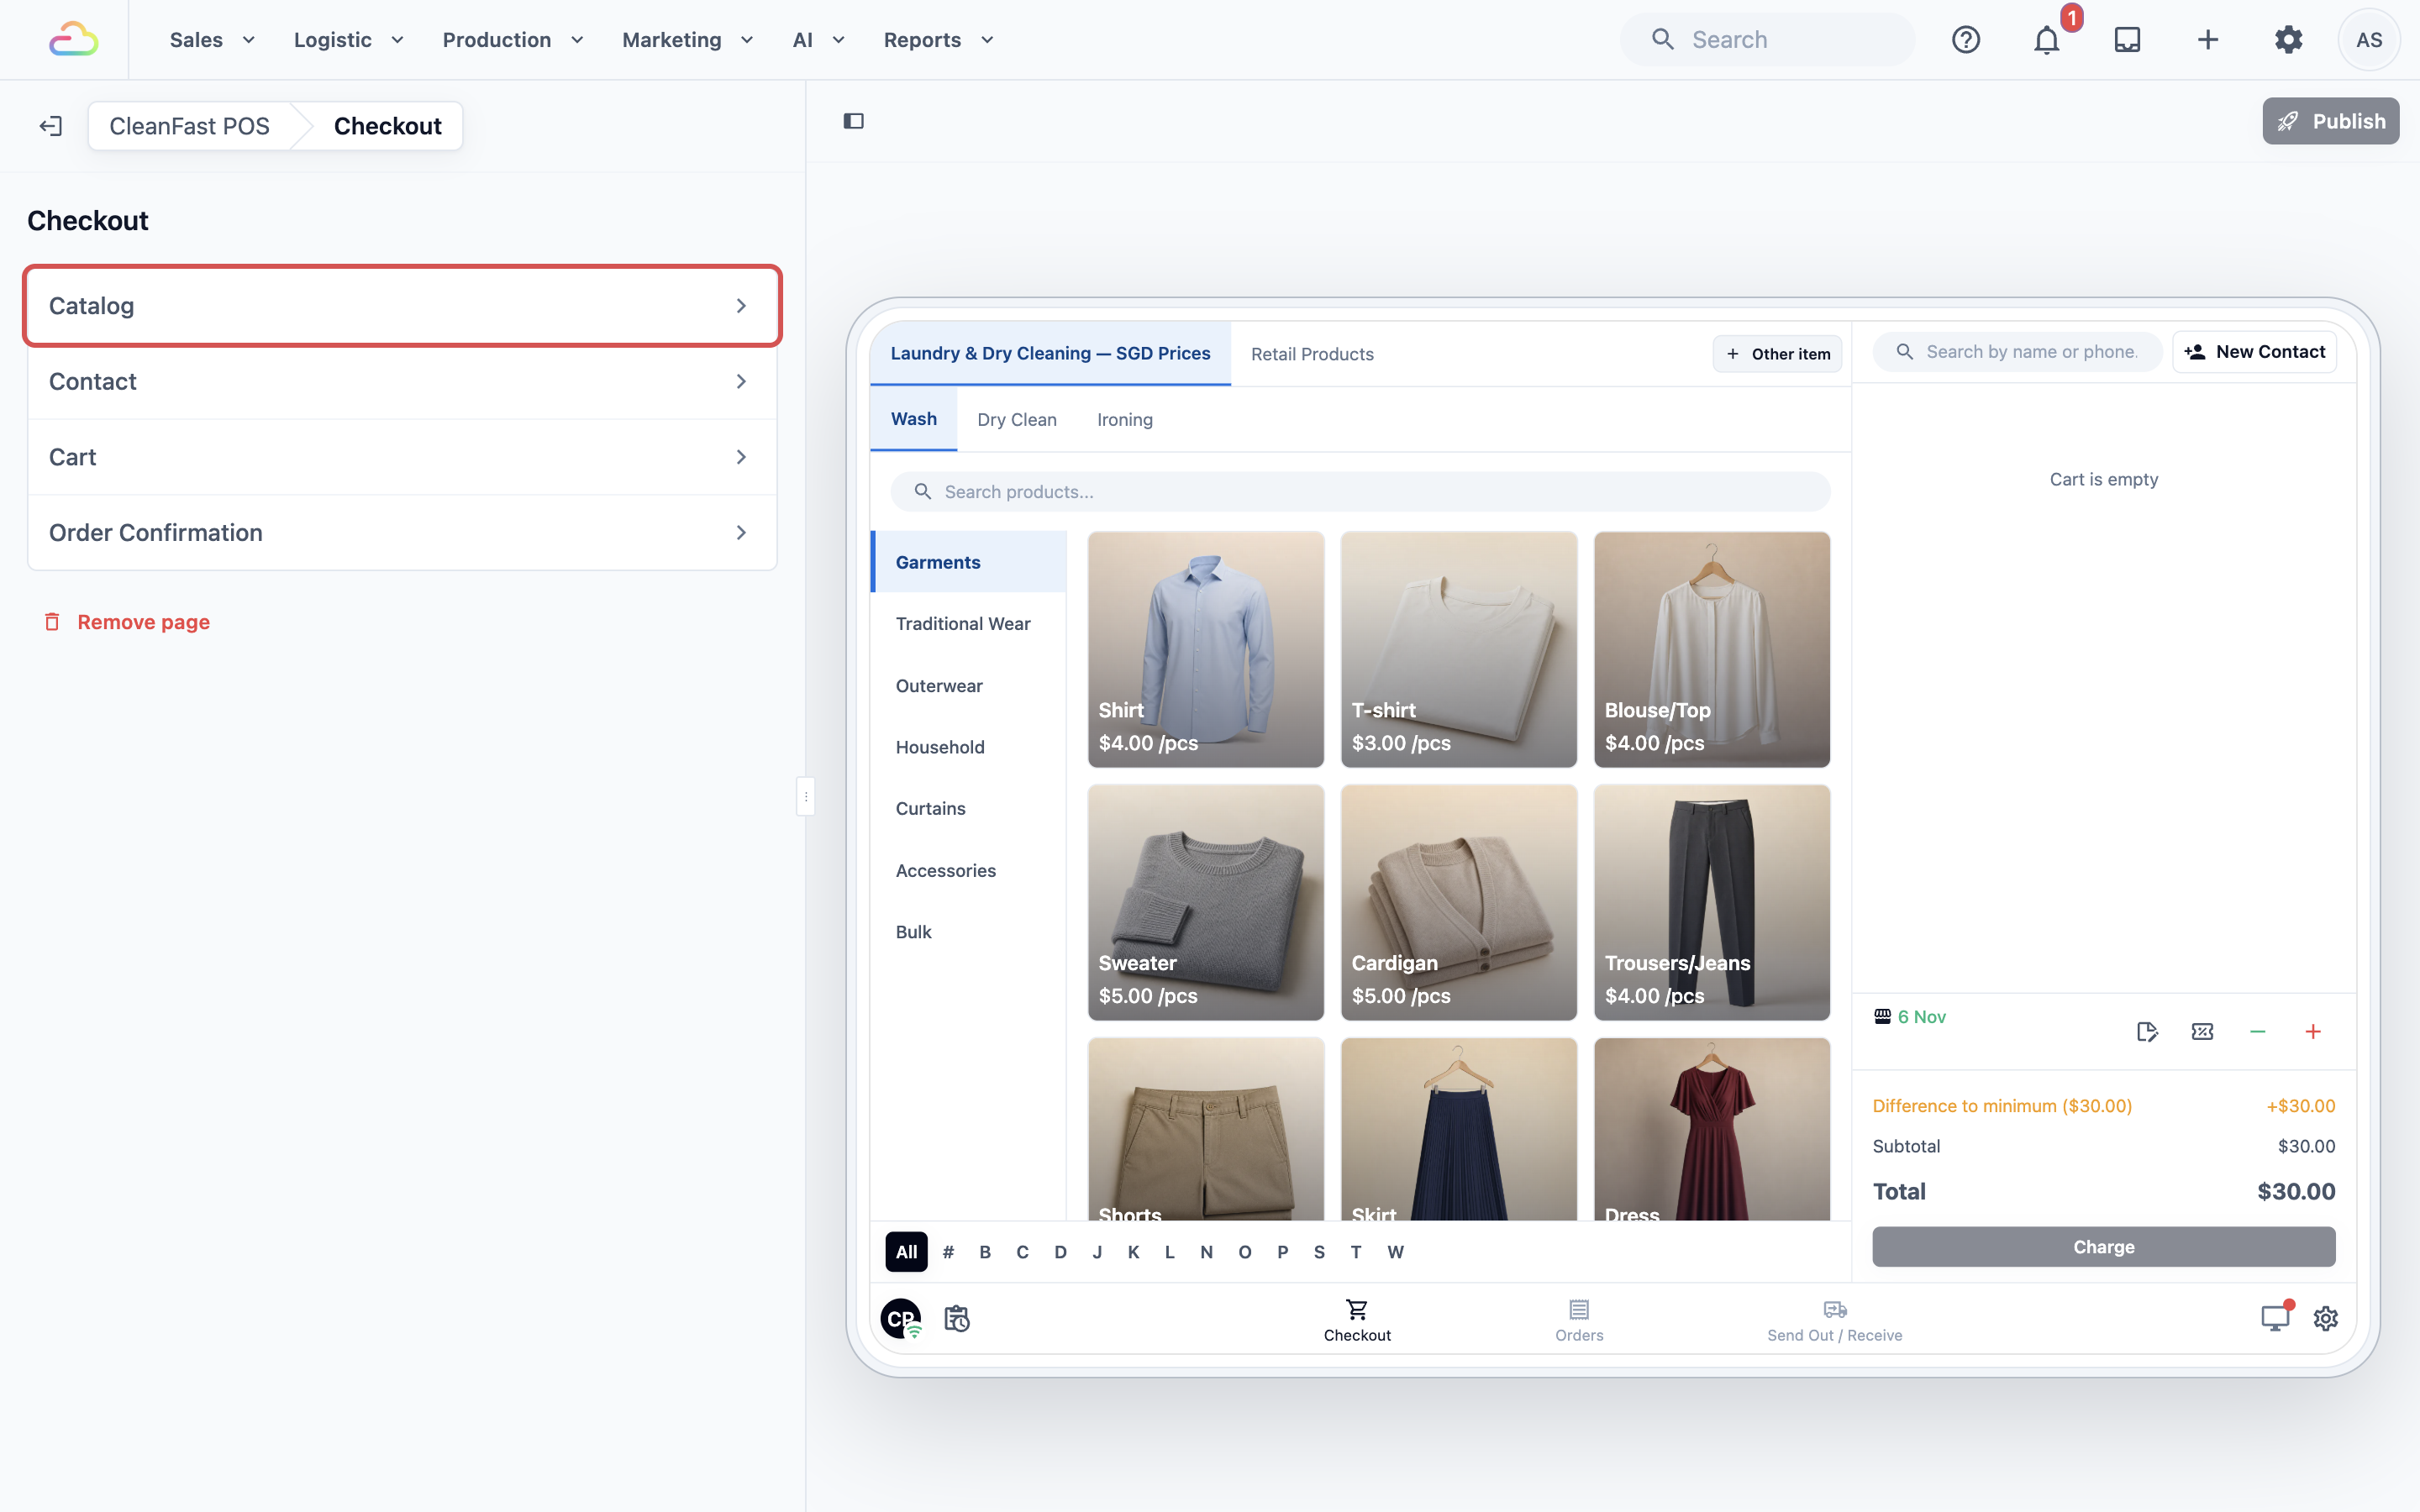
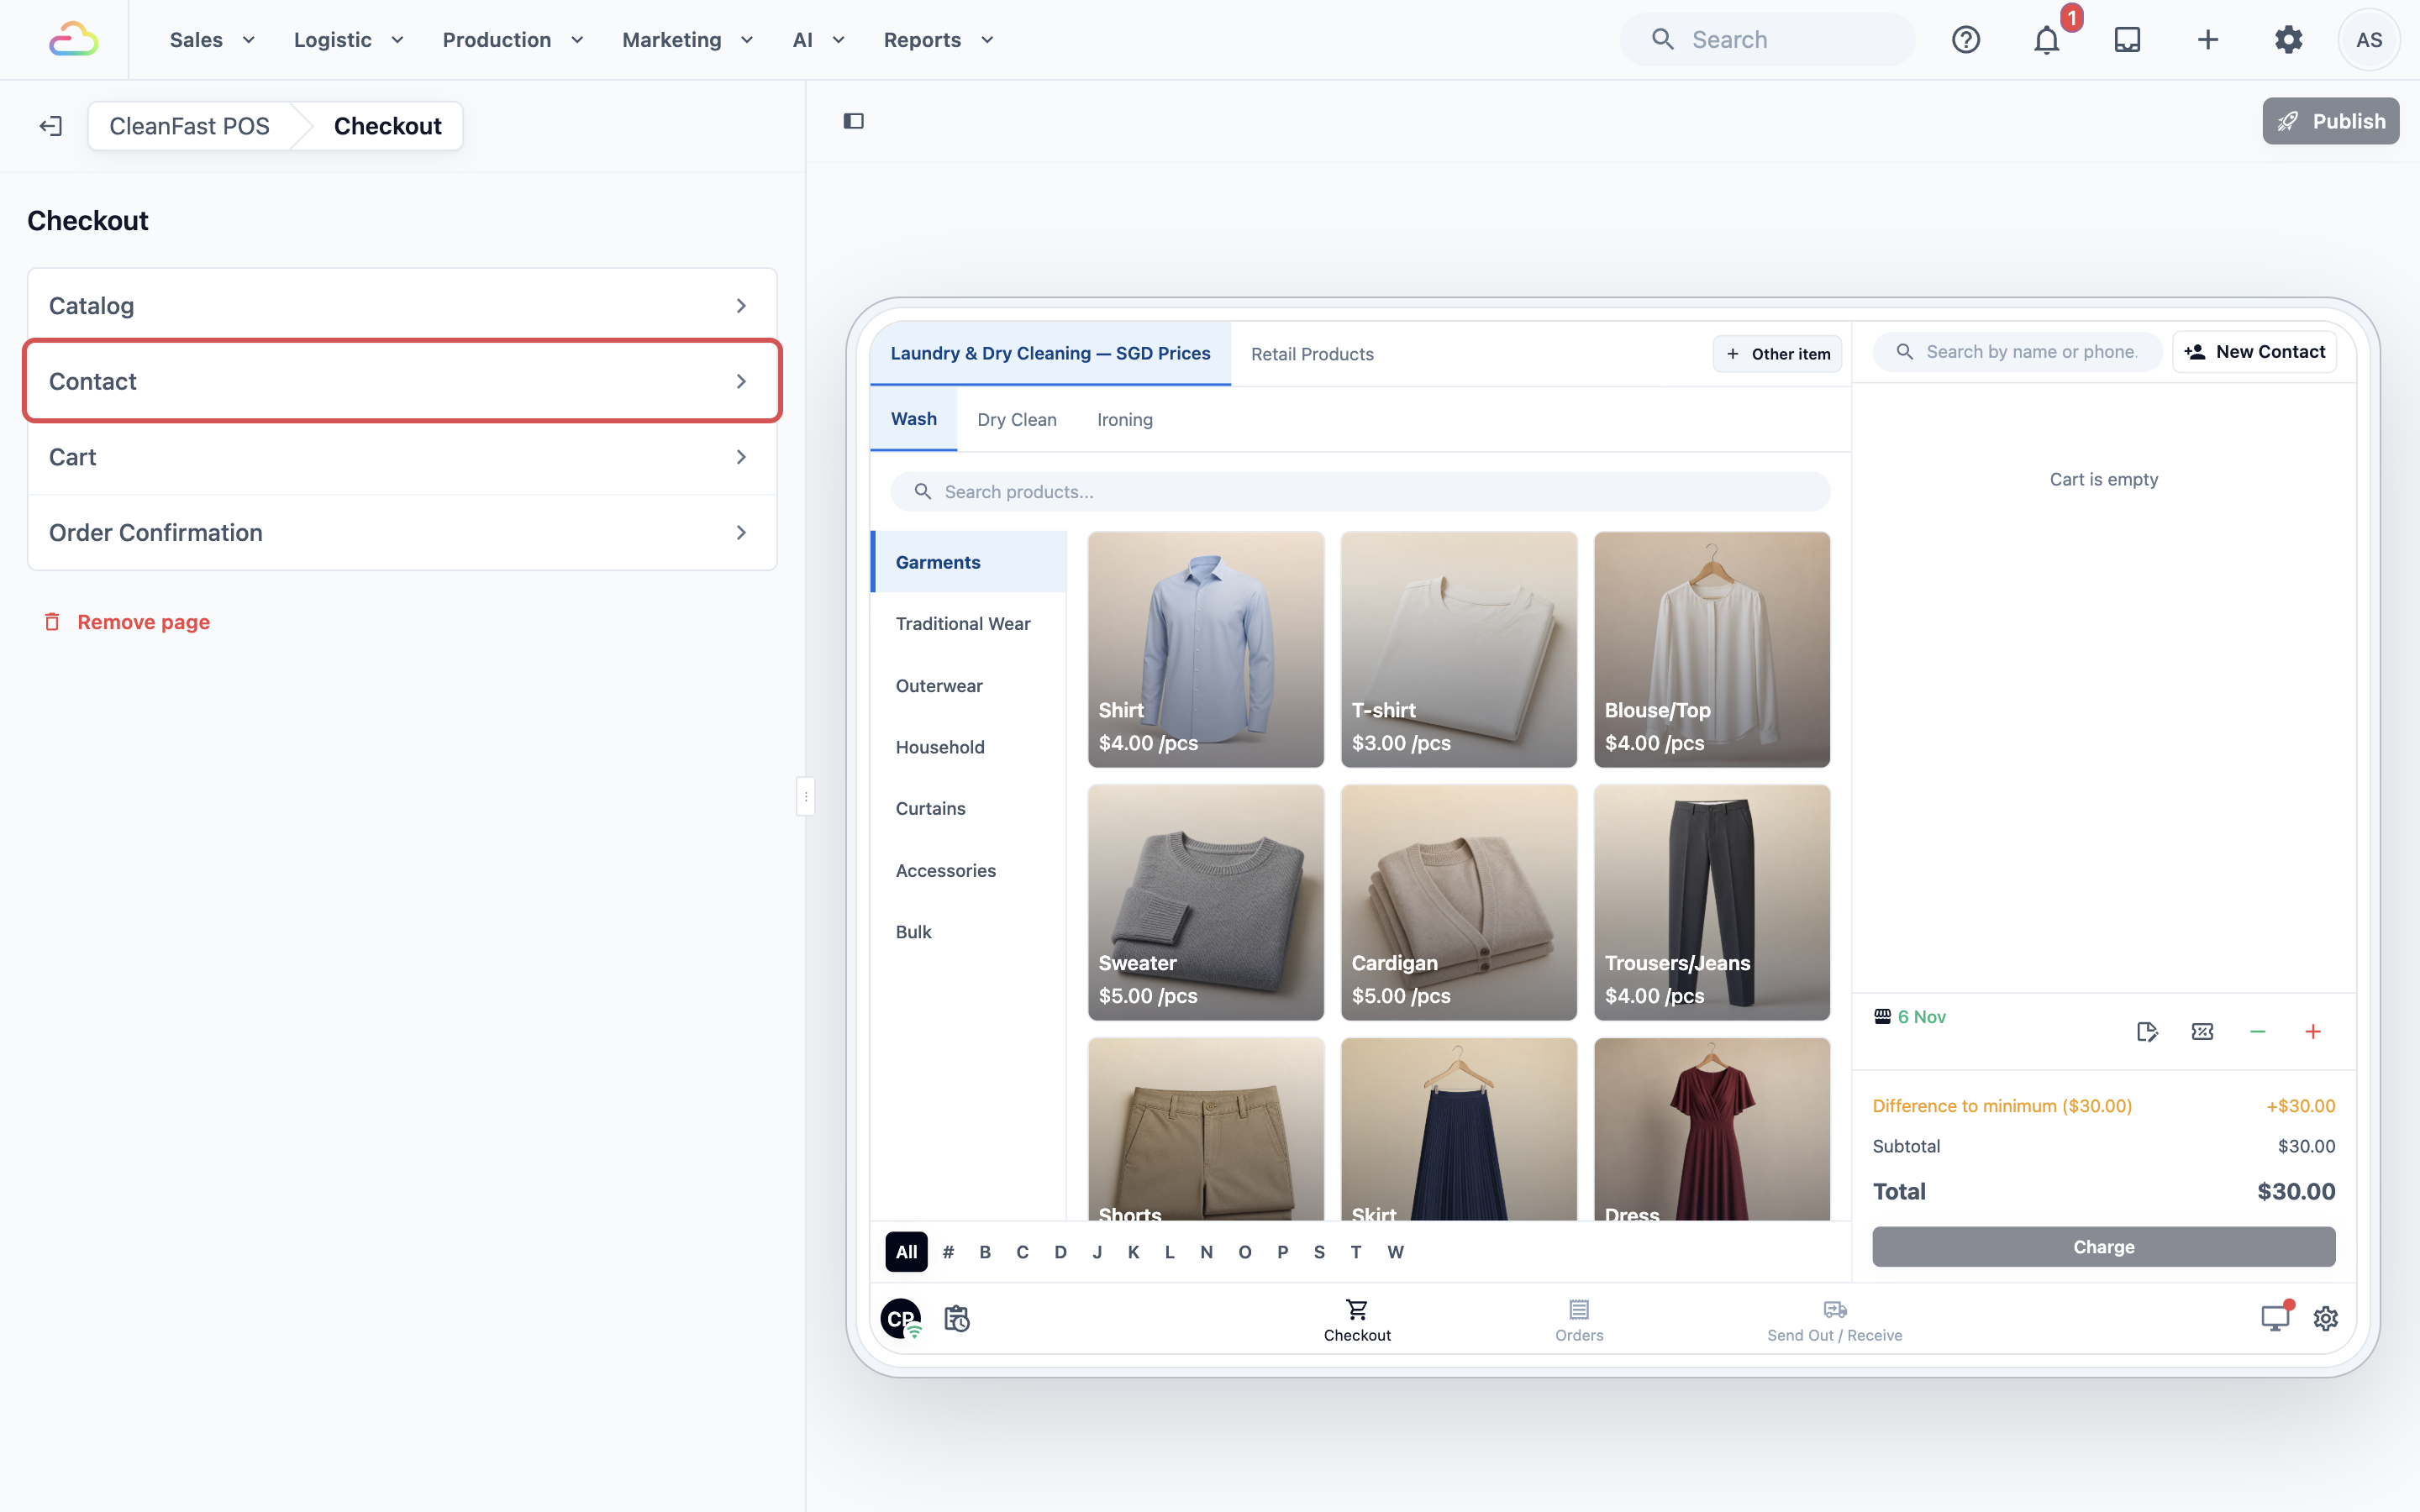
The Checkout page lists four rows: **Catalog**, **Contact**, **Cart** and **Order Confirmation**. Click a row to see its settings. The preview on the right shows the Checkout screen as staff will see it.
---
## Setting it up
### Catalog
The catalog is the left side of the Checkout screen, where staff tap items to add them to the cart.
1. On the Checkout page, click **Catalog**.
2. Choose the settings below.
3. Click Publish when you have finished all the rows on this page.
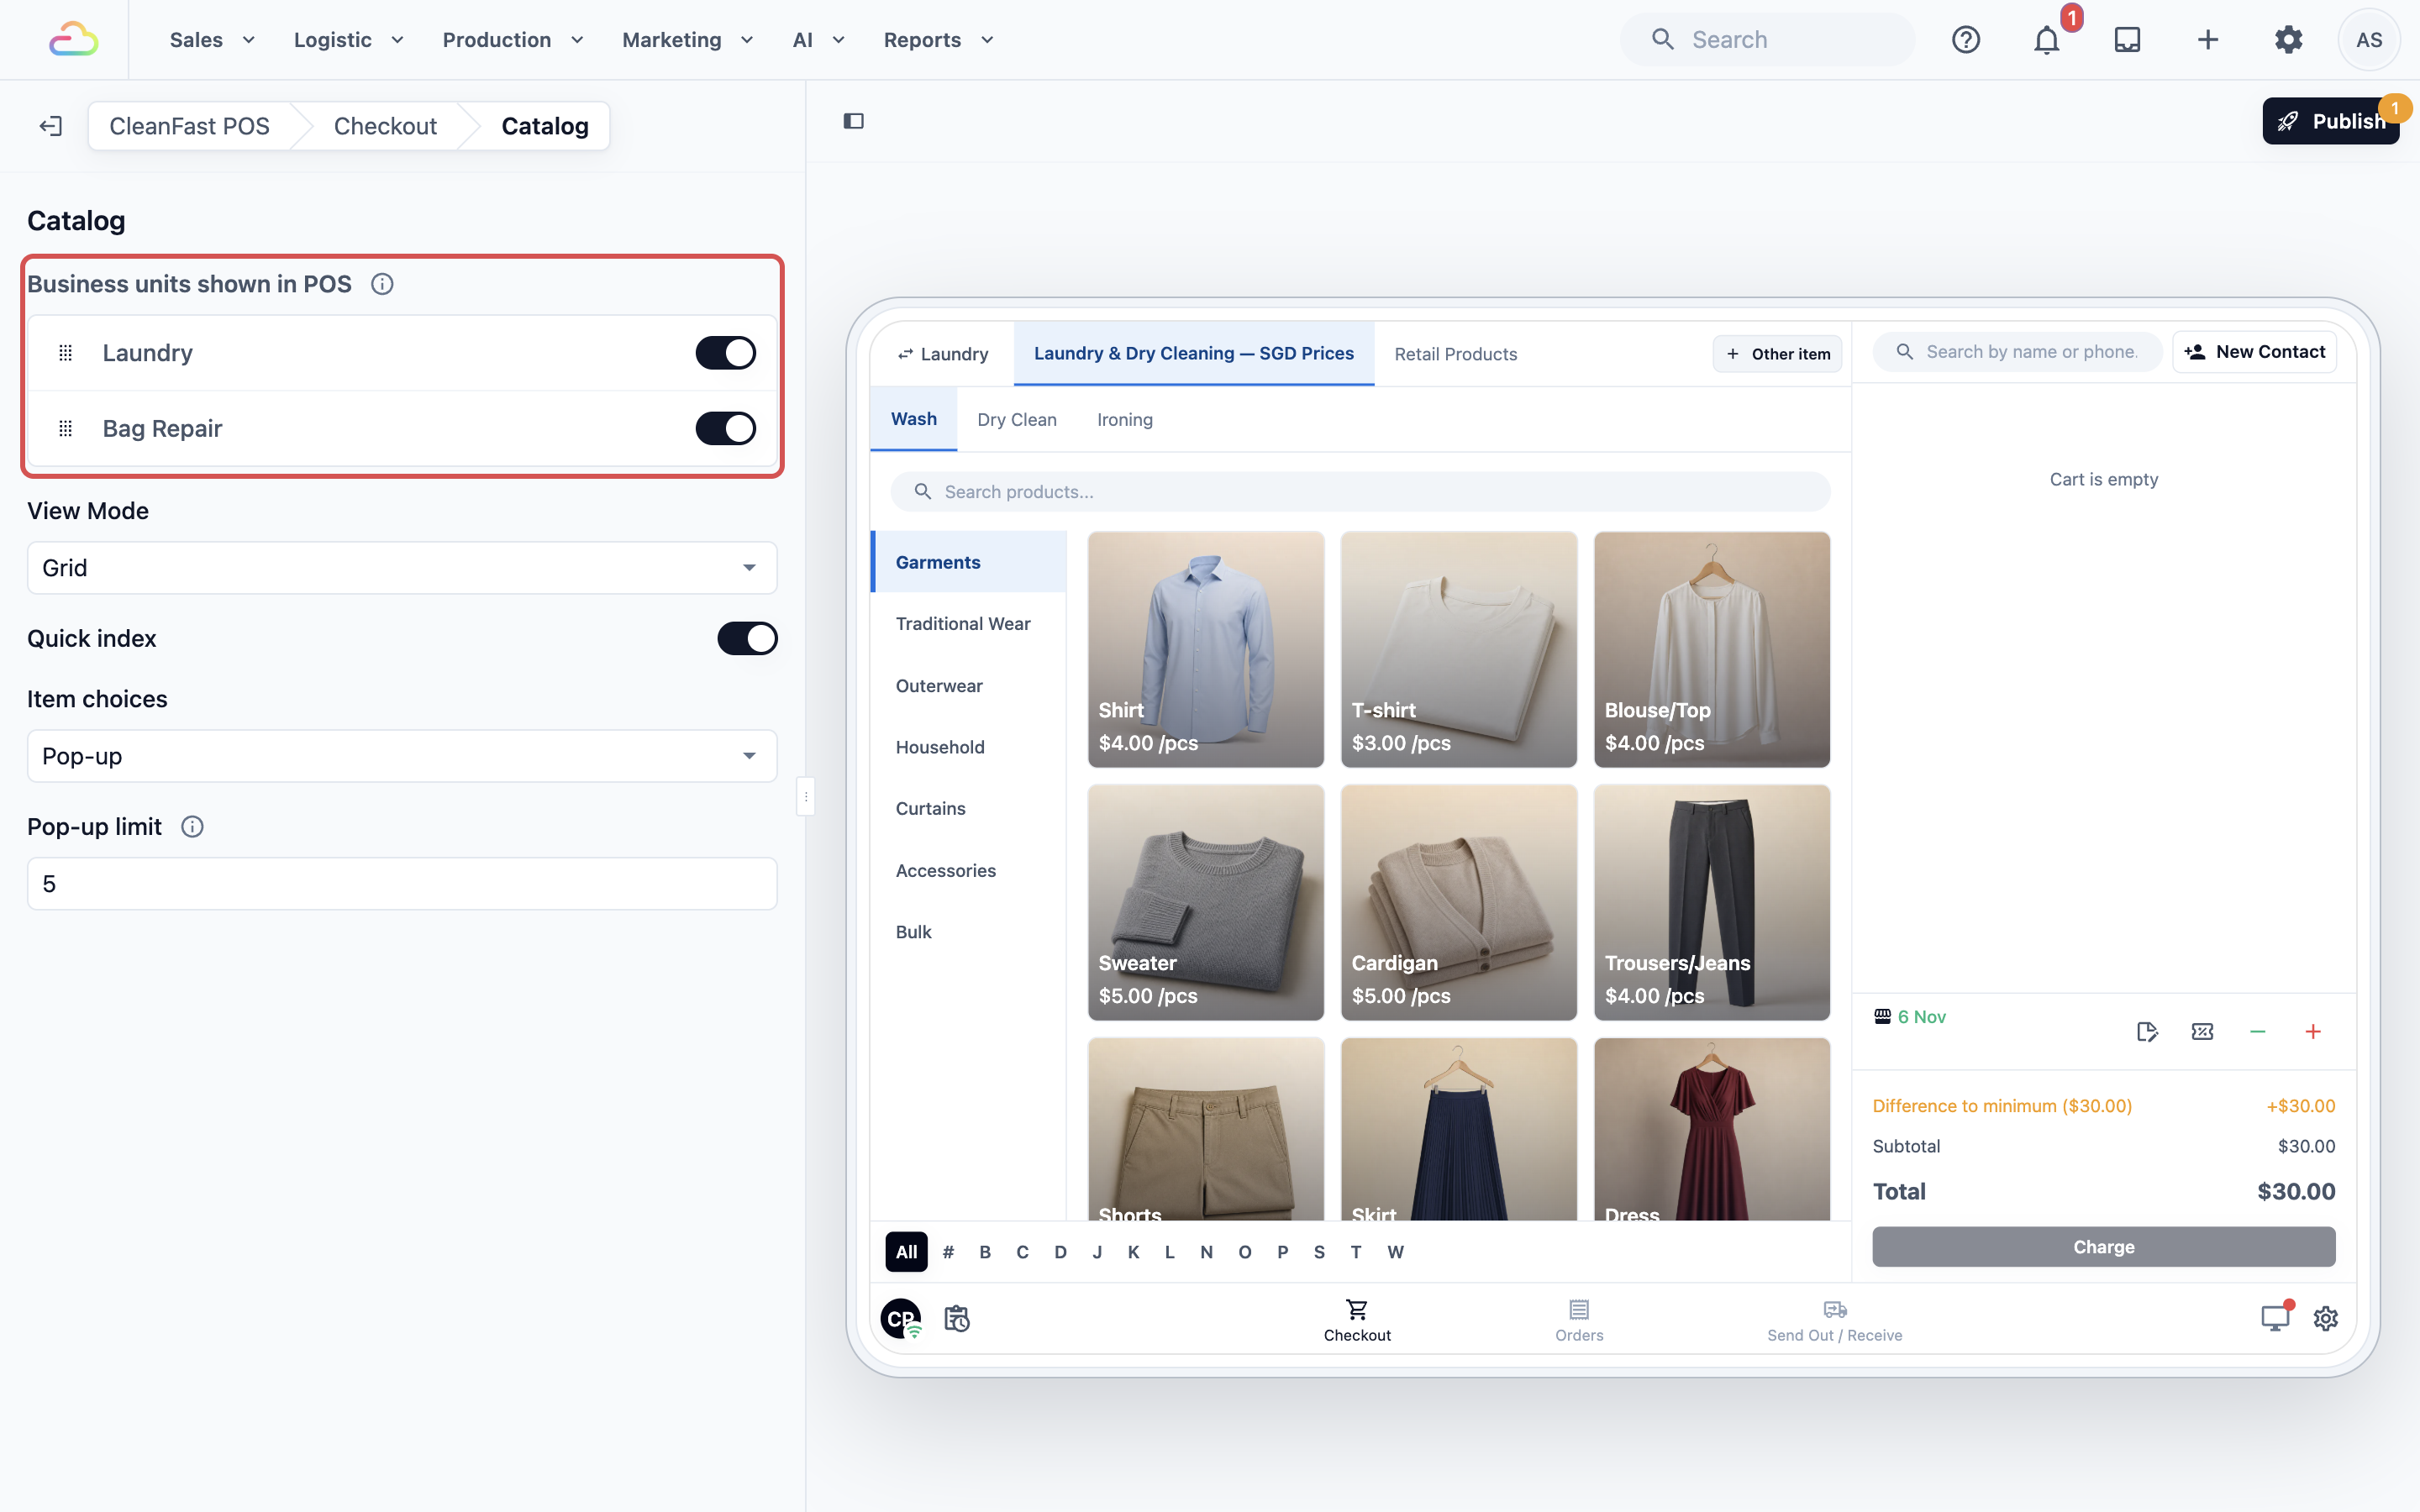
- **Business units shown in POS**
A business unit is one line of work you sell, such as Laundry or Bag Repair. Switch on the units staff can sell from at this counter, and drag them into the order staff see them. At least one must stay on, and the first one is selected when staff start a new order. To learn more about choosing units, see [Choosing Which Business Units Staff Can Sell](/docs/choosing-which-business-units-staff-can-sell).
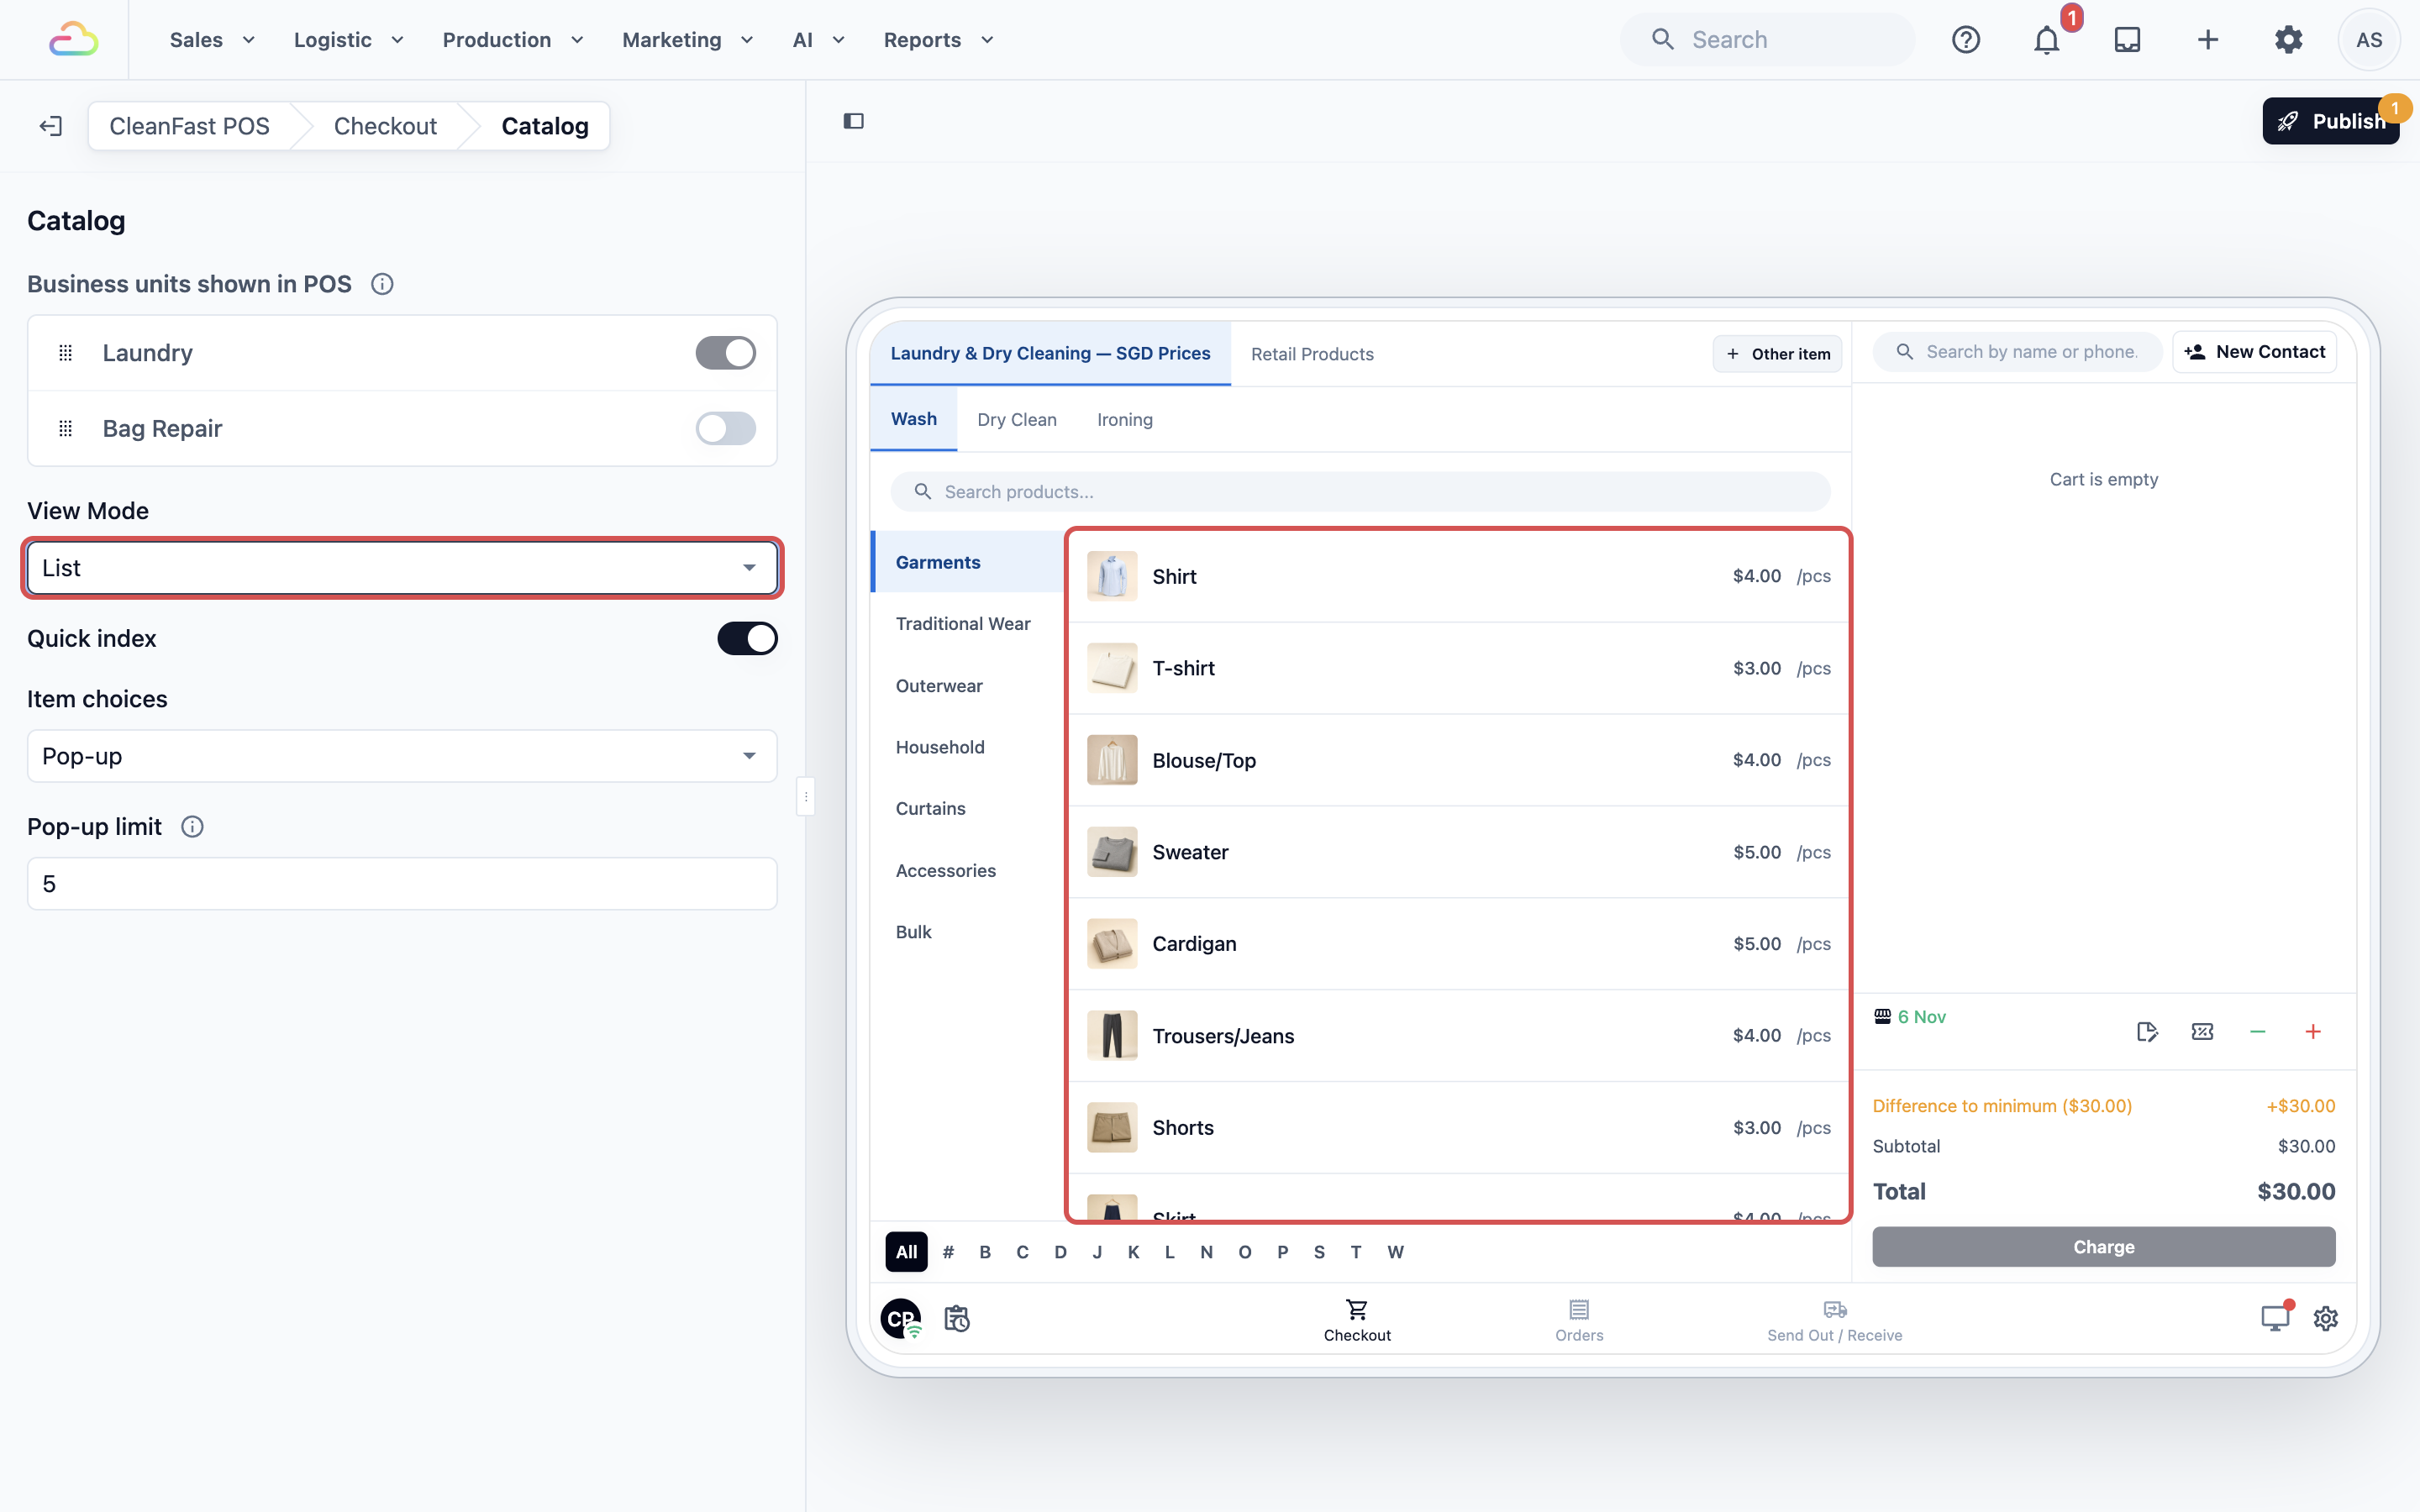
- **View Mode**
| **Option** | **What staff see** |
| --- | --- |
| Grid | Items as picture tiles. Best when your items have photos and staff like to tap by picture. |
| List | Items in a scrolling list. Best for long price lists with many similar items. |
Choose an option and watch the preview on the right. Here View Mode is set to List, and the items in the preview change from picture tiles to a list.
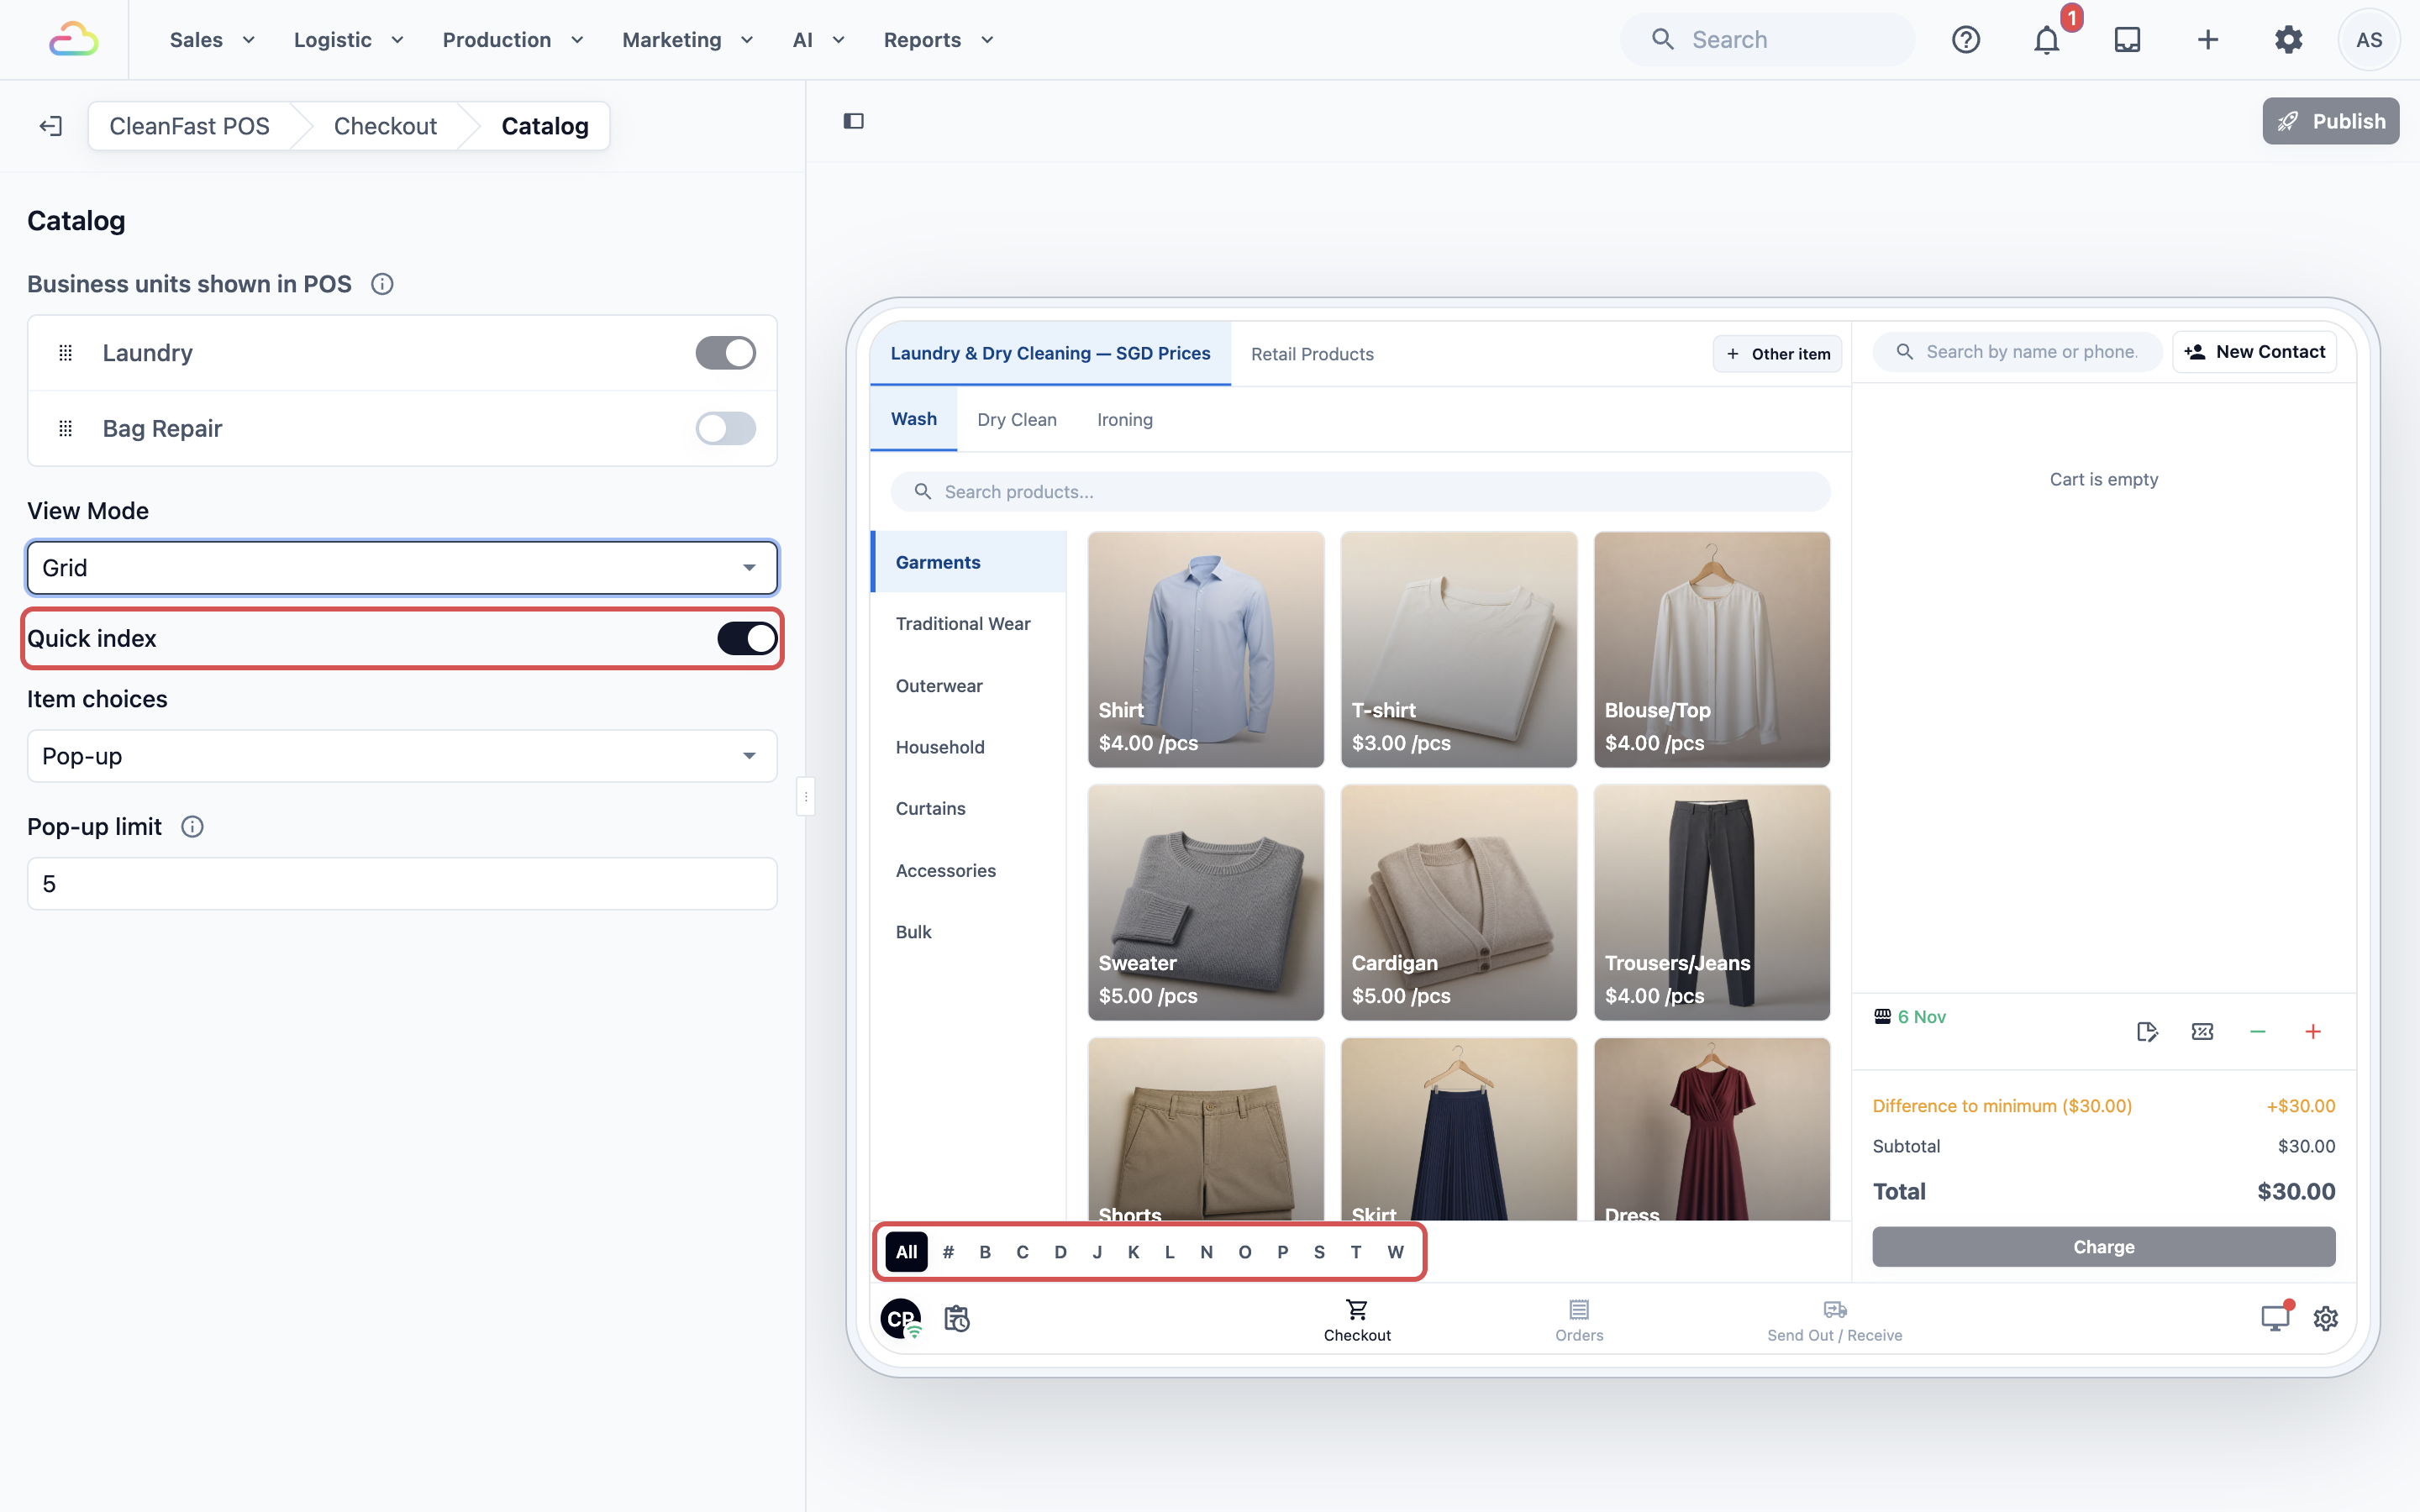
- **Quick index**
If you turn this on, staff see an A to Z bar beside the items. Tapping a letter jumps to items starting with it. It is on by default. The bar shows along the bottom of the preview.
- **Item choices**
A "choice" is one of several types of the same item, such as a shirt that can be Wash & Iron or Dry Clean. This setting decides what staff see when they tap an item with choices.
| **Option** | **What staff see** |
| --- | --- |
| Pop-up | A small pop-up beside the item, listing its choices. Quick for items with a few choices. |
| Full panel | The choices fill the catalog area. Easier to read when items have long lists of choices. |
- **Pop-up limit**
This shows only when **Item choices** is set to Pop-up. Type the most choices a pop-up should show. Items with more choices than this open the full panel instead. Leave it empty to use the standard limit of 5.
---
### Contact
A contact is the customer the order belongs to. This row decides whether staff add one to each order.
1. On the Checkout page, click **Contact**.
2. Choose an option under **Contact on orders**.
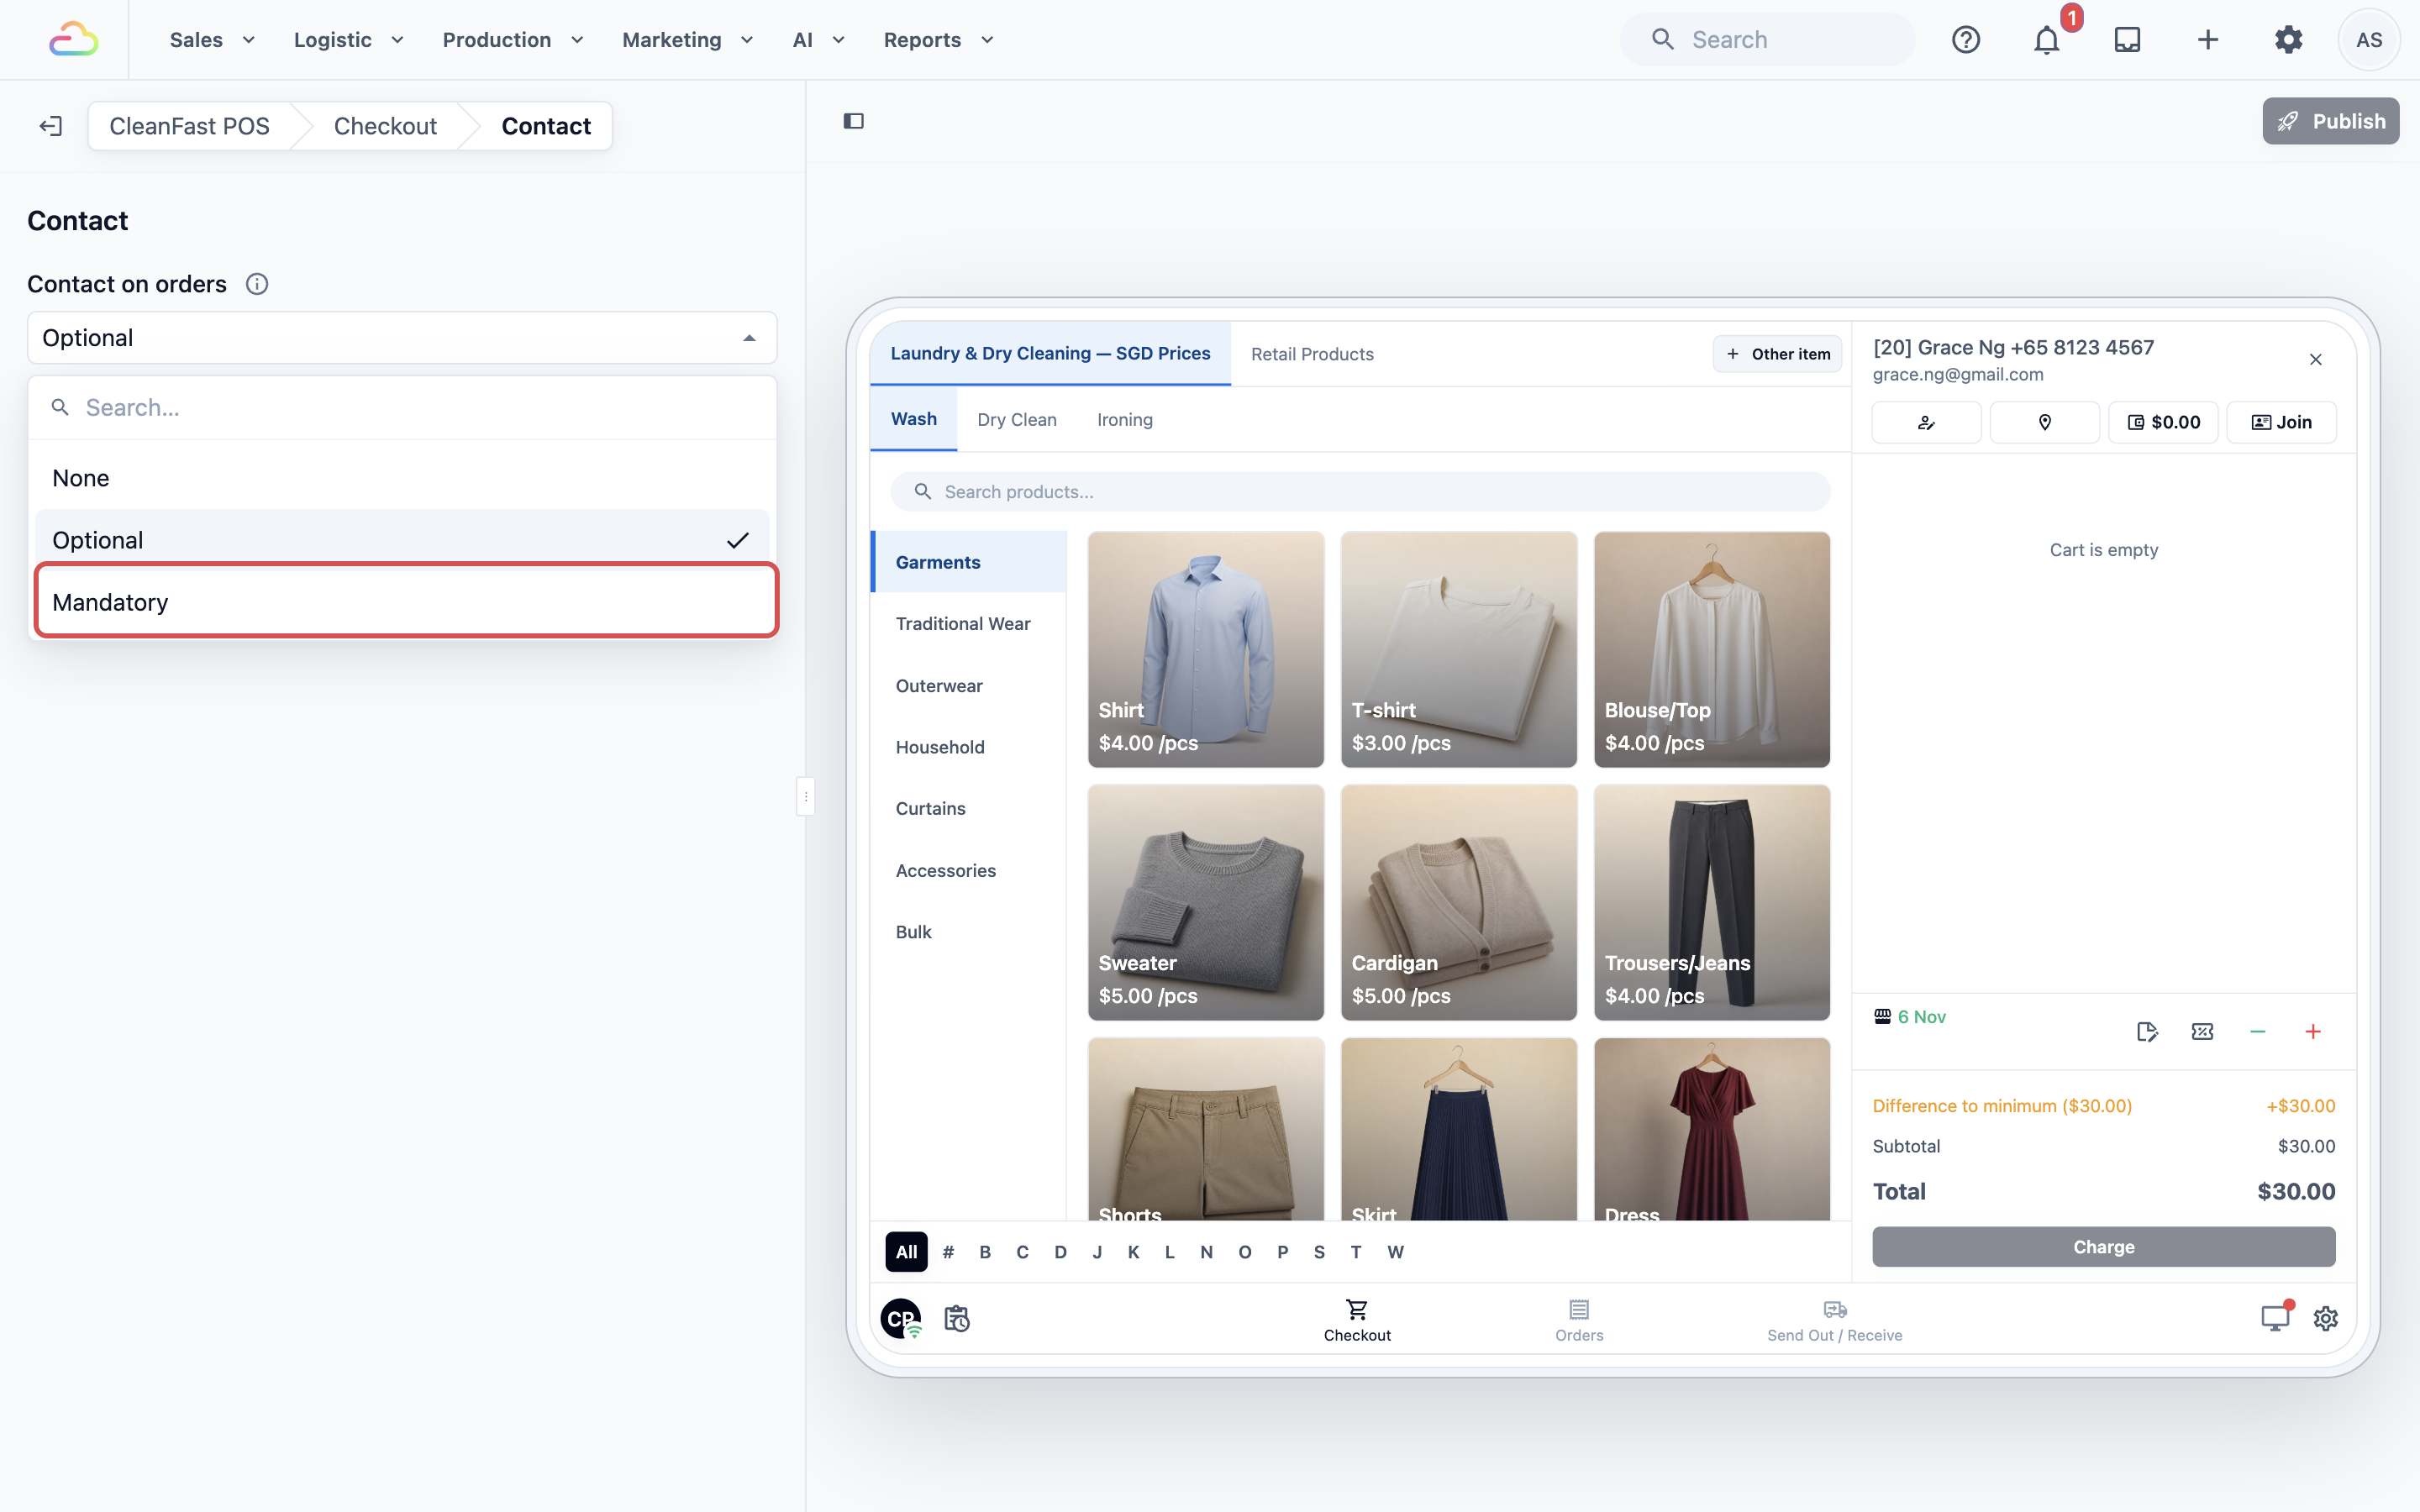
- **Contact on orders**
| **Option** | **What staff see** |
| --- | --- |
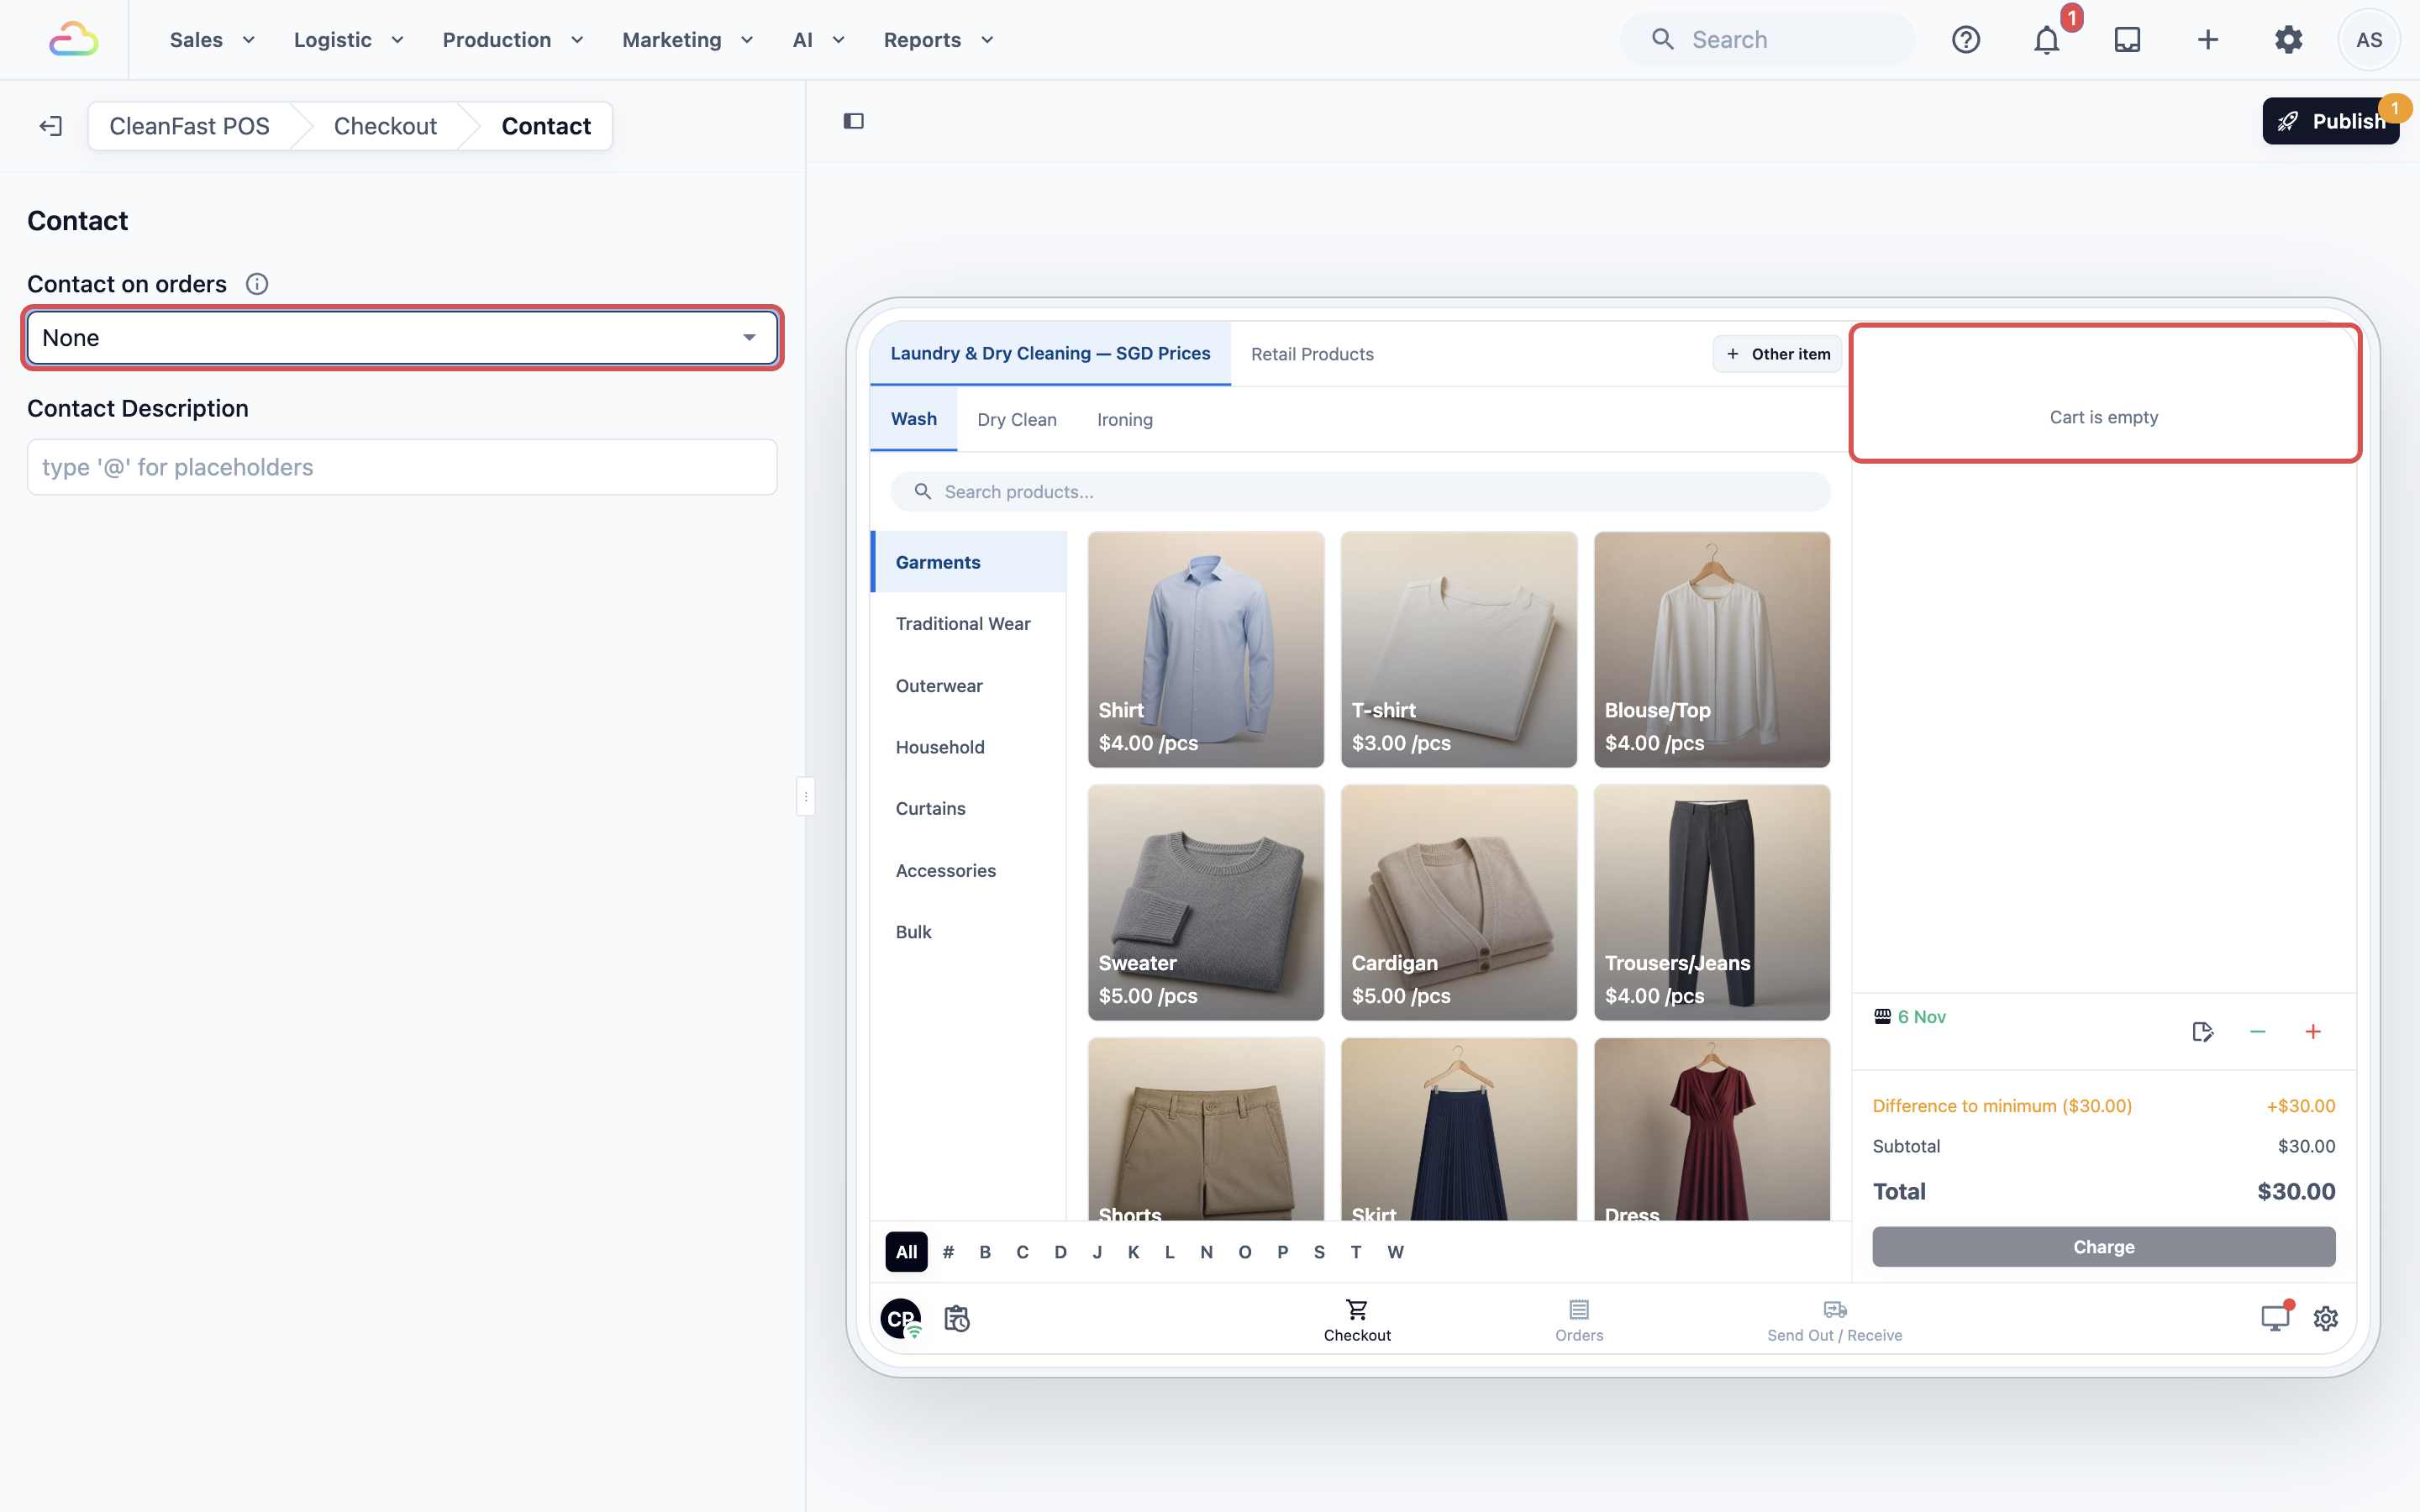
| None | No customer search in the cart. Orders are made without a customer. |
| Optional | A customer search at the top of the cart. Staff can pick a customer or skip it. This is the standard setting. |
| Mandatory | A customer search at the top of the cart. If staff tap Charge without a customer, they see "Select a customer account before continuing." and cannot go on. |
What staff fill in when they add a new customer here is set once for your whole business, in ⚙️ Settings › **Records** › **Contacts**. See [Choosing What Customer Details Staff Collect](/docs/setting-up-the-pos-customer-form).
The preview on the right changes as soon as you choose. Here Contact on orders is set to None, so the customer search and the promo code button no longer show at the top of the cart.
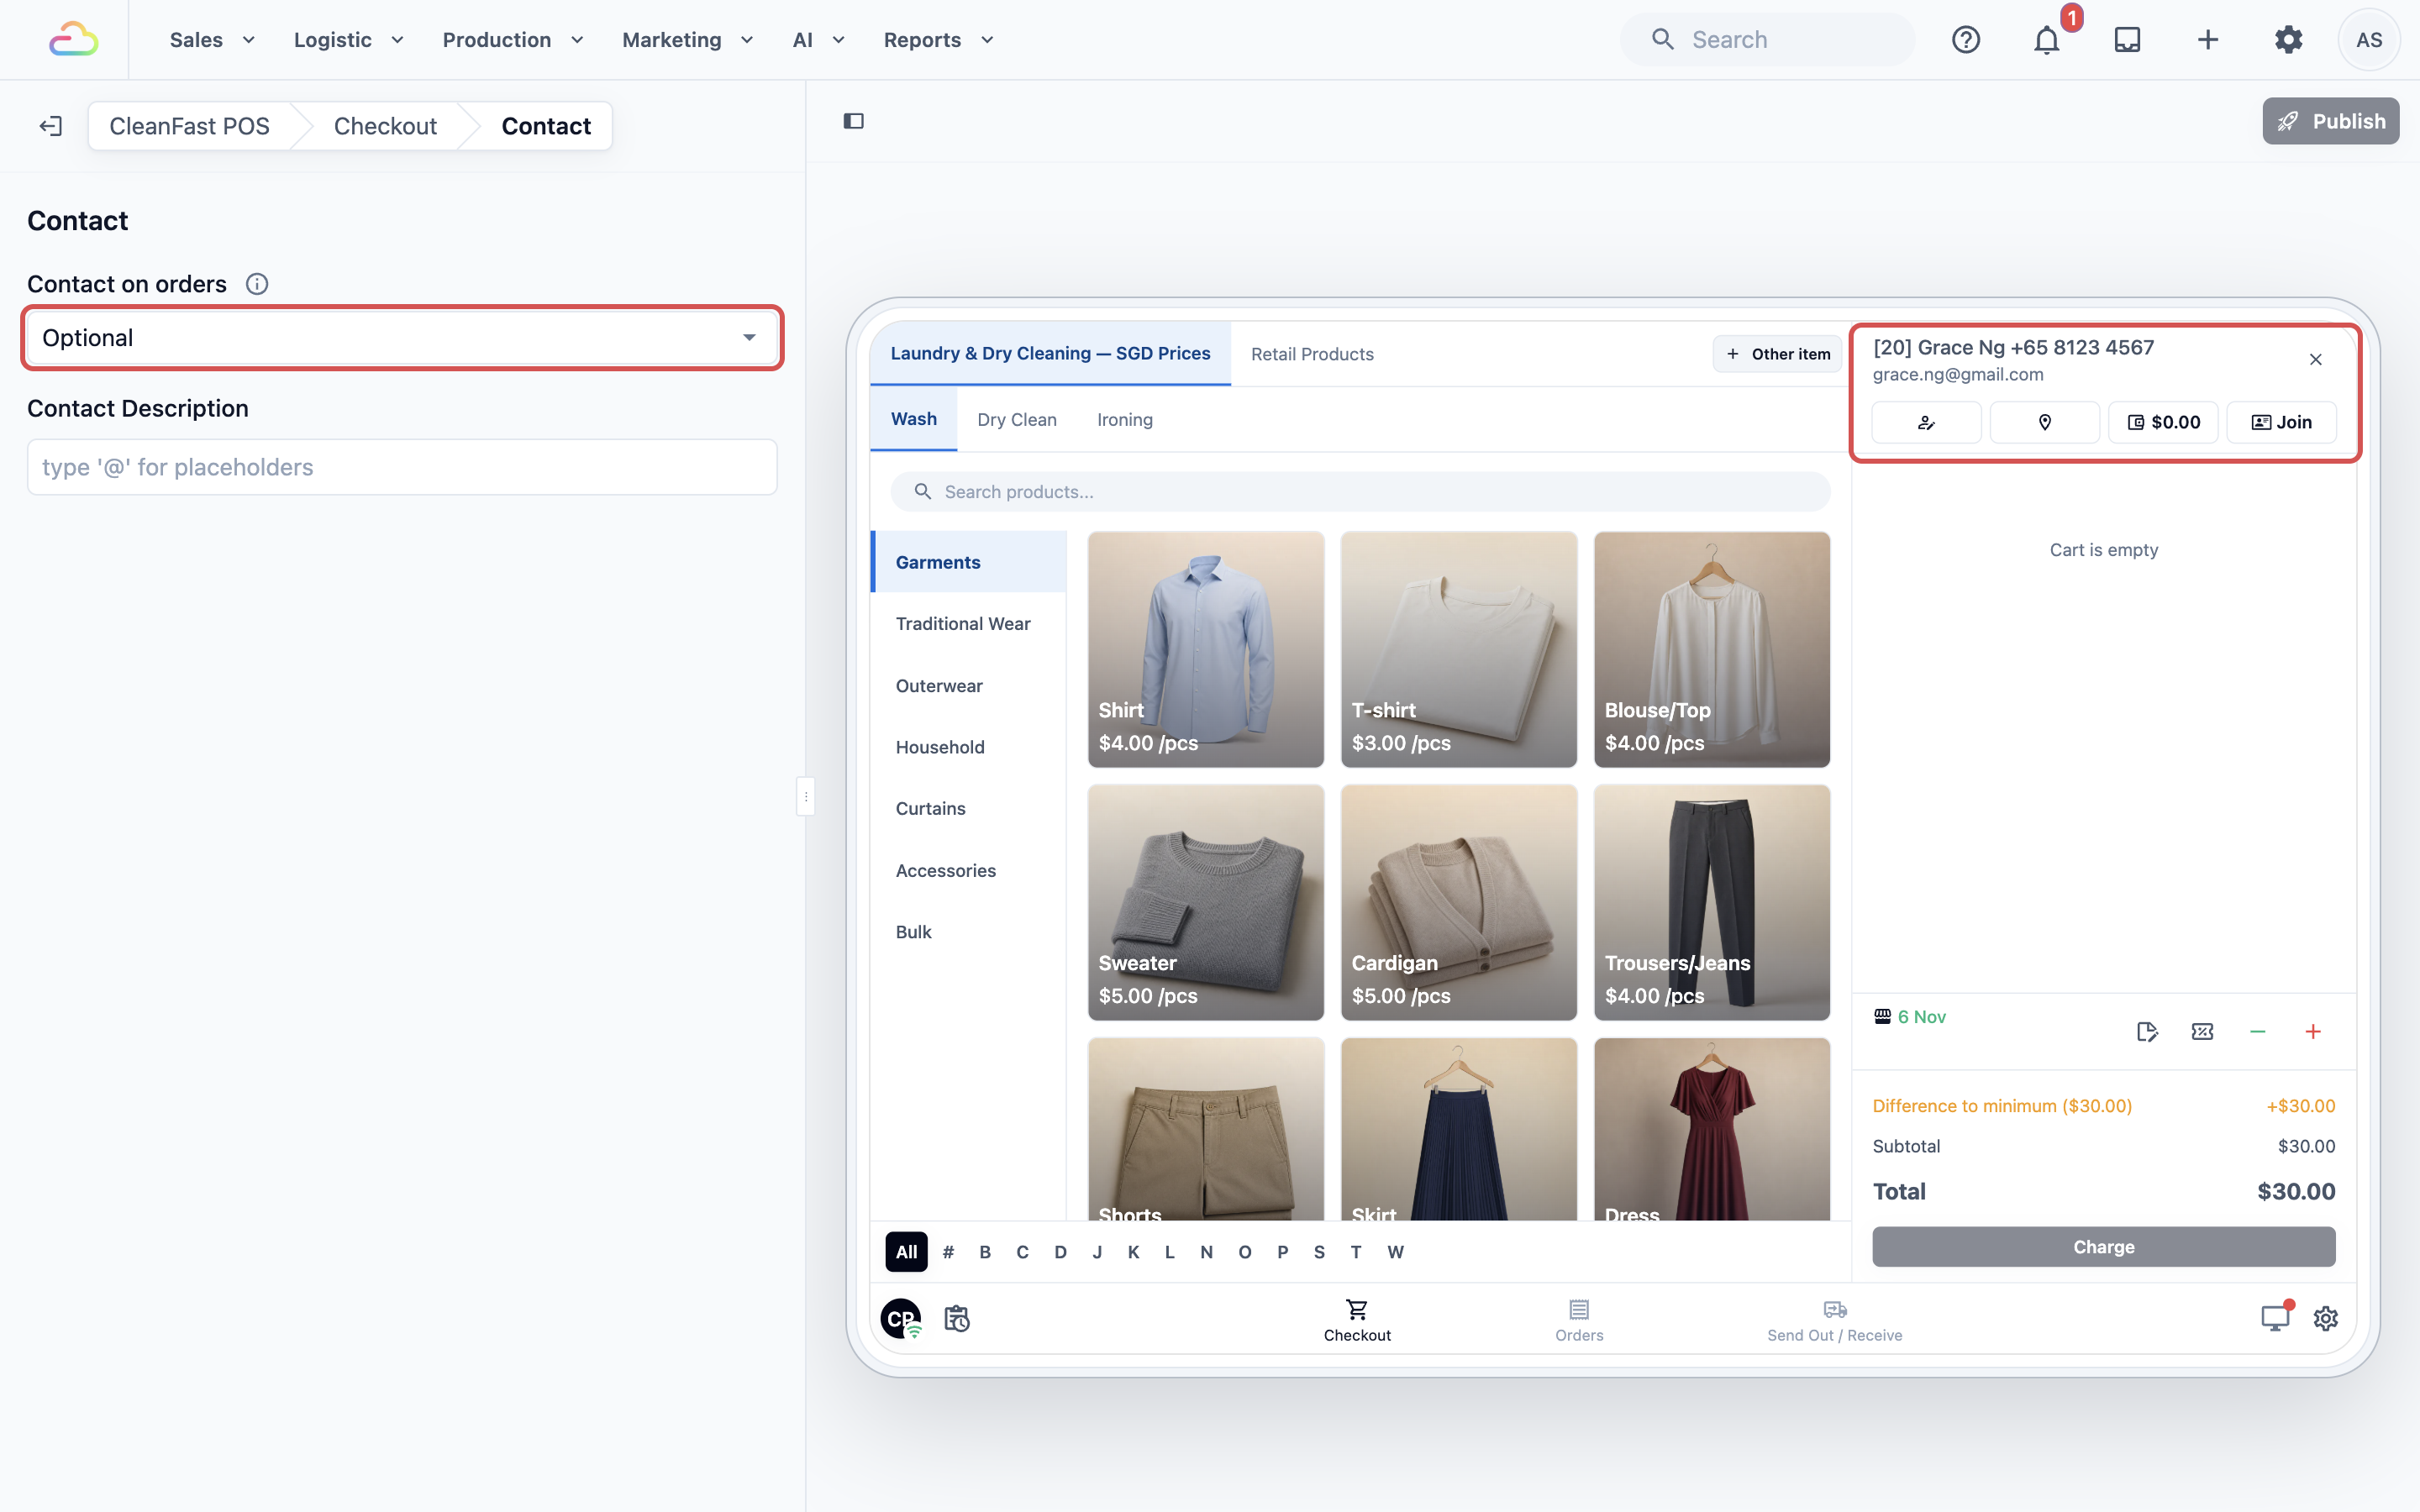
- **Contact card**
This decides what shows under the customer's name once staff pick them, such as their phone number or a note your staff keep. Keep **System Default**, or choose a card you made in **Settings › Cards**. Click Edit card to change the card you picked, or Manage cards to add one. With Optional or Mandatory, the preview shows a sample customer at the top of the cart, so you can see how a customer looks once staff pick them.
Promo codes and loyalty points are tied to a customer. If you set Contact on orders to None, staff can't enter a promo code or use points at this counter.
---
### Cart
The cart is the right side of the Checkout screen. It lists the items, the total and the Charge button.
1. On the Checkout page, click **Cart**.
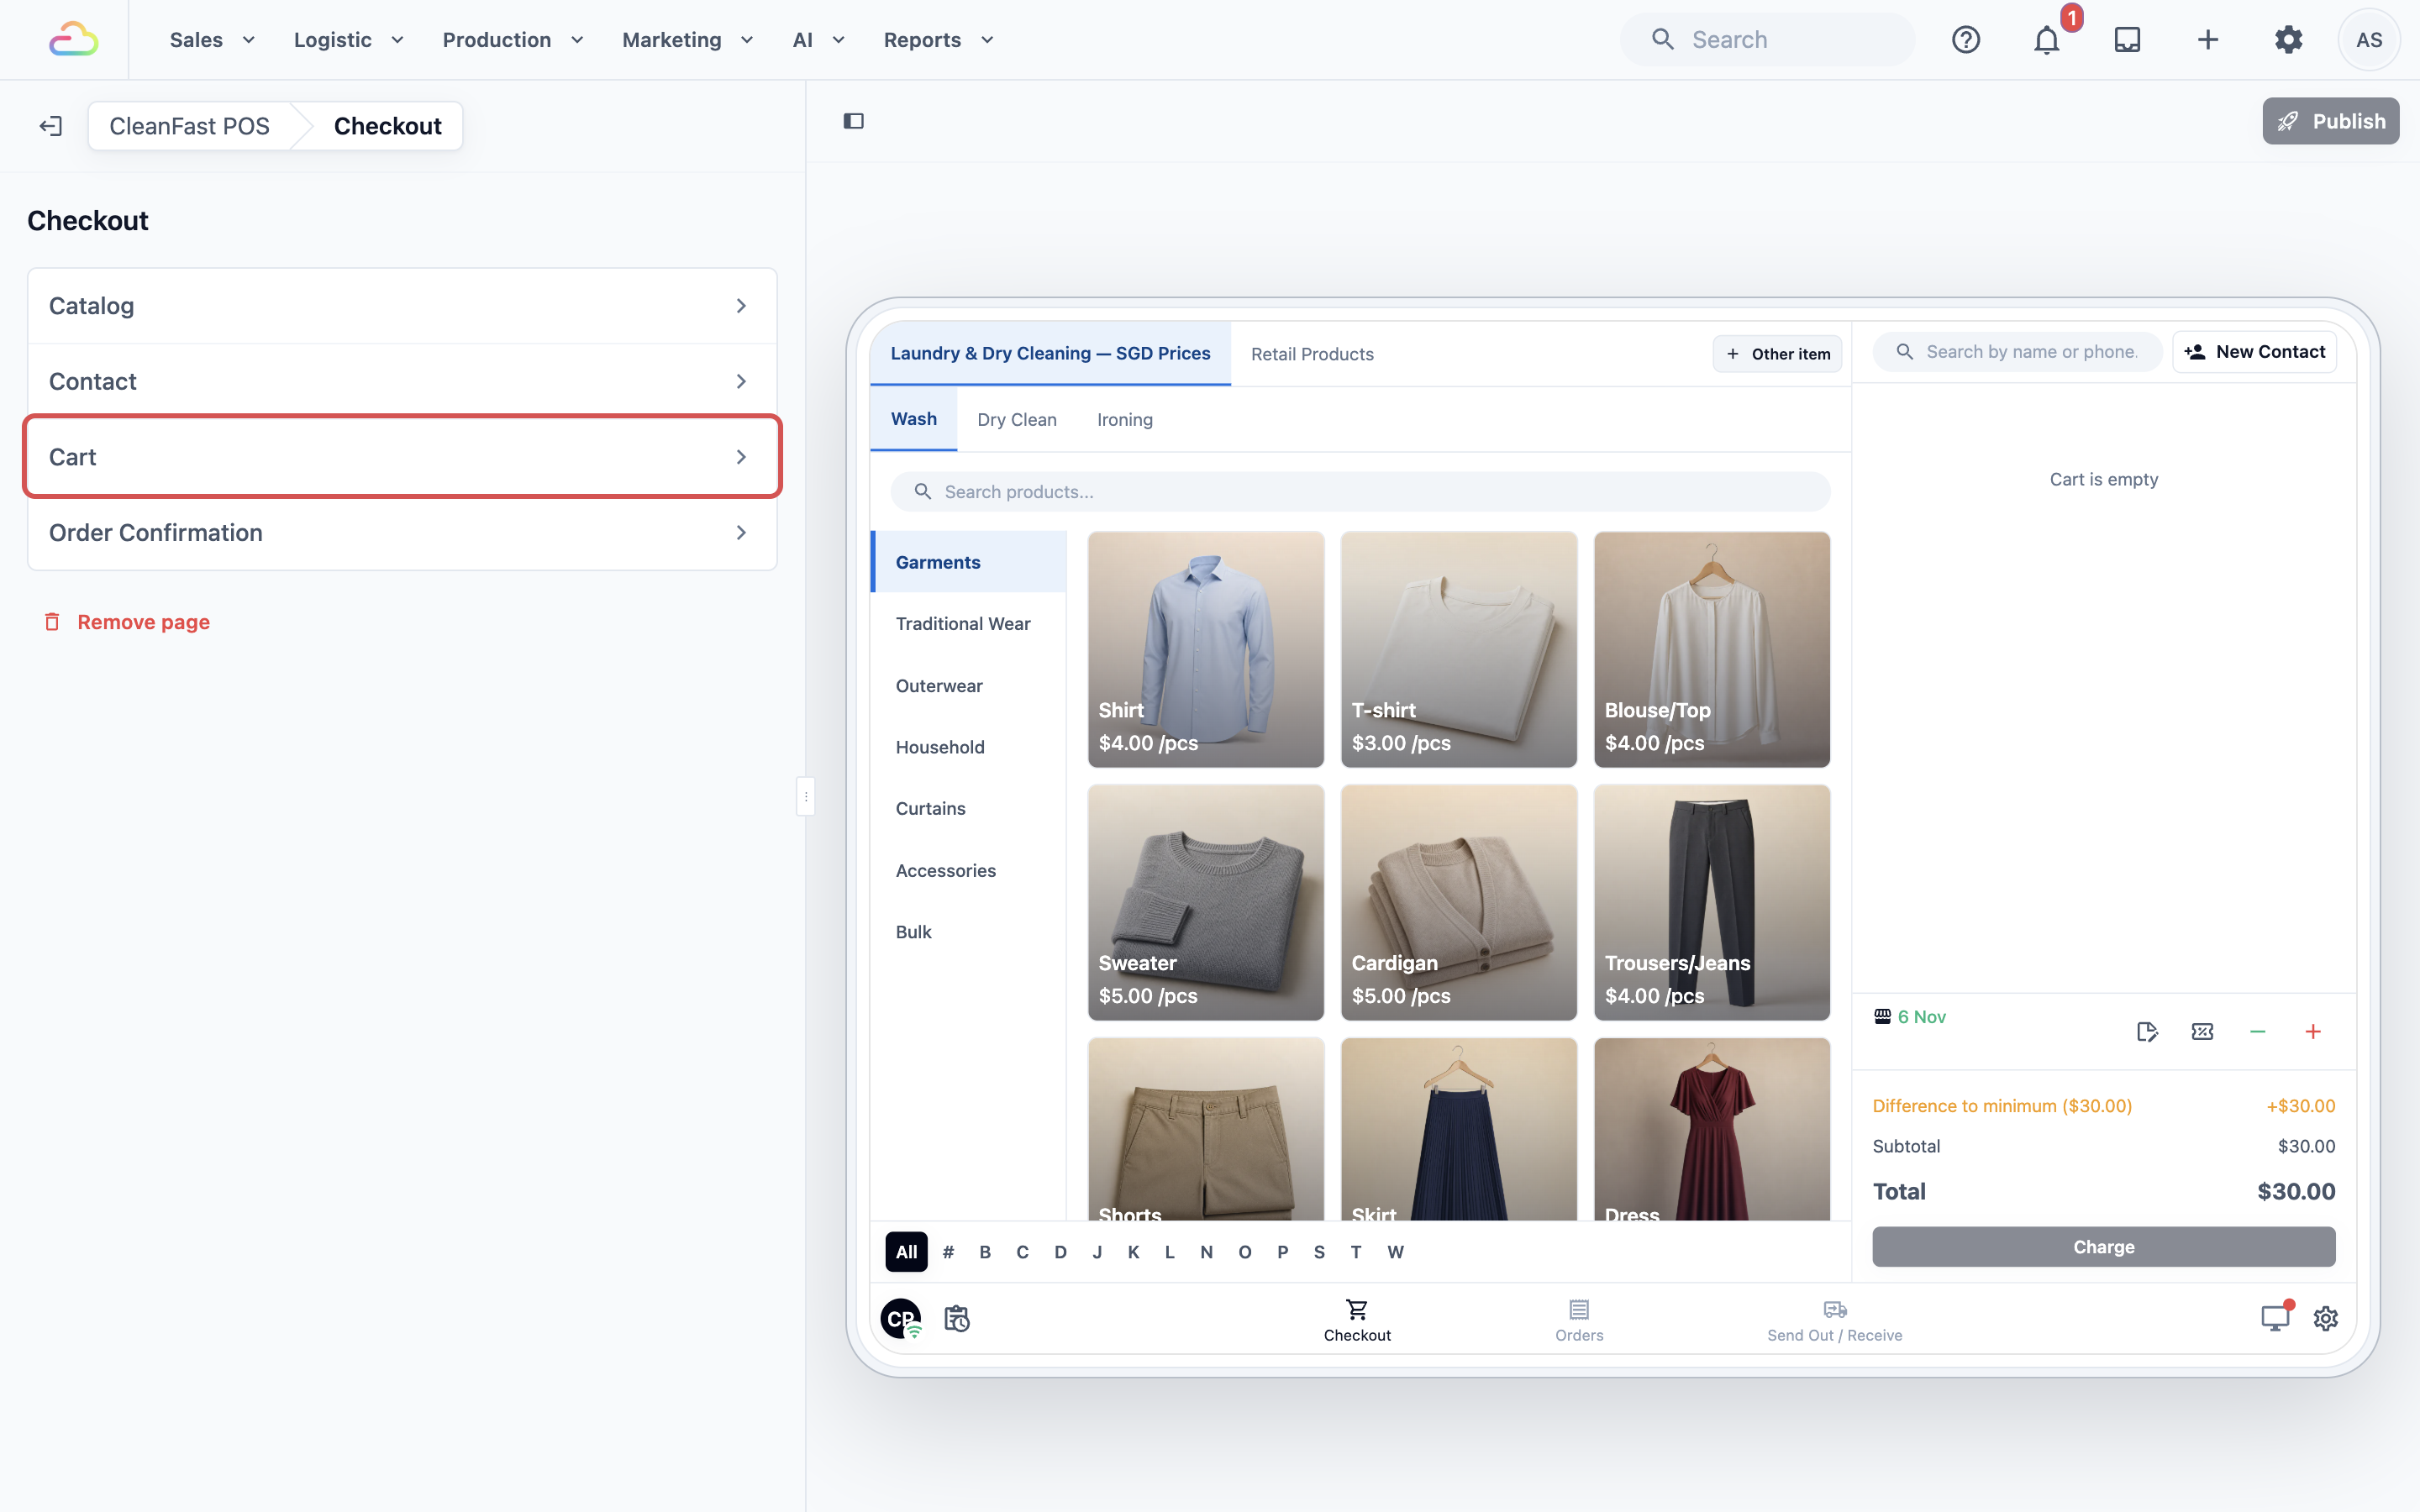
2. Choose a **Cart item card**, then turn each switch on or off.
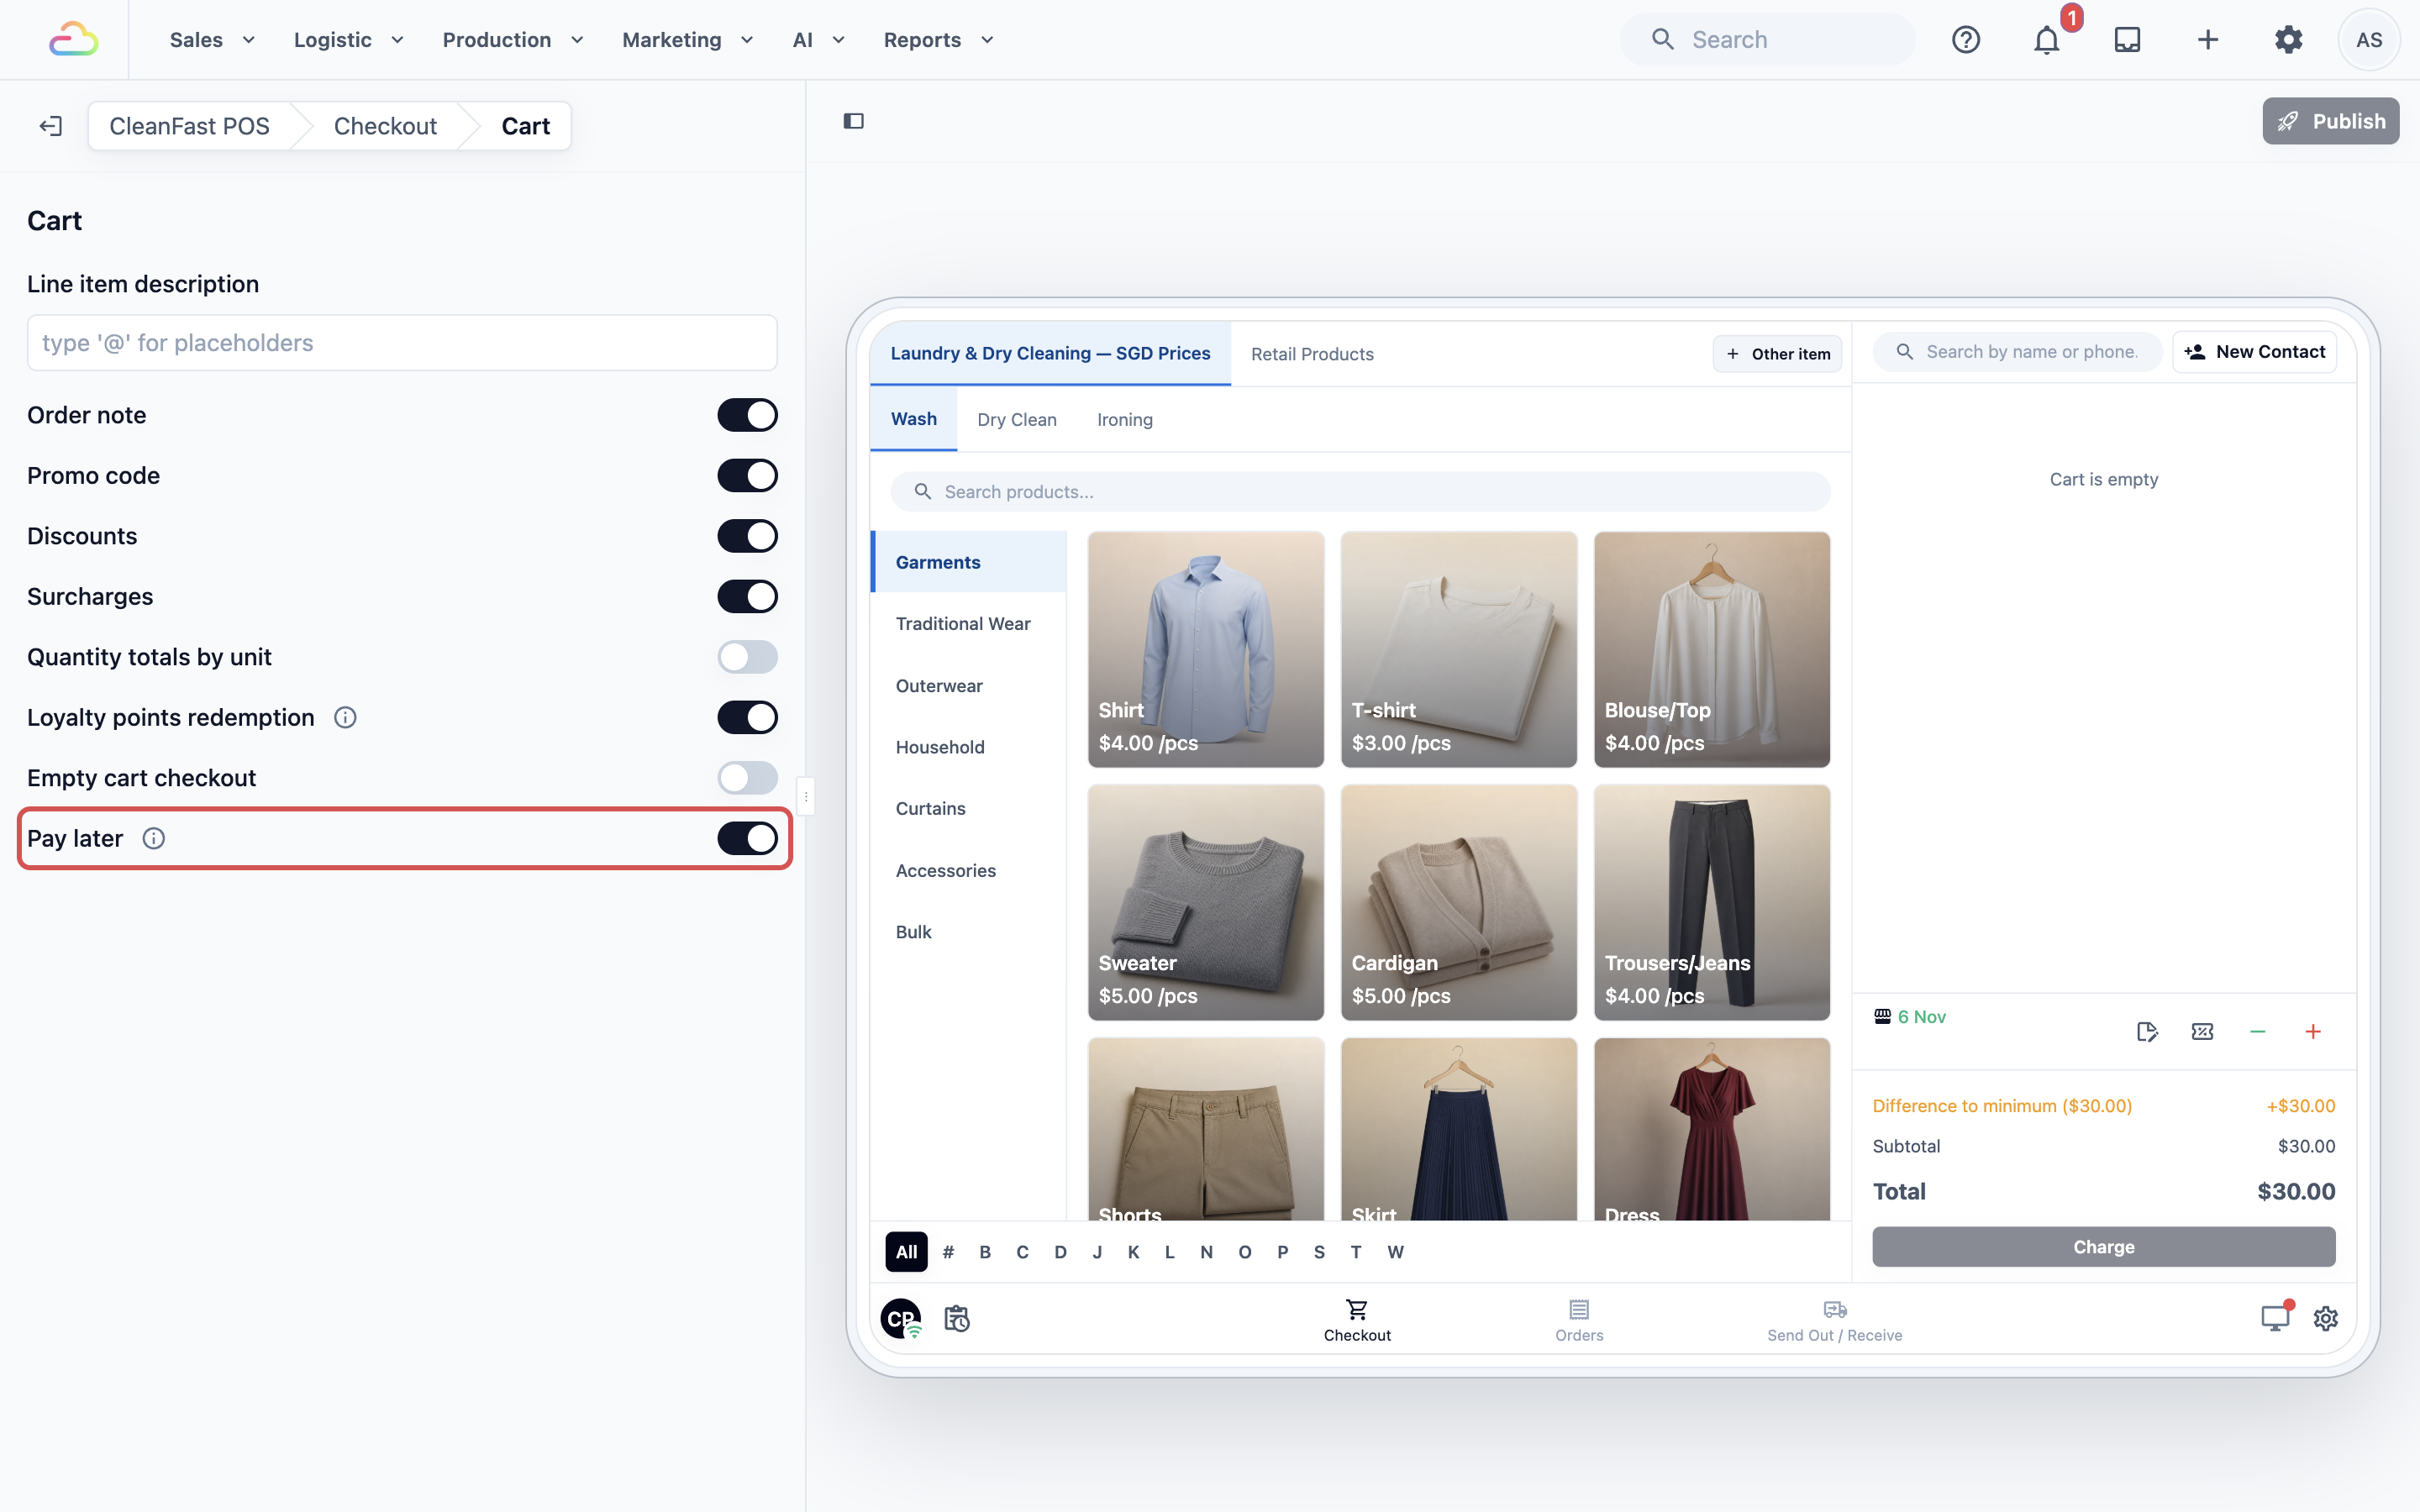
- **Cart item card**
This decides what shows under each item's name in the cart, such as extra details staff added to the item. Keep **System Default**, or choose a card you made in **Settings › Cards**. Click Edit card to change the card you picked, or Manage cards to add one.
- **Cart switches**
| **Switch** | **If you turn this on, staff see** | **Standard setting** |
| --- | --- | --- |
| Order note | A note button, to add a note to the whole order, such as "Customer will collect after 6pm" | On |
| Promo code | A coupon button, to enter a promo code. Needs a customer on the order. See [Setting Up Coupons](/docs/setting-up-coupons) | On |
| Discounts | The − button, to take money off the order. See [Giving Discounts at the Counter](/docs/giving-discounts-at-the-counter) | On |
| Surcharges | The + button, to add a charge, such as an urgent fee. See [Giving Surcharges at the Counter](/docs/giving-discounts-at-the-counter) | On |
| Quantity totals by unit | A count of items by unit above the total, for example 12 pcs, 3 kg | Off |
| Loyalty points redemption | A points button when the customer has points, so they can pay part of the order with them. See [Setting Up Your Loyalty Points Program](/docs/setting-up-your-loyalty-points-program) | On |
| Empty cart checkout | Charge works with no items in the cart, for example to take a deposit | Off |
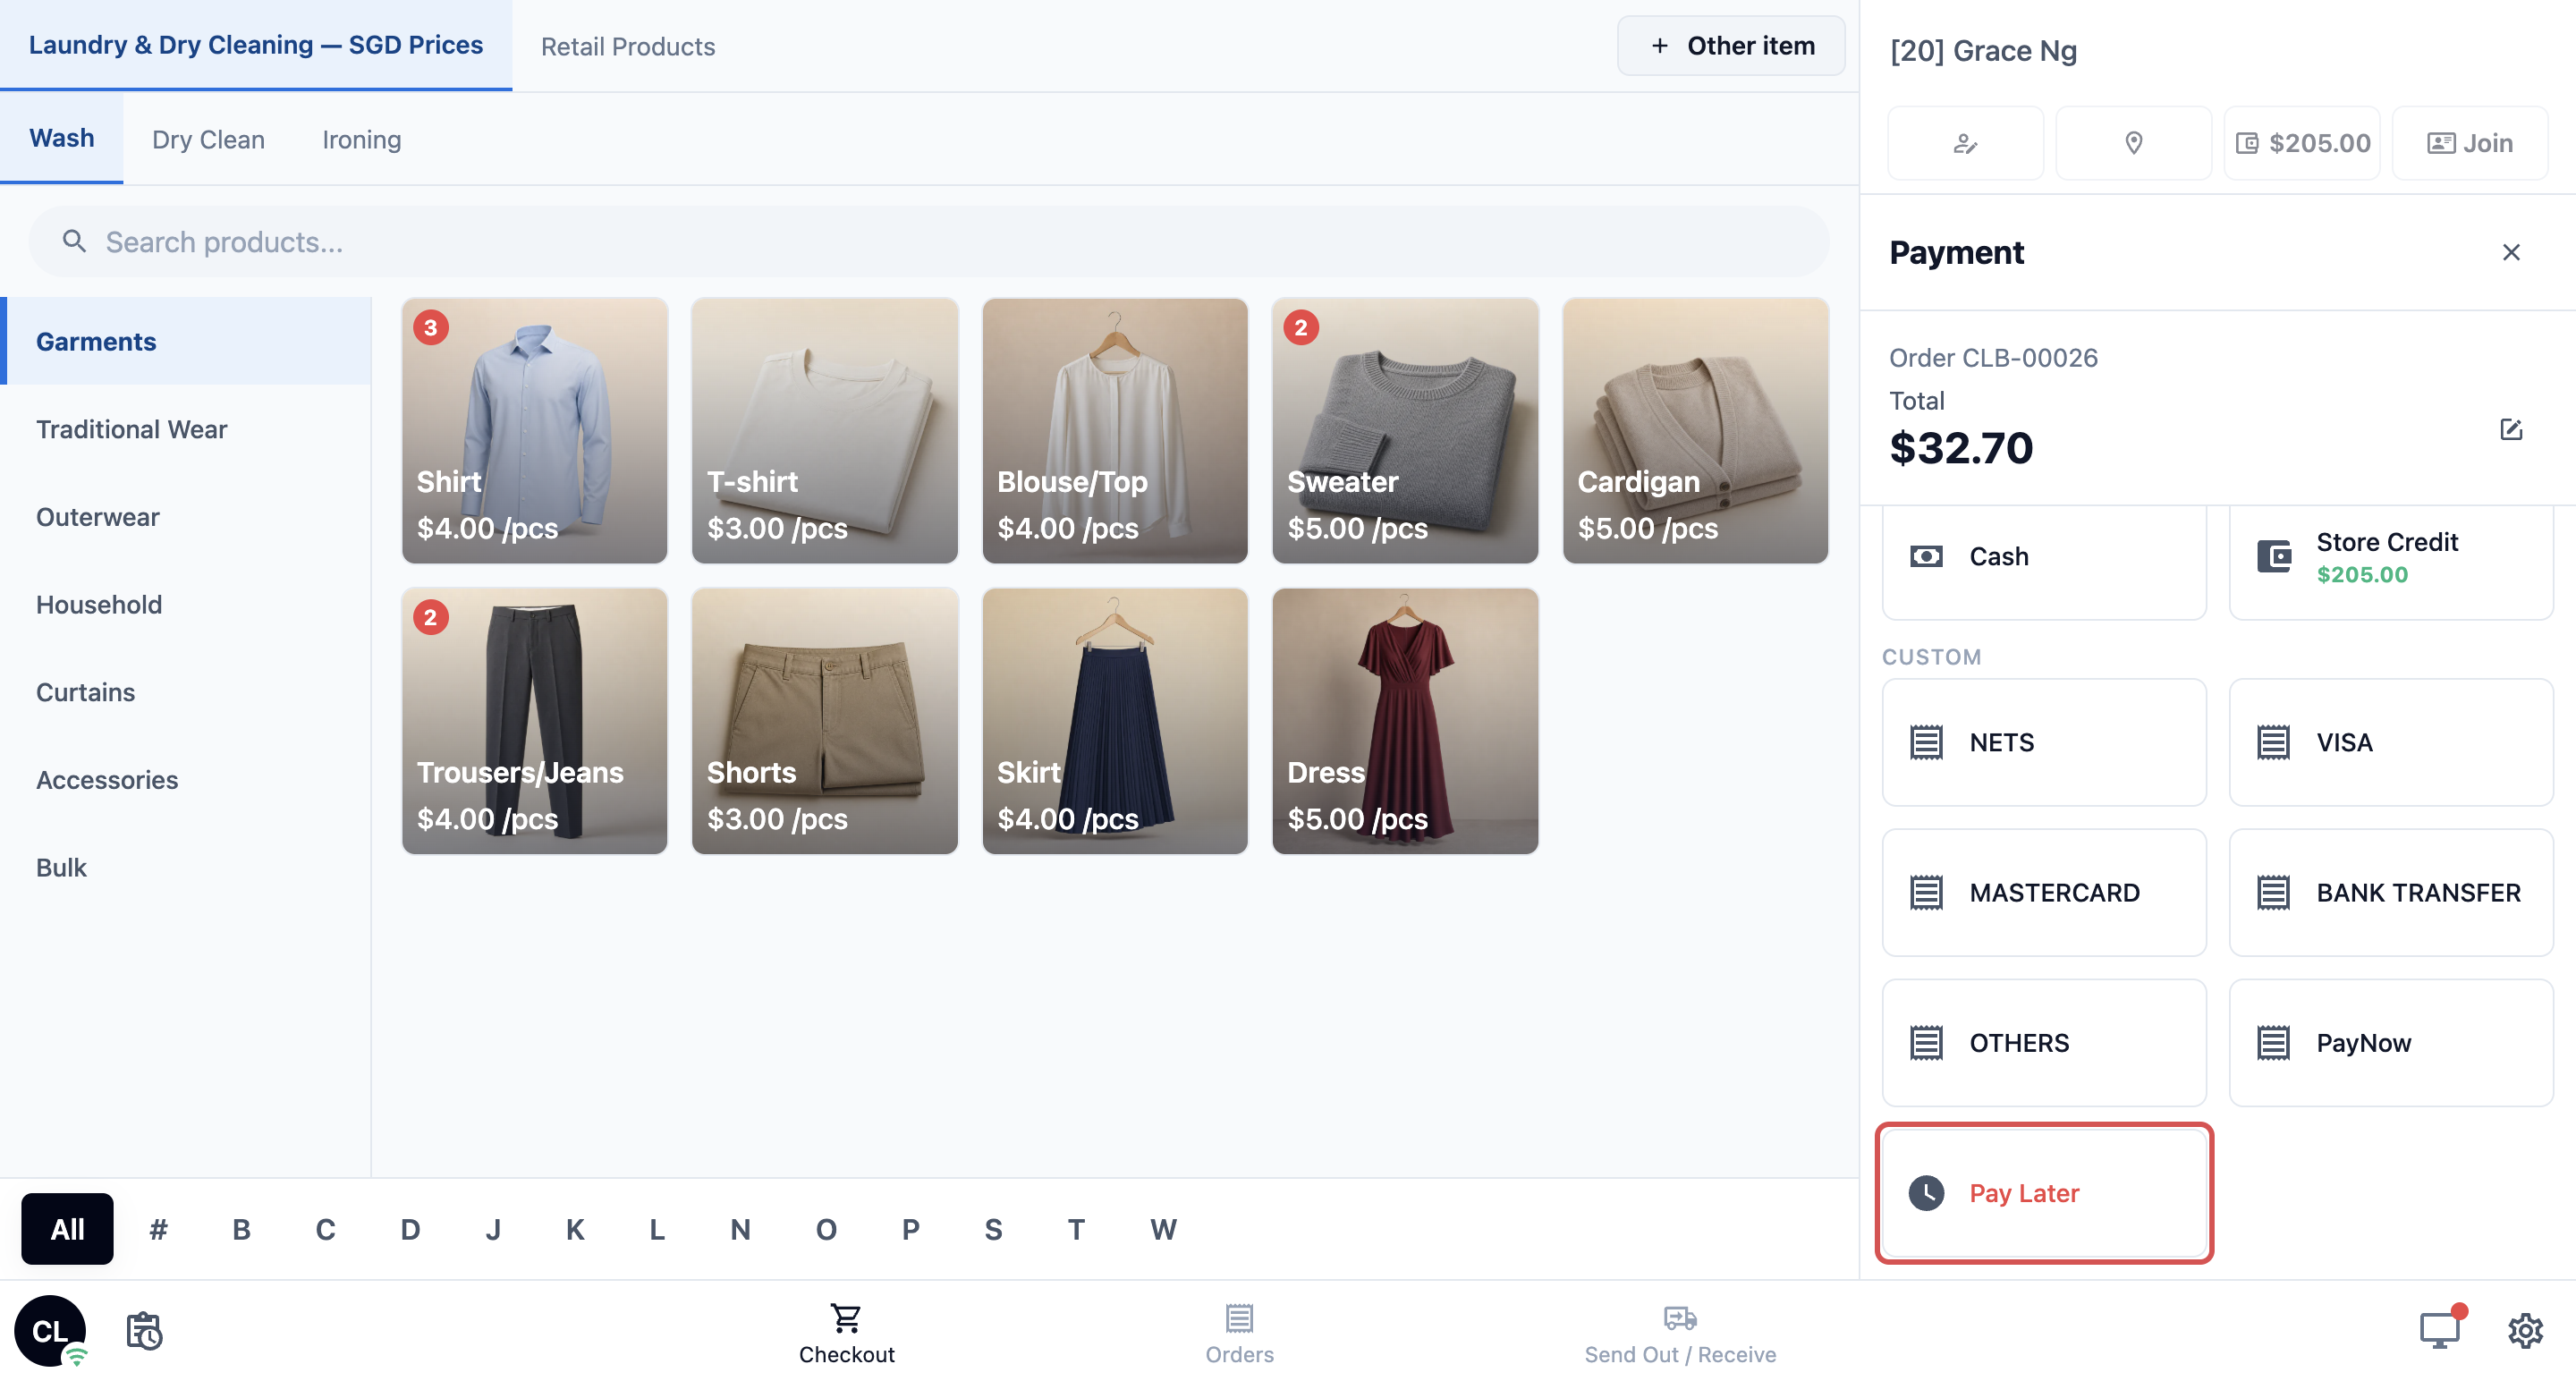
| Pay later | A Pay Later button on the payment screen, so the order is made unpaid and the customer pays when they collect | On for new apps |
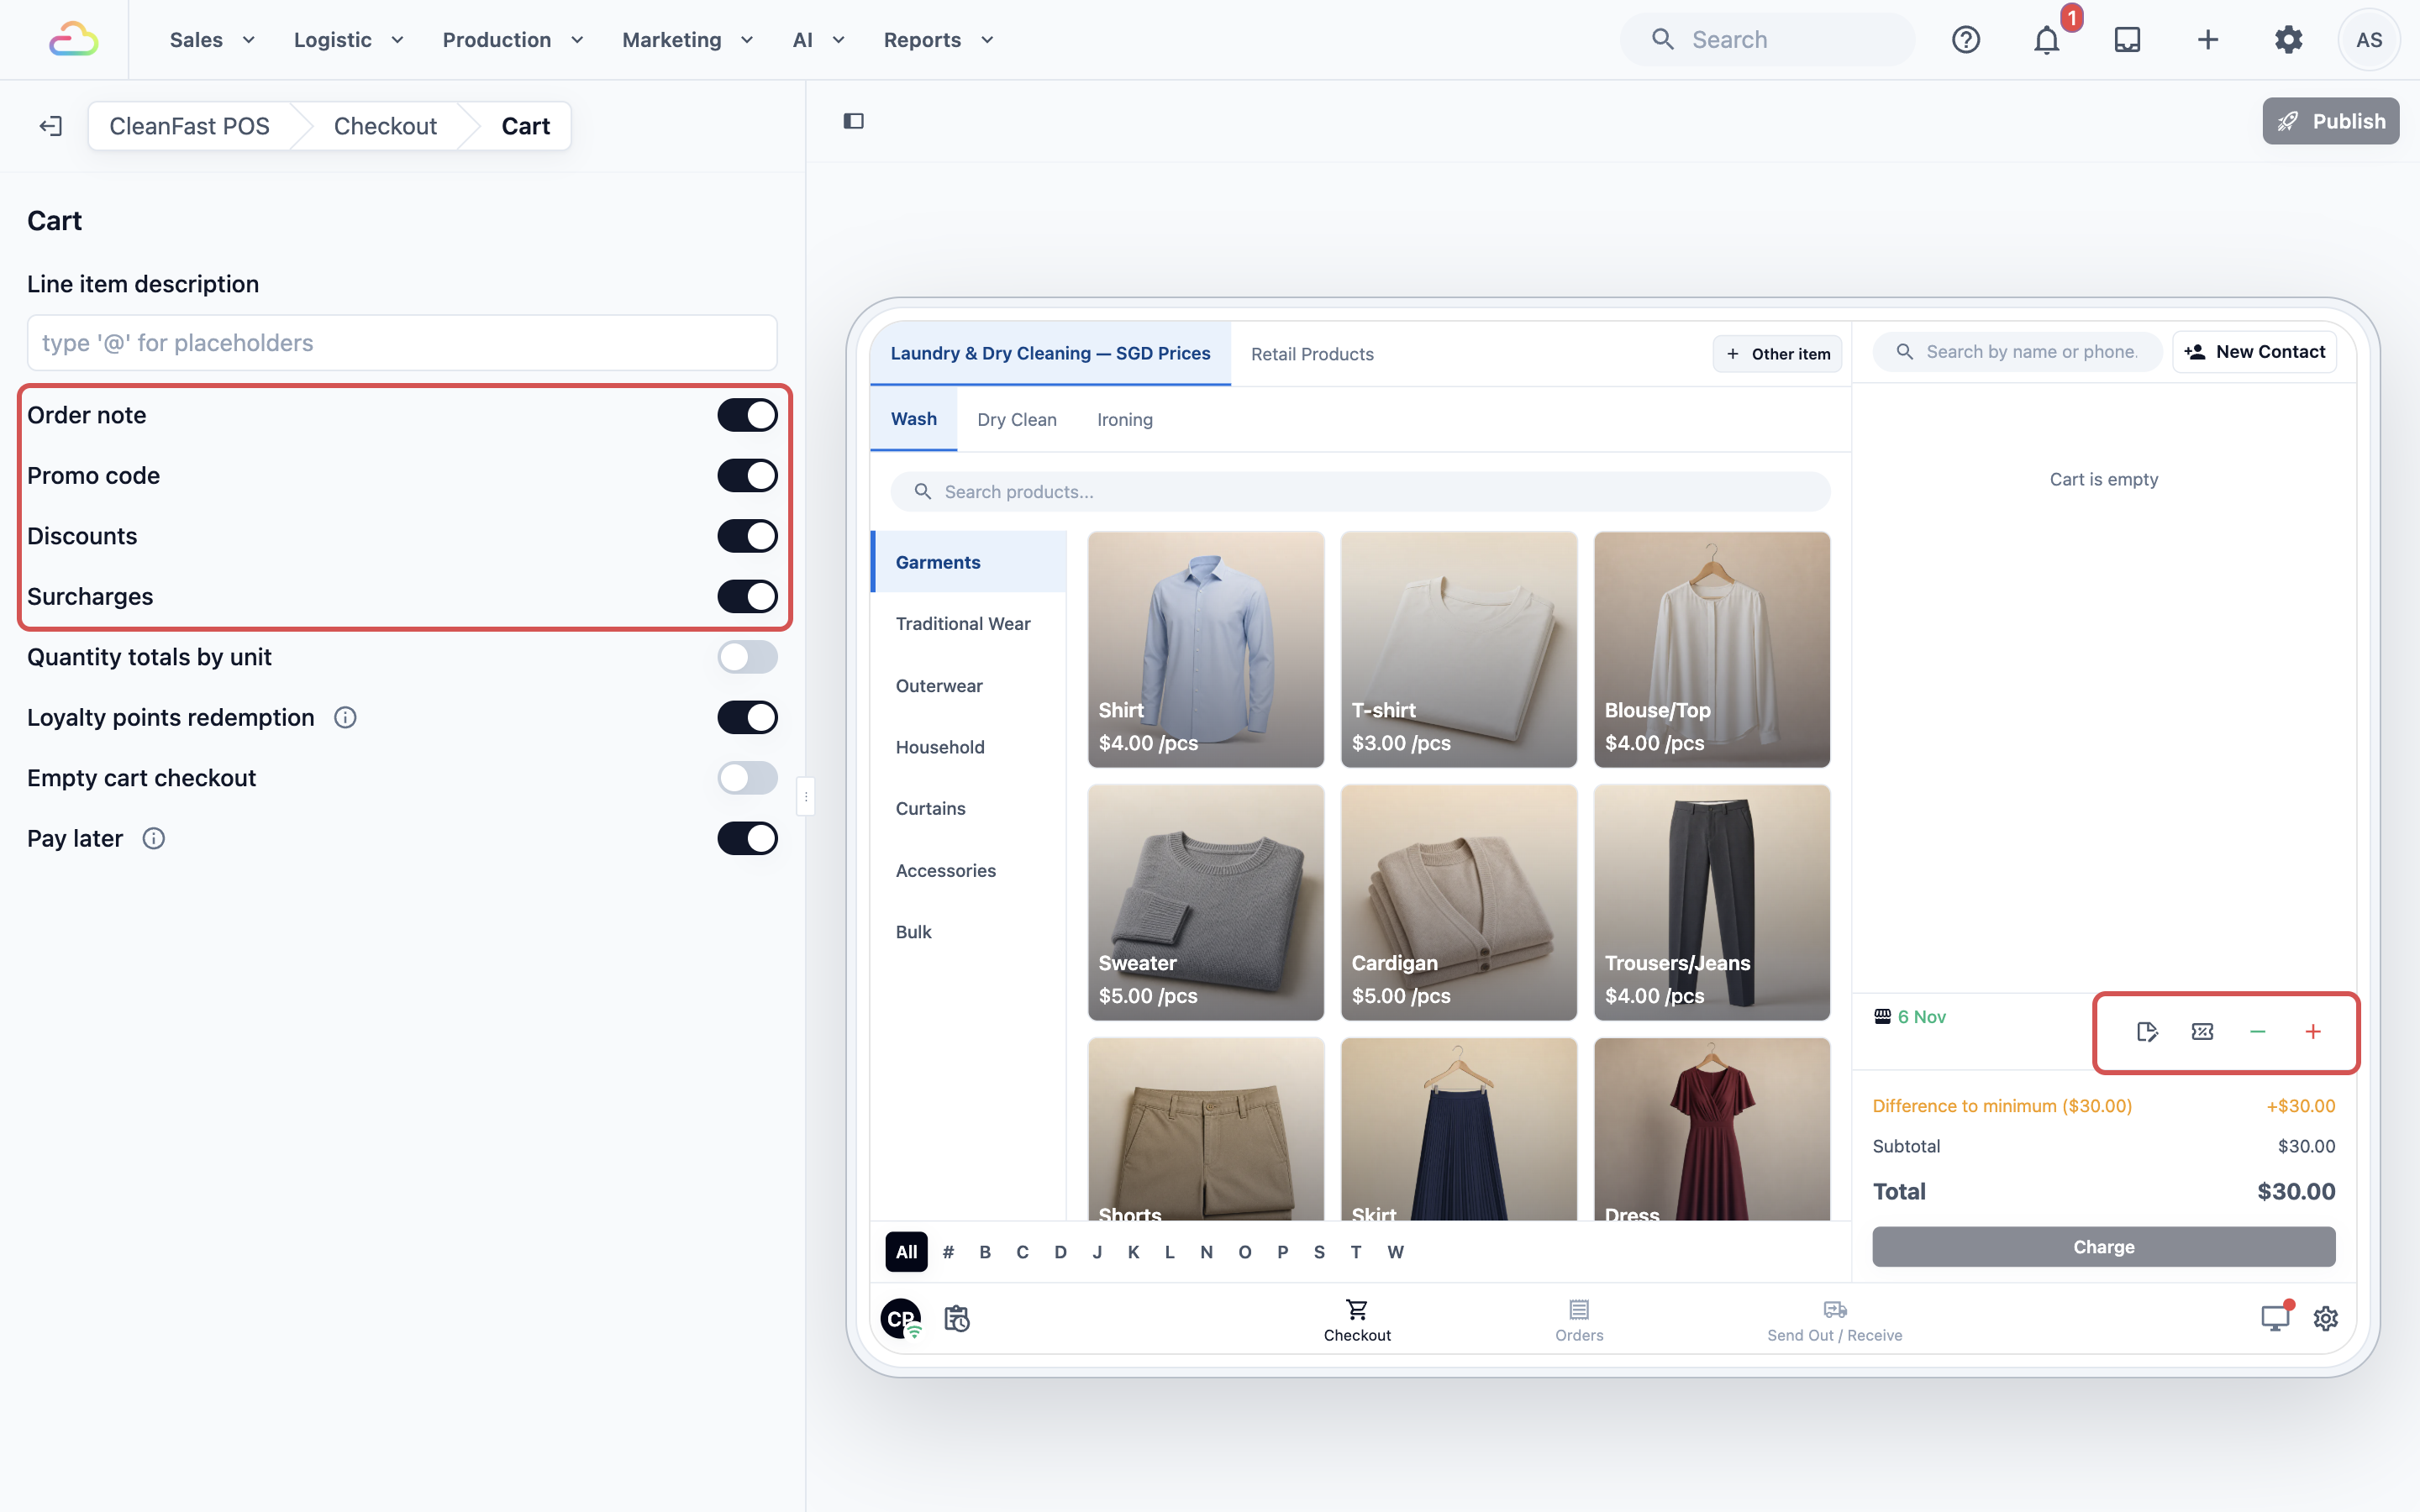
The preview on the right changes as soon as you turn a switch on or off. With Order note, Promo code, Discounts and Surcharges on, the cart shows four buttons above the total: the note, the coupon, − and +.
Turn Discounts and Surcharges off, and the − and + buttons disappear from the preview.
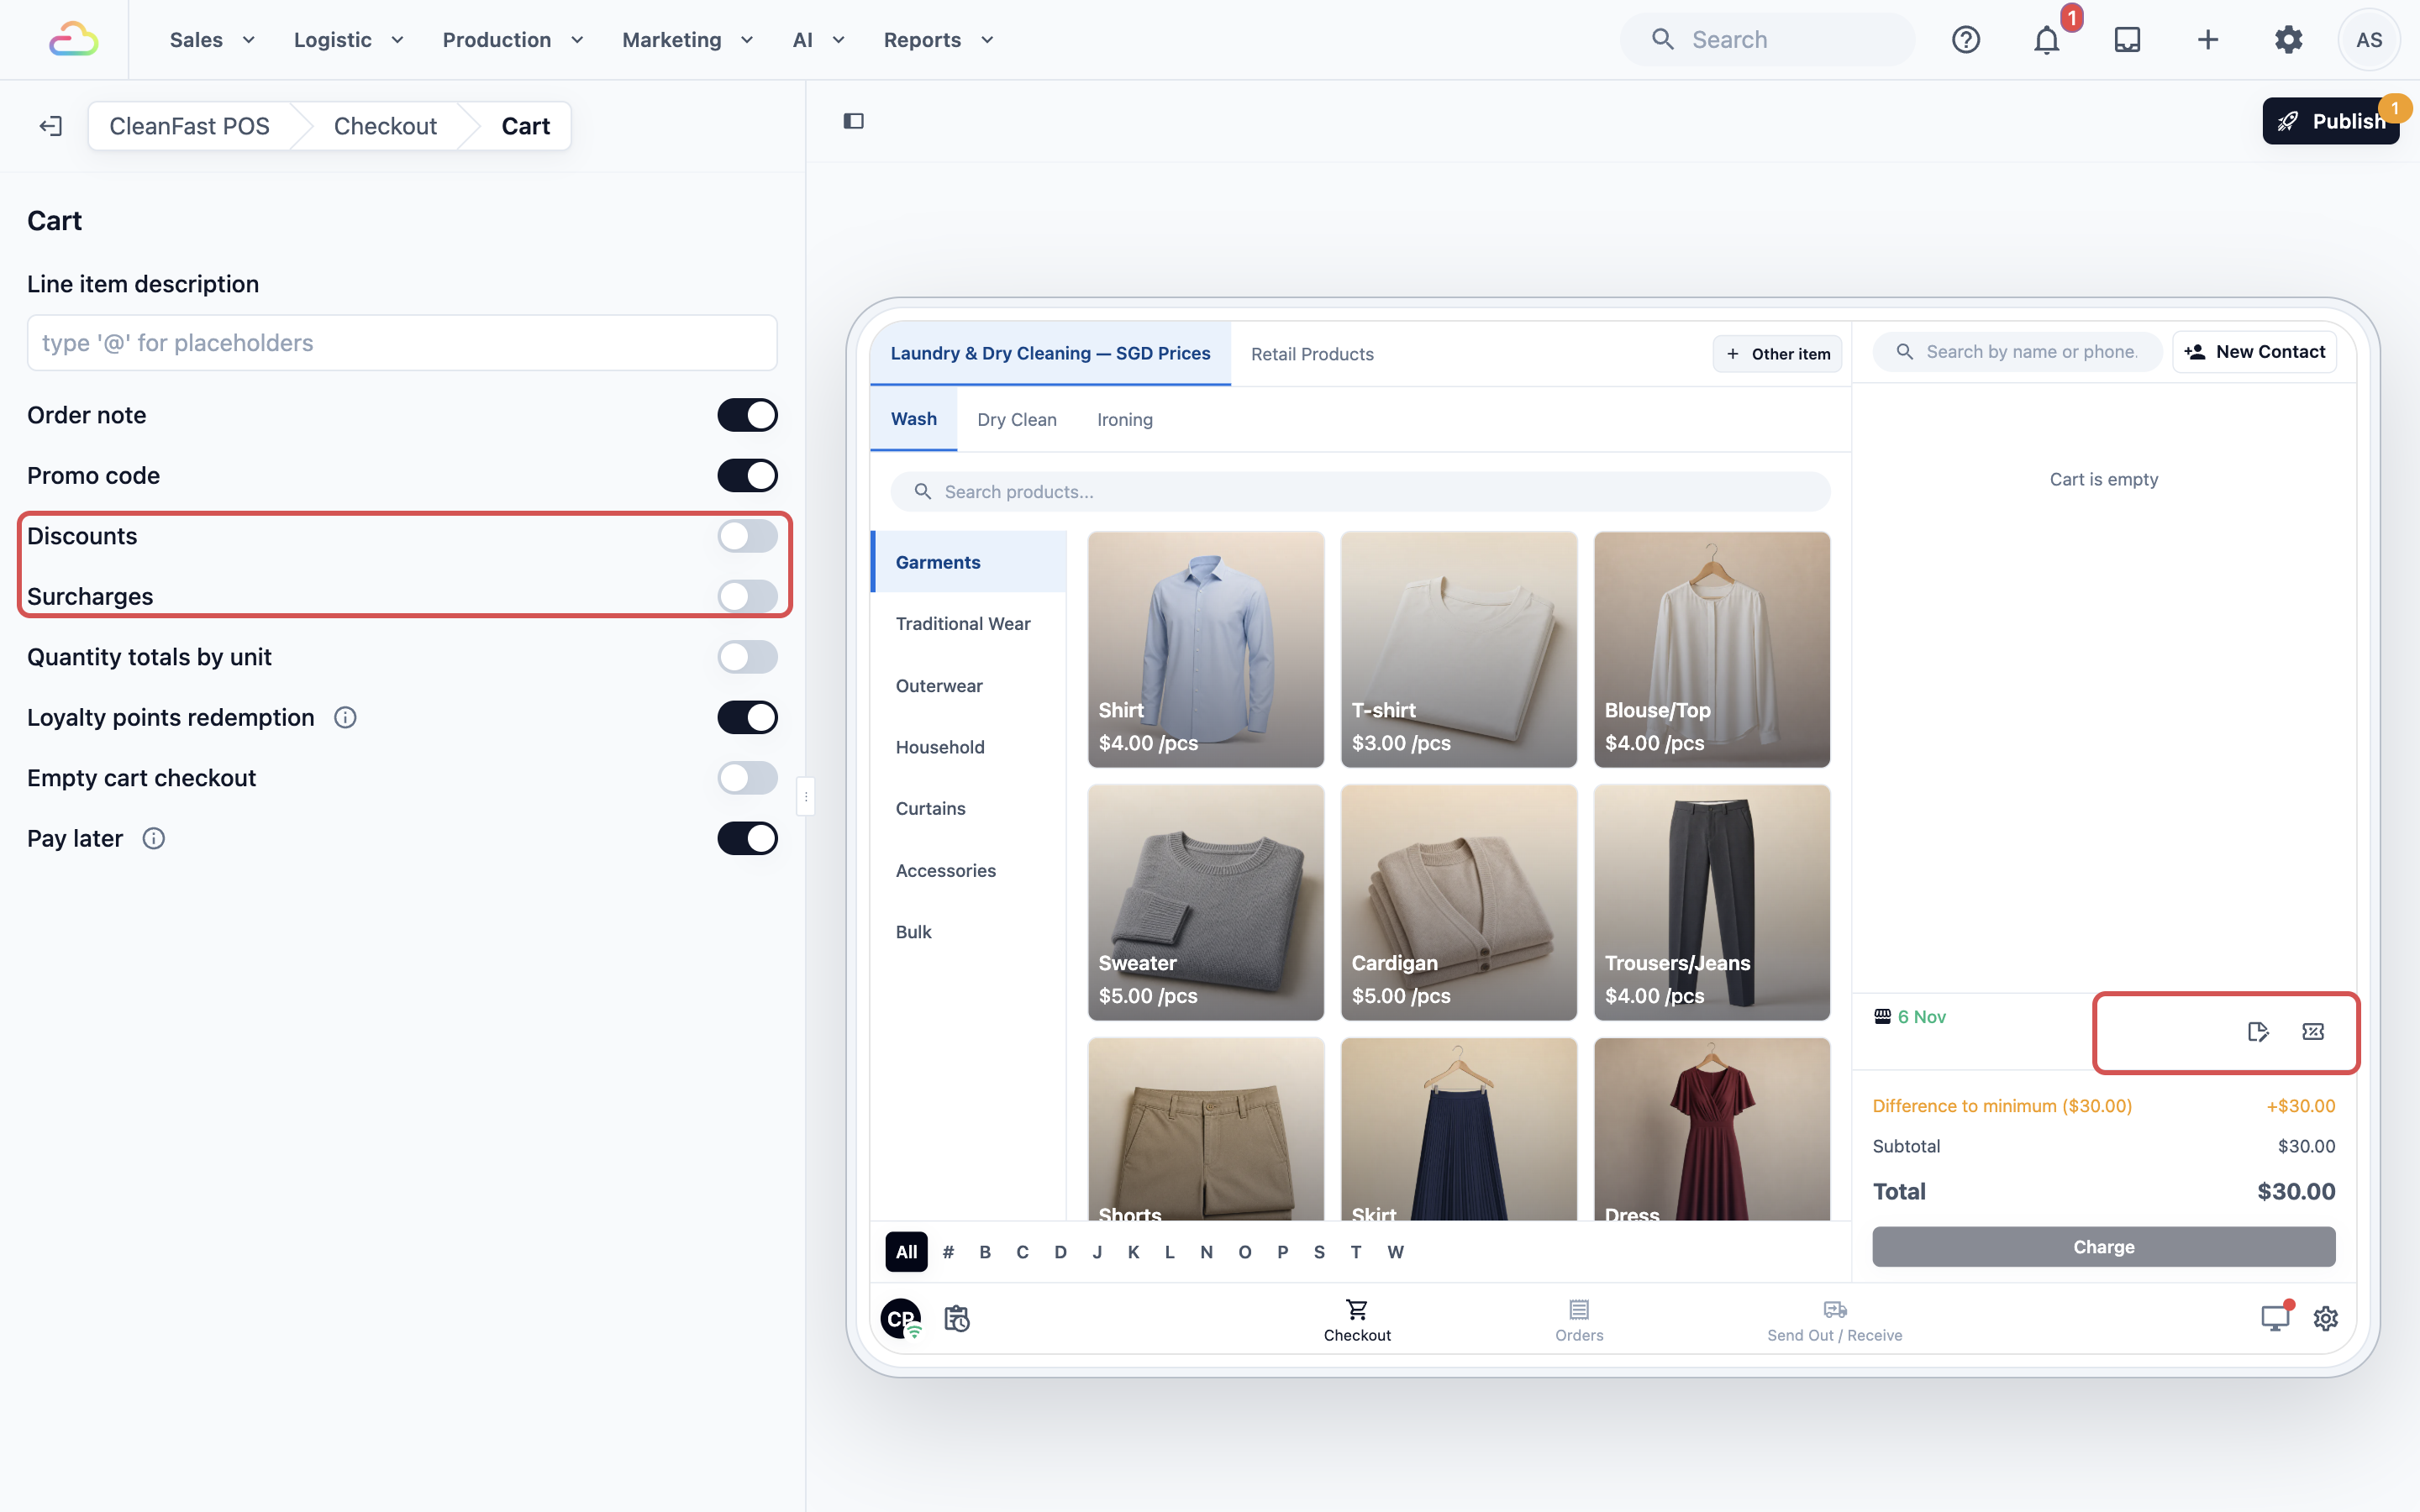
Turning a switch off only hides it on this app's Checkout. An order that already has a note keeps showing it.
**Using the switches together**
All the switches can be on at the same time. Each one adds its own button or line to the cart, and none of them turns another off. The payment methods shown next to Pay Later come from your Payment feature. See [Setting Up Your Payment Methods at POS](/docs/setting-up-your-payment-methods-at-pos).
If Pay later is on and Contact on orders is None, staff can leave orders unpaid with no customer on them. Set Contact on orders to Optional or Mandatory so you know who to chase.
---
### Order Confirmation
Order Confirmation is the screen staff see once an order is made, with buttons such as printing the receipt. It is a feature, so it works the same across the POS. See [Setting Up Order Confirmation](/docs/setting-up-order-confirmation).
---
## Example setup
CleanFast Laundry sells Laundry and Bag Repair at its Tampines and Jurong shops. They want staff to always take the customer, so every bag can be traced, and they let regulars pay at collection.
| **Setting** | **CleanFast Laundry's choice** |
| --- | --- |
| Business units shown in POS | Laundry first, then Bag Repair |
| View Mode | Grid |
| Item choices | Pop-up, with the standard limit of 5 |
| Contact on orders | Mandatory |
| Pay later | On |
| Every other switch | Left as standard |
They click Publish, then Publish again in **Review your changes**.
Other businesses set Checkout up differently:
- **Bag Repair:** a shop with long repair lists (stitching, edge paint, zip, cleaning) picks **Full panel** for **Item choices**, so staff can read every repair type.
- **Home Cleaning:** a cleaning counter that takes deposits before a job turns on **Empty cart checkout**, so staff can charge a deposit before the job's items are known.
### What the cart adds up to
A customer brings 3 shirts at S$4.00 each and uses a 10% promo code. CleanFast Laundry's prices are before GST.
| **Line** | **Amount** |
| --- | --- |
| 3 × Shirt (Wash & Iron) at S$4.00 | S$12.00 |
| Promo code, 10% off | −S$1.20 |
| GST (9%) on S$10.80 | S$0.97 |
| **Total** | **S$11.77** |
If your prices already include GST, no GST is added and the total is S$10.80. The tax name and rate come from your market's tax settings.
---
## What staff see
After you publish, staff at Tampines and Jurong open the Checkout tab. Laundry is selected, with Bag Repair beside it. They tap Shirt, choose Wash & Iron in the pop-up, and the shirt joins the cart.
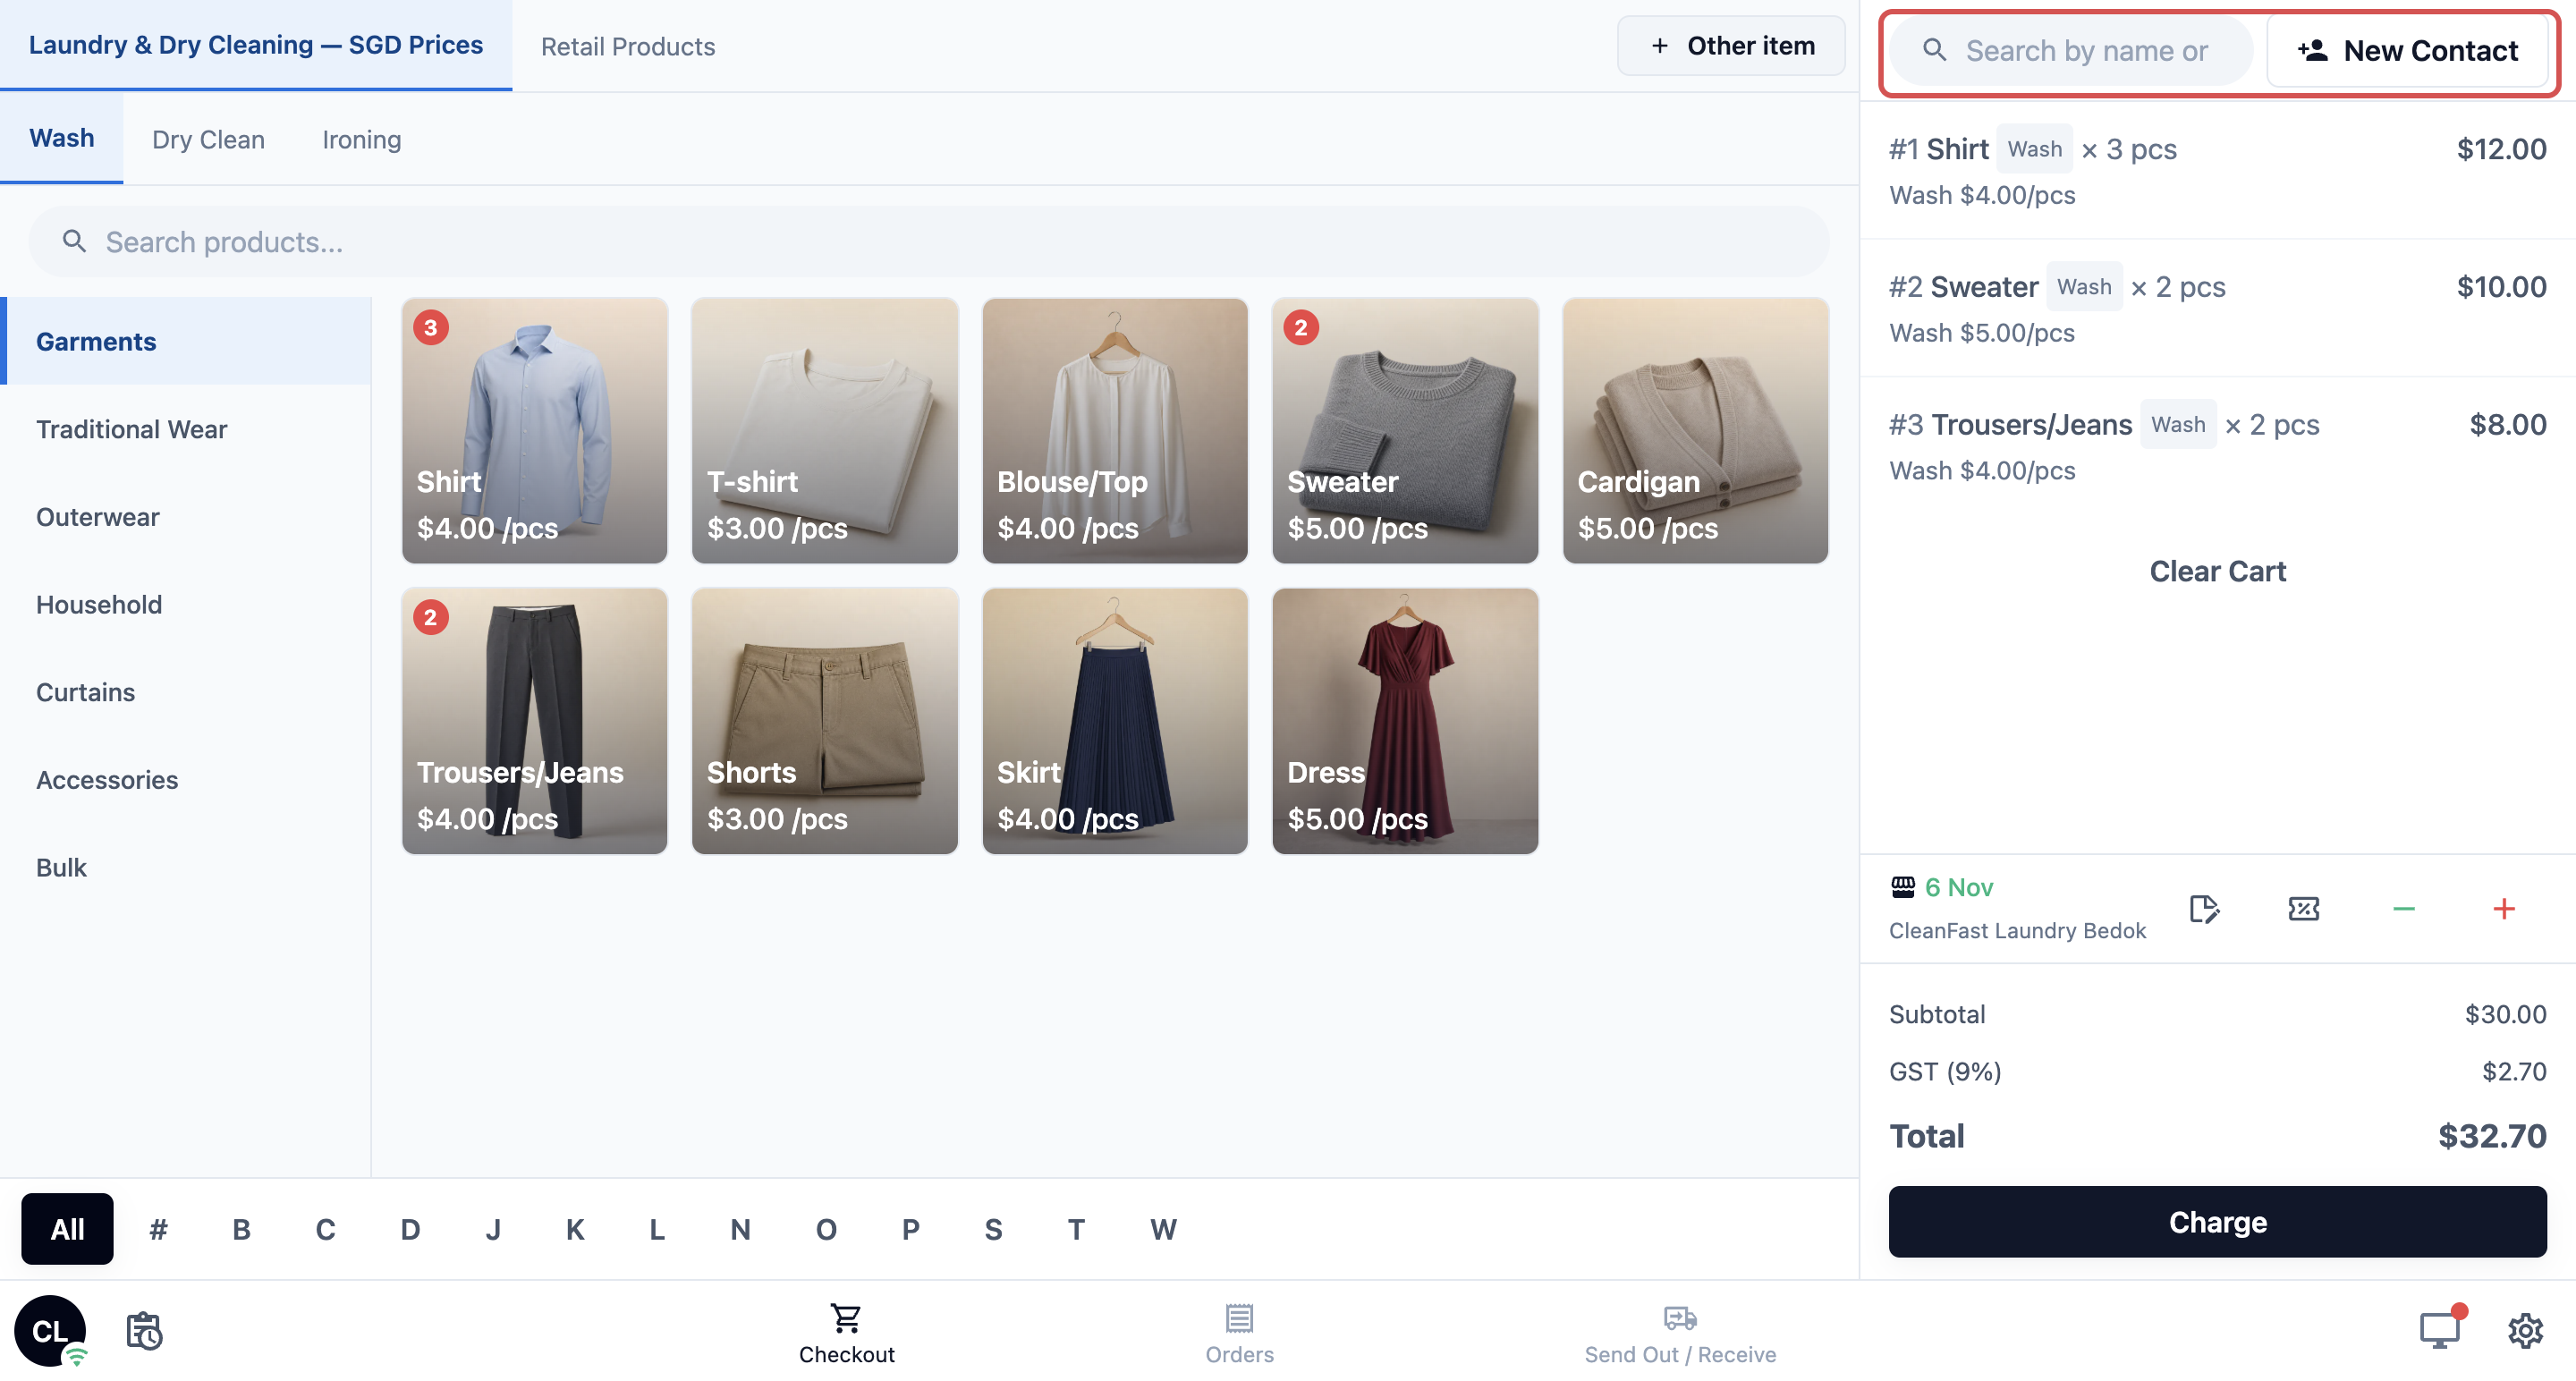
They pick the customer, then tap Charge. The payment screen shows your payment methods and Pay Later.
---
## How it works with other features
- **Staff permissions:** the − discount button shows only when the Discounts switch is on and the staff member is allowed to give discounts. If you turn Discounts off here, even staff with that permission don't see the button.
- **Collection dates:** the collection date staff pick in the cart comes from your business unit's store pickup settings, not from this page. See [Setting Collection Dates for Shop Orders](/docs/setting-collection-dates-for-shop-orders).
---
## FAQs
**The catalog on the POS is empty. What did I miss?**
> The business units switched on under **Business units shown in POS** have no items yet. Add a price list or catalog to the unit, then check the unit is switched on in the Catalog row. See [Setting Up Your Business Unit Catalog](/docs/setting-up-business-unit-catalog).
**Staff tap Charge and nothing happens.**
> If **Contact on orders** is Mandatory, staff must pick a customer first. They see "Select a customer account before continuing." If the cart is empty, Charge only works when **Empty cart checkout** is on.
**Where is the discount button?**
> Check that **Discounts** is on in the Cart row and that you published. The button also needs the staff member to be allowed to give discounts. See [Giving Discounts at the Counter](/docs/giving-discounts-at-the-counter).
**One of my shops sells only Bag Repair. Can it hide Laundry?**
> Business units are chosen for the whole app, so every shop using it sees the same ones. Create a second POS app with only Bag Repair switched on, and sign in that shop's devices with it. See [Creating Your POS App and Using the Editor](/docs/create-your-pos-app).
**Where do Pay Later orders go?**
> They are saved as unpaid orders. Staff find them on the Orders page under the **Unpaid** tab and take payment when the customer collects. See [Setting Up the Orders Page](/docs/setting-up-the-pos-orders-page).
**If I turn off Loyalty points redemption, do customers stop earning points?**
> No. The switch only hides the points button in this app's cart. Customers keep earning points on their orders as set in your loyalty program.
---
## What's Next
You have chosen what staff can sell and what the cart shows on your Checkout page. Next, set up where staff find and manage those orders in [Setting Up the Orders Page](/docs/setting-up-the-pos-orders-page): order tabs, order cards and order details.
Happy with the ready-made order tabs? Go straight to the page you want to add: [Send Out / Receive](/docs/setting-up-send-out-and-receive-at-the-pos), [Inventory](/docs/set-up-inventory-tracking-on-your-pos) or [WhatsApp](/docs/set-up-whatsapp-inbox-on-your-pos). Finished building your pages? Skip to [Setting Up Payment Methods at the POS](/docs/setting-up-your-payment-methods-at-pos).