At 6pm your Jurong staff tap Add all, then Send out 12 orders, and every order in the van shows Sent to Factory.
## Before You Start
- **Your POS app:** you add this page in the POS app editor. See [Creating Your POS App and Using the Editor](/docs/create-your-pos-app).
- **A receipt printer:** staff scan the QR code on each receipt or item label. See [Connecting Your Printers to the POS](/docs/connecting-your-printers-to-the-pos).
- **Access:** you need a Console login that can manage the Point of Sale.
- **Factory steps (Advanced setups only):** for orders to move to their next step on their own, your business unit's Production steps need the Sent Out from Shop and Received Back at Shop Auto Triggers. If you haven't set up a pipeline before, read [Tracking Every Order from Drop-Off to Collection](/docs/tracking-order-stages-pipeline) first. The Setting up your factory steps section then shows how.
If you set this up before: Send Out / Receive is now its own page in your POS app. You add it once with Add new page, and staff open it as a tab on the POS.
## Choose your setup
Pick the row that matches how your shop works, then read only the sections it lists.
| **Level** | **Fits shops like** | **What you set up** | **Read these sections** |
| --- | --- | --- | --- |
| Easy | One shop that does all its work in-house, or a home cleaning business that works at the customer's place | Nothing. Leave this page out, and your orders move through their steps as they do today. You can add the page later if you start sending work out. | [What's Next](#whats-next) |
| Intermediate | A few shops sharing one workshop, where staff only need to record which orders left and came back | The Send Out / Receive page with **Order number** or **Scan QR** as its default tab. Each order's history shows when it left and came back, but its step stays the same. | [Where to find it](#where-to-find-it), [Setting it up](#setting-it-up), [What staff see](#what-staff-see), [Rules staff should know](#rules-staff-should-know) |
| Advanced | Several shops sending work to a factory, with steps that move on their own | Everything in Intermediate, plus factory steps with Auto Triggers, the **Pending orders** tab and a paired phone at the back door | Every section, including [Setting up your factory steps](#setting-up-your-factory-steps) and [Using a paired phone](#using-a-paired-phone) |
## Overview
Send Out / Receive is the POS page your staff use when orders leave the shop for your factory or workshop, and when they come back. Instead of opening each order and updating it, staff collect the orders into one batch and confirm them all with one tap. Each order's history then records who sent it, when and from which shop. When your factory steps have Auto Triggers, each order also moves to its next step on its own. You only choose which tab the page opens on, so setup takes a minute.
**Where it works**
- **Console:** you add the page and choose its default tab in the POS app editor.
- **POS:** staff see a **Send Out / Receive** tab on every device signed in with this app.
- **Paired phone:** staff can send out and receive from a phone paired to the POS, with the same tabs and batch.
- **Online Store and Mobile App:** customers who check their order see the step it is at, such as Sent to Factory.
Send Out / Receive is not a Pro page, so it works on Standard POS and Professional POS. The Pro pages, Inbox and WhatsApp Broadcasts, need Professional POS. Like every page type, Send Out / Receive can be added once per app.
---
## Why set it up
A van leaving with 40 bags of laundry should not mean 40 orders updated one by one. With this page, staff scan or pick the orders, check the count and send the whole batch at once. Staff can tell at a glance which orders are on the shelf and which are at the factory, and customers stop calling to ask.
If your work leaves the shop and you skip this page, nothing records it. Orders at the factory look the same as orders still in the shop, and the steps you set with Auto Triggers wait until someone updates each order by hand.
---
## Where to find it
1. Click the ⚙️ Settings icon in the top-right corner.
2. Under the **Sales Channels** section, click **Point of Sale**.
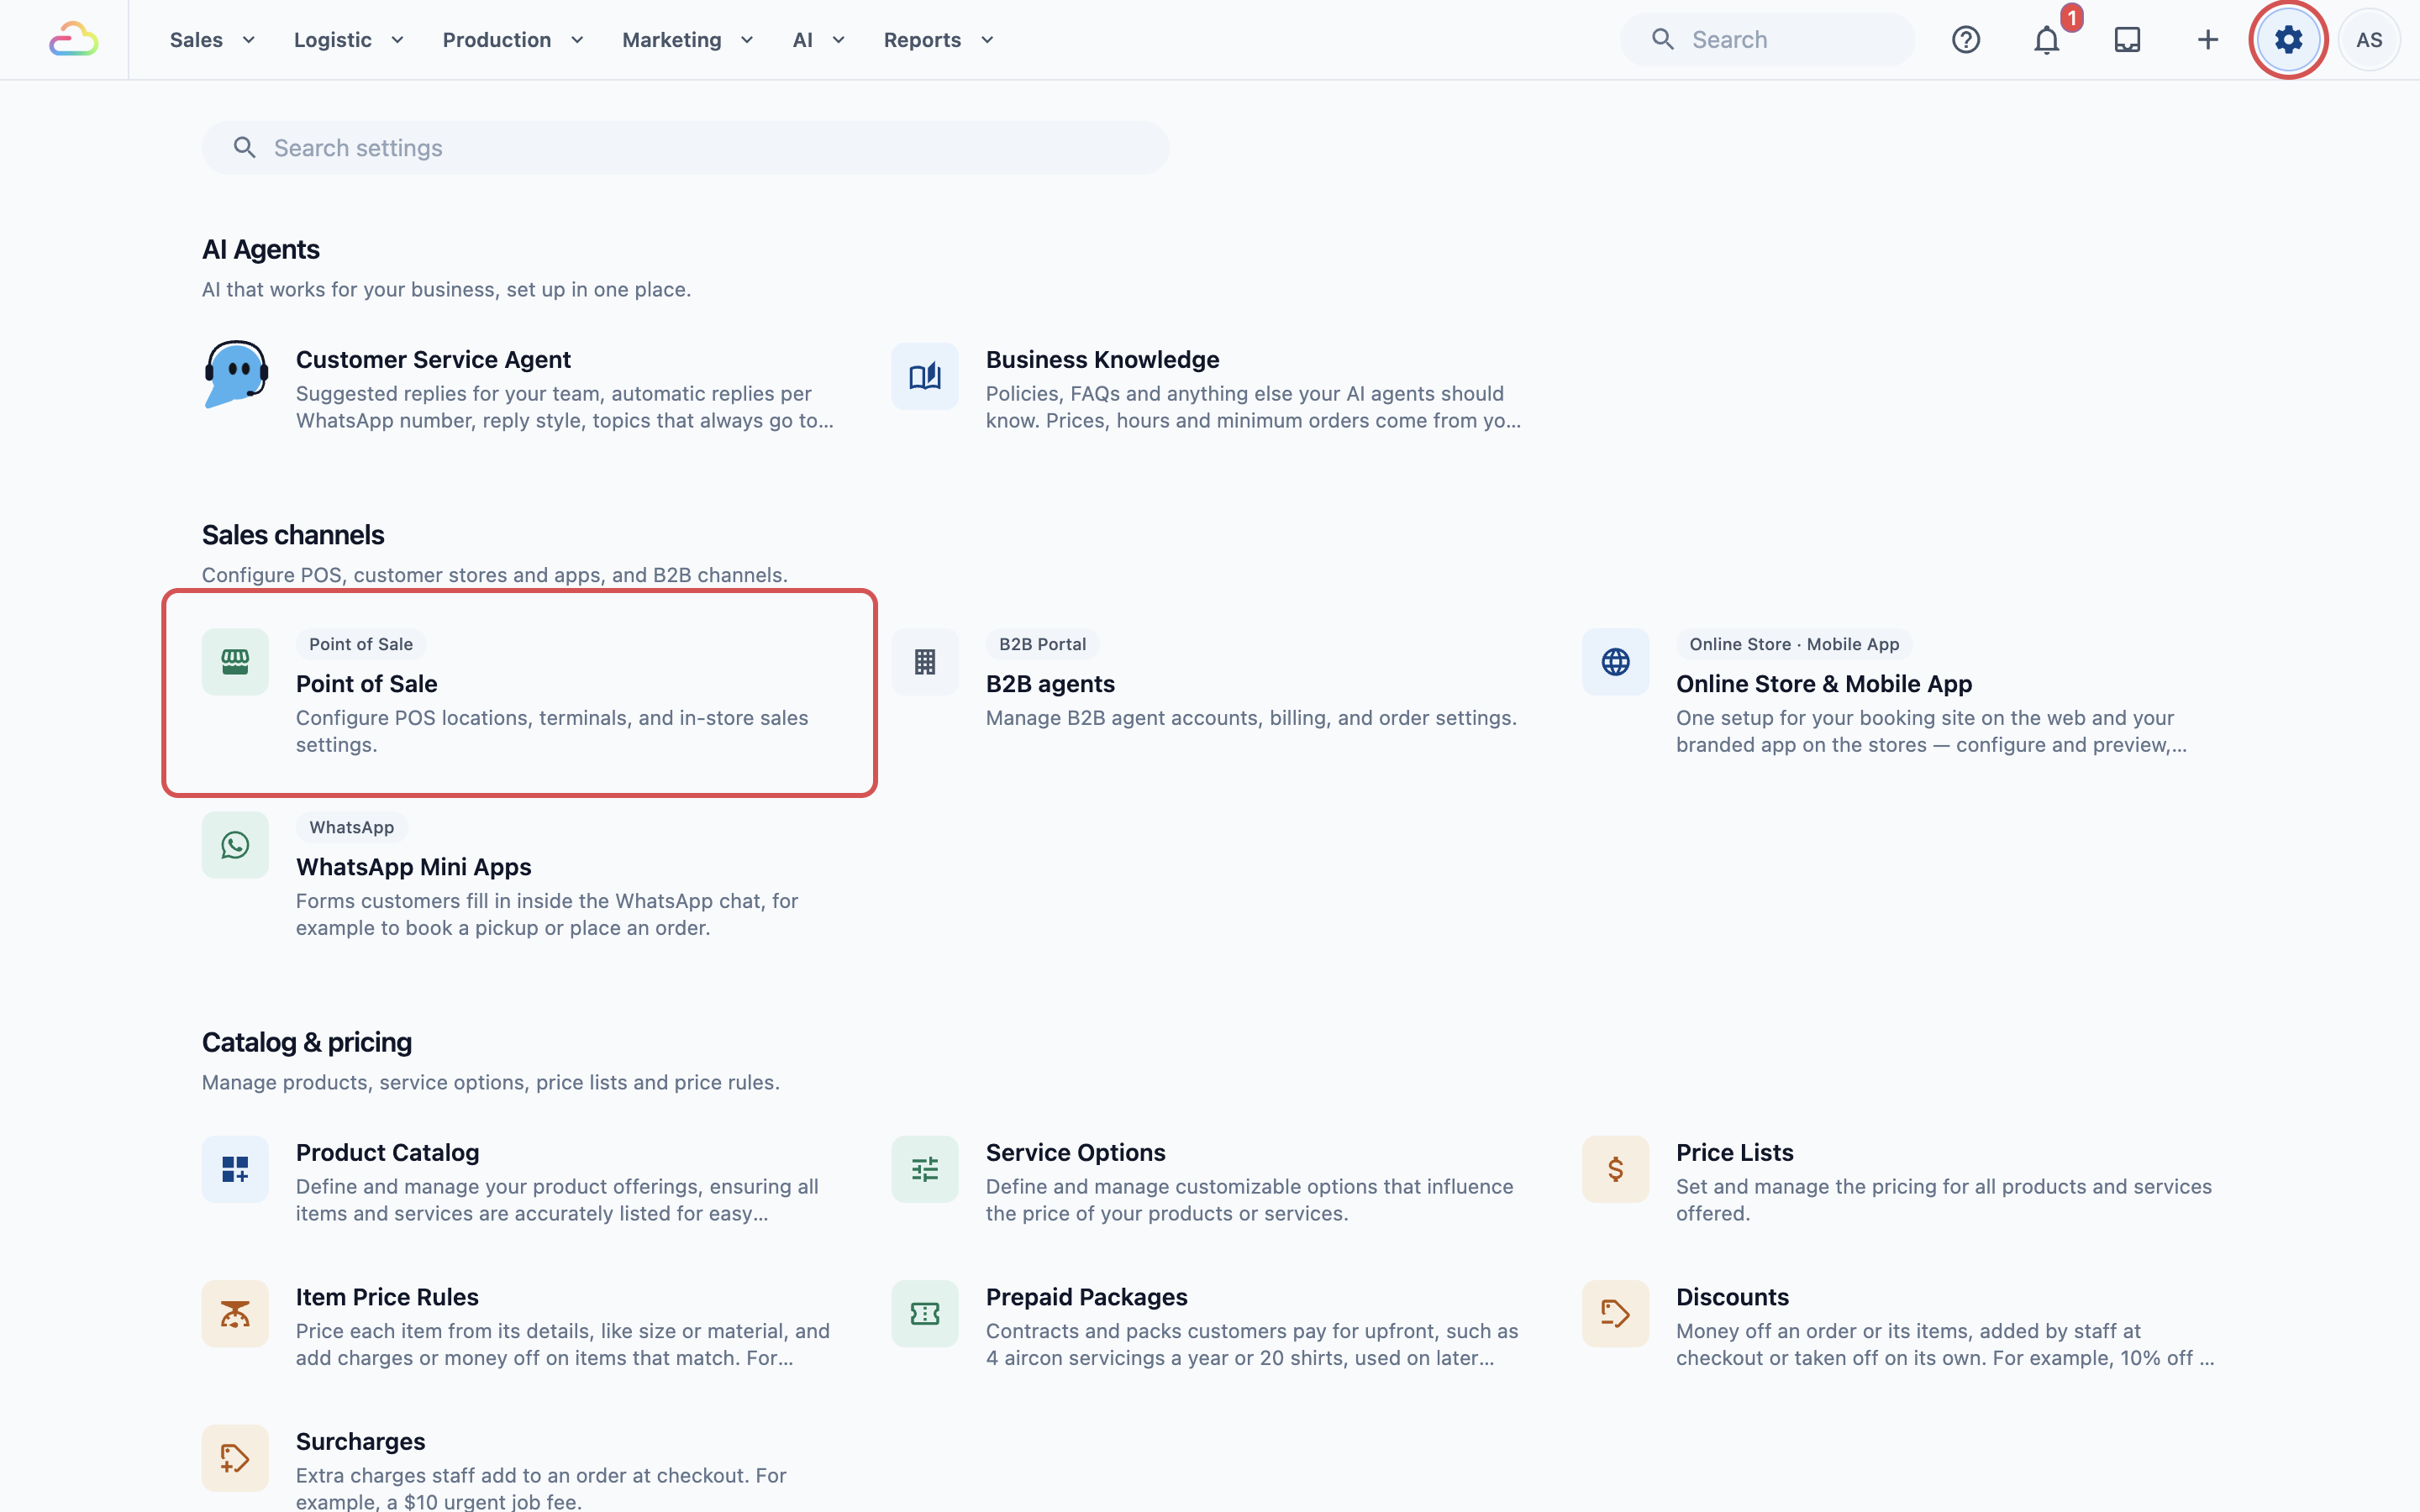
3. Under **POS Apps**, click your app, then click Edit.
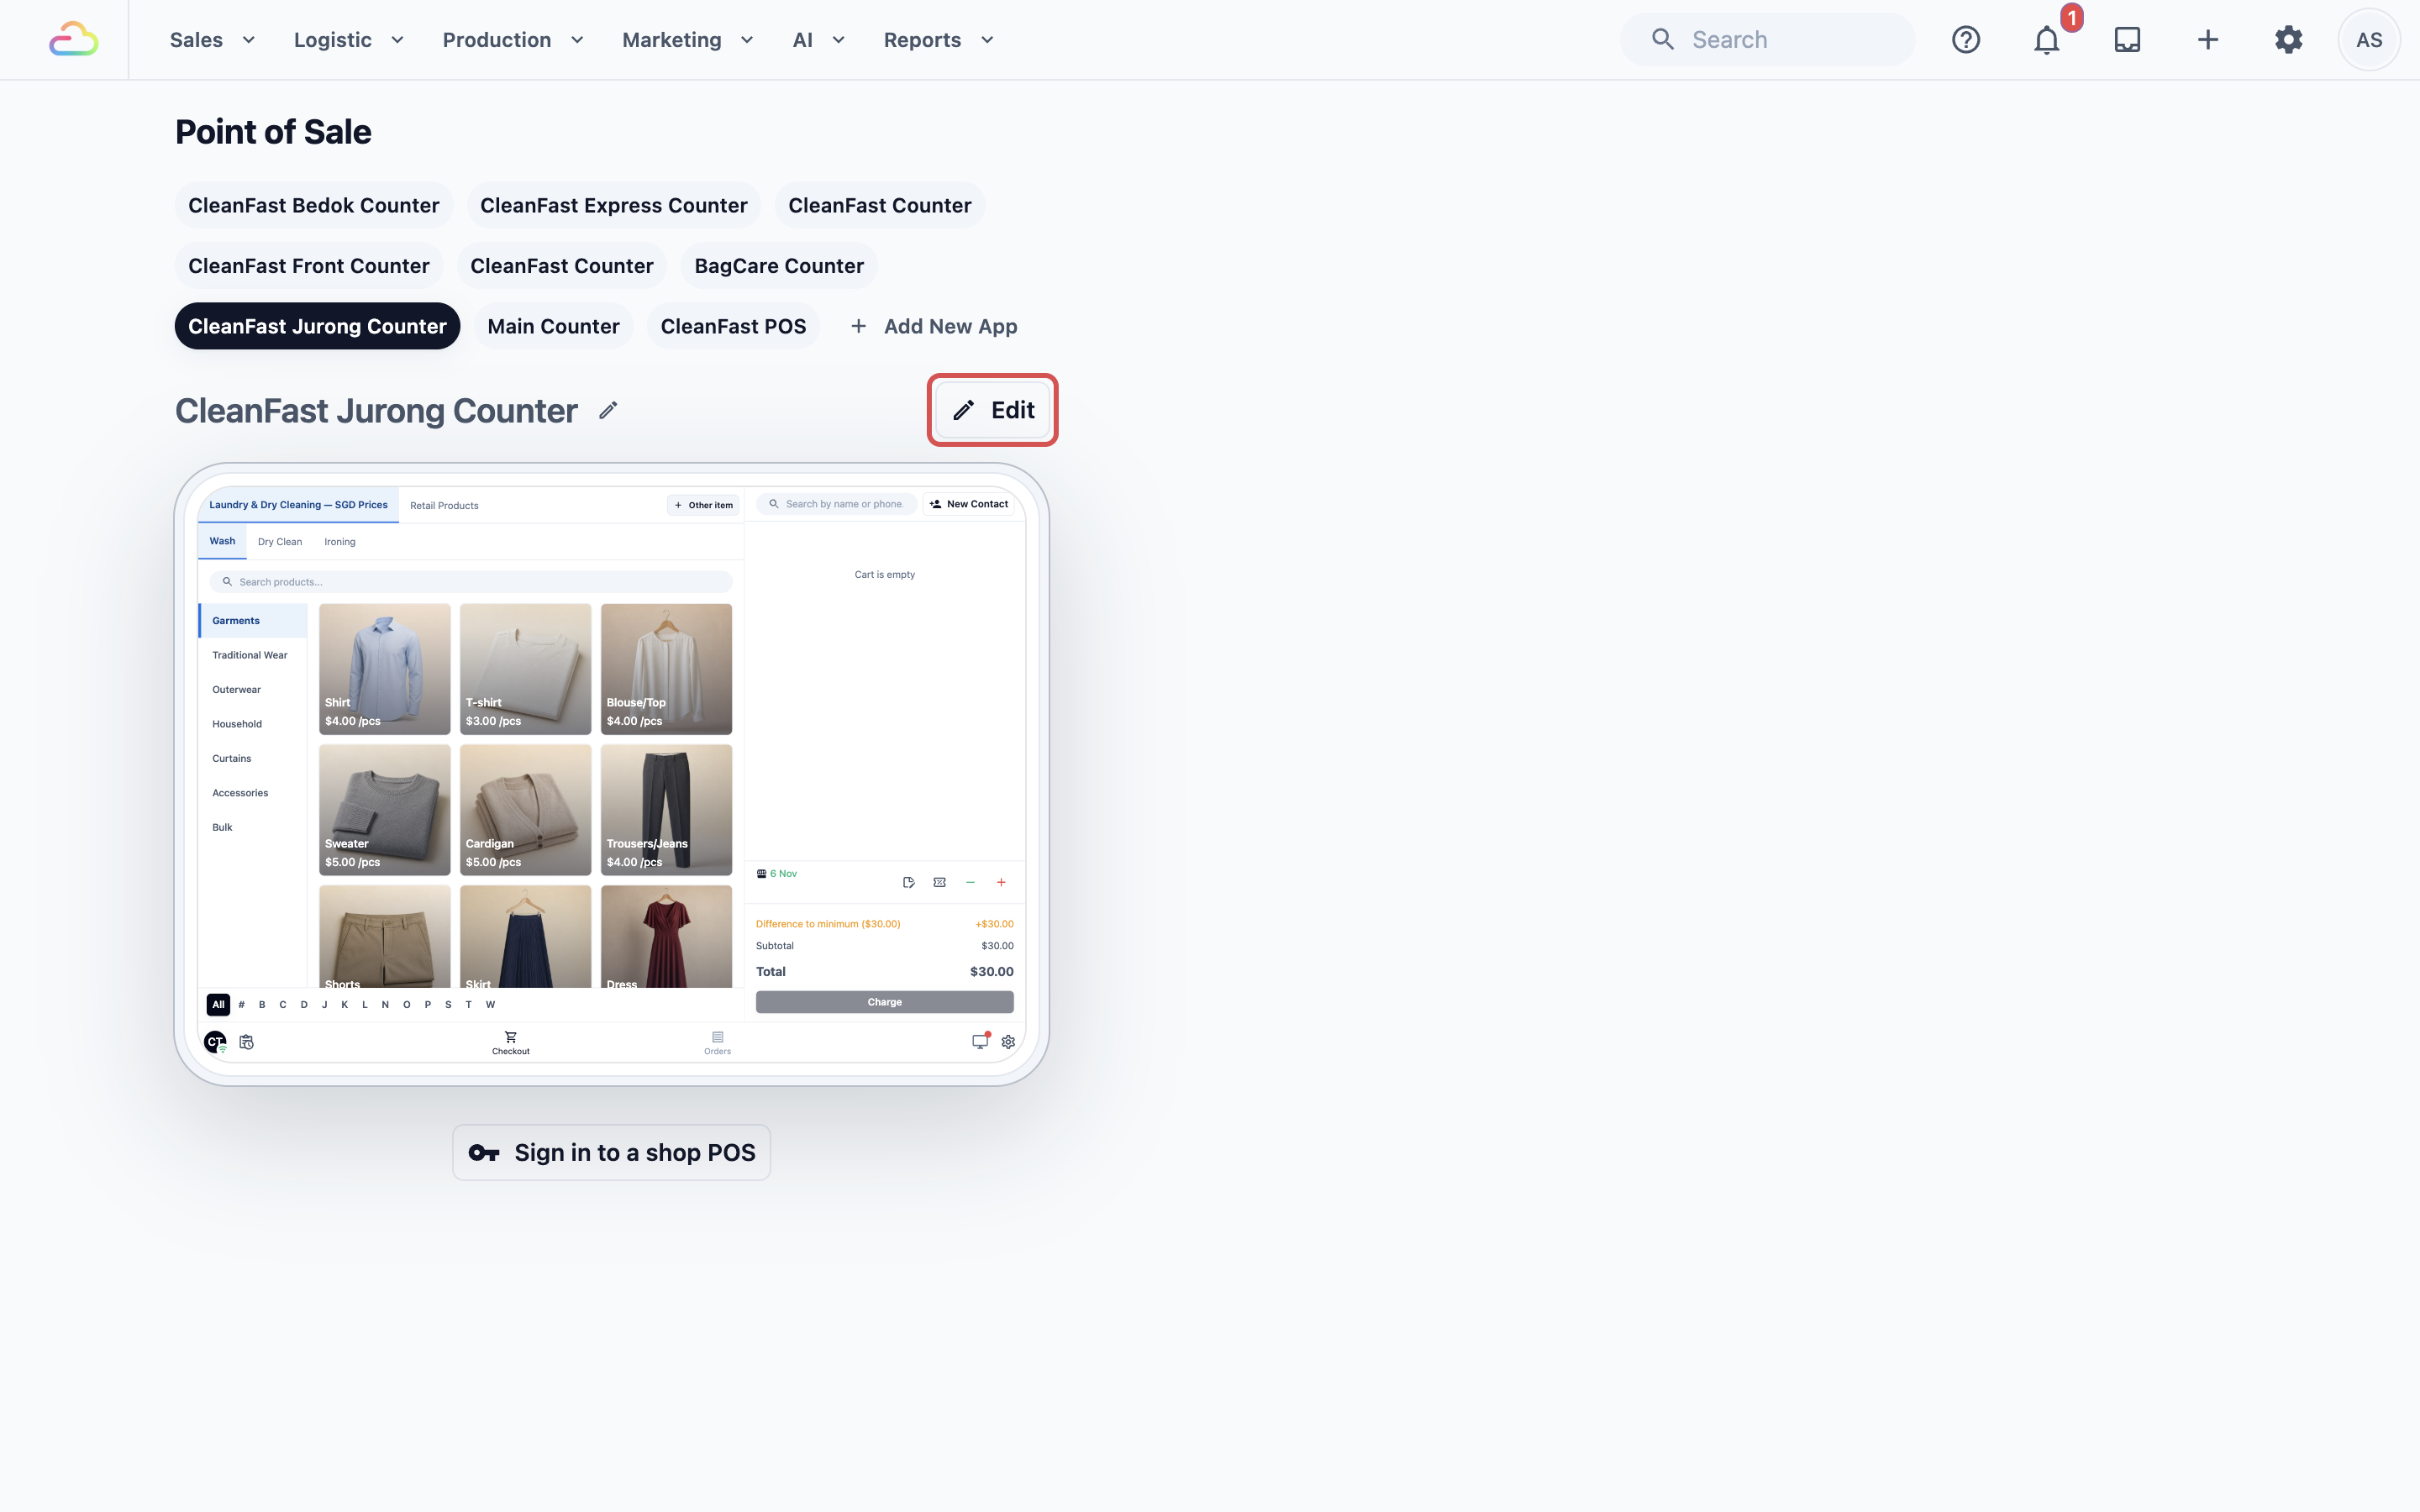
4. Next to **Pages**, click Add new page.
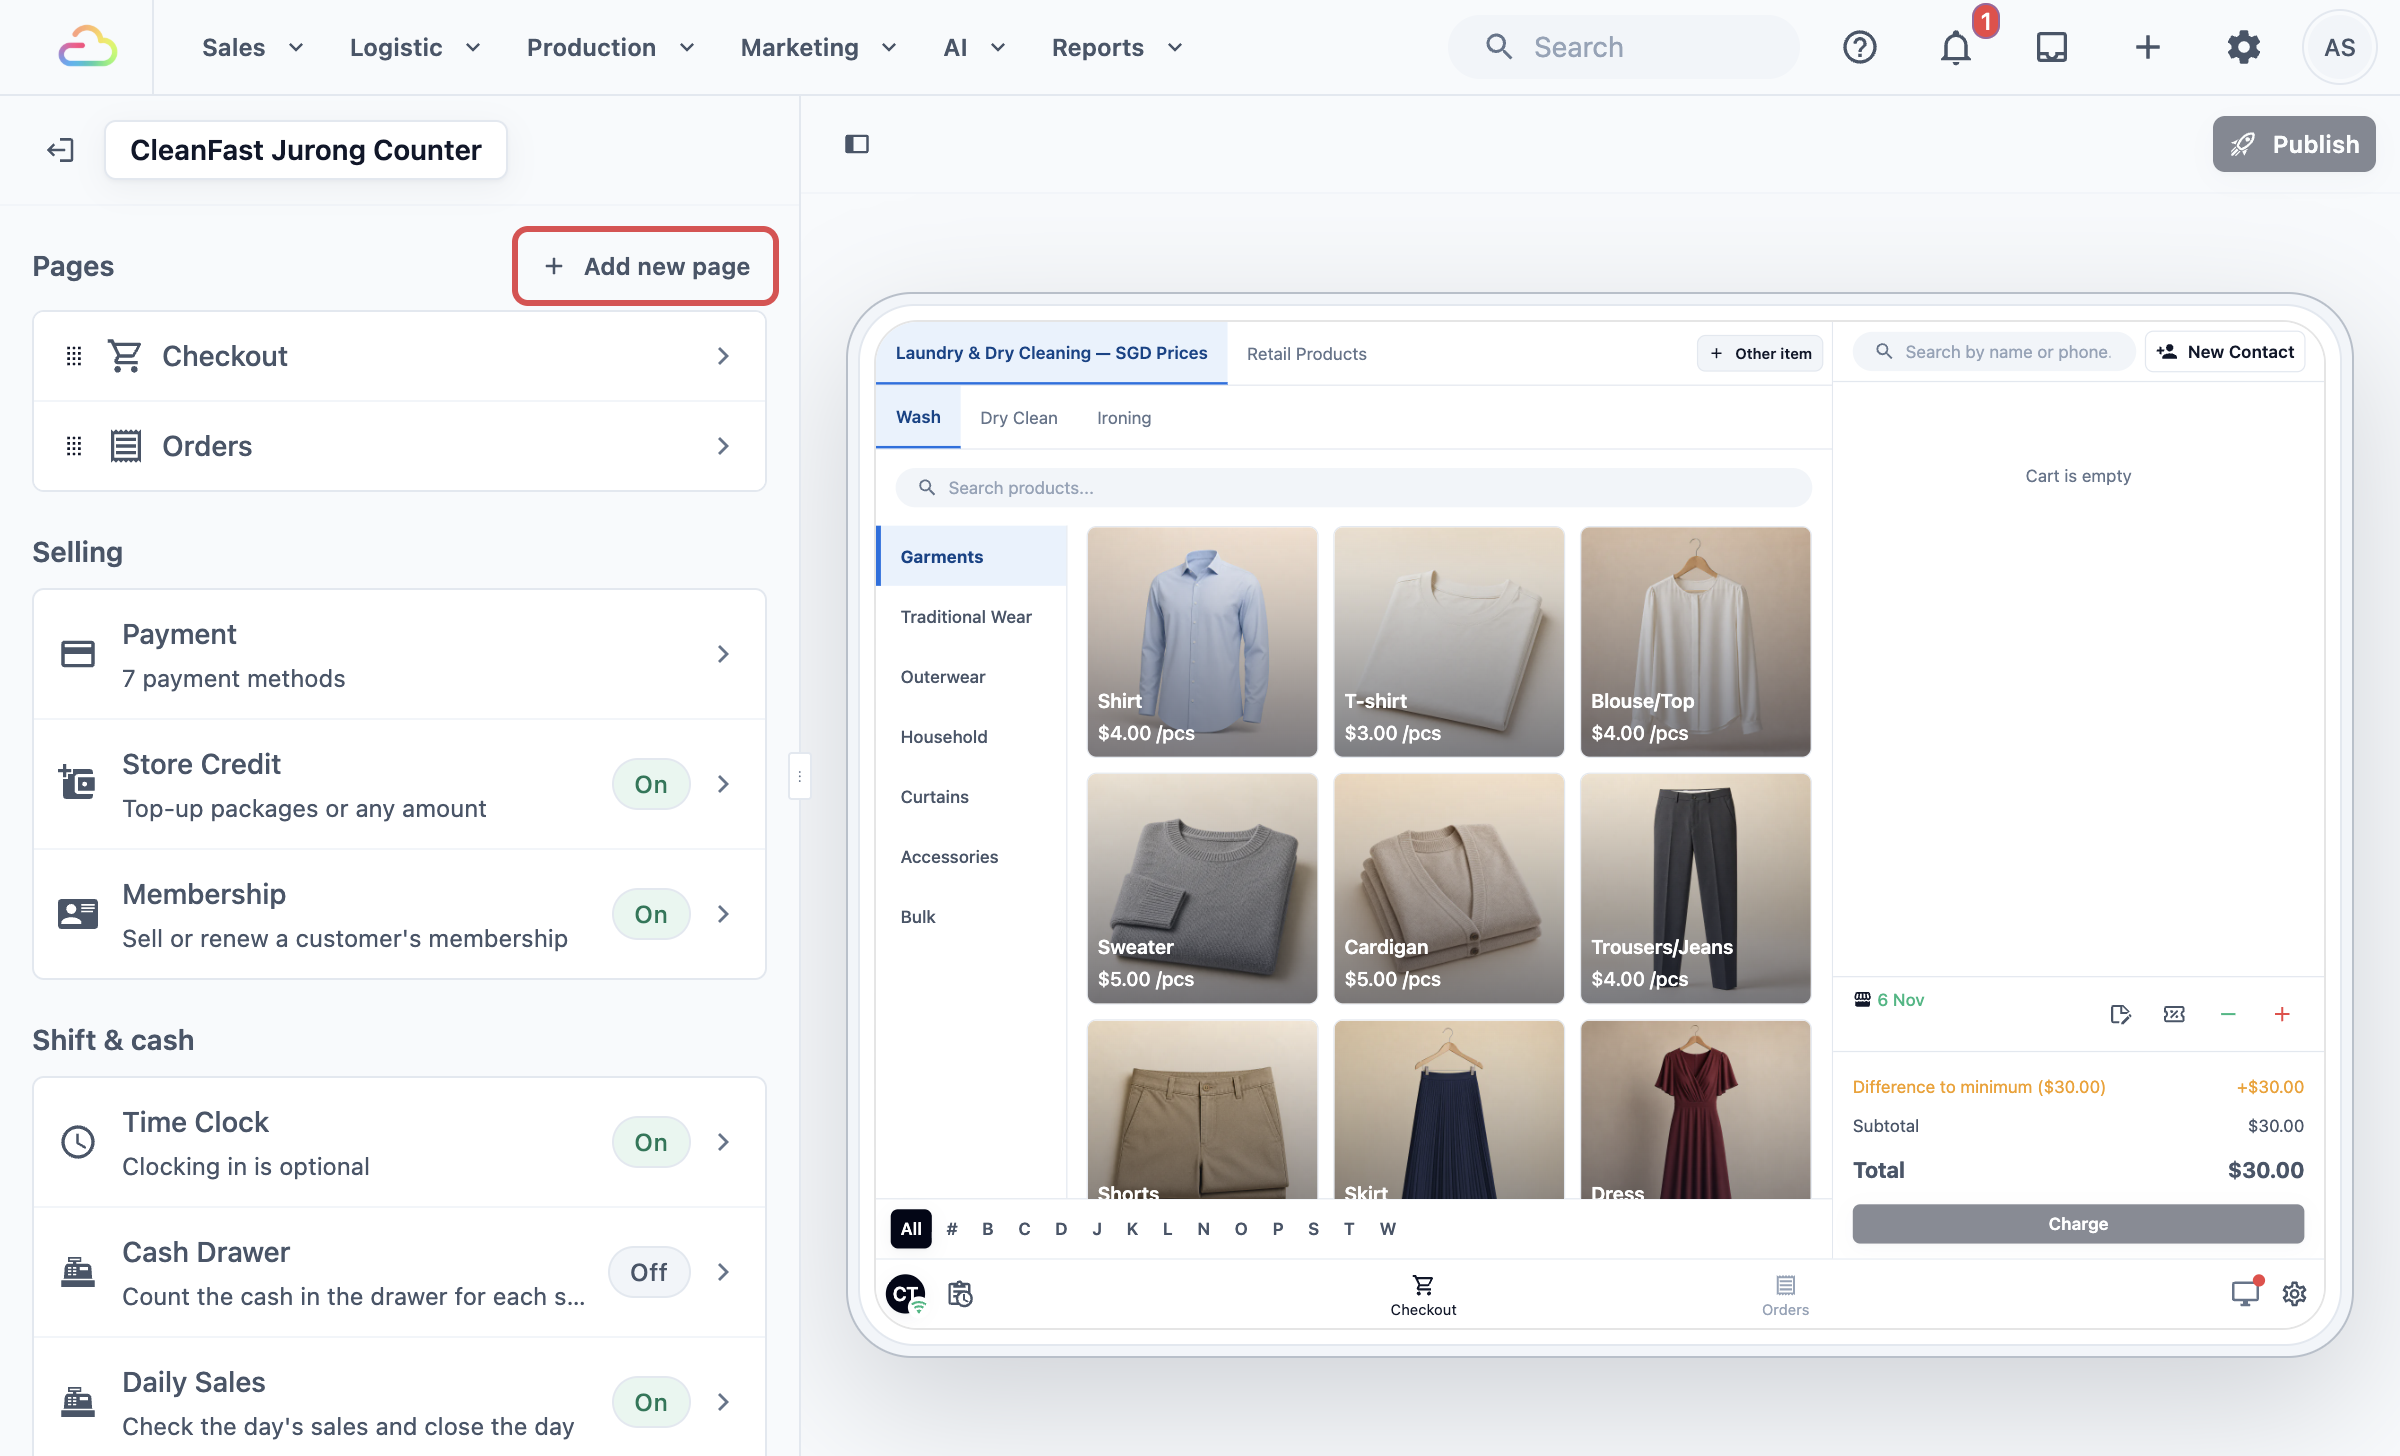
5. Find **Send Out / Receive** in the list and click Add. You see "Page created", and the page opens in the editor.
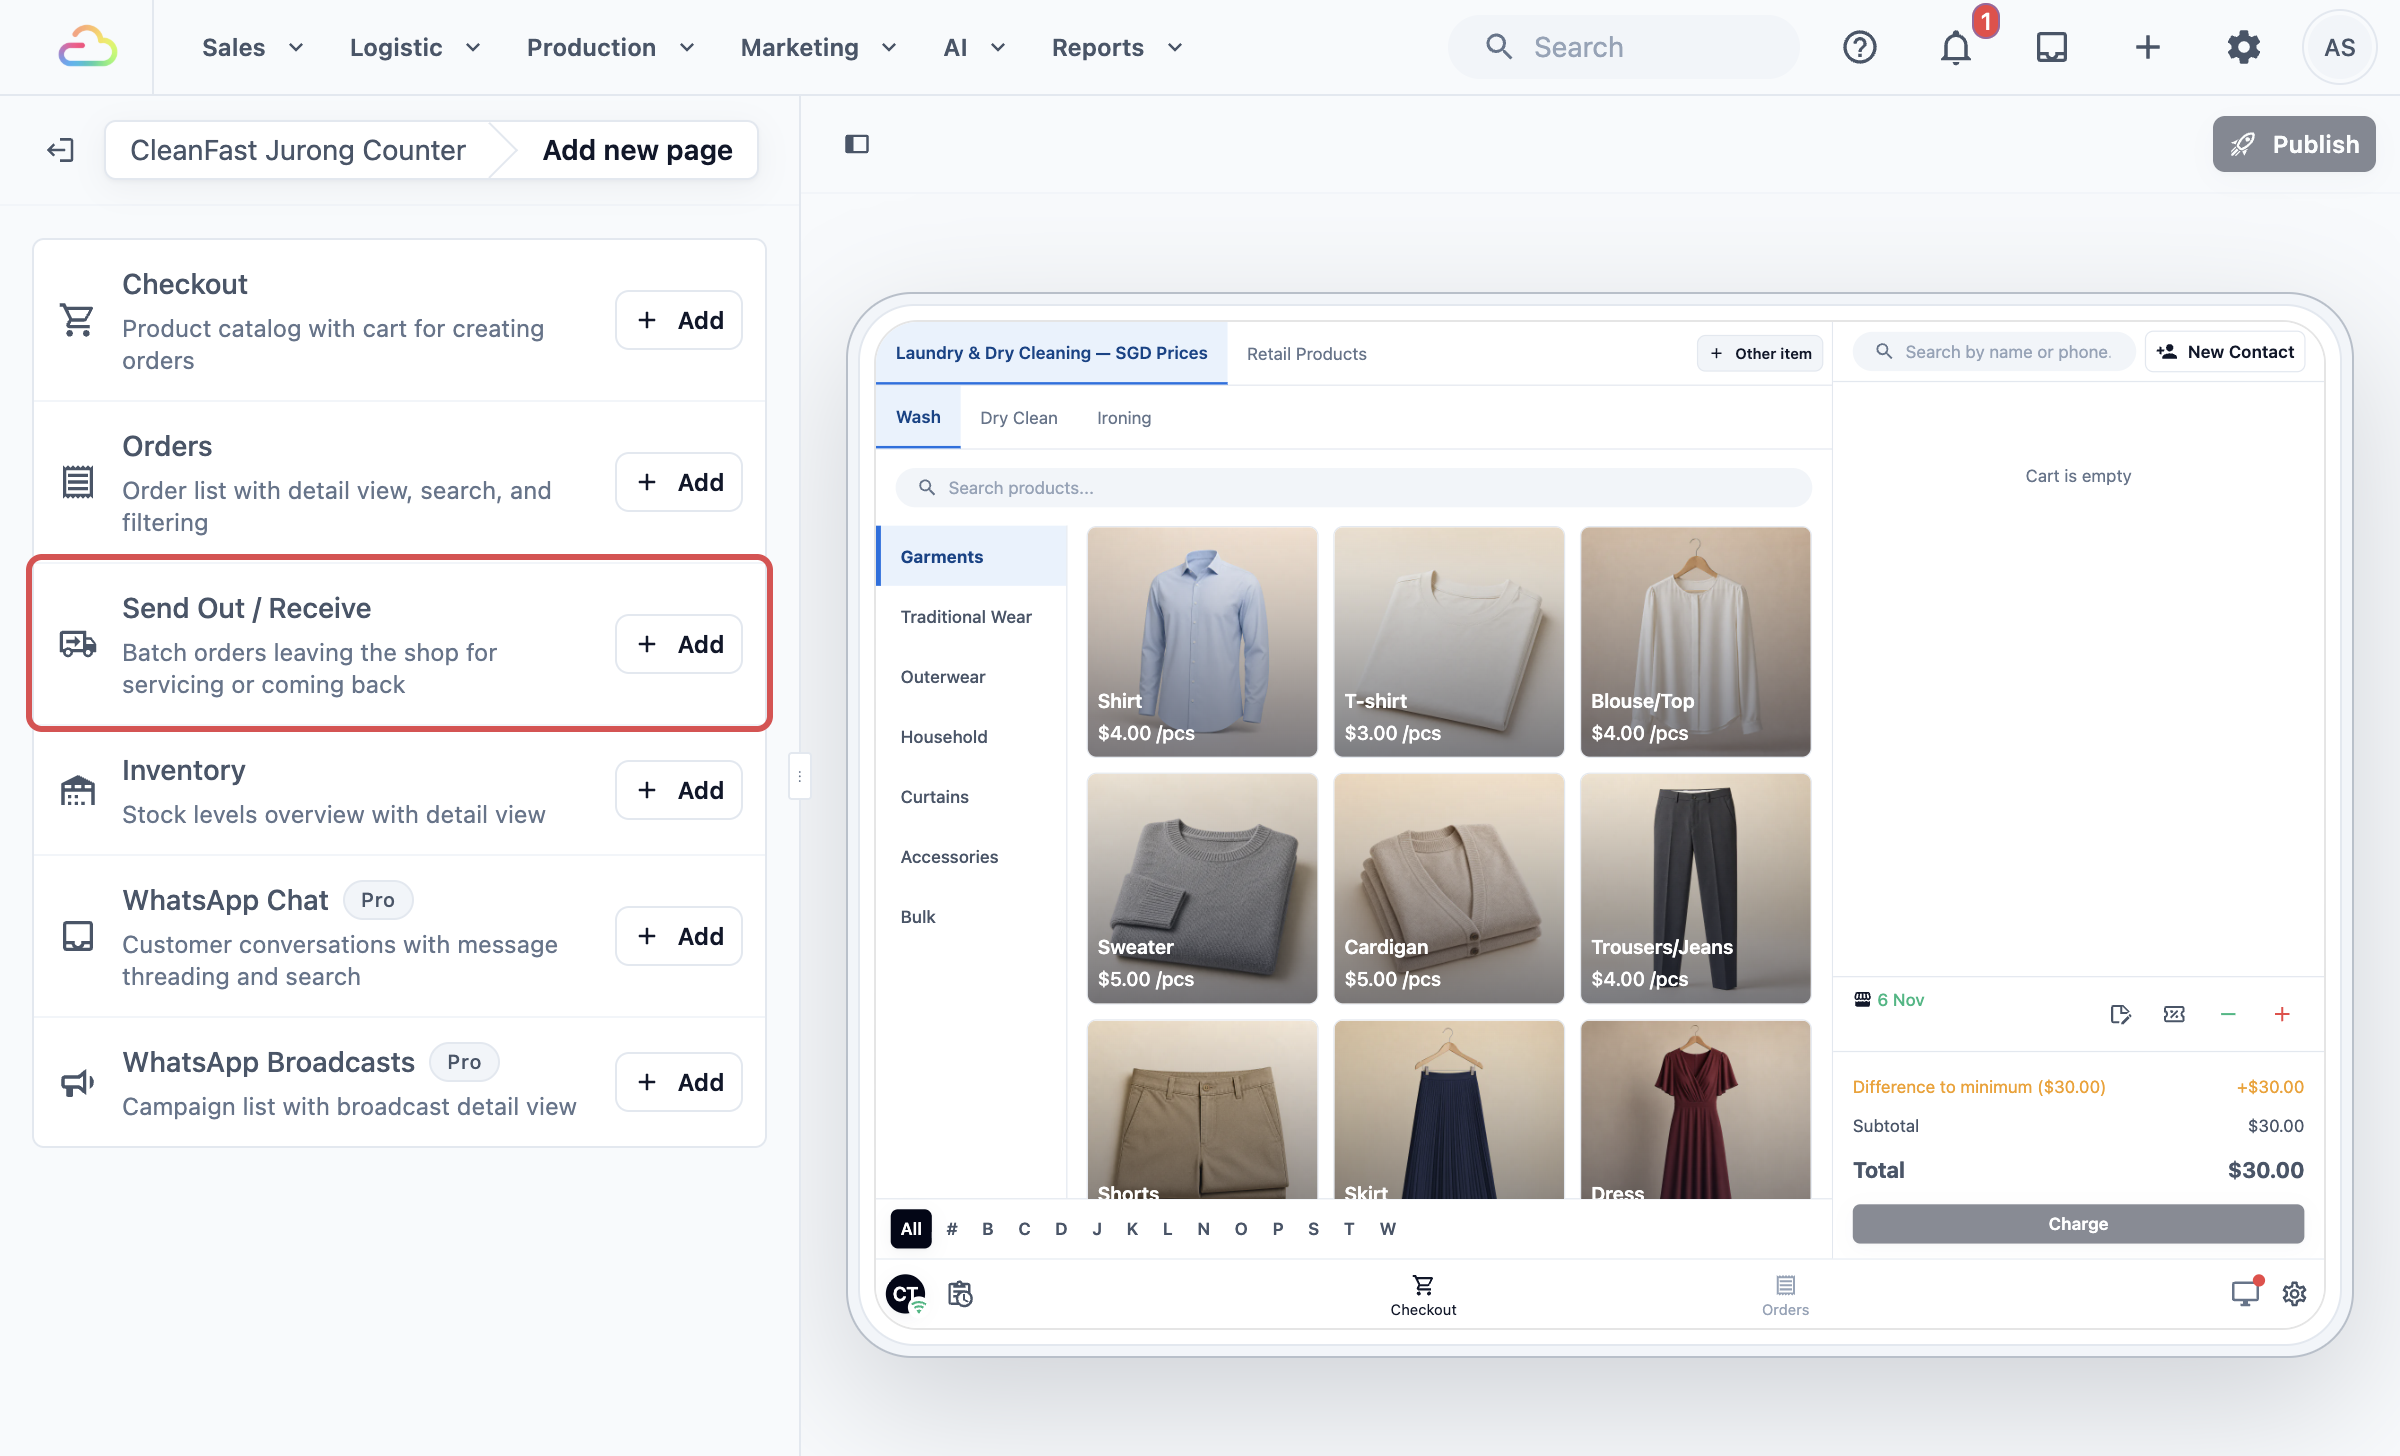
If the page is already in this app, the list shows **Already added** instead of Add.
---
## Setting it up
The page has one setting. The preview on the right shows the page as staff will see it.
1. Under **Pages**, click **Send Out / Receive**.
2. Choose a **Default tab**.
3. Click Publish at the top right, then Publish again in **Review your changes**.
You see "Published. Your counters have the changes." The **Send Out / Receive** tab now shows on every POS signed in with this app.
**Default tab**
The default tab is the way of adding orders the page opens on. Staff can still switch to any other tab at any time.
| **Option** | **What staff see first** | **Best for** |
| --- | --- | --- |
| Scan QR | The camera, ready to scan a receipt or item label | A tablet or phone with a camera |
| Order number | A keypad to type the number on the receipt. This is the setting for a new page | A computer at the counter, with a keyboard or barcode scanner |
| Pending orders | The list of this shop's orders waiting to go out or come back | Advanced setups that send out a whole day's work at once. The list fills only when your factory steps have Auto Triggers |
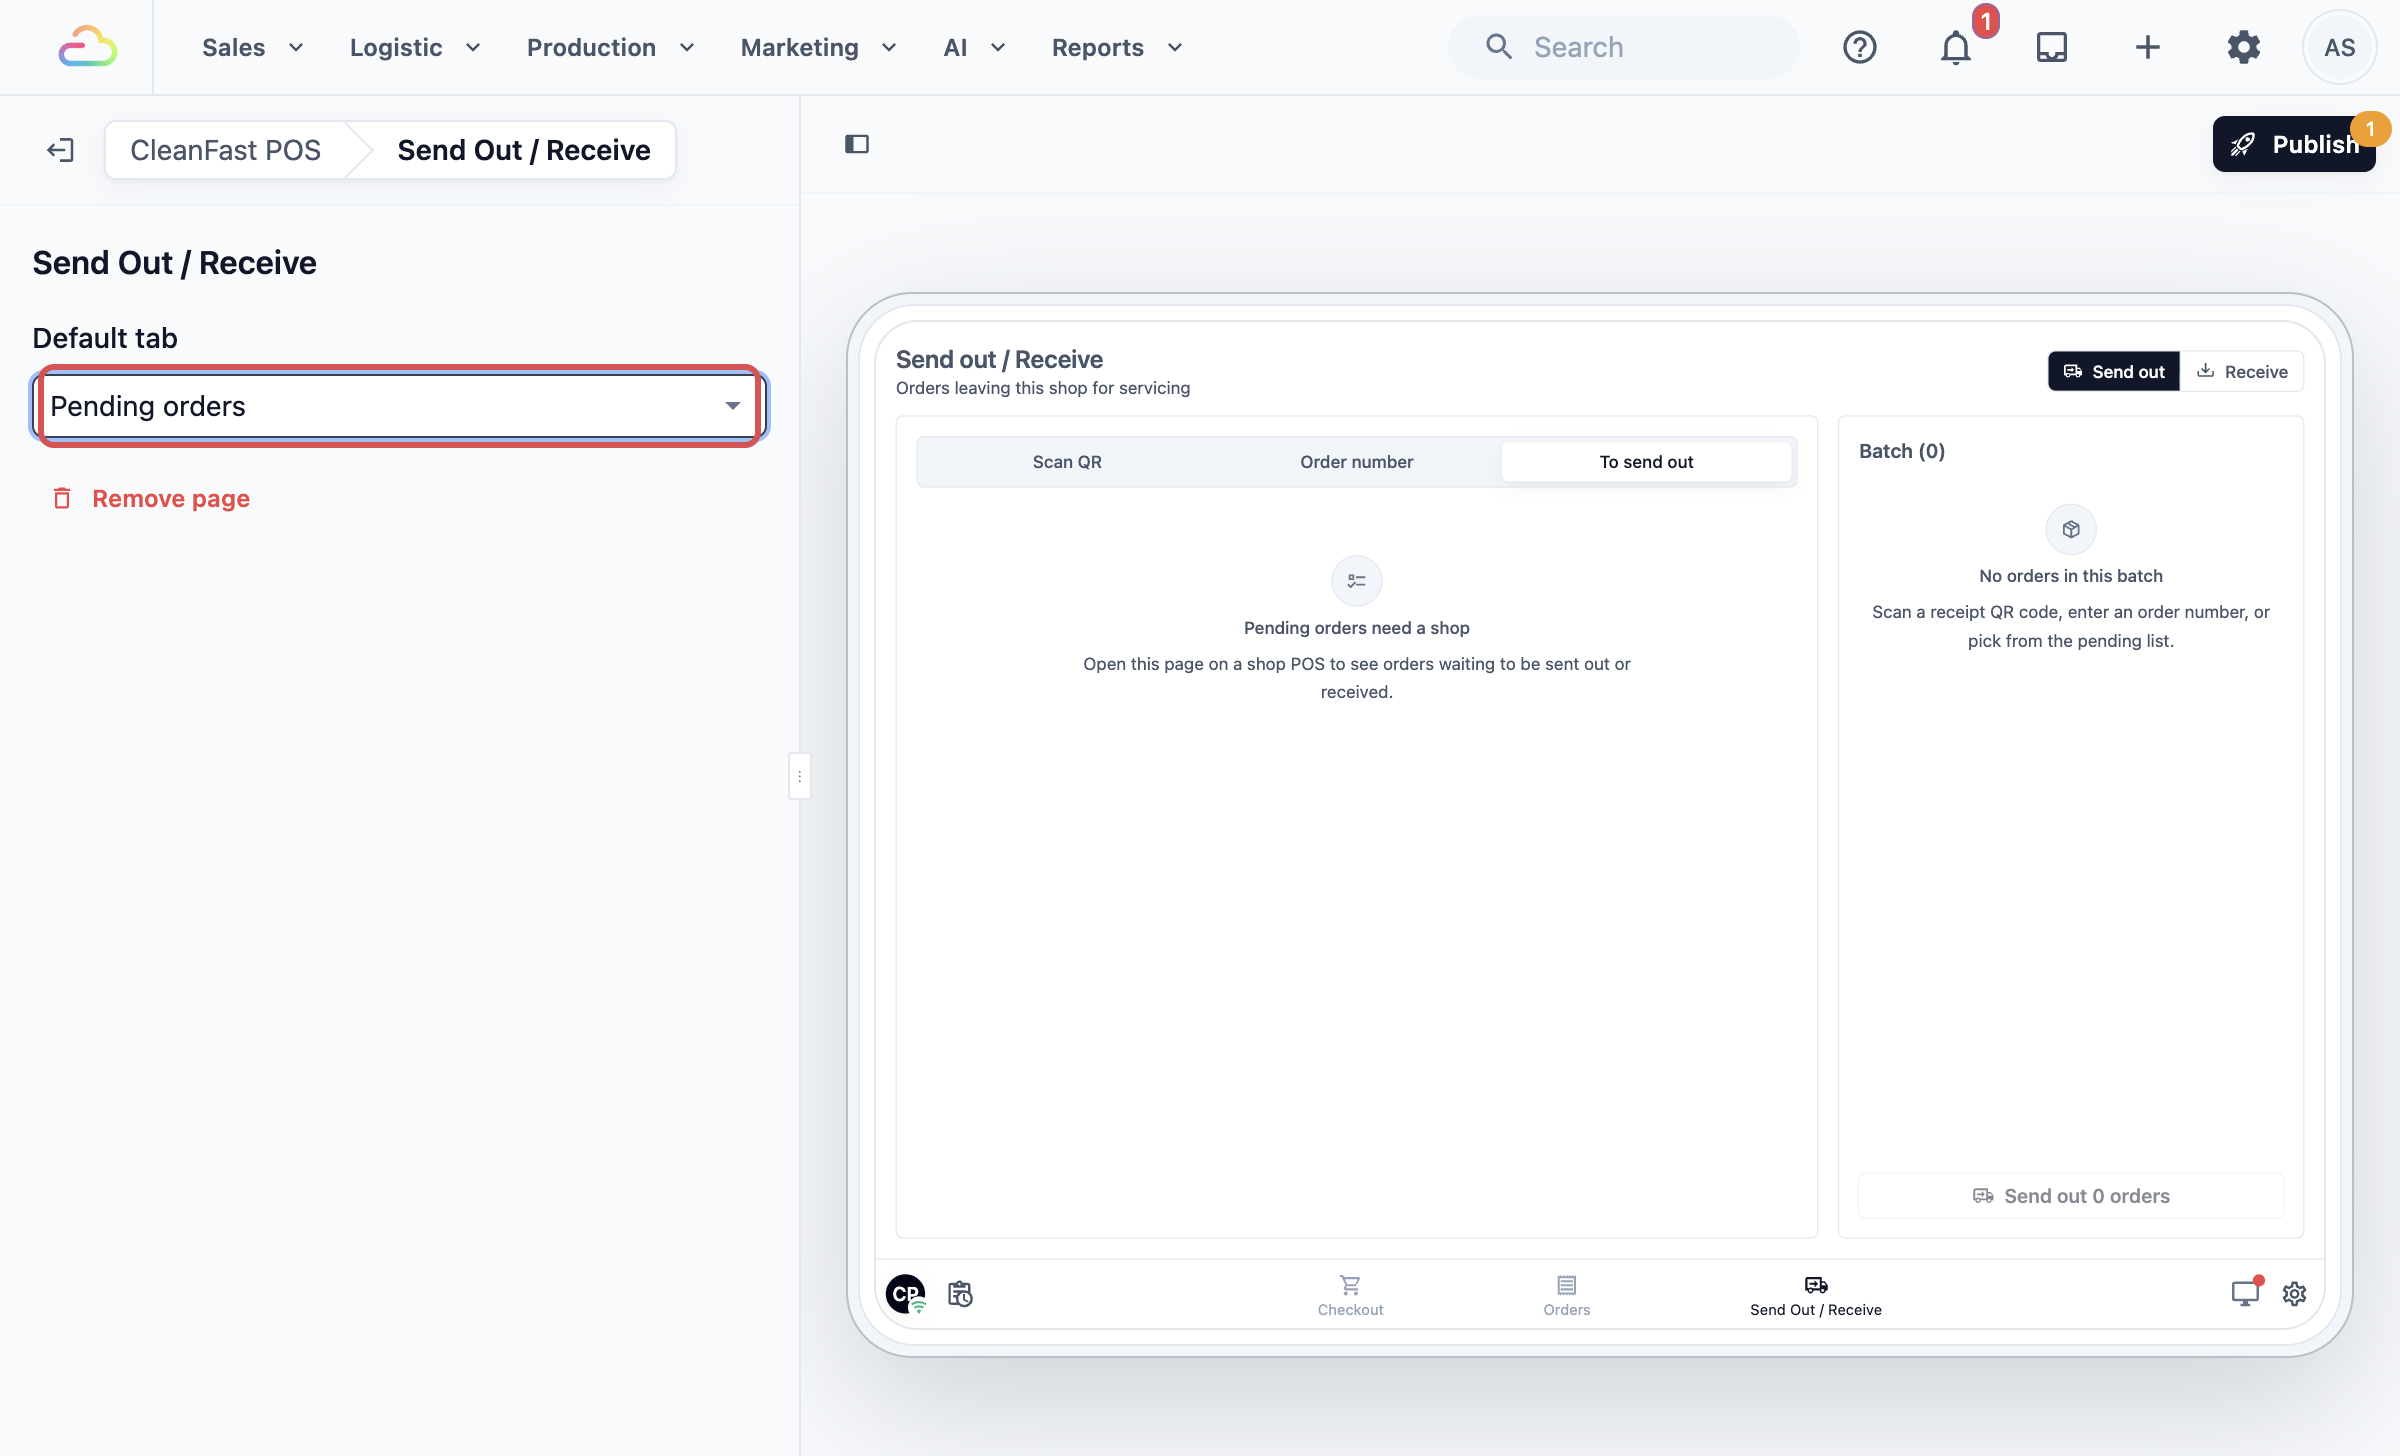
On the POS, the Pending orders tab is called To send out when staff send out, and To receive when they receive.
The preview in the editor can't show your pending orders, because it isn't signed in as a shop. It shows "Pending orders need a shop" until you open the page on a shop POS.
To take the page off the POS, open it in the editor, click Remove page, then publish. Orders already sent out keep their steps and history.
---
## What staff see
After you publish, staff tap the Send Out / Receive tab on the POS. At the top right, they choose Send out for orders leaving the shop, or Receive for orders coming back. The page always opens on Send out.
**Adding orders to the batch**
The batch is the group of orders that leave or come back together. Staff add orders in any of three ways:
- Scan QR: point the camera at the QR code on the receipt, the item label or the package label.
- Order number: type the number on the receipt, such as 464 or JEM-00464, then tap Add to batch or press Enter.
- To send out or To receive (Advanced setups): tap an order in the list, or tap Add all to add every order shown. Type in **Filter by number or customer** first to add only some.
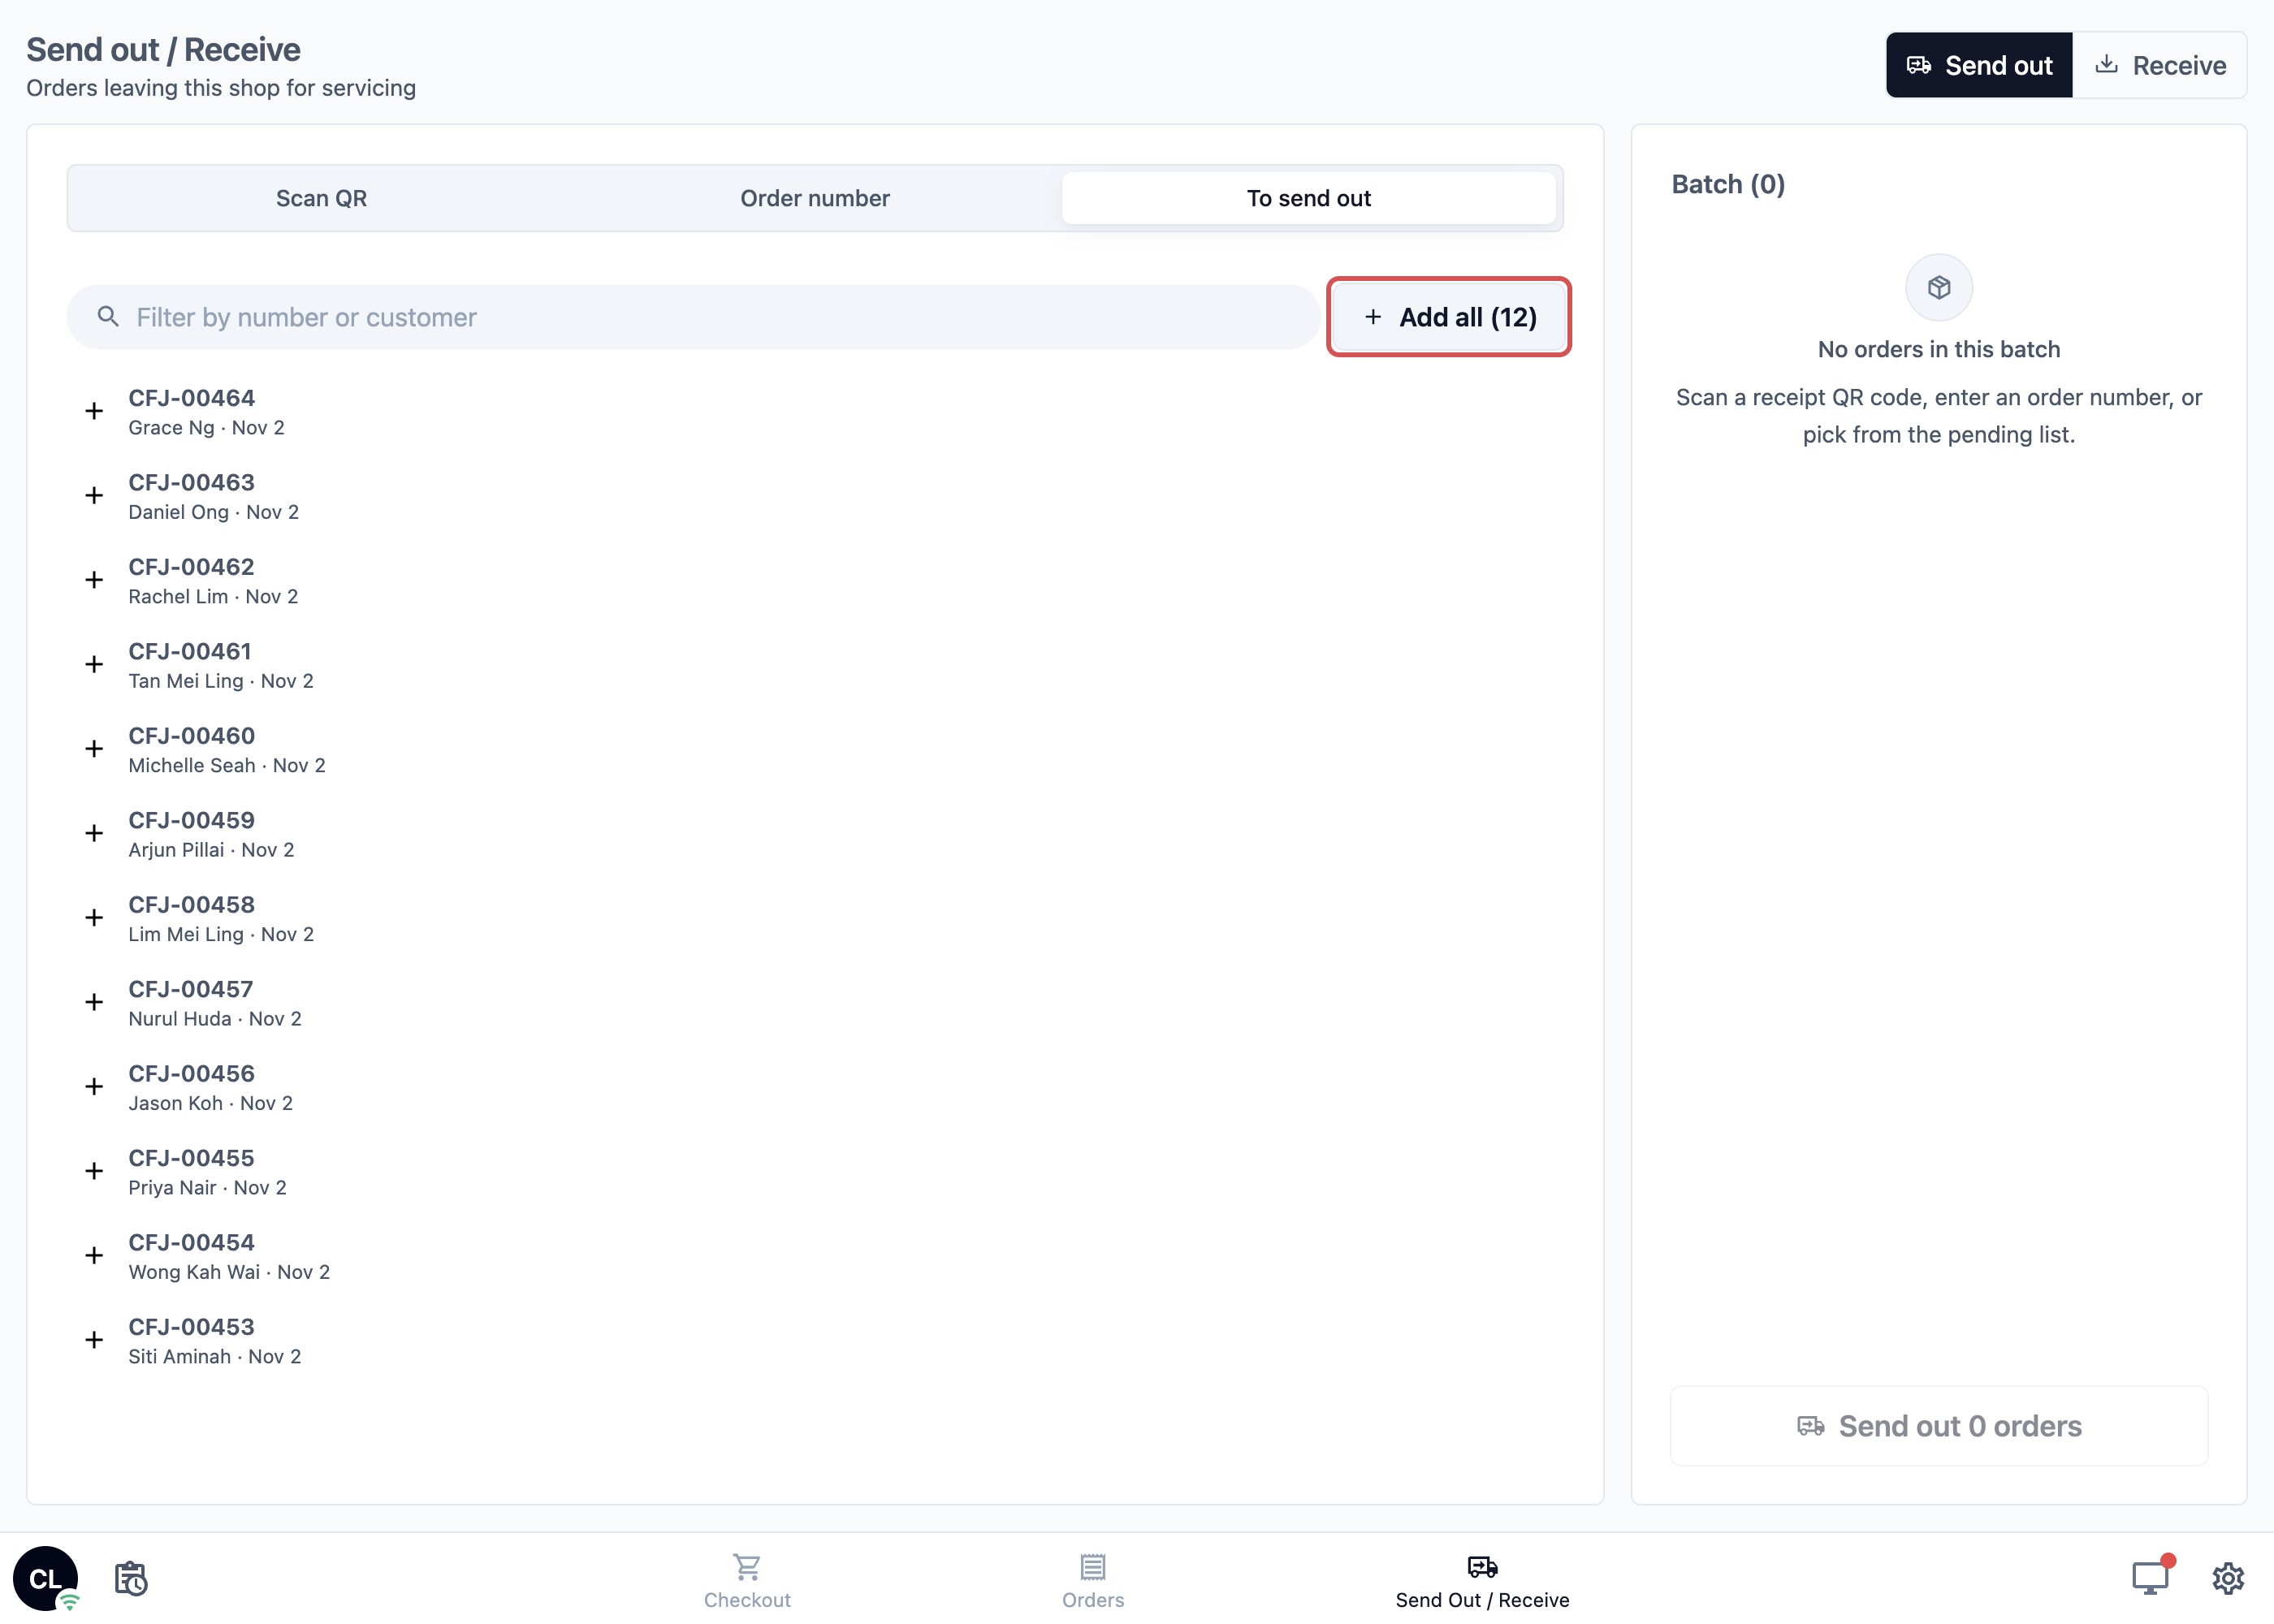
**Sending the batch**
1. Check the **Batch** on the right. Each order shows the customer's name and the number of items.
2. To take an order out, tap its ✕. To start again, tap Clear.
3. Count the bags against the batch, then tap Send out 12 orders or Receive 12 orders. The number always matches the batch.
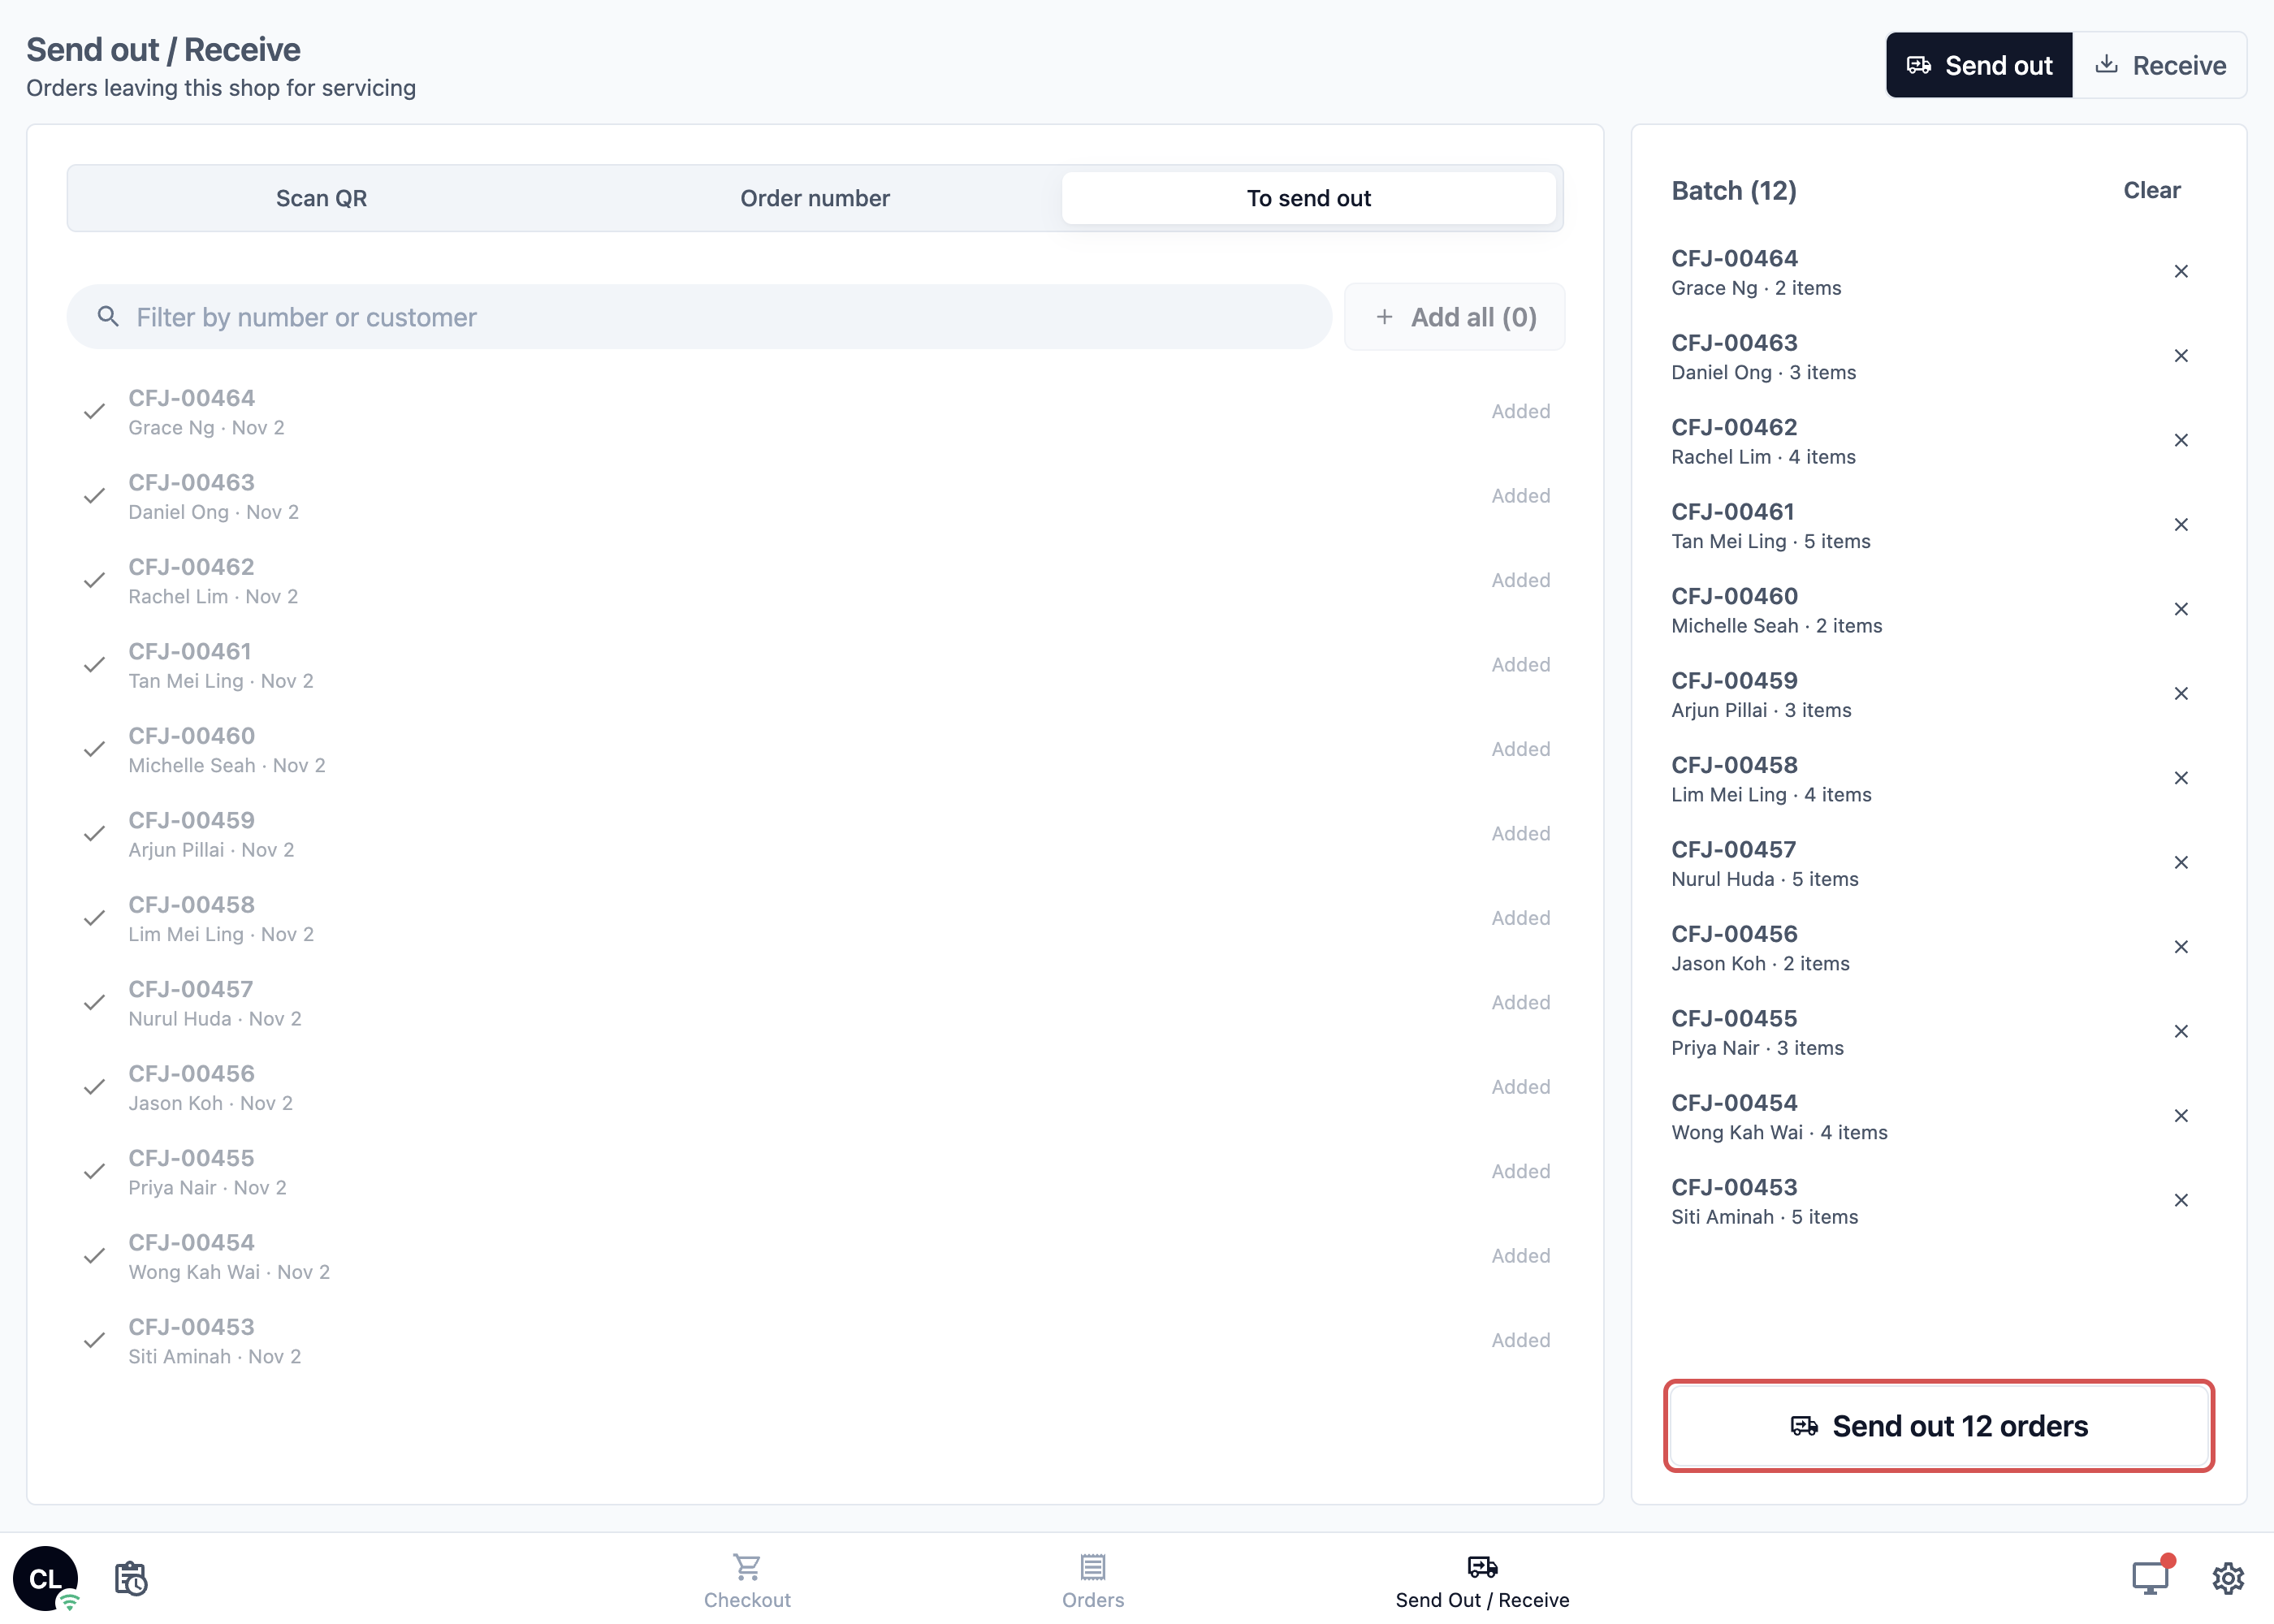
The POS confirms with "12 orders sent out" or "12 orders received". Each order's history shows "Sent out from shop" or "Received back at shop" with the shop, the time and the staff member. In an Advanced setup, each order also moves to its next step.
A USB or Bluetooth barcode scanner works on every tab. Scan the receipt and the order joins the batch, even on a computer with no camera.
Switching between Send out and Receive empties the batch. Finish and confirm one batch before you switch.
---
## Rules staff should know
- A batch holds up to 100 orders. For more, send them in two batches.
- Training orders never appear on the To send out or To receive lists.
- Typing an order number finds this shop's orders and orders due to be collected here. For an order from another shop, scan its receipt instead.
- The POS checks each order as soon as it is added, and tells staff straight away if it can't move. If an order can't move when staff confirm, the rest of the batch still goes through, and the batch shows the reason next to each order that stayed behind.
The reasons staff may see are:
- Order not found
- Order is cancelled
- Order is already completed
- Already sent out
- Already received back
- Cannot send out: order has already passed the Send out stage
- Already in this batch
- This code is not an order, item or package QR code
- A batch holds up to 100 orders
---
## Setting up your factory steps
For Advanced setups: these steps make each order move on its own when staff send it out or receive it, and they fill the To send out and To receive lists.
Each business unit has a pipeline, the list of steps an order goes through from drop-off to collection. The **Production** part of it holds the steps while your team works on the order, such as "At Shop" and "Sent to Factory". A step can have an Auto Trigger, an action that finishes the step on its own, so the order moves to the next step without anyone updating it.
New to pipelines? Read [Tracking Every Order from Drop-Off to Collection](/docs/tracking-order-stages-pipeline) first. It explains each part of the pipeline and how orders move through it. Then come back here to add the factory steps.
1. Click the ⚙️ Settings icon in the top-right corner.
2. Under the **Company & business structure** section, click **Business Units**.
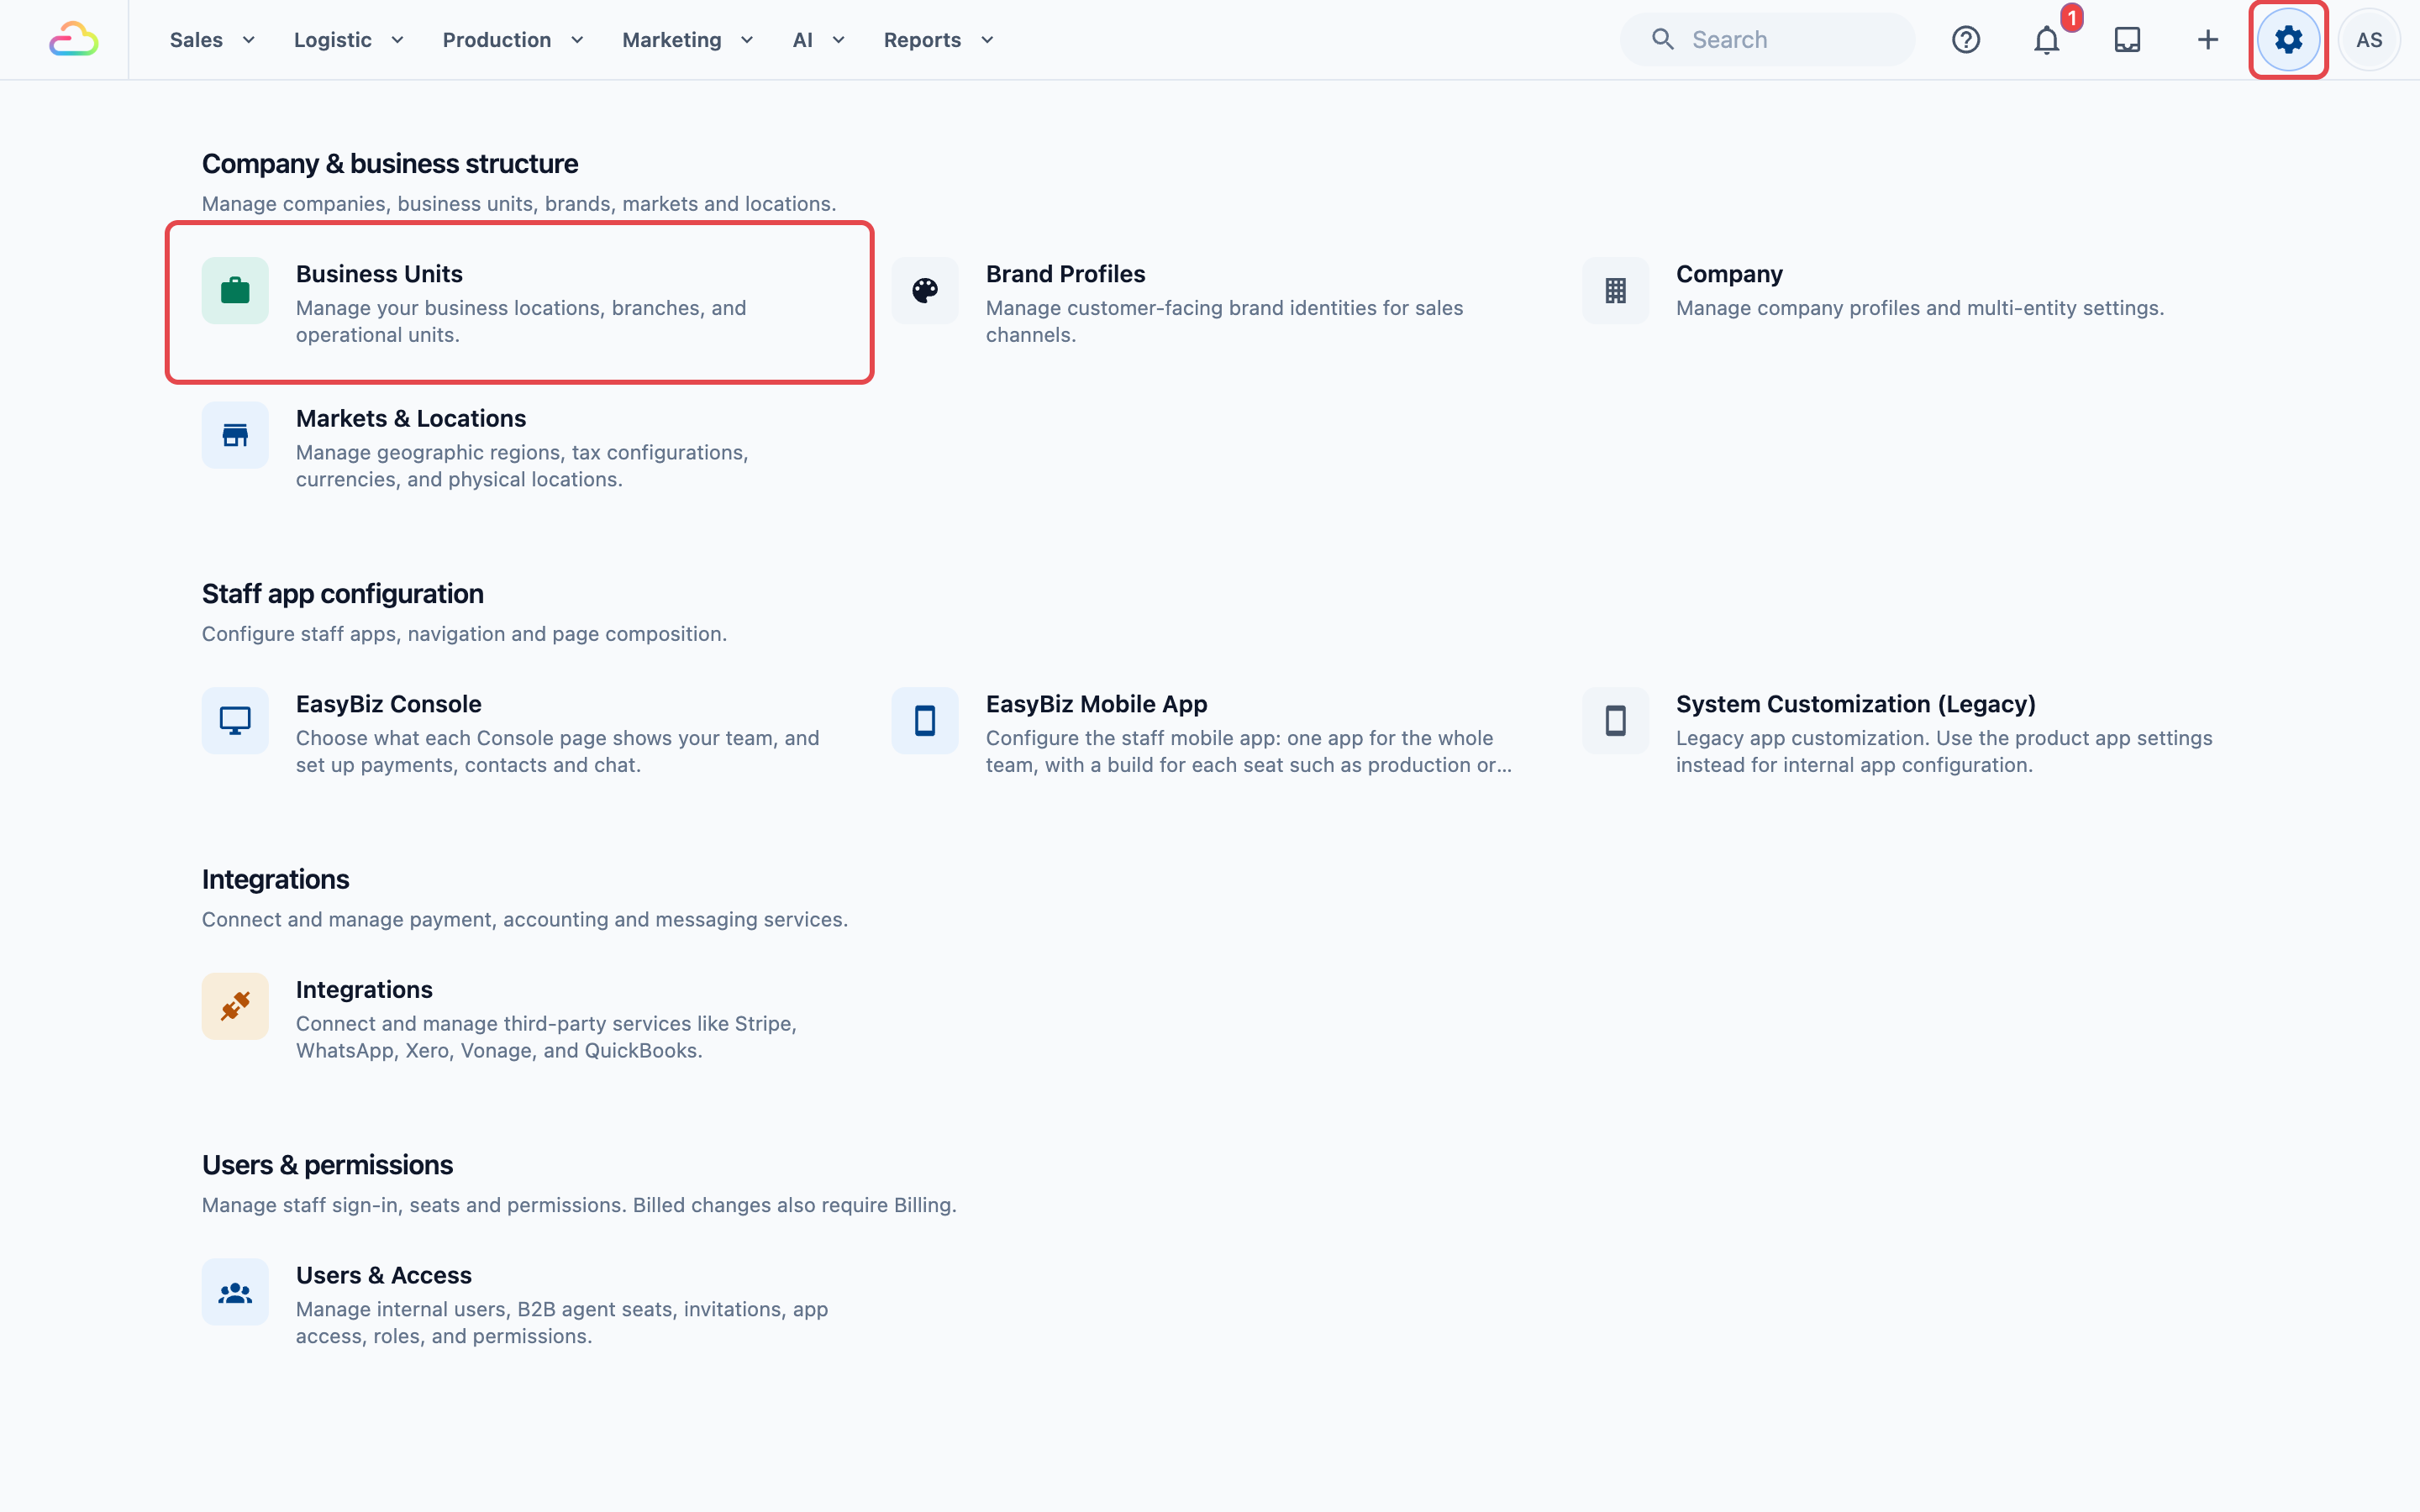
3. Click the business unit that sends work out, such as Laundry.
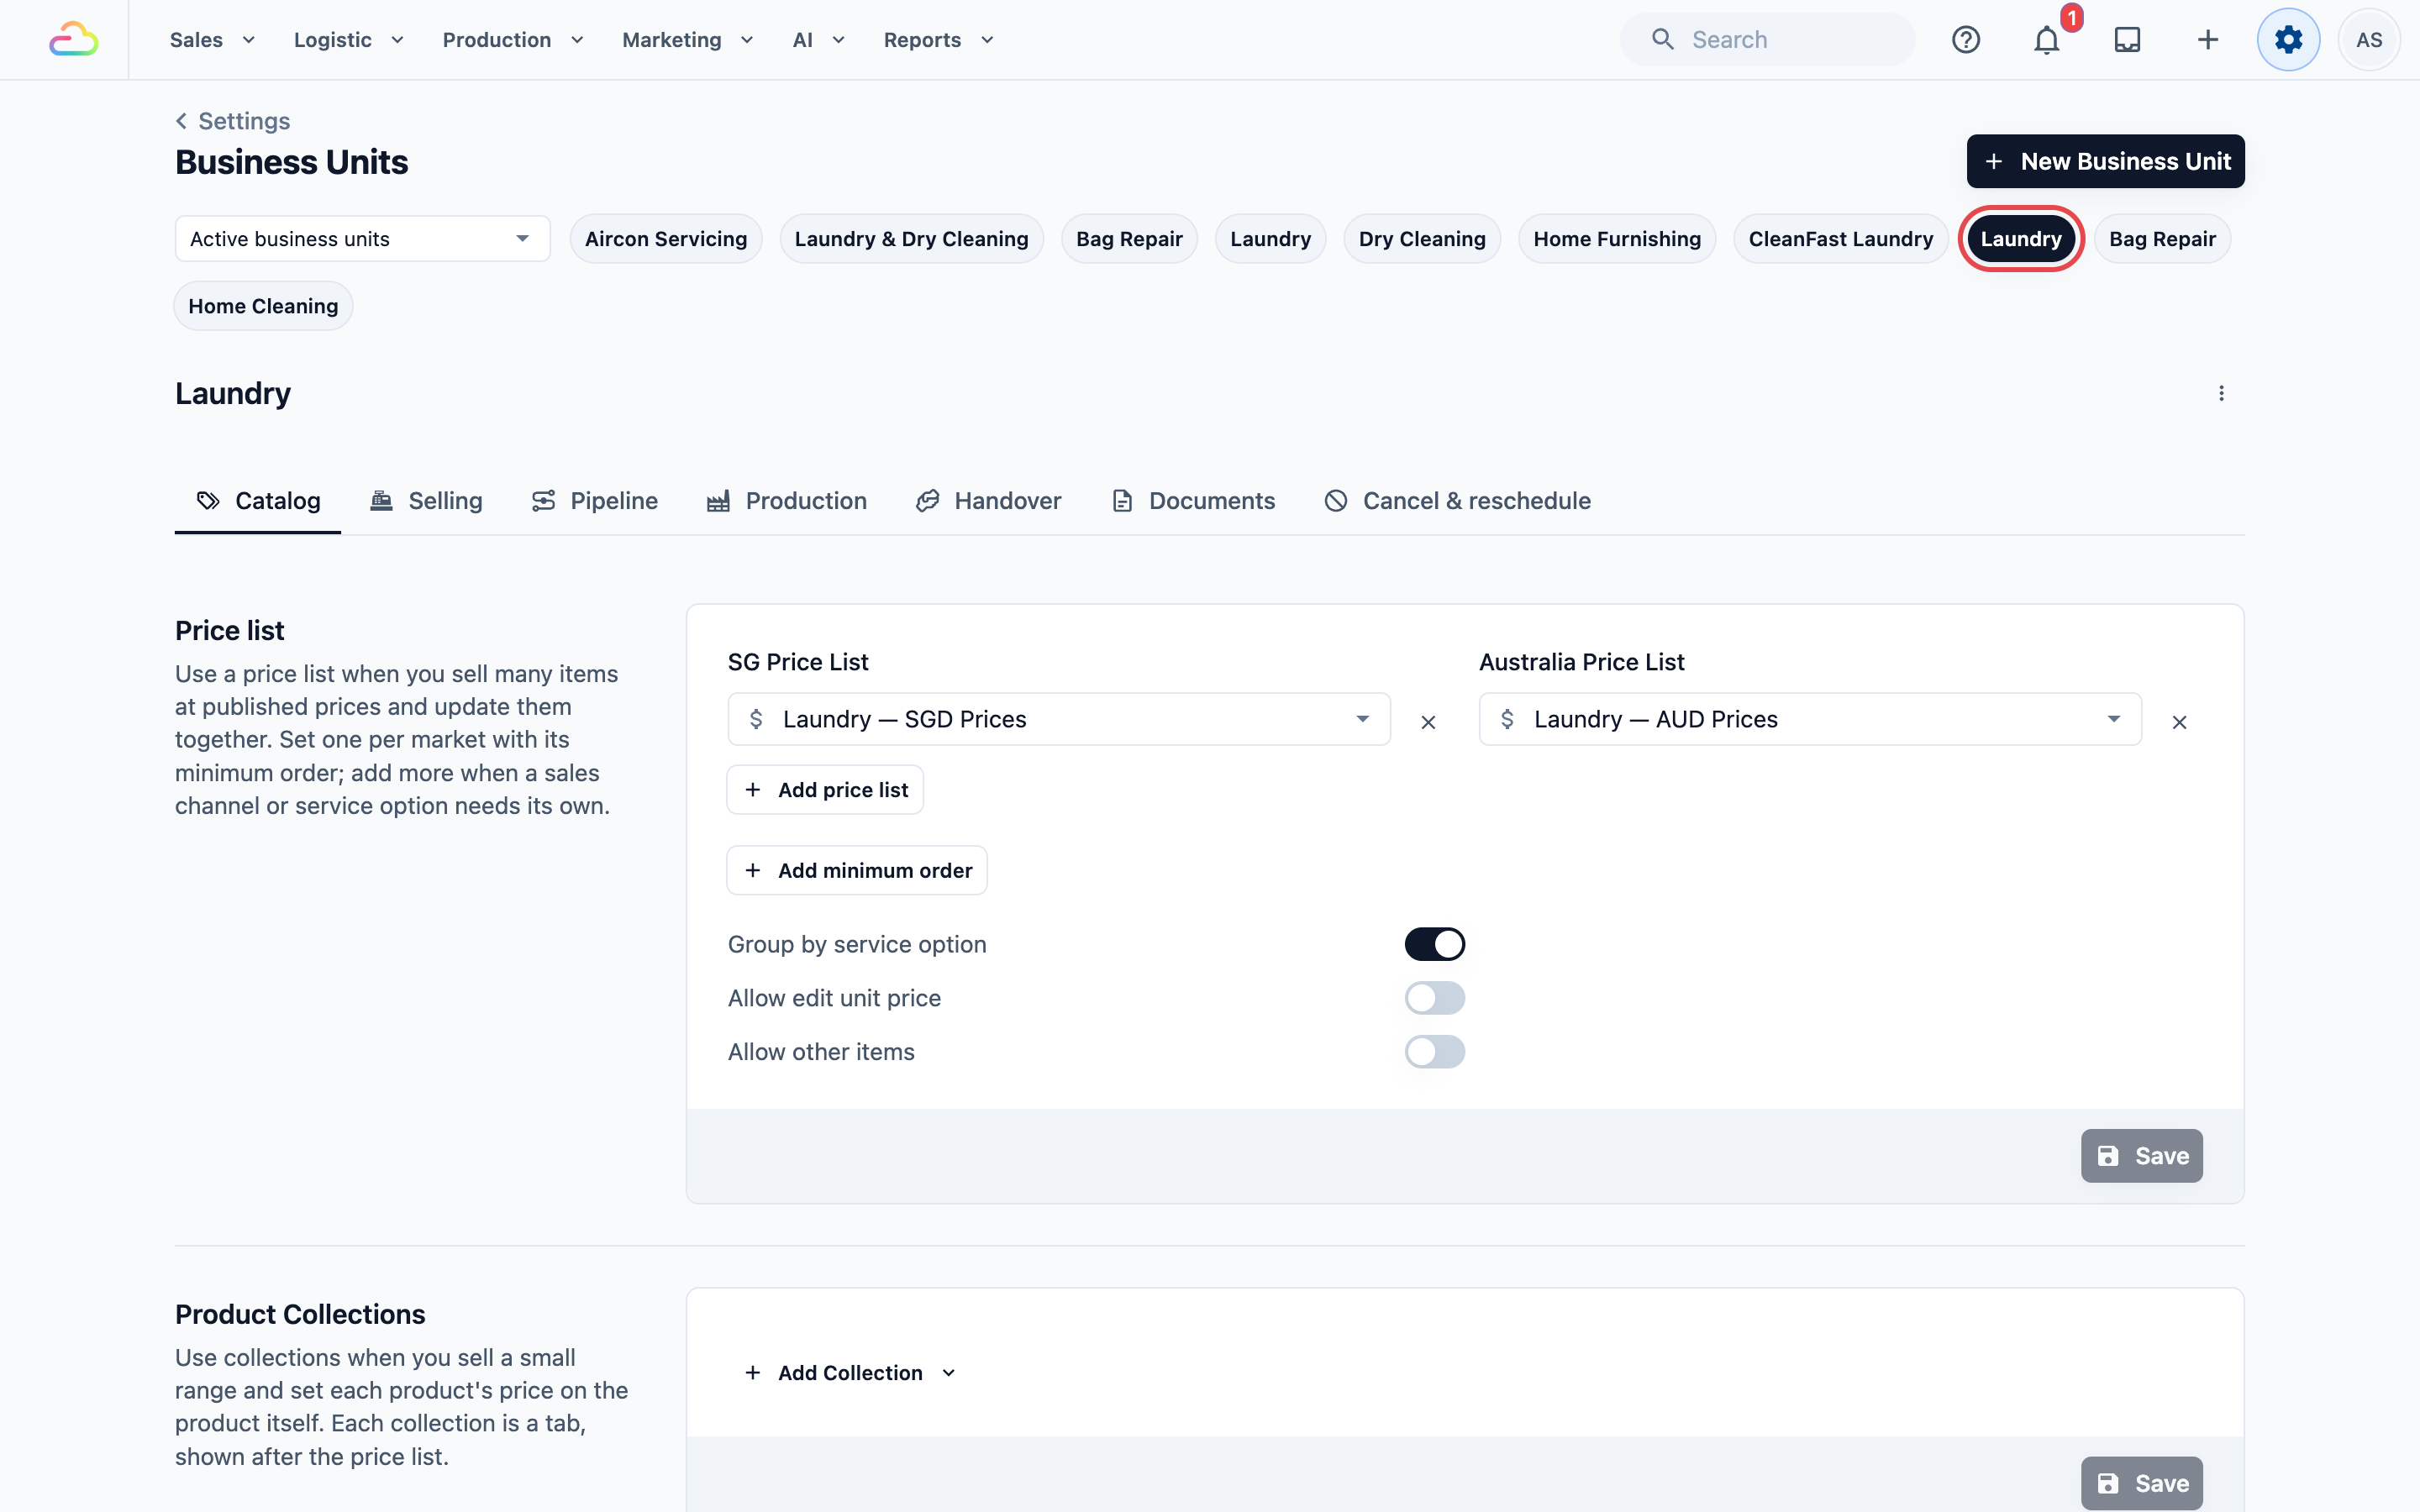
4. Click the Pipeline tab.
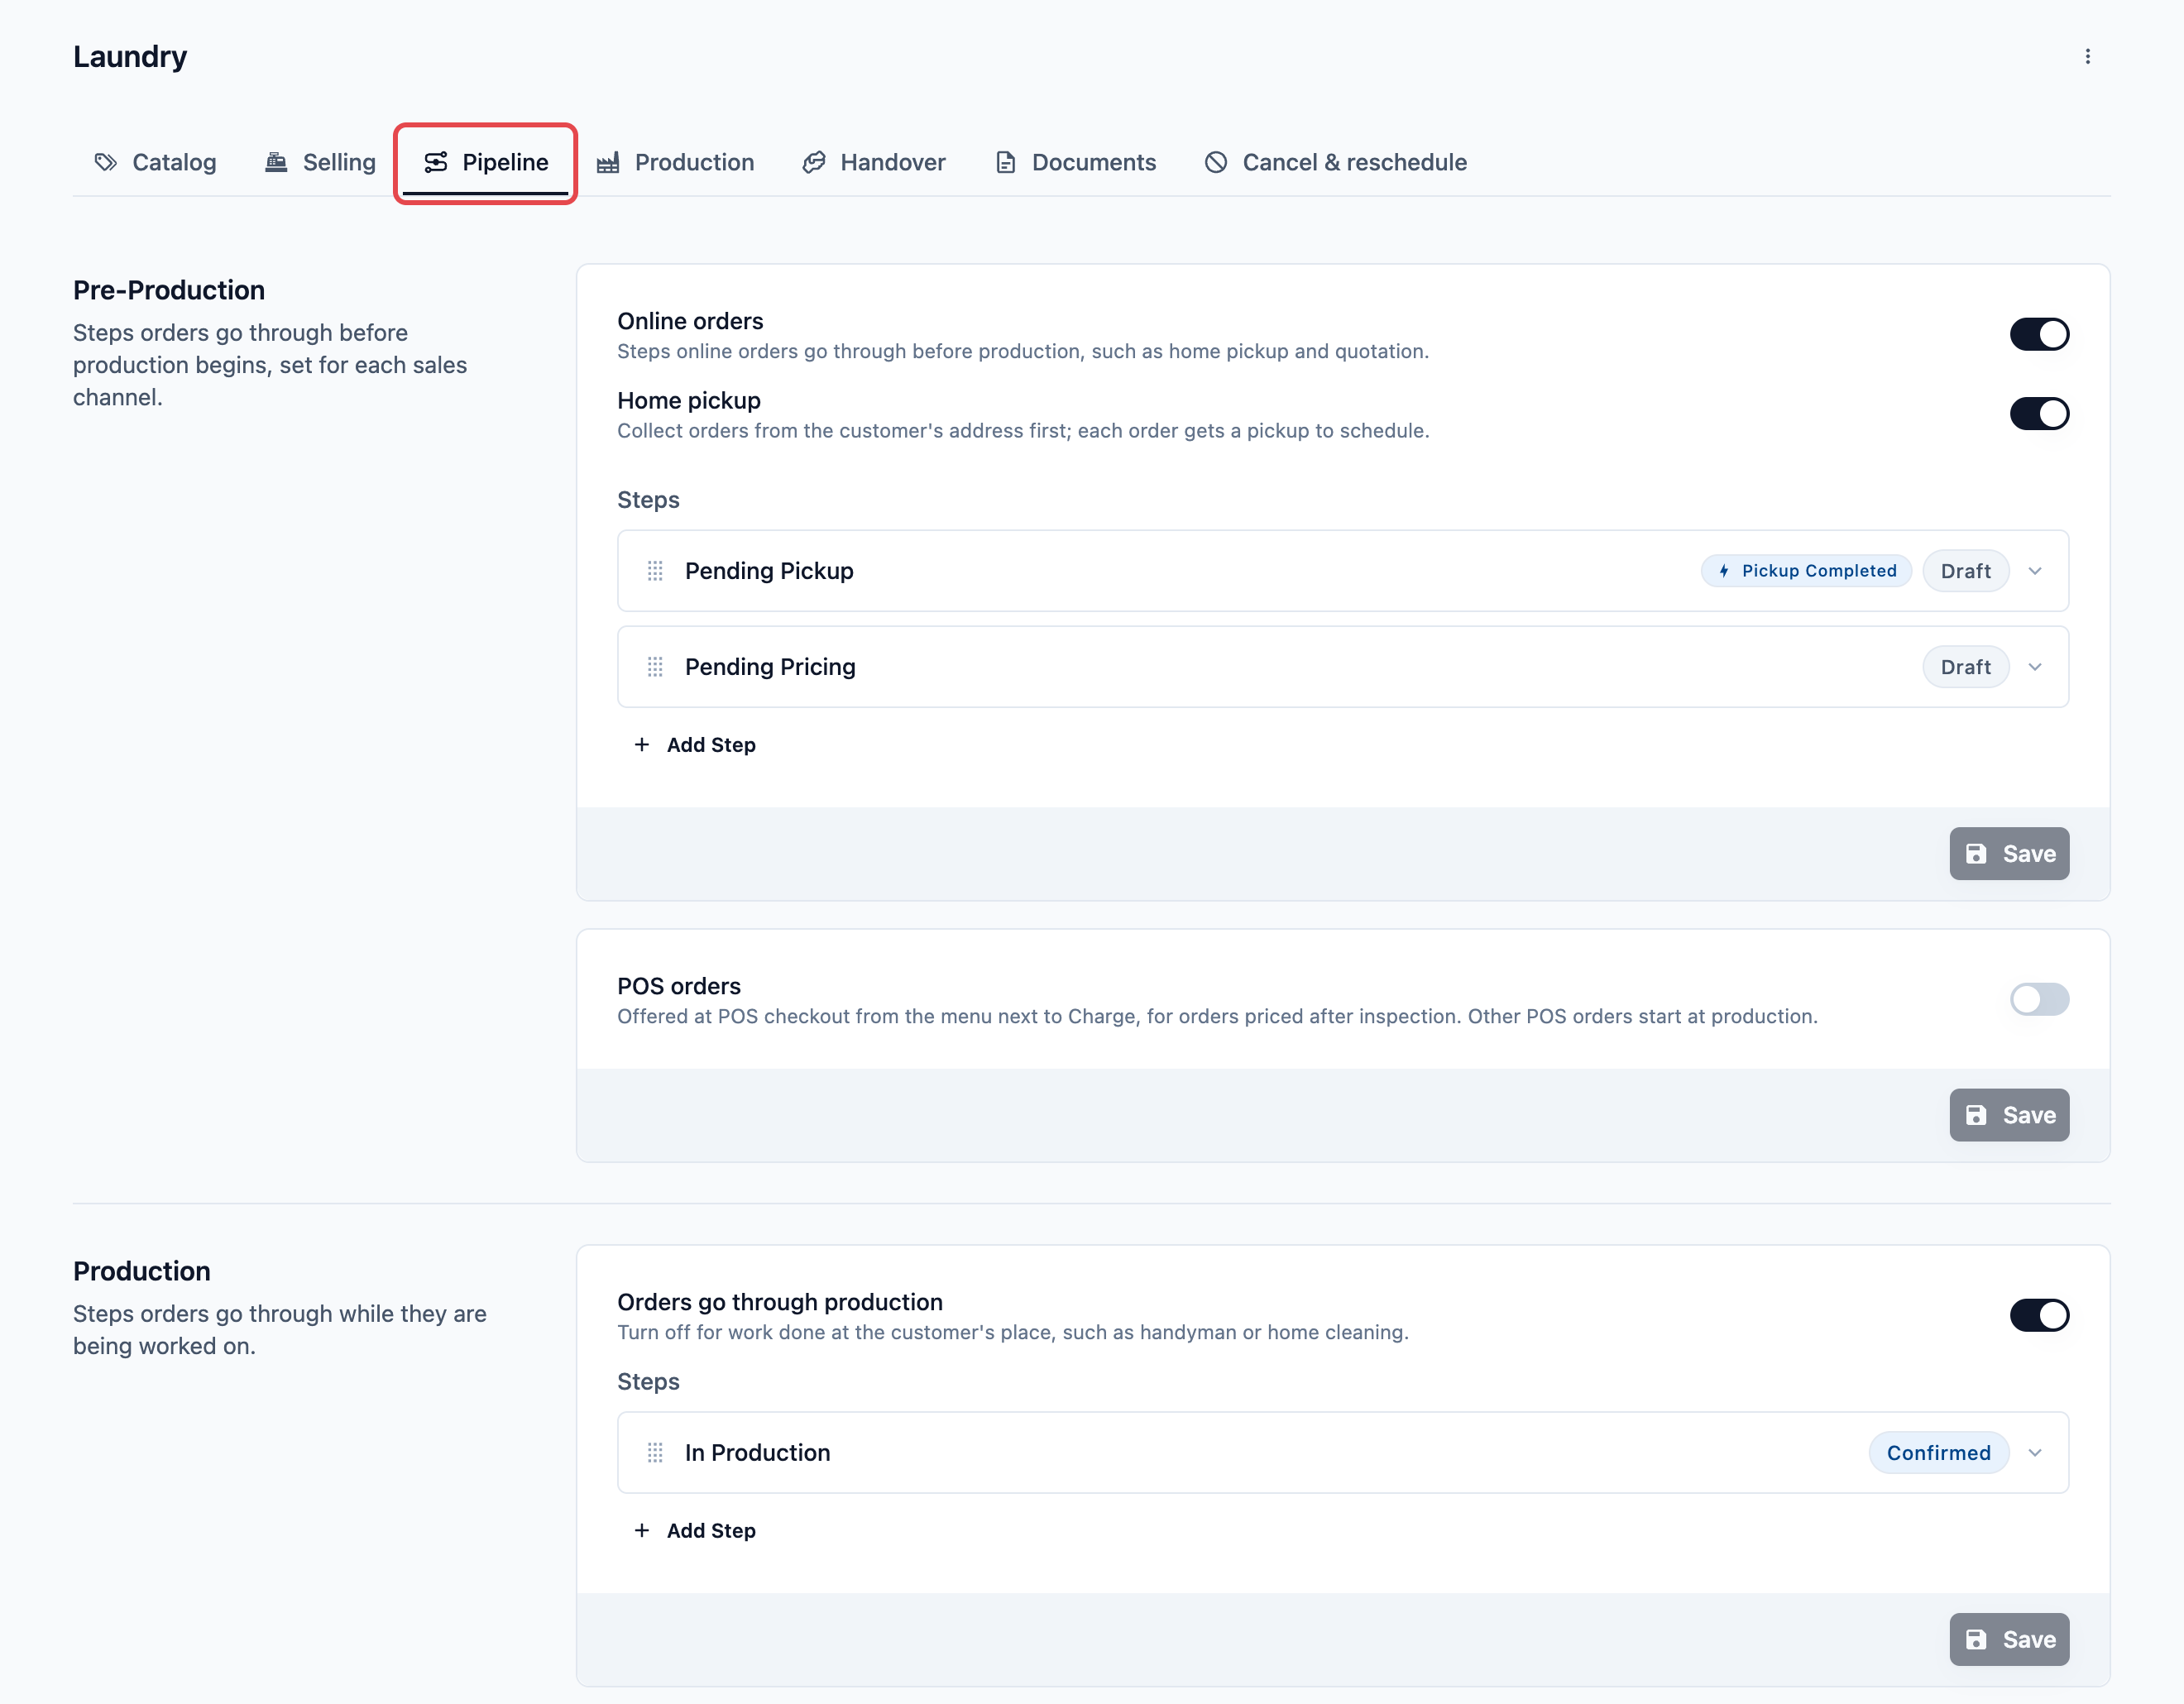
5. In the **Production** section, check that **Orders go through production** is on.
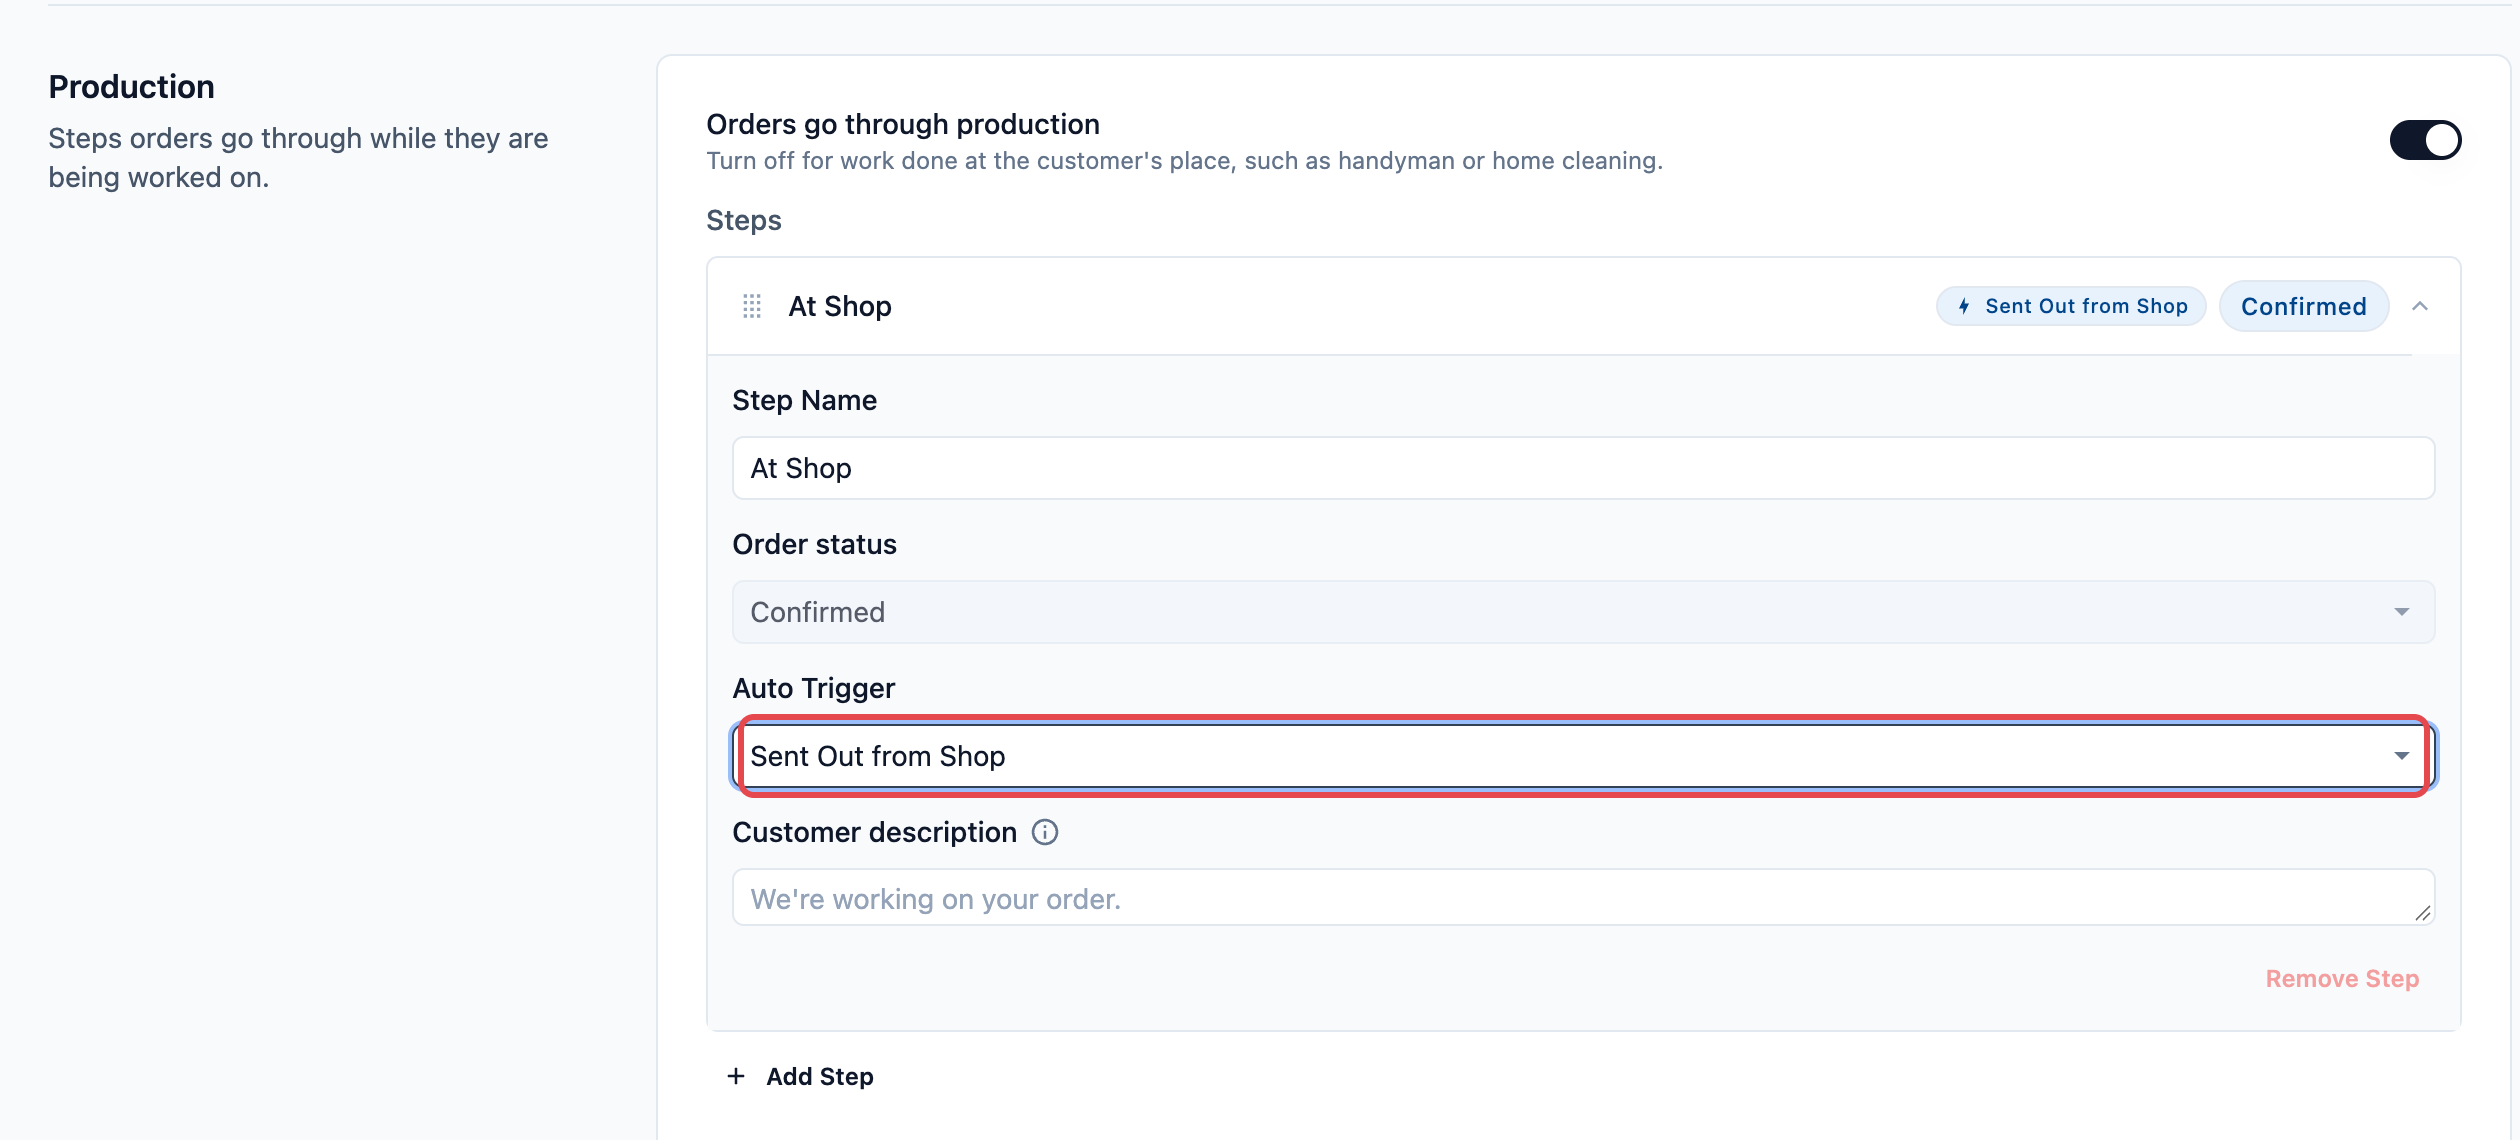
6. Click the **In Production** step. Change the **Step Name** to the place where orders wait before they leave, such as "At Shop".
7. In **Auto Trigger**, choose **Sent Out from Shop**.
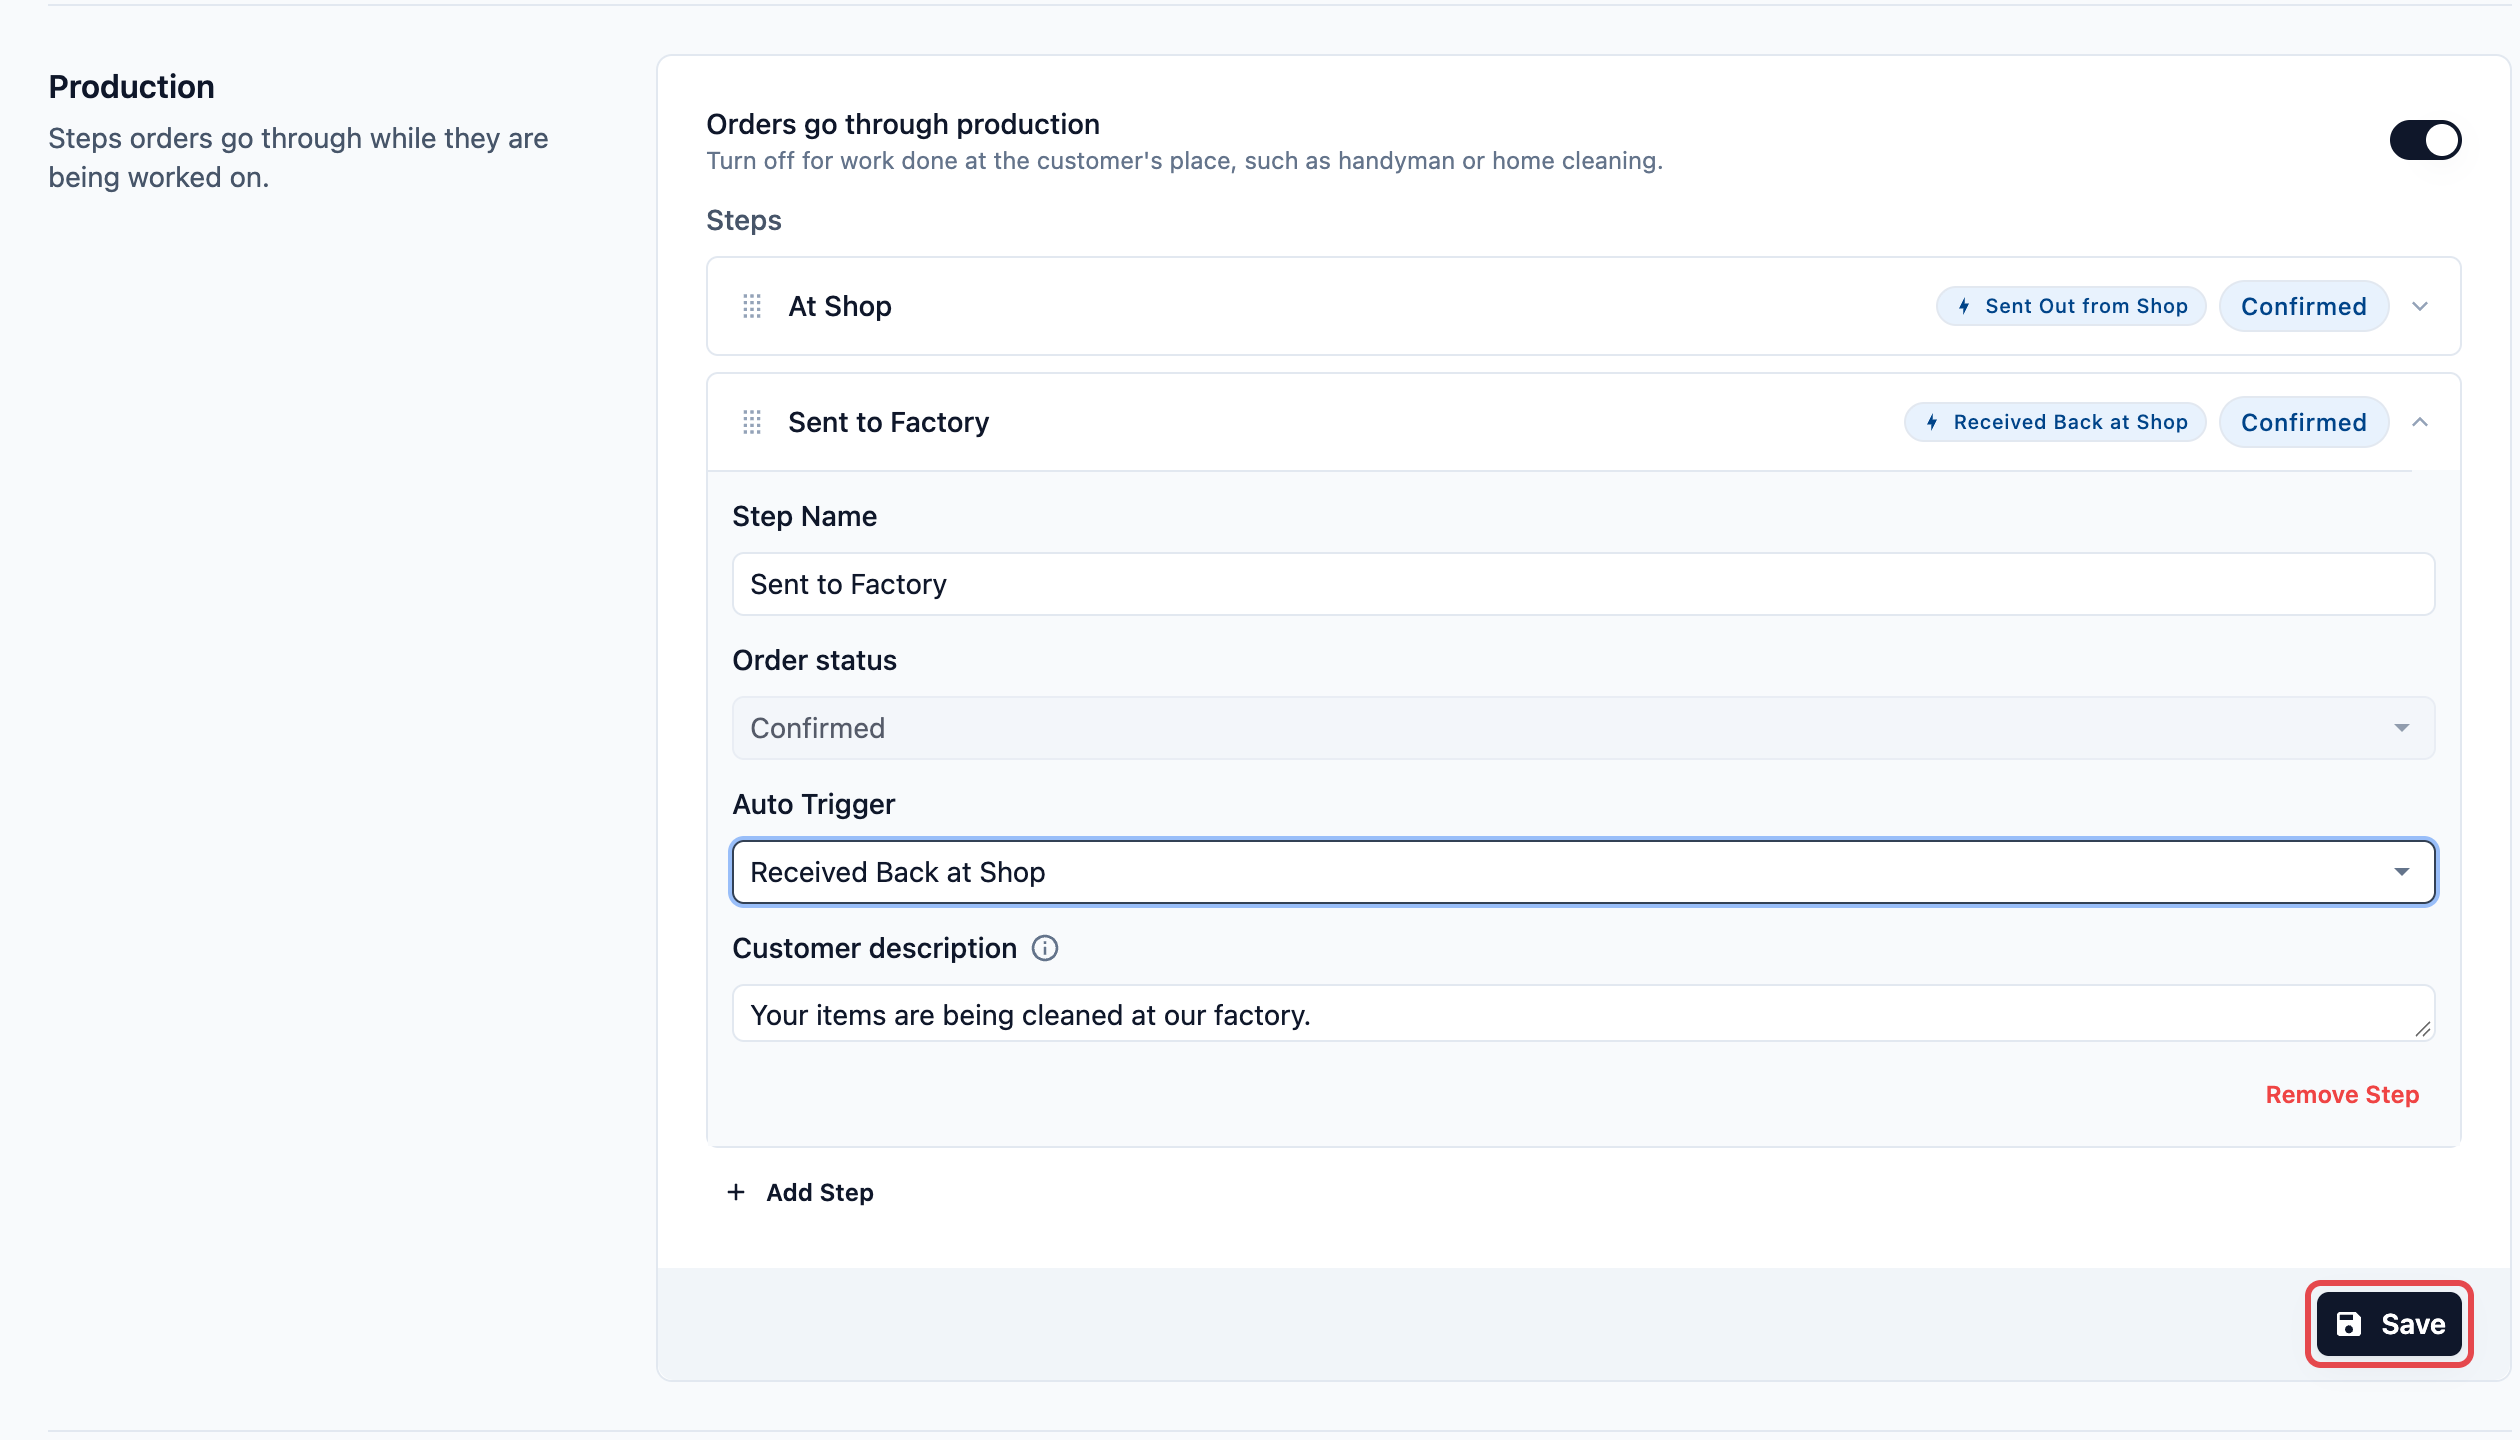
8. Click Add Step. Enter a **Step Name** such as "Sent to Factory", and choose **Received Back at Shop** in **Auto Trigger**.
9. In **Customer description**, type what customers read while the order is away, such as "Your items are being cleaned at our factory."
10. Click Save.
You see "Order pipeline saved". New orders for this business unit now follow these steps.
**Auto Trigger**
Put each trigger on the step the order is waiting in.
| **Auto Trigger** | **What finishes the step** |
| --- | --- |
| Sent Out from Shop | Staff send the order out on the Send Out / Receive page |
| Received Back at Shop | Staff receive the order back on the Send Out / Receive page |
When the last Production step finishes, the order moves on to Completion & Handover, where it waits for the customer. To change the order of your steps, drag them by the handle on the left. To delete one, click it and click Remove Step.
Keep **Orders go through production** on for any business unit that sends work to a factory. If it is off, orders skip these steps and go straight to Completion & Handover.
For more on each step and its settings, see [Tracking Work and Trips to Your Factory](/docs/setting-up-production-and-send-out-receive).
---
## Using a paired phone
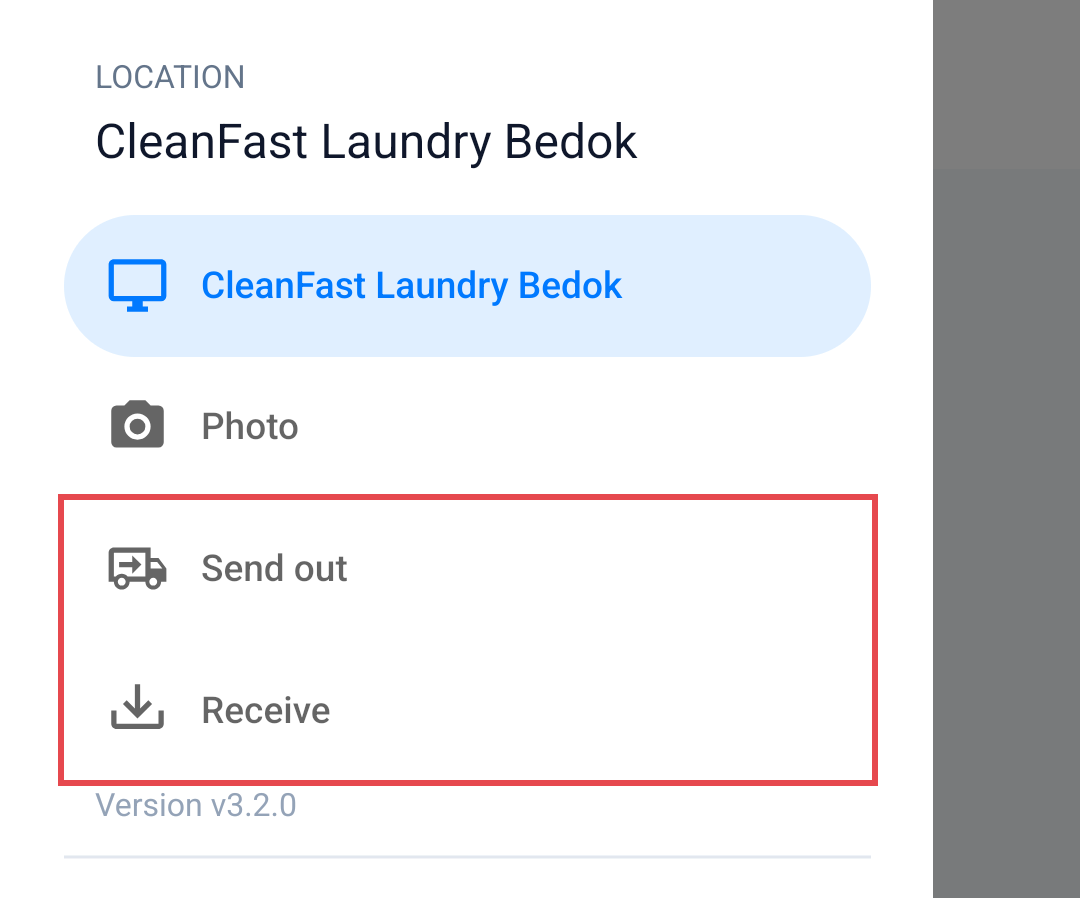
For Advanced setups: a phone paired to the POS has Send out and Receive in its menu (☰), with the same tabs and batch as the POS. Use it when the van is at the back door or the bags are in the workroom, so staff scan each bag where it is while the counter keeps serving customers. There is no switch to turn this on in the editor: every paired phone has it. If your shop asks staff to clock in, the phone opens these pages only once someone is clocked in on the POS, and each batch is saved under that person's name. See [Pairing a Phone for Photos, Send Out and Receive](/docs/pairing-a-phone-with-your-pos) and [Clocking In and Out (Time Clock)](/docs/set-up-time-clock-on-your-pos).
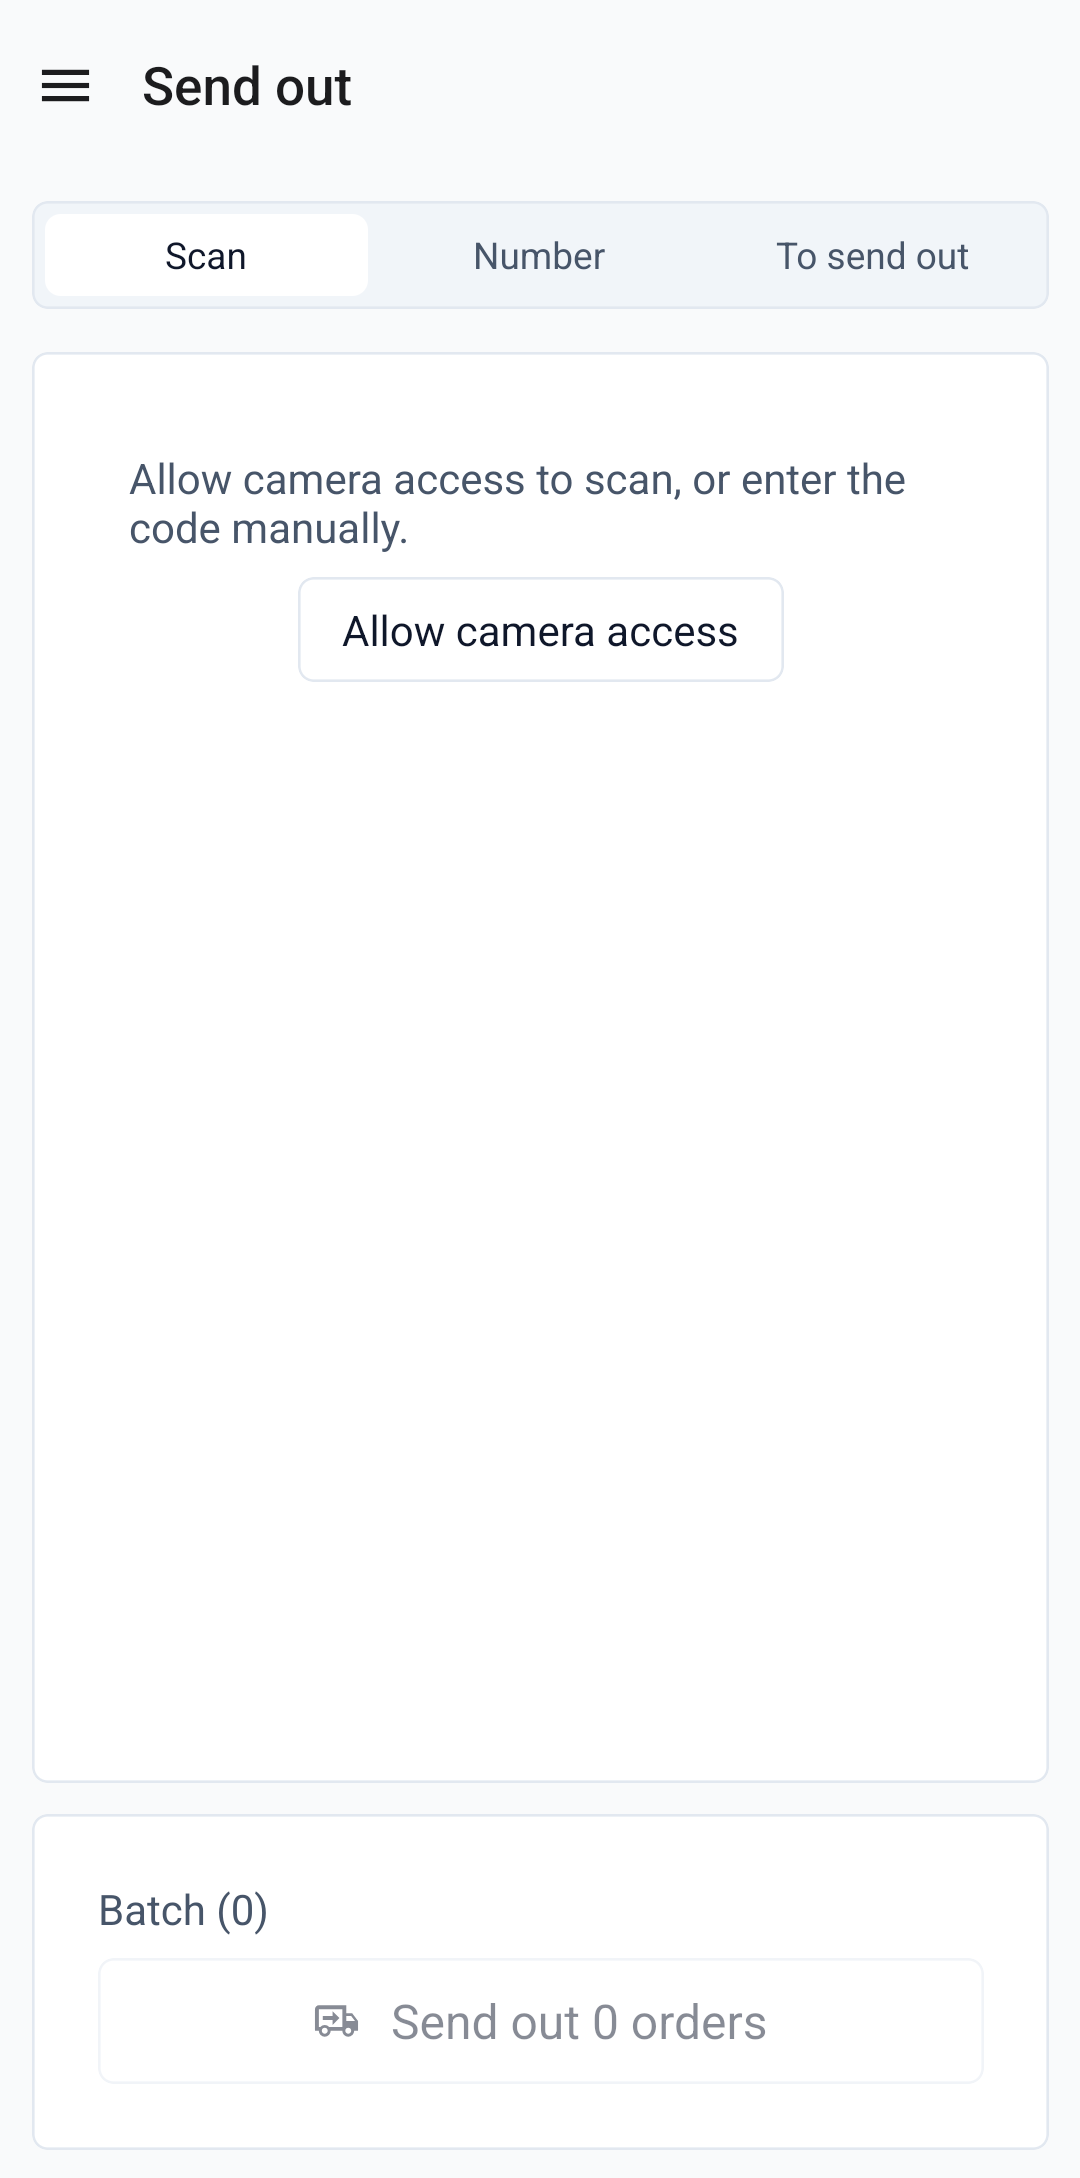
Tap Send out and the page opens on the Scan tab, with the Batch bar below it.
---
## Example setup
CleanFast Laundry uses the Advanced setup. It sends its Laundry orders from the Jurong shop to its factory on the 6pm van, and they come back two days later. In **Business Units › Pipeline**, the Laundry business unit has these steps:
1. **At Shop**, with the Auto Trigger Sent Out from Shop.
2. **Sent to Factory**, with the Auto Trigger Received Back at Shop.
3. **Ready for Collection**, the first step of store pickup.
| **Setting** | **CleanFast Laundry's choice** |
| --- | --- |
| Page | Send Out / Receive, added to the CleanFast Jurong Counter app |
| Default tab | Pending orders, because staff send the whole day's laundry at once |
| Paired phone | One phone at the back door, for receiving bags off the van by scan |
At 6pm, the Jurong staff member opens the tab, sees the day's 12 orders under To send out, taps Add all and Send out 12 orders. All 12 move to Sent to Factory. Two days later, the driver unloads at the back door, and staff scan each receipt with the paired phone and tap Receive 12 orders. All 12 move to Ready for Collection.
Other businesses use the page differently:
- **Bag Repair (Intermediate):** BagCare Pro sends bags to its workshop twice a week. A tablet at the counter opens on **Scan QR**, and staff scan the item label on each bag as it goes into the box, so no bag leaves unrecorded.
- **Home Cleaning (Easy):** the work happens at the customer's place and nothing comes back to a shop, so the page has nothing to do.
---
## How it works with other features
- **Factory steps:** the page moves an order only if its current step has the Sent Out from Shop or Received Back at Shop trigger. Without them, sending out still records where the order is, but its step stays the same. Set them up in the Setting up your factory steps section.
- **Orders page:** staff see each order's new step and its history on the Orders page. See [Setting Up the Orders Page](/docs/setting-up-the-pos-orders-page).
- **Collection at another shop:** an order comes back to the shop where the customer will collect it, so it shows on that shop's To receive list.
---
## FAQs
**Why isn't an order on the To send out list?**
> The list shows only orders waiting at the step with the Sent Out from Shop trigger. An order still being quoted, one that has already come back, one from a business unit with no factory steps, or a training order isn't listed. The list also looks only at this shop's 150 newest orders. You can still add any order by scanning its receipt or typing its number.
**Can I start with the Intermediate setup and add factory steps later?**
> Yes. Keep using the page as it is, then add the Sent Out from Shop and Received Back at Shop triggers to your factory steps, as in the Setting up your factory steps section. From then on, orders staff send out or receive move to their next step on their own, and the To send out list starts filling.
**I added the factory steps. Will my existing orders follow them?**
> No. Each order keeps the steps it had when it was created, so only orders taken after you click Save move on their own. Staff can still send out and receive older orders by scanning their receipts. Their history records the trip, but their step stays the same.
**The customer collects at a different shop. Which shop receives the order?**
> The shop where the customer will collect it. The order appears on that shop's To receive list, not on the list of the shop that sent it out.
**Can staff send out or receive from the Console?**
> No. Send Out / Receive works only on the POS and on a phone paired to it. Each batch is recorded for the shop the device is signed in to.
**Staff typed an order number and see "Order not found".**
> Typing a number finds only this shop's orders and orders due to be collected here. If the order was taken at another shop, scan the QR code on its receipt or item label instead.
**Do customers see that their order went to the factory?**
> Yes, if you added a **Customer description** to the factory step, such as "Your items are being cleaned at our factory". Customers who check their order on your Online Store or Mobile App read it once the order is sent out.
---
## What's Next
You have set up how staff send orders to your factory and receive them back, on the POS or a paired phone. Next, set up the page staff use to check what is in stock and what needs reordering, in [Tracking Stock at the POS (Inventory)](/docs/set-up-inventory-tracking-on-your-pos). Don't sell stocked items such as detergent? Skip to [WhatsApp Chat and Broadcasts on Your POS](/docs/set-up-whatsapp-inbox-on-your-pos), or go straight to [Setting Up Payment Methods at the POS](/docs/setting-up-your-payment-methods-at-pos) if you don't use WhatsApp at the counter either.