When you finish, every new order at your counter ends on one screen where staff print the receipt, print the labels and email the customer in one tap, or have them print by themselves.
## Before You Start
- Set up your Checkout page first. See [Setting Up the Checkout Page](/docs/setting-up-the-pos-checkout-page).
- You need a published receipt template. See [Setting Up Your Order Receipt](/docs/setting-up-your-order-receipt).
- Link your receipt and label templates to your business unit first. Go to ⚙️ Settings › **Business Units**, choose your business unit and open the Documents tab. Choose your **POS receipt** under **Terminal receipts** and your **Item label** under **Labels**, then click Save.
- For labels: you need a label printer connected to the POS. See [Connecting Your Printers to the POS](/docs/connecting-your-printers-to-the-pos). Your labels are designed in [Setting Up Your Item Labels](/docs/setting-up-your-item-labels).
- For email: you need a customer email. See [Setting Up Your Customer Emails](/docs/setting-up-your-customer-emails).
- You need access to ⚙️ Settings in the Console.
- If you set this up before: Order Confirmation has moved. It used to be under **Features** in the POS app editor. It is now under **Pages › Checkout**, beside Catalog and Cart.
## Choose your setup
| **Level** | **Fits shops like** | **What you set up** | **Read these sections** |
| --- | --- | --- | --- |
| Easy | One counter that hands over a printed receipt and doesn't tag items | The ready-made Print Receipt tile: check its receipt template, and choose Off (staff tap to print) or 1 copy printing by itself | [Where to find it](#where-to-find-it), [Setting it up (Print Receipt)](#print-receipt), [What staff see on the POS](#what-staff-see-on-the-pos) |
| Intermediate | Shops that tag every item for the workshop, email receipts, print a shop copy, or take many QR payments on a computer | Everything in Easy, plus Print Labels, Email, extra Print Receipt tiles and Auto-print receipt when payment completes | Everything in Easy, plus [Adding more actions](#adding-more-actions) and [When the customer pays by QR later](#when-the-customer-pays-by-qr-later) |
With the Easy setup, staff get one receipt tile after every order. You can add labels, email and auto-printing later without changing anything else.
## Overview
Order Confirmation is the screen your staff see the moment an order is made at the counter. It shows the order number, the amount, and one tile for each action you add, such as printing the receipt, printing the item labels or emailing the customer. You choose which tiles show, in what order, and whether the receipt and labels print by themselves. It appears after every order, whether the customer has paid in full, paid a deposit or will pay at collection. Each POS app has its own Order Confirmation, so your Tampines and Jurong counters can work differently.
**Where it works**
- **Console:** you set it up in your POS app's editor, on the Checkout page.
- **POS:** staff see the screen after every new order, on a computer in Chrome or Edge and in the EasyBiz POS app on an iPad or Android tablet.
- **Customers:** customers get their printed receipt at the counter, and an email if staff send one.
---
## Why set it up
- Staff hand over the receipt and tag every item before the customer leaves, without opening the order again.
- With printing set to happen by itself, nothing is forgotten on a busy morning, and labels go on the clothes before they reach the workshop.
- If you add no actions, staff only see the order number, the amount and New Order. To print a receipt they have to find the order on the Orders page.
---
## Where to find it
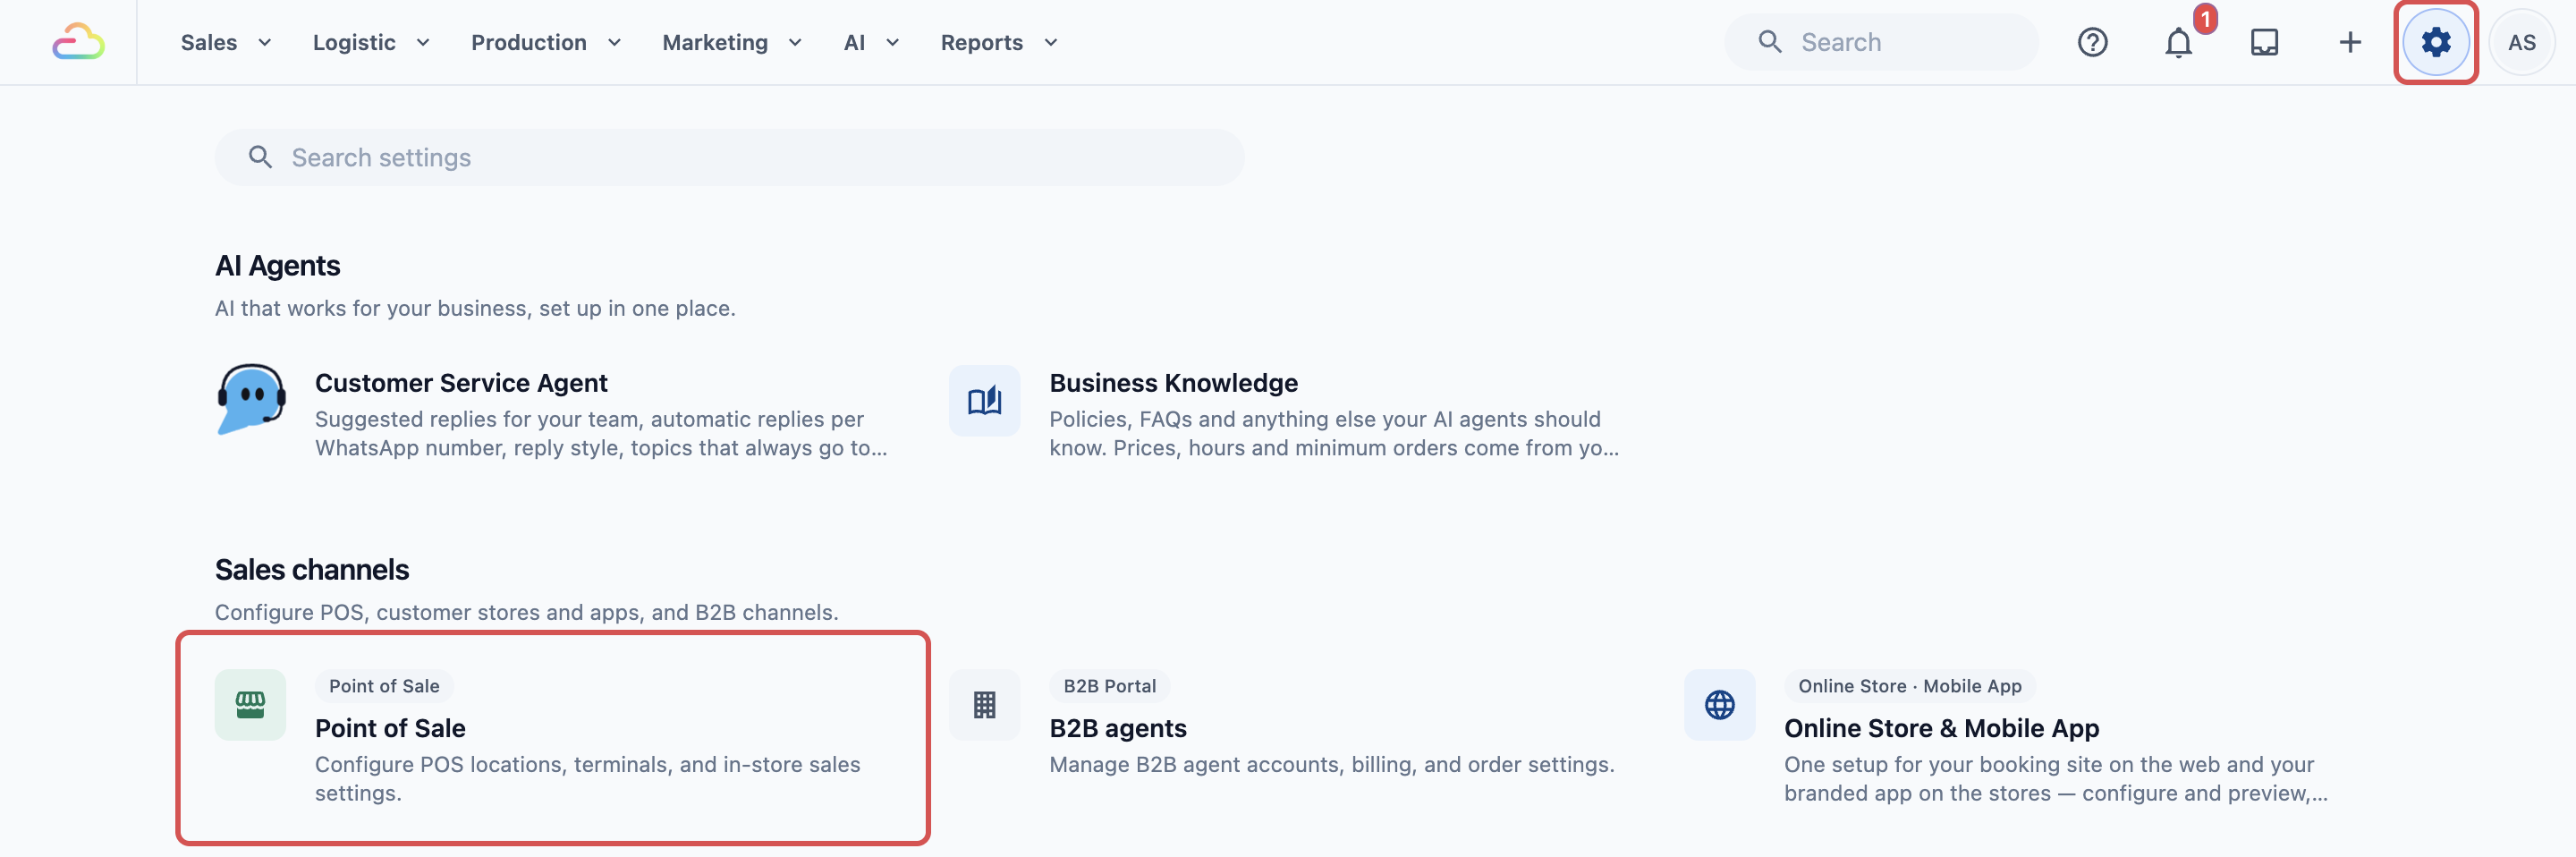
1. Click the ⚙️ Settings icon in the top-right corner.
2. Under the **Sales channels** section, click **Point of Sale**.
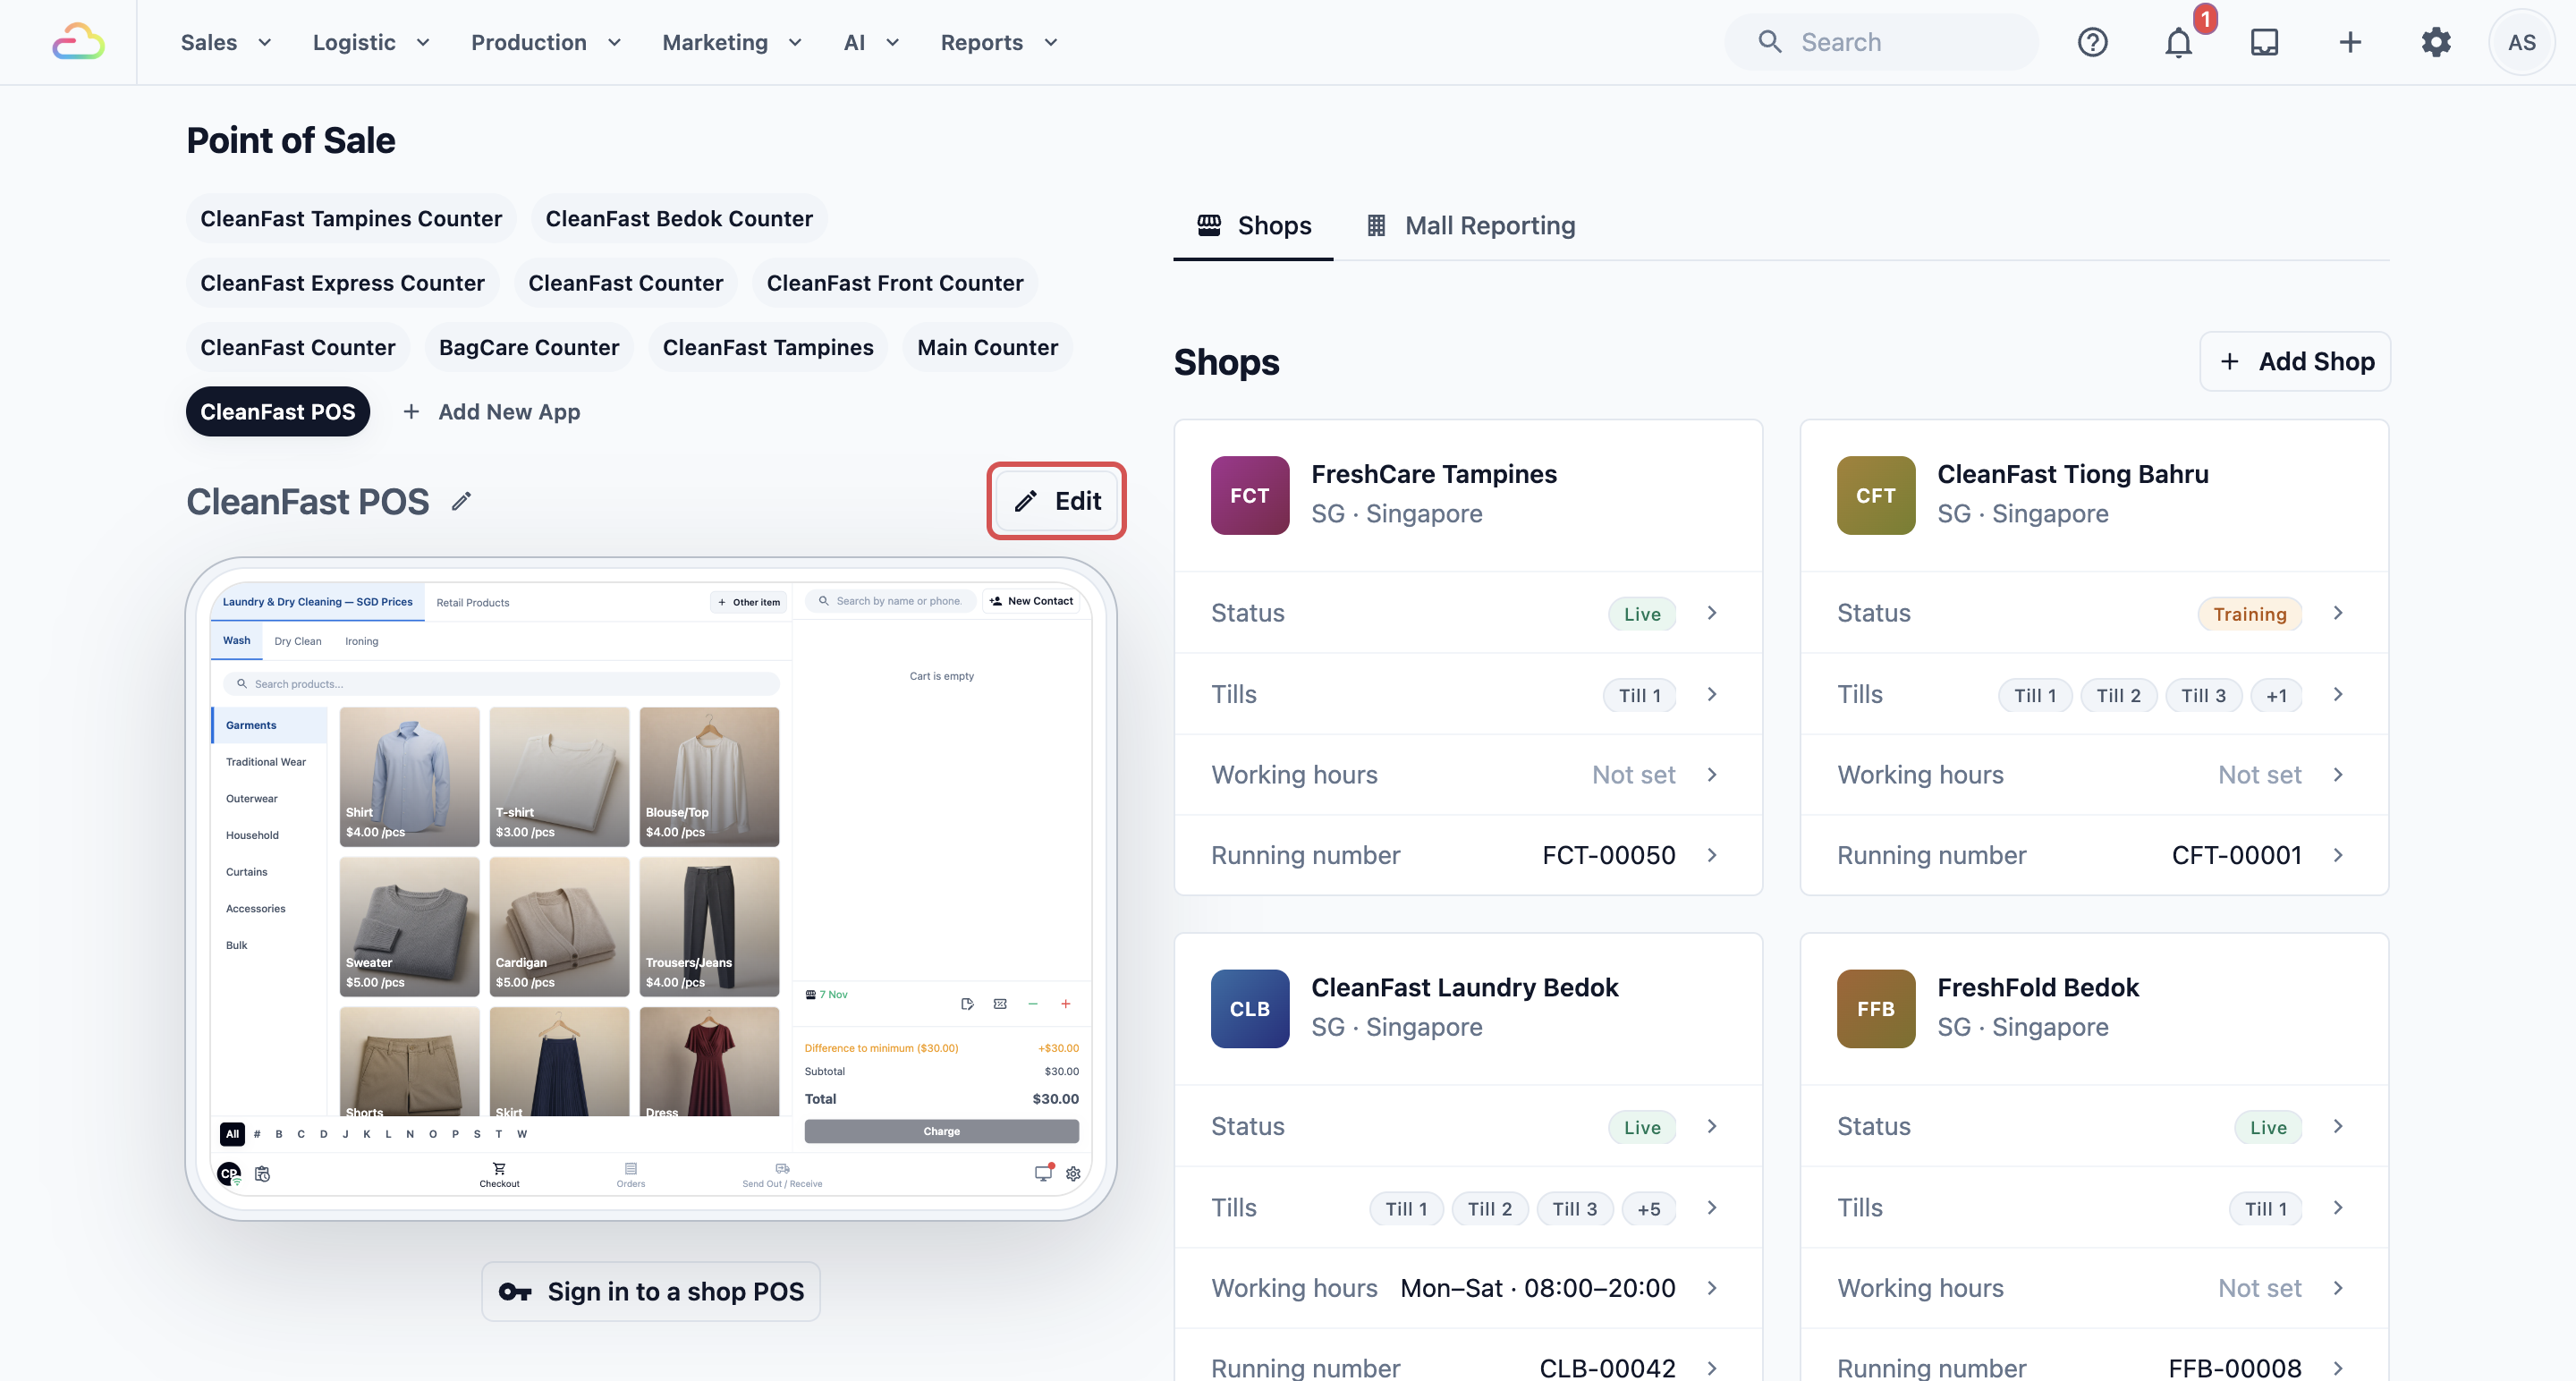
3. Under **POS Apps**, click your app, for example CleanFast POS, then click Edit.
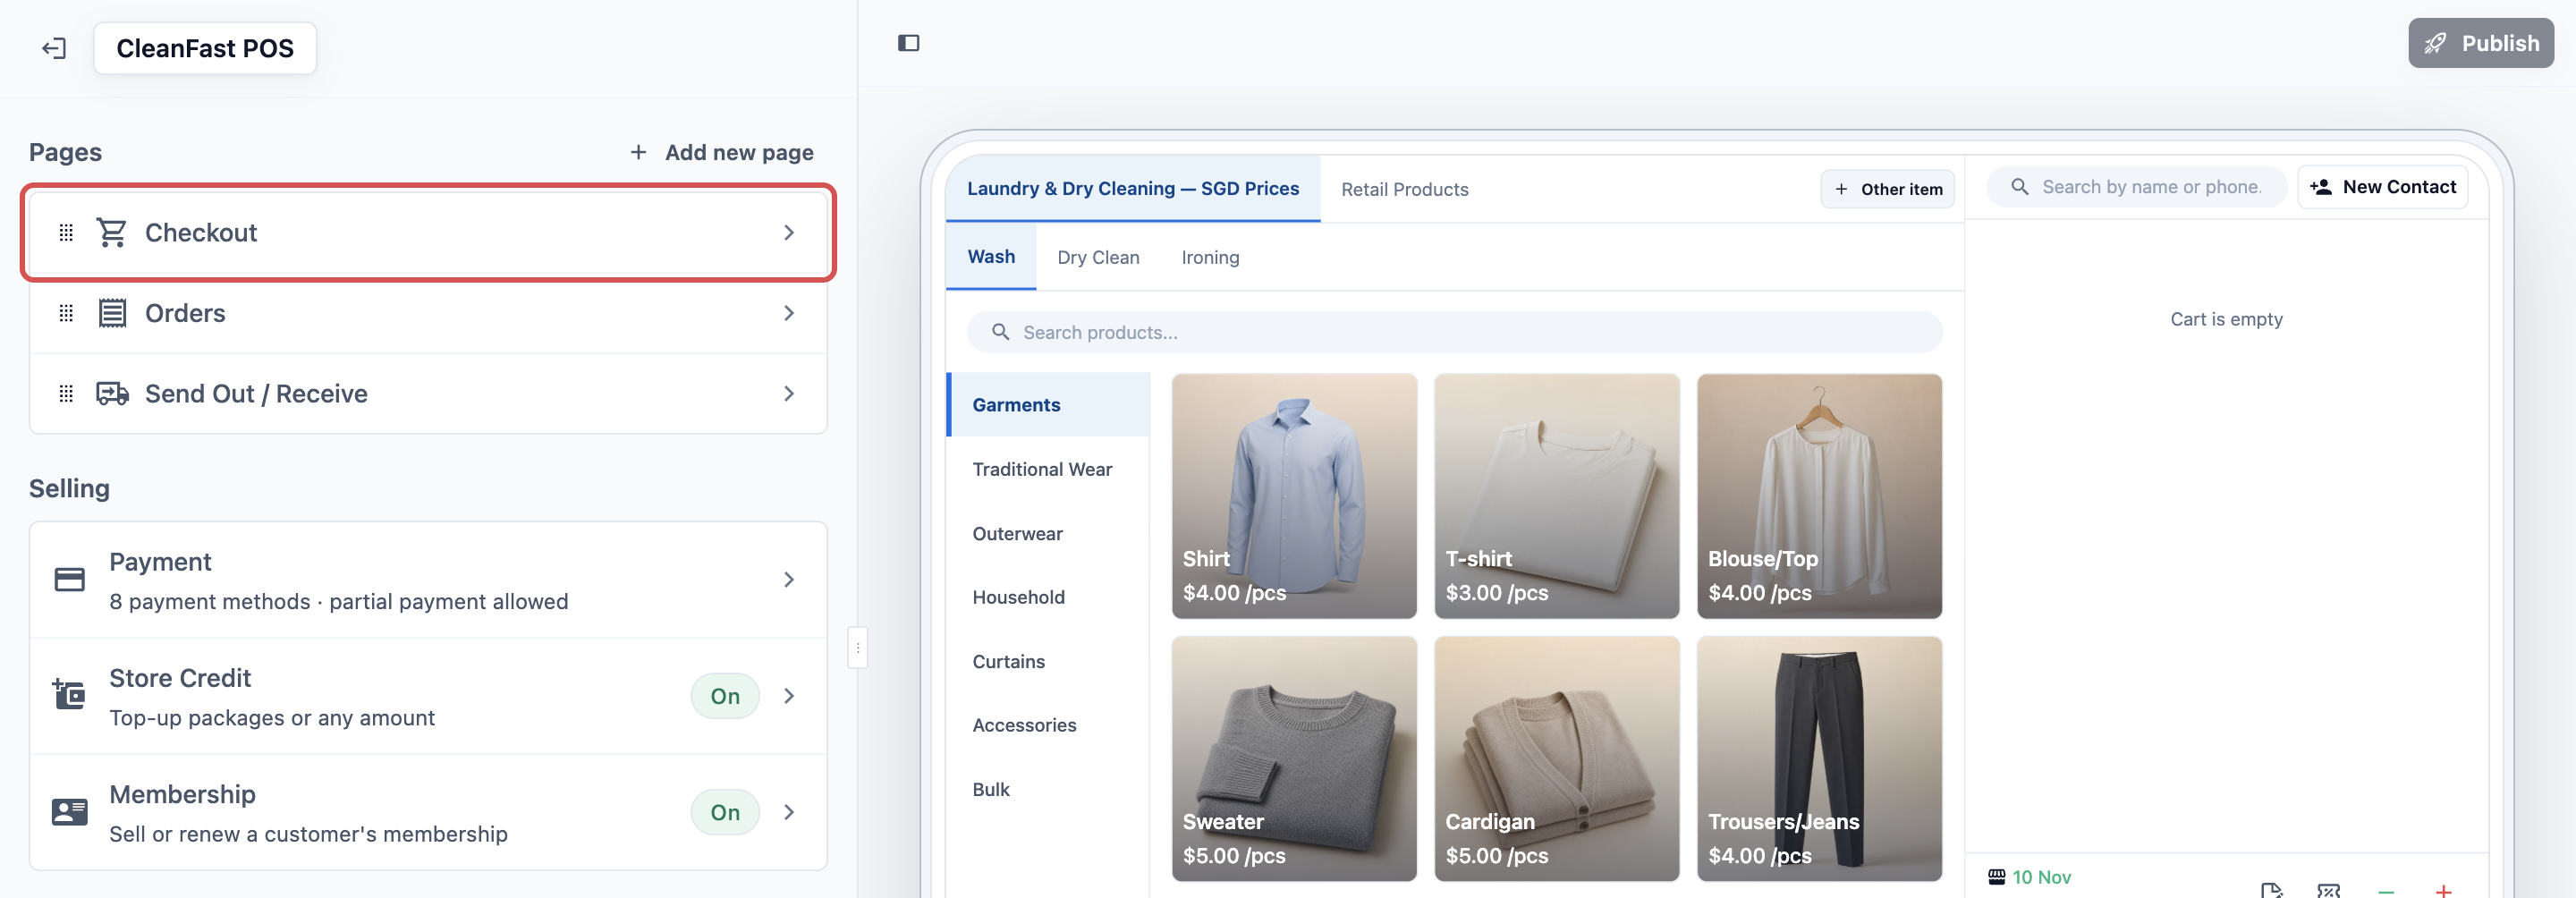
4. Under **Pages**, click **Checkout**.
5. Click **Order Confirmation**, the row below Catalog, Contact and Cart.
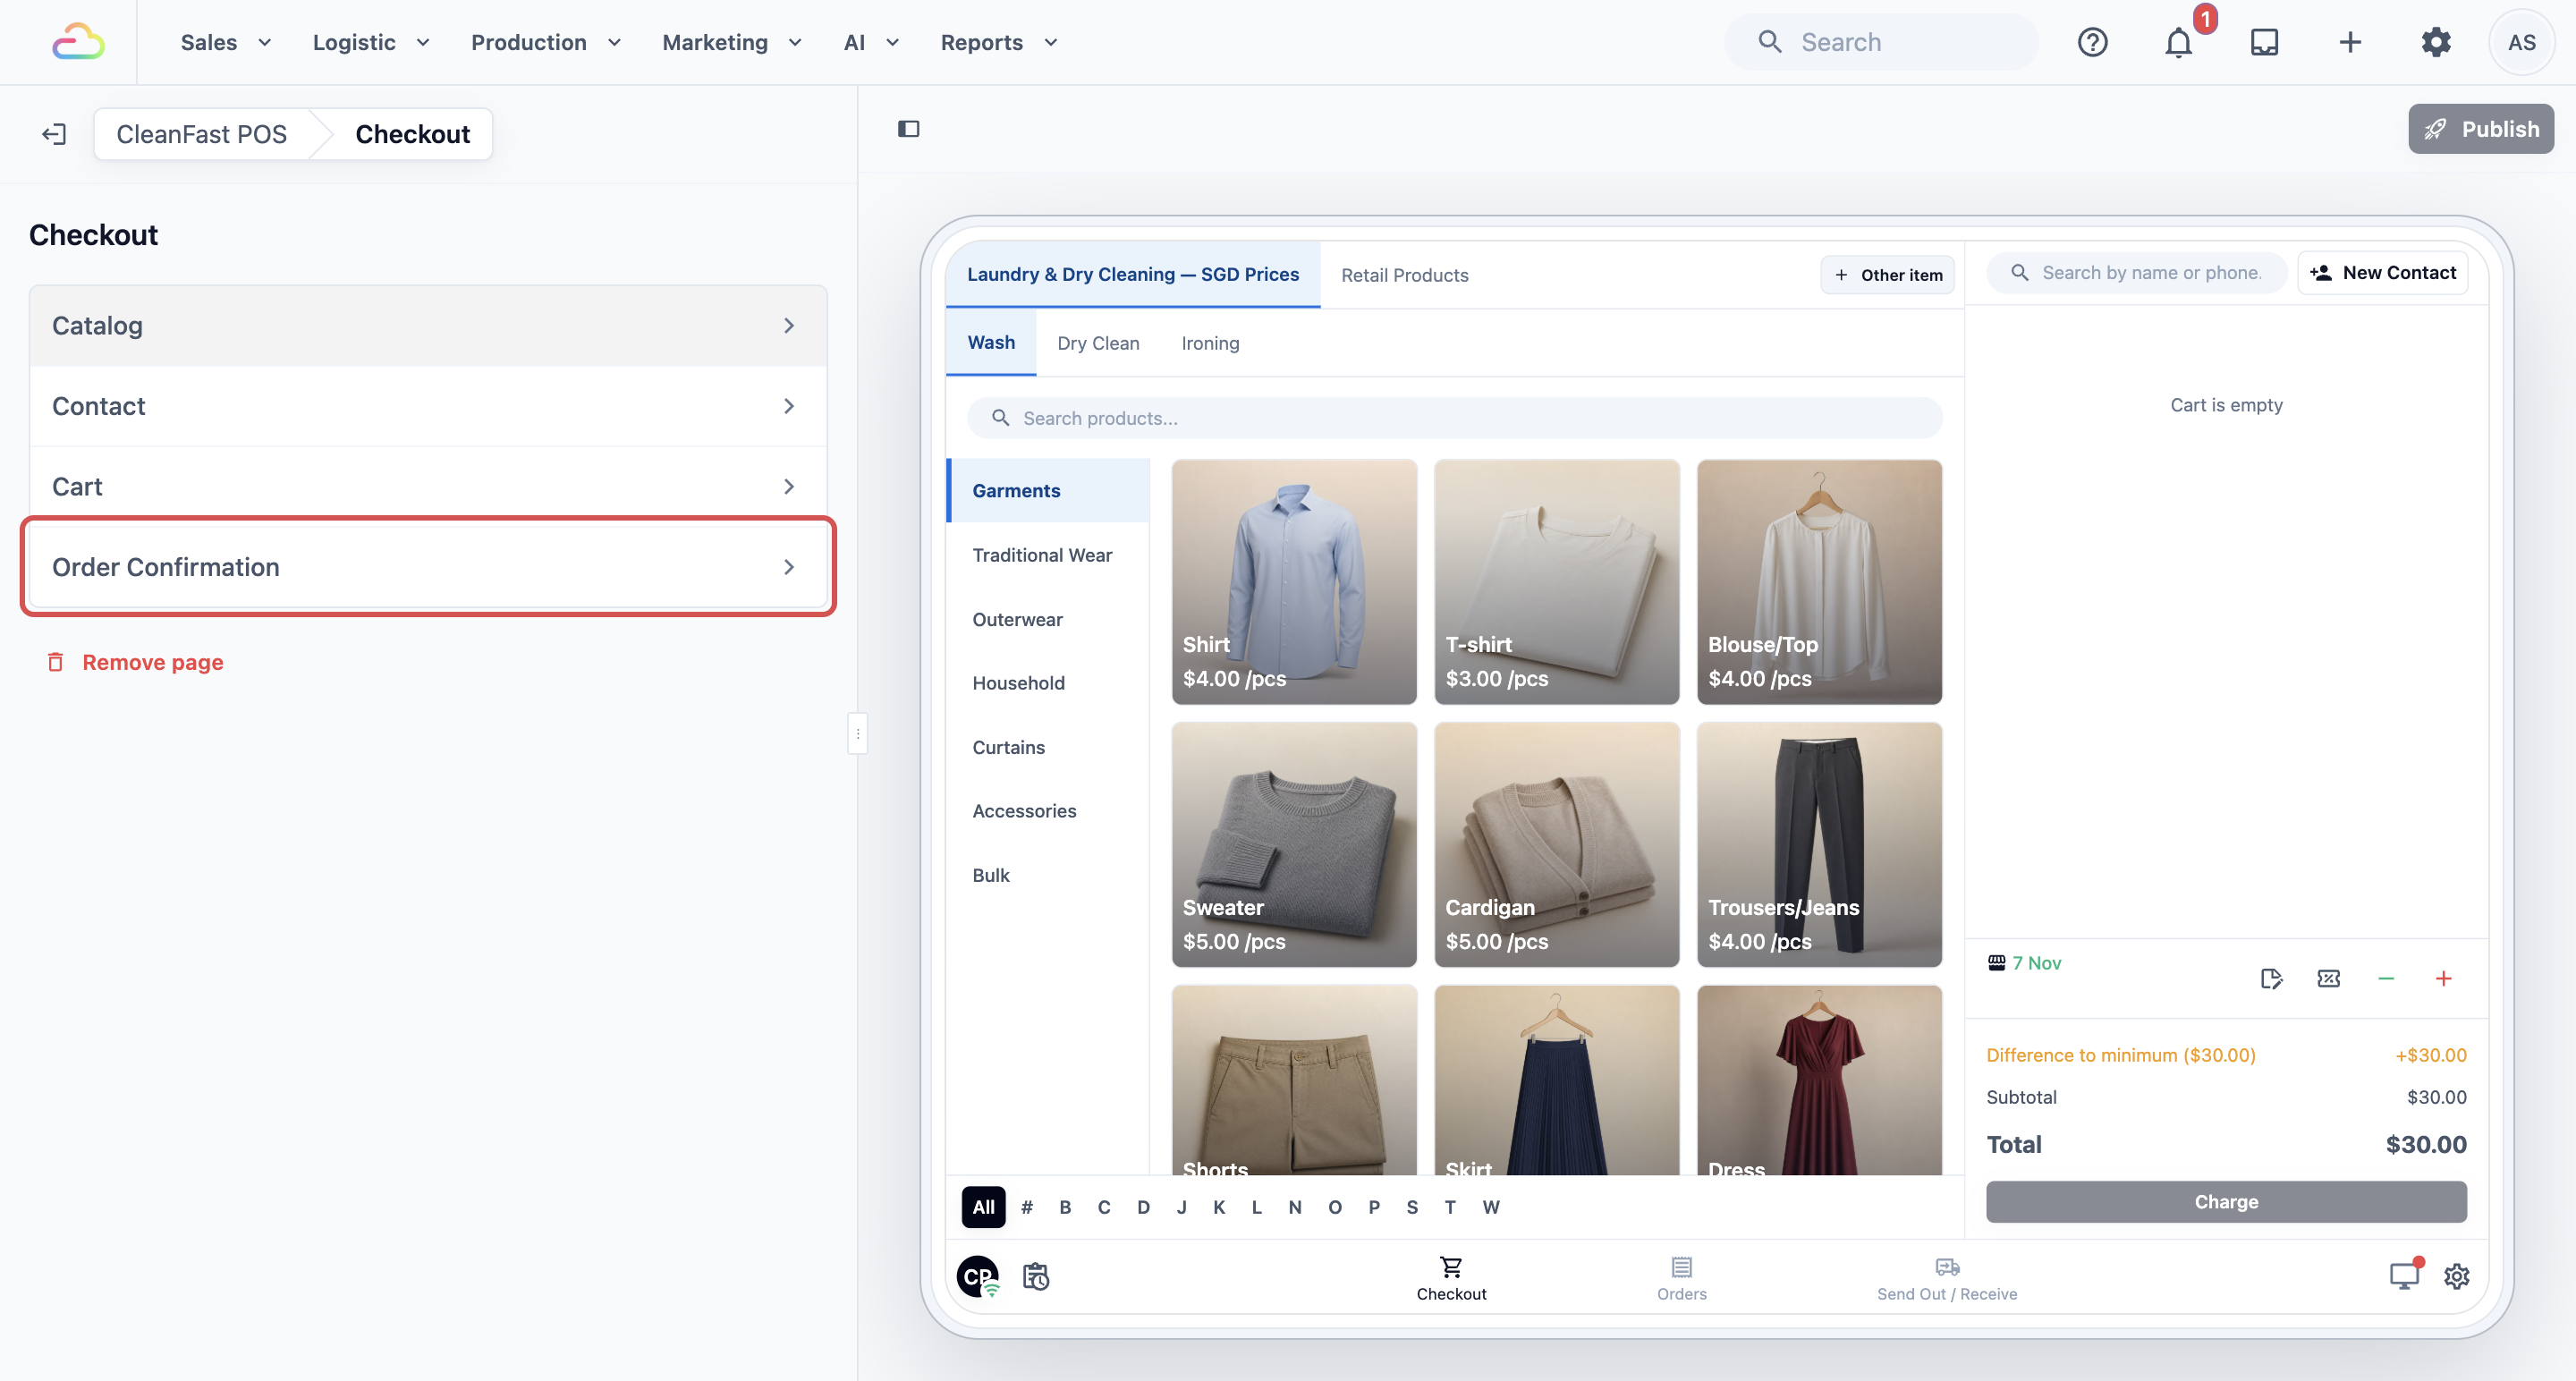
The **Confirmation Actions** list opens on the left. The preview on the right switches to the screen staff see after an order is made.
Order Confirmation is always part of the POS, so it has no Enabled switch. A new POS app usually starts with one Print Receipt action that uses your order receipt.
---
## Setting it up
Here is the whole setup in four steps. Each step is explained in detail in the sections below.
1. Click the **Print Receipt** action in the list to open it. If your list is empty, click Add action and choose Print Receipt.
2. Choose its receipt template and how many copies print by themselves.
3. For the Intermediate setup, add the other actions you want, then drag them into the order staff should see.
4. Click Publish, then Publish again in **Review your changes**.
### Print Receipt
Choose the receipt template this tile prints, then choose how many copies print by themselves when the order is made.
| **Option** | **What happens** |
| --- | --- |
| Off | Nothing prints until staff tap the tile |
| 1 | One receipt prints by itself |
| 2 | Two receipts print by themselves, for example one for the customer and one for the shop |
| 3 | Three receipts print by themselves |
If you choose no template, staff see "Receipt not configured" on the tile and cannot print from it.
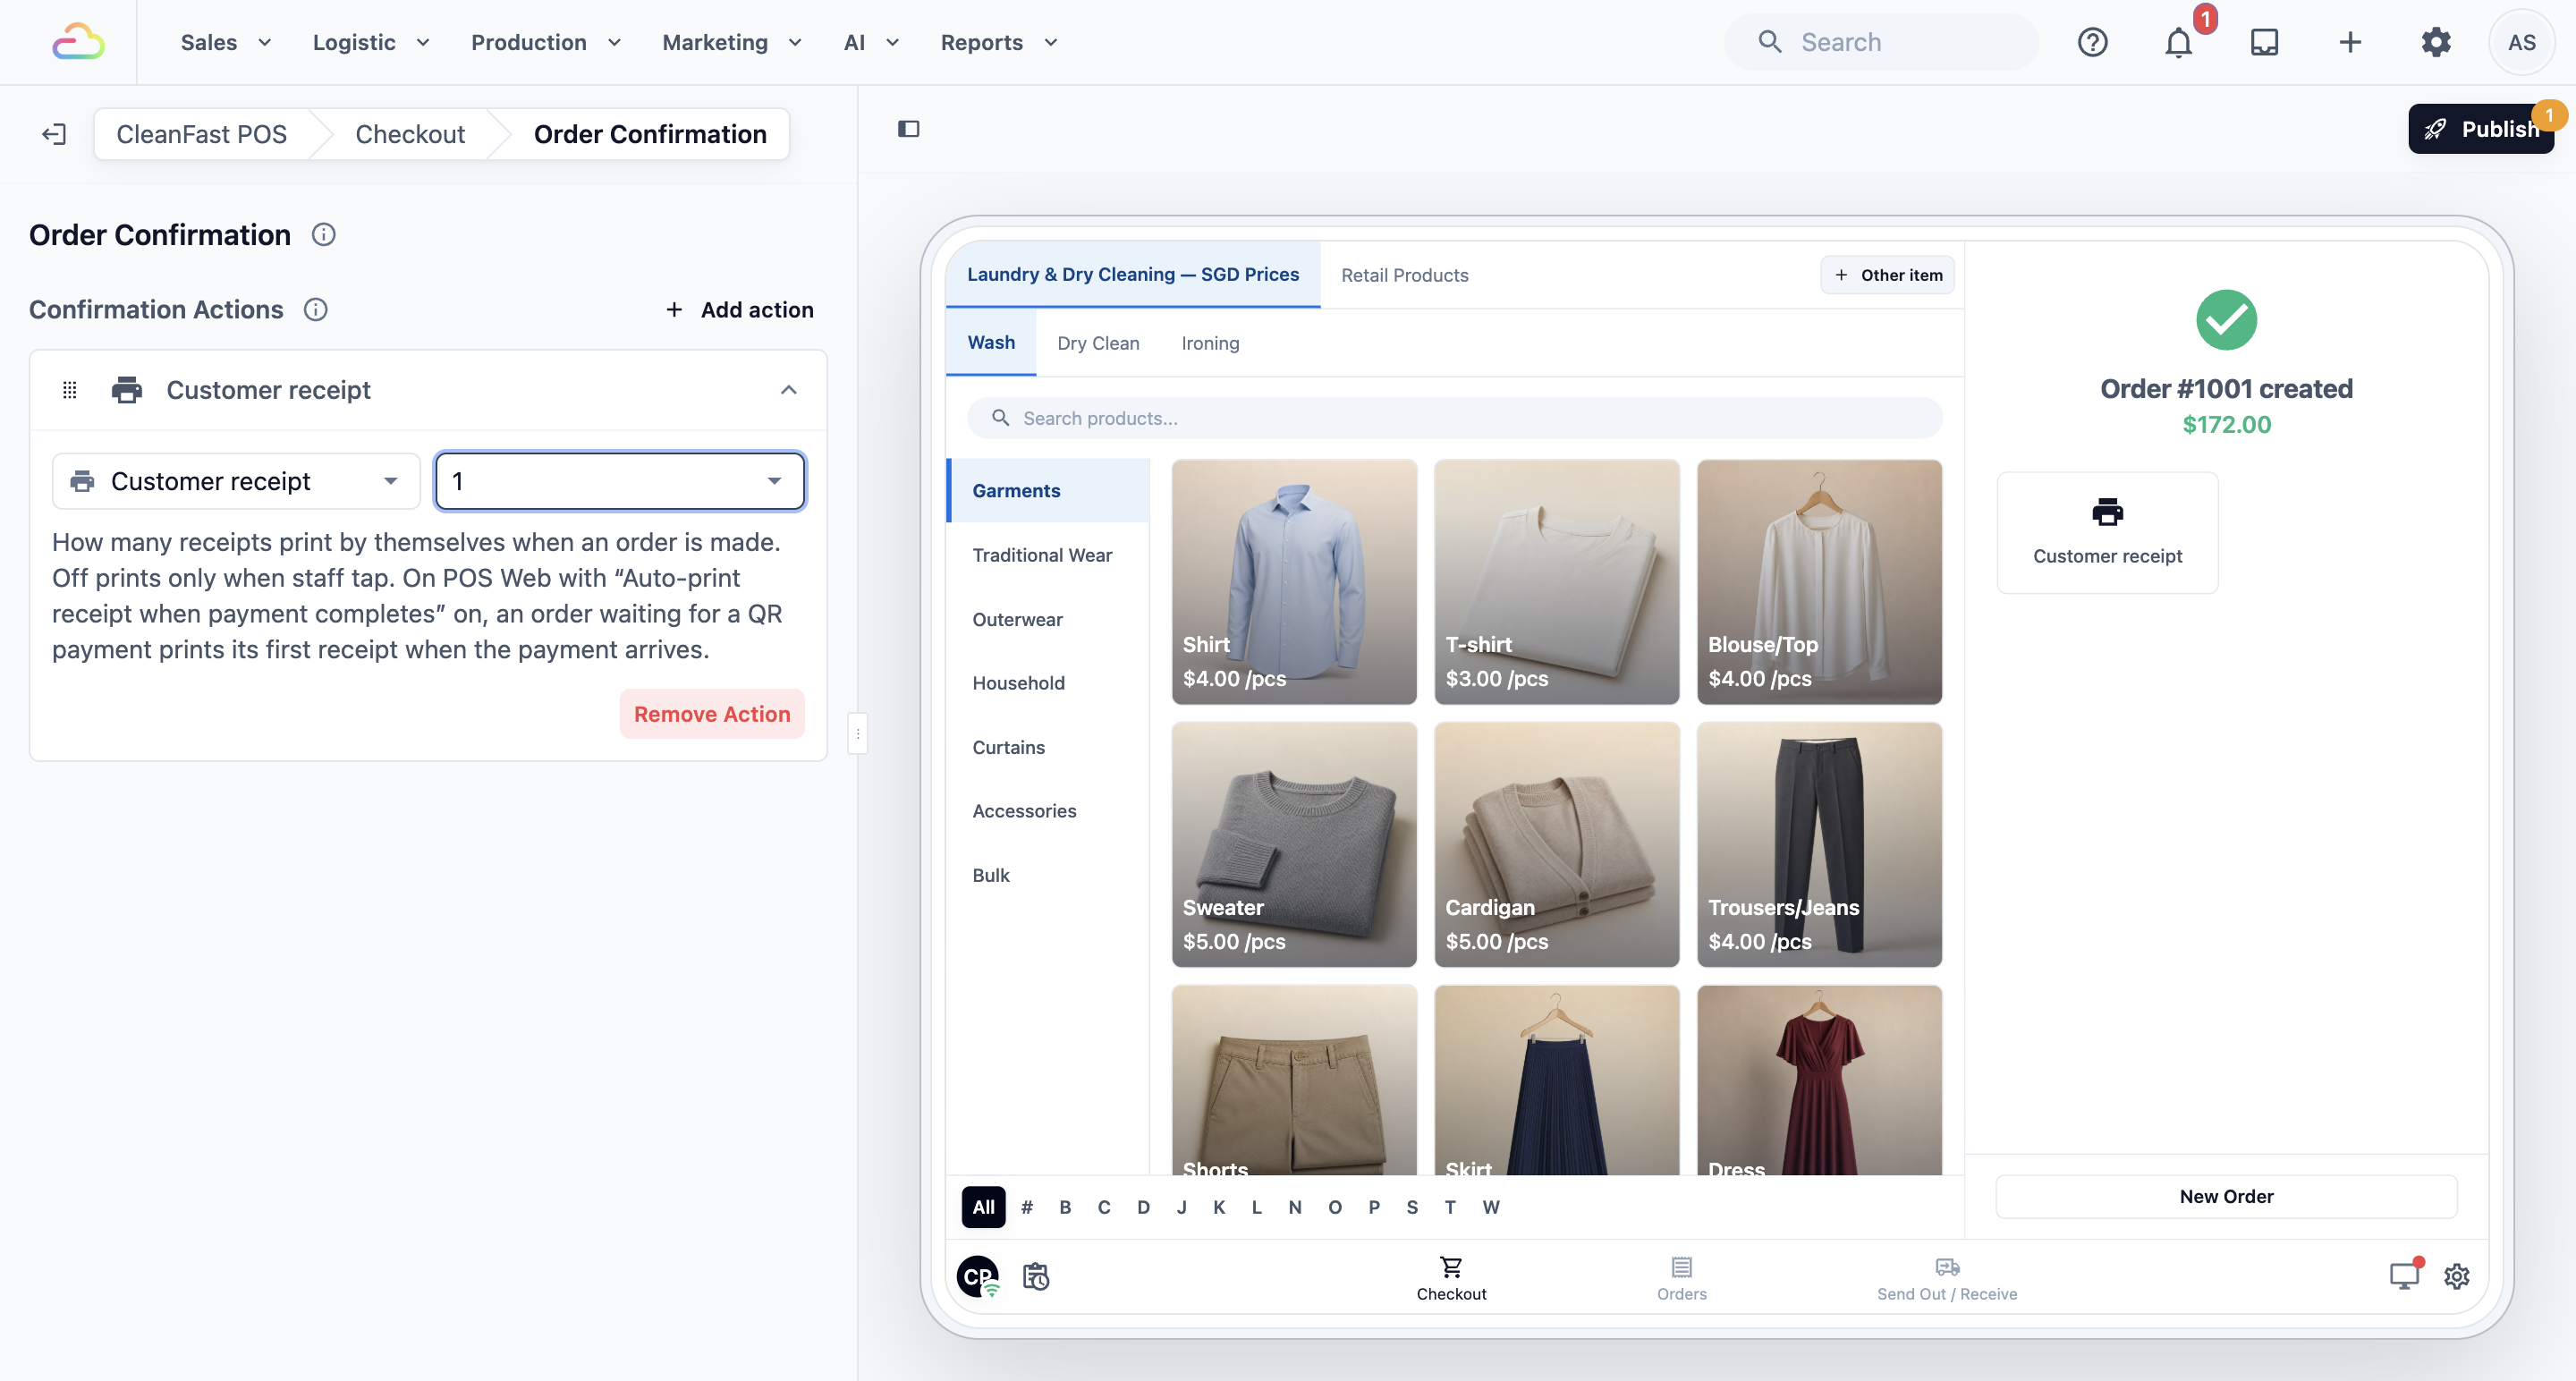
Printing by itself only works when the printer is already connected to that POS. The POS never asks to connect a printer on its own, so if nothing prints, staff can still tap the tile.
### Adding more actions
For Intermediate setups: add these if you tag items, email receipts or want a second receipt. Easy setups can skip to Example setup.
Click Add action, choose an action, then click it in the list to set it up as below.
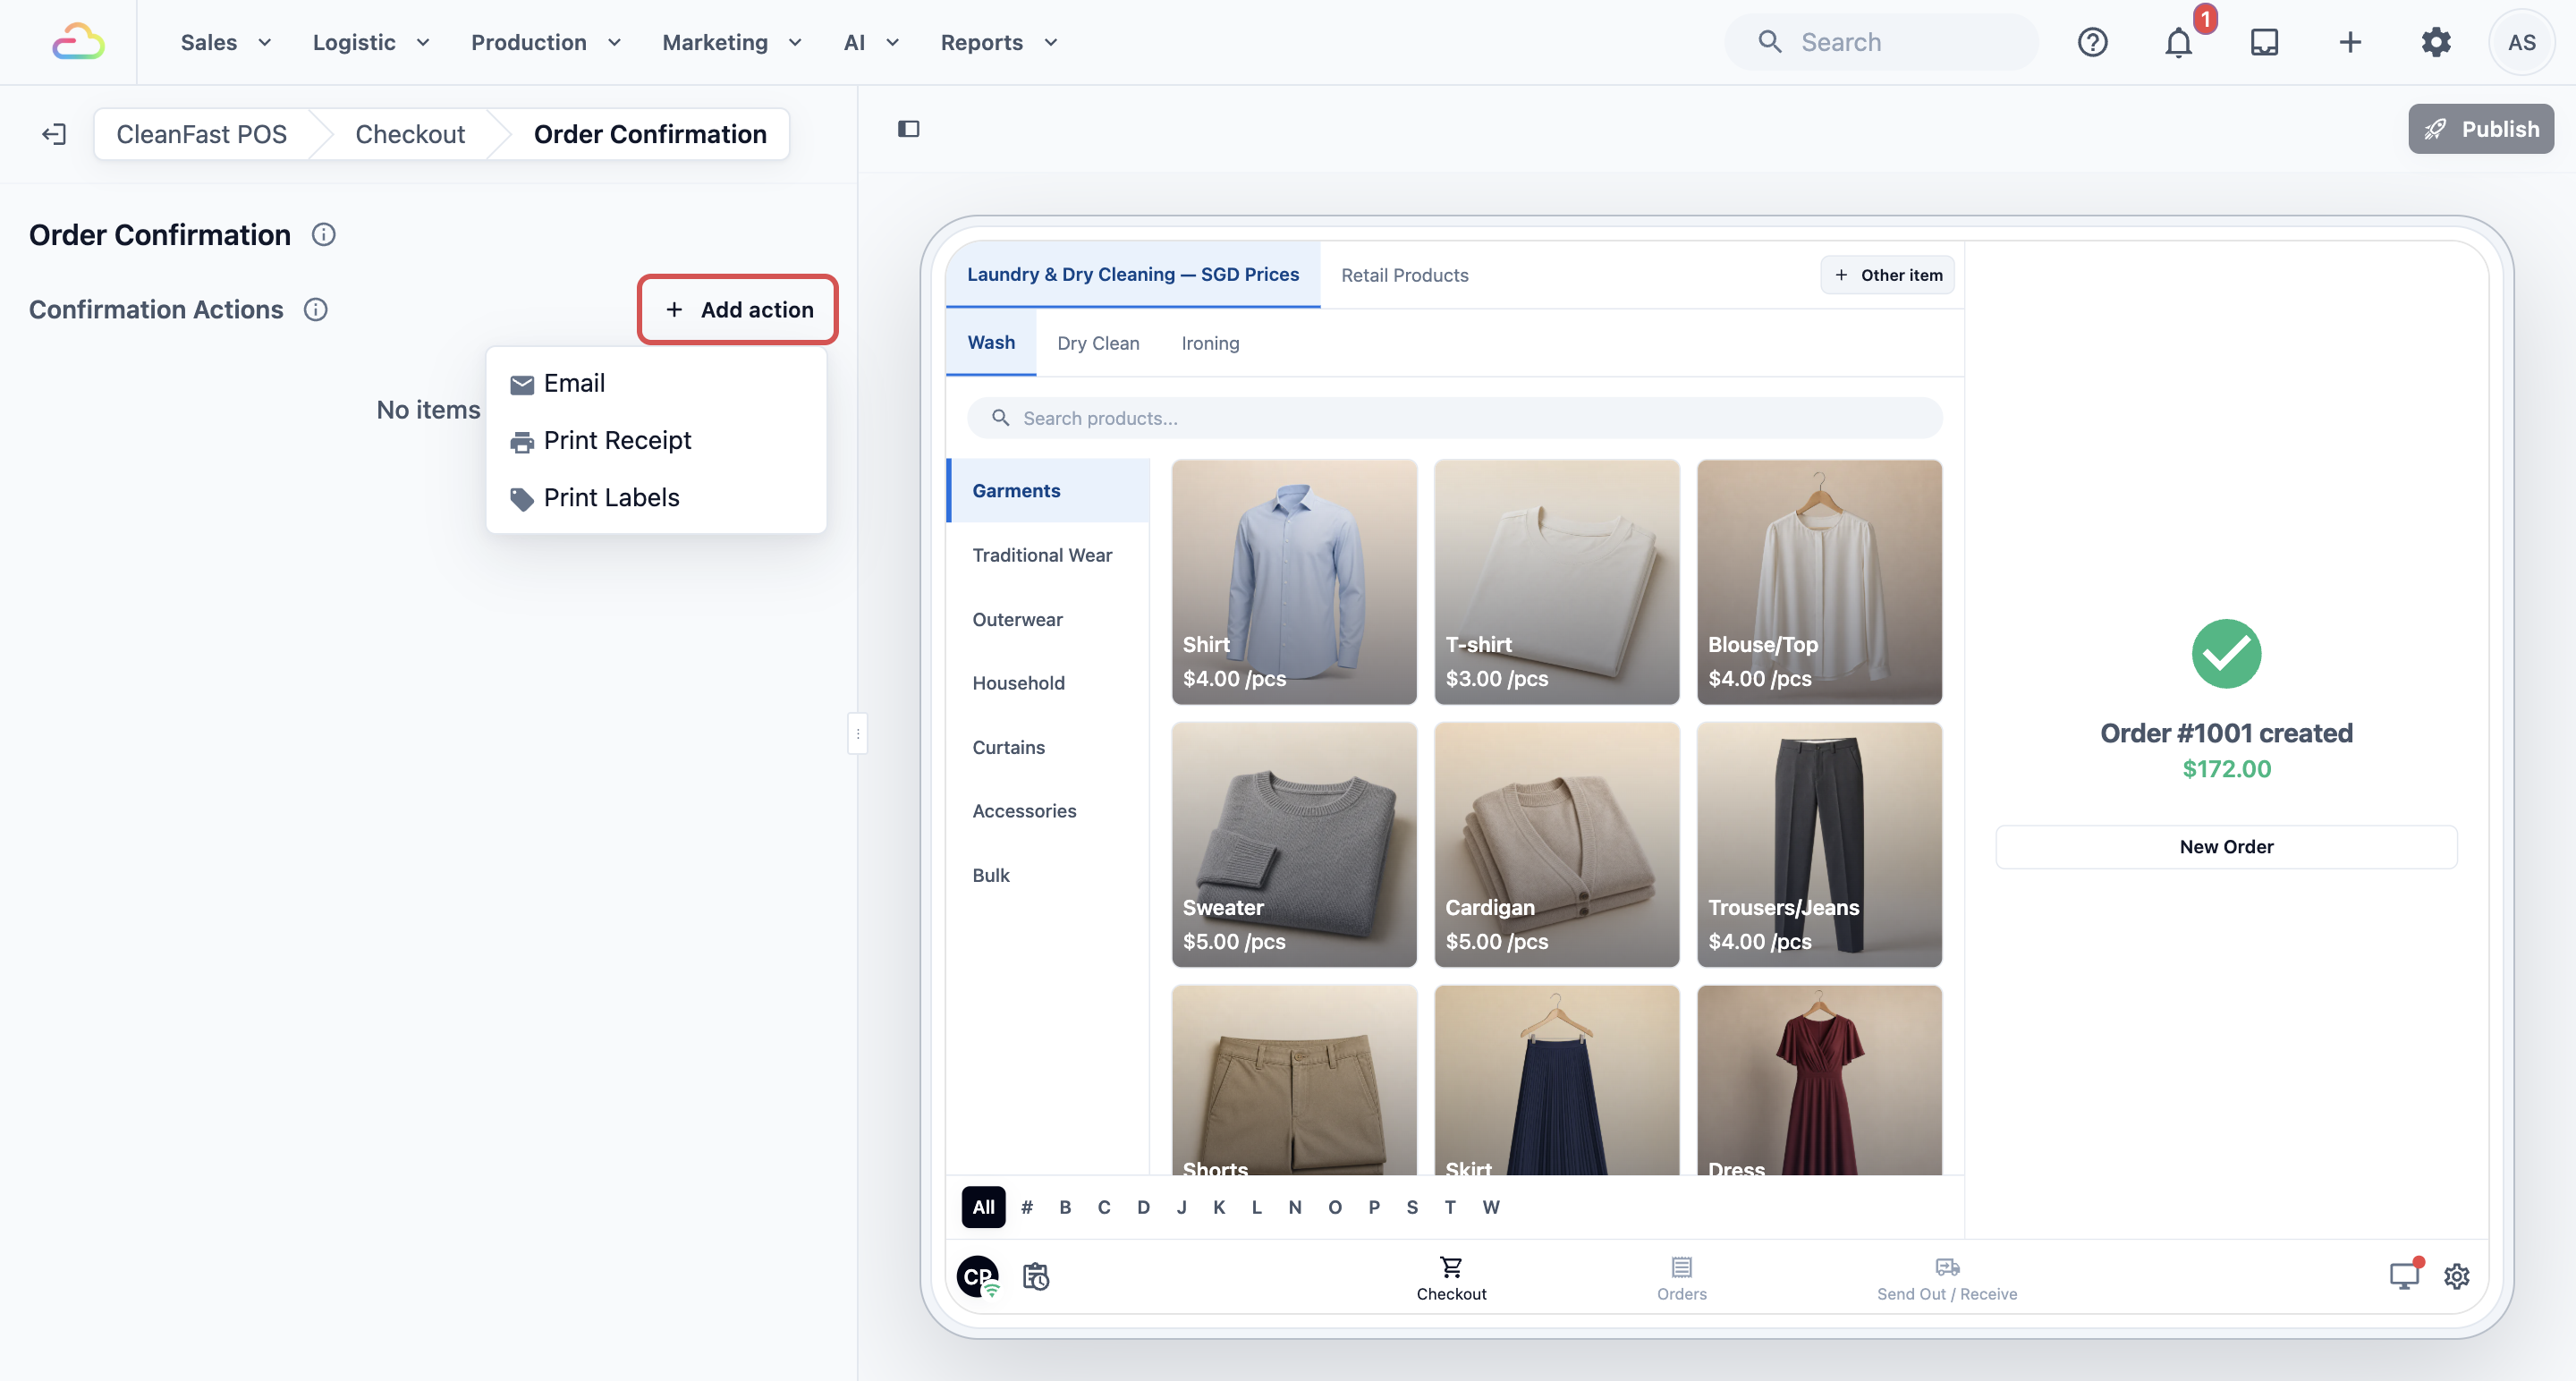
**Add action**
| **Action** | **What staff get on the POS** | **What you choose** |
| --- | --- | --- |
| Print Receipt | A tile that prints the order receipt | A receipt template, and how many copies print by themselves |
| Print Labels | A tile that prints the labels for the order's items | A label template, and how many sets print by themselves |
| Email | A tile that emails the customer, for example their receipt | A customer email |
You can add the same action more than once. For example, add two Print Receipt actions to print a customer copy and a shop copy from different templates.
### Print Labels
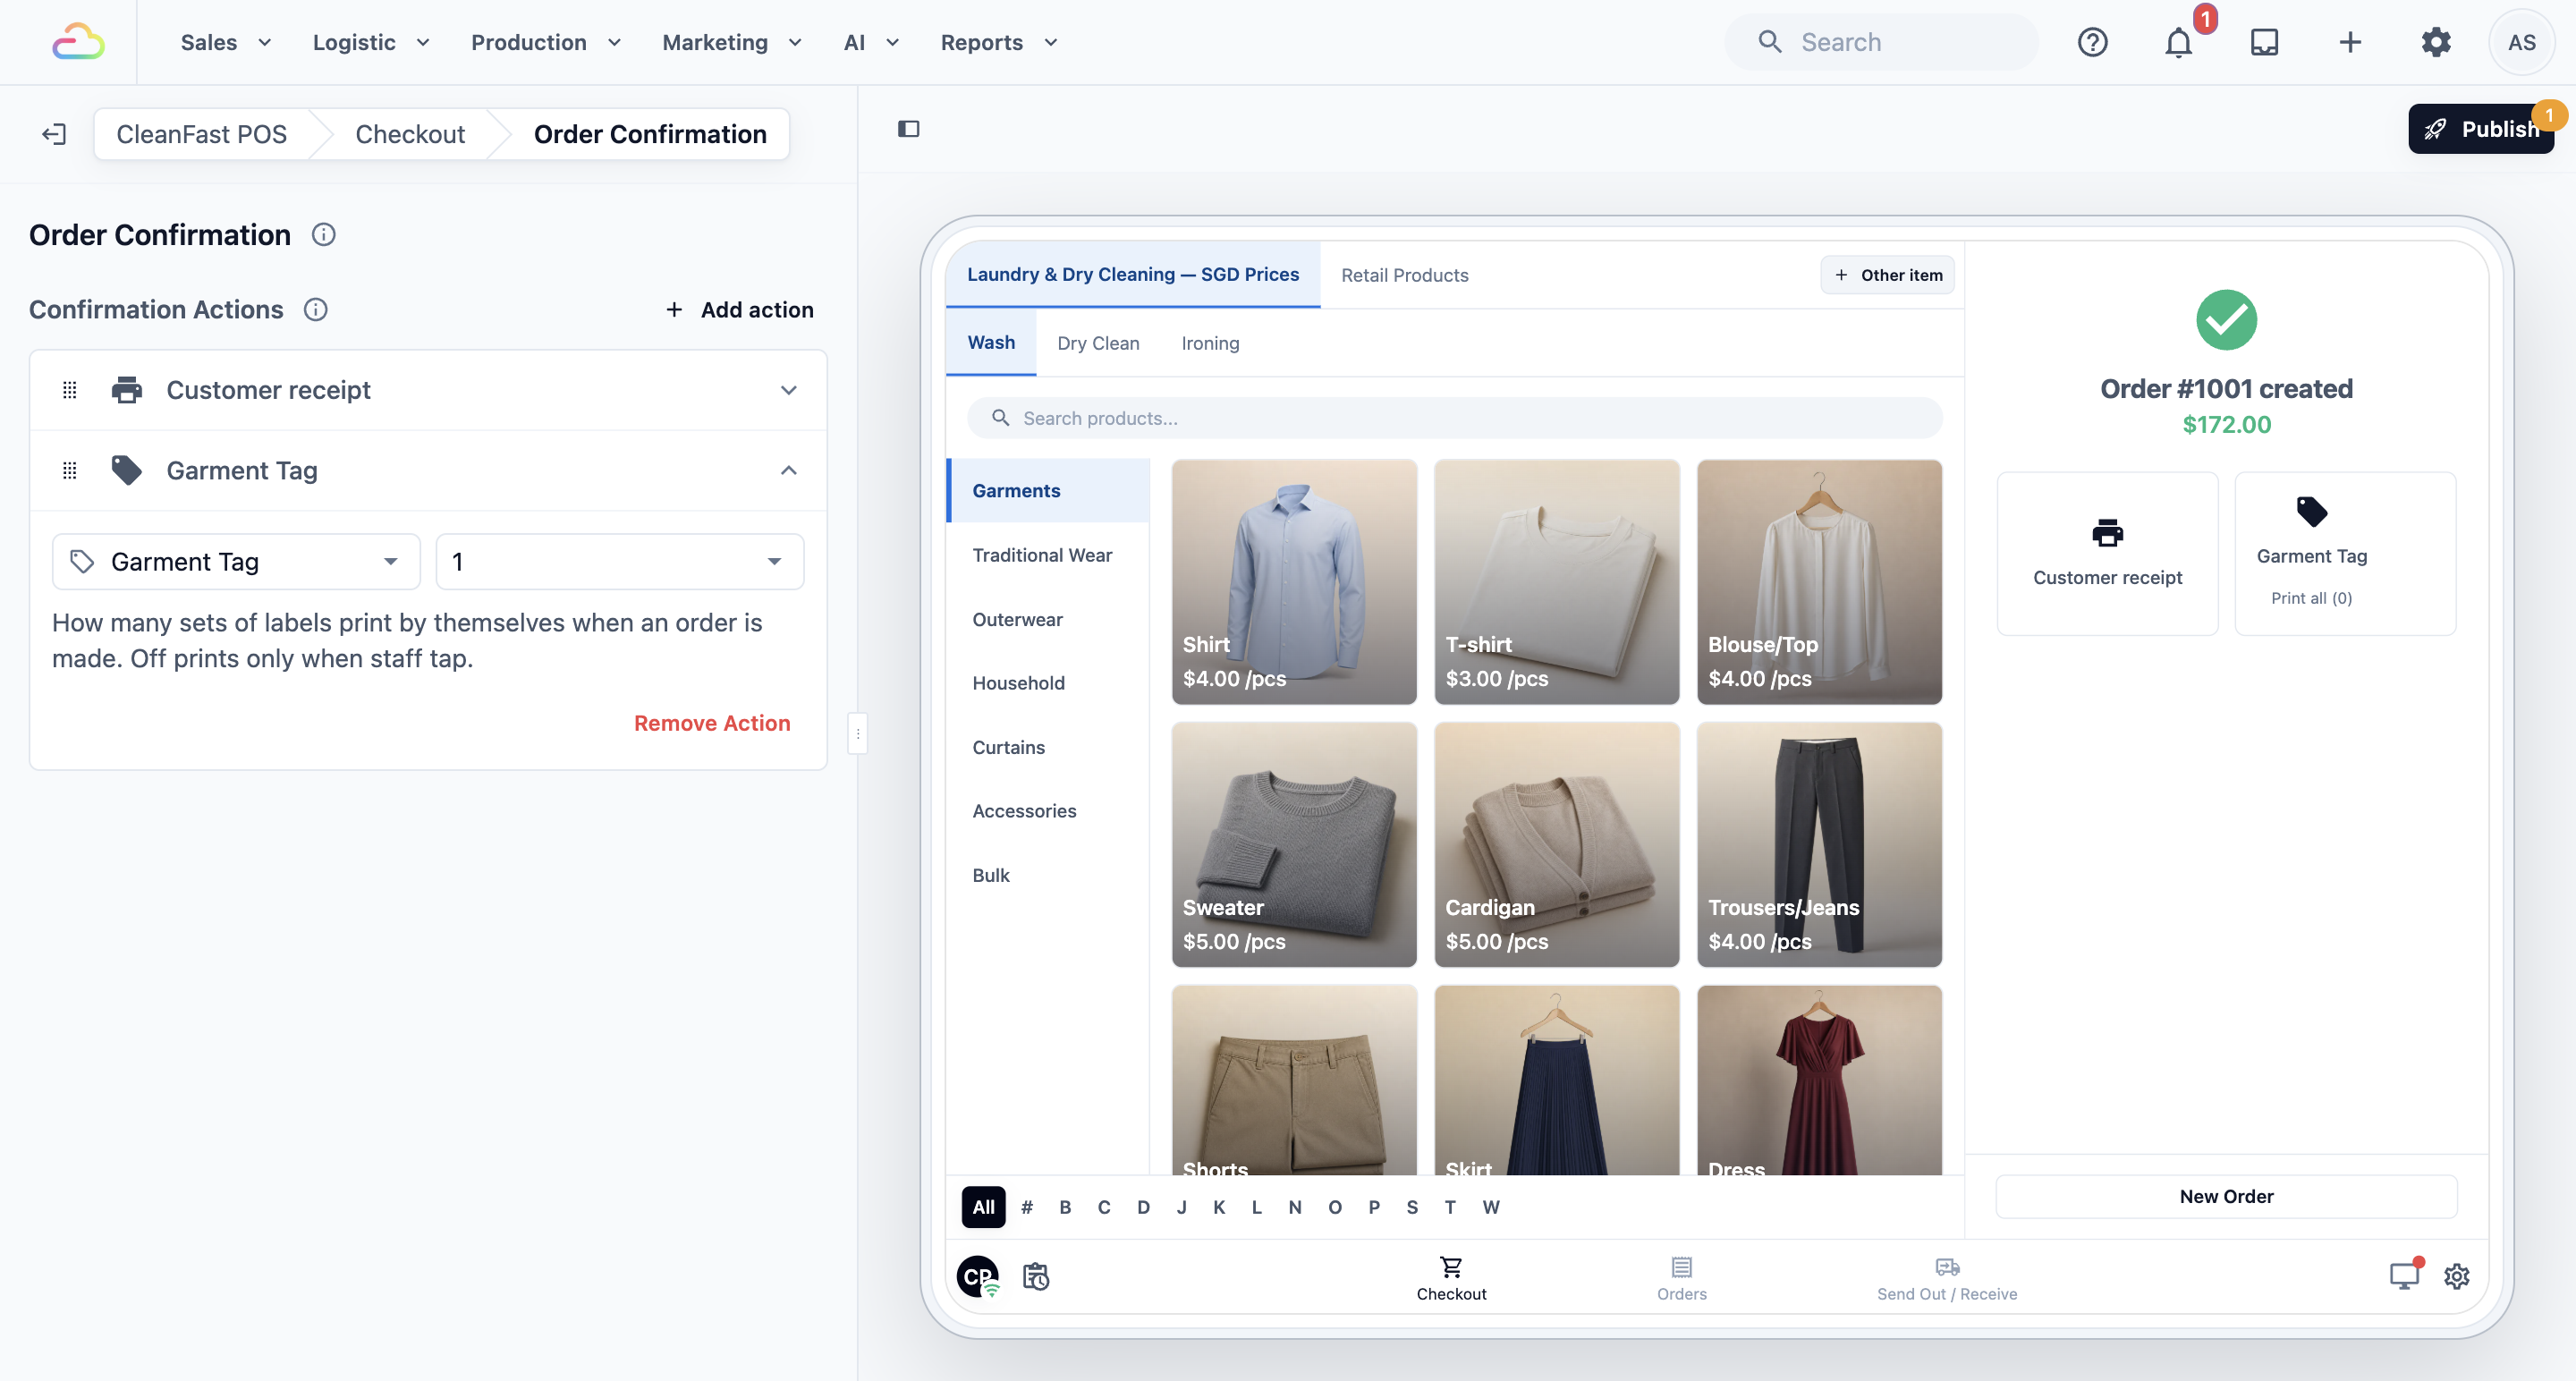
Choose the label template this tile prints, then choose how many sets print by themselves, using the same Off, 1, 2 and 3 options. If you leave the template empty, the POS prints the label set for the order's business unit, so your Laundry and Bag Repair orders each get their own label.
### Email
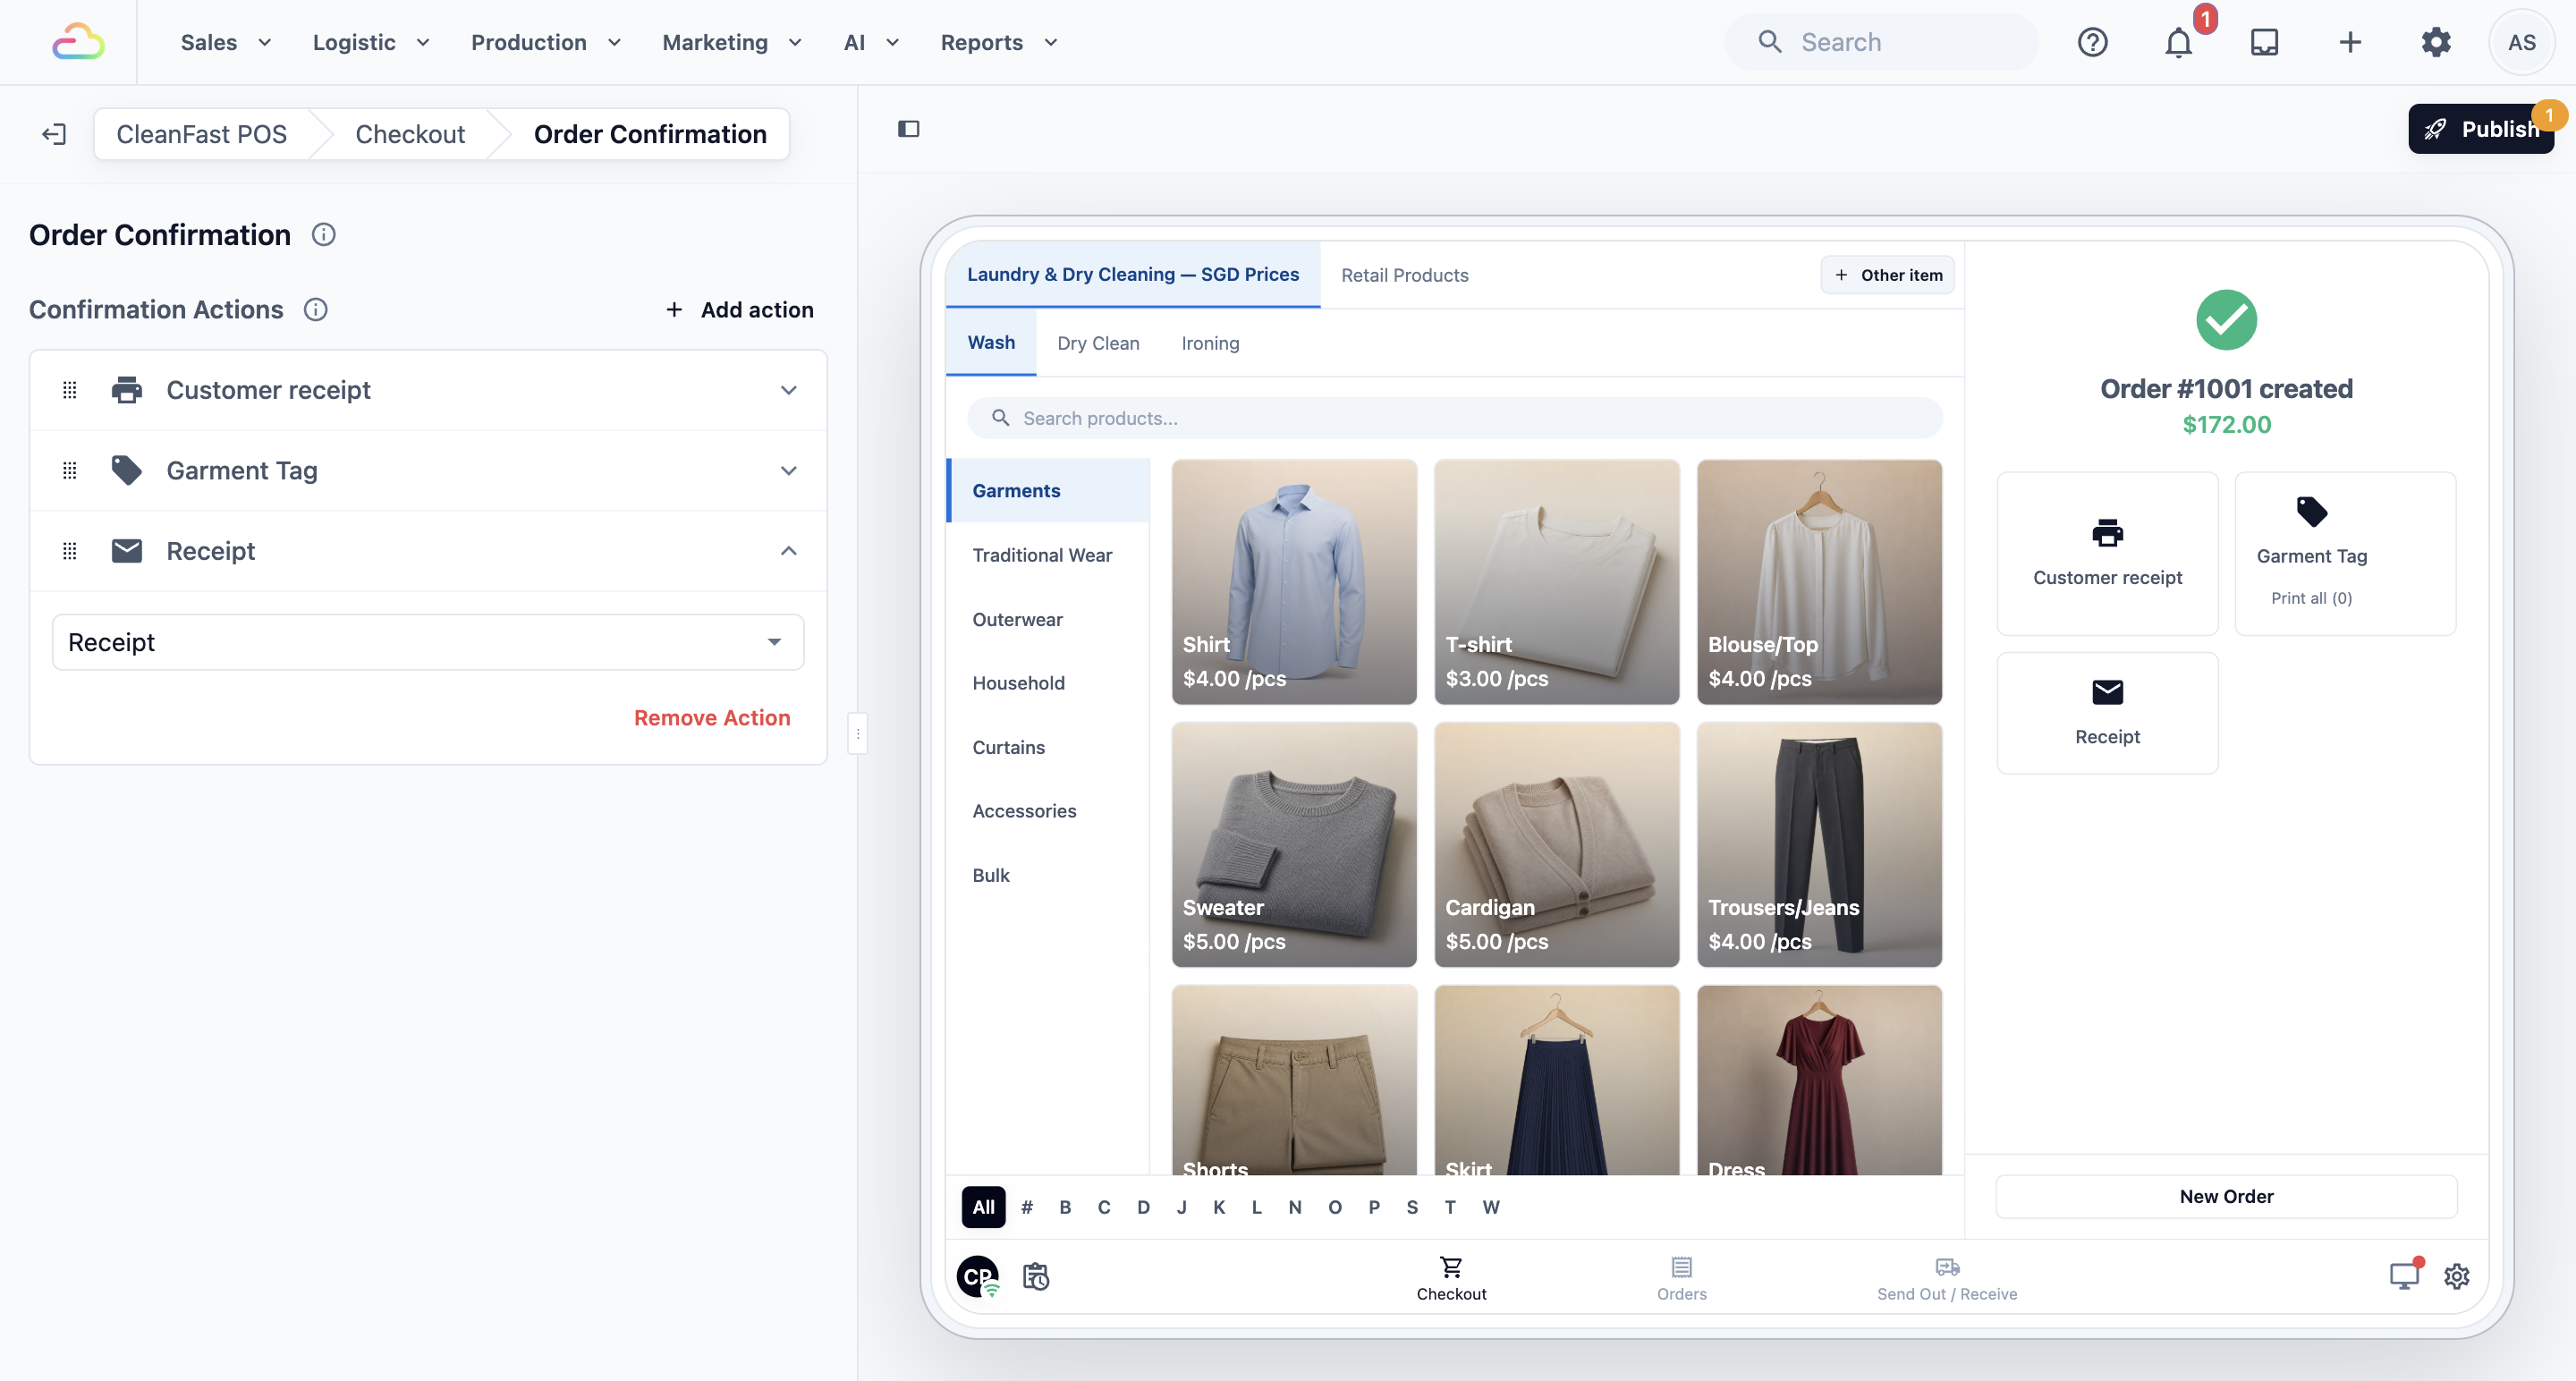
Choose the customer email this tile sends, for example your order receipt email. Staff check the customer's email address on the POS before it goes out, so an email never sends by itself from this screen.
### Reordering and removing actions
- **Reorder:** drag an action up or down. The tiles on the POS follow the same order, two to a row.
- **Remove:** open the action and click Remove Action. The tile disappears from the POS after you publish.
---
## Example setup
CleanFast Laundry's Tampines shop tags every item before it goes to the workshop, so it uses the Intermediate setup on CleanFast POS:
1. **Print Receipt:** CleanFast Receipt, 1 copy.
2. **Print Labels:** Item Label, 1 set.
3. **Email:** the order receipt email.
A customer drops off 5 shirts and a duvet and pays by cash:
- 5 shirts × S$4.00: S$20.00
- 1 duvet: S$18.00
- Total: S$38.00
The moment the order is made, the receipt and the labels print by themselves. Staff hand over the receipt, tag the items and tap Email only when the customer asks for a copy by email. With the Easy setup, the same counter would show only the receipt tile.
---
## What staff see on the POS
After every order, the screen shows "Order 00125 created", the amount, then your tiles in your order.
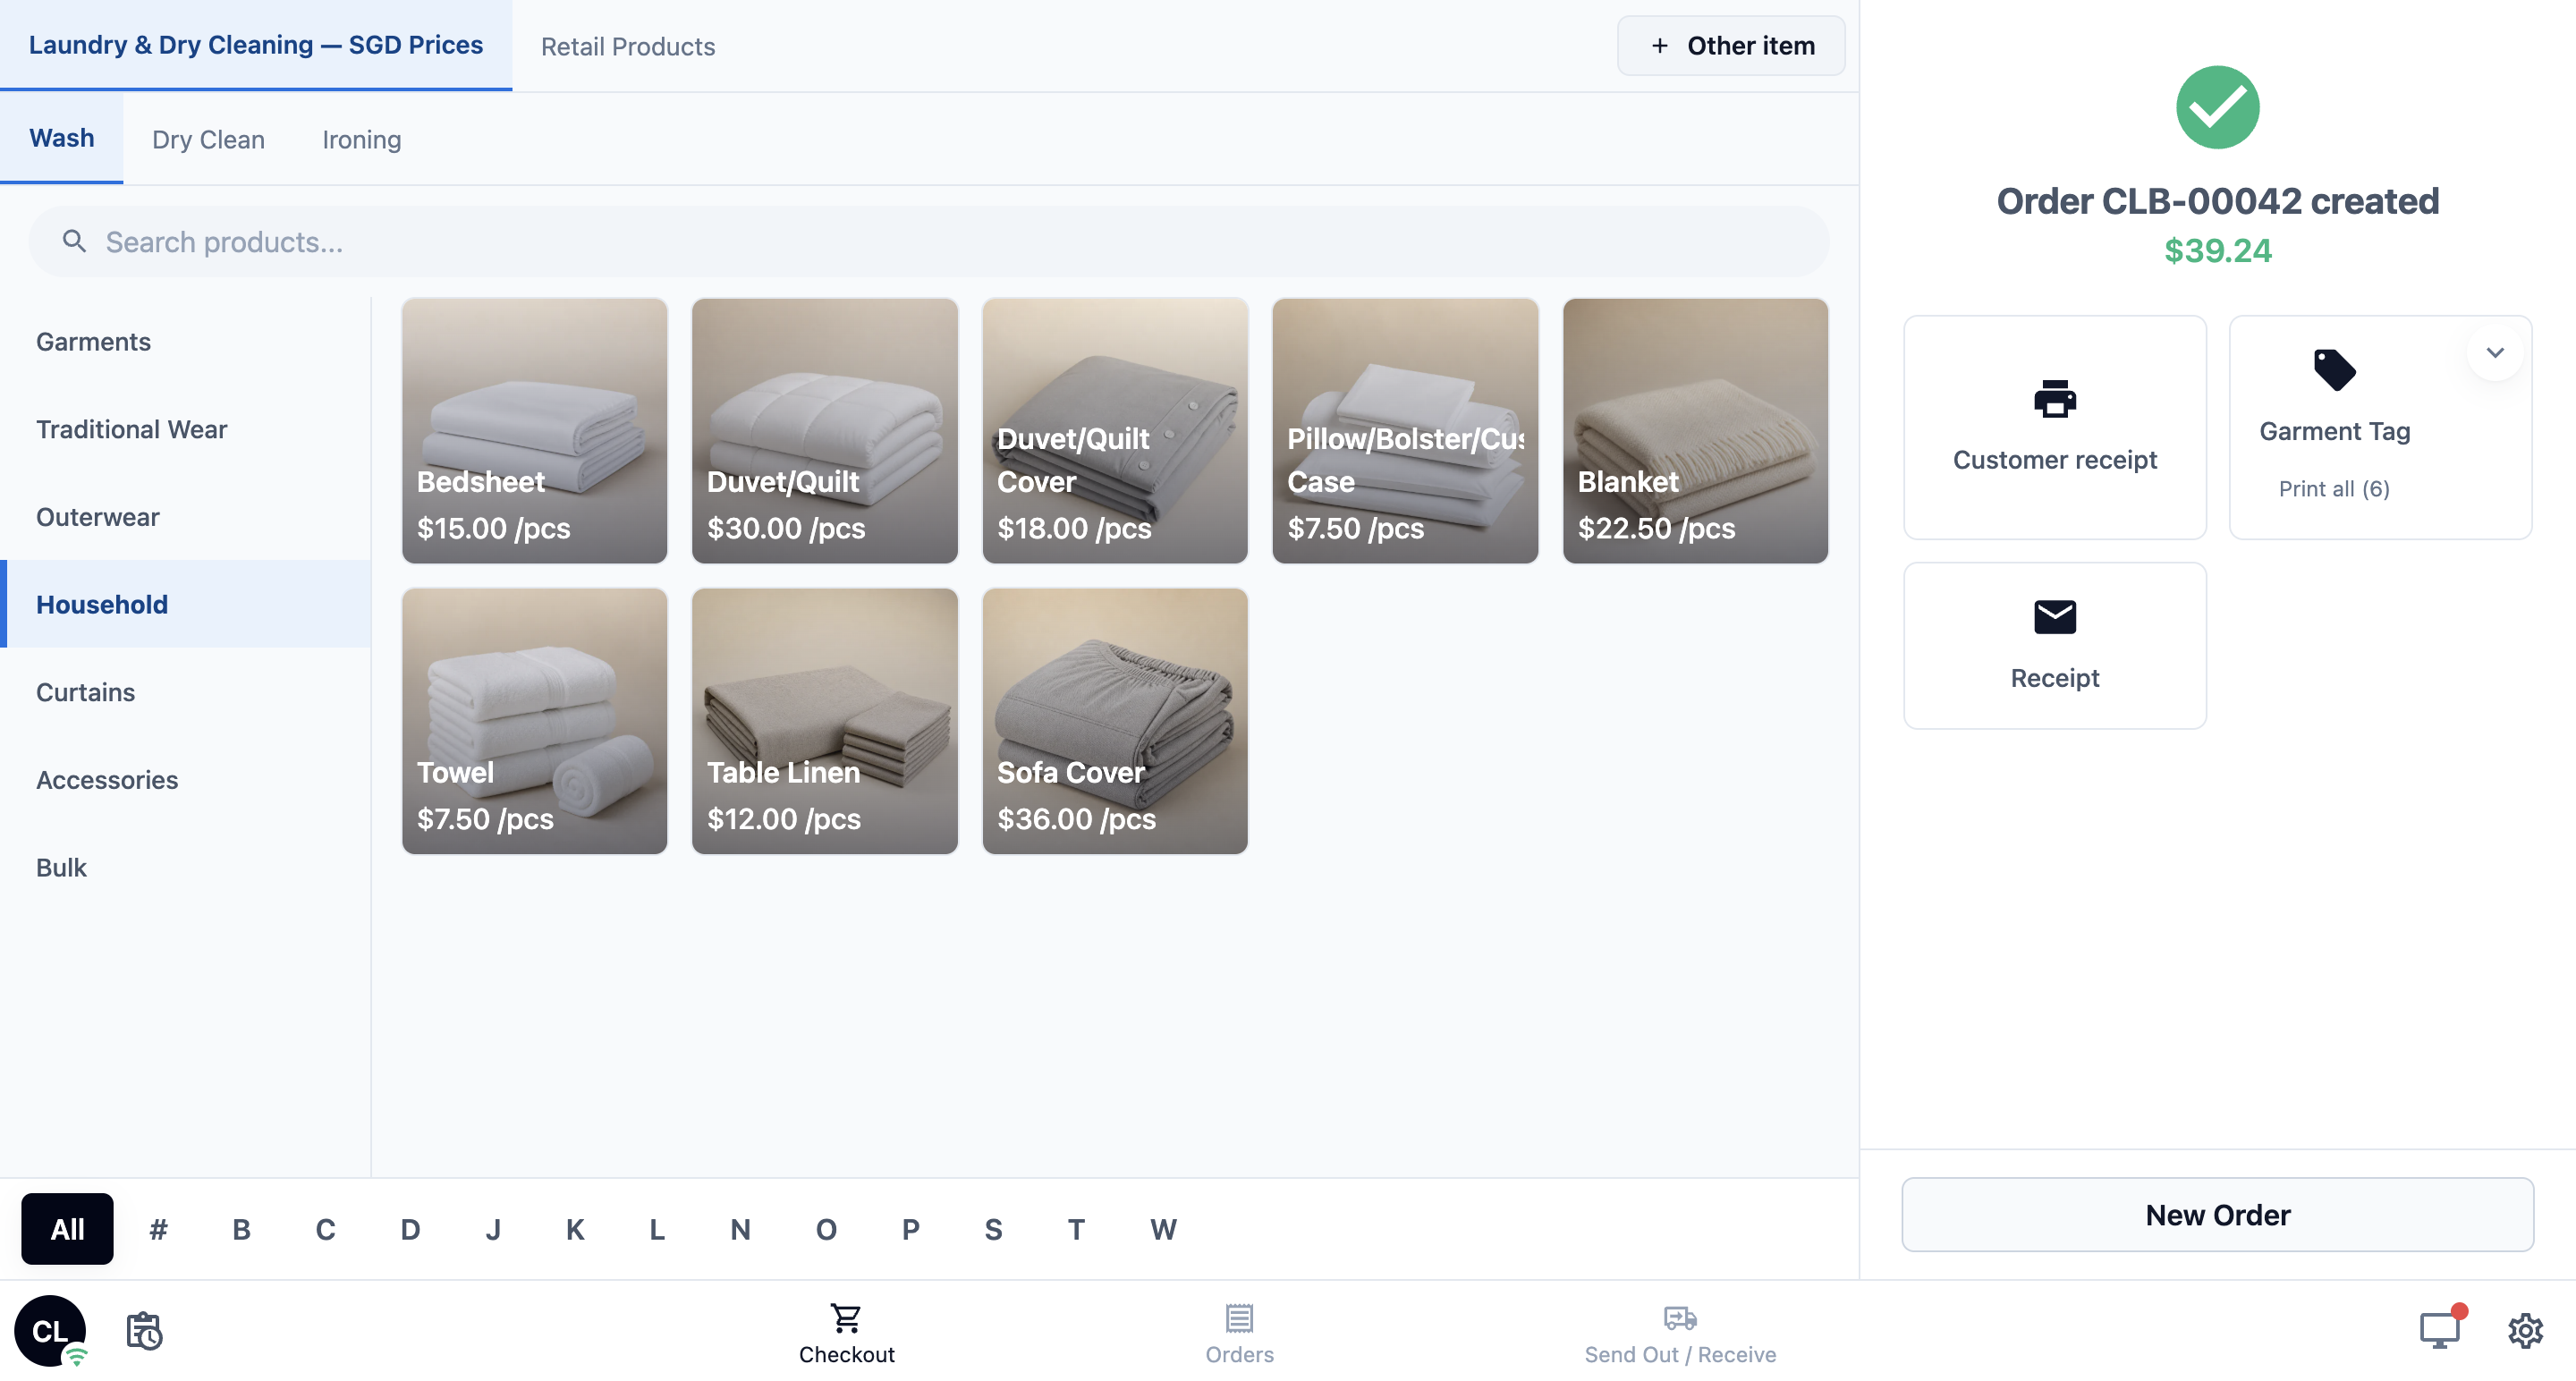
- **Print Receipt:** the tile shows the template name. It shows "Printed" once the receipt has printed. Staff can tap it again for another copy.
- **Print Labels:** the tile shows the template name and "Print all", with the number of labels in brackets. Staff tap the small button on the corner of the tile to see each label and print only one.
- **Email Receipt:** staff tap the tile, check the email address and tap Send. The tile then shows "Sent", "Delivered" and "Opened" as the email goes through. If your customer notifications already sent that email for this order, the tile shows its status instead of sending it again.
- **New Order:** clears the screen for the next customer.
For a training order, the screen shows that payment was skipped instead of the amount, and the tiles still work, so staff can practise printing. See [Taking a POS Shop Live](/docs/taking-a-pos-shop-live).
### When the customer pays by QR later
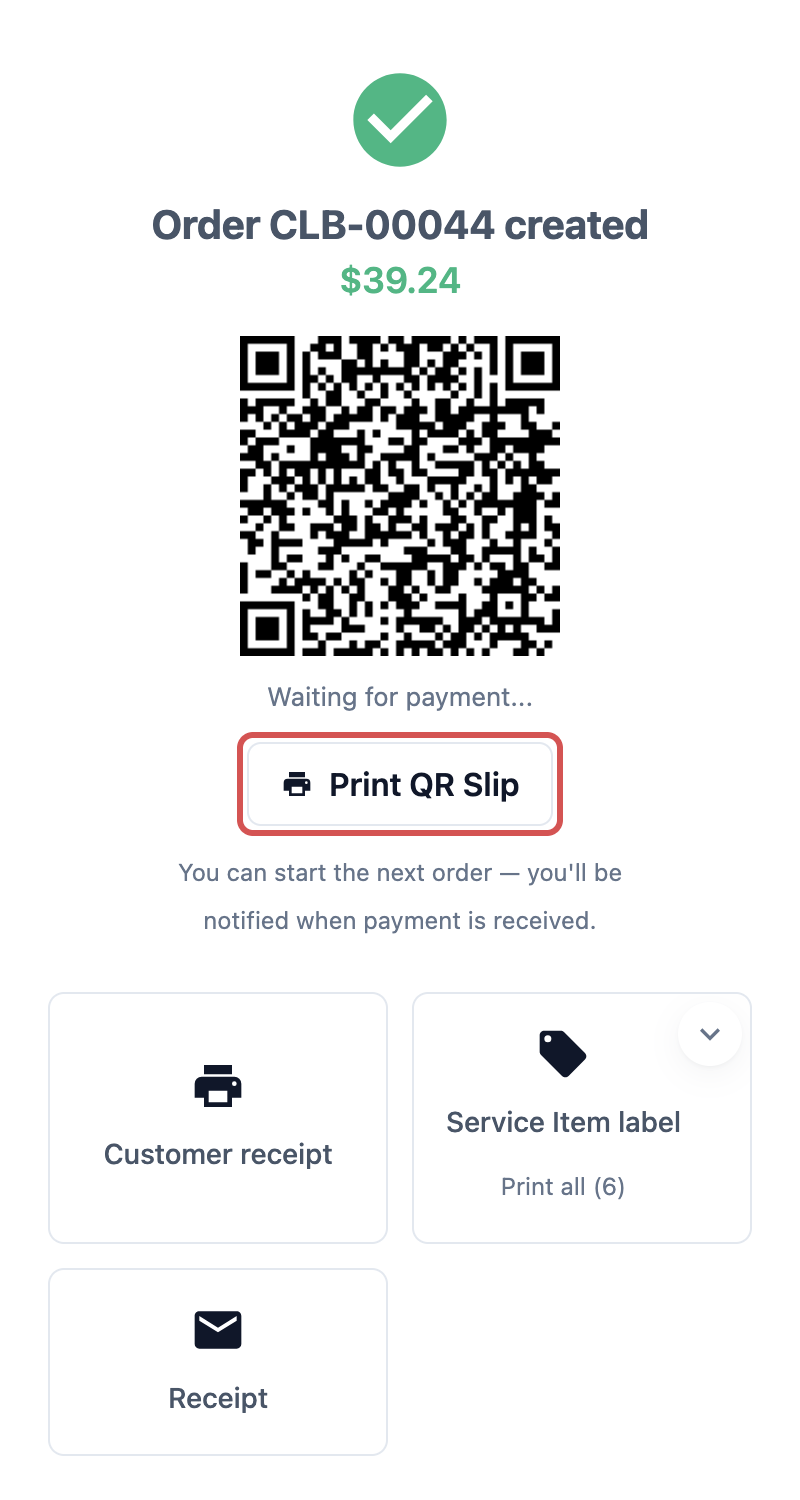
When the customer pays by PayNow or GrabPay, the screen shows the QR code with "Waiting for payment..." and Print QR Slip, so staff can print the QR for the customer to scan. Staff don't need to wait. They can tap New Order and serve the next customer.
What happens when the payment arrives depends on where your POS runs:
| **POS on** | **What staff see when the customer pays** | **When the receipt prints by itself** |
| --- | --- | --- |
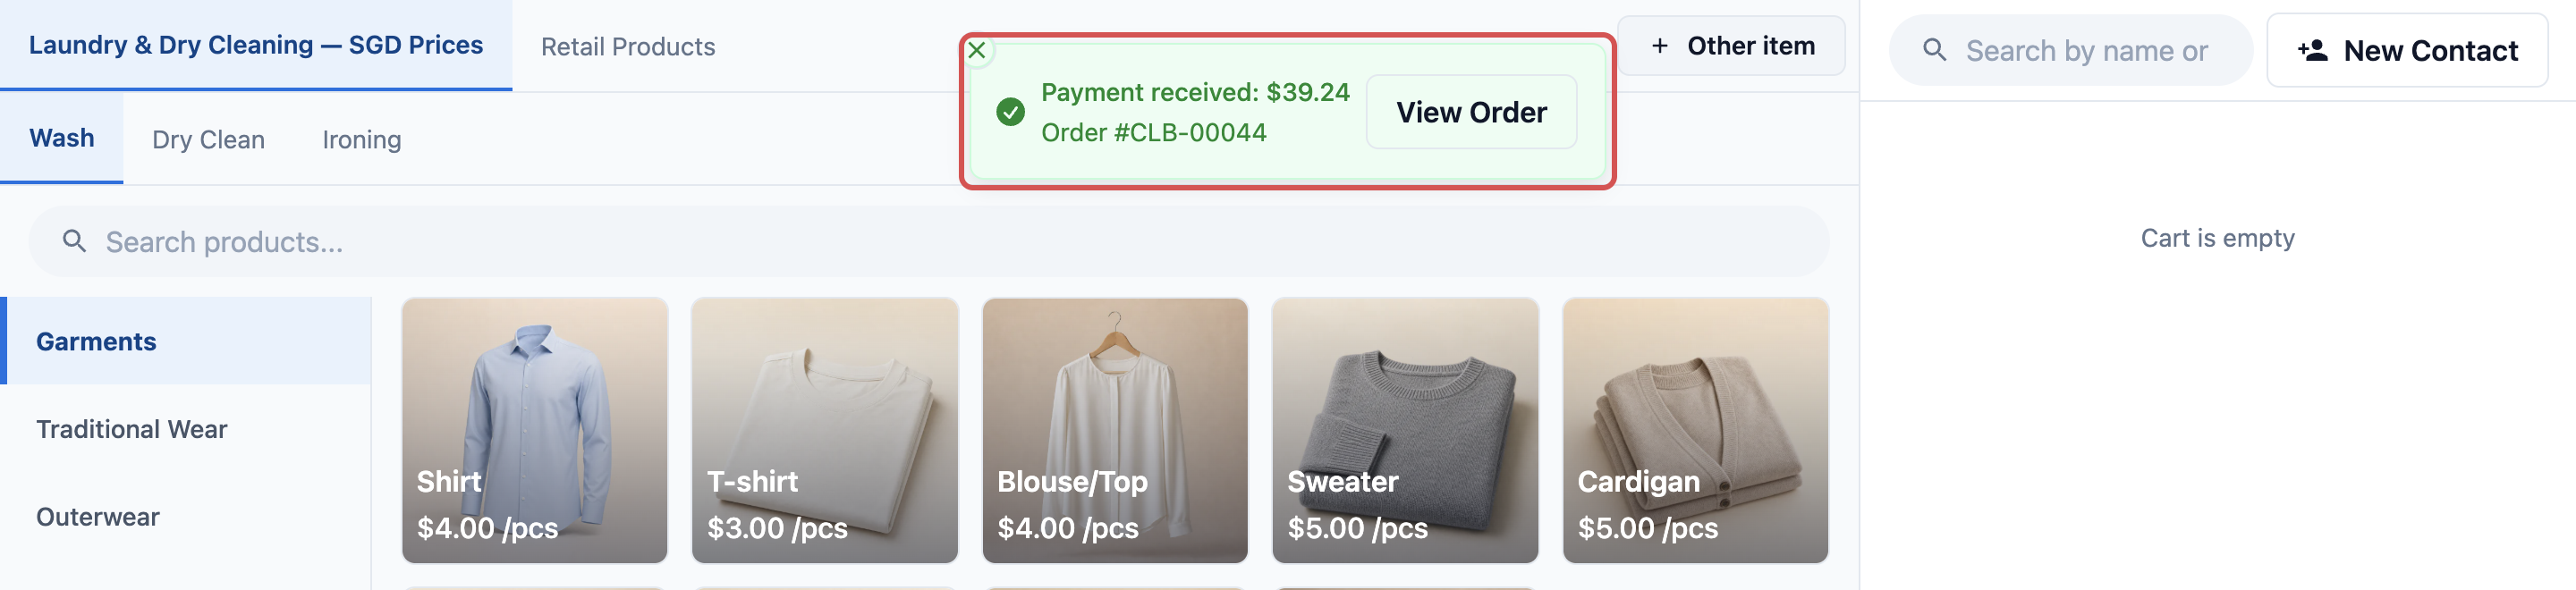
| A computer, in Chrome or Edge | "Payment received" with the amount and order number, on whichever POS screen staff are on, with View Order | When the payment arrives, if Auto-print receipt when payment completes is on (see below). Otherwise when the order is made |
| The EasyBiz POS app on an iPad or Android tablet | "Payment received" on the order screen, if staff are still on it | When the order is made, before the customer pays |
**Auto-print receipt when payment completes**
For Intermediate setups: use this only if your POS runs on a computer and your customers often pay by QR. It holds the receipt back until the payment arrives, so the receipt shows the order as paid.
1. Click the ⚙️ Settings icon in the top-right corner.
2. Under the **Sales channels** section, click **Point of Sale**.

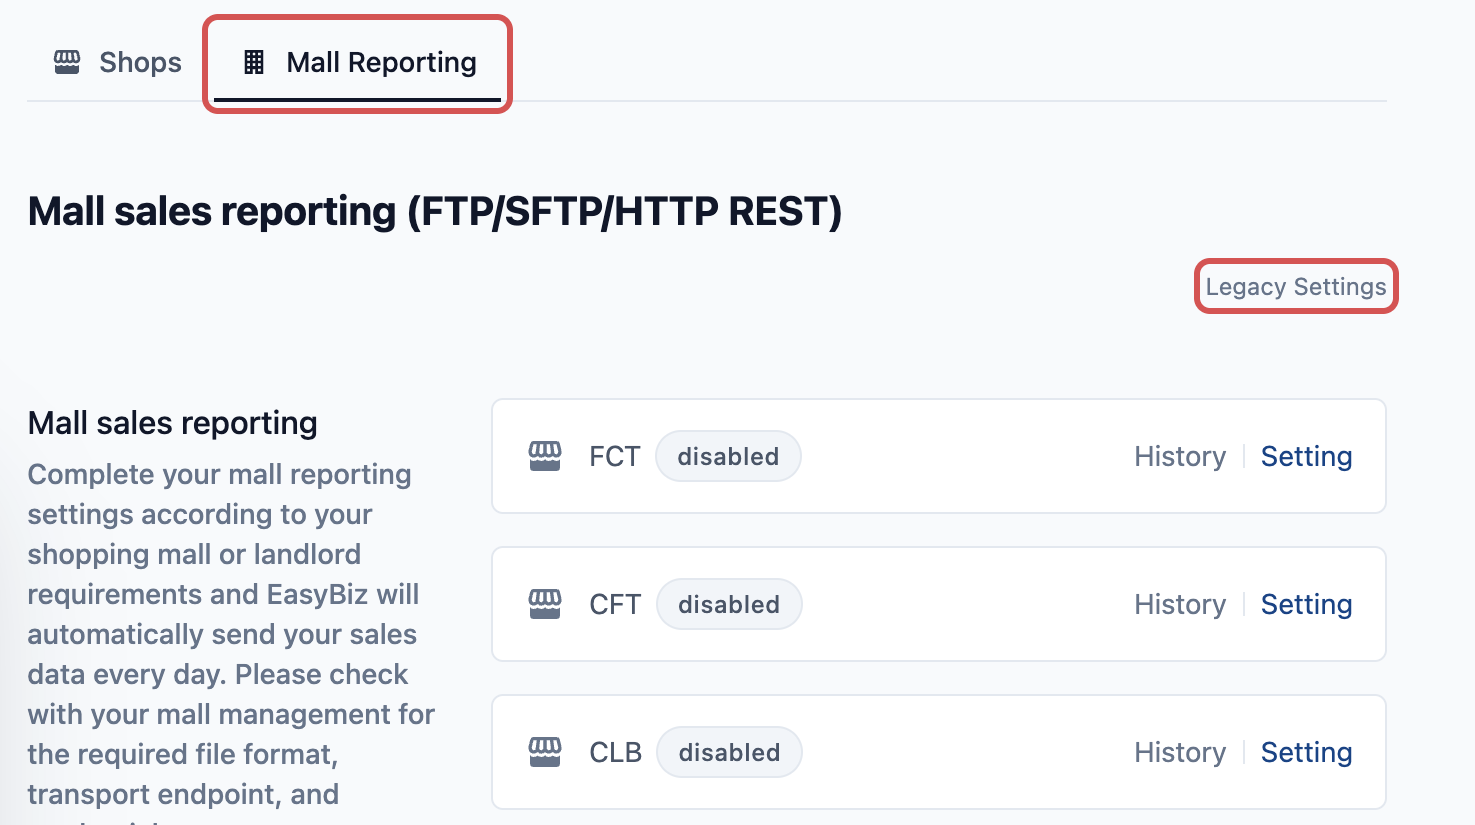
3. Click the Mall Reporting tab, then click **Legacy Settings** at the top right.
4. Under **Payment Settings**, turn on **Auto-print receipt when payment completes**.
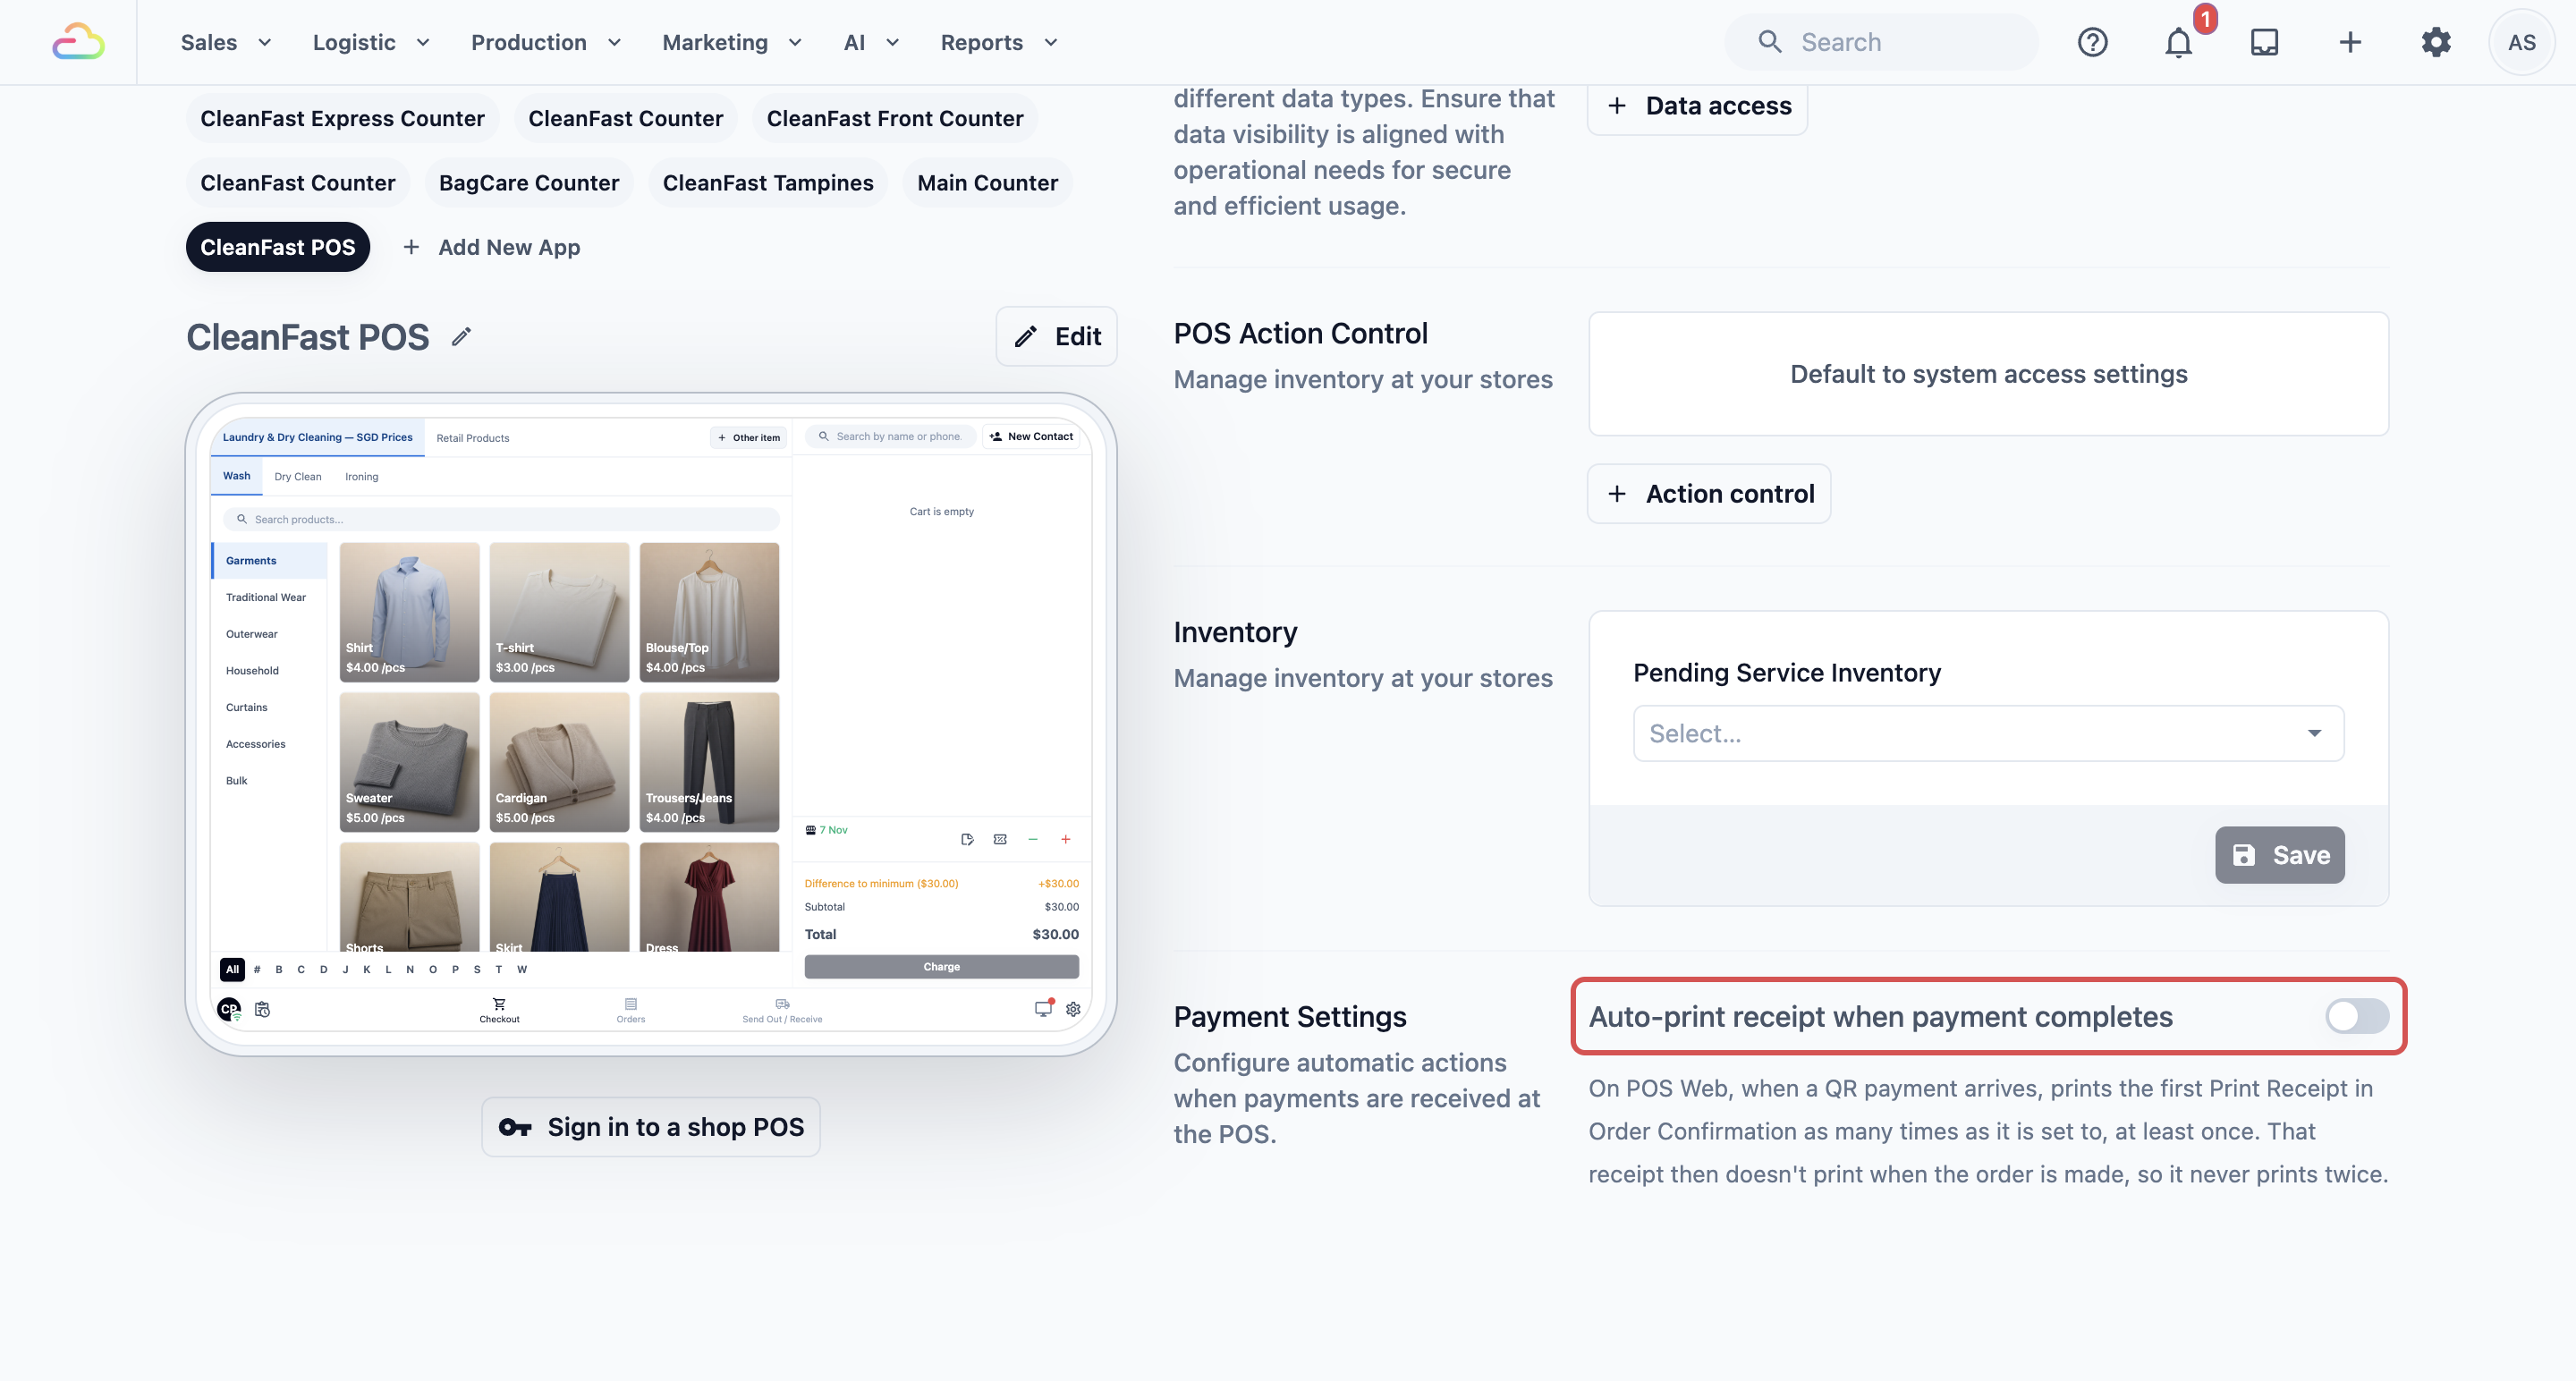
If you turn this on, an order waiting for a QR payment prints its first Print Receipt when the payment arrives, as many copies as that action is set to, and at least one. That receipt doesn't print when the order is made, so it never prints twice. Labels and any other receipt actions still print when the order is made. This switch covers every shop in your account.
**Receipt template (optional)**
This field appears once the switch is on.
| **Choice** | **What prints** |
| --- | --- |
| Leave empty | The template of the first Print Receipt action in Order Confirmation |
| Choose a template | That template, for QR payments only |
---
## FAQs
**Do I need labels or email if I only hand out receipts?**
> No. Keep the one Print Receipt tile. That is the Easy setup. Add Print Labels or Email later, when you start tagging items or customers ask for receipts by email.
**Why doesn't the receipt print by itself?**
> Check three things. The Print Receipt action must be set to 1, 2 or 3 copies, not Off. The receipt printer must already be connected to that POS. On a computer with Auto-print receipt when payment completes on, a QR order's receipt waits until the customer has paid.
**Can the customer get the receipt later?**
> Yes. Staff open the order on the Orders page and use its Quick Actions to print the receipt again or email it. See [Setting Up the Orders Page](/docs/setting-up-the-pos-orders-page).
**Does a PayNow payment made 10 minutes later still print?**
> On a computer with Auto-print receipt when payment completes on, yes, as long as that POS stays open. The POS watches a QR payment for 30 minutes. If the page is closed or reloaded before the customer pays, the payment is still saved on the order, but nothing prints, so staff print it from the Orders page.
**Why does the tile say "Receipt not configured"?**
> The Print Receipt action has no template, or its template is no longer published. Open the action in Order Confirmation, choose a published receipt template and publish your app.
**Why does the tablet print the receipt before the customer has paid by QR?**
> The EasyBiz POS app prints its receipts when the order is made. Auto-print receipt when payment completes only works on a POS running in Chrome or Edge on a computer. If your customers often pay by QR on a tablet, set Print Receipt to Off and let staff tap it once the screen shows Payment received.
**Do my changes affect orders already made?**
> No. Order Confirmation only shows right after a new order. Past orders are reprinted or emailed from the Orders page.
---
## What's Next
Your counter now knows what to print and send after each payment. Next, give each of your counter staff their own clock-in PIN, so you know who served each customer, in [Adding Counter Staff and Their Clock-In PINs](/docs/set-up-pos-staff-management). To choose what staff fill in for a new customer, see [Choosing What Customer Details Staff Collect](/docs/setting-up-the-pos-customer-form).