## Where to Find It
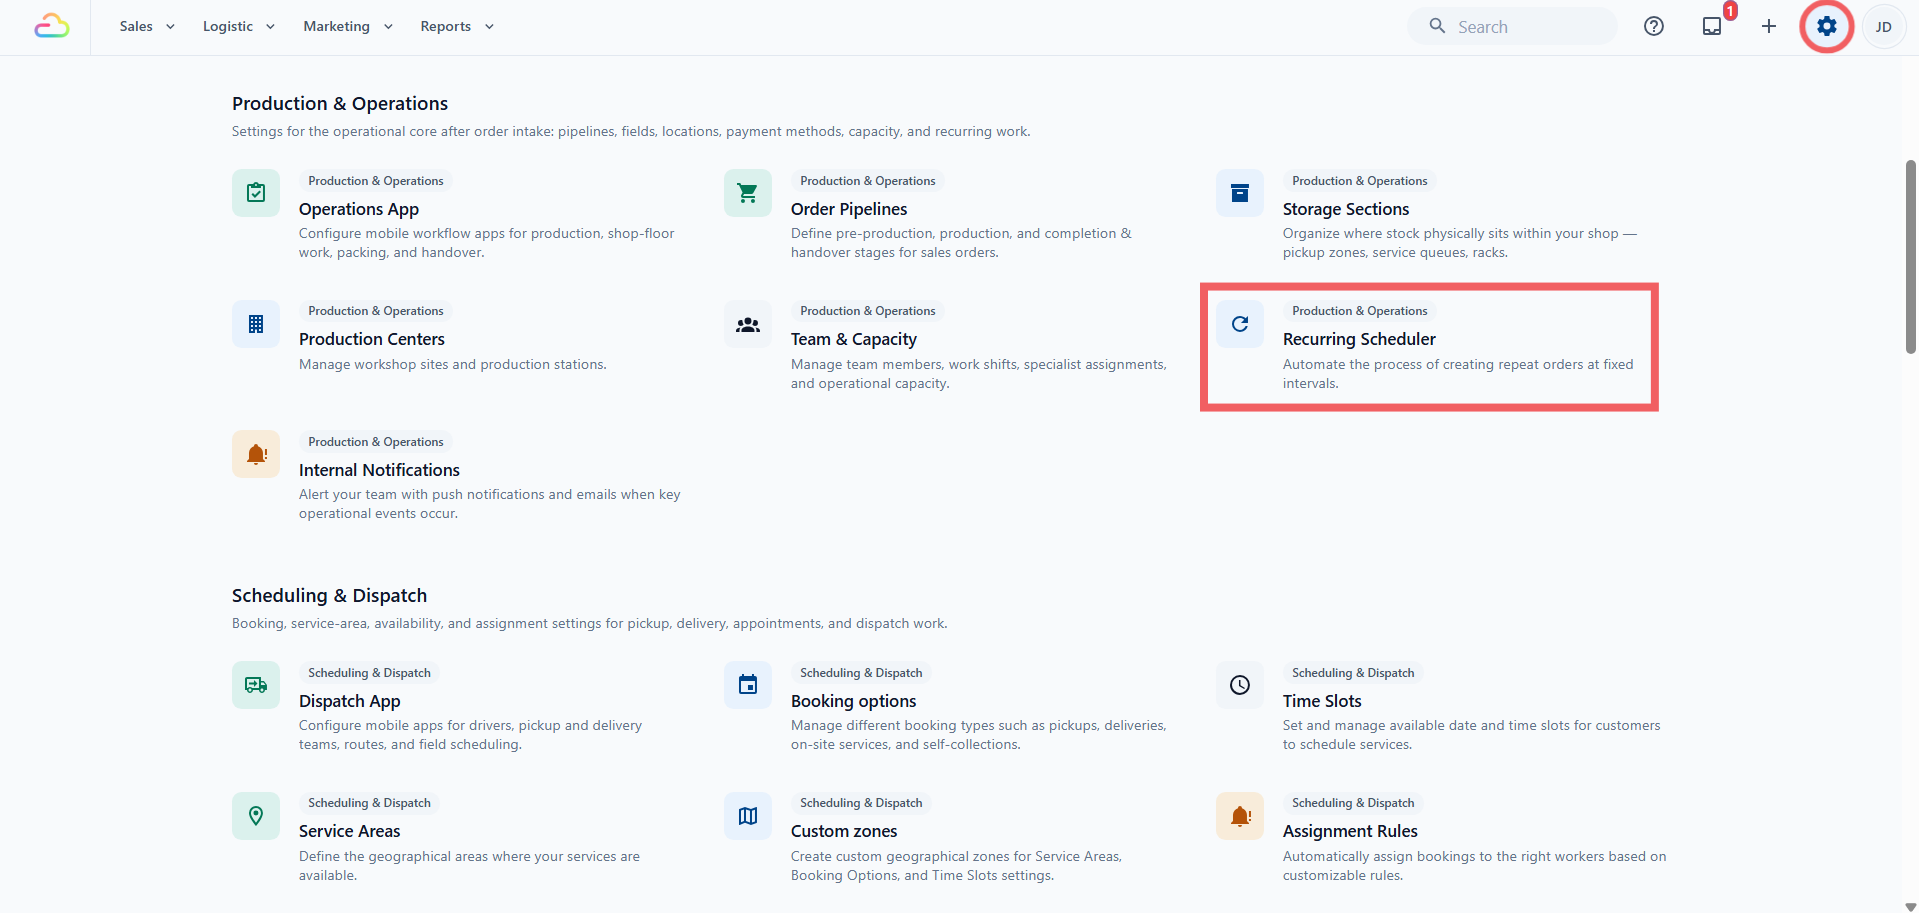
1. Click the ⚙️ Settings icon in the top-right corner.
2. Under the **Production** section, click Recurring Scheduler.
---
### The List Page
The page has three tabs, each with a count **Active**, **Paused**, and **Failed**. The Active tab has a search bar at the top right, and the list pages with Previous and Next controls. The table shows:
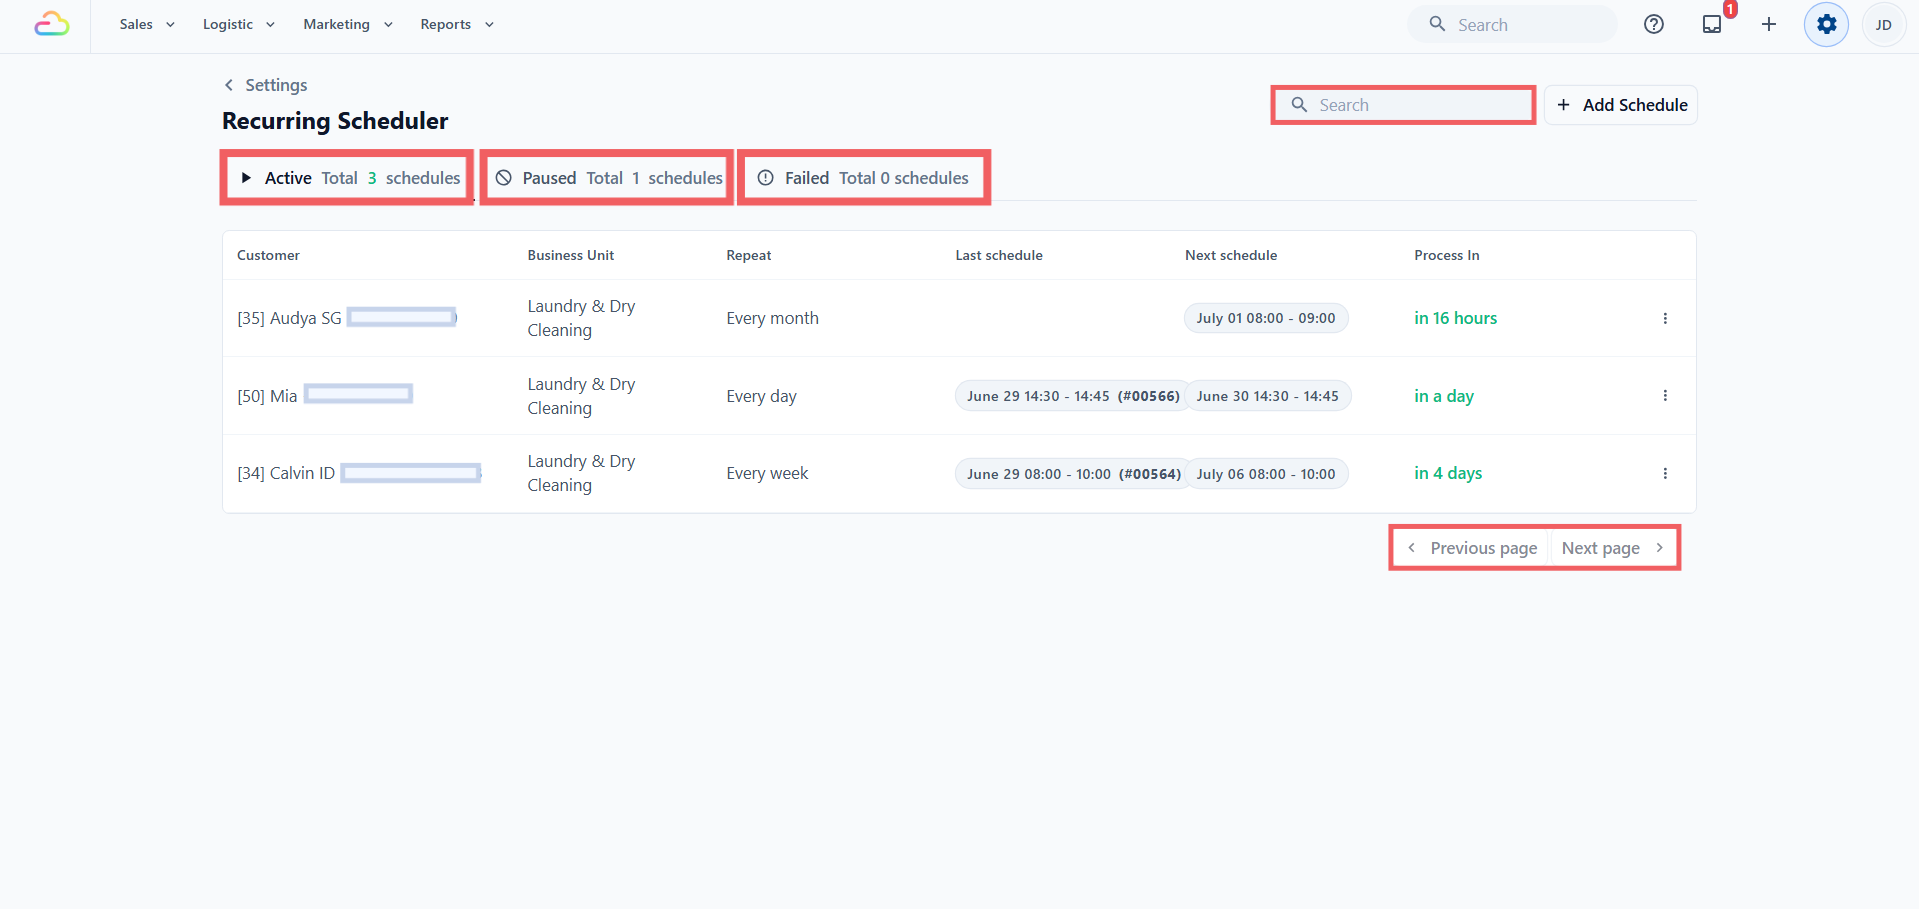
| Column | What it shows |
| --- | --- |
| Customer | The customer attached to the schedule |
| Business Unit | The line of business, like Laundry and Garment Care or Bag Repair |
| Repeat | How often the schedule repeats |
| Last schedule | The last created order's date and number |
| Next schedule | The next pickup date, or the status for paused and failed schedules |
| Process In | The countdown to when EasyBiz creates the next order, not the pickup itself |
To manage a schedule, use the ⠇ three-dot menu on its row. Active schedules show **Pause**, **Restart**, and **Delete**, while Paused and Failed schedules show Start and Delete. Click the row itself to open the schedule and edit it.
---
### Filling In the Schedule
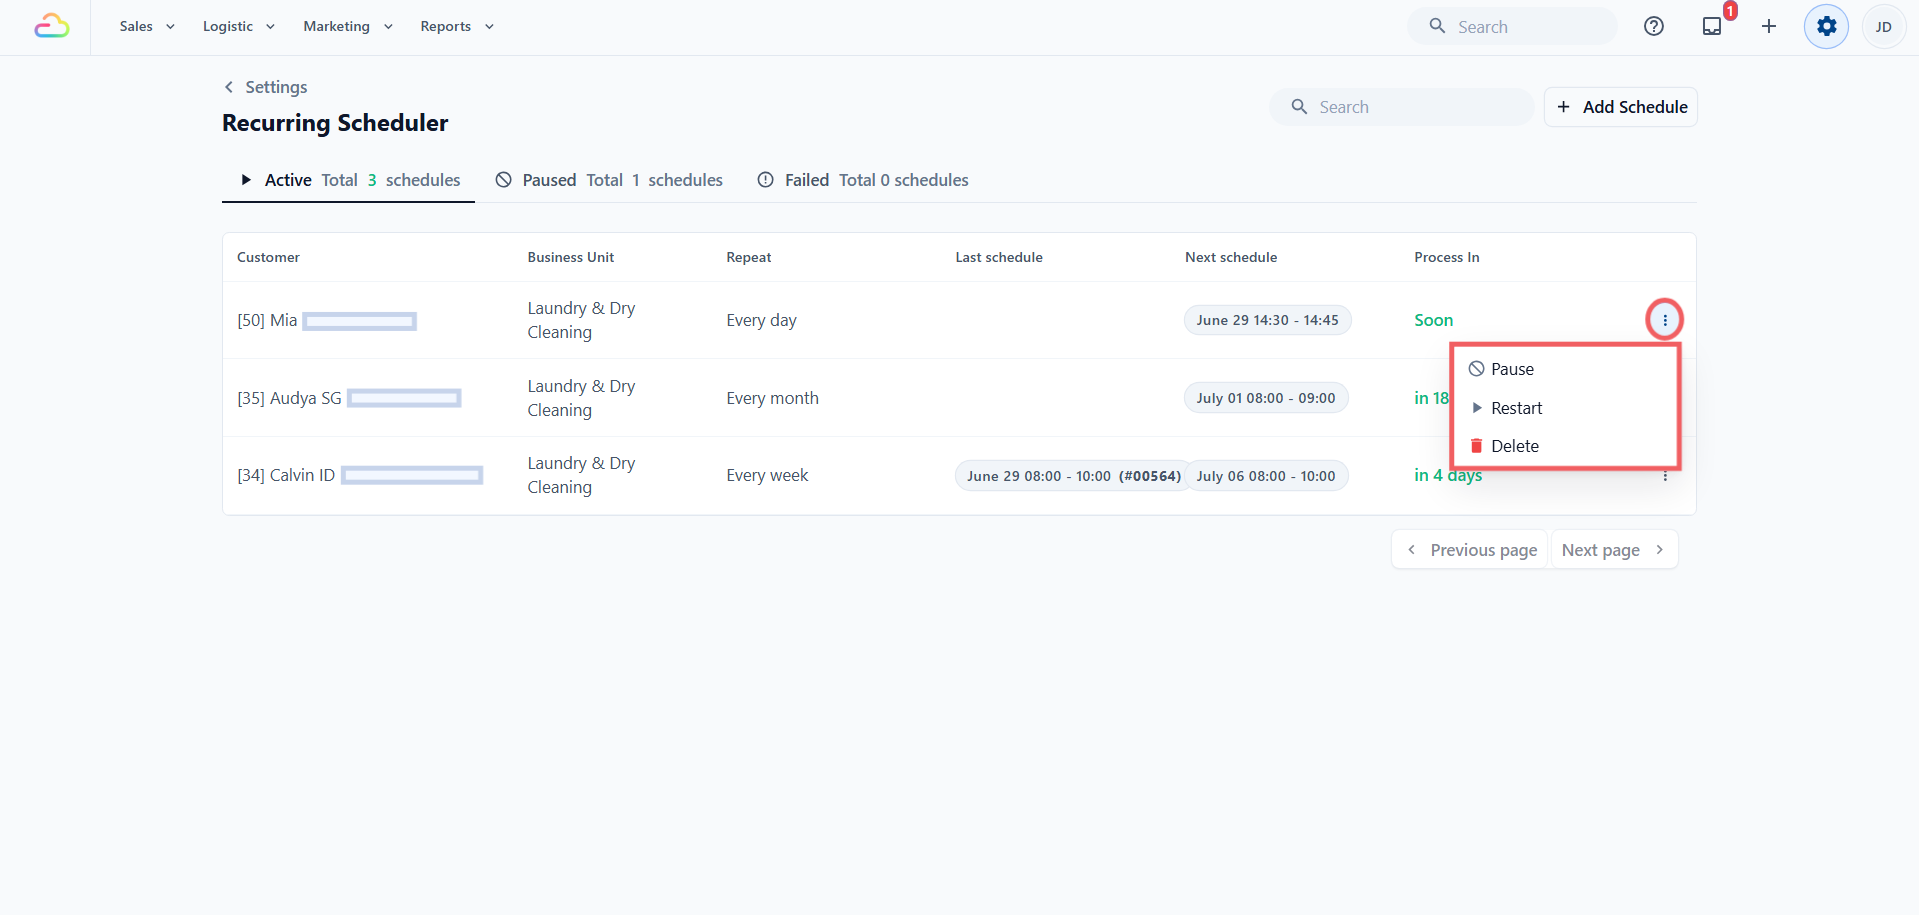
To add a new recurring schedule, click Add schedule to open the dialog. It has three tabs, Address, Repeat, and Defaults, and you start with the basic details:
- **Sales channel** → choose the online channel the order belongs to. This sets the order's numbering, company, tax setup, and reporting. Only licensed online channels appear here.
- **Business unit** → choose the line of business. This decides whether delivery timing appears, which pricing applies, and the jobs created.
- **Customer** → choose an existing customer, or create a new one from the dialog.
- **Address** → use Find address to search by postal code, or enter the address lines and postal code. This becomes the pickup or delivery address on every created order.
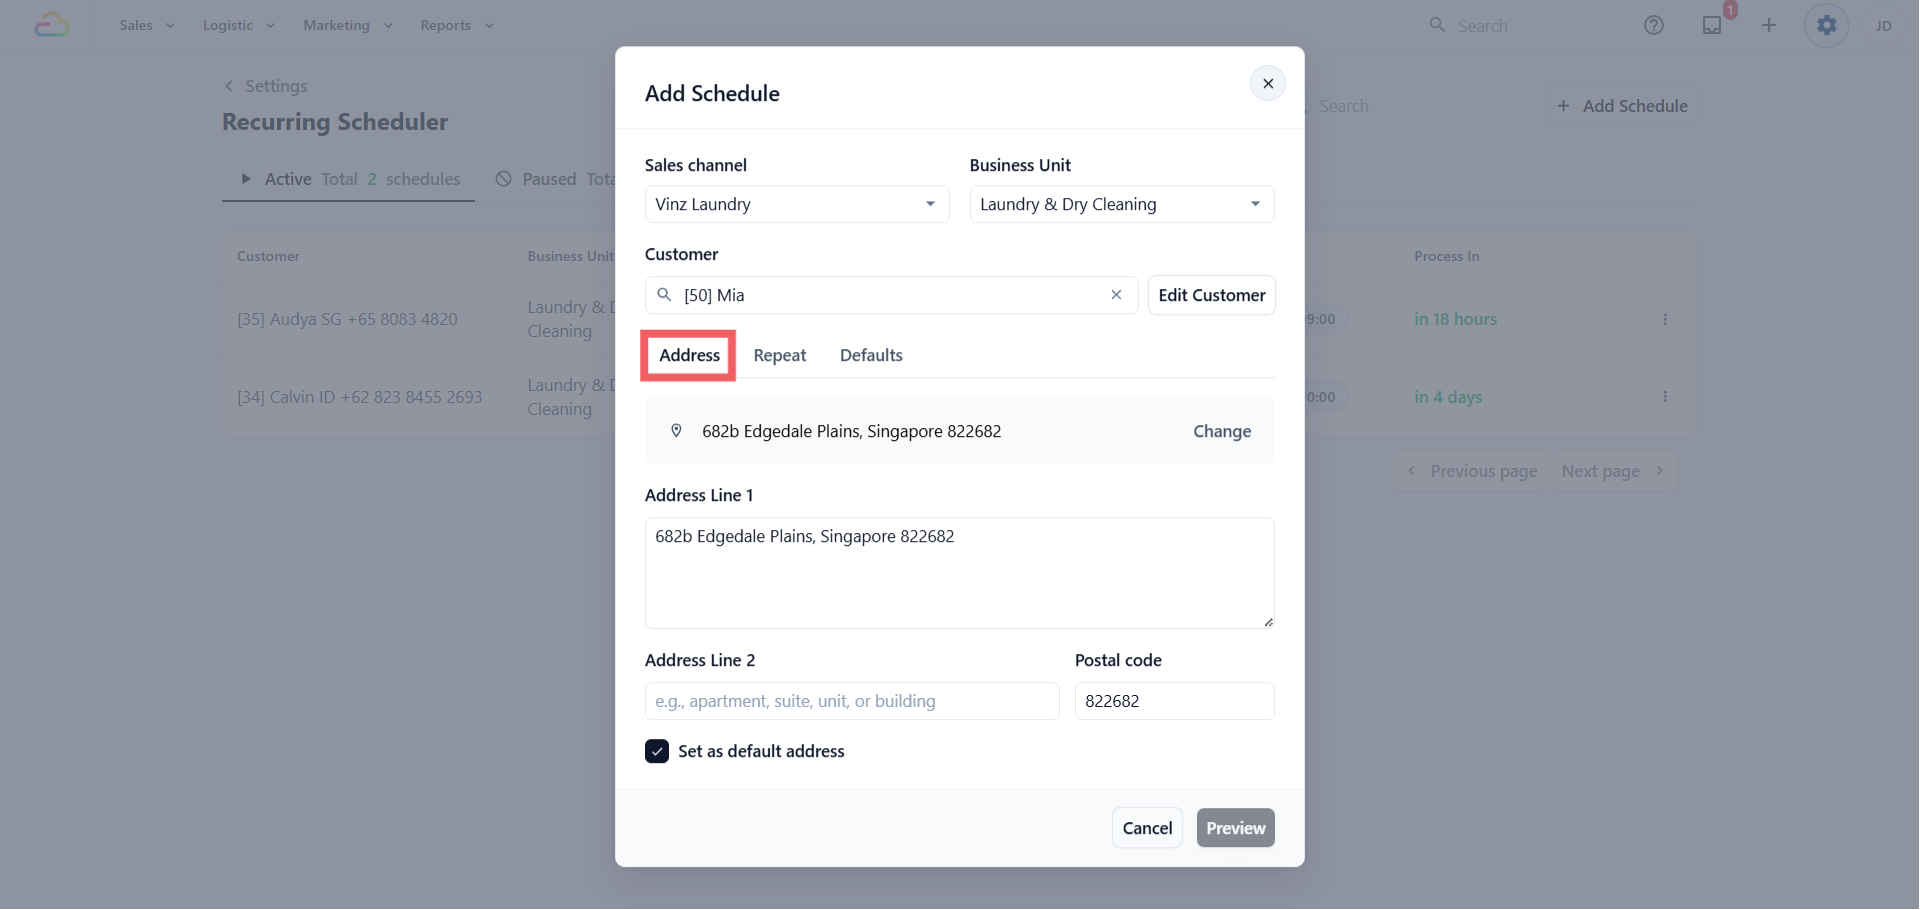
Ticking "Set as default address" does not overwrite the customer's existing default address. EasyBiz saves the address, and only makes it the customer's default if they do not already have one.
---
## The Repeat Tab
Set how often the order is created:
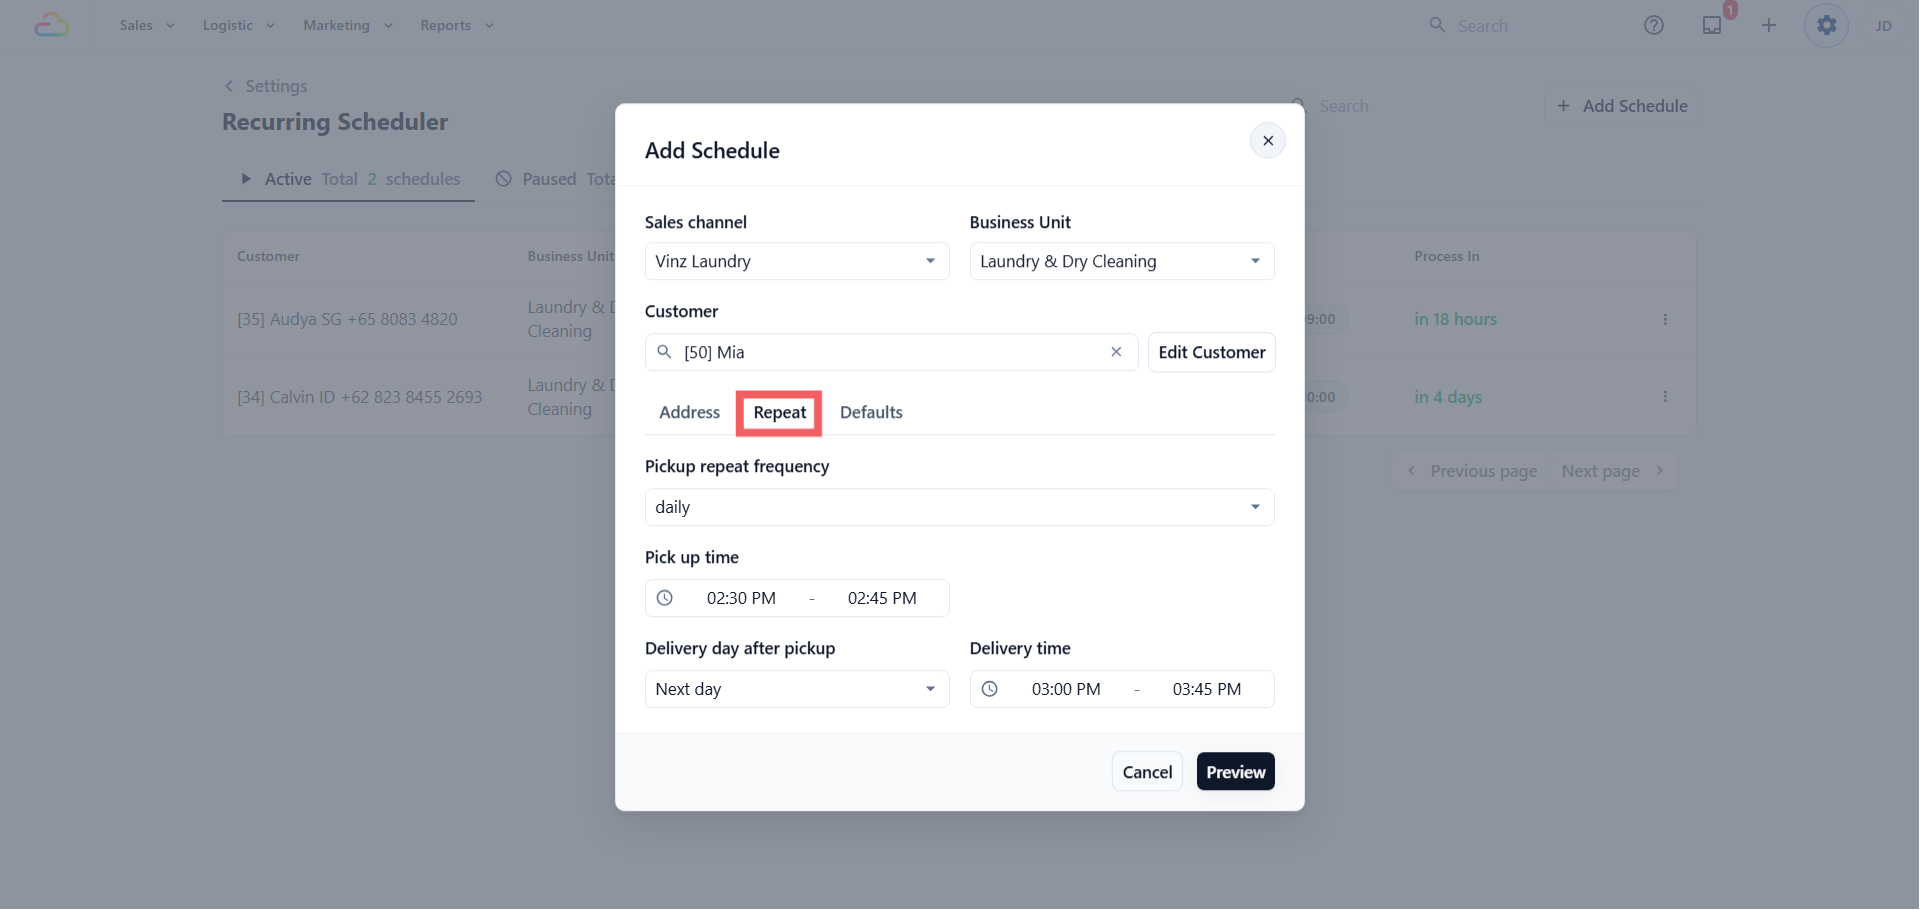
| Frequency | What it does |
| --- | --- |
| Every day | Creates an order every day |
| Every week | Creates an order once a week, on the day you choose |
| Every 2, 3, or 4 weeks | Same as weekly, spaced further apart |
| Every month | Creates an order once a month, on the date you choose |
| Every 2, 3, or 4 months | Same as monthly, spaced further apart |
Then set the day and time, depending on the frequency:
- **Scheduled day** → appears for weekly frequencies. Pick the weekday, Monday to Sunday.
- **Scheduled date** → appears for monthly frequencies. Pick the 1st to the 28th.
- **Scheduled time** → appears for all frequencies. Pick a start and end time, which becomes the pickup window on the created order.
The monthly date stops at the 28th on purpose, so a schedule never skips a short month like February.
If your business unit does both pickup and delivery, two more fields appear:
- **Delivery day after pickup** → Same day, Next day, or 2 to 14 days after pickup.
- **Delivery time** → the return window.
---
## The Defaults Tab
These carry into every order the schedule creates:
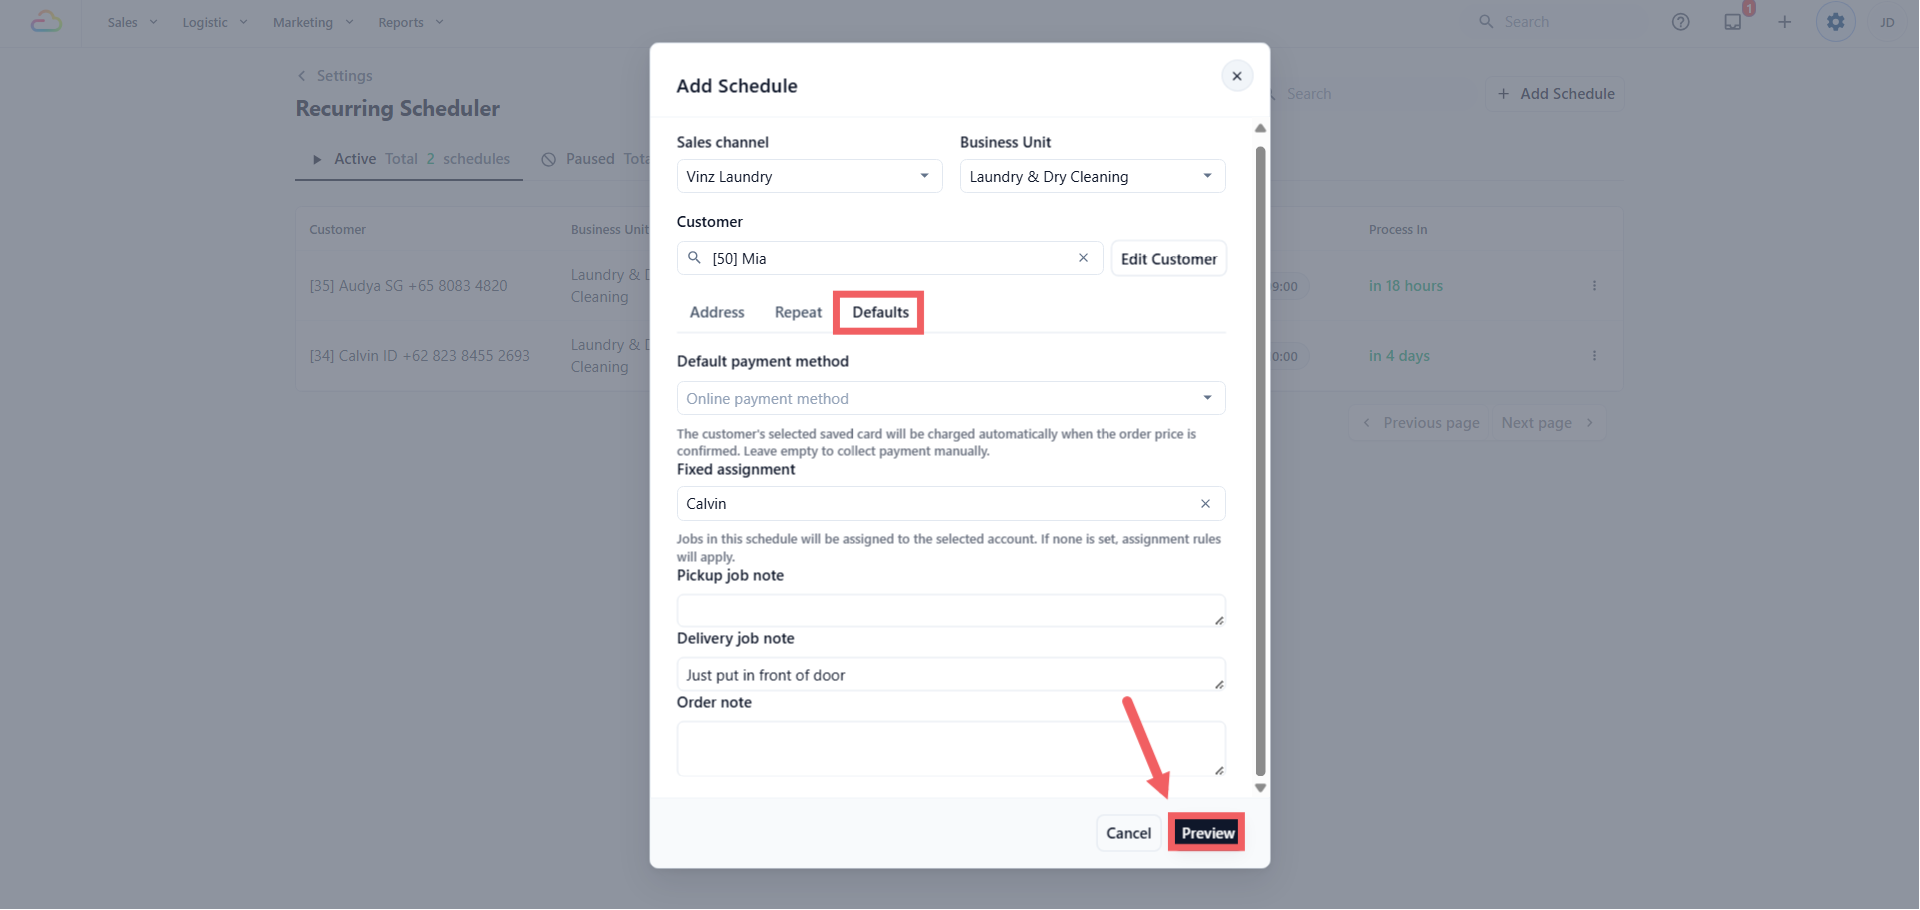
- **Default payment method** → this chooses how the customer pays. Leave it blank, or on "Online payment method", and every created order is collected manually, the same as a normal order. If this customer has added a card to their online store account, that card shows here as an option. Pick it and EasyBiz charges that card automatically once the order price is confirmed.
Only a card the customer saved themselves in their online store account shows up here. Your staff cannot add one from the counter, so for customers without a saved card, leave this blank and collect payment as usual.
- **Fixed assignment** → leave empty to follow your normal assignment, or choose a worker who should always get these jobs. See [Setting Up Assignment Rules](/docs/setting-up-assignment-rules).
- **Job note and Order note** → free text your staff see on every created order. A separate delivery note appears for delivery jobs.
Automatic charging is not fully hands-off. The order is created empty, so the card is only charged after your staff add the items and confirm the price. If the card fails or needs the customer to approve it, the order stays open with the balance due and your staff follow up the normal way.
---
## Preview and Confirm
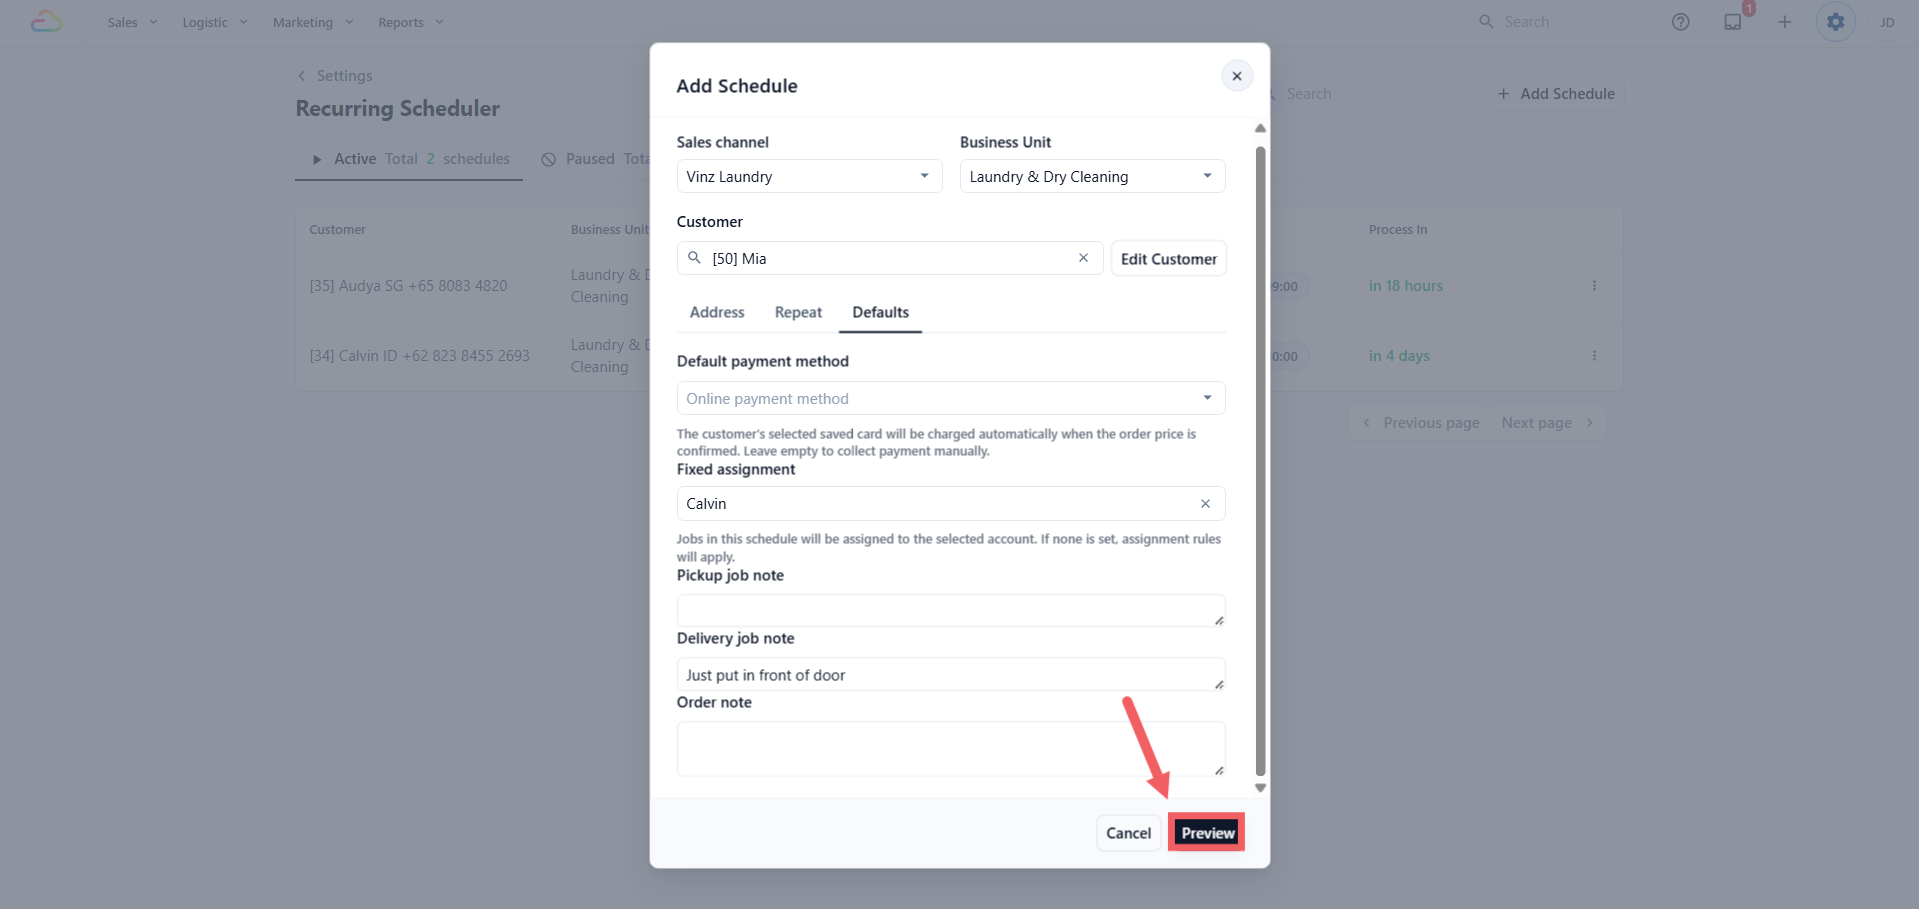
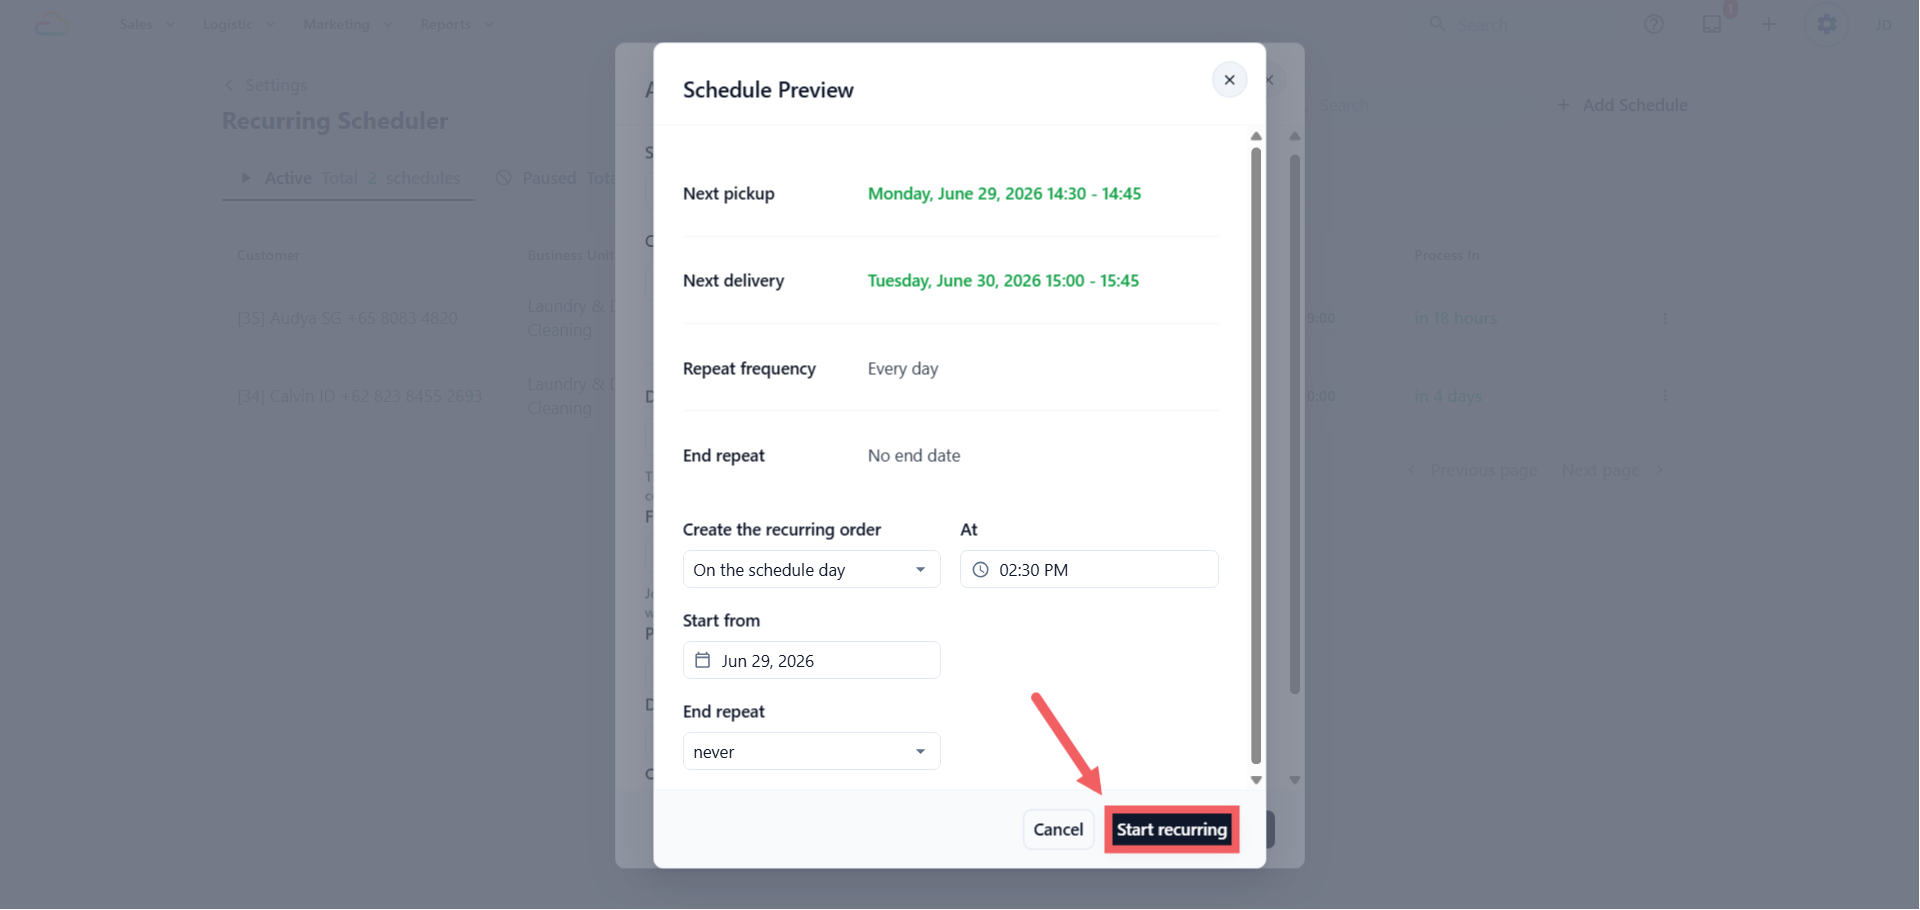
Click Preview to see the next pickup date, the next delivery date if any, and the repeat frequency in plain words. Then set when the order is actually created:
- **Create the recurring order** → On the schedule day, or 1 to 9 days before, so staff can prepare. This is the preparation date, not the pickup date.
- **At** → the time of day the order is created.
- **Start from** → the first date the schedule can use. Nothing is created before it.
Pickup is Friday. You set Create the recurring order to 2 days before. The order appears on Wednesday.
- **End repeat** → sets when it stops
| Option | What happens |
| --- | --- |
| No end date | Repeats until you pause or delete it |
| End after X occurrences | Stops after that many orders are created |
| End by date | Stops once the next date would fall after the end date |
Click Start recurring to save. The schedule now appears under the Active tab.
---
## Where to Find the Created Order
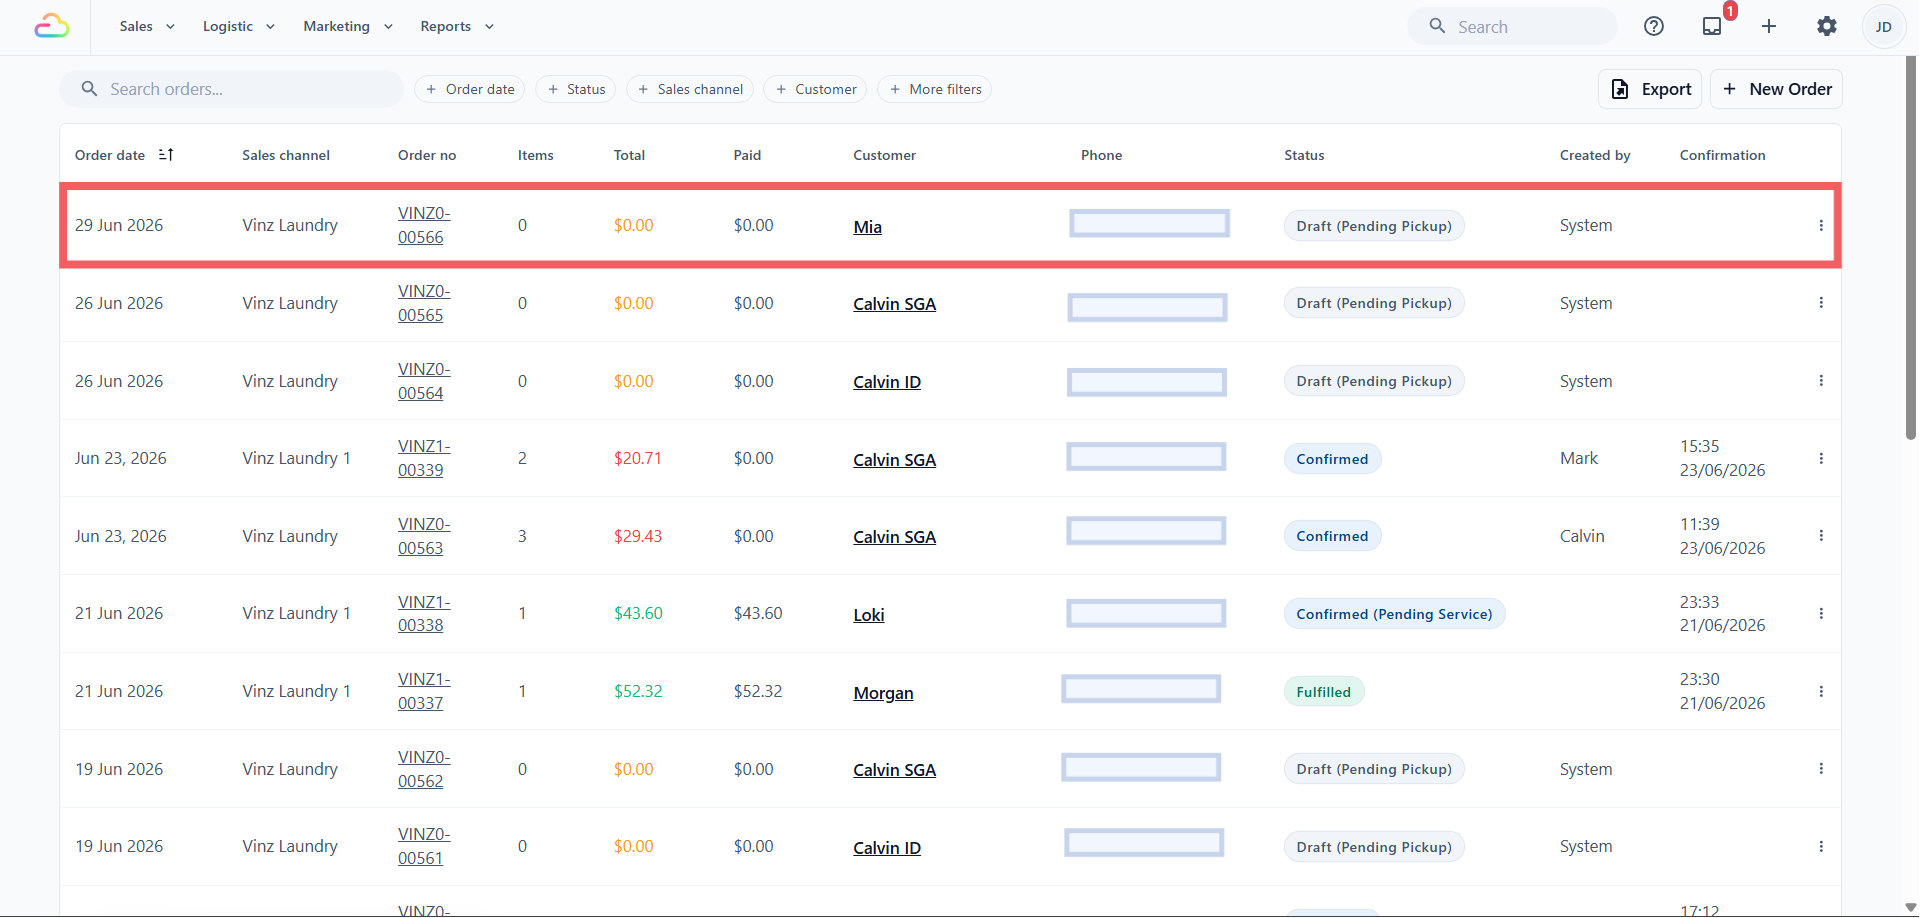
The schedule lives under Settings, but the orders it creates do not. Each created order lands in your normal Orders list, the same place as every other order.
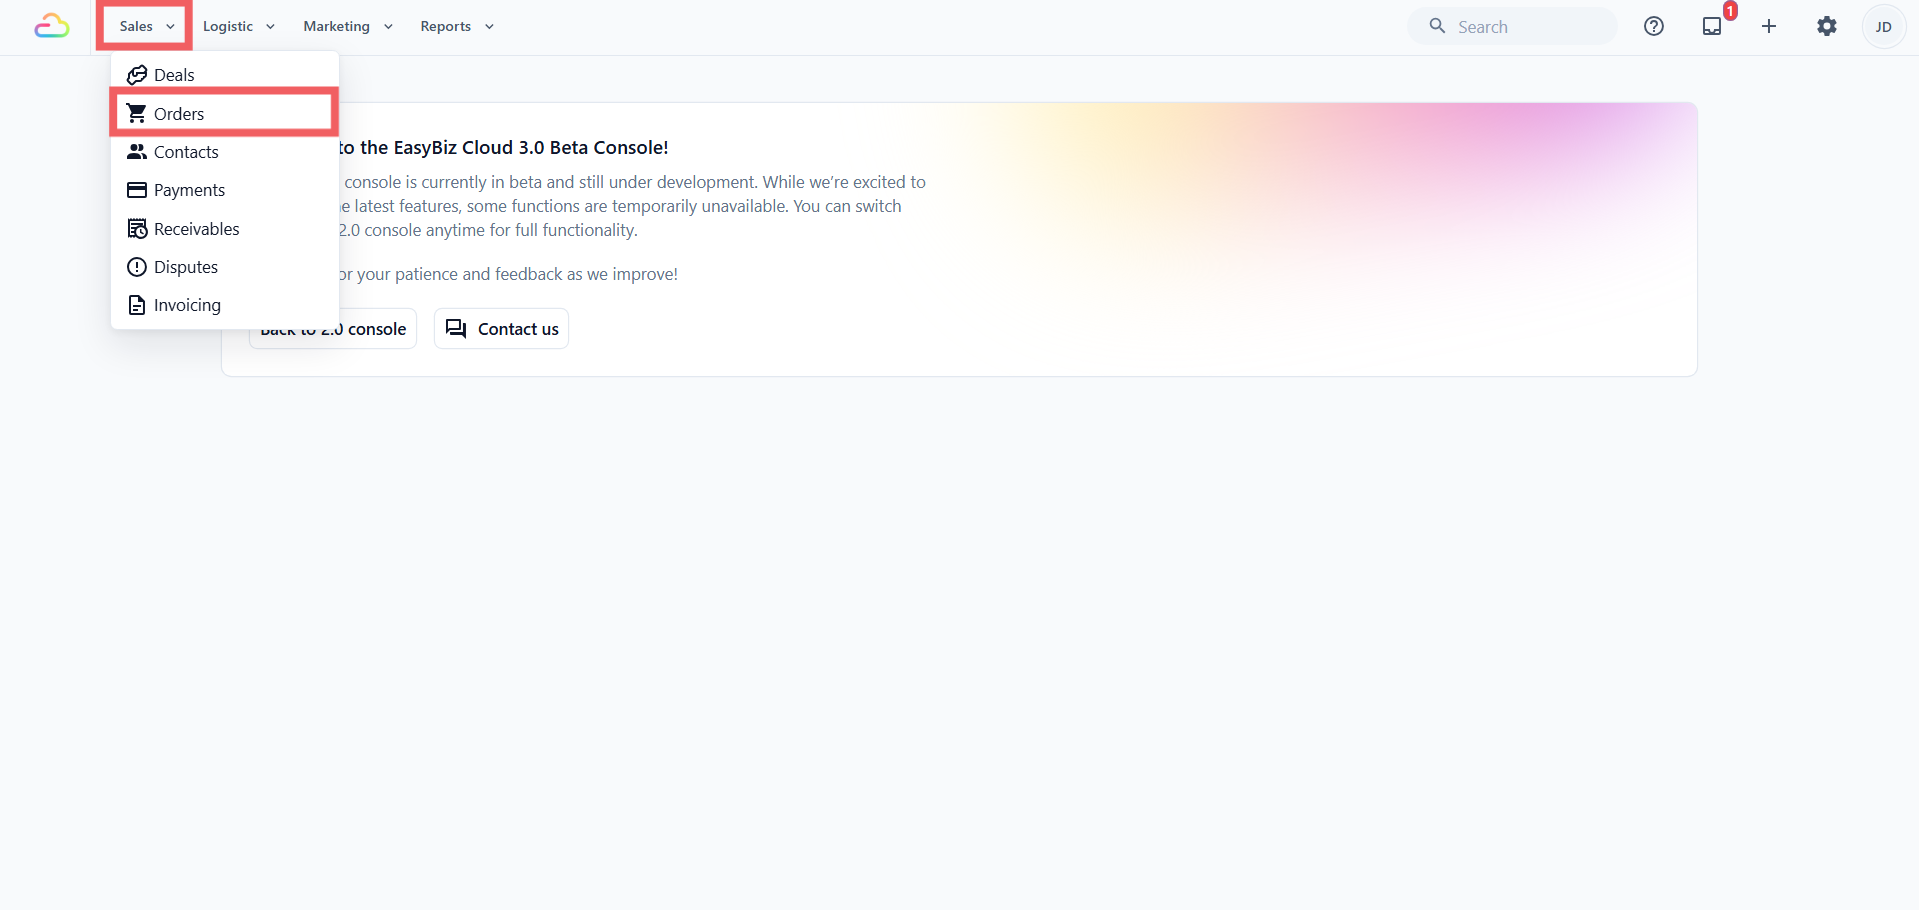
1. In the top navigation bar, click the **Sales** dropdown.
2. Click Orders.
3. Find the new recurring order in the list and click it to open it.
From the order page, your staff handle it like any other order.
Each order EasyBiz creates starts empty, with no items. It carries the customer, address, pickup or delivery job, your notes, and the payment and assignment defaults, but your staff add the actual laundry or repair items when the customer's things arrive.
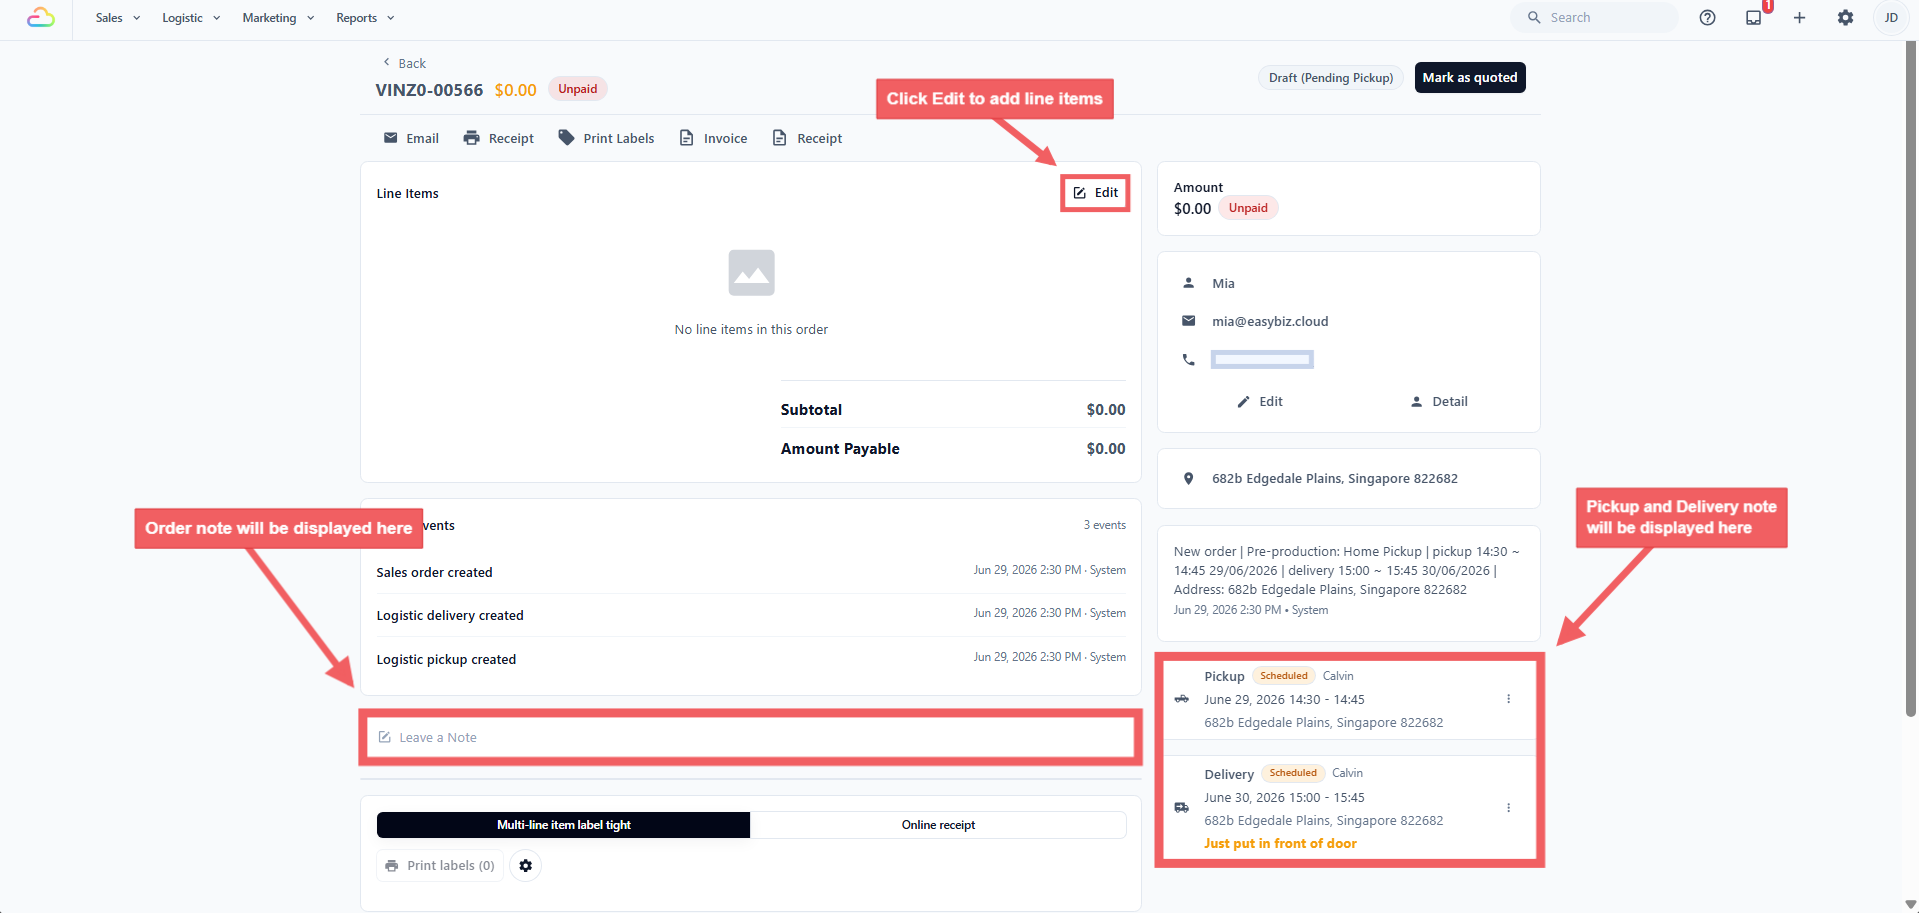
They can add the line item, confirm and collect payment, change the pickup or delivery details, and edit anything else the order needs. Nothing about the order is locked because it came from a schedule.
Editing the order here only changes that one order. It does not change the schedule or any future order. To change every future order, edit the schedule itself under Recurring Scheduler.
---
## FAQs
**Does the auto-created order get a driver automatically?**
> If you set a fixed worker, that person is assigned. If you leave it empty, the job follows your normal Assignment Rules, the same as any booking.
**How do my customers usually pay for recurring orders?**
> Most shops leave the payment method empty and collect after staff confirm the items and price, the same as a normal order. Automatic card charging only applies if the customer has a saved card and you pick it on the schedule.
**The customer removed their saved card. What happens to the schedule?**
> The schedule keeps running and orders are still created, but the automatic charge fails and leaves the balance due. Your staff collect payment the normal way.
**If I change an order after the card was charged, what happens?**
> EasyBiz works out the new balance. If the customer overpaid, your staff refund from the order. If more is owed, EasyBiz does not charge on the spot. It may charge the saved card again at the next price confirmation or packing step, so check the order balance after editing.
**Can a recurring schedule and a customer's own online booking create two orders on the same day?**
> Yes. The scheduler does not check what the customer has already booked, so you may see both in your Orders list. Cancel or merge one if needed.
**What happens if a pickup or delivery date is blocked?**
> EasyBiz applies Blocking Rules when each recurring order is created. If only the delivery date is blocked, the pickup stays on its usual day and the delivery moves to the next open delivery day, up to 30 days later. If the pickup date is blocked, the pickup moves to the next open pickup day before the next occurrence, and the delivery initially moves with it to preserve the usual turnaround. If that delivery date is also blocked, the delivery moves forward independently. If EasyBiz cannot find a suitable date, only that occurrence is skipped. The following occurrence returns to the normal repeat pattern.
---
## What's Next
Your recurring orders are now created automatically, which means the customer does not see them happen. If you want EasyBiz to remind them by WhatsApp or email each time a recurring order is created, see [Introduction to WhatsApp Message Templates](/docs/introduction-to-whatsapp-message-templates).