## Before You Start
Your WhatsApp Business account must be connected to EasyBiz, and your booking time slots must already be configured, otherwise the date screens will have nothing to offer the customer.
If you are not sure what a Mini App is or what your customer will see, read [What Is a Mini App?](/docs/what-is-a-mini-app) first. Then return to this guide when you are ready to create one.
- [Set up WhatsApp Integration](/docs/connect-and-configure-whatsapp)
- [How the Mini App Builder Works](/docs/how-the-mini-app-builder-works)
## Who Is This For
This Mini App is built for any service business that collects items but cannot guarantee a fixed return date at the time of pickup. Bag repair, shoe repair, clothing alteration, electronics repair, specialty cleaning — if your turnaround time depends on the job, this template fits. The form only covers the pickup. You arrange the return delivery separately once the job is complete, using the [Schedule Delivery Mini App](/docs/setting-up-a-schedule-delivery-mini-app).
---
## Create Your Mini App
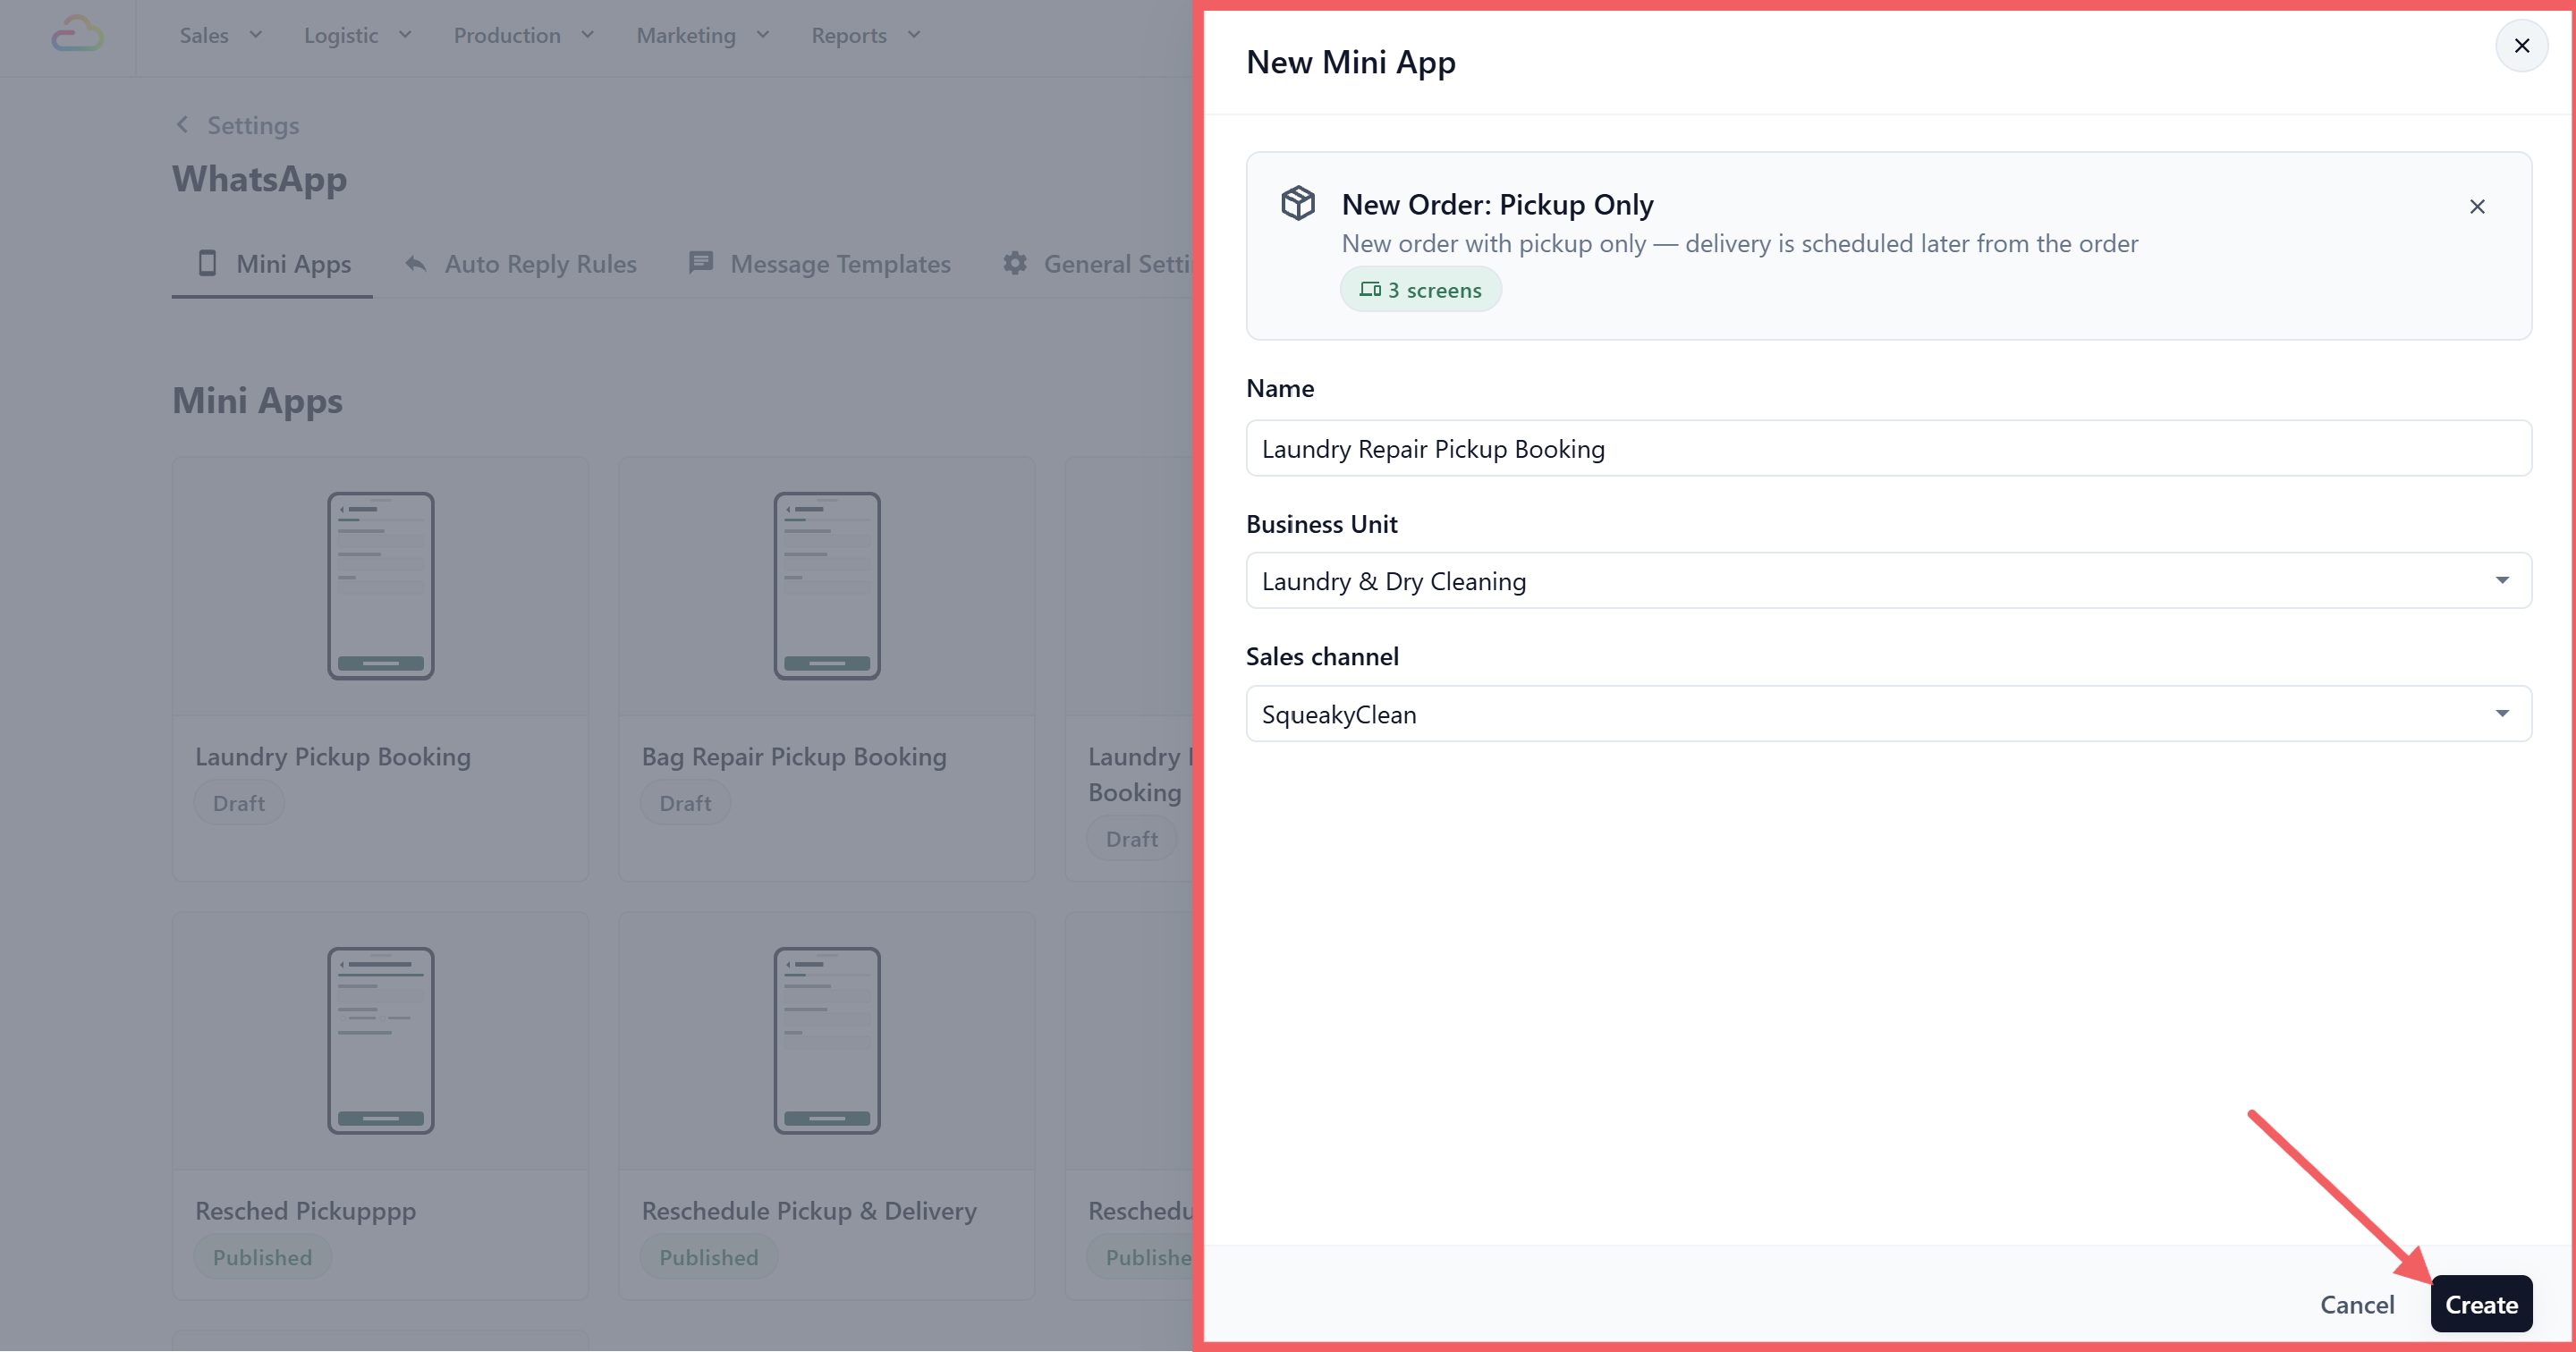
1. Click Settings in the top navigation bar.
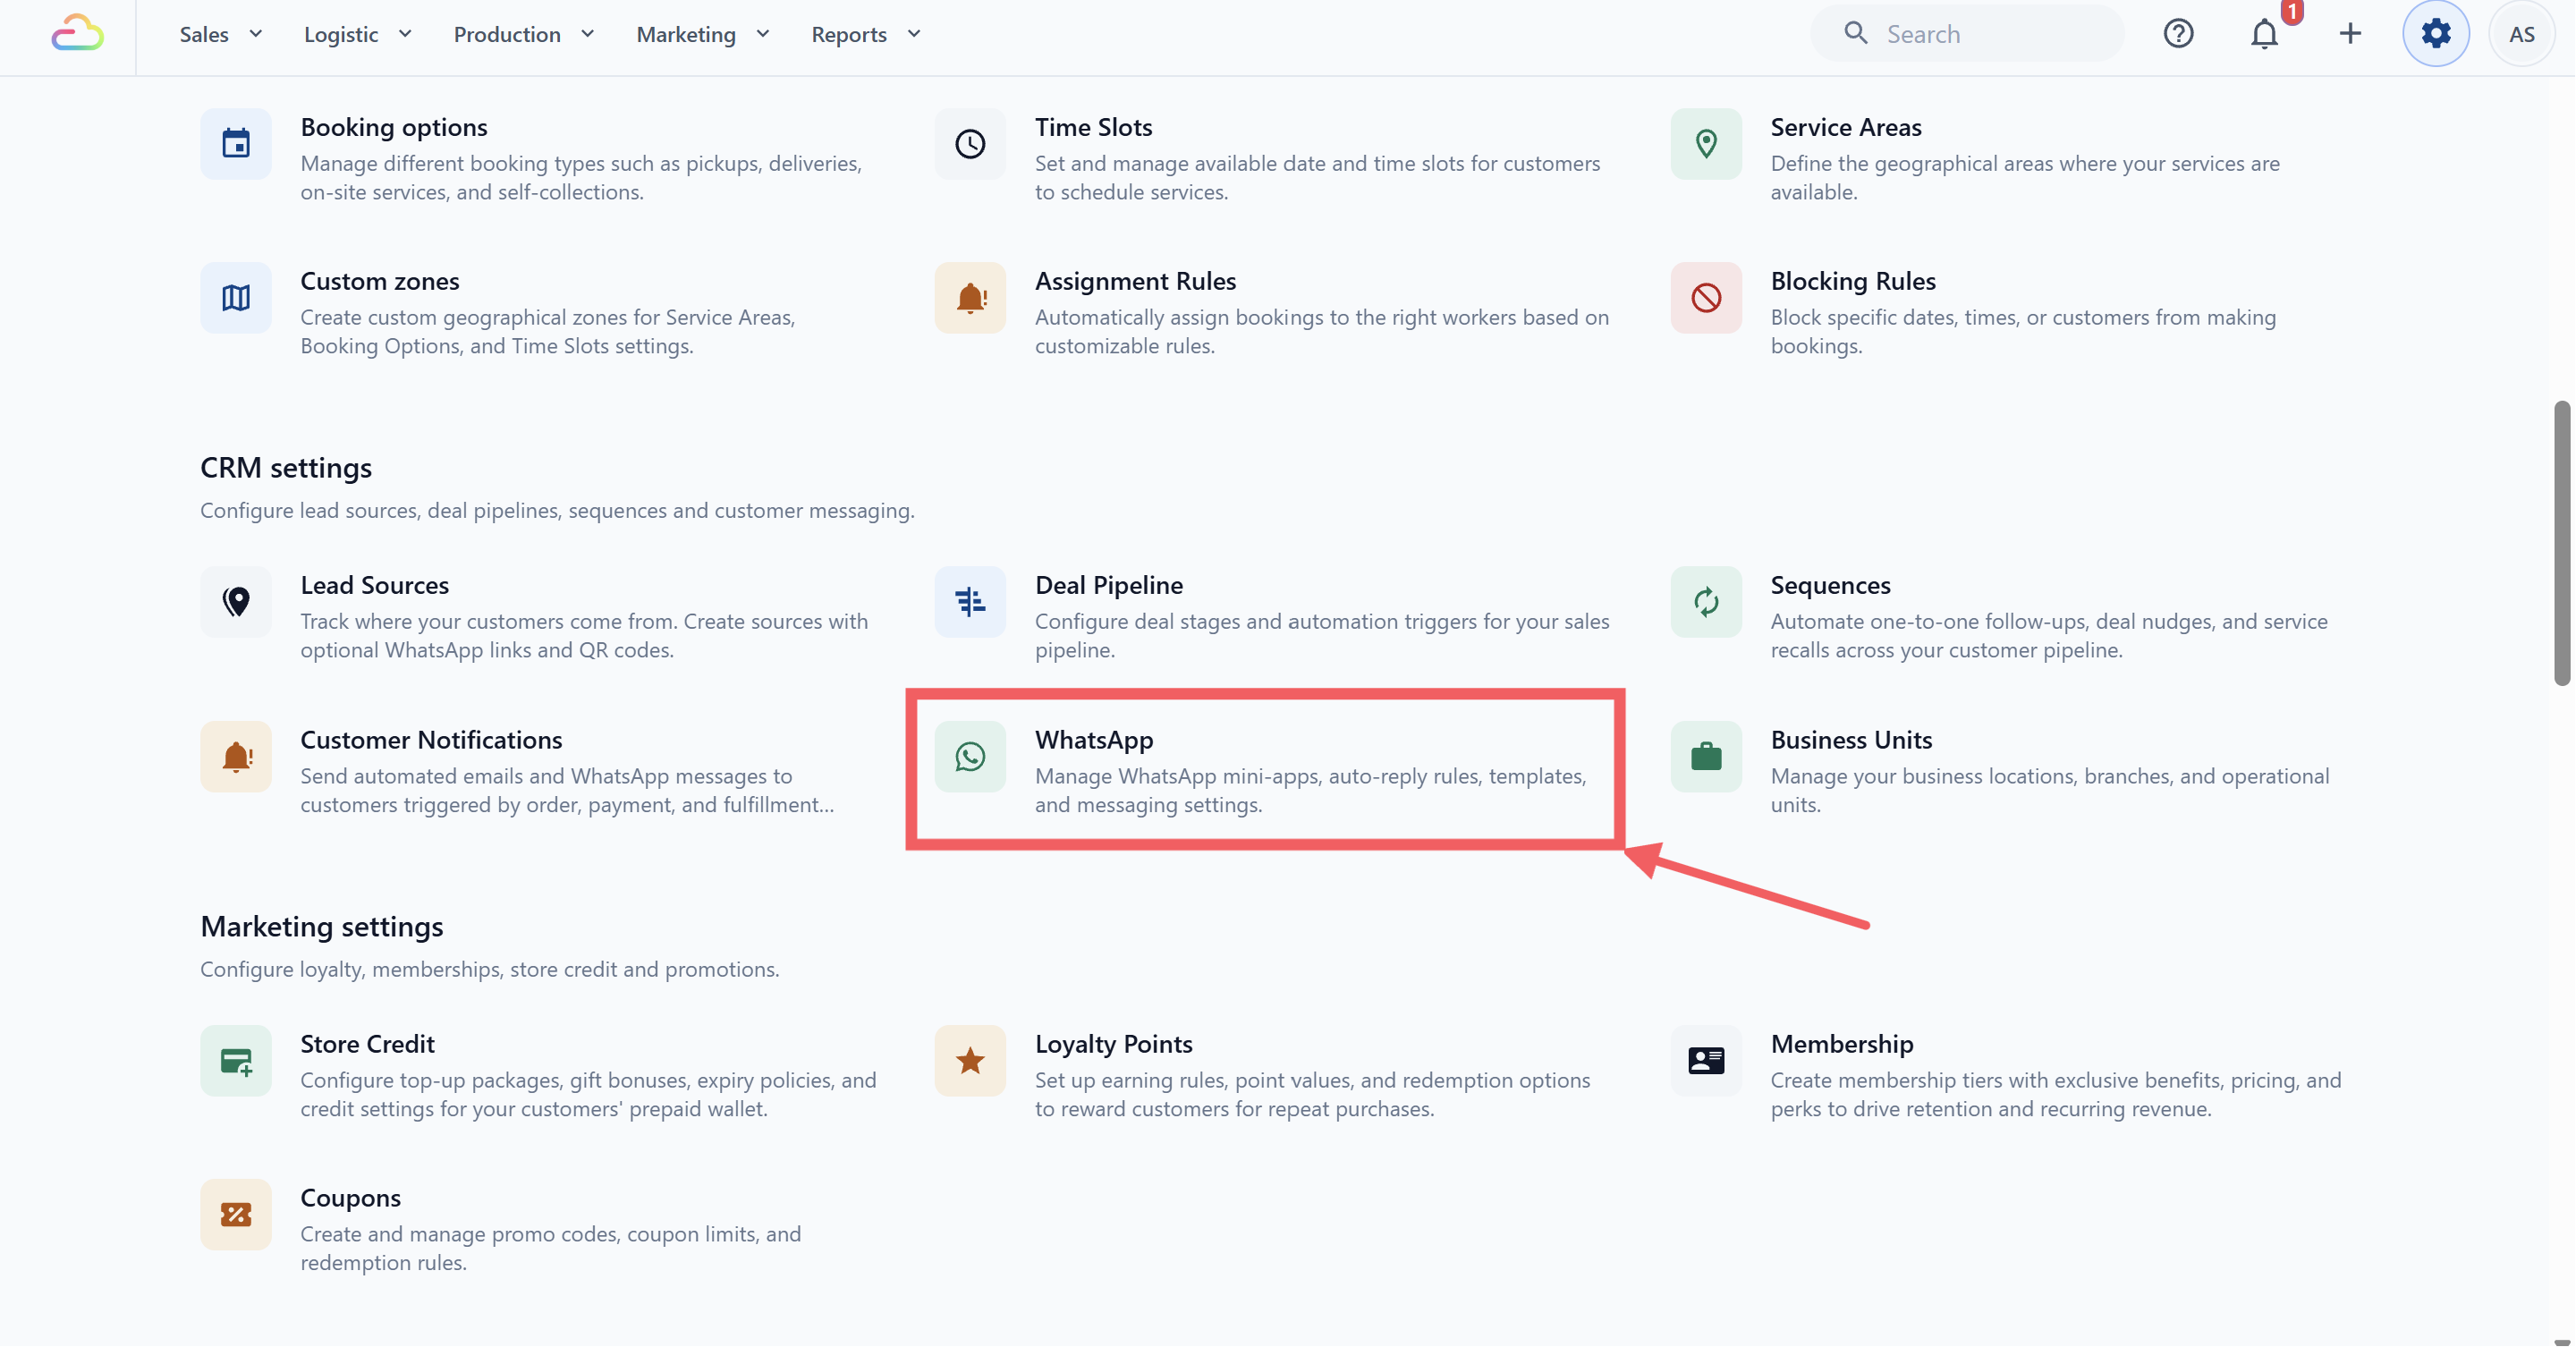
2. Under the CRM settings section, click WhatsApp.
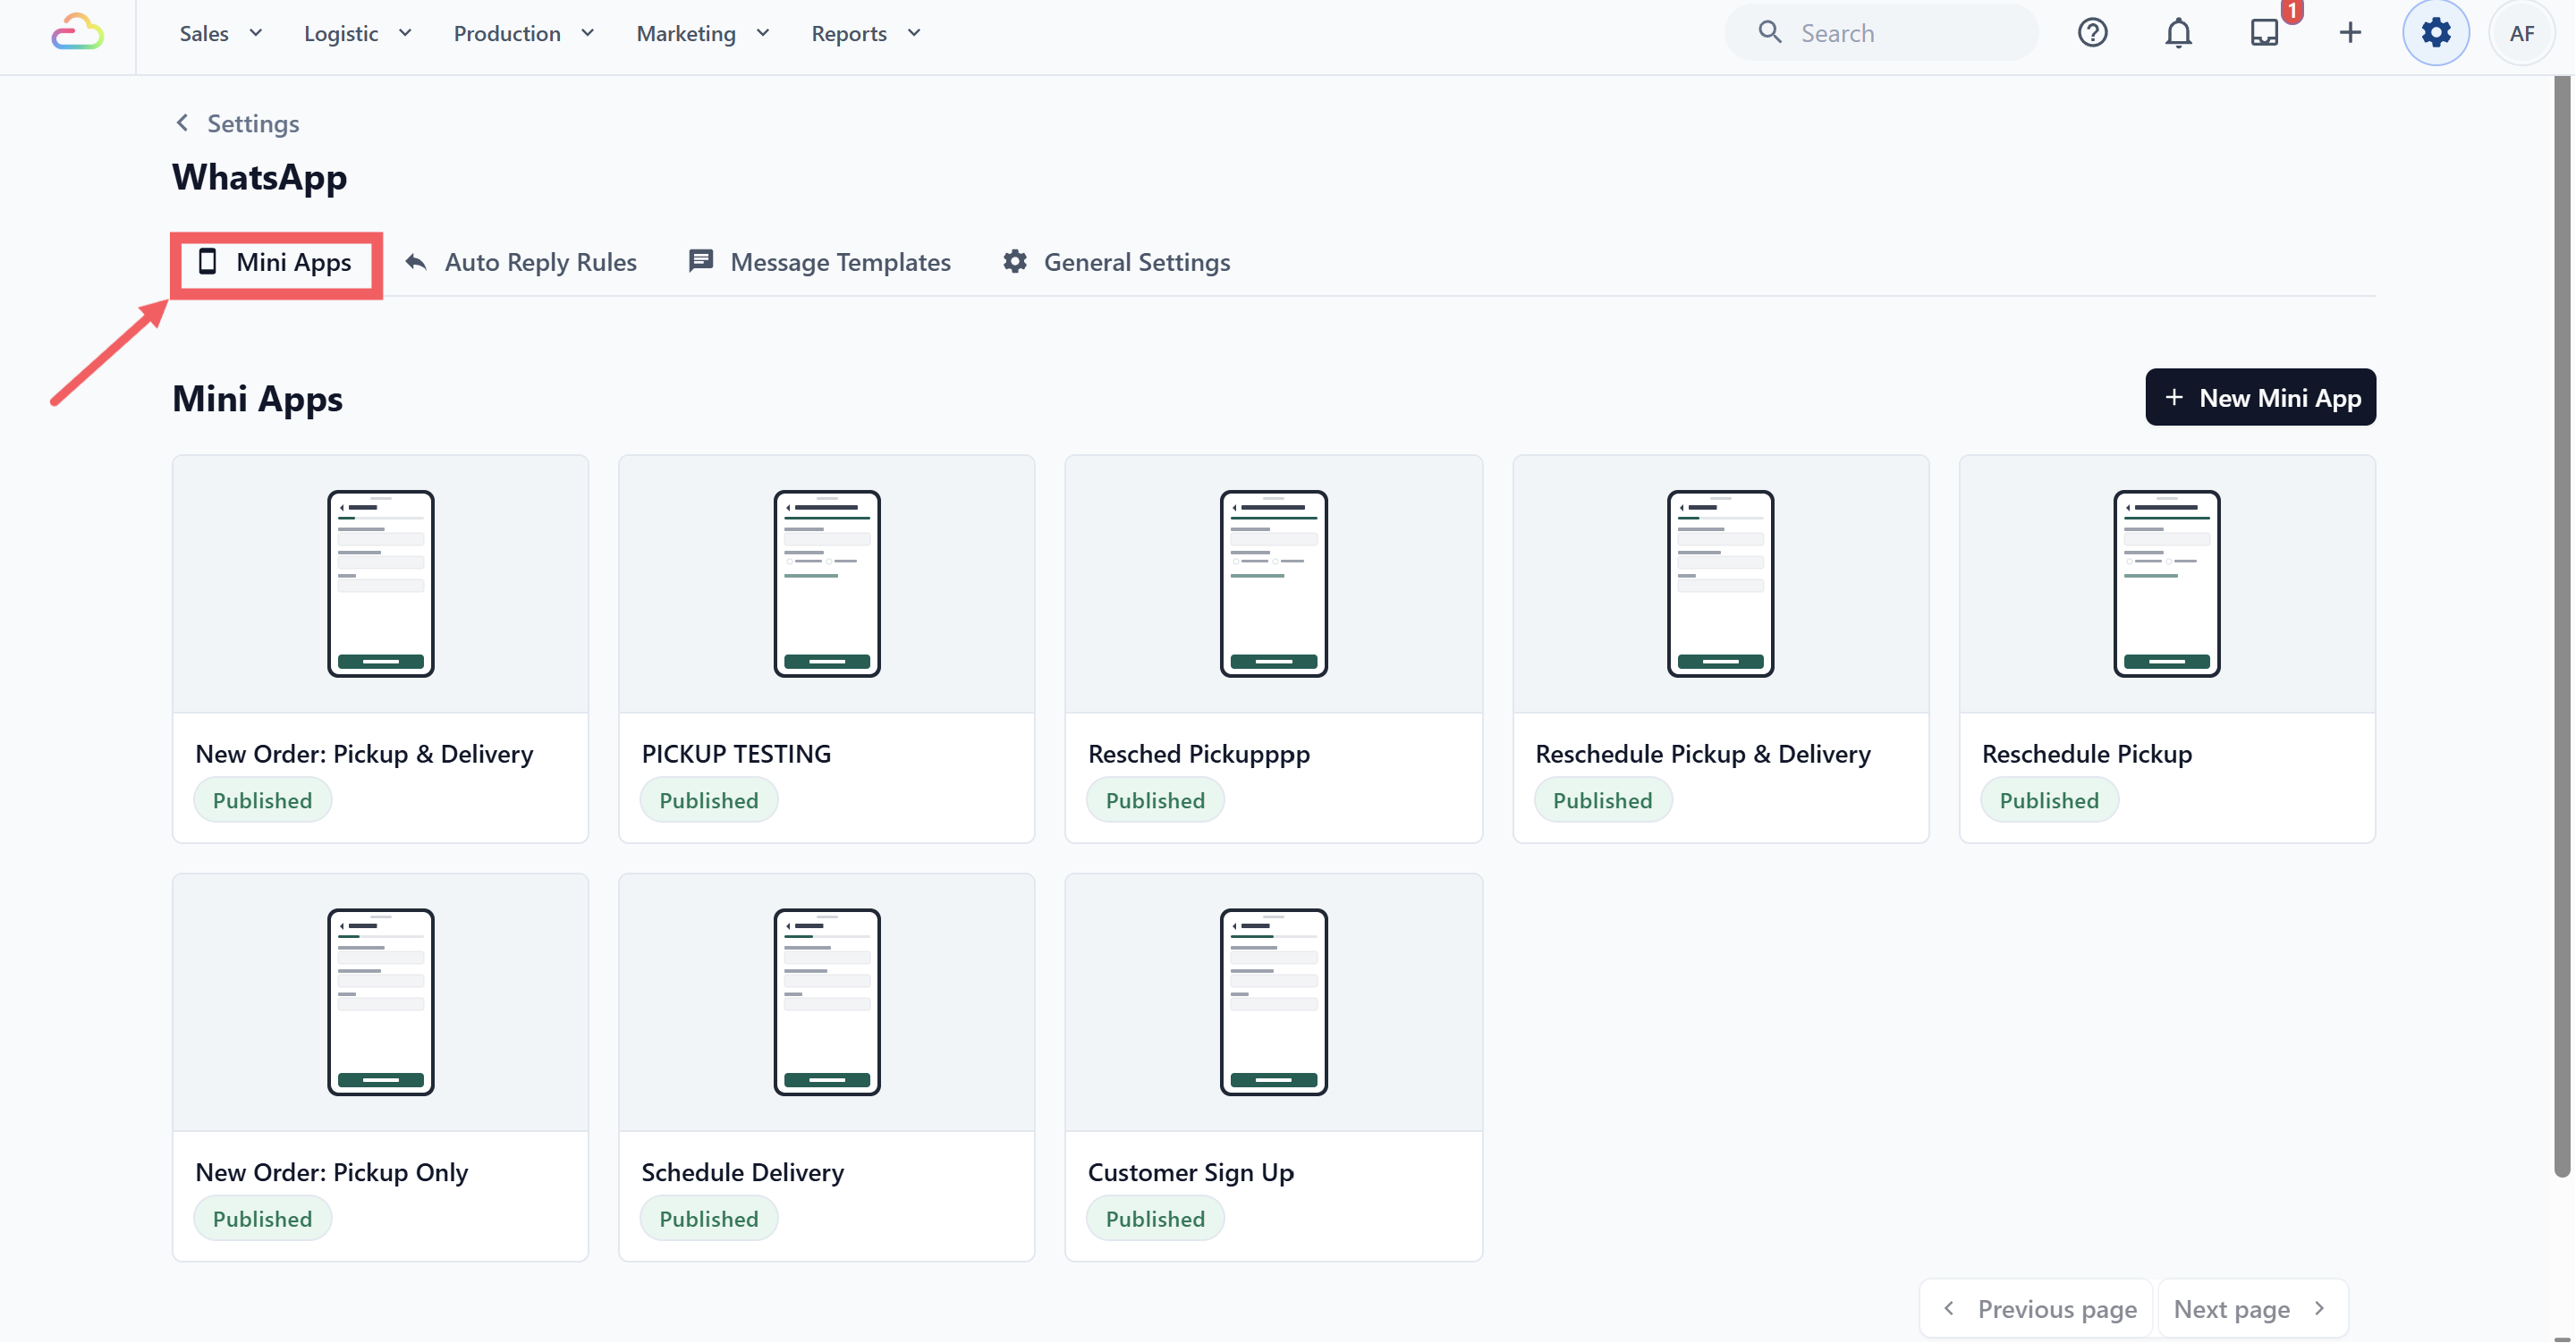
3. Click the Mini Apps tab.
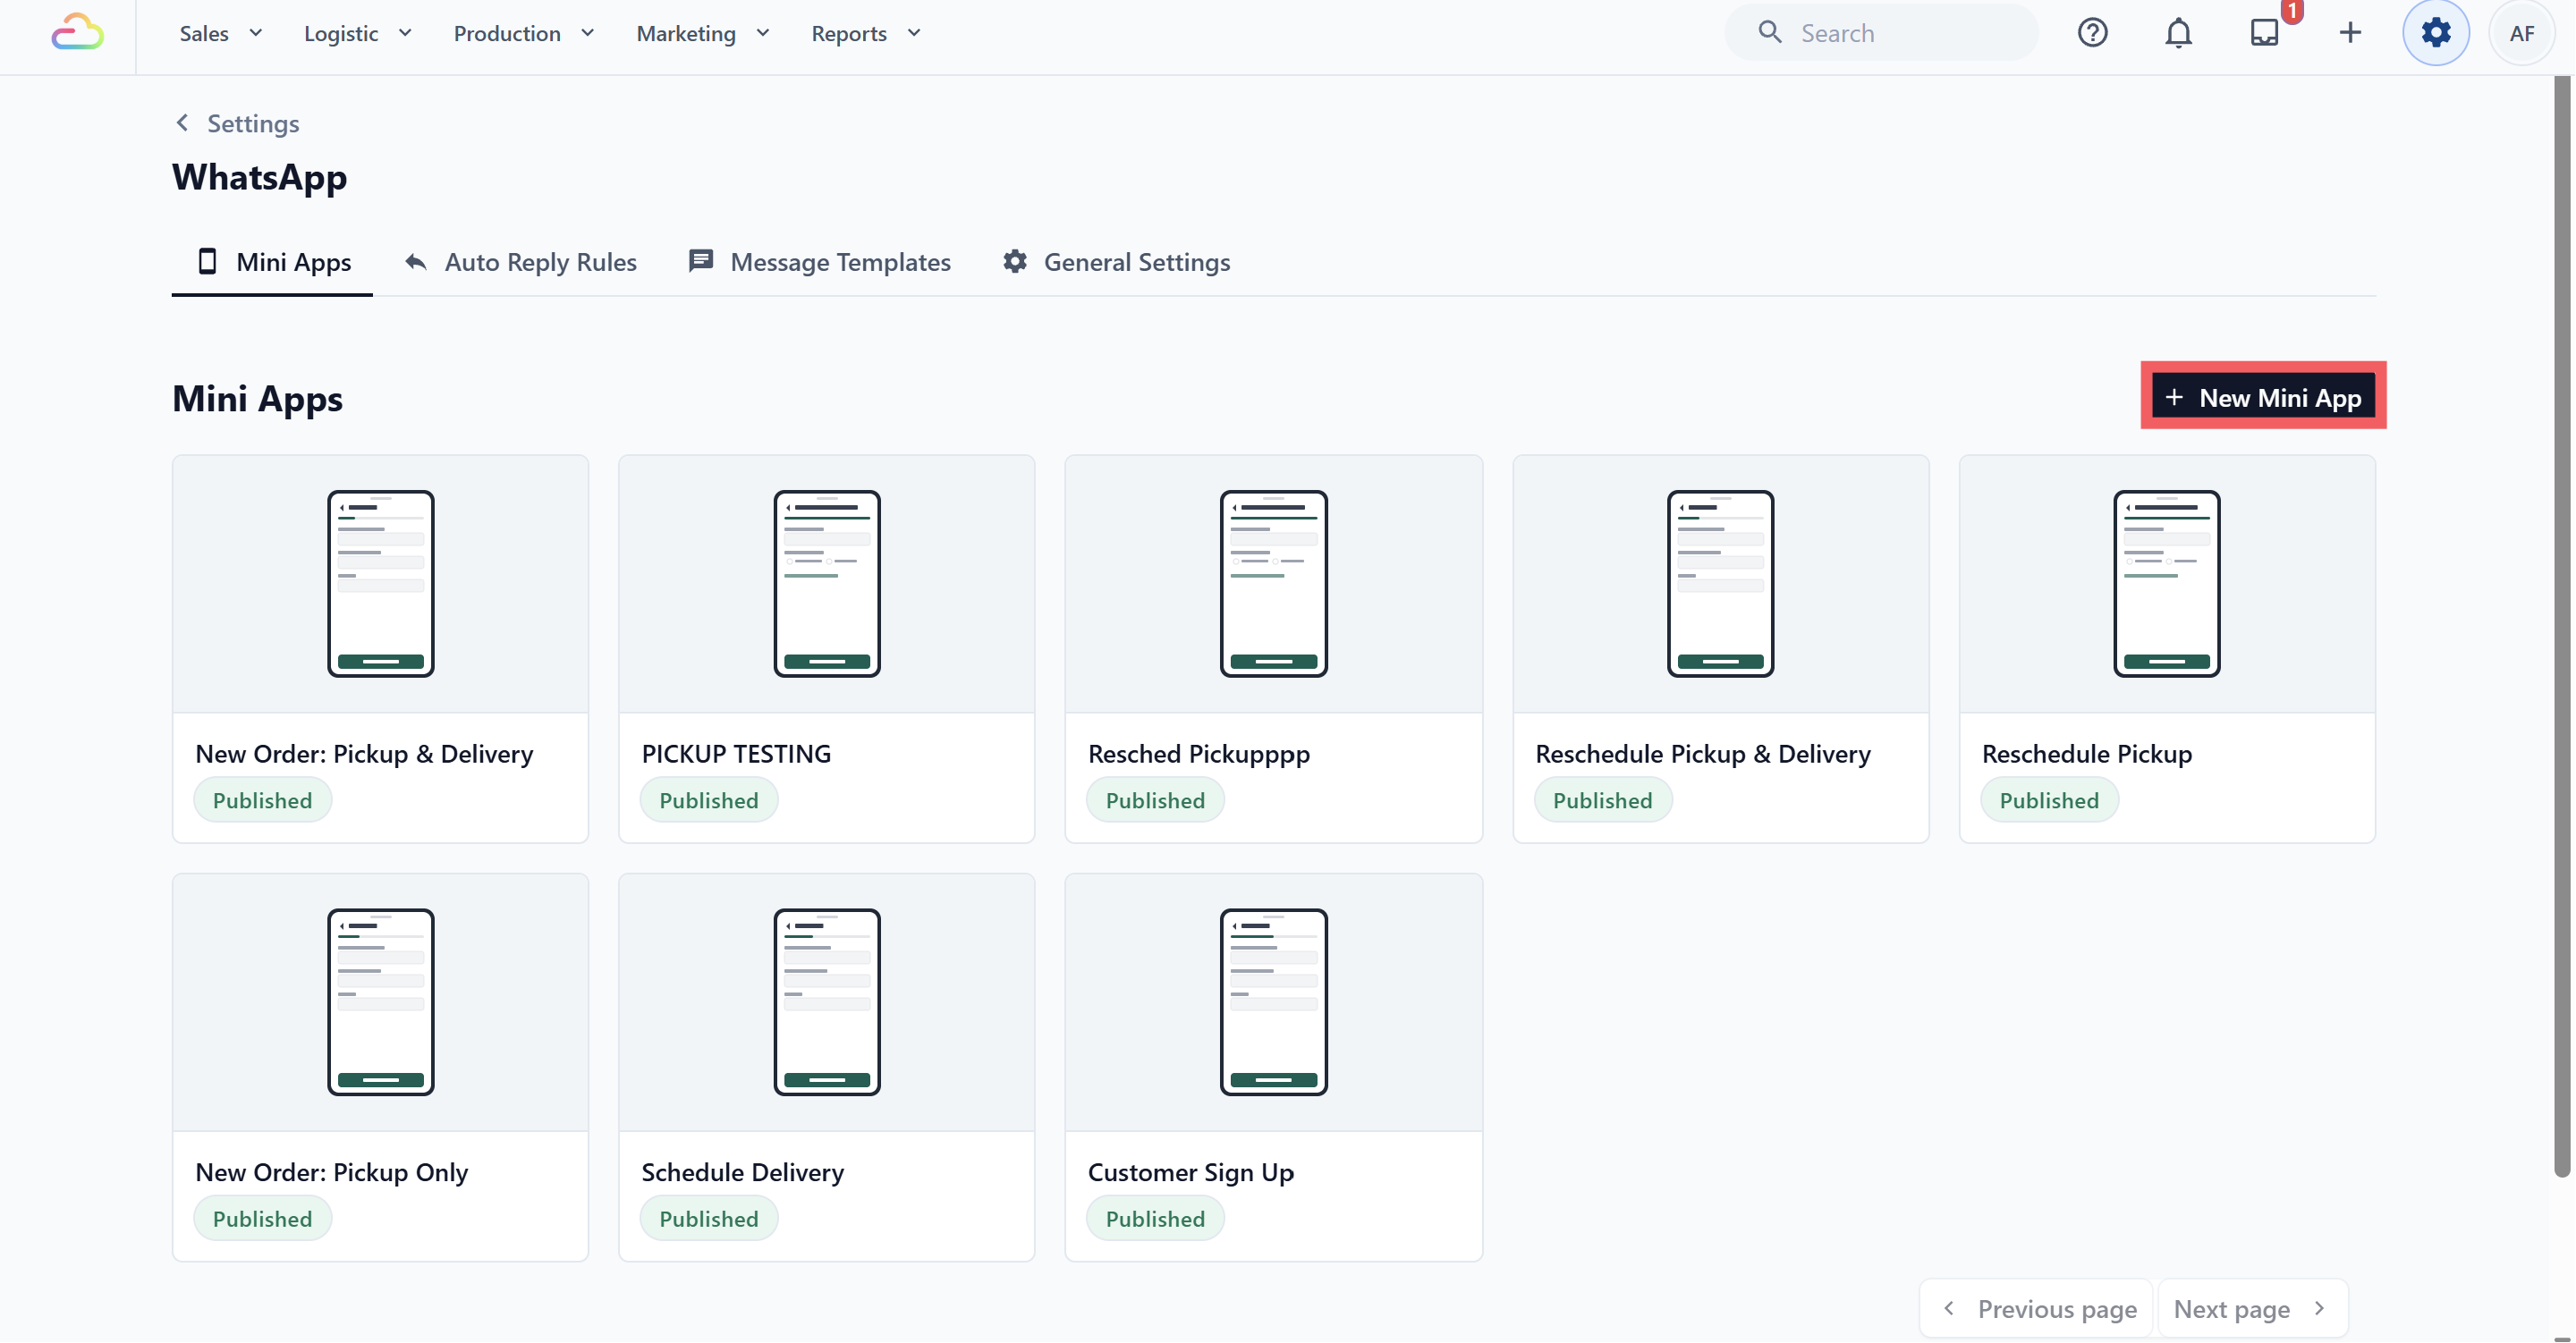
4. Click New Mini App.
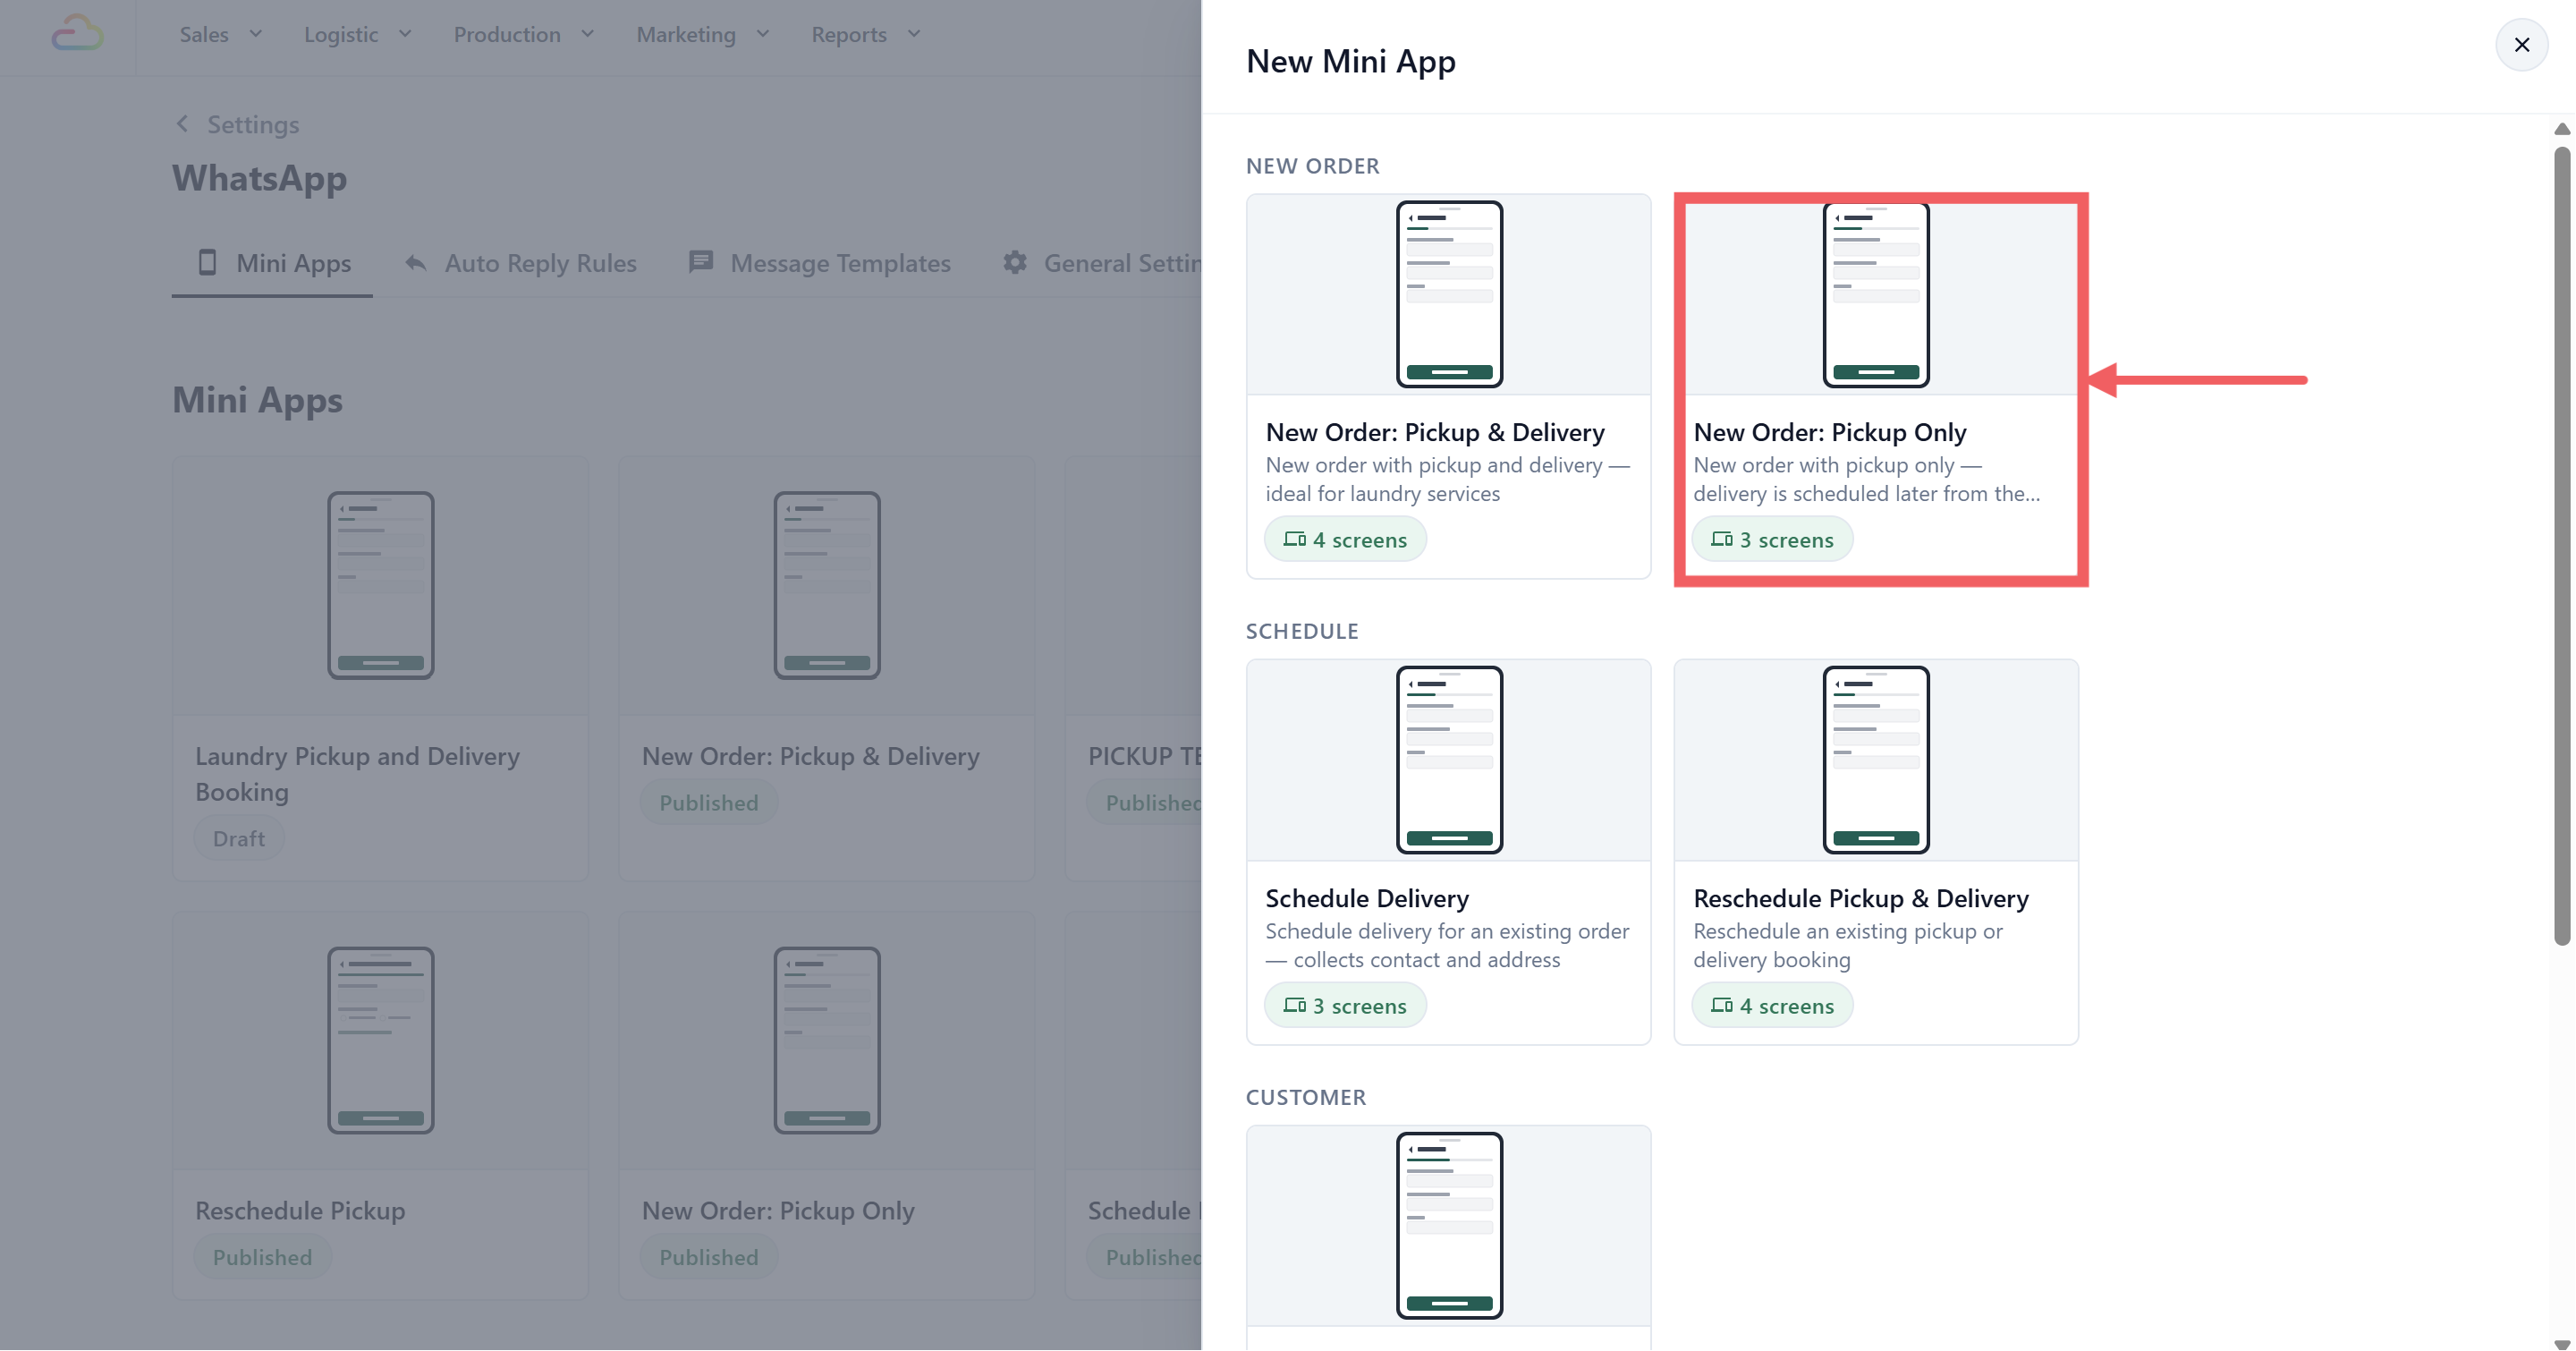
5. Under the New Order group, select New Order: Pickup Only.
6. Enter a name, for example Laundry Repair Pickup Booking.
7. Choose the Business Unit and Sales Channel this Mini App belongs to. A business unit is a line of service in your shop, for example Laundry. A sales channel is where the order is counted as coming from.
8. Click Create.
---
## What Is Already Set Up
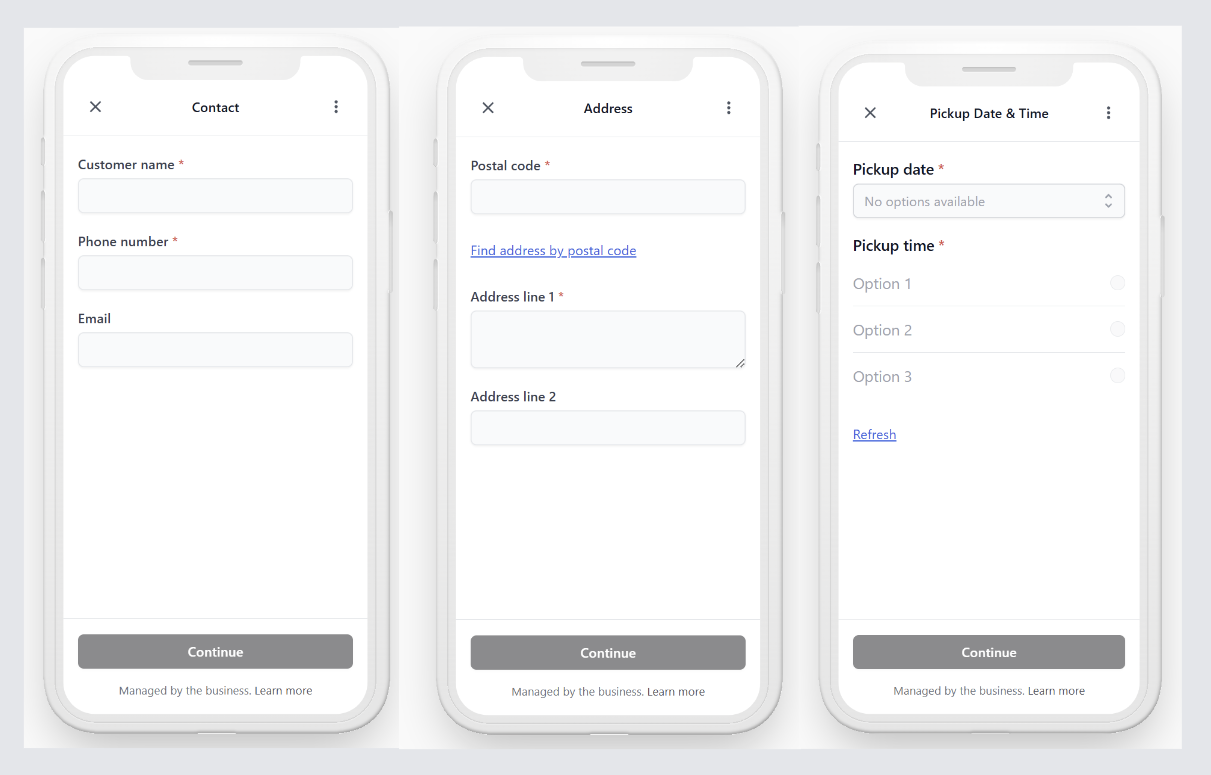
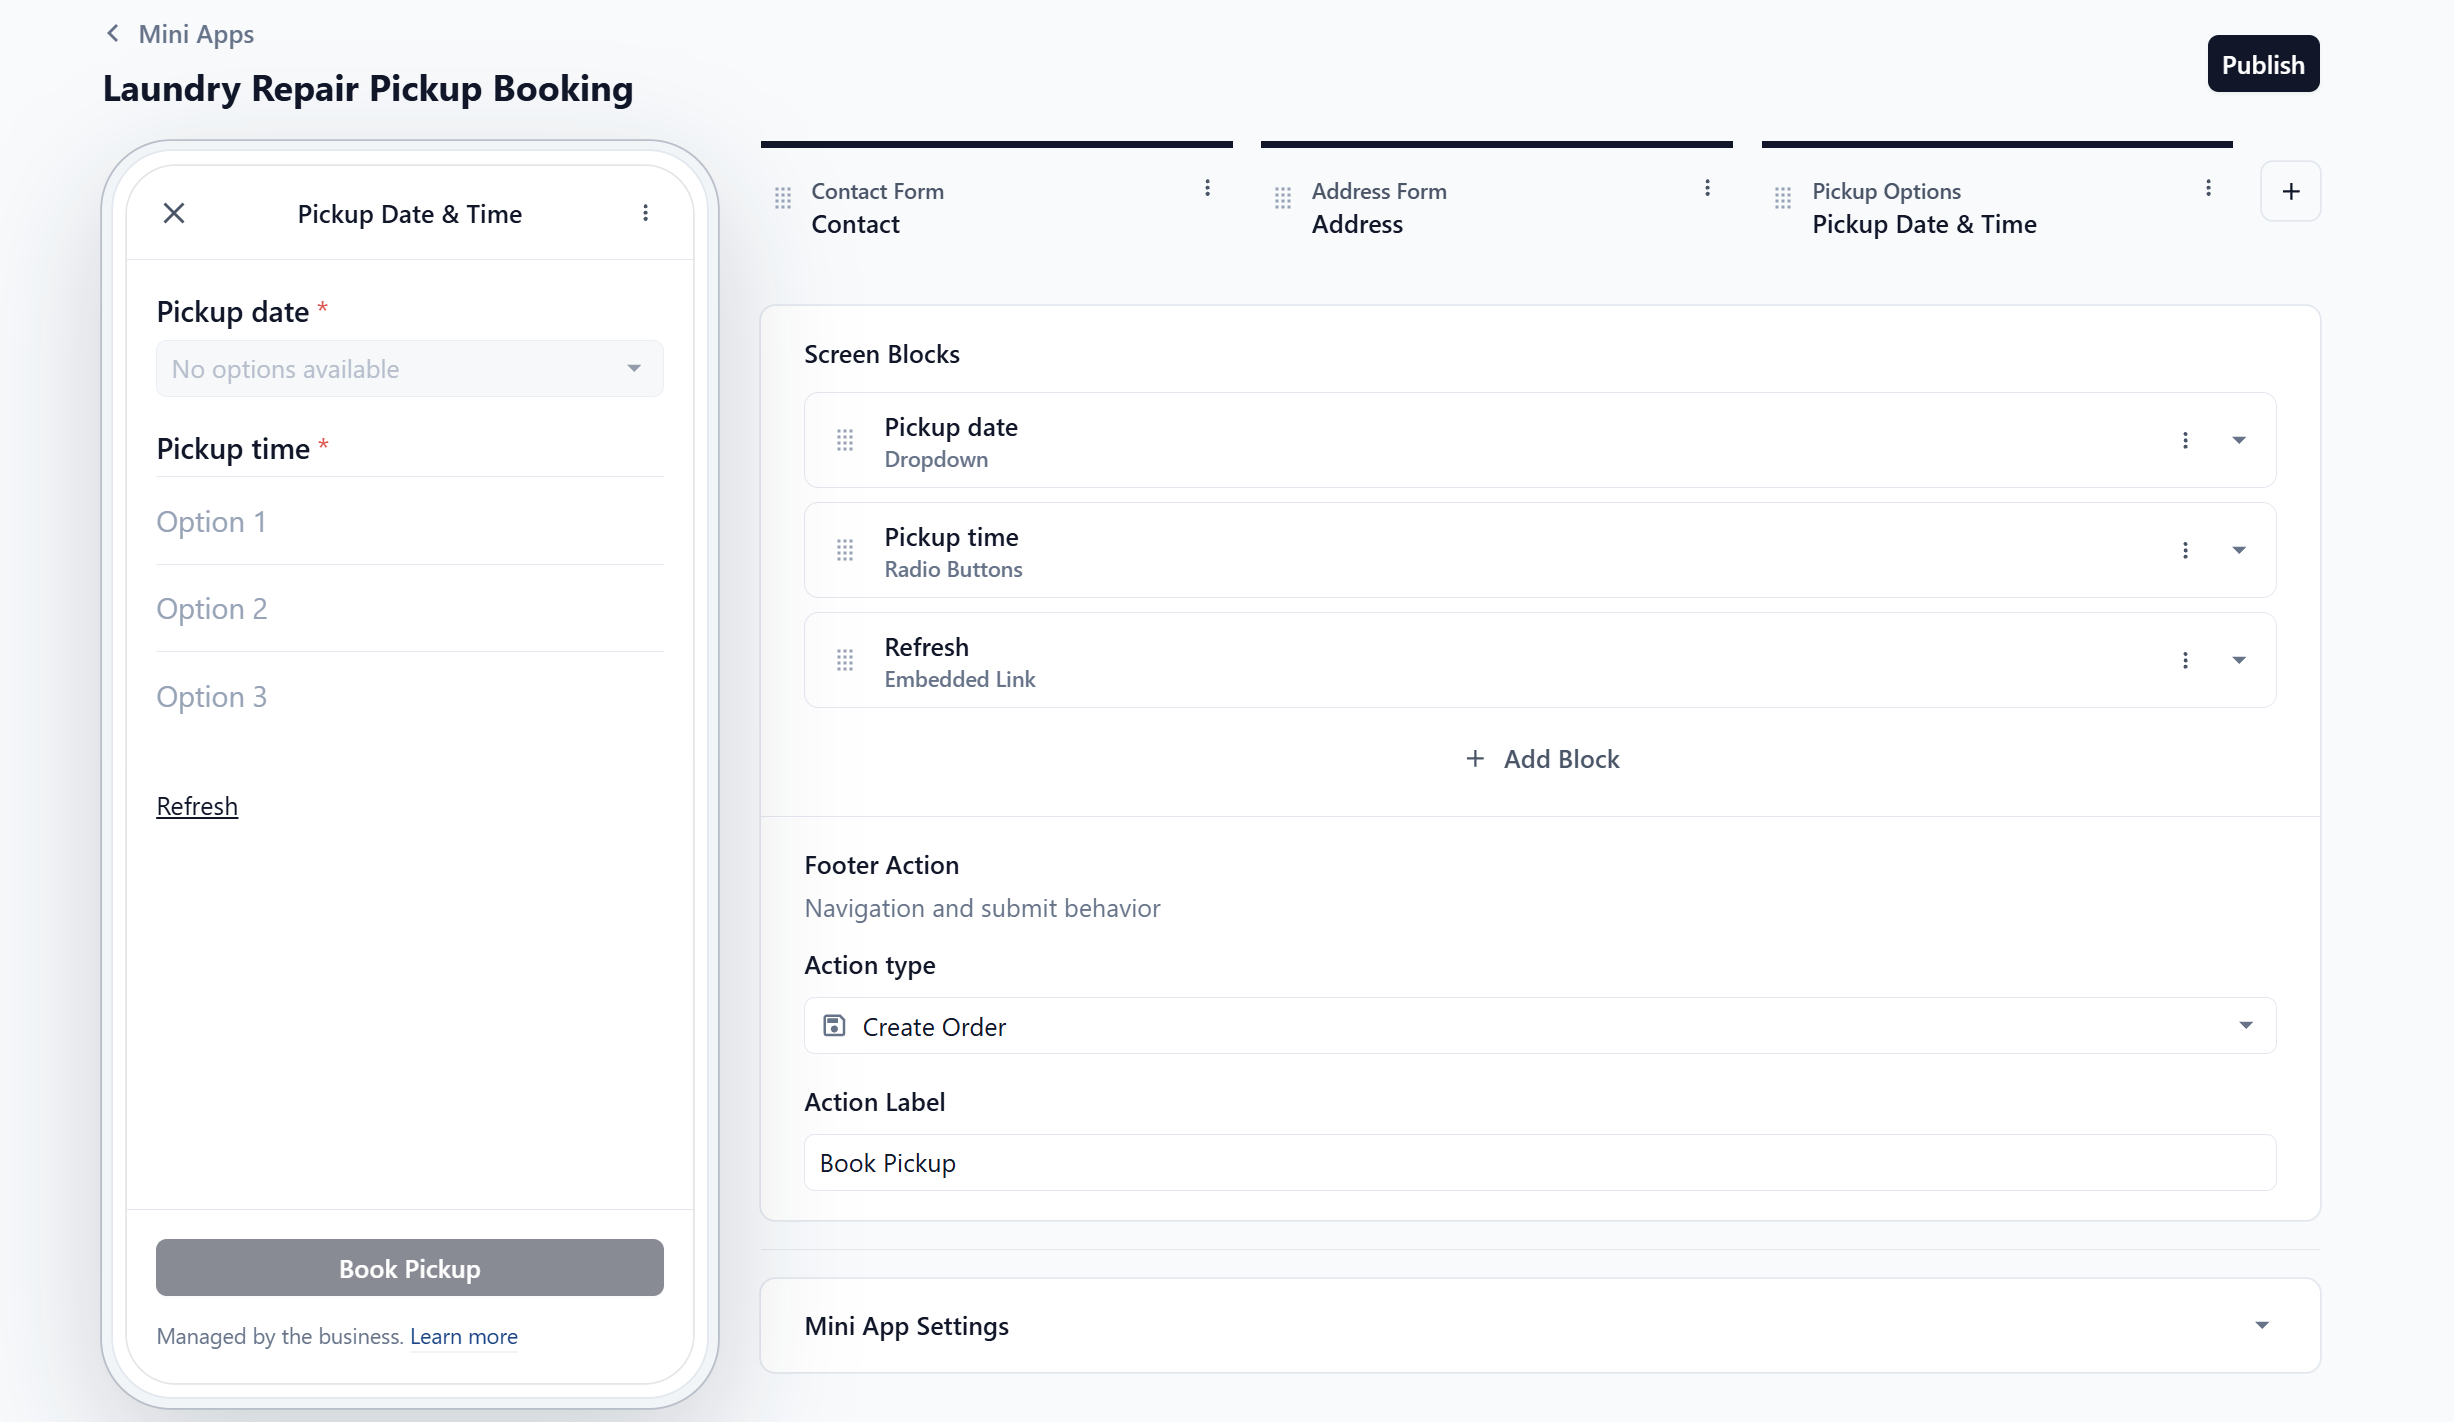
The template arrives with three screens in this order. You can publish it as it is and start taking bookings today.
Before changing the screens, read [How the Mini App Builder Works](/docs/how-the-mini-app-builder-works). It explains what screens and blocks are, how to move them, and what the button at the bottom of each screen does.
**Contact**
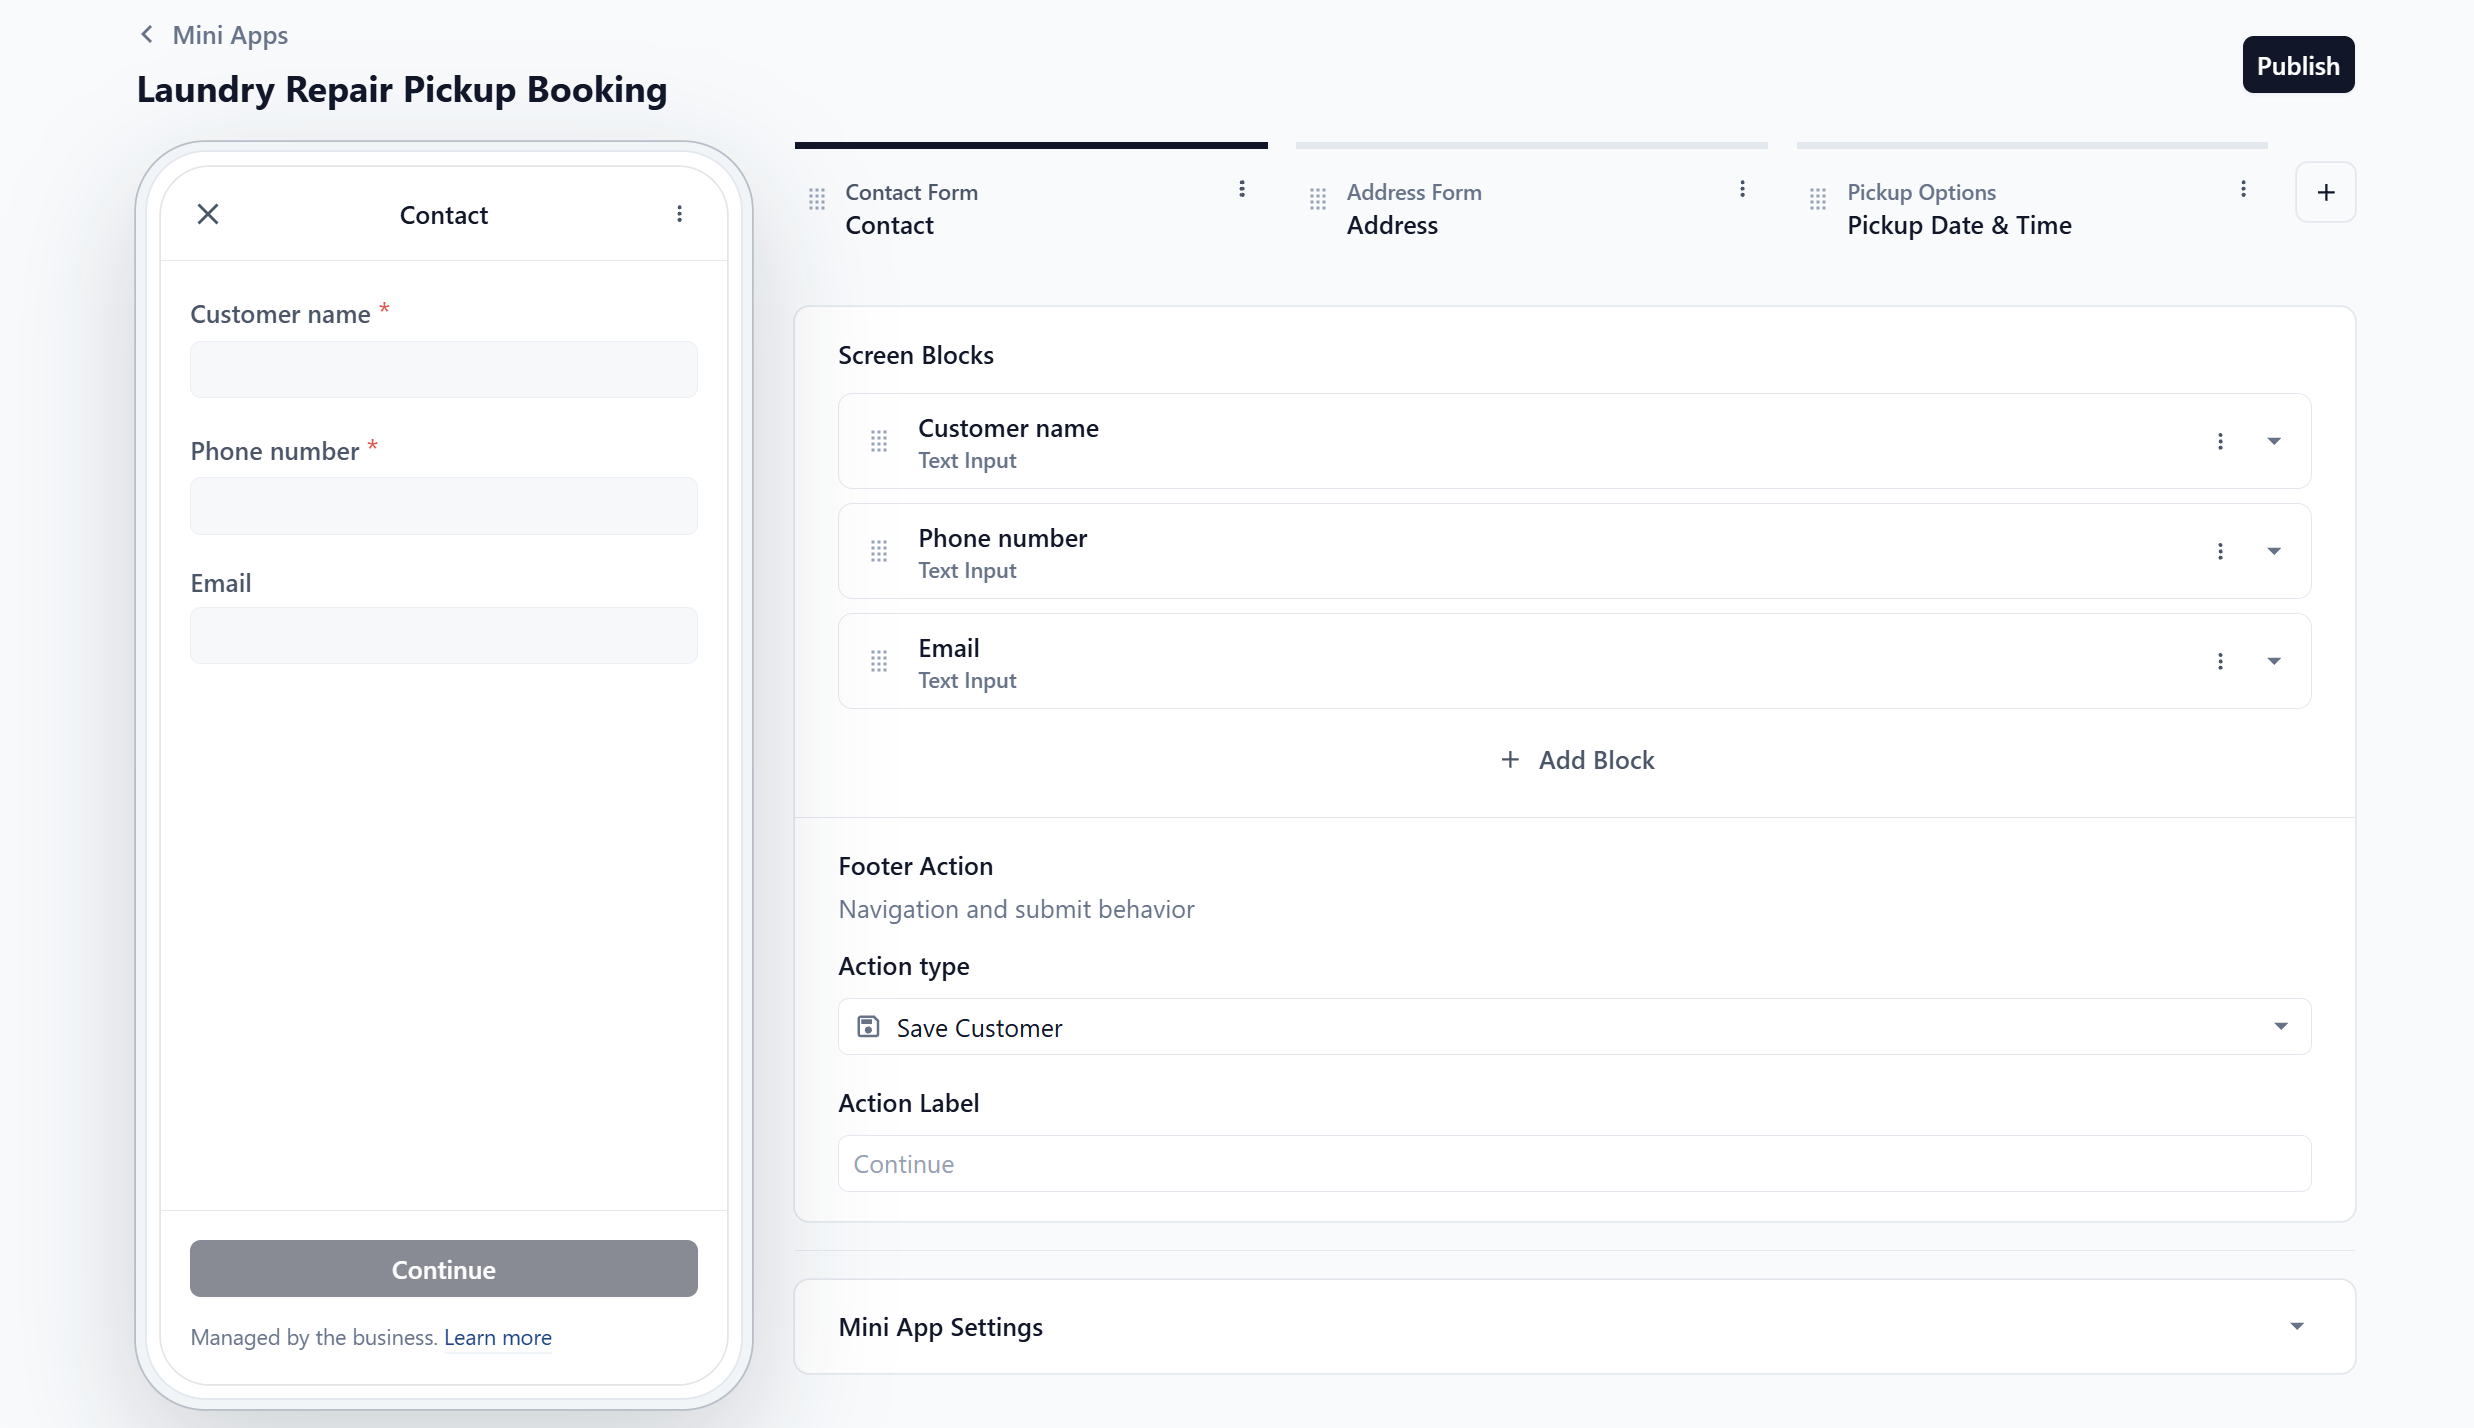
Asks for customer name, phone number and email. The footer action is Save Customer, so the profile is created or updated when they continue.
**Address**
Asks for postal code, a Find address by postal code link, then address line 1 and address line 2. Address line 2 is optional, for unit and floor numbers. The footer action is Save Address.
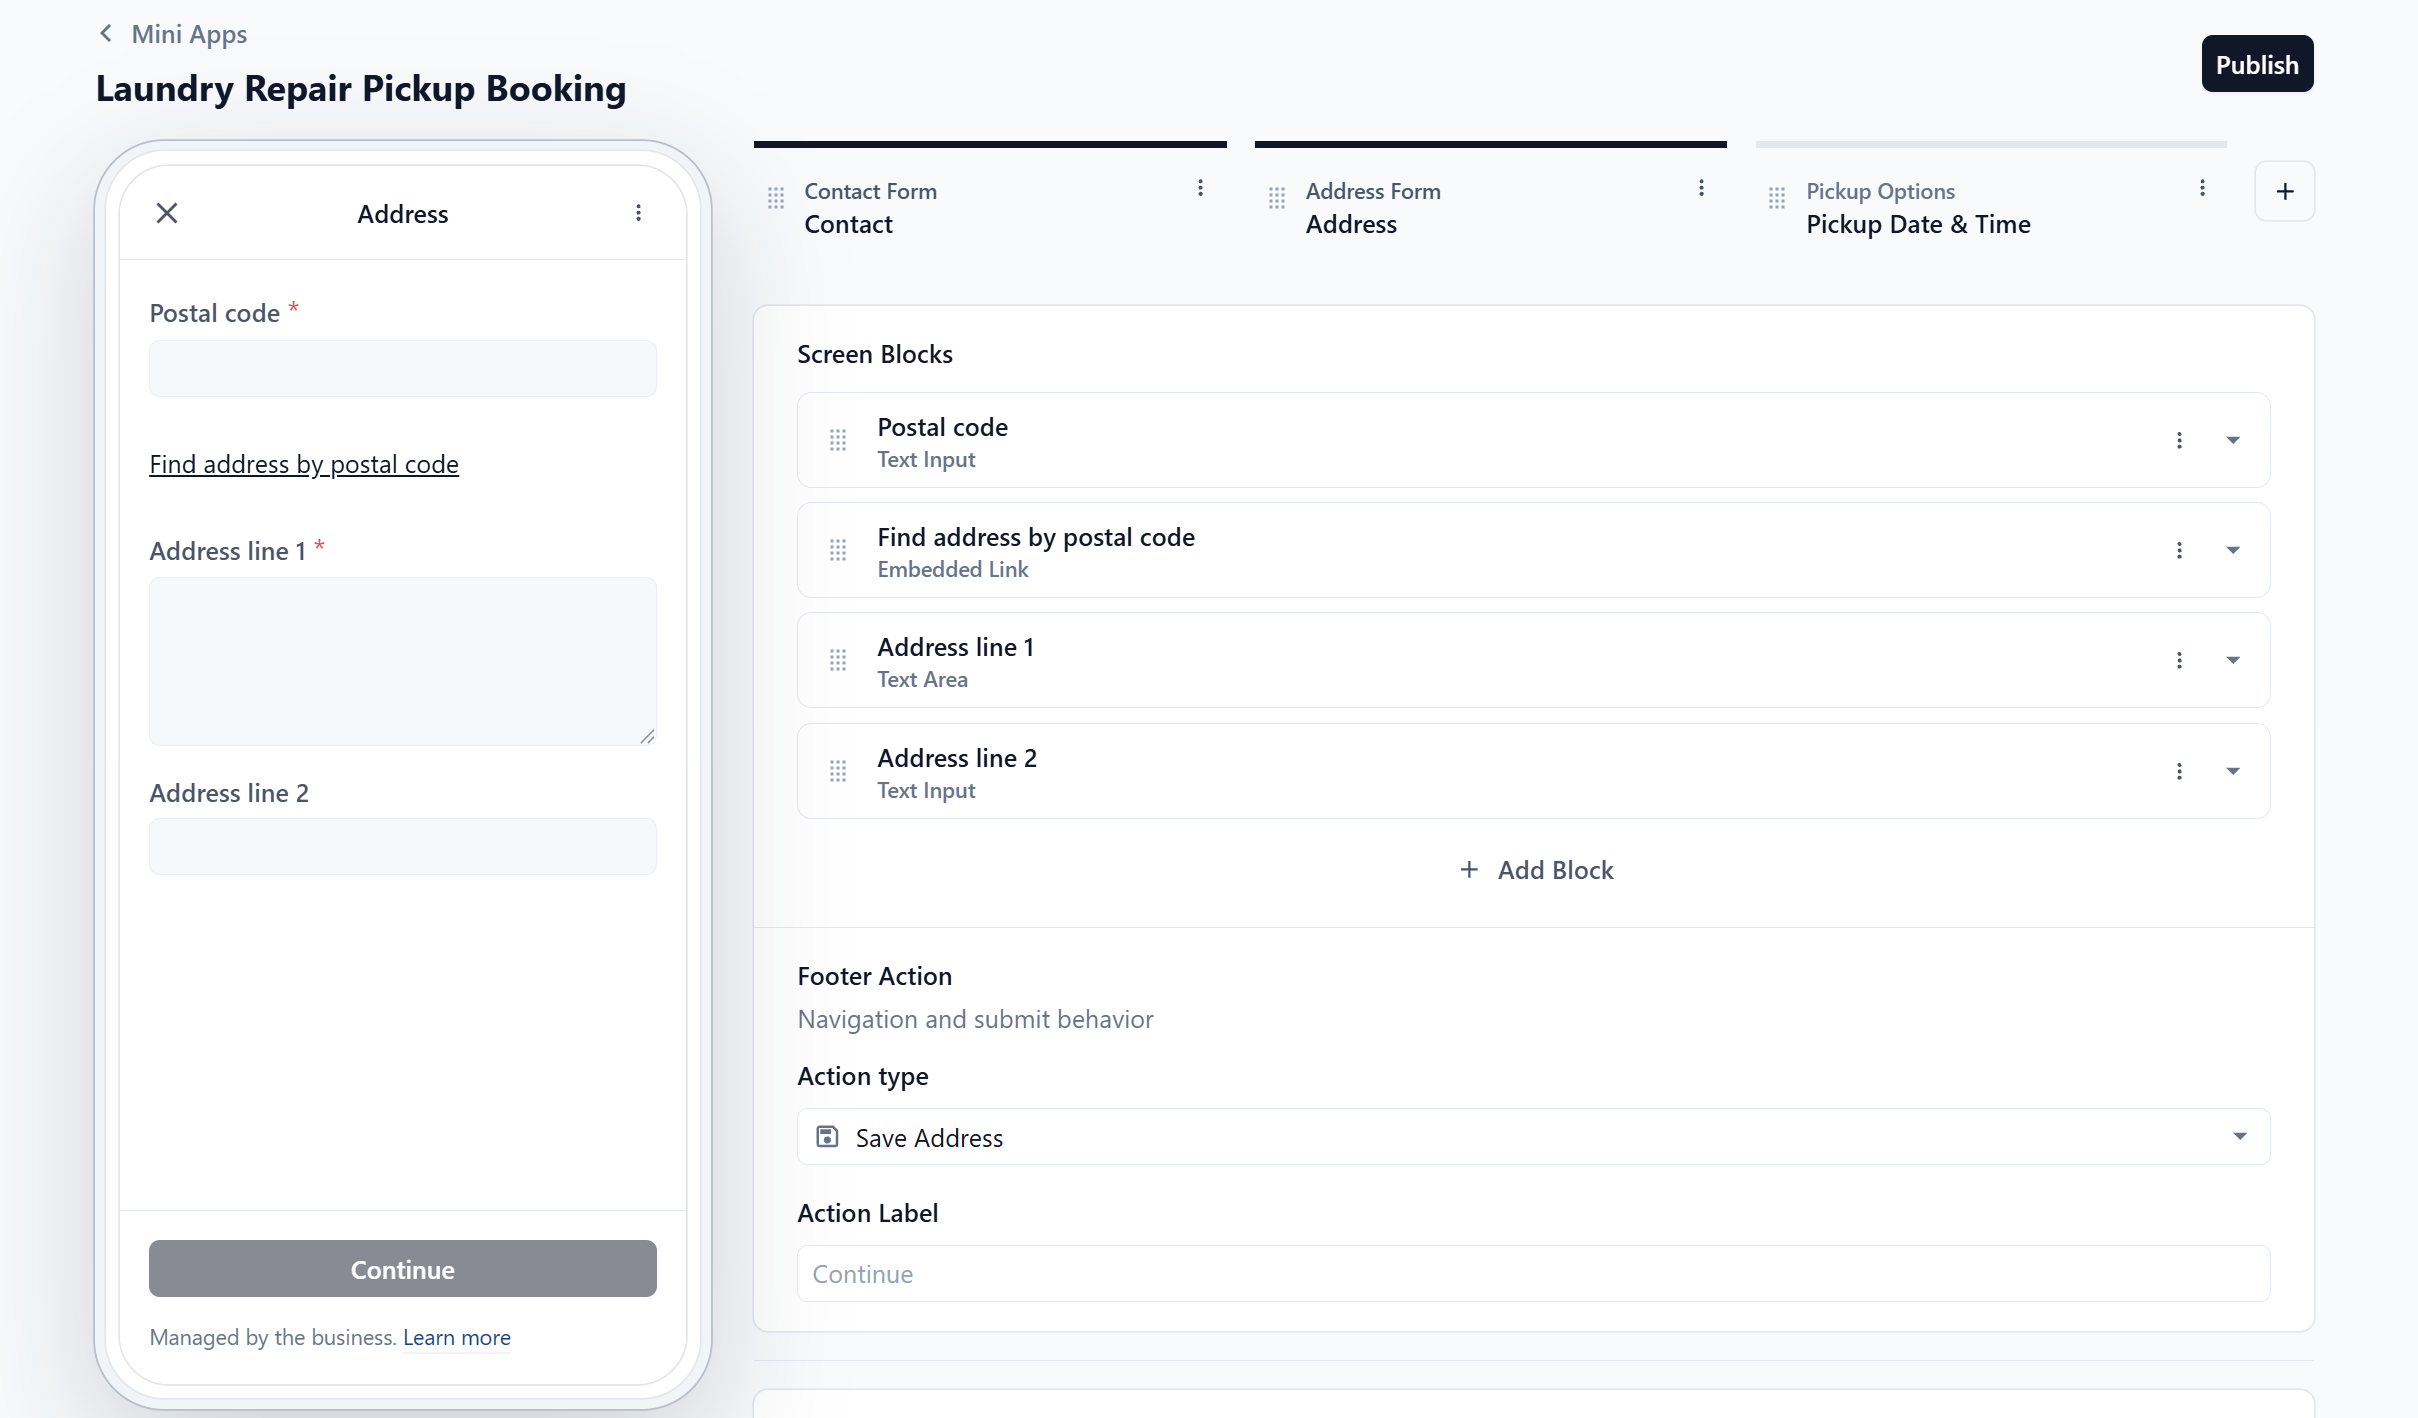
The Find address link fills in the street name on its own. There is nothing to configure.
**Pickup Date & Time**
A pickup date dropdown, pickup time options and a Refresh link for the latest slots. The footer action is Create Order, so tapping it creates the booking in EasyBiz.
### Add Only the Extra Details Your Shop Needs
The three screens above are enough to take a basic pickup booking. You can add extra steps when your staff need more information before collecting the item. Keep the form simple and only ask for details that will help your team prepare, give the right advice or complete the pickup without contacting the customer again.
| Extra detail | Add this when | How it helps your shop |
|---|---|---|
| Service Options | Customers should tell you what type of work they may need before pickup. | Your team knows what may be collected, and the customer can see any applicable minimum charge before creating the order. |
| Item Issue | Your team needs to know the item's condition or problems before it arrives. | Staff can prepare for the inspection, and there is a record of what the customer reported before collection. |
| Property Type | Your driver needs a unit or floor number for HDBs, condos and offices. | Customers in multi-unit buildings must enter the missing details, while landed-home customers can continue without them. |
The next sections explain how to add these extra details.
---
## Let Customers Choose Their Services
Add one if you want the customer to tell you what work they need, and see a price, before your driver goes out.
This is useful when your shop provides several types of work, such as bag cleaning, leather repair, zip replacement, shoe repair or alteration. The customer can choose the services they are interested in while making the booking, so your staff know what may be collected and can prepare the right person or equipment.
If you have set a minimum charge for a service option or for the whole business unit, the Mini App shows the relevant minimum based on the customer's choices. This lets the customer know the minimum spend before creating the order.
Your service options come from Settings, Catalog & Pricing section. This screen reads that list, so there is no custom field to create.
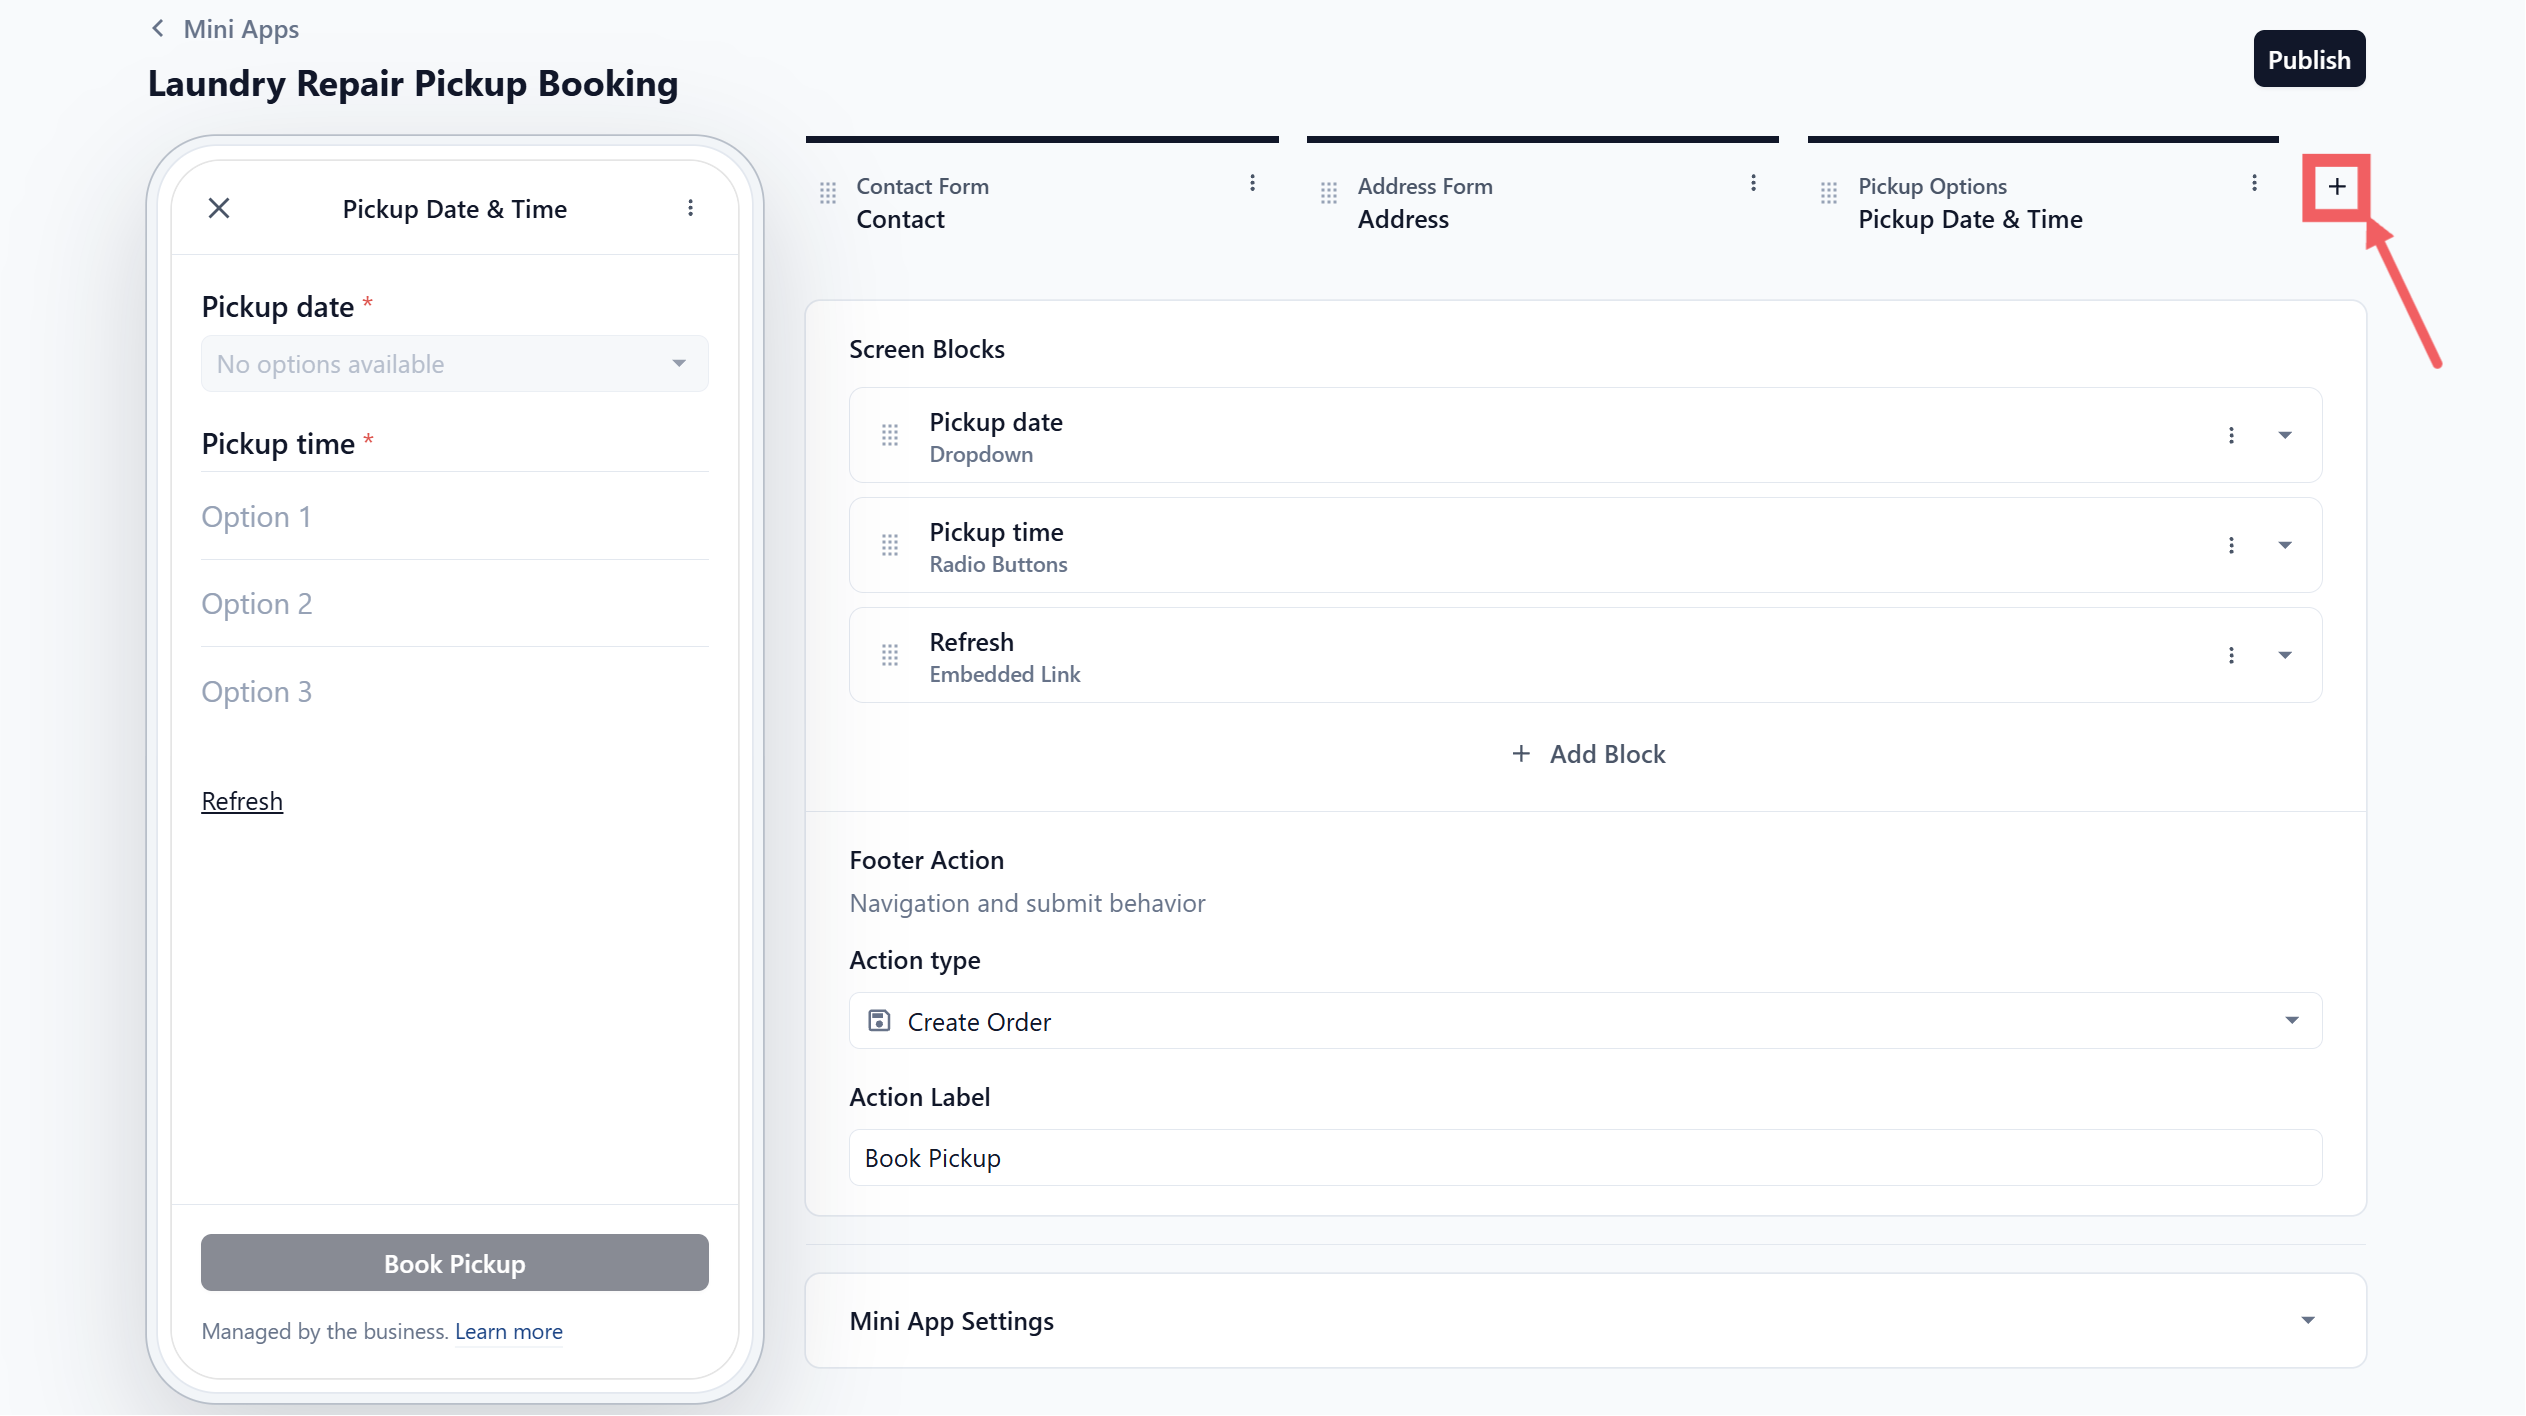
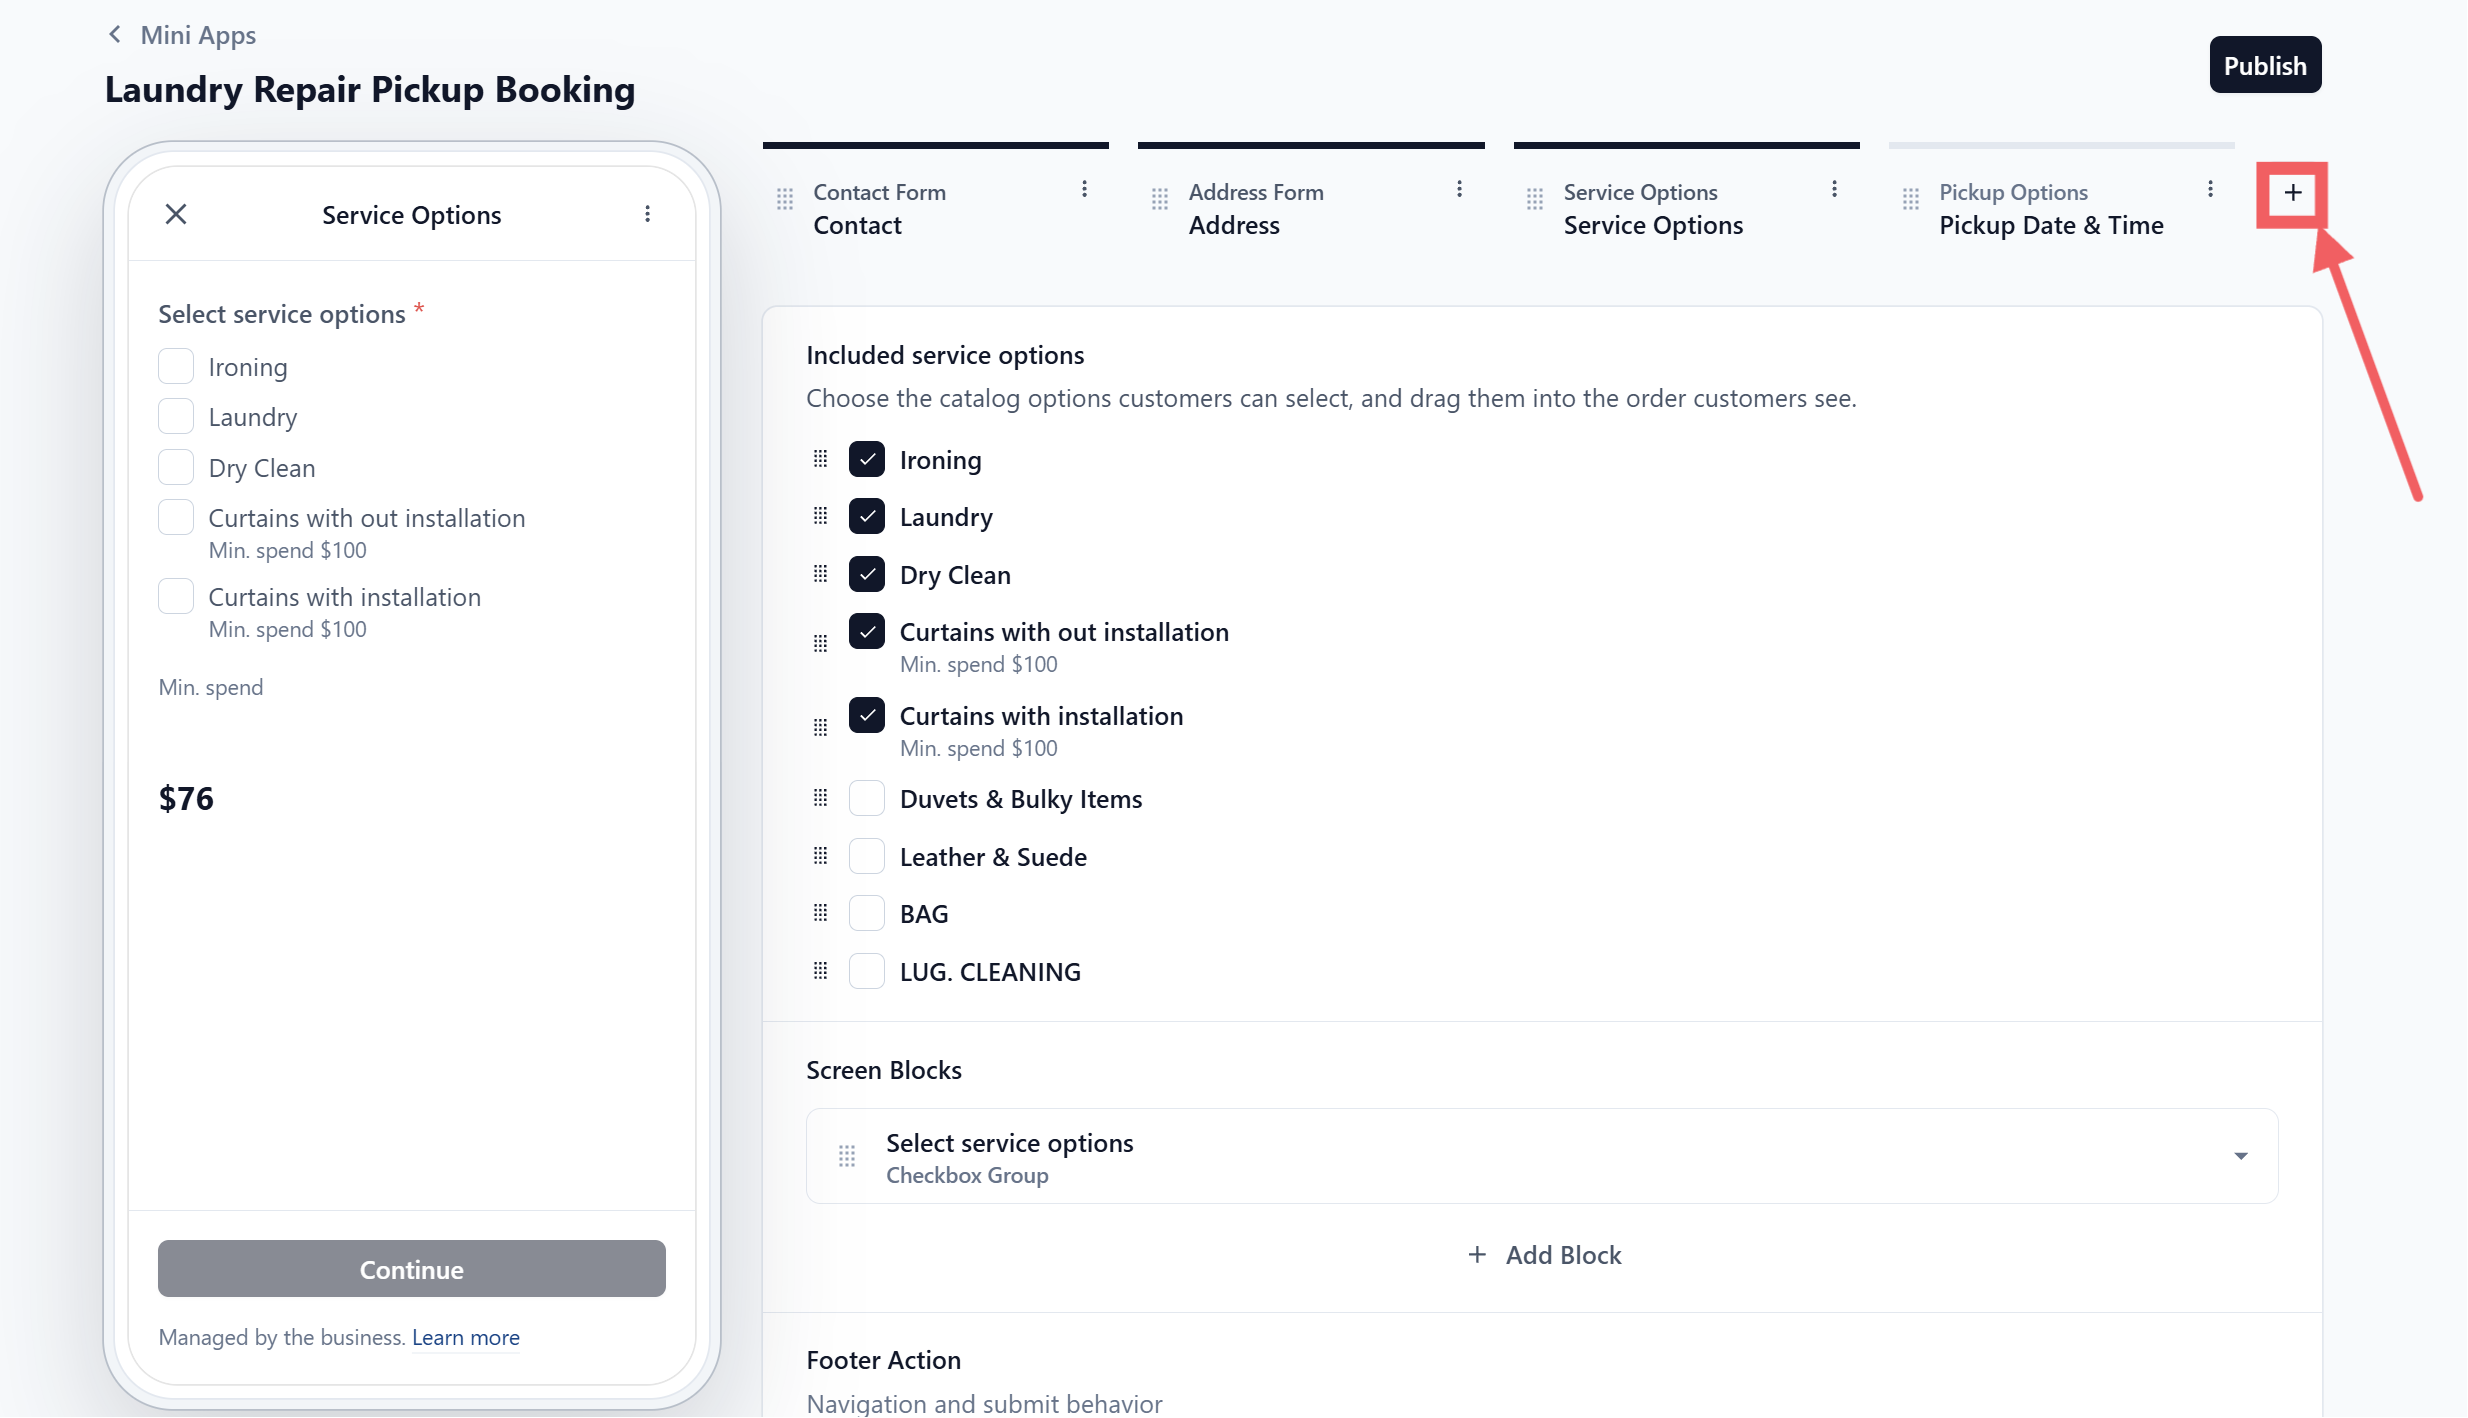
1. In the editor, click + at the end of the screen row.
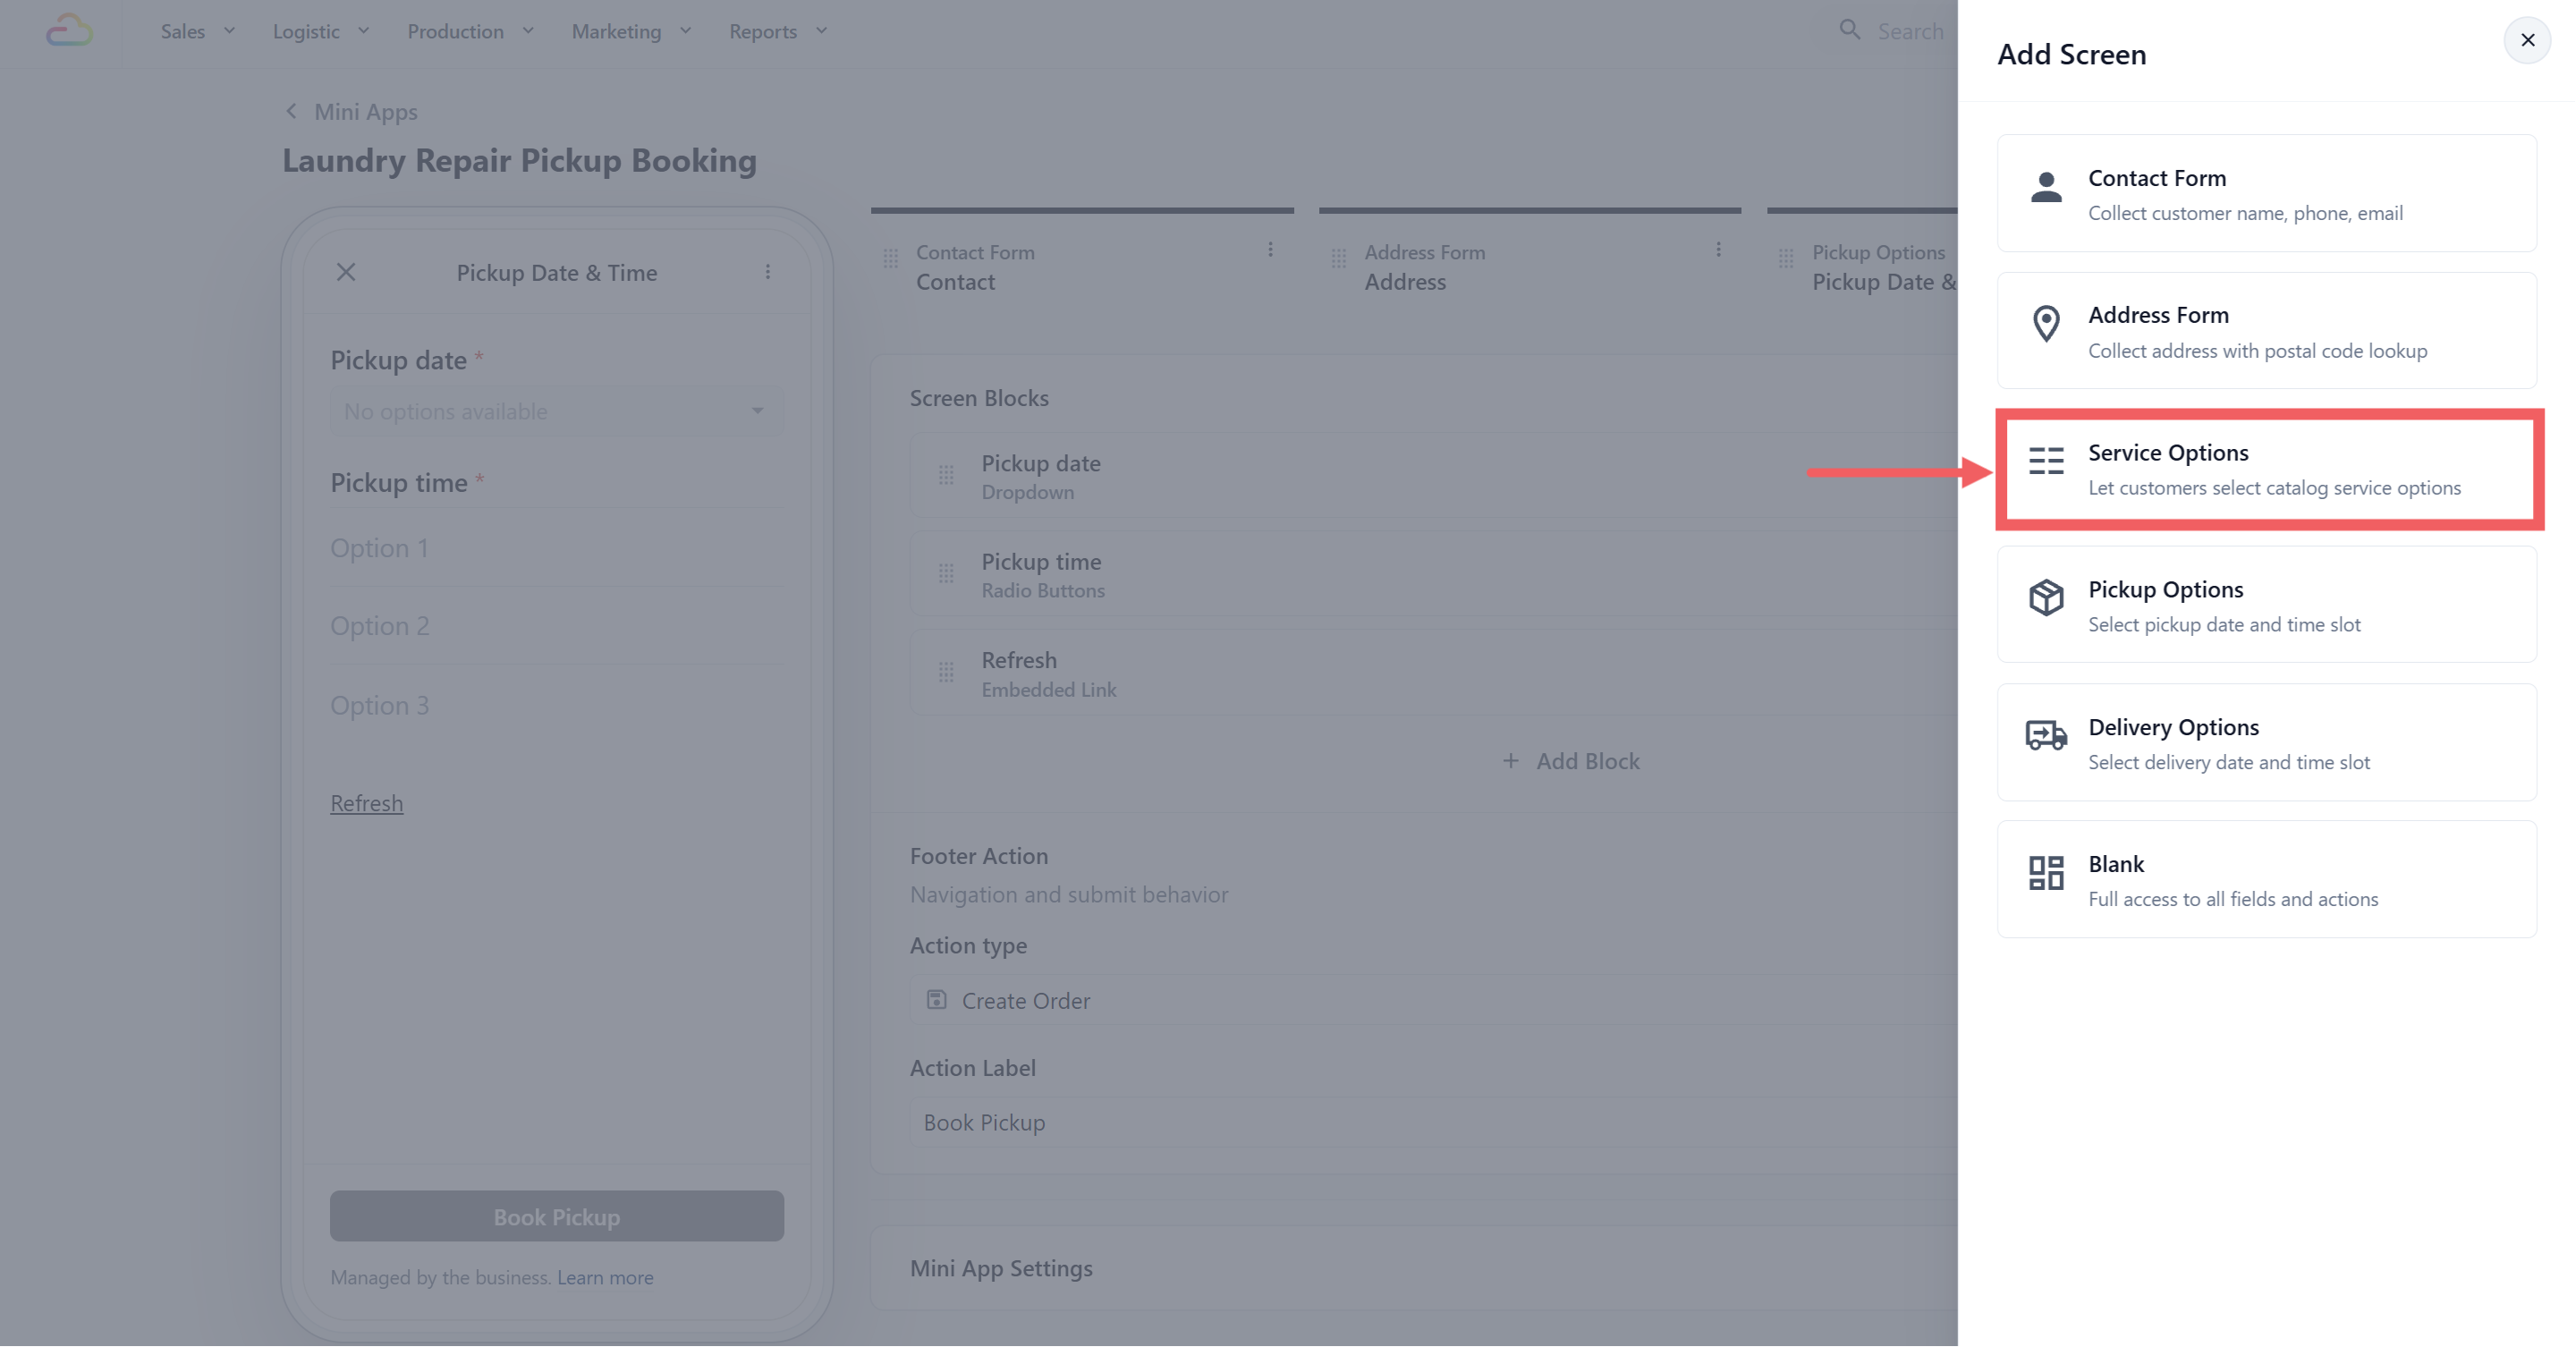
2. Choose Service Options and click Add.
3. Drag the new screen so it sits between Address and Pickup Date & Time.
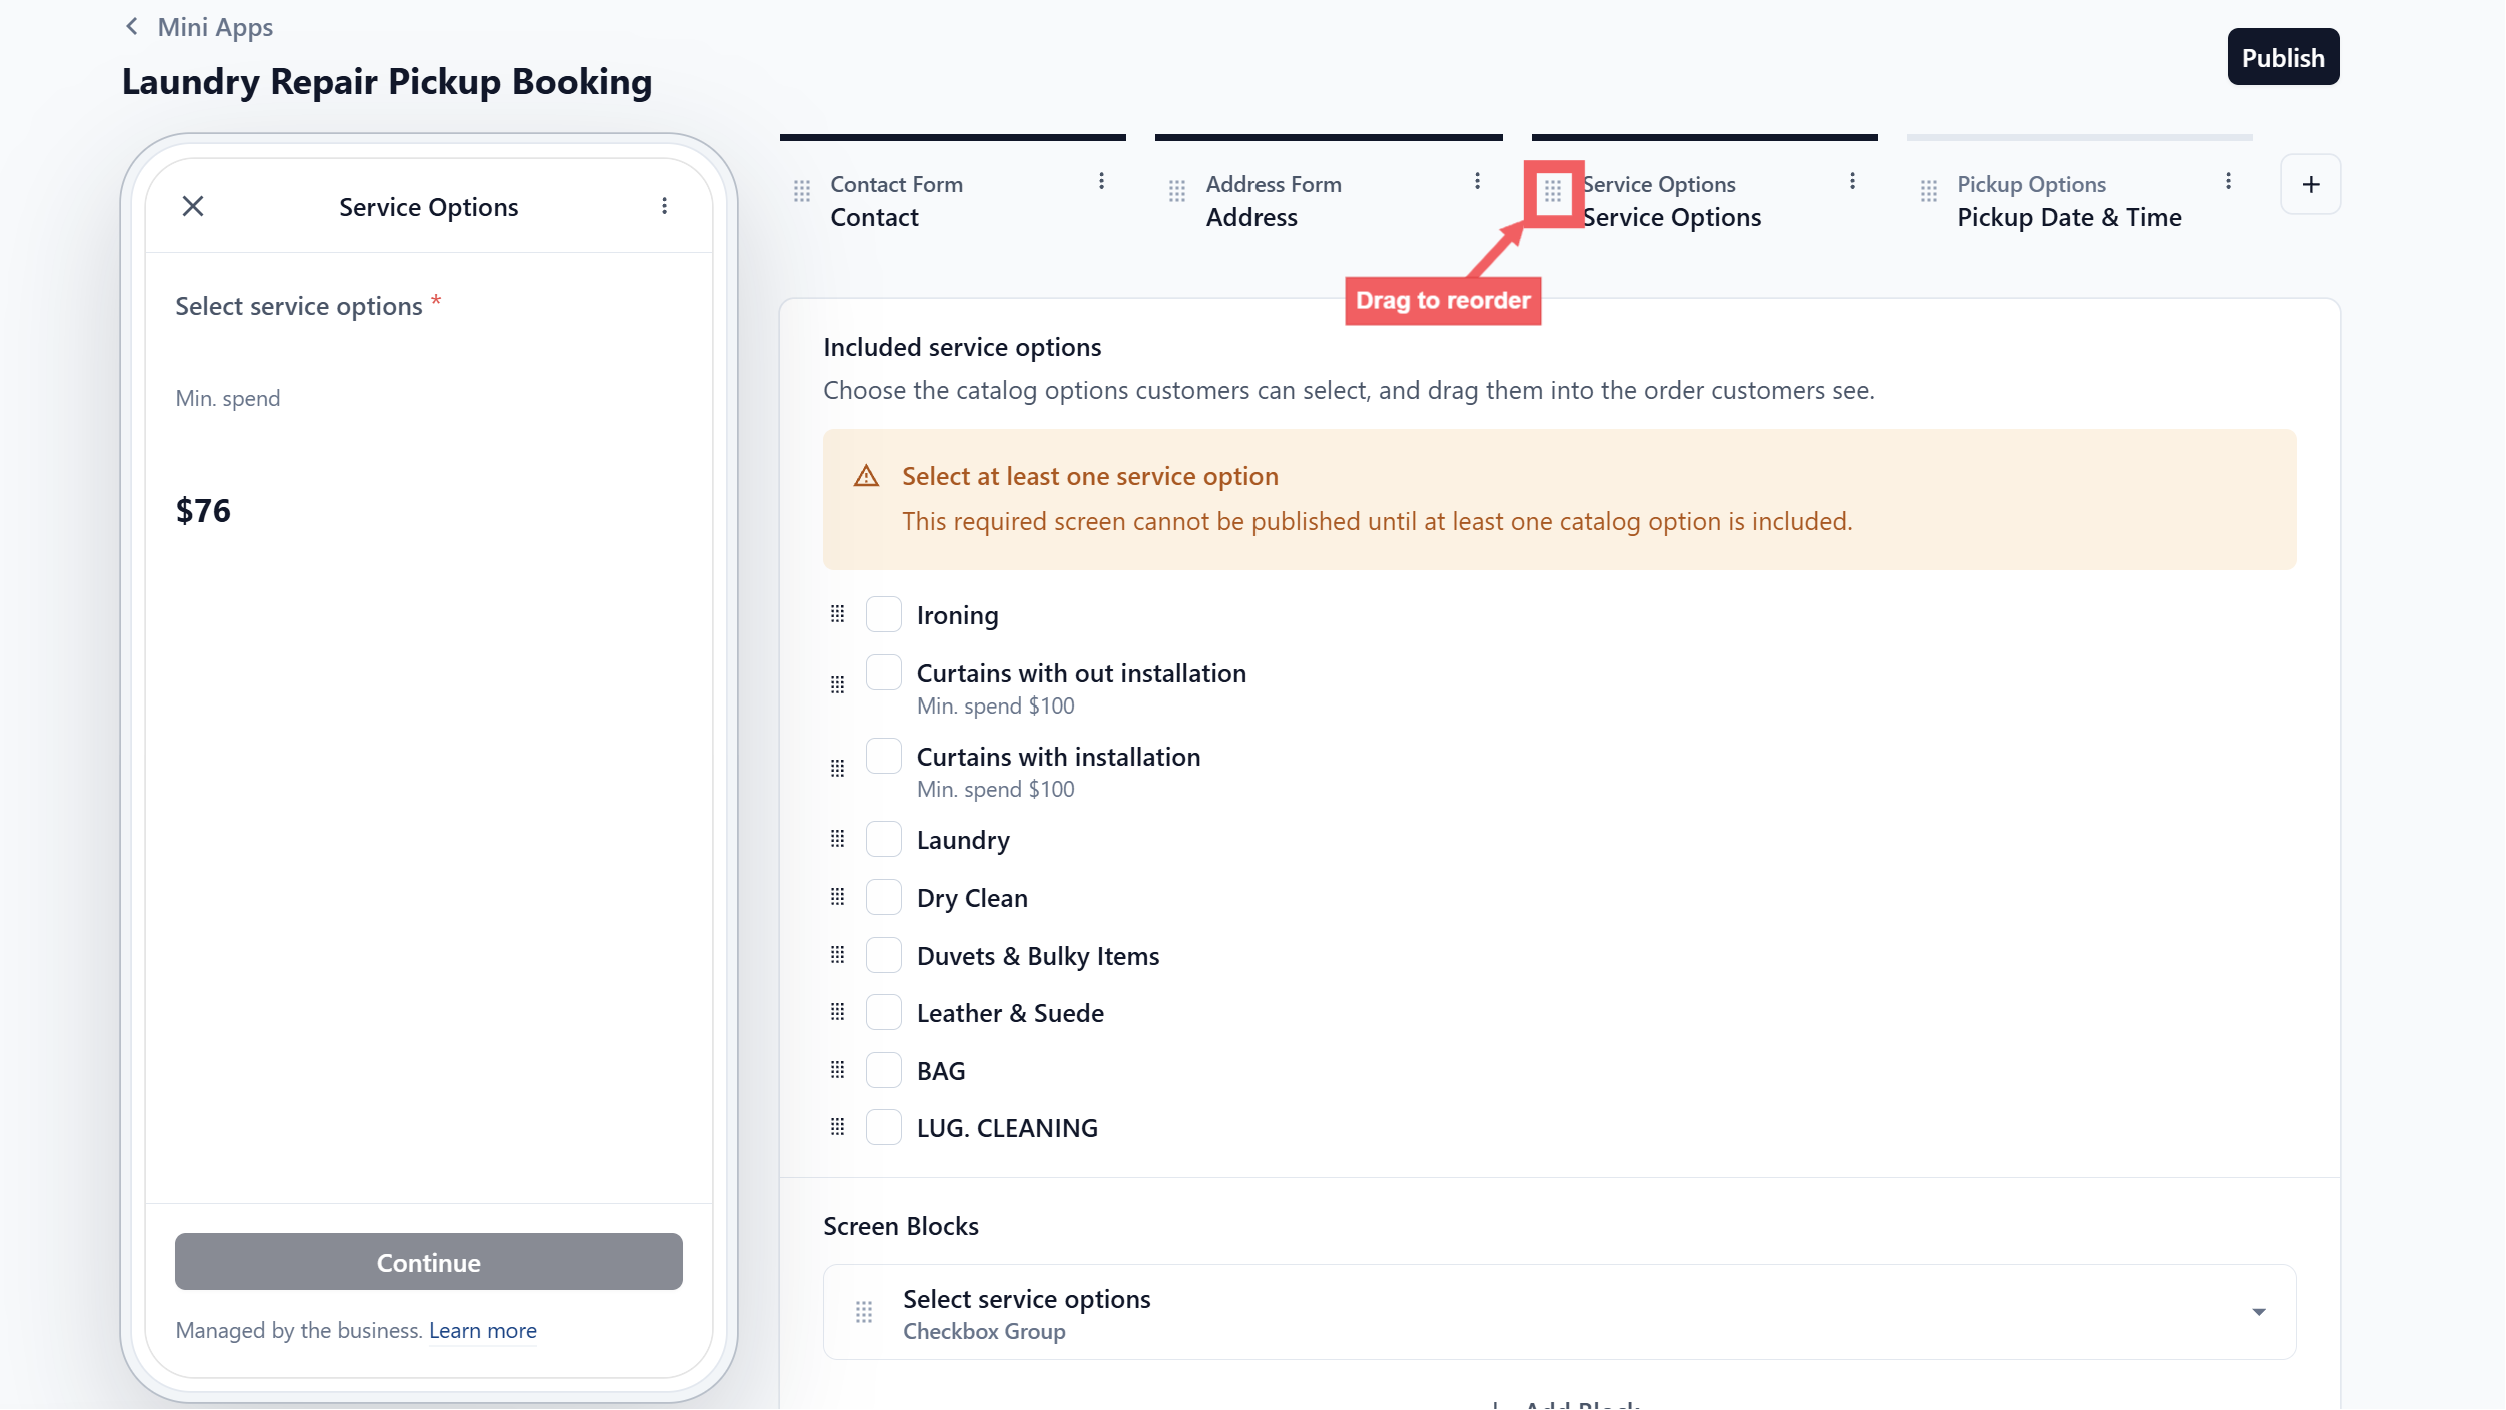
4. Open the screen settings and tick the service options you want to show.
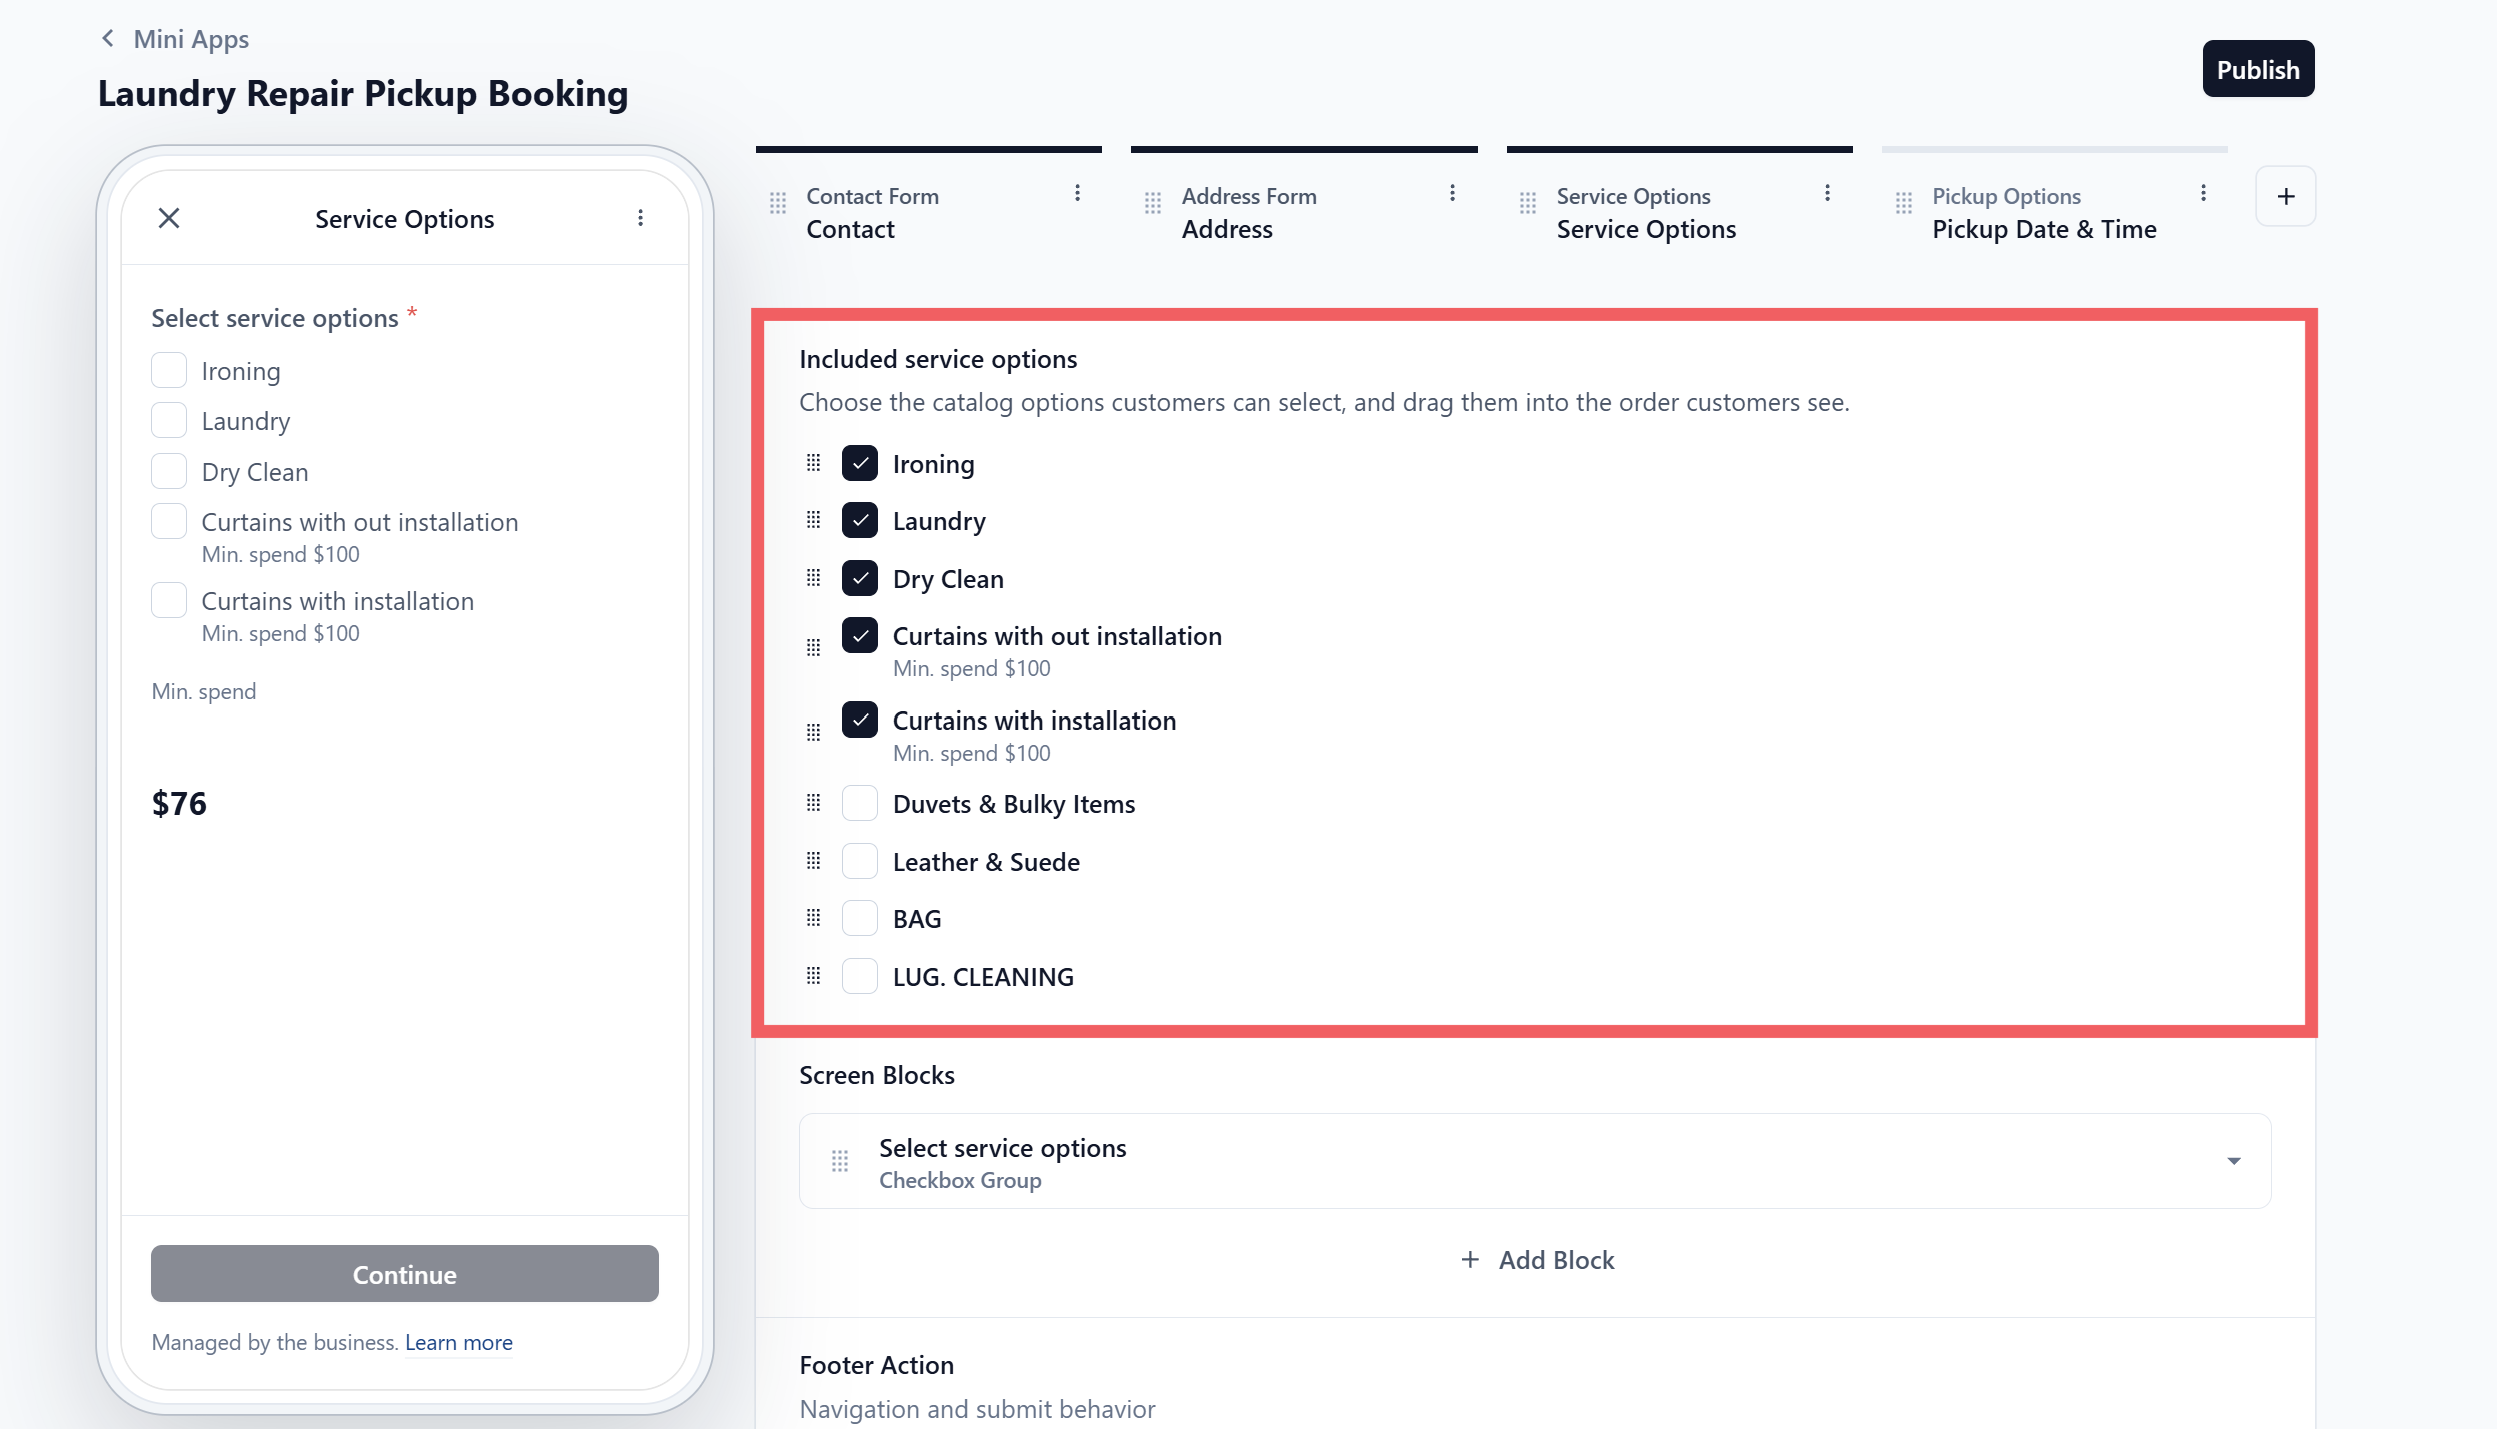
A Mini App screen can show up to 20 service options. If your catalog is longer, choose the services that customers request most often for pickup.
---
## Record the Condition of the Item
Repair and alteration shops need to know what is wrong with the item before collection, so your staff know what they are receiving.
Add this step when one item can have more than one problem. For example, a bag may have a broken zip, colour fading and mould at the same time. Letting the customer tick every issue gives your team a clearer idea of what is coming. It also reduces the chance that your staff must call the customer before arranging the inspection.
The customer's answers describe what they noticed before collection. Your team should still inspect the item after it arrives before confirming the final work, price and completion date.
**Step 1. Create the field**
1. Go to Settings, Library section, Custom Fields.
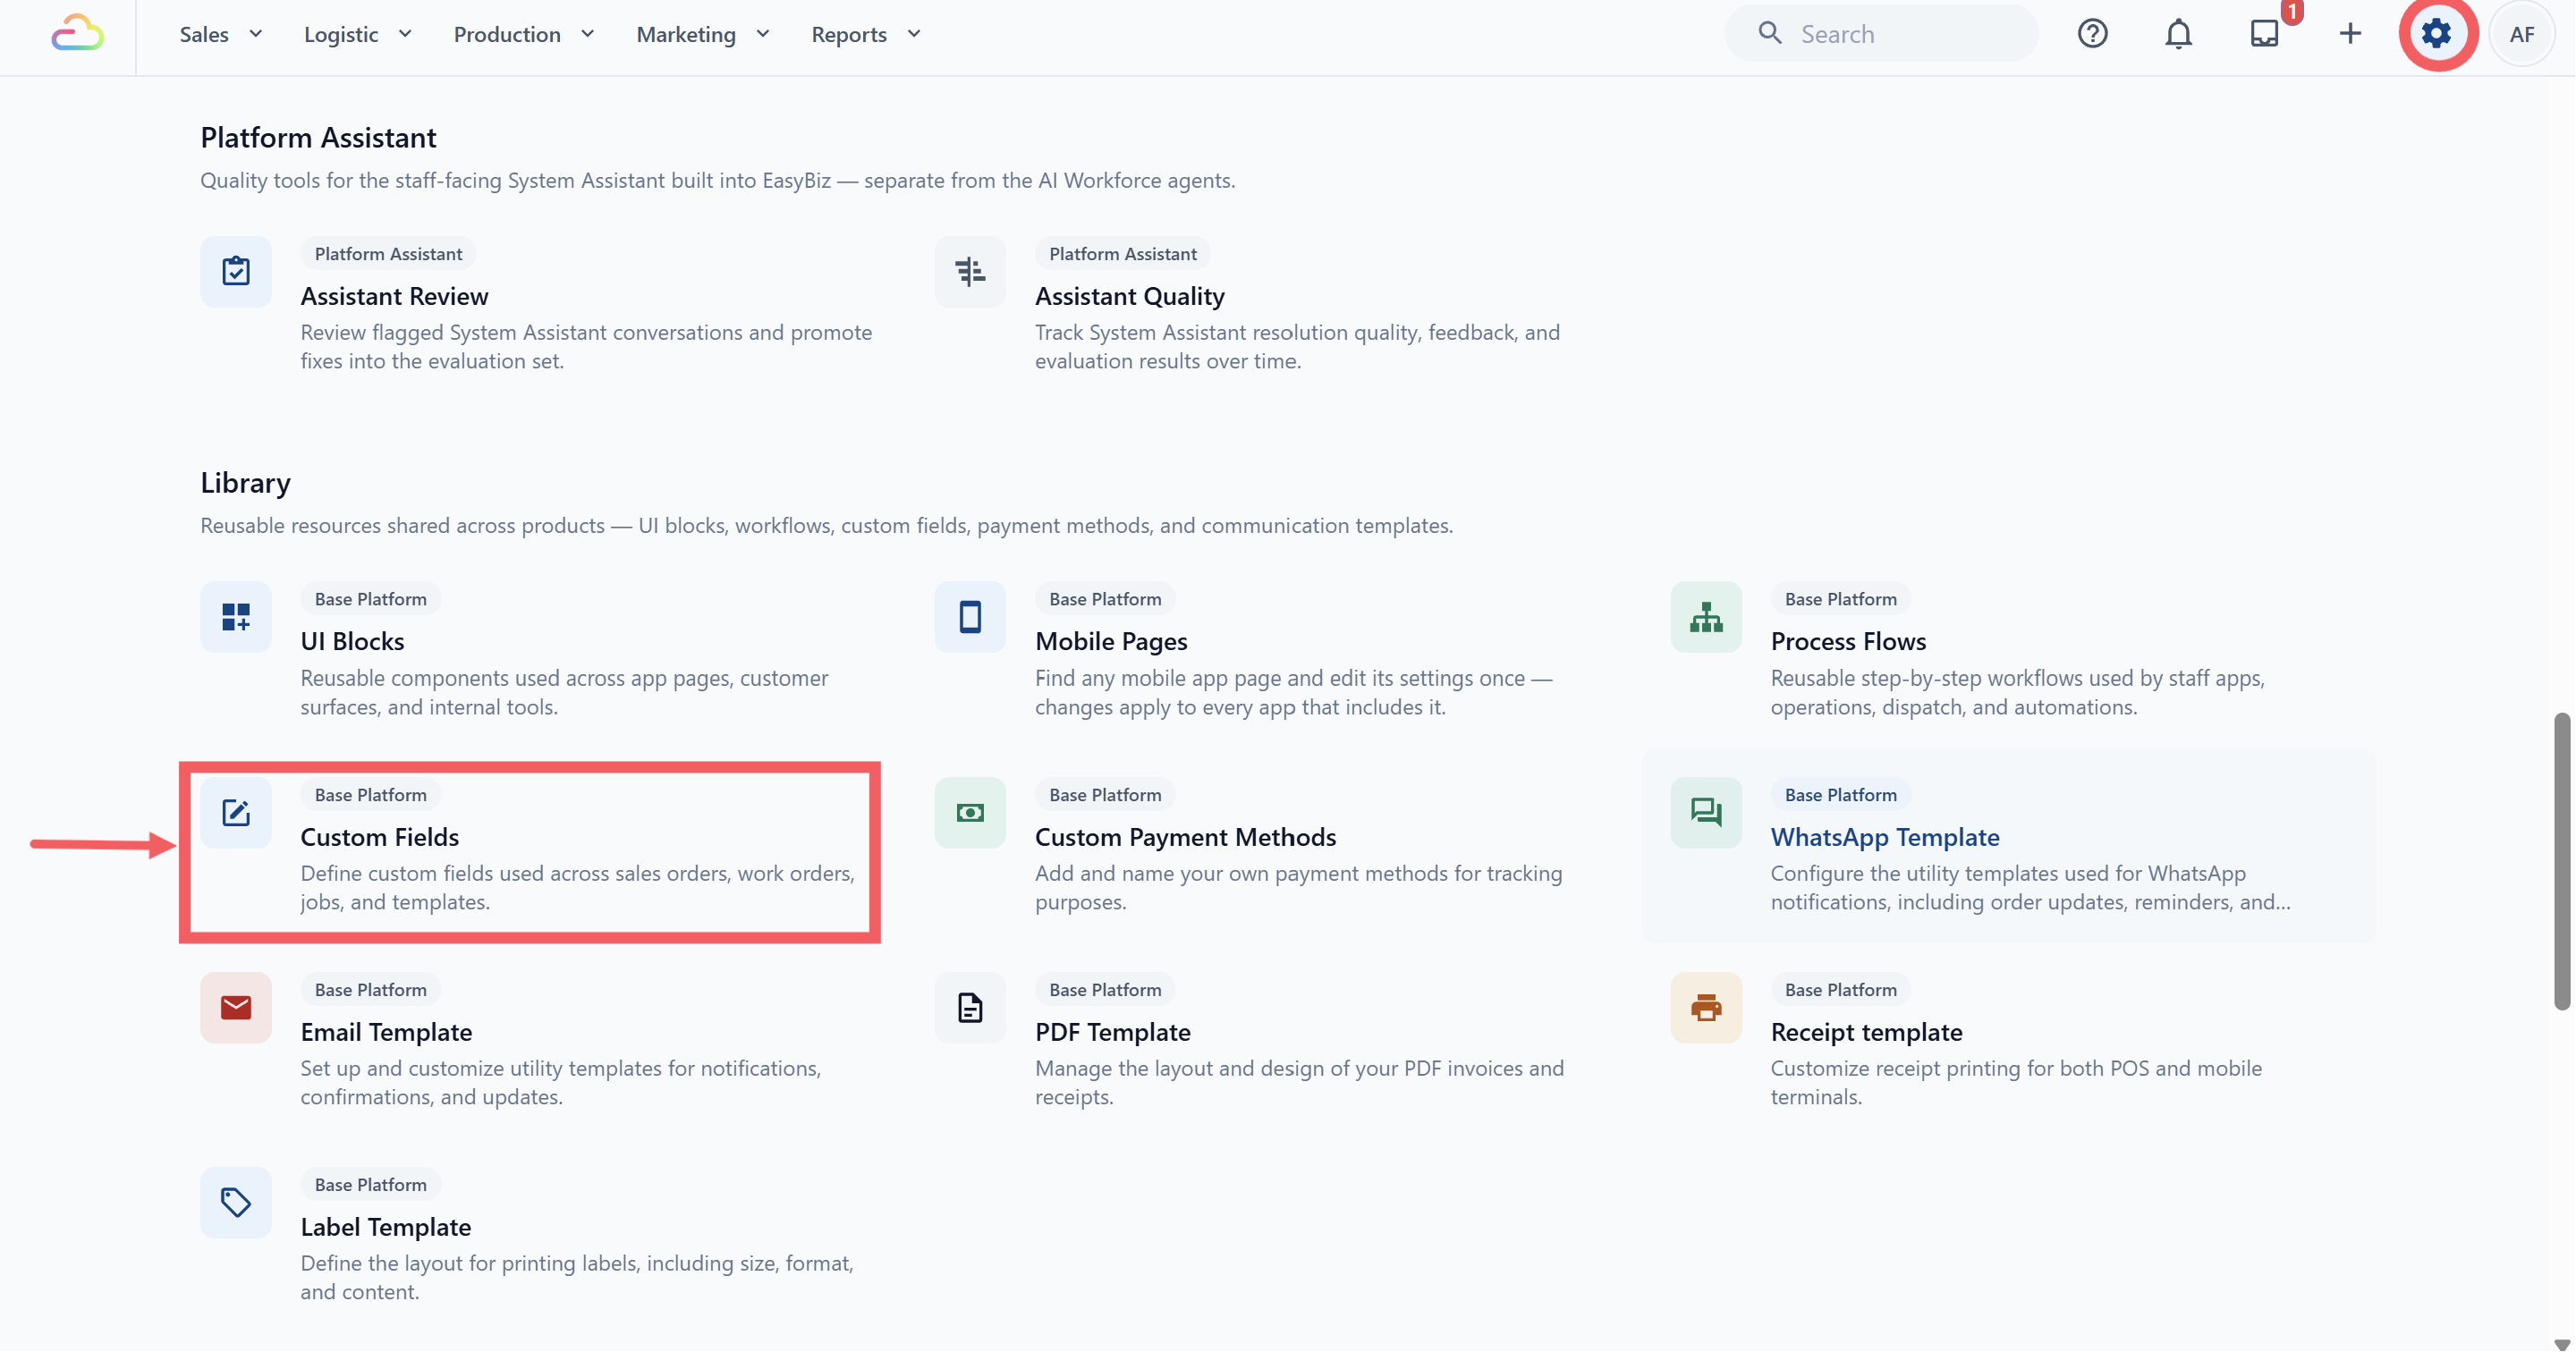
2. Click Add Data Field. Name it Item Issue and choose Options as the Data type.
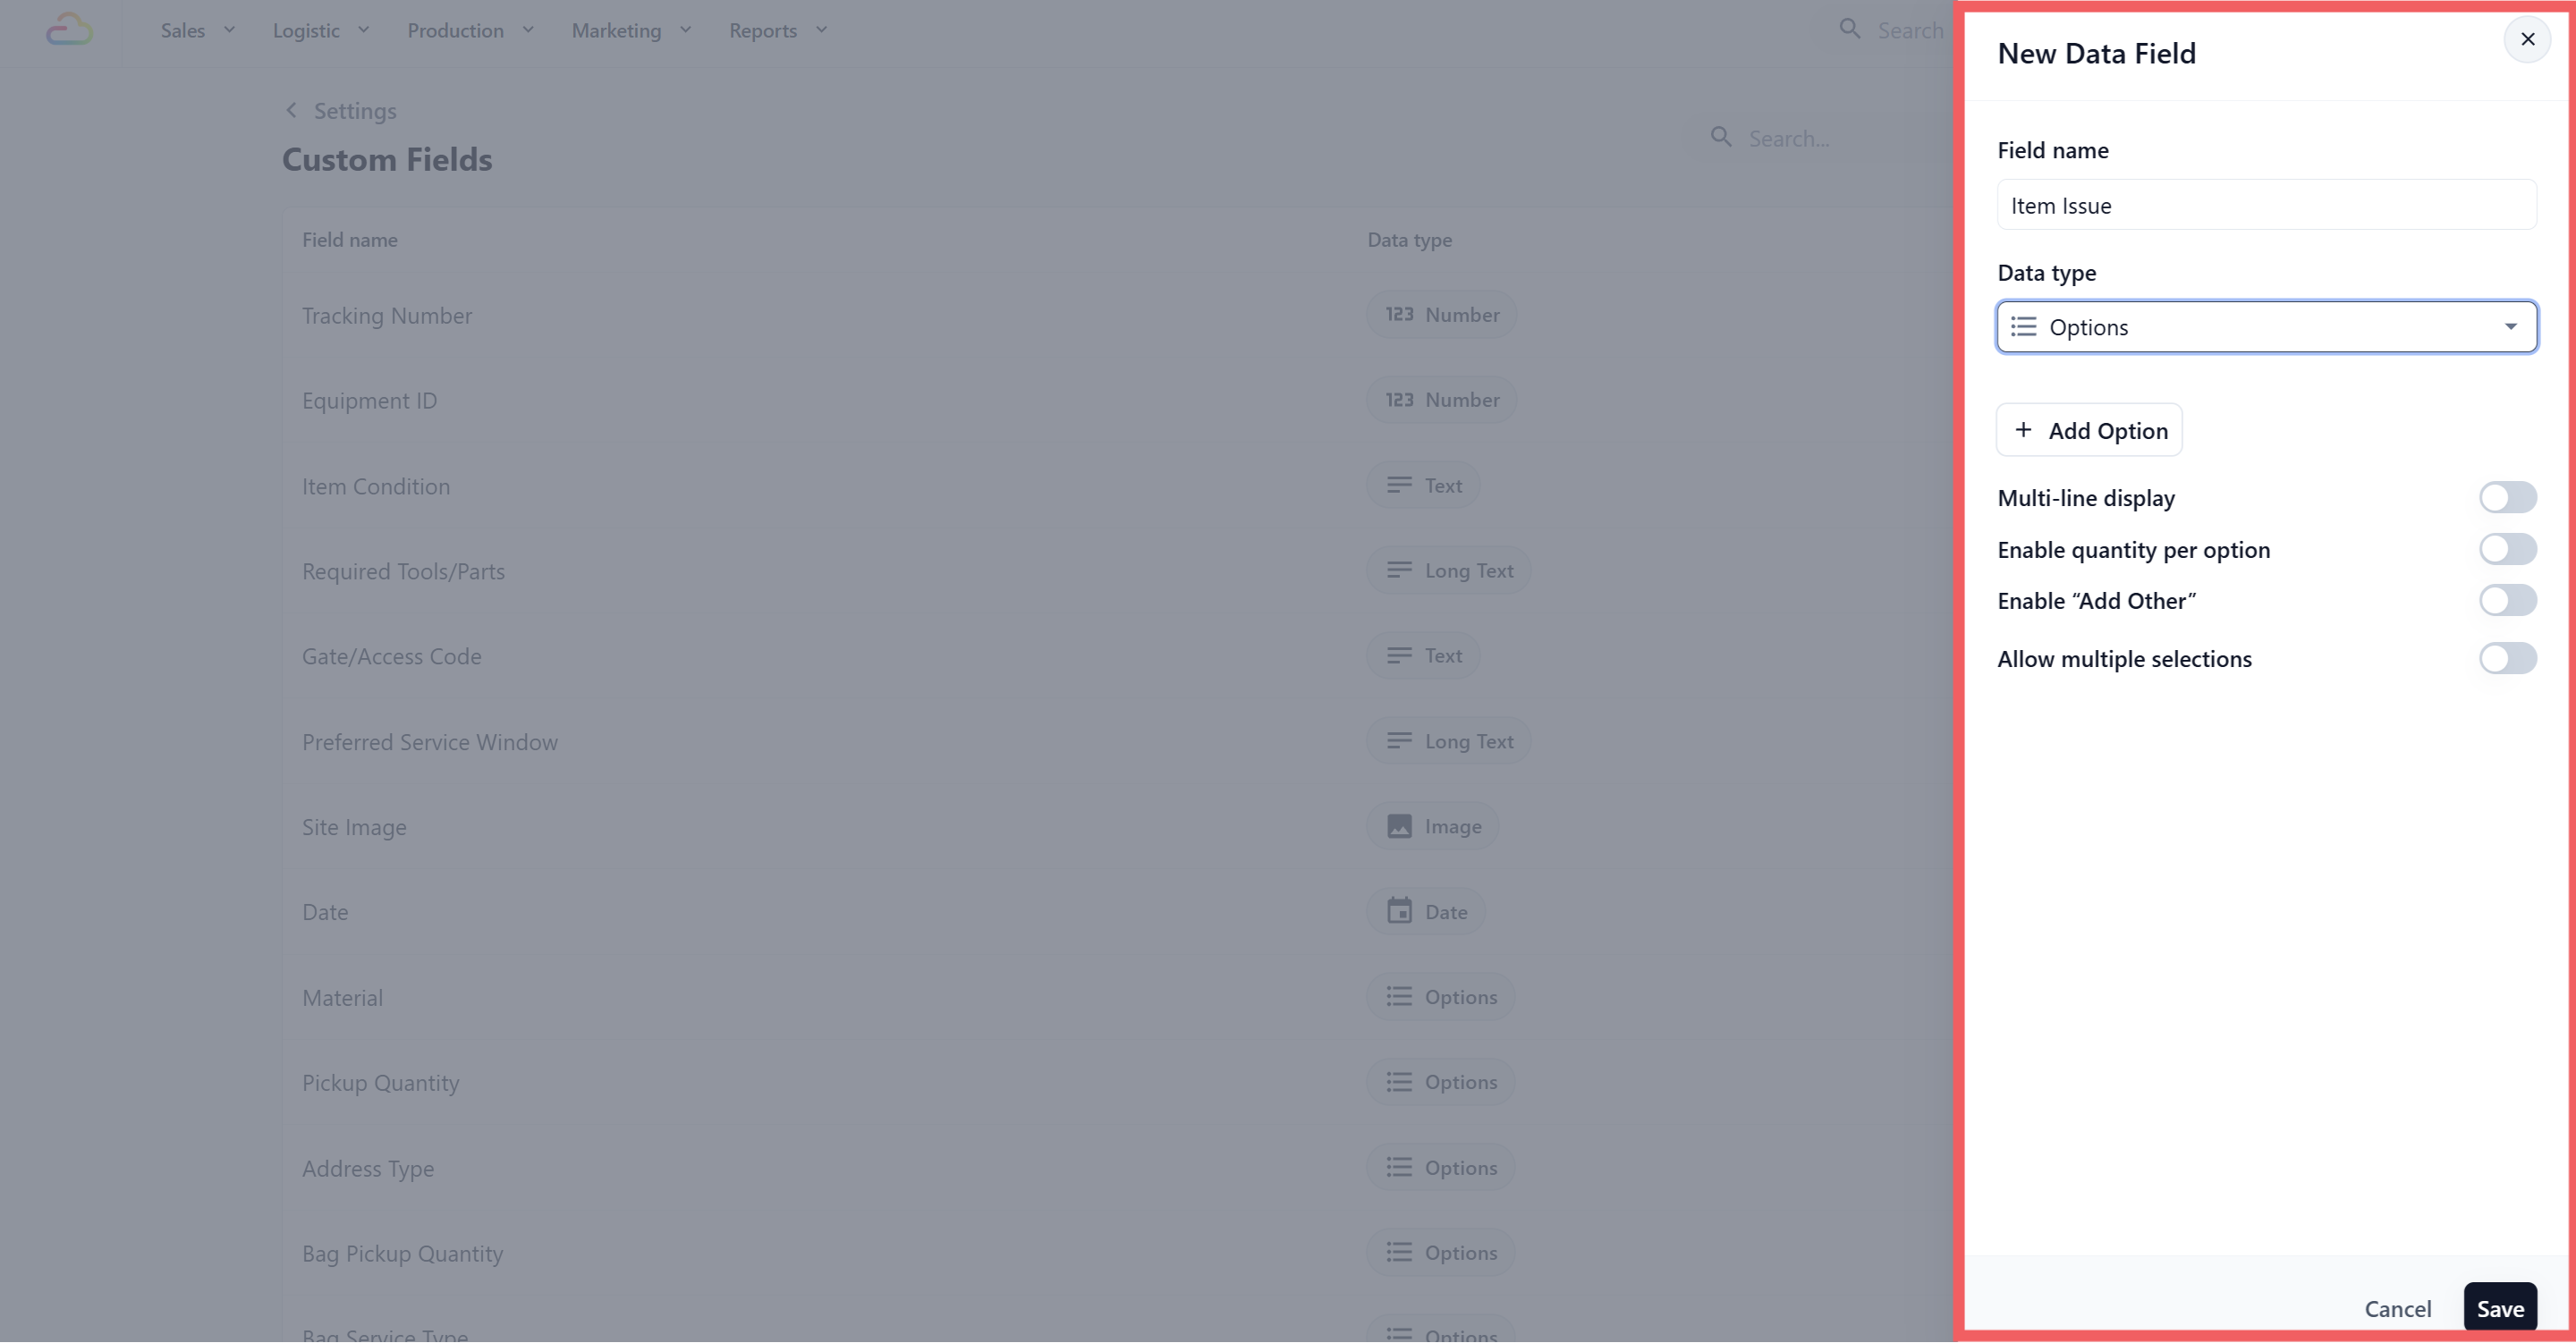
3. Type your choices, for example Dirty or needs cleaning, Stain marks, Colour fading, Mould or smell, Torn seam, Broken zip. Click Save.
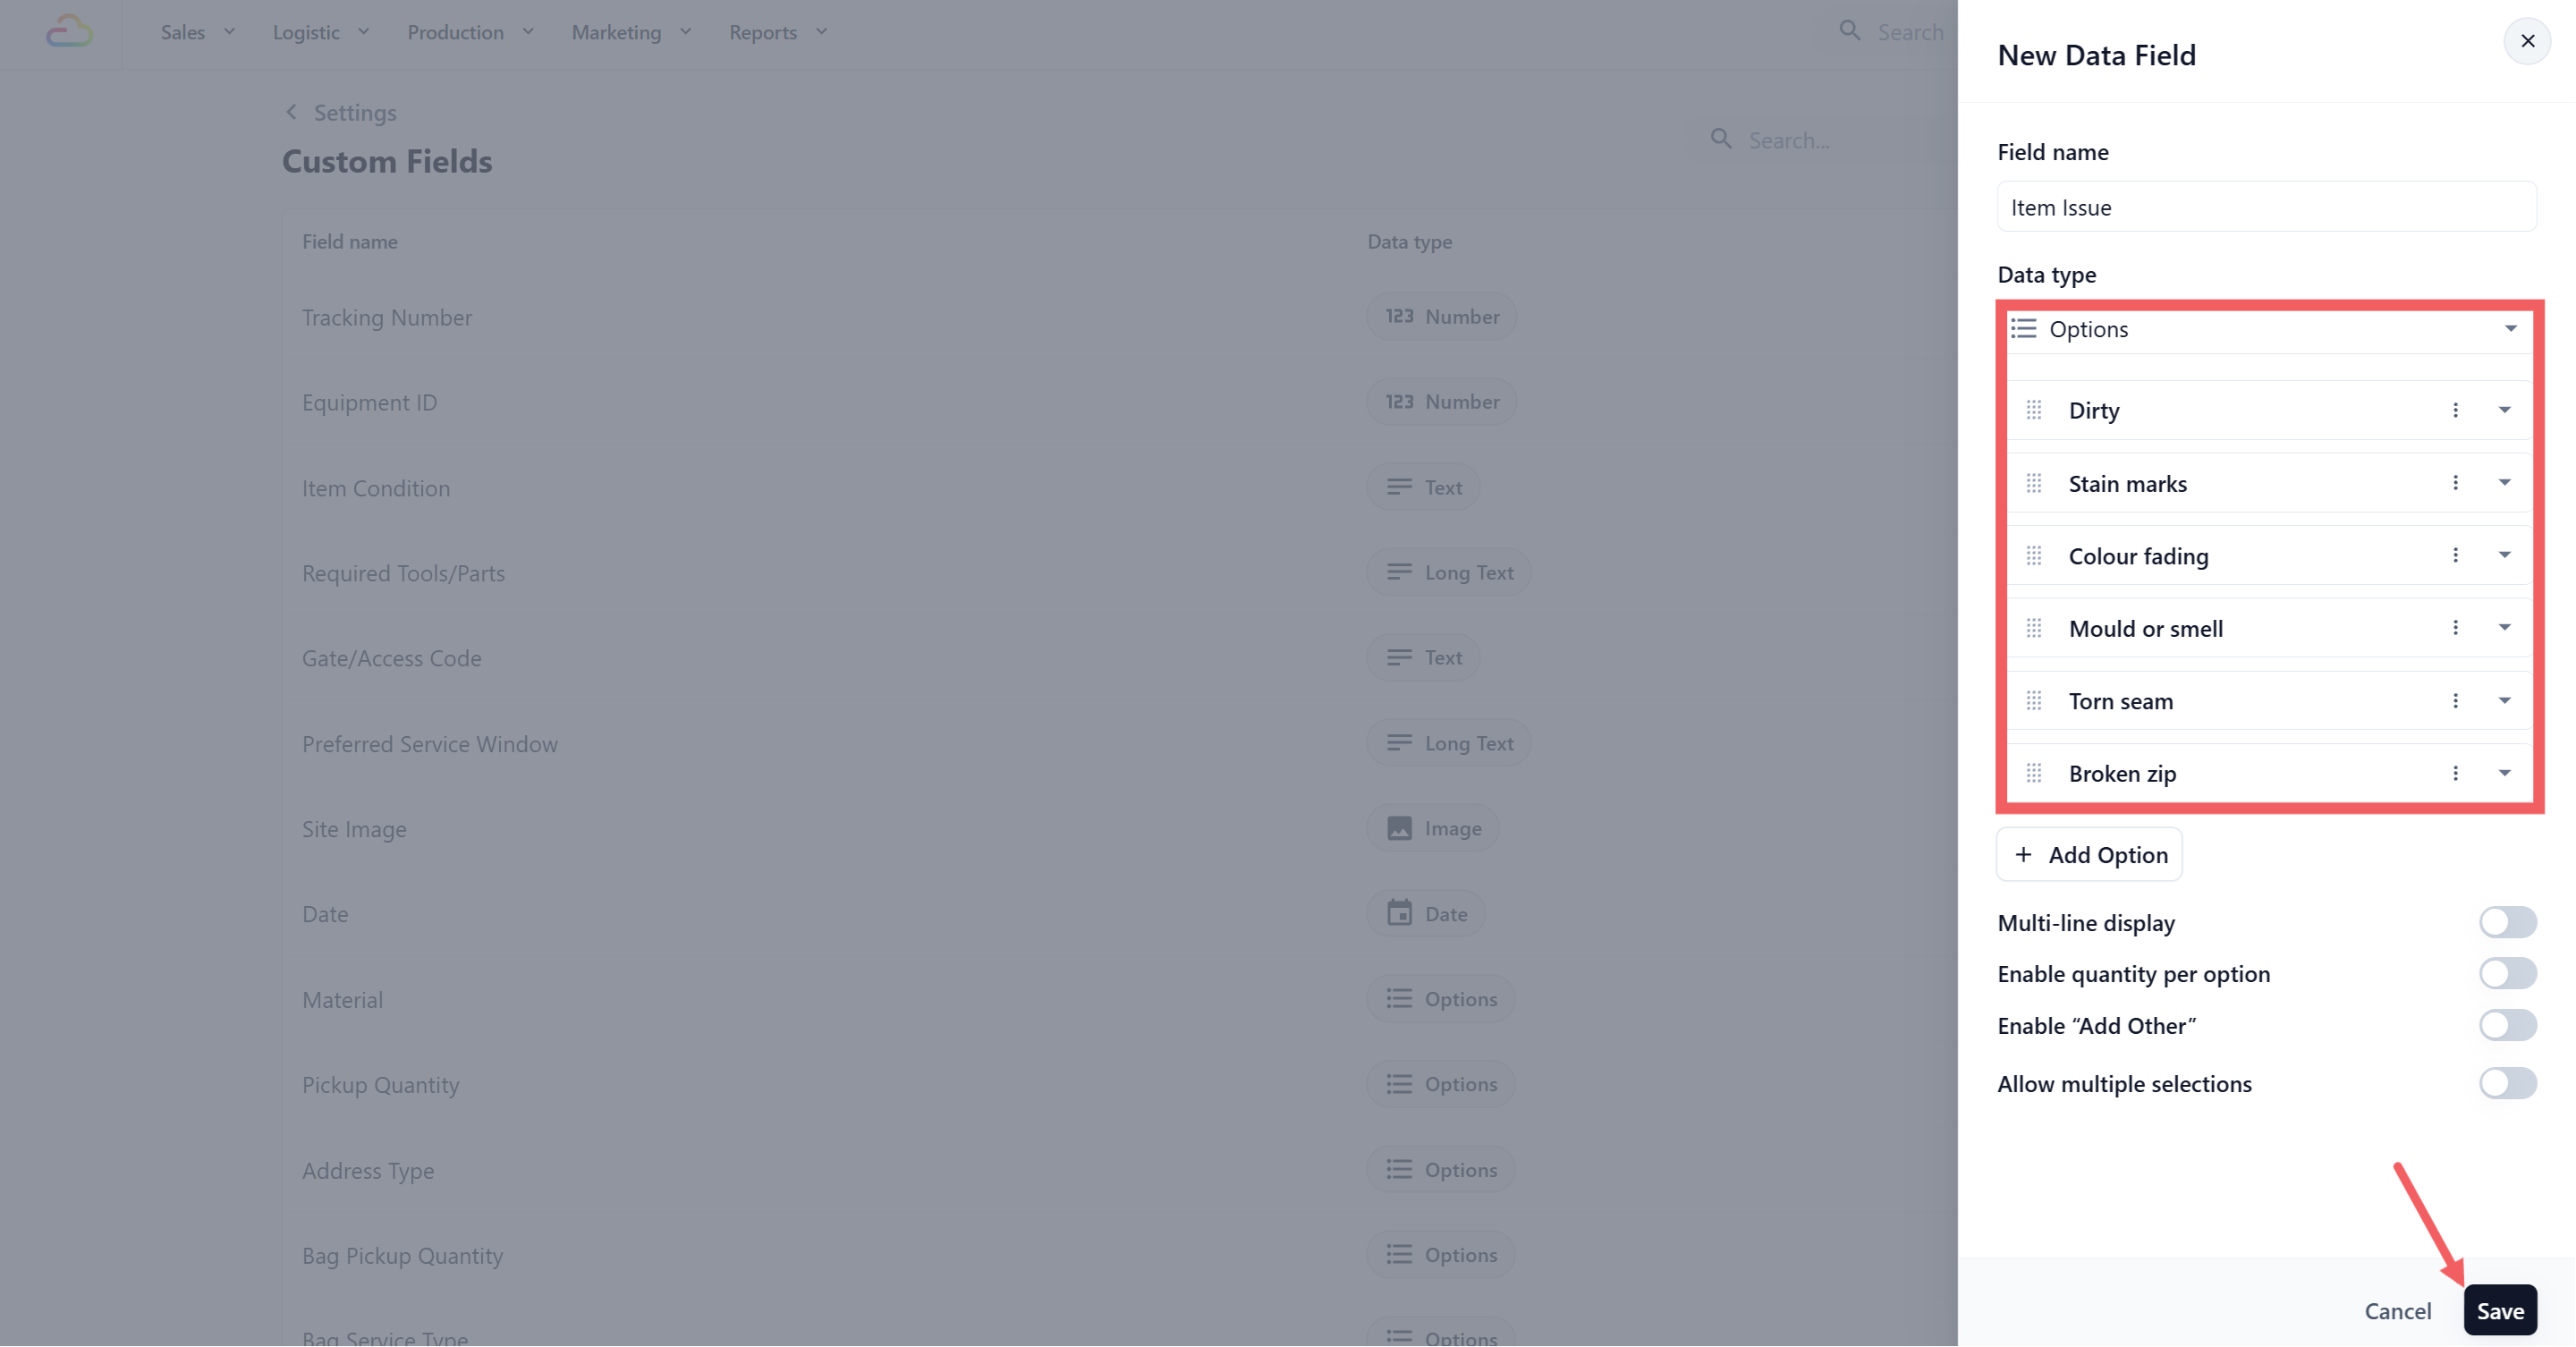
Options is the data type you choose in Custom Fields. Dropdown and Checkbox Group are block types you choose inside the Mini App editor. One holds the list of answers, the other decides how the customer picks from it.
**Step 2. Add the screen**
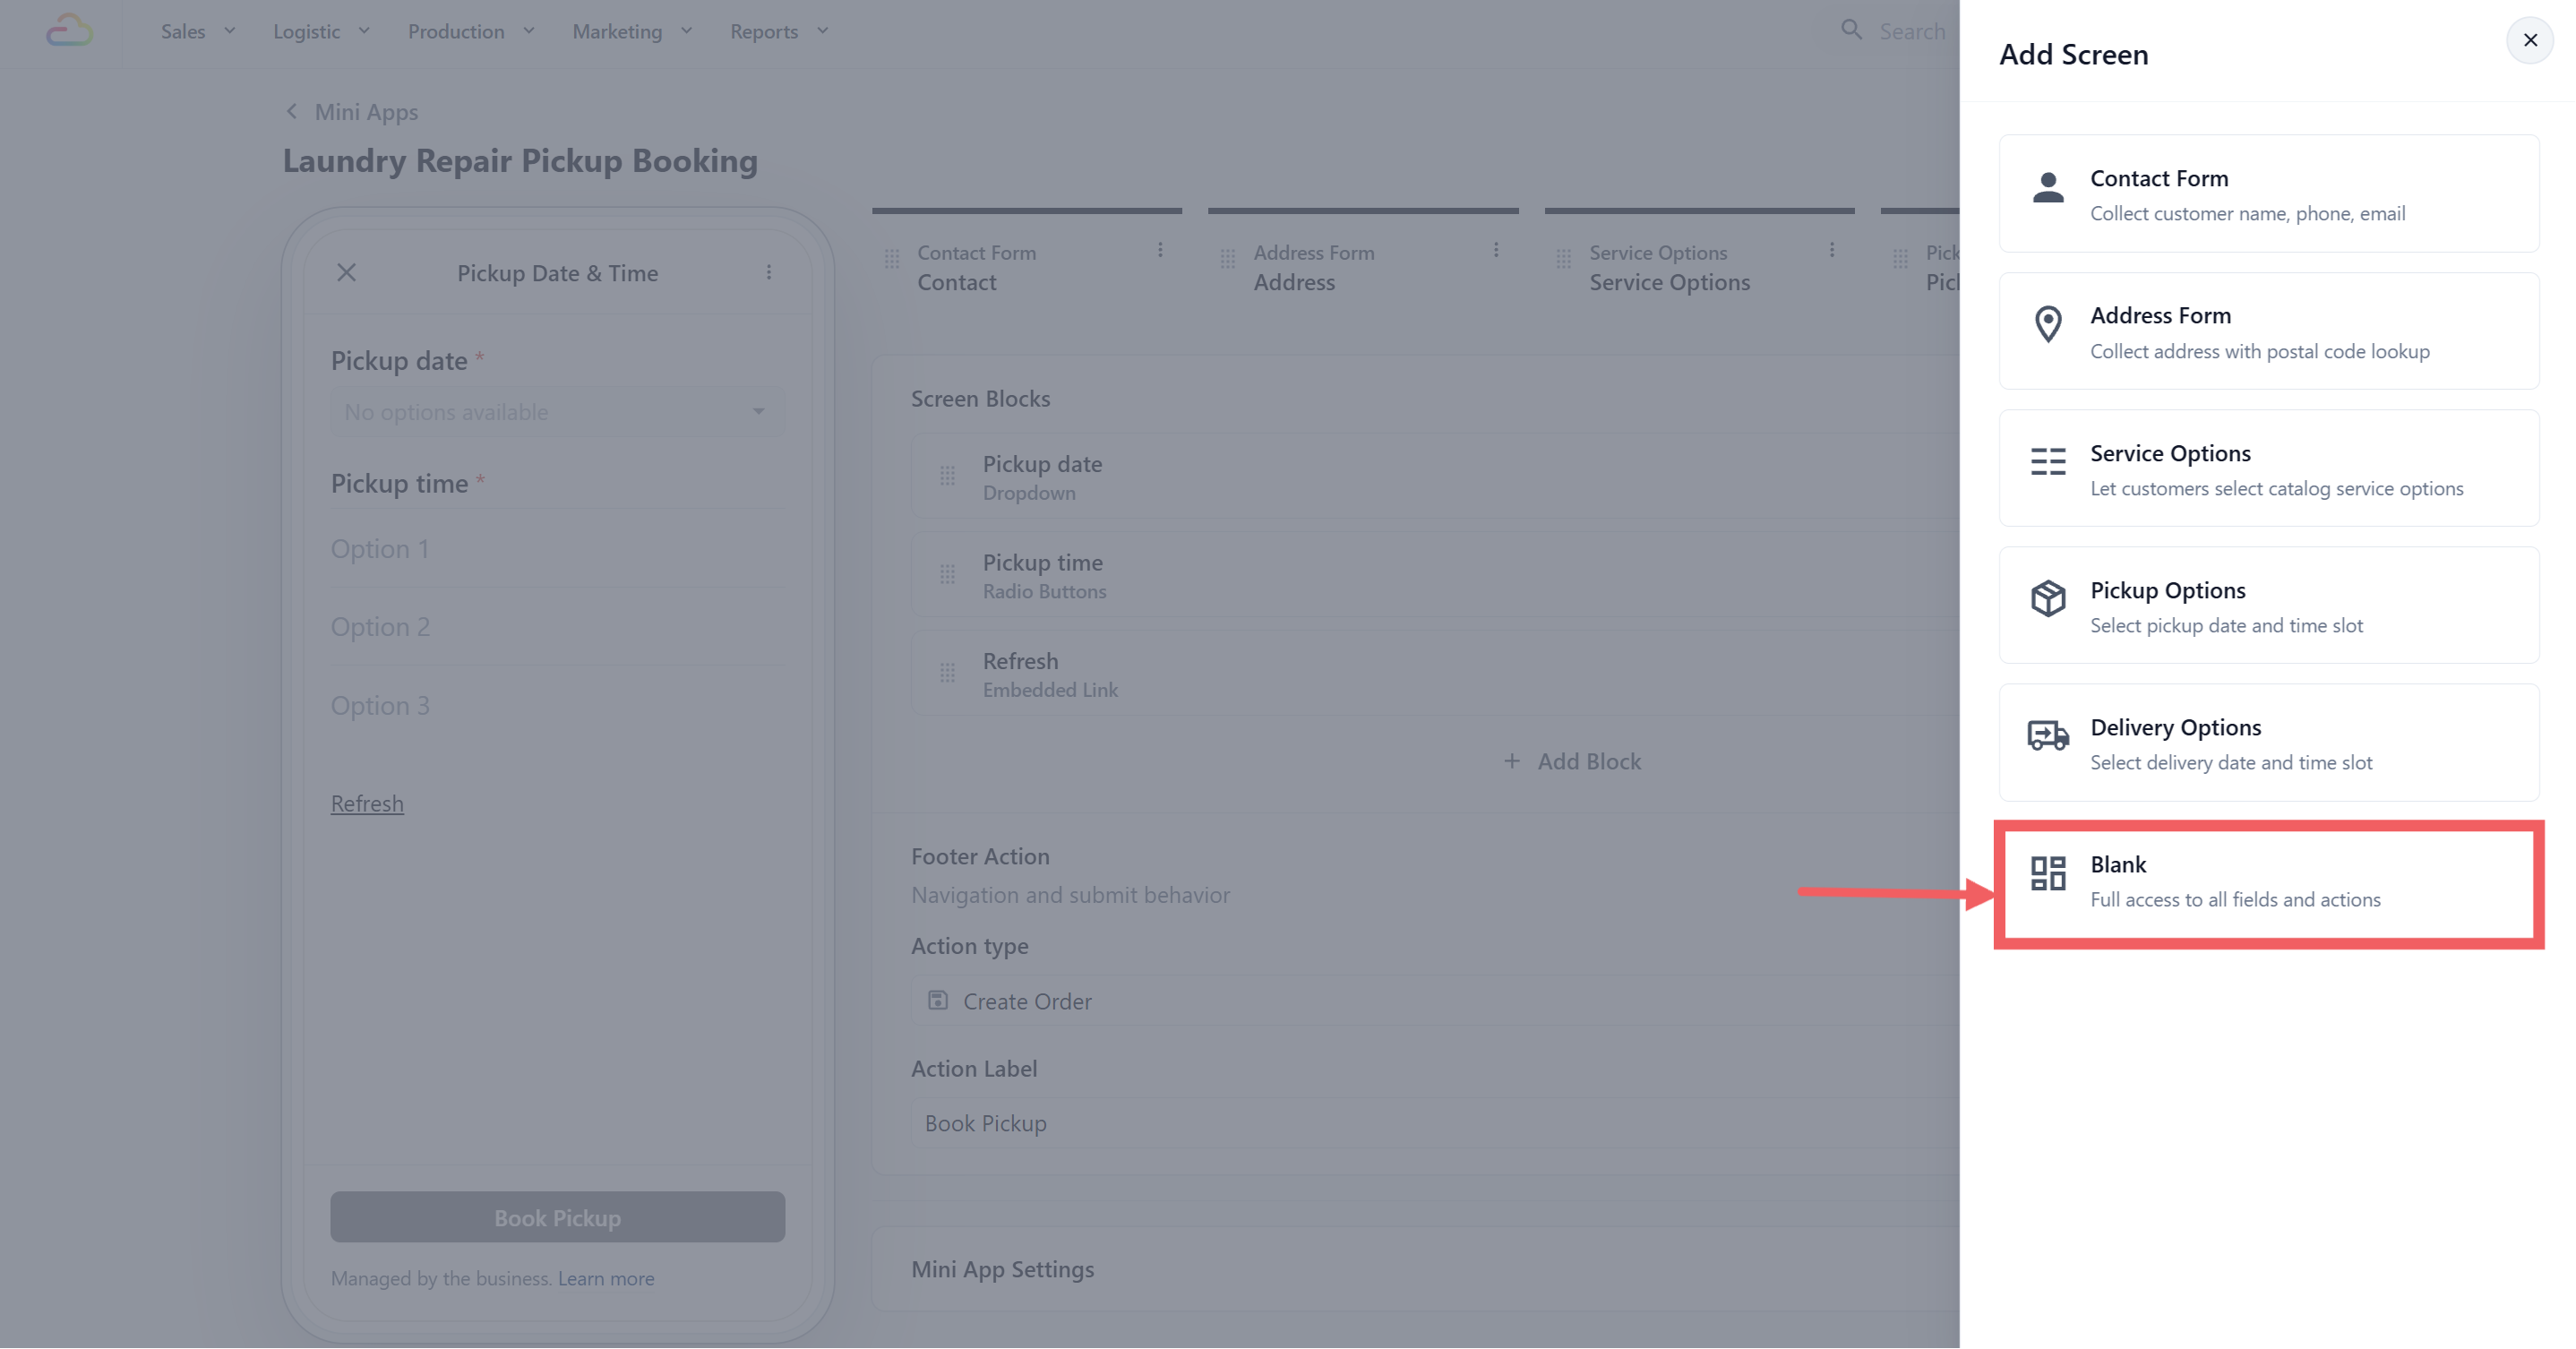
1. In the editor, click + at the end of the screen row.
2. Choose Blank.
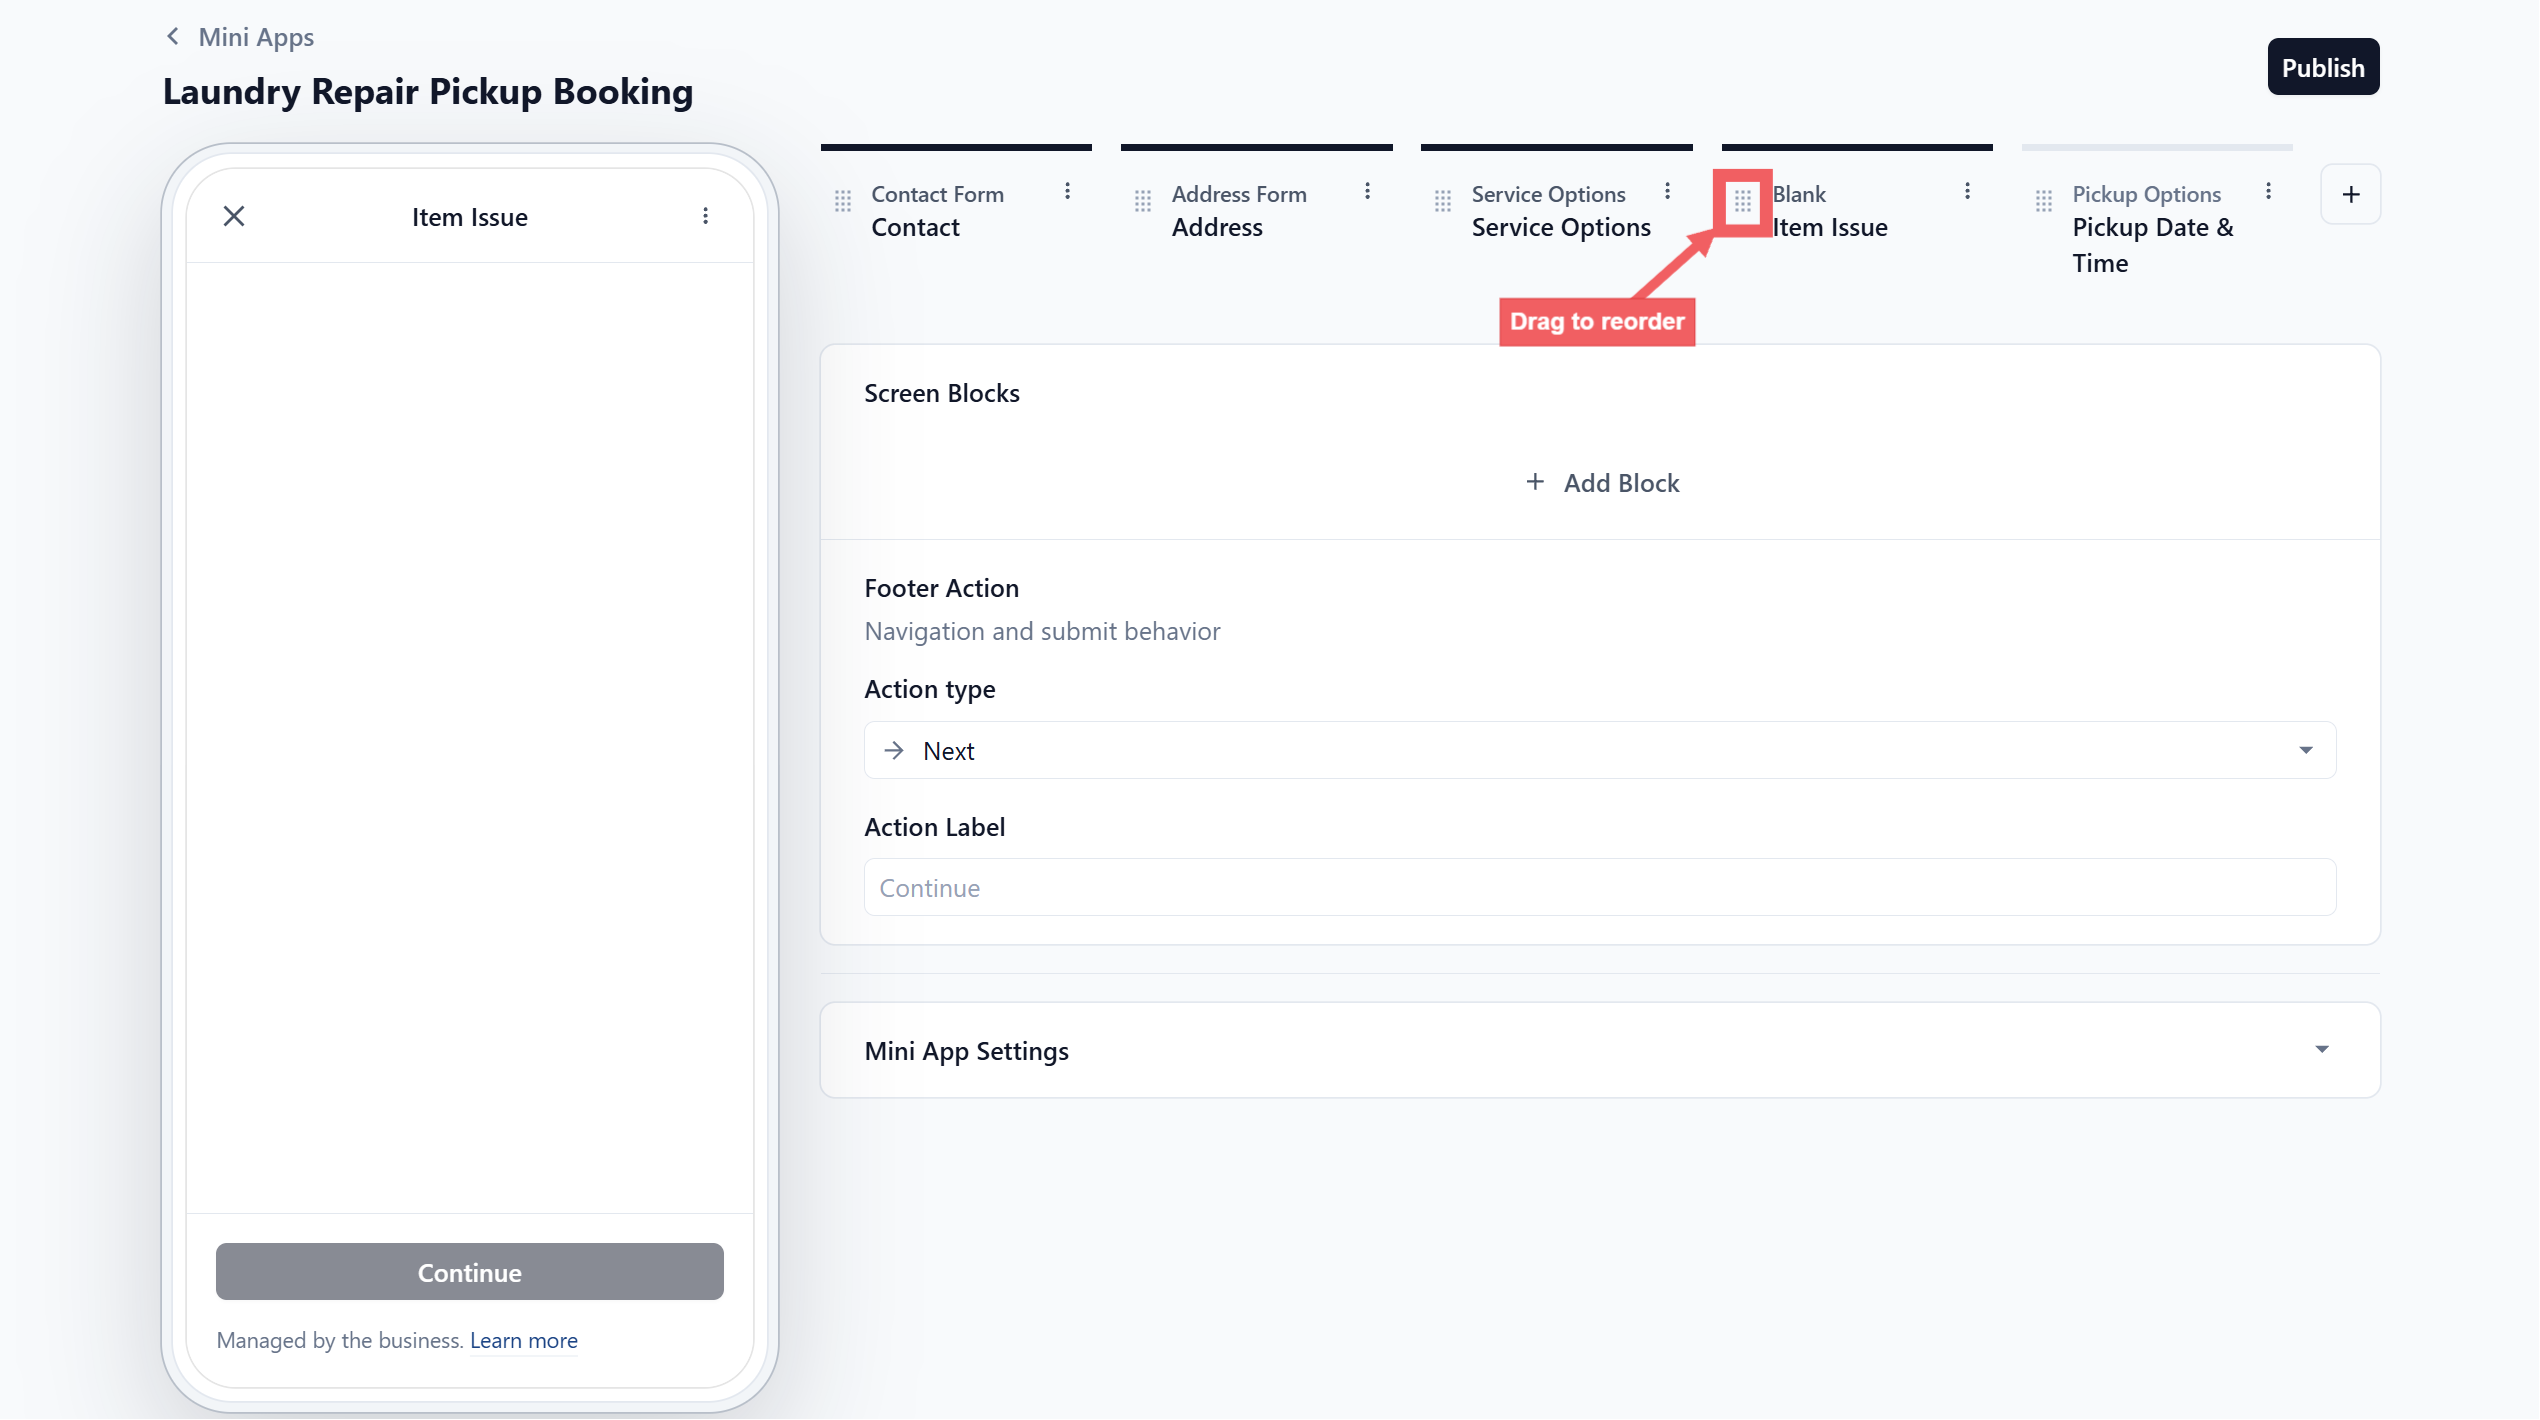
3. Name it Item Issue, and click Add.
4. Drag it so it sits after Service Options and before Pickup Date & Time.
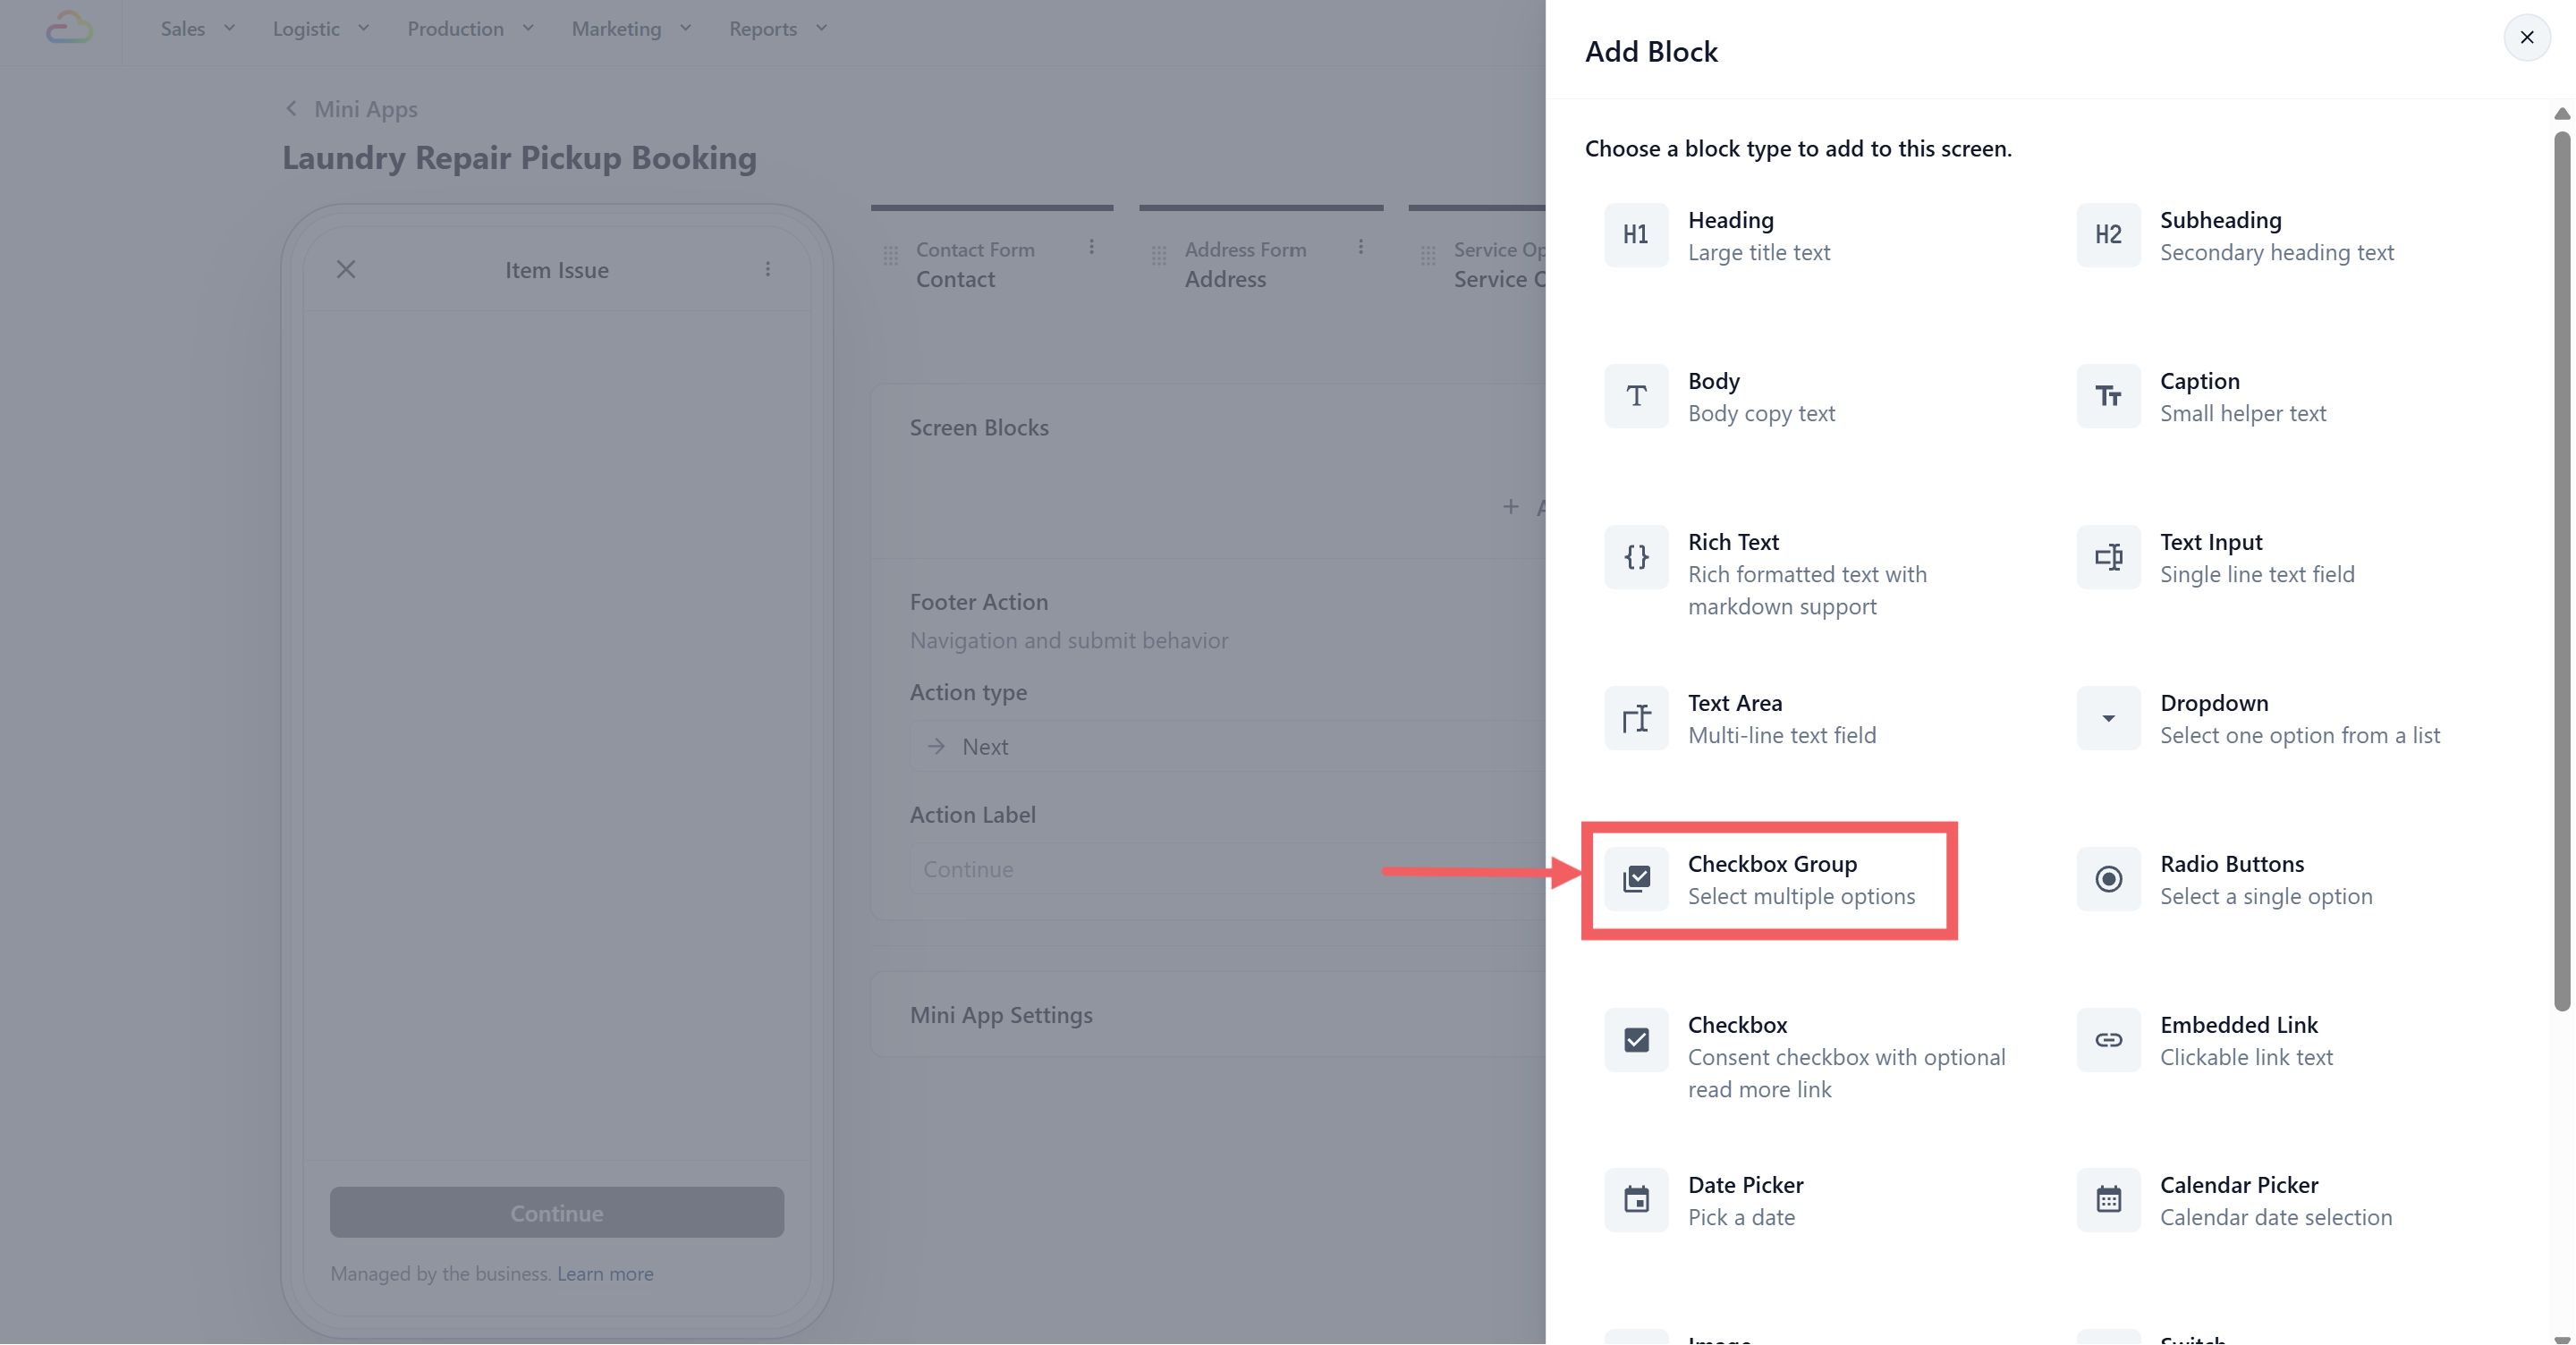
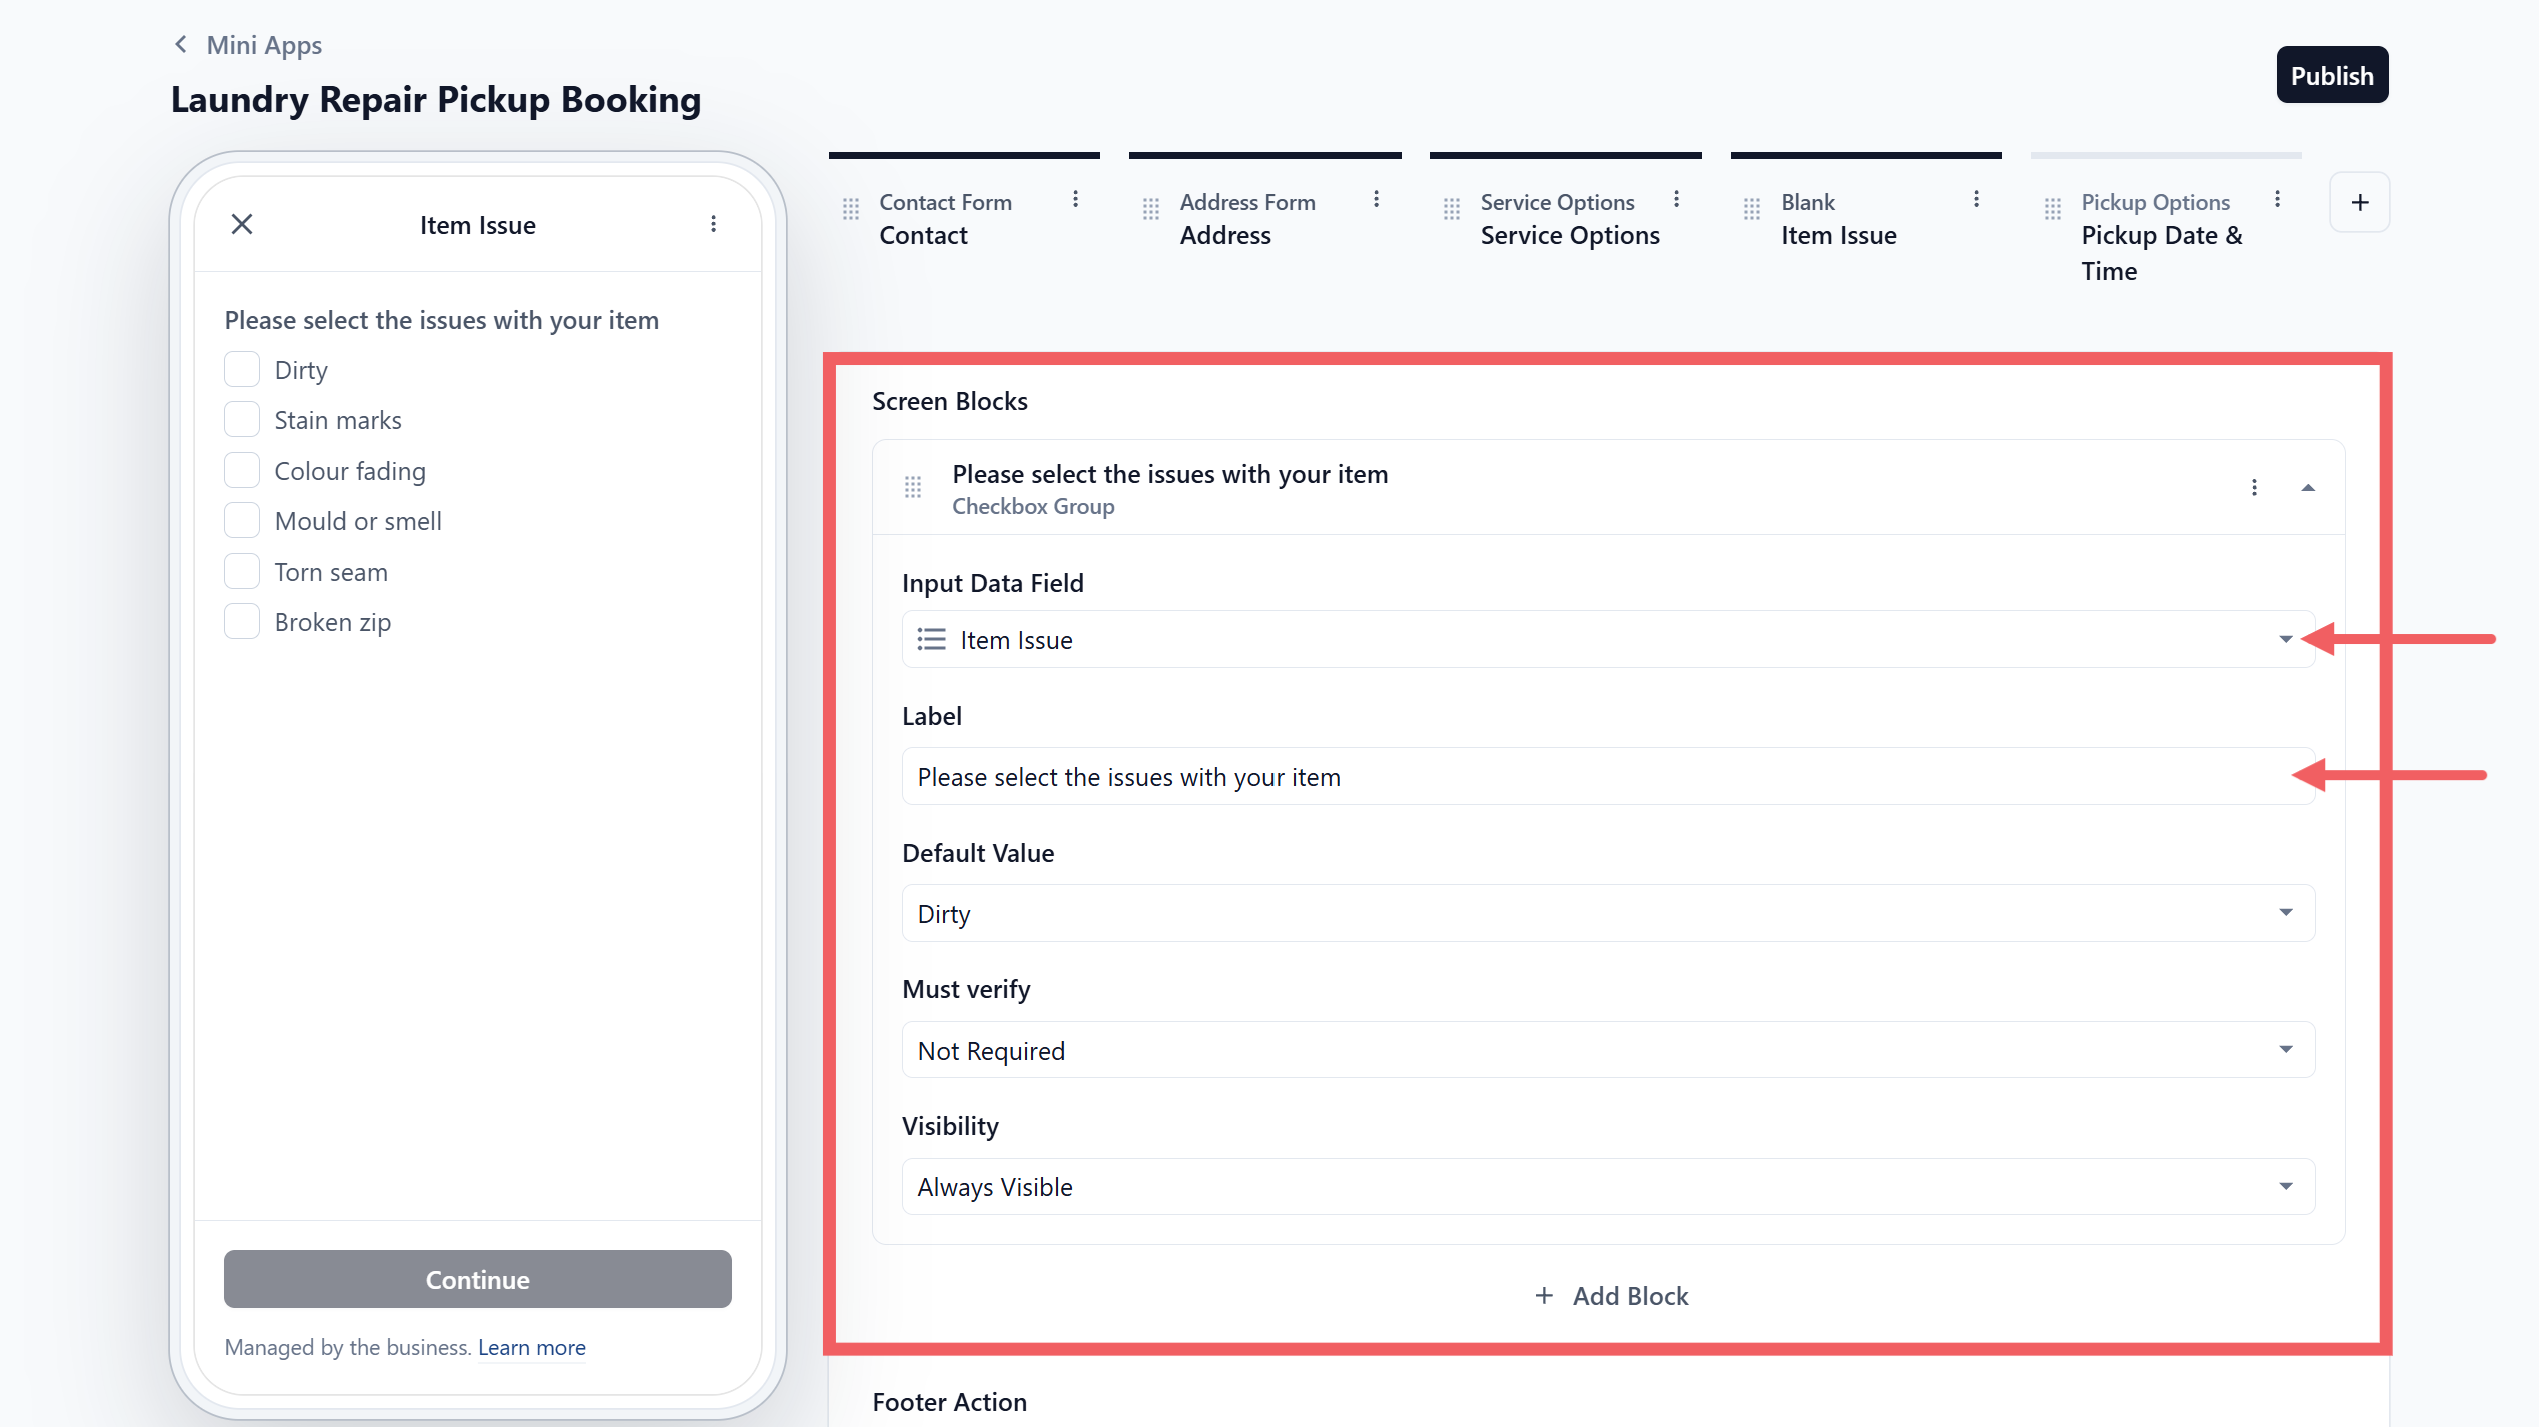
5. Inside the new screen, click Add Block and choose Checkbox Group, so the customer can tick more than one issue. A Dropdown or Radio Buttons block would only let them pick one.
6. Open the block settings, set Input Data Field to Item Issue, and set the Label to Please select the issues with your item.
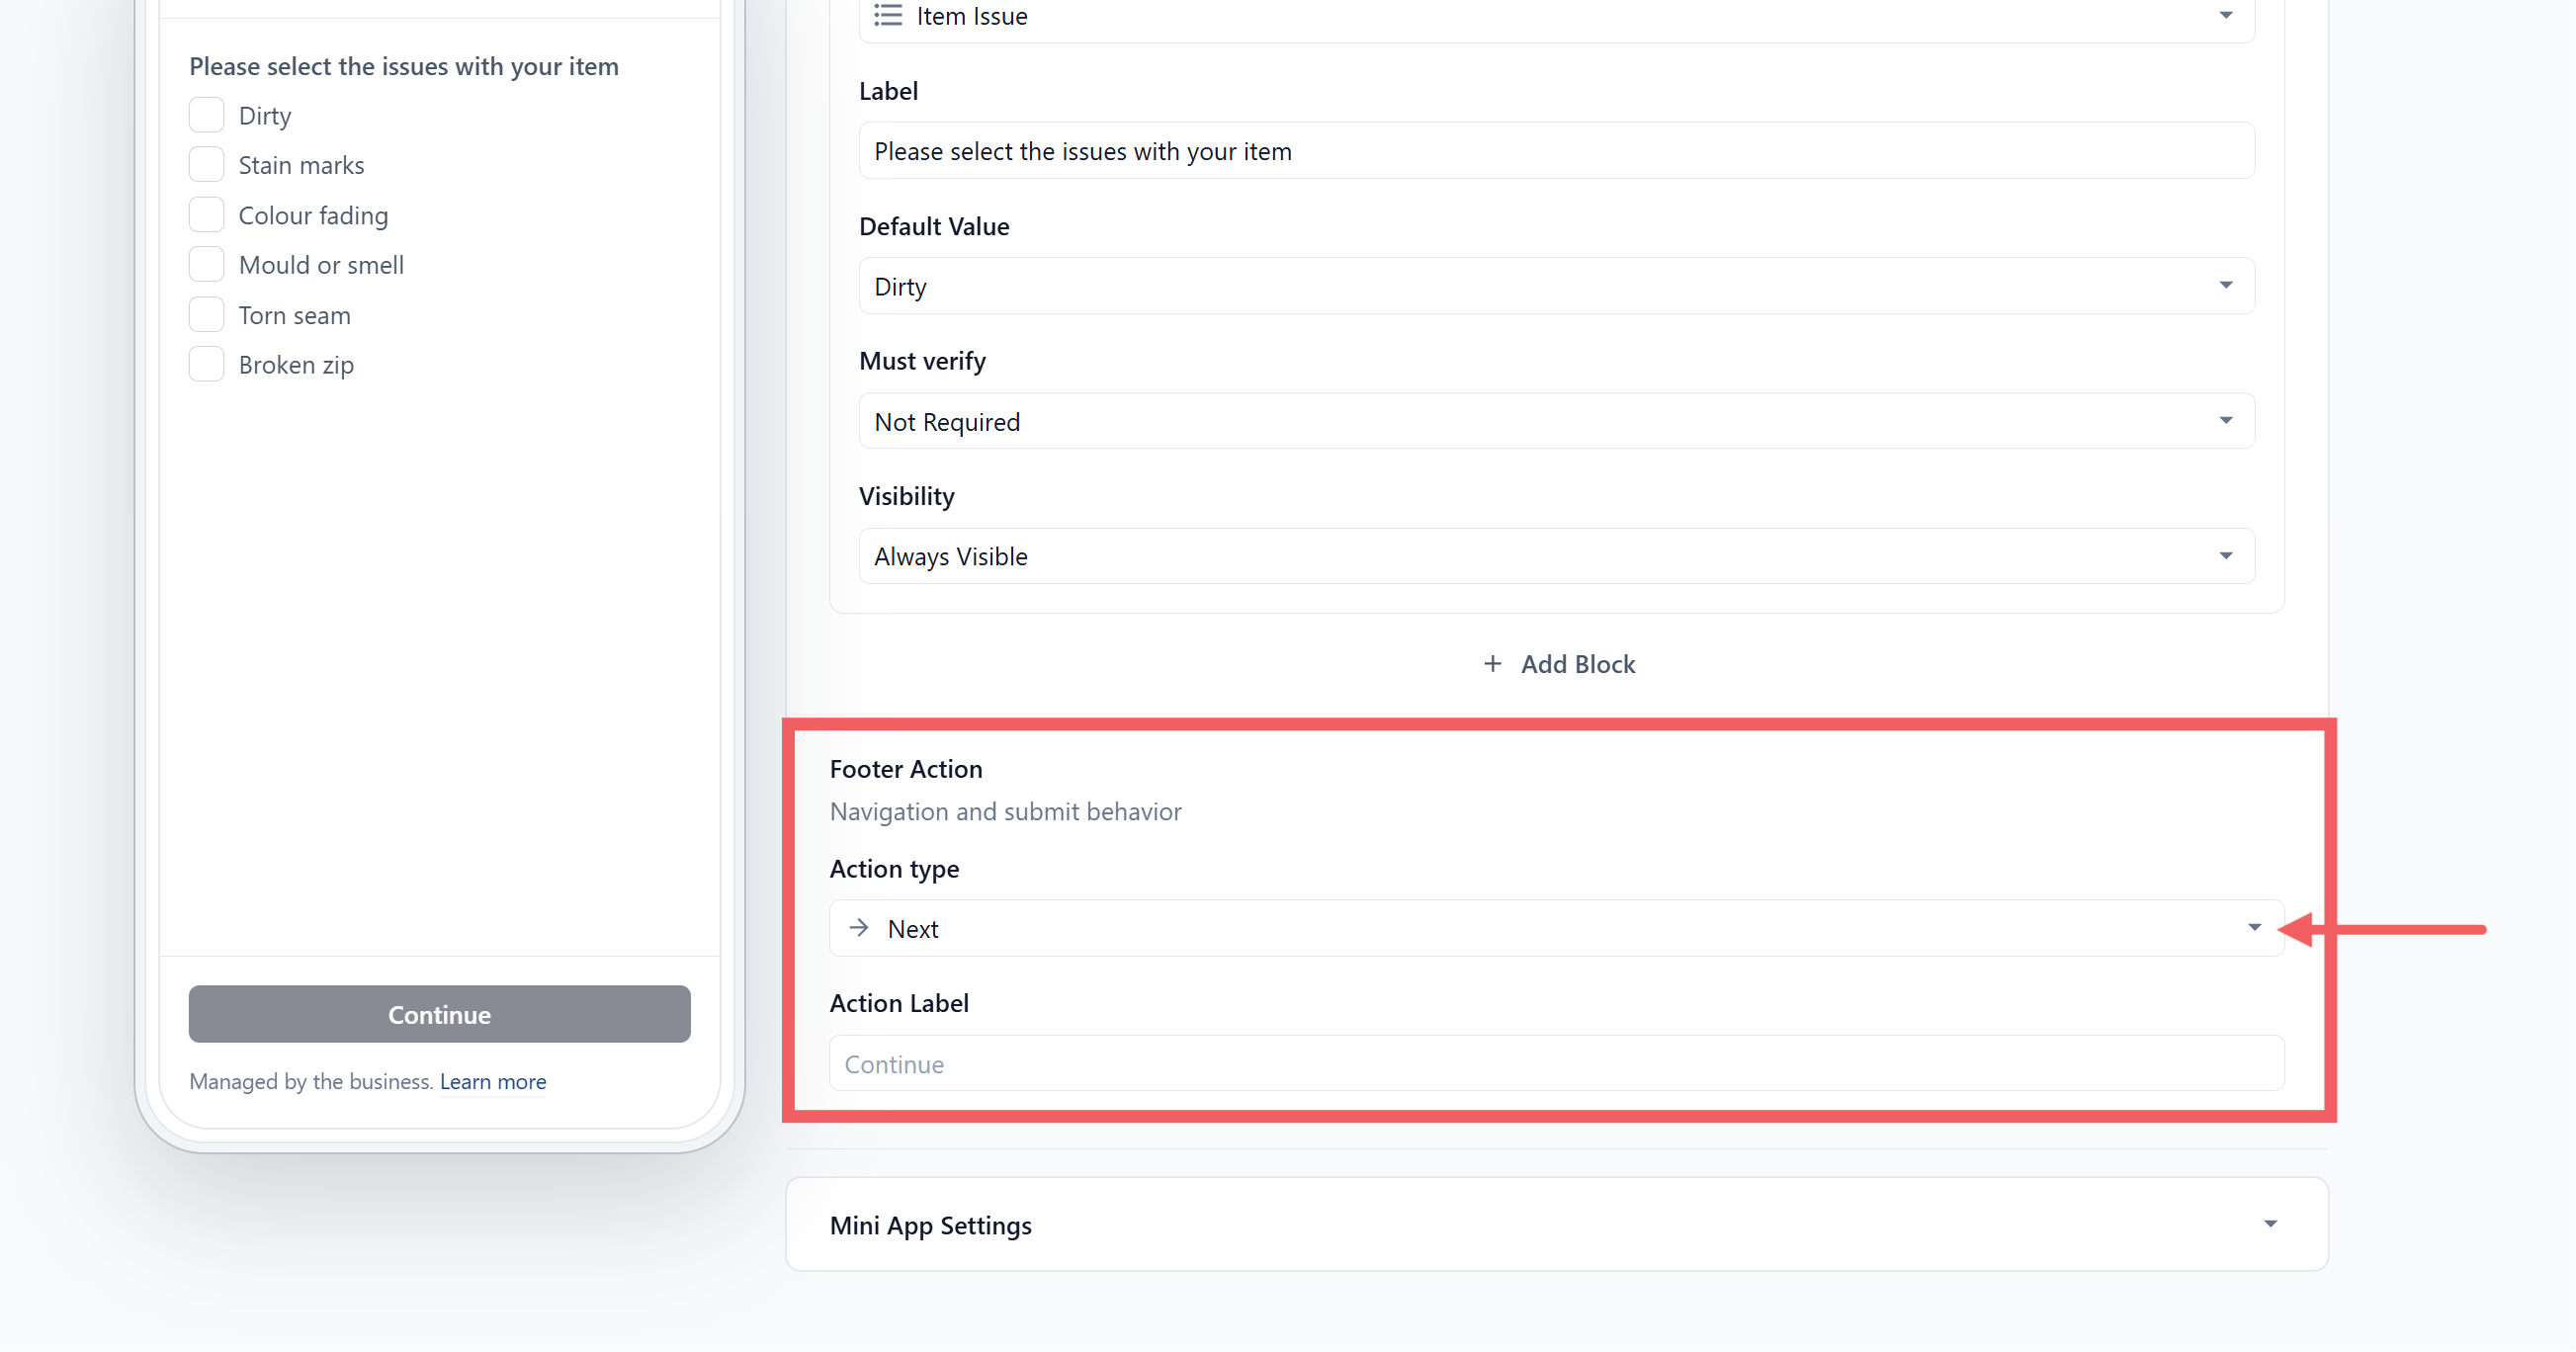
7. Leave the footer action as Next.
---
## Ask for the Property Type
By default, address line 2 is optional, because landed houses have no unit number. Here is how to make it compulsory for HDB, Condo and Office only.
Add this question when your driver needs a unit number or floor number to complete the pickup. Without it, your staff may have to call or message the customer again, and the driver may be delayed at the building. Customers who choose Landed will not be forced to enter a unit number that they do not have.
**Step 1. Create the field**
1. Go to Settings, Library section, Custom Fields.
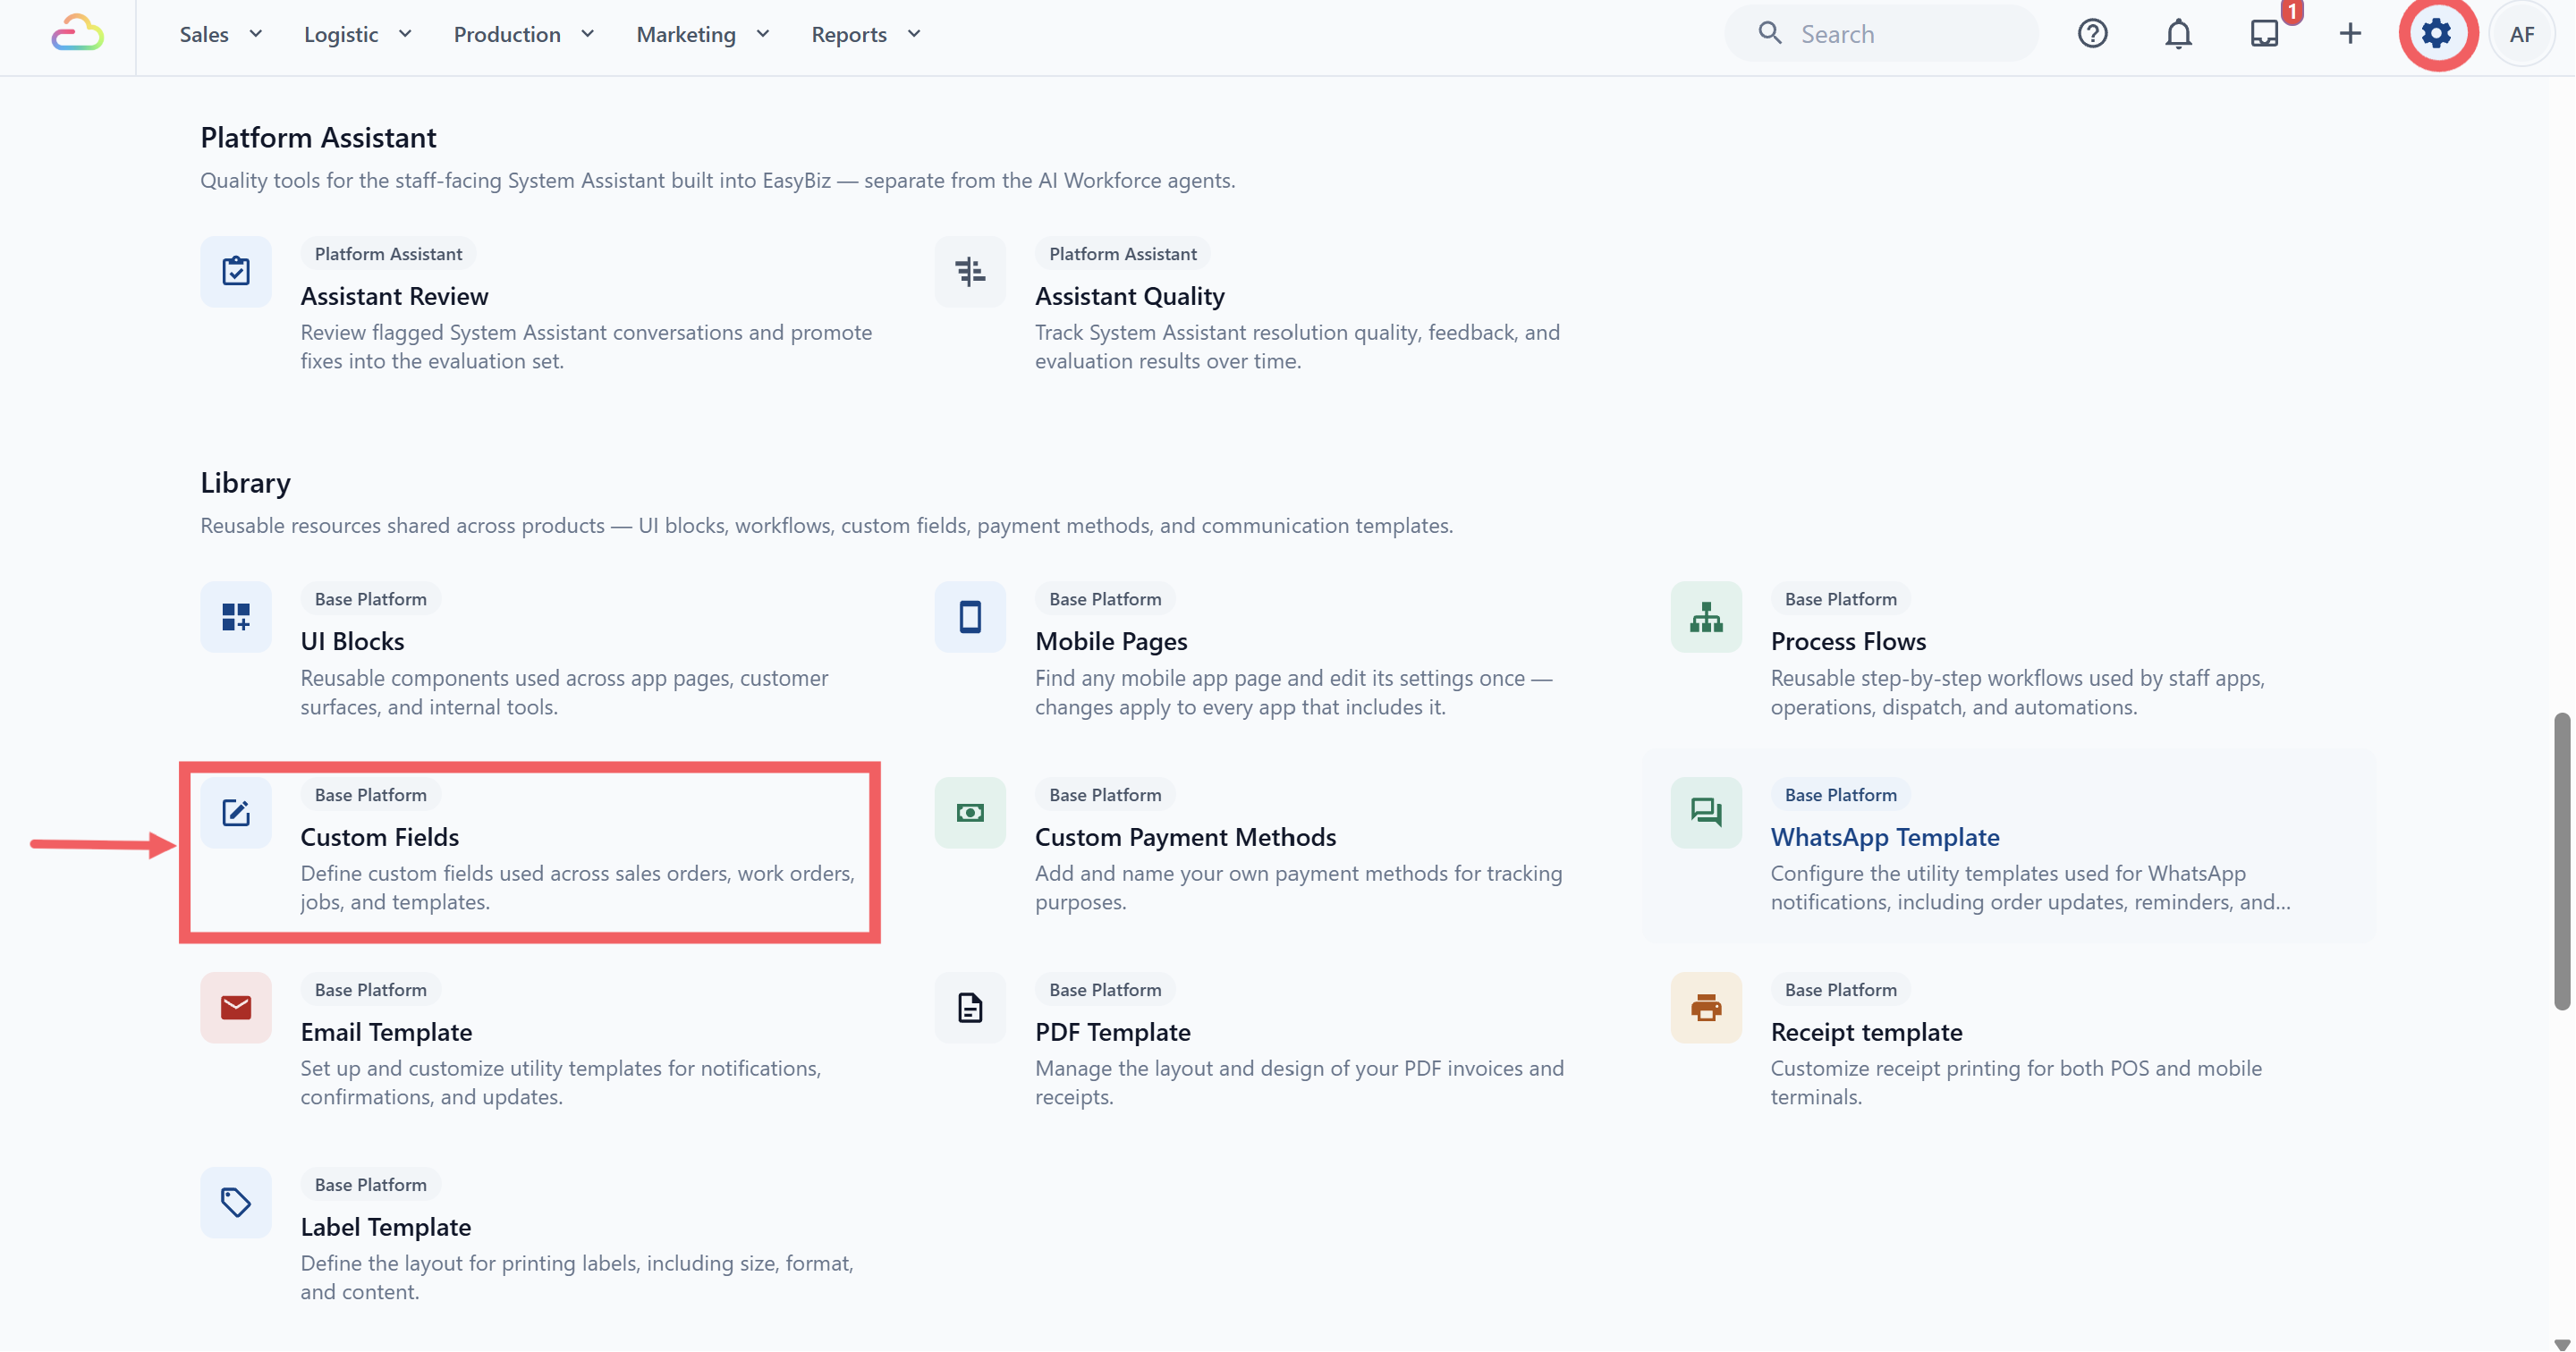
2. Click + Add Data Field. Name it Address Type and choose Options as the Data Type.
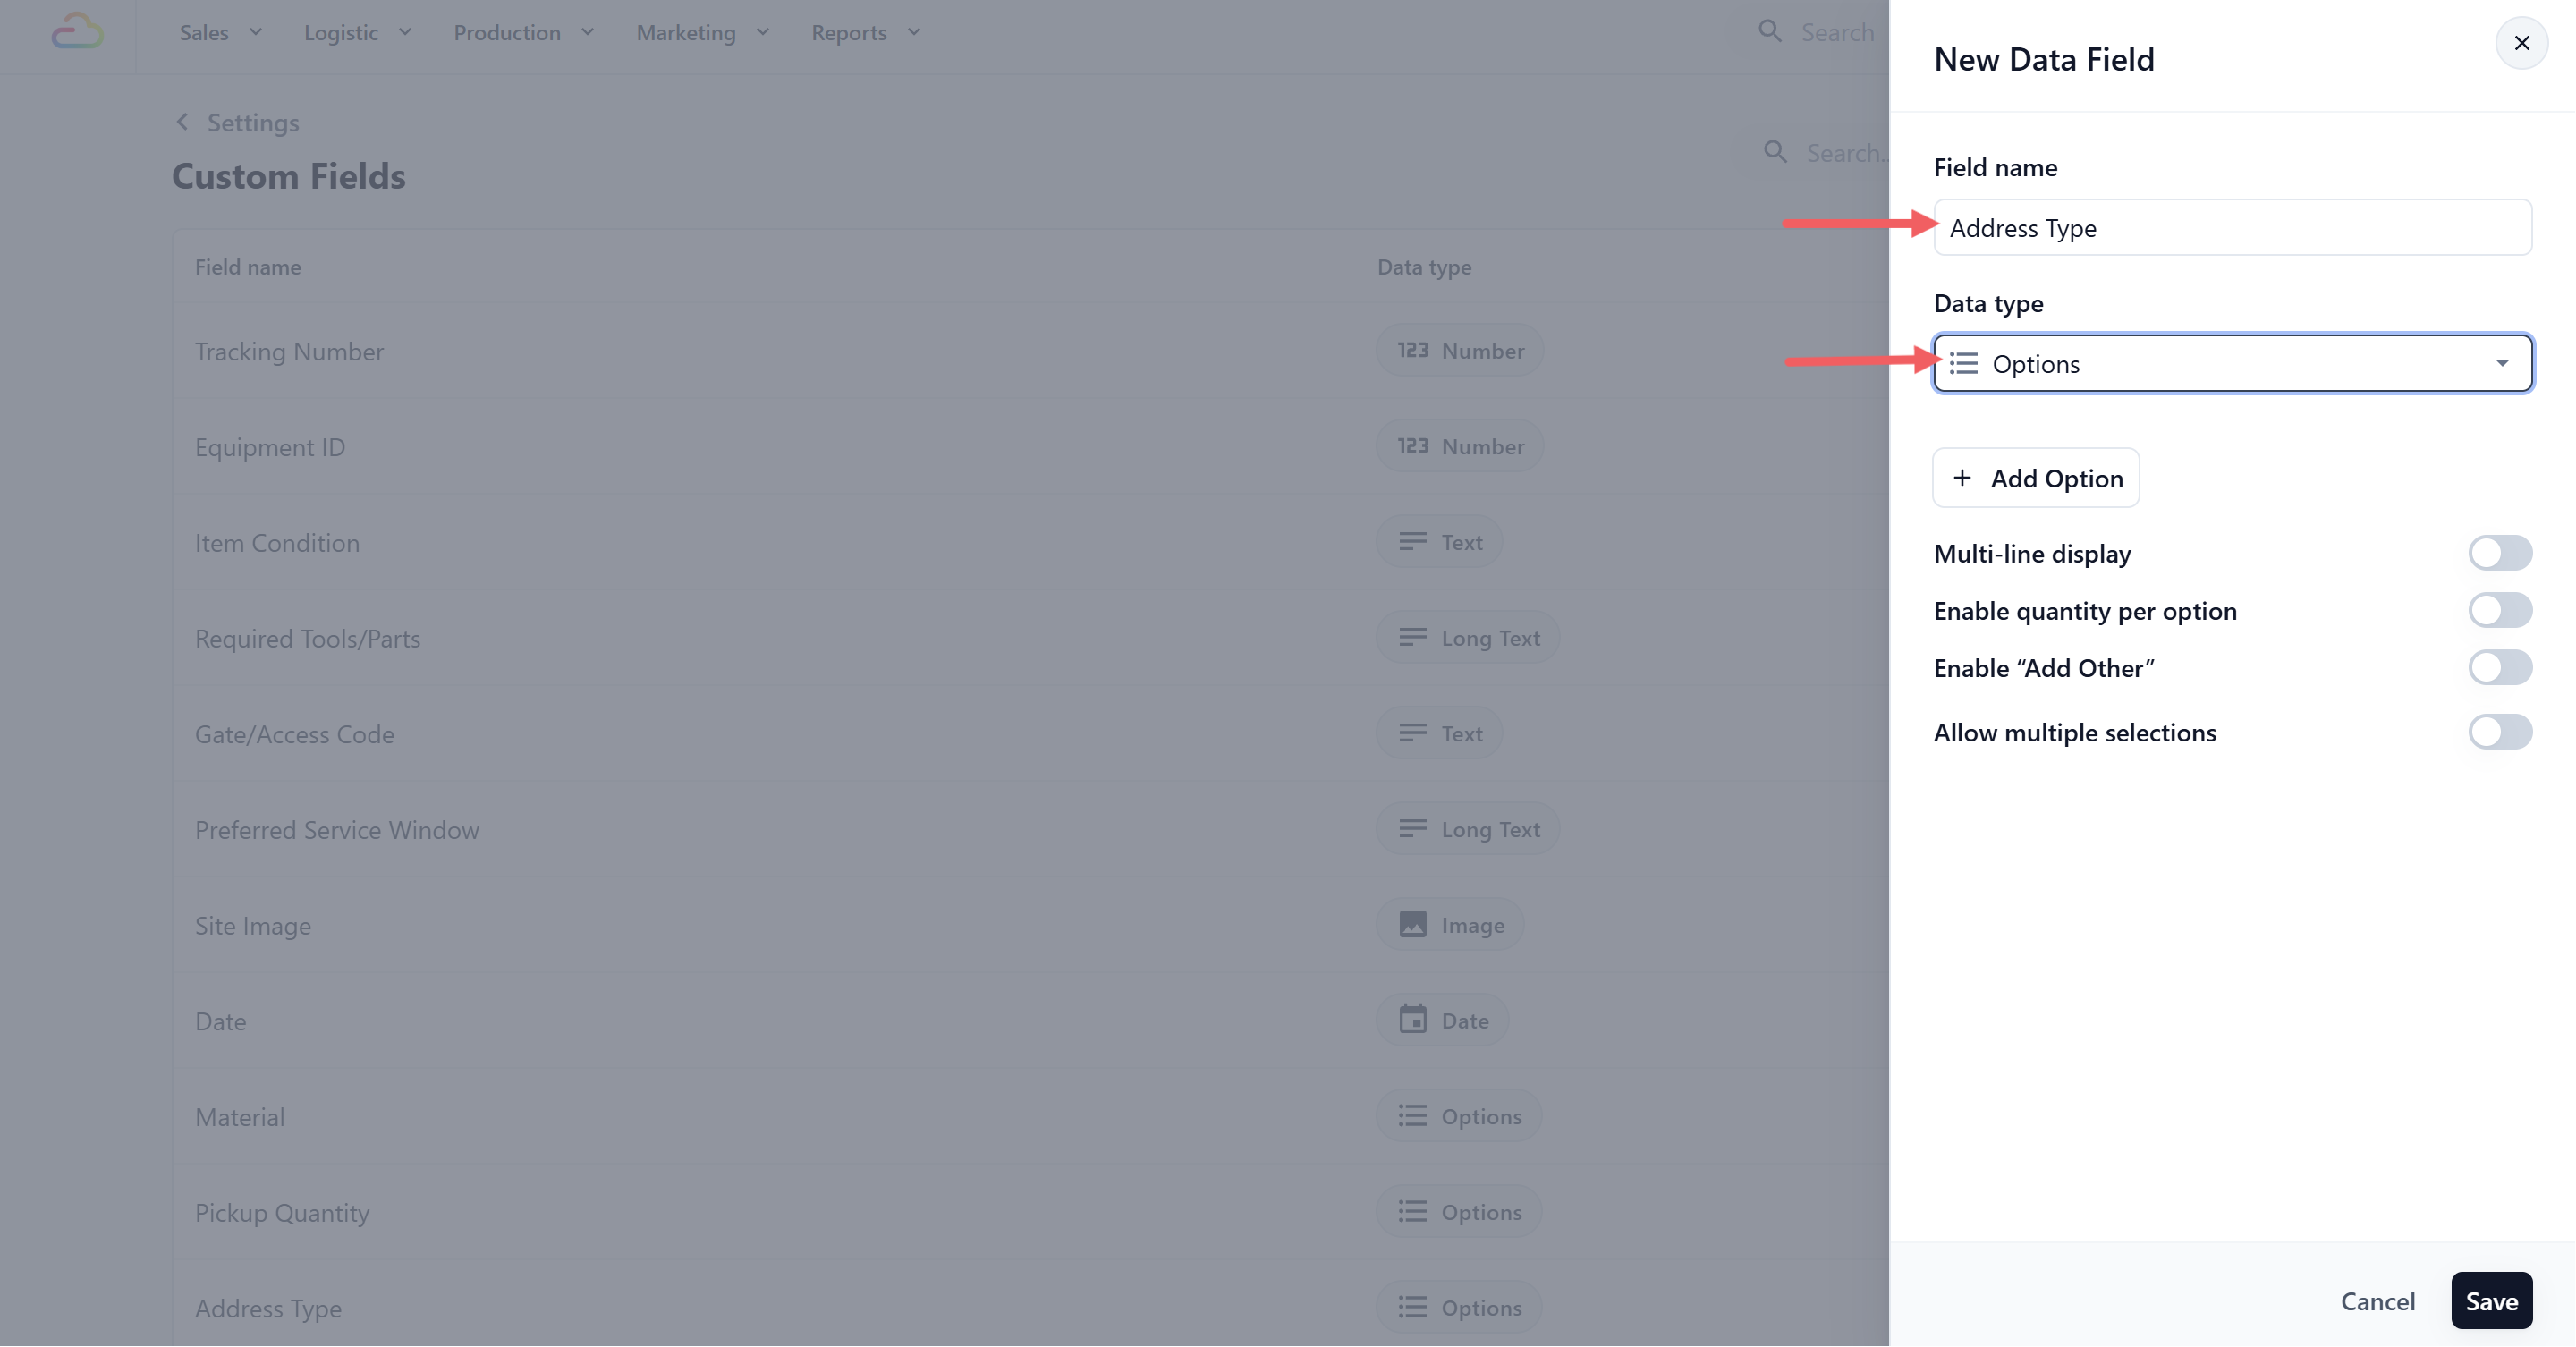
3. Type your choices: HDB, Condo, Office, Landed. Click Save.
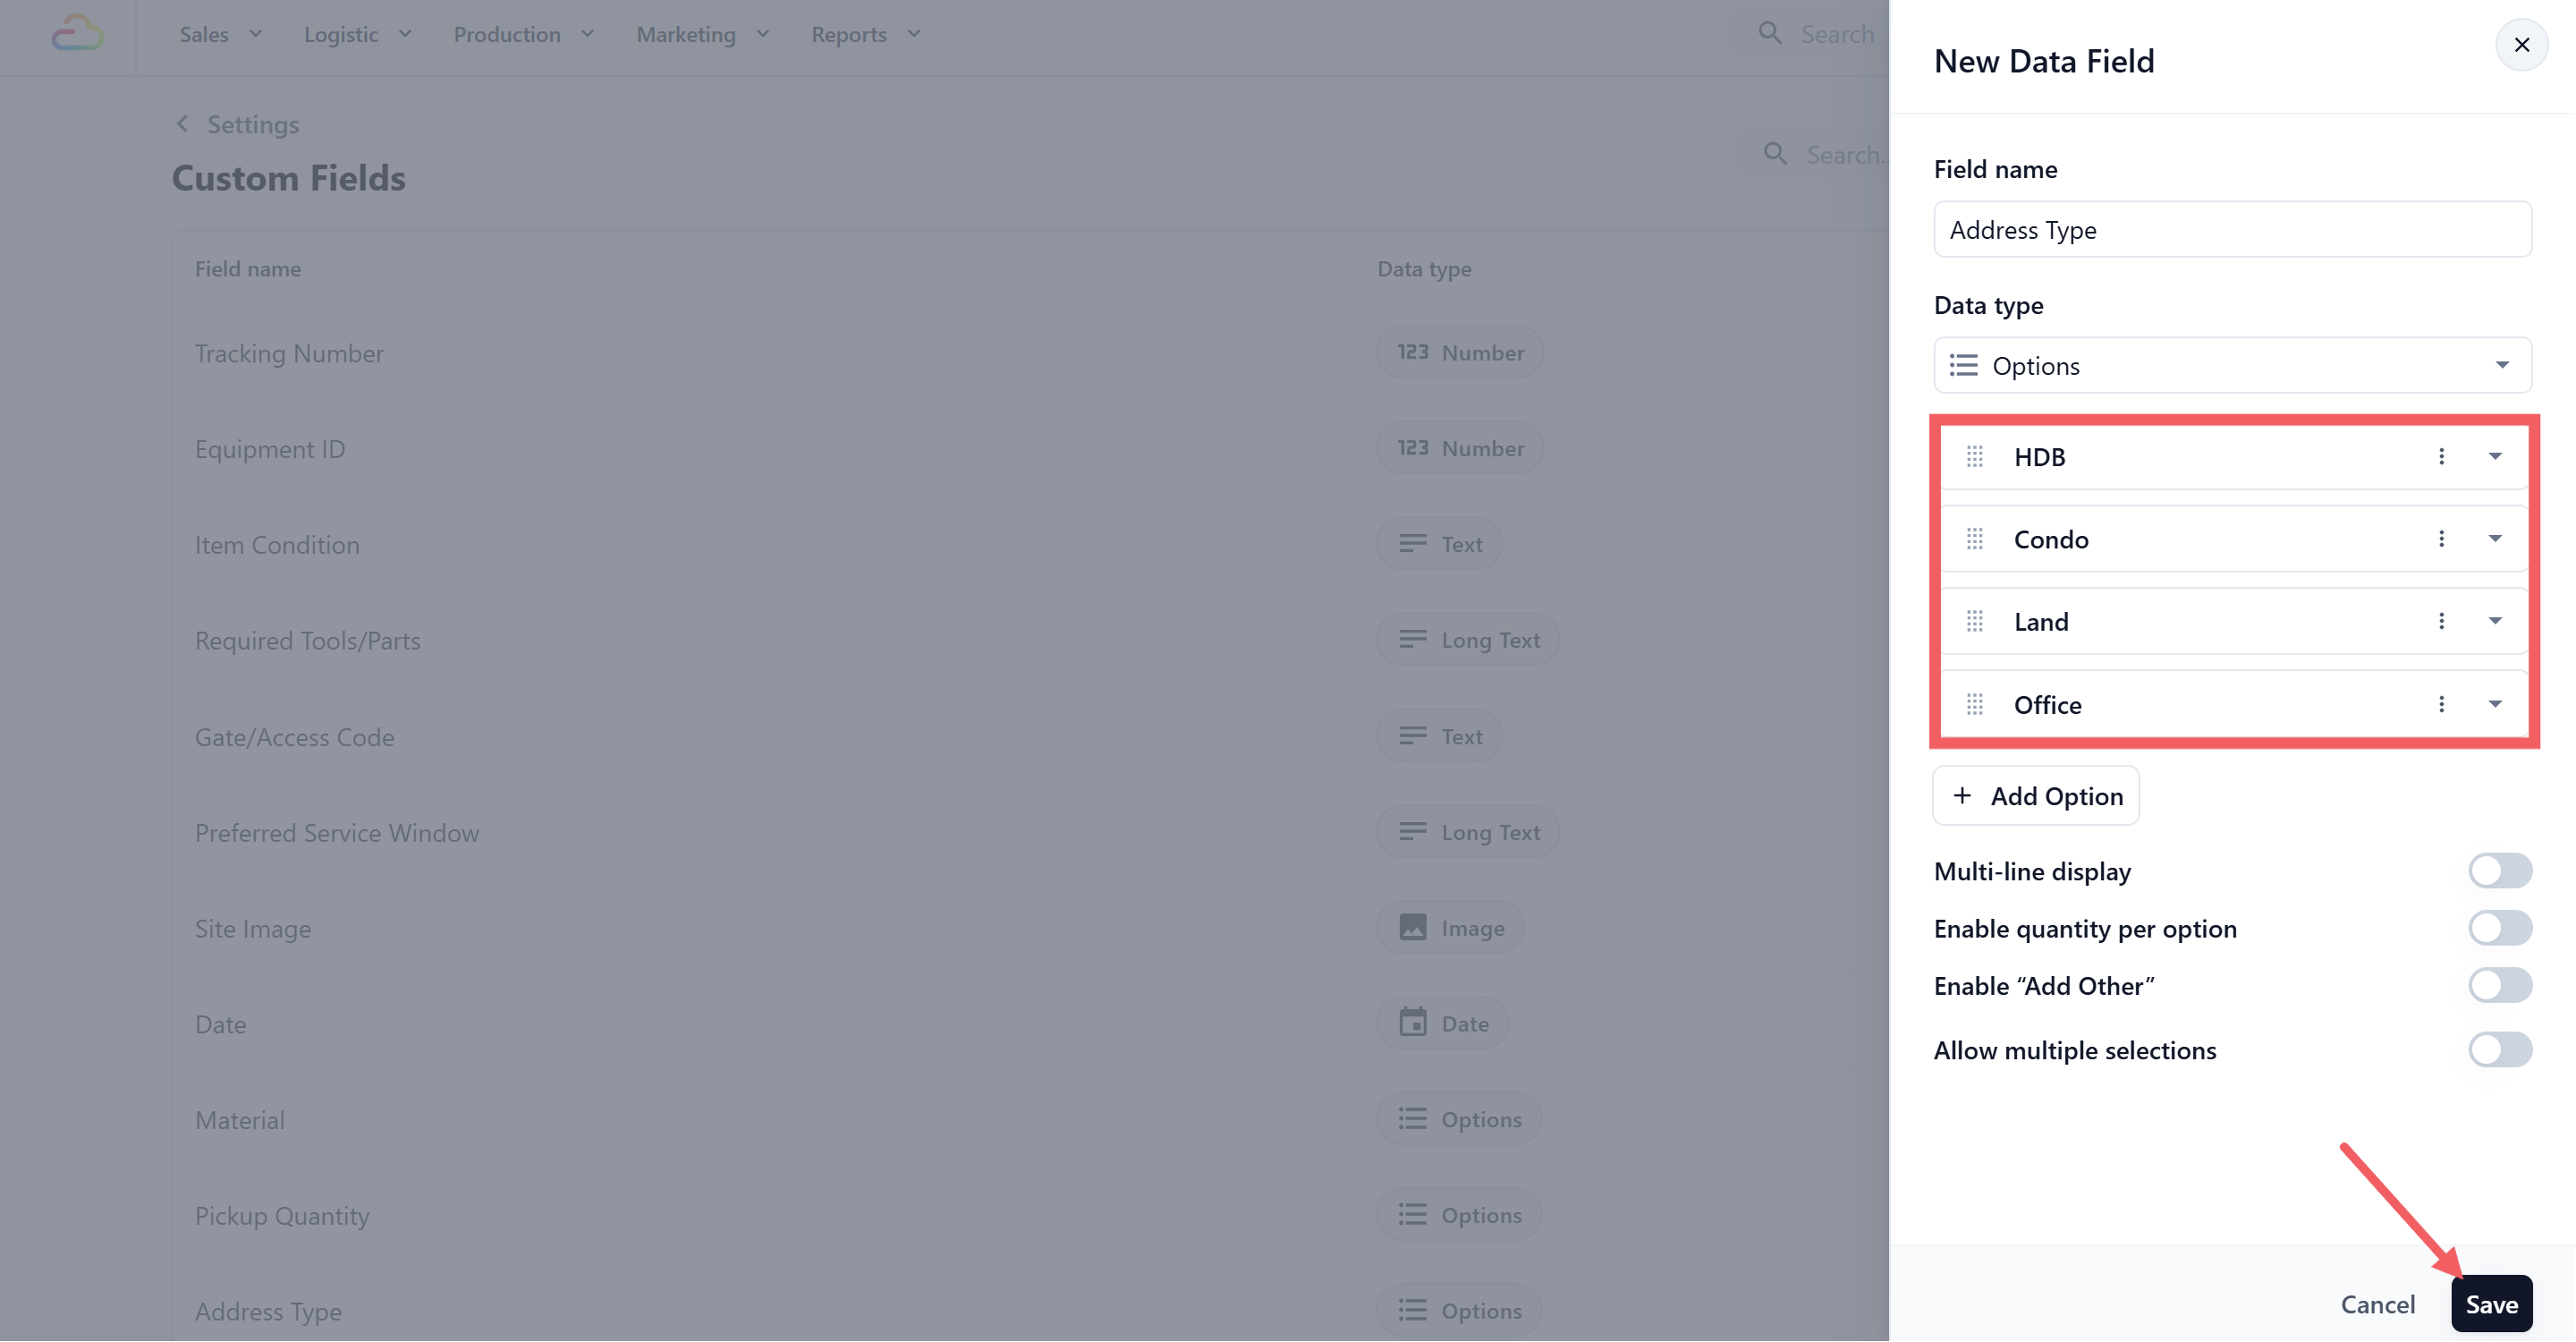
Options is the data type you pick in Custom Fields. Dropdown is a block type you pick inside the Mini App editor. They work together, but they are chosen in two different places.
**Step 2. Add the block**
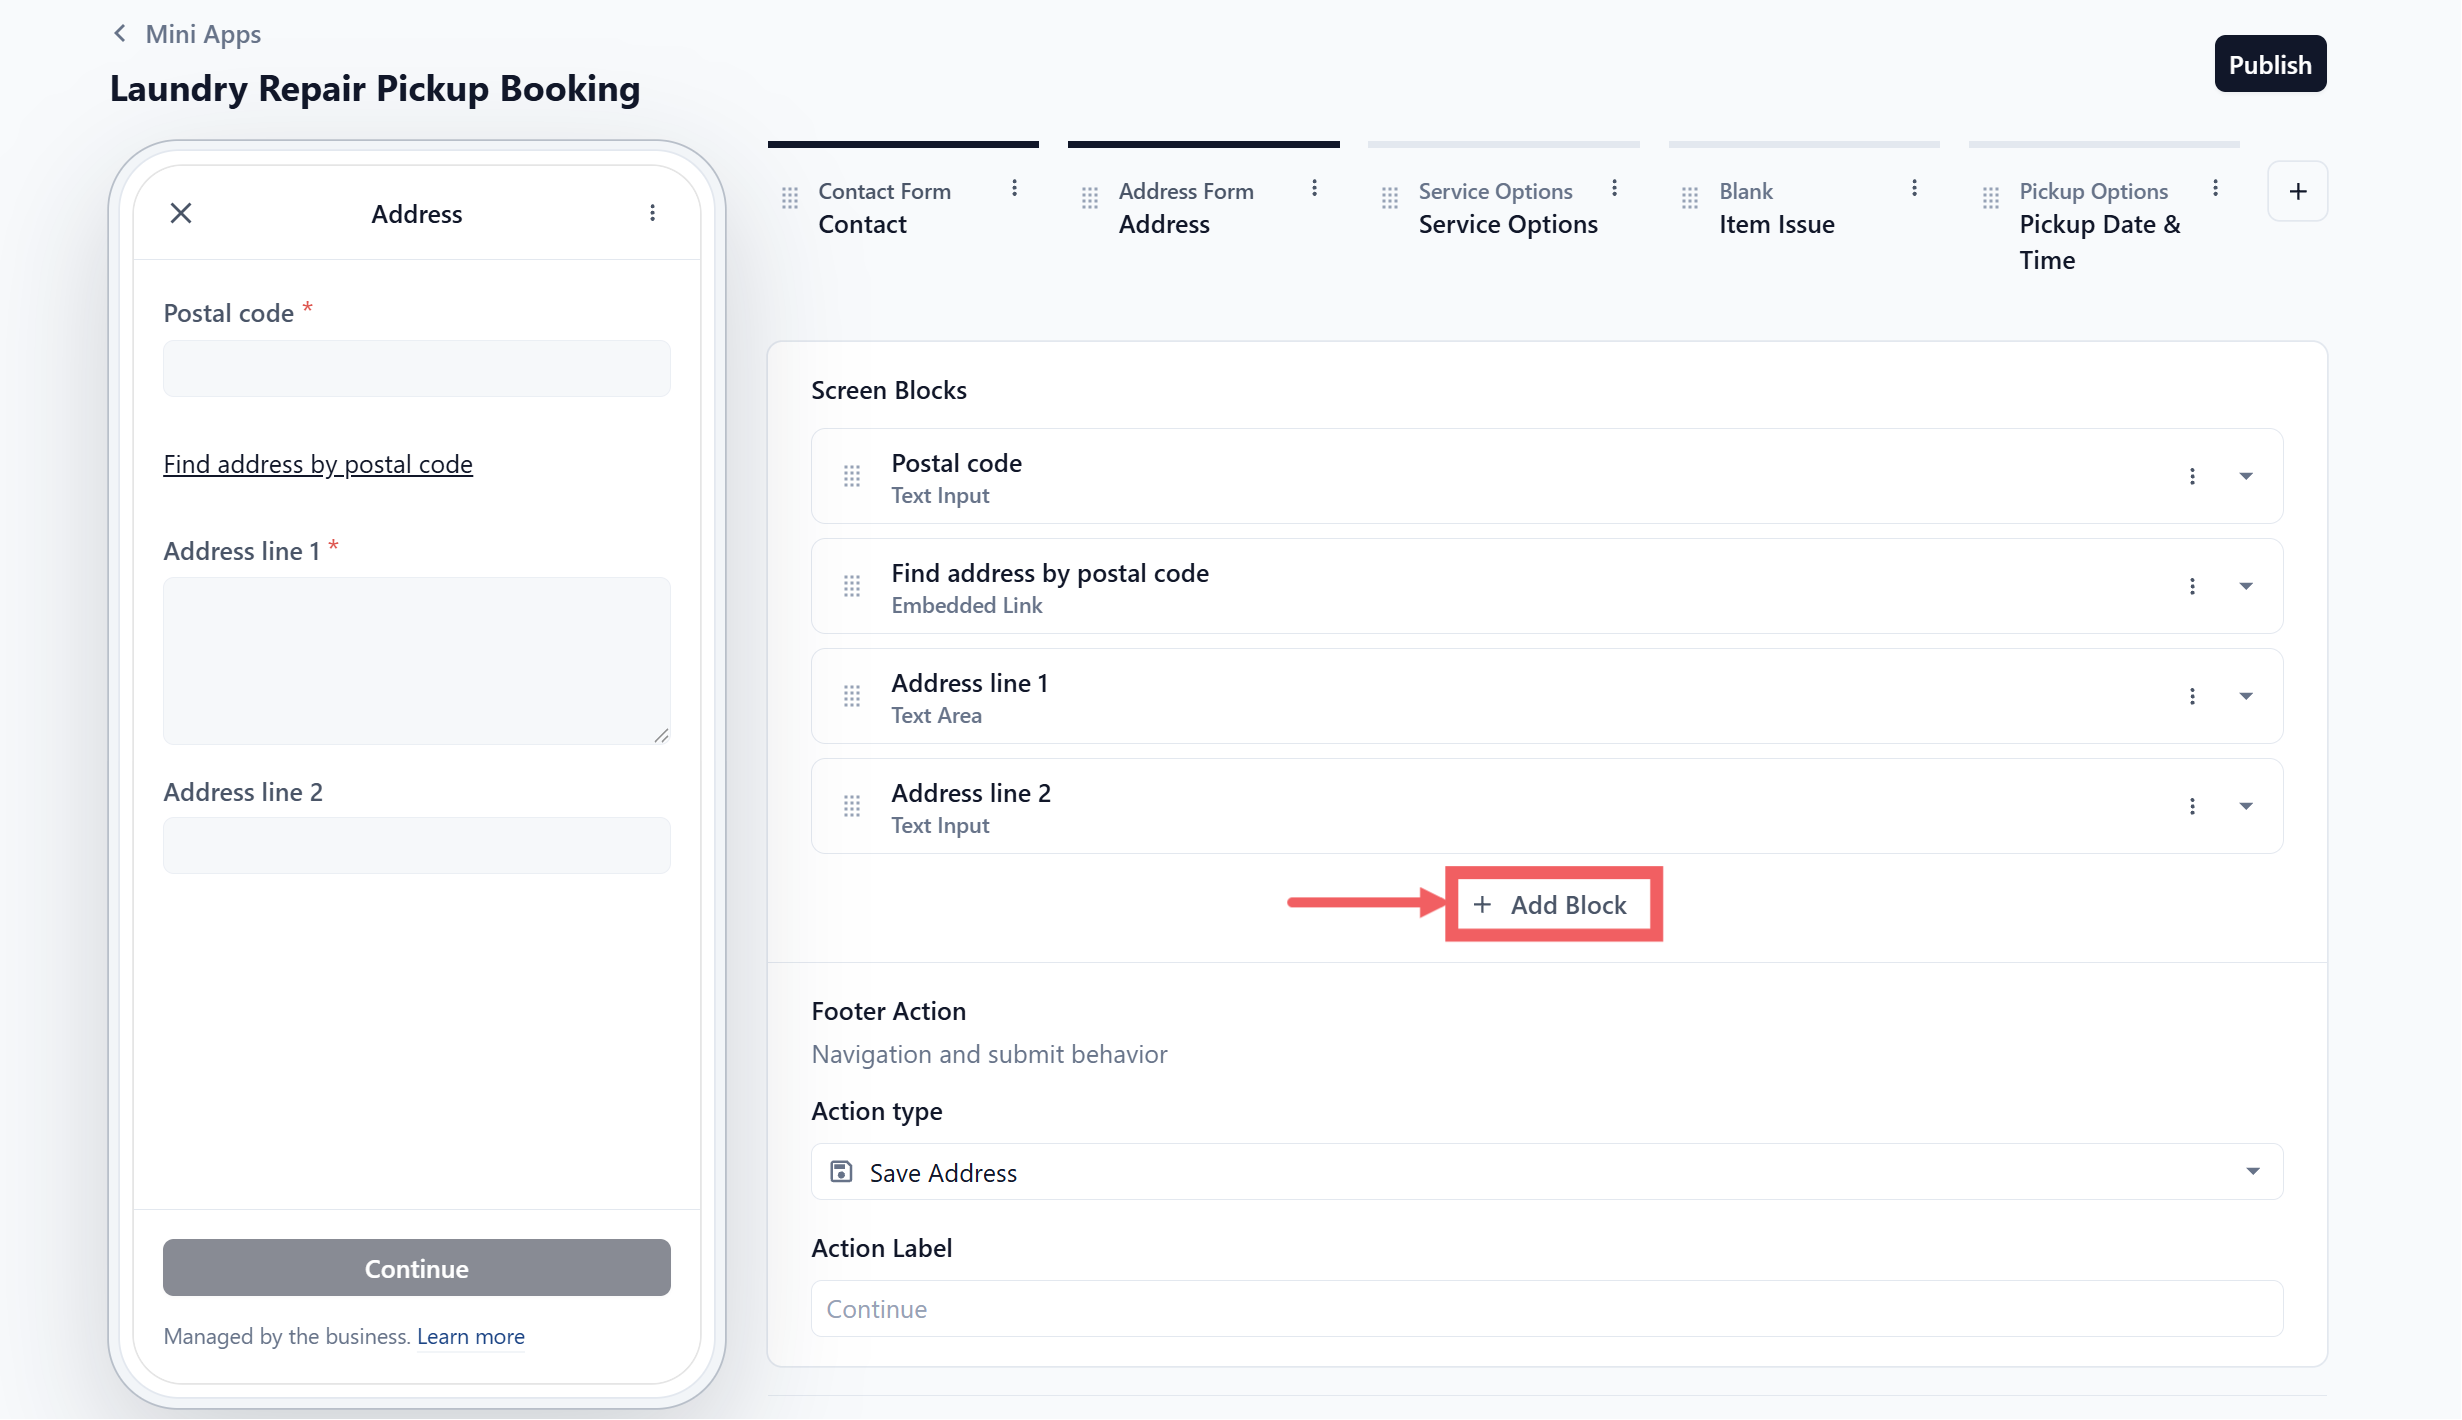
1. In the editor, click your Address screen.
2. Click + Add Block .
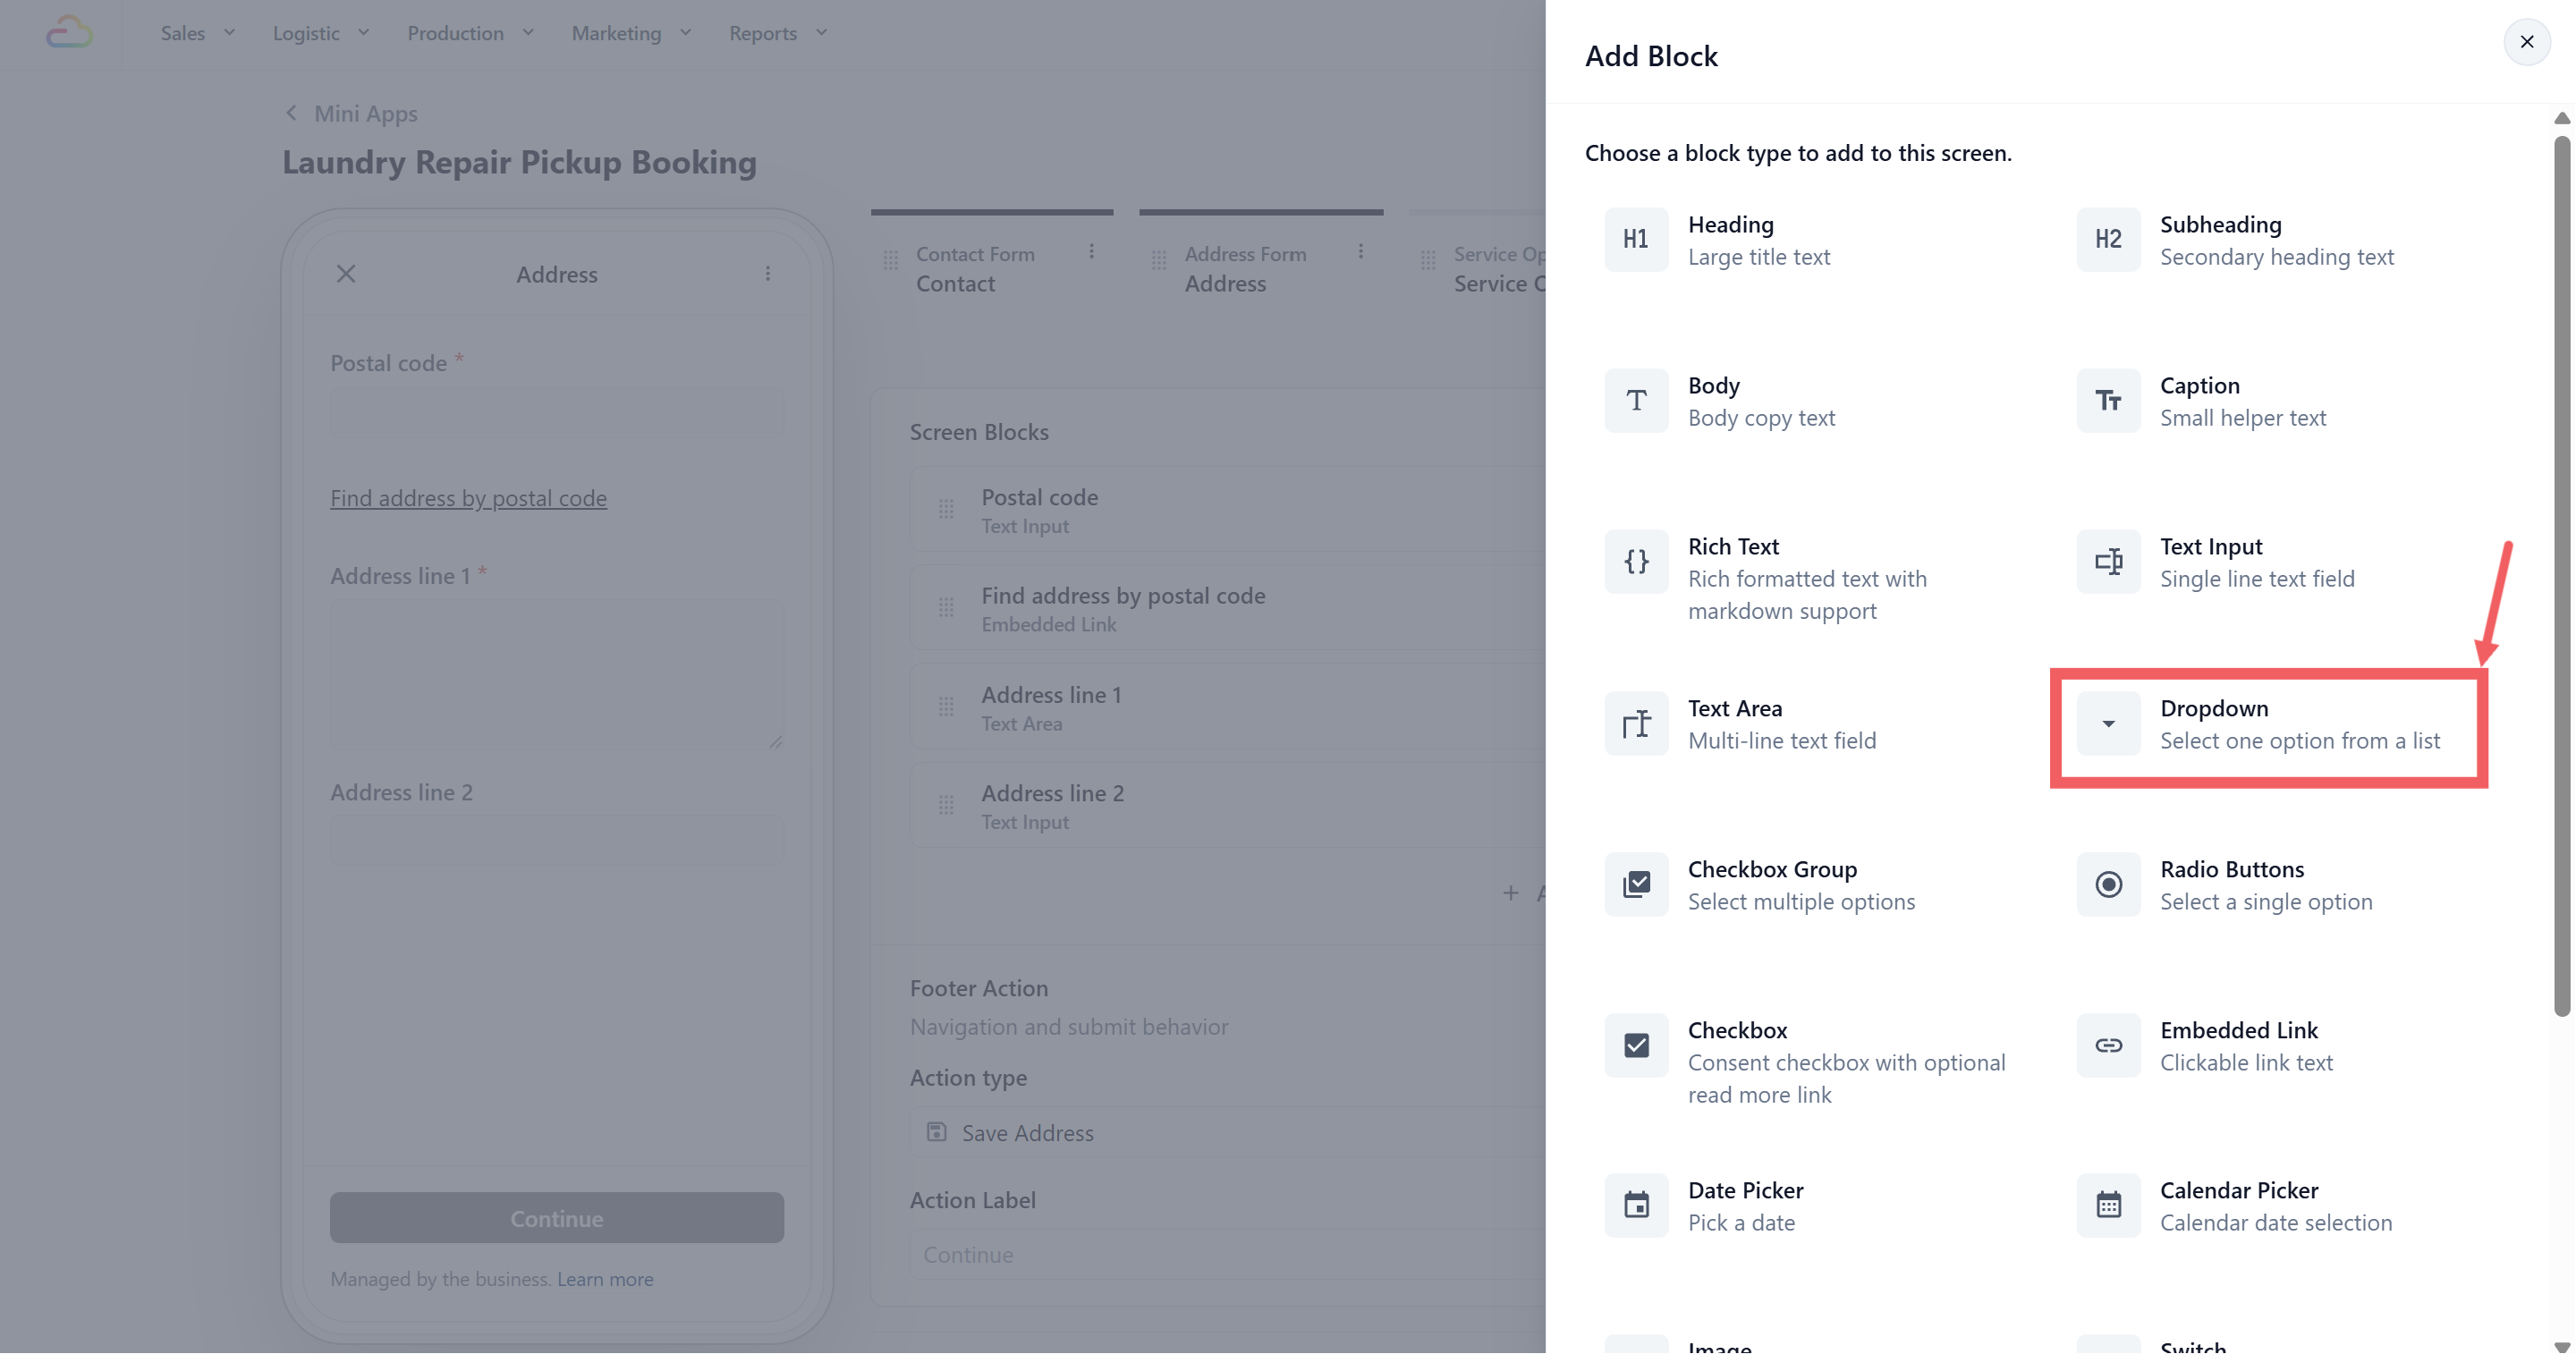
3. Choose Dropdown.
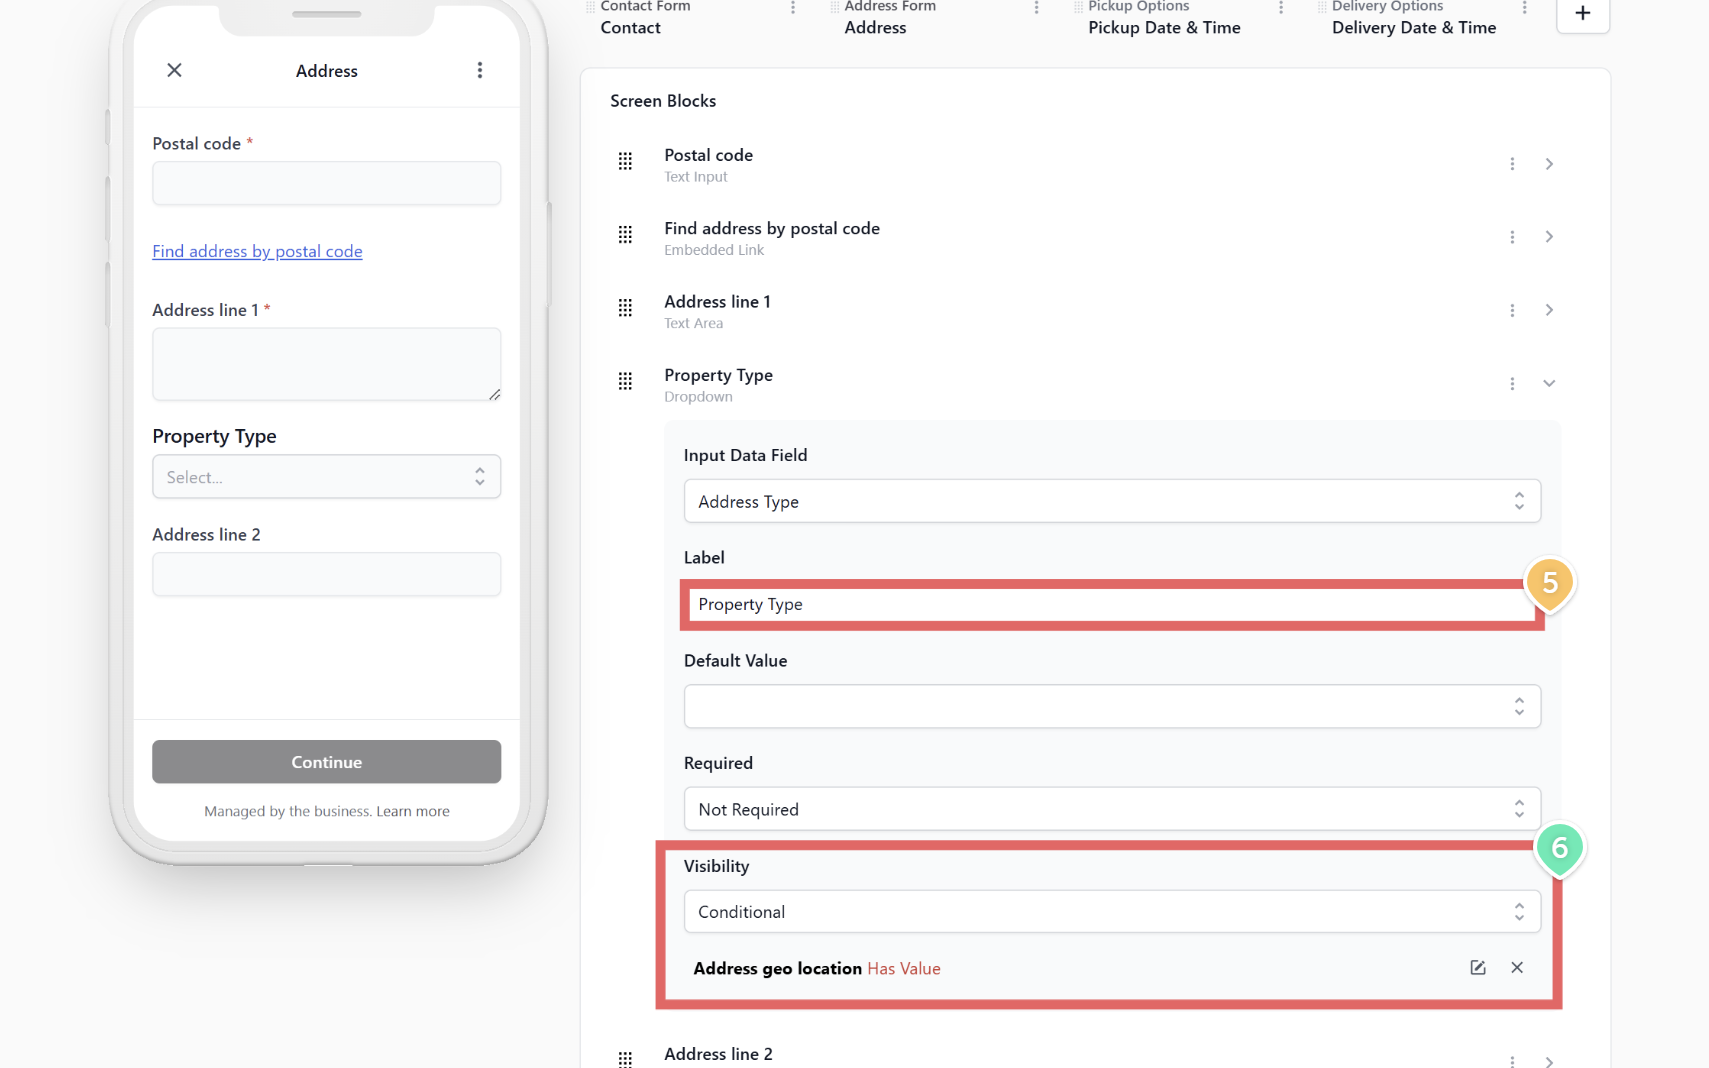
4. Open the block settings and set Input Data Field to Address Type.
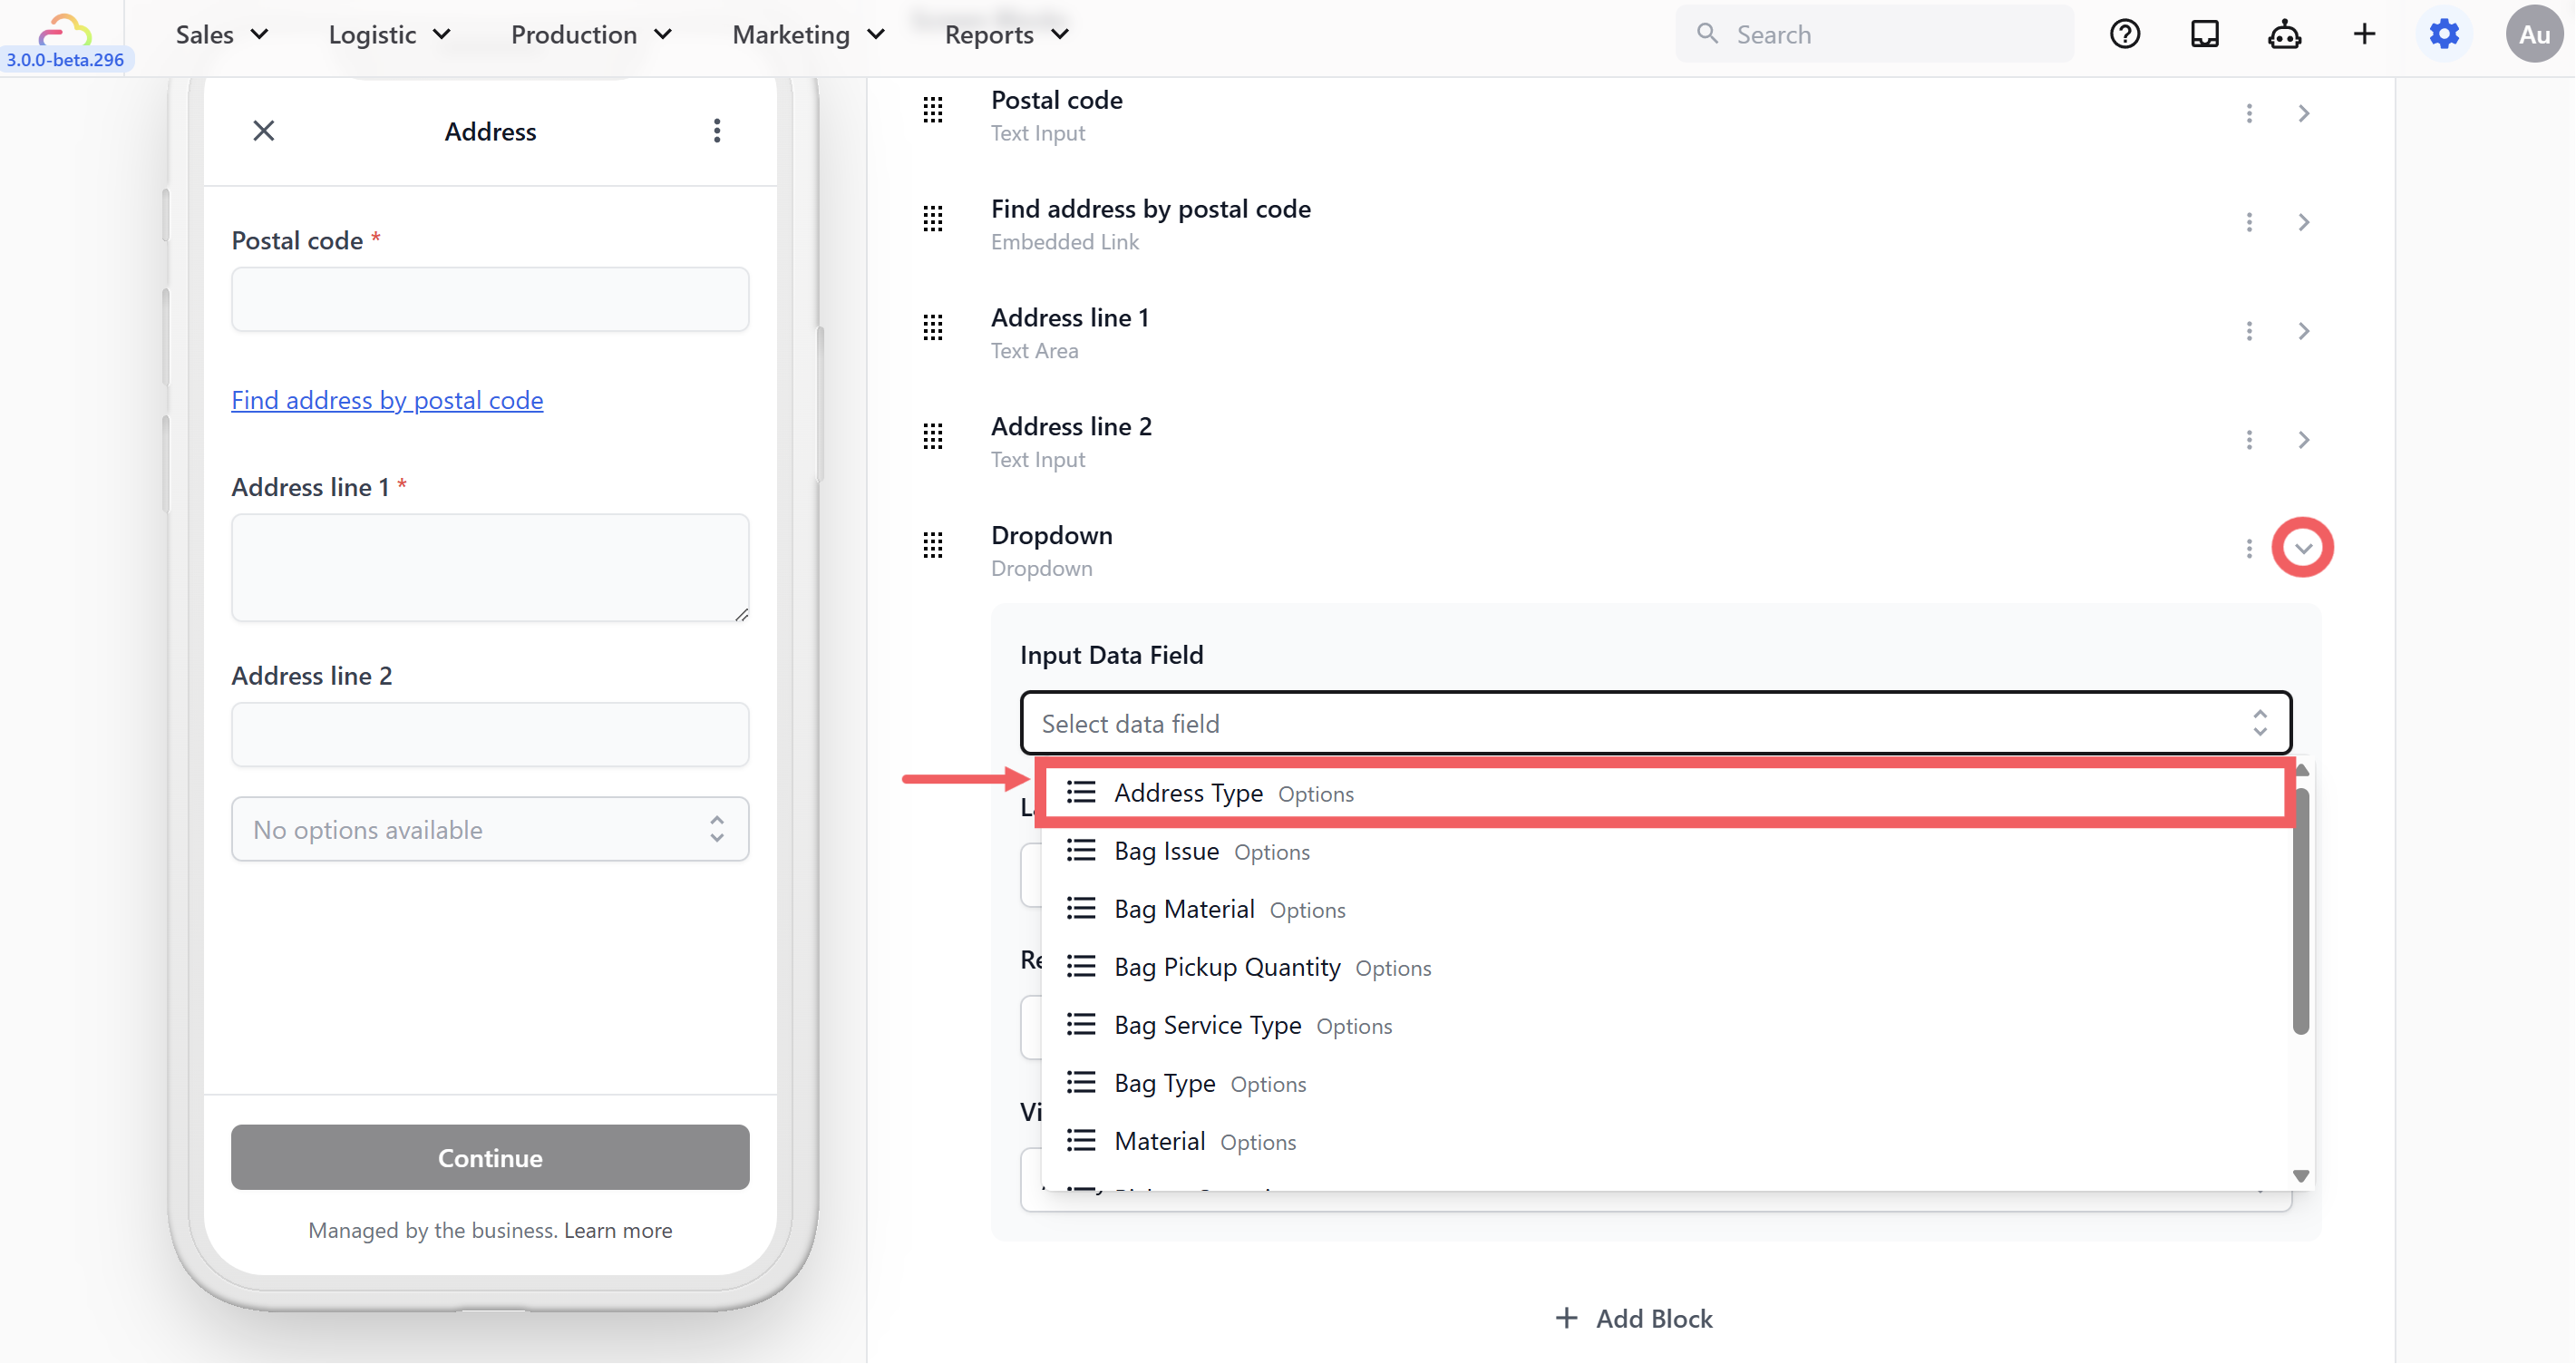
5. Set the Label to Property Type.
6. Set Visibility to Conditional, with When Address geo location and Operator Has Value. The question then appears only after the customer finds their postal code.
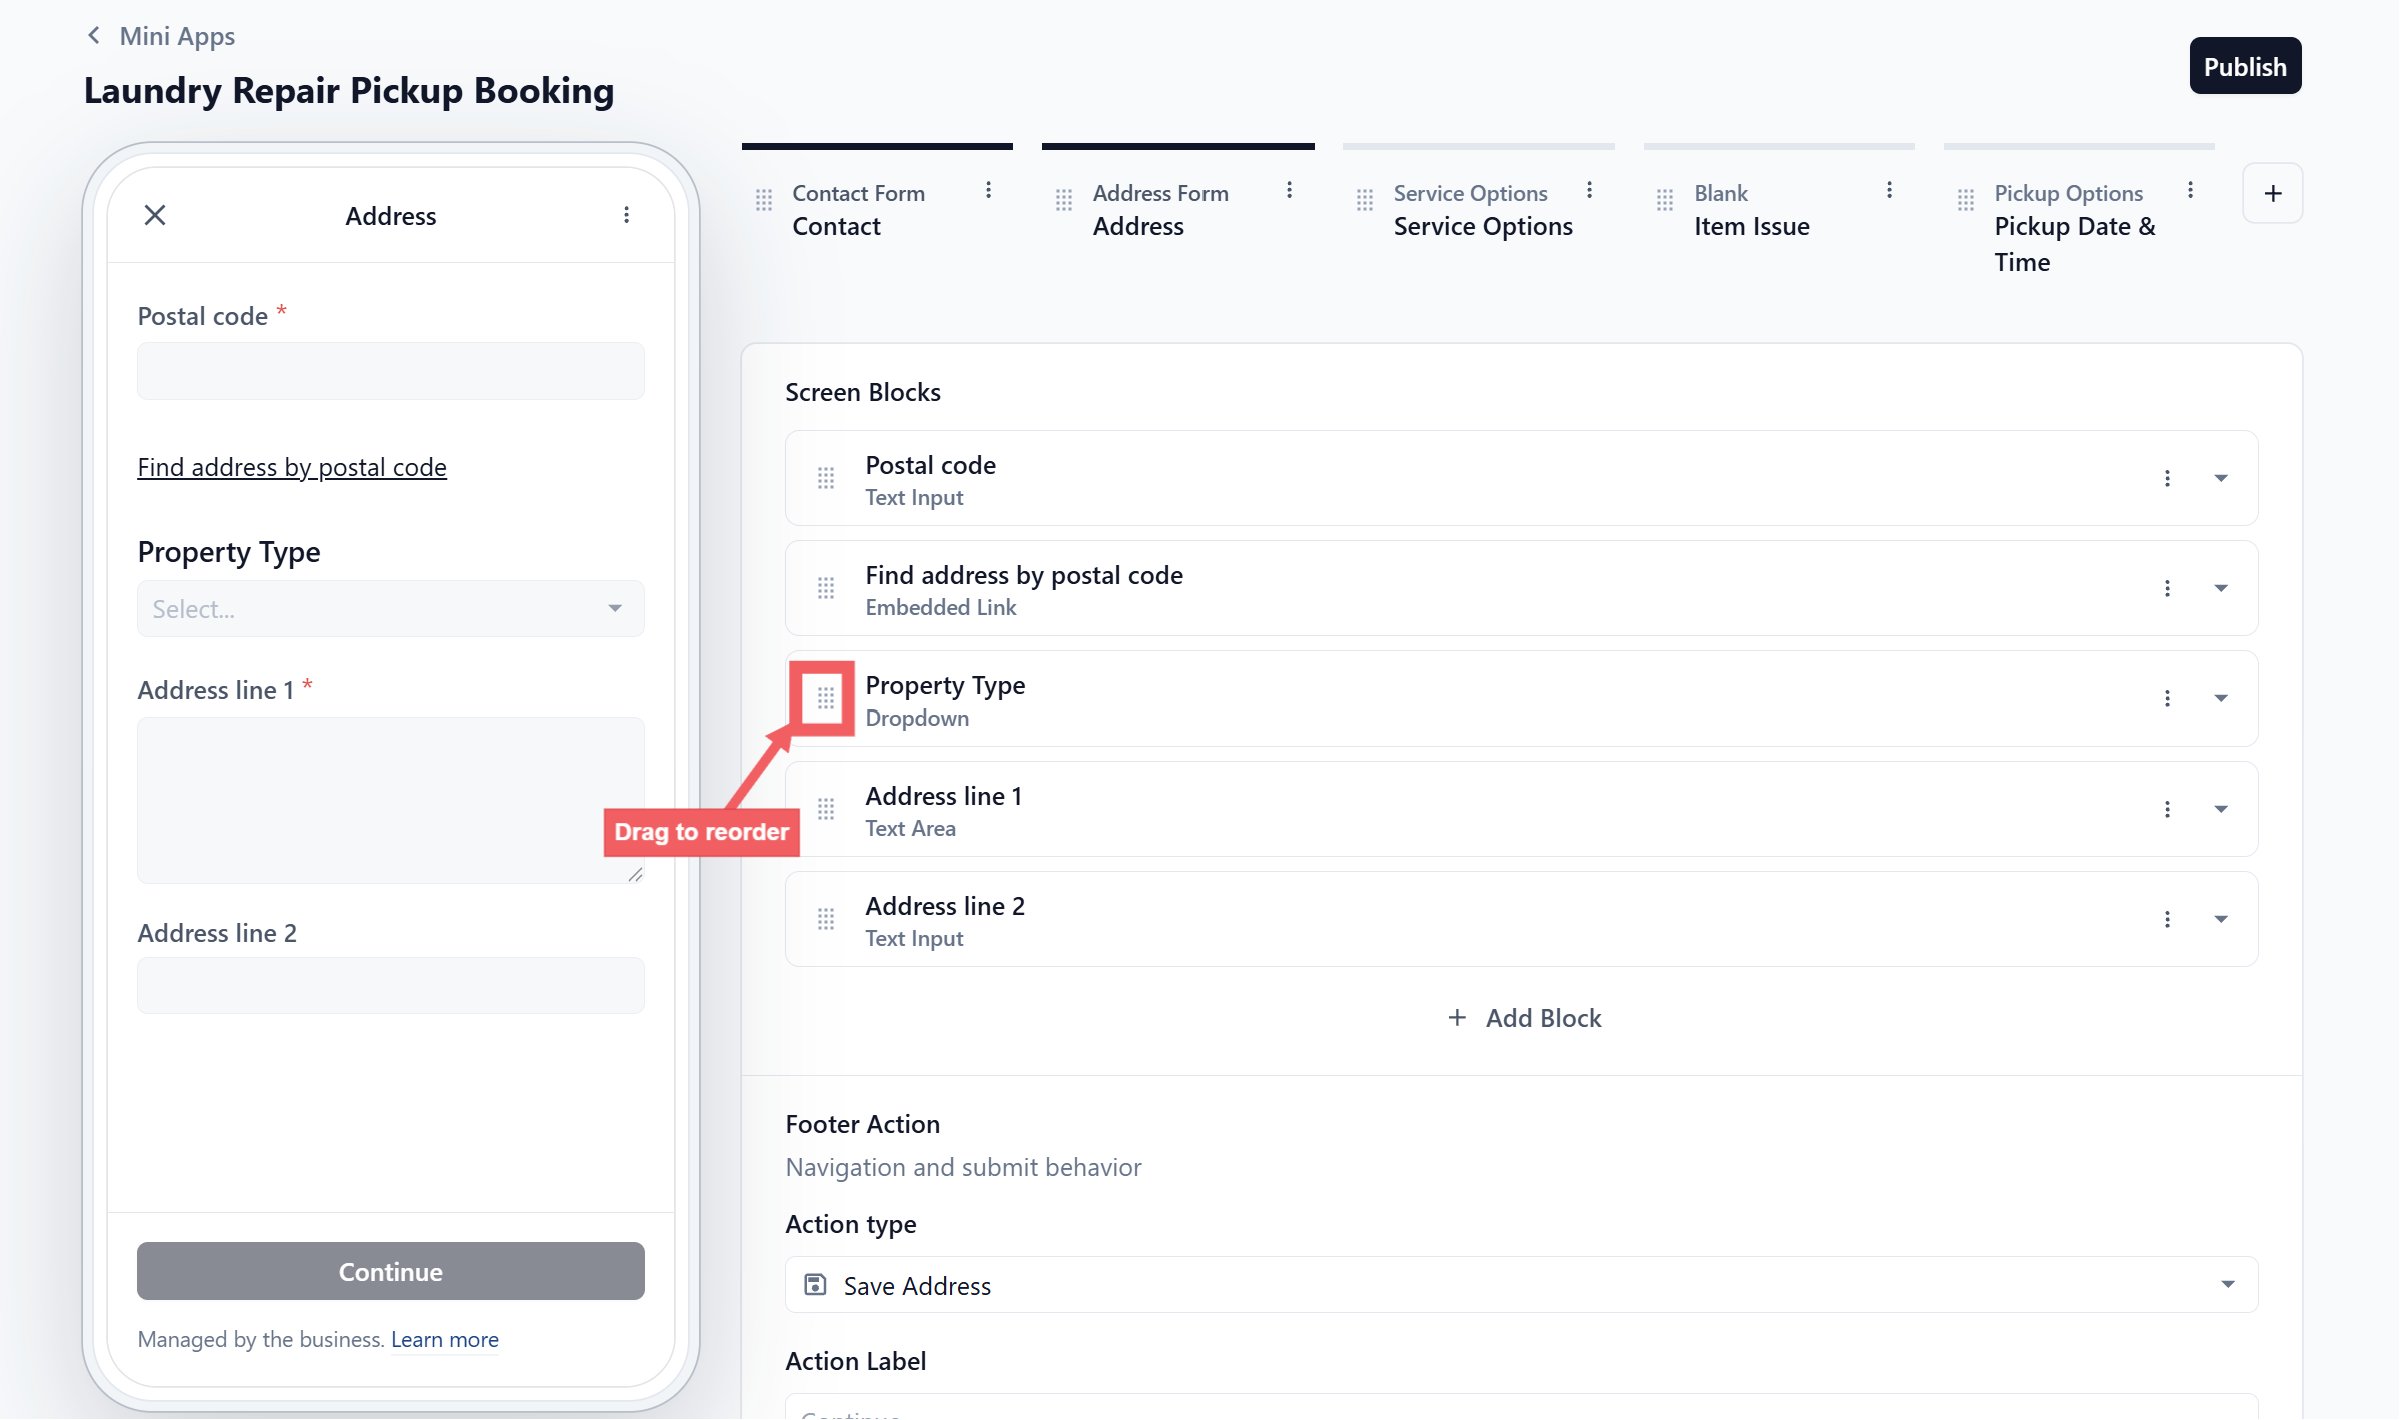
7. Drag the block above Address line 1.
**Step 3. Make address line 2 conditional**
1. Open the settings for the Address line 2 block.
2. Change Required to Conditional.
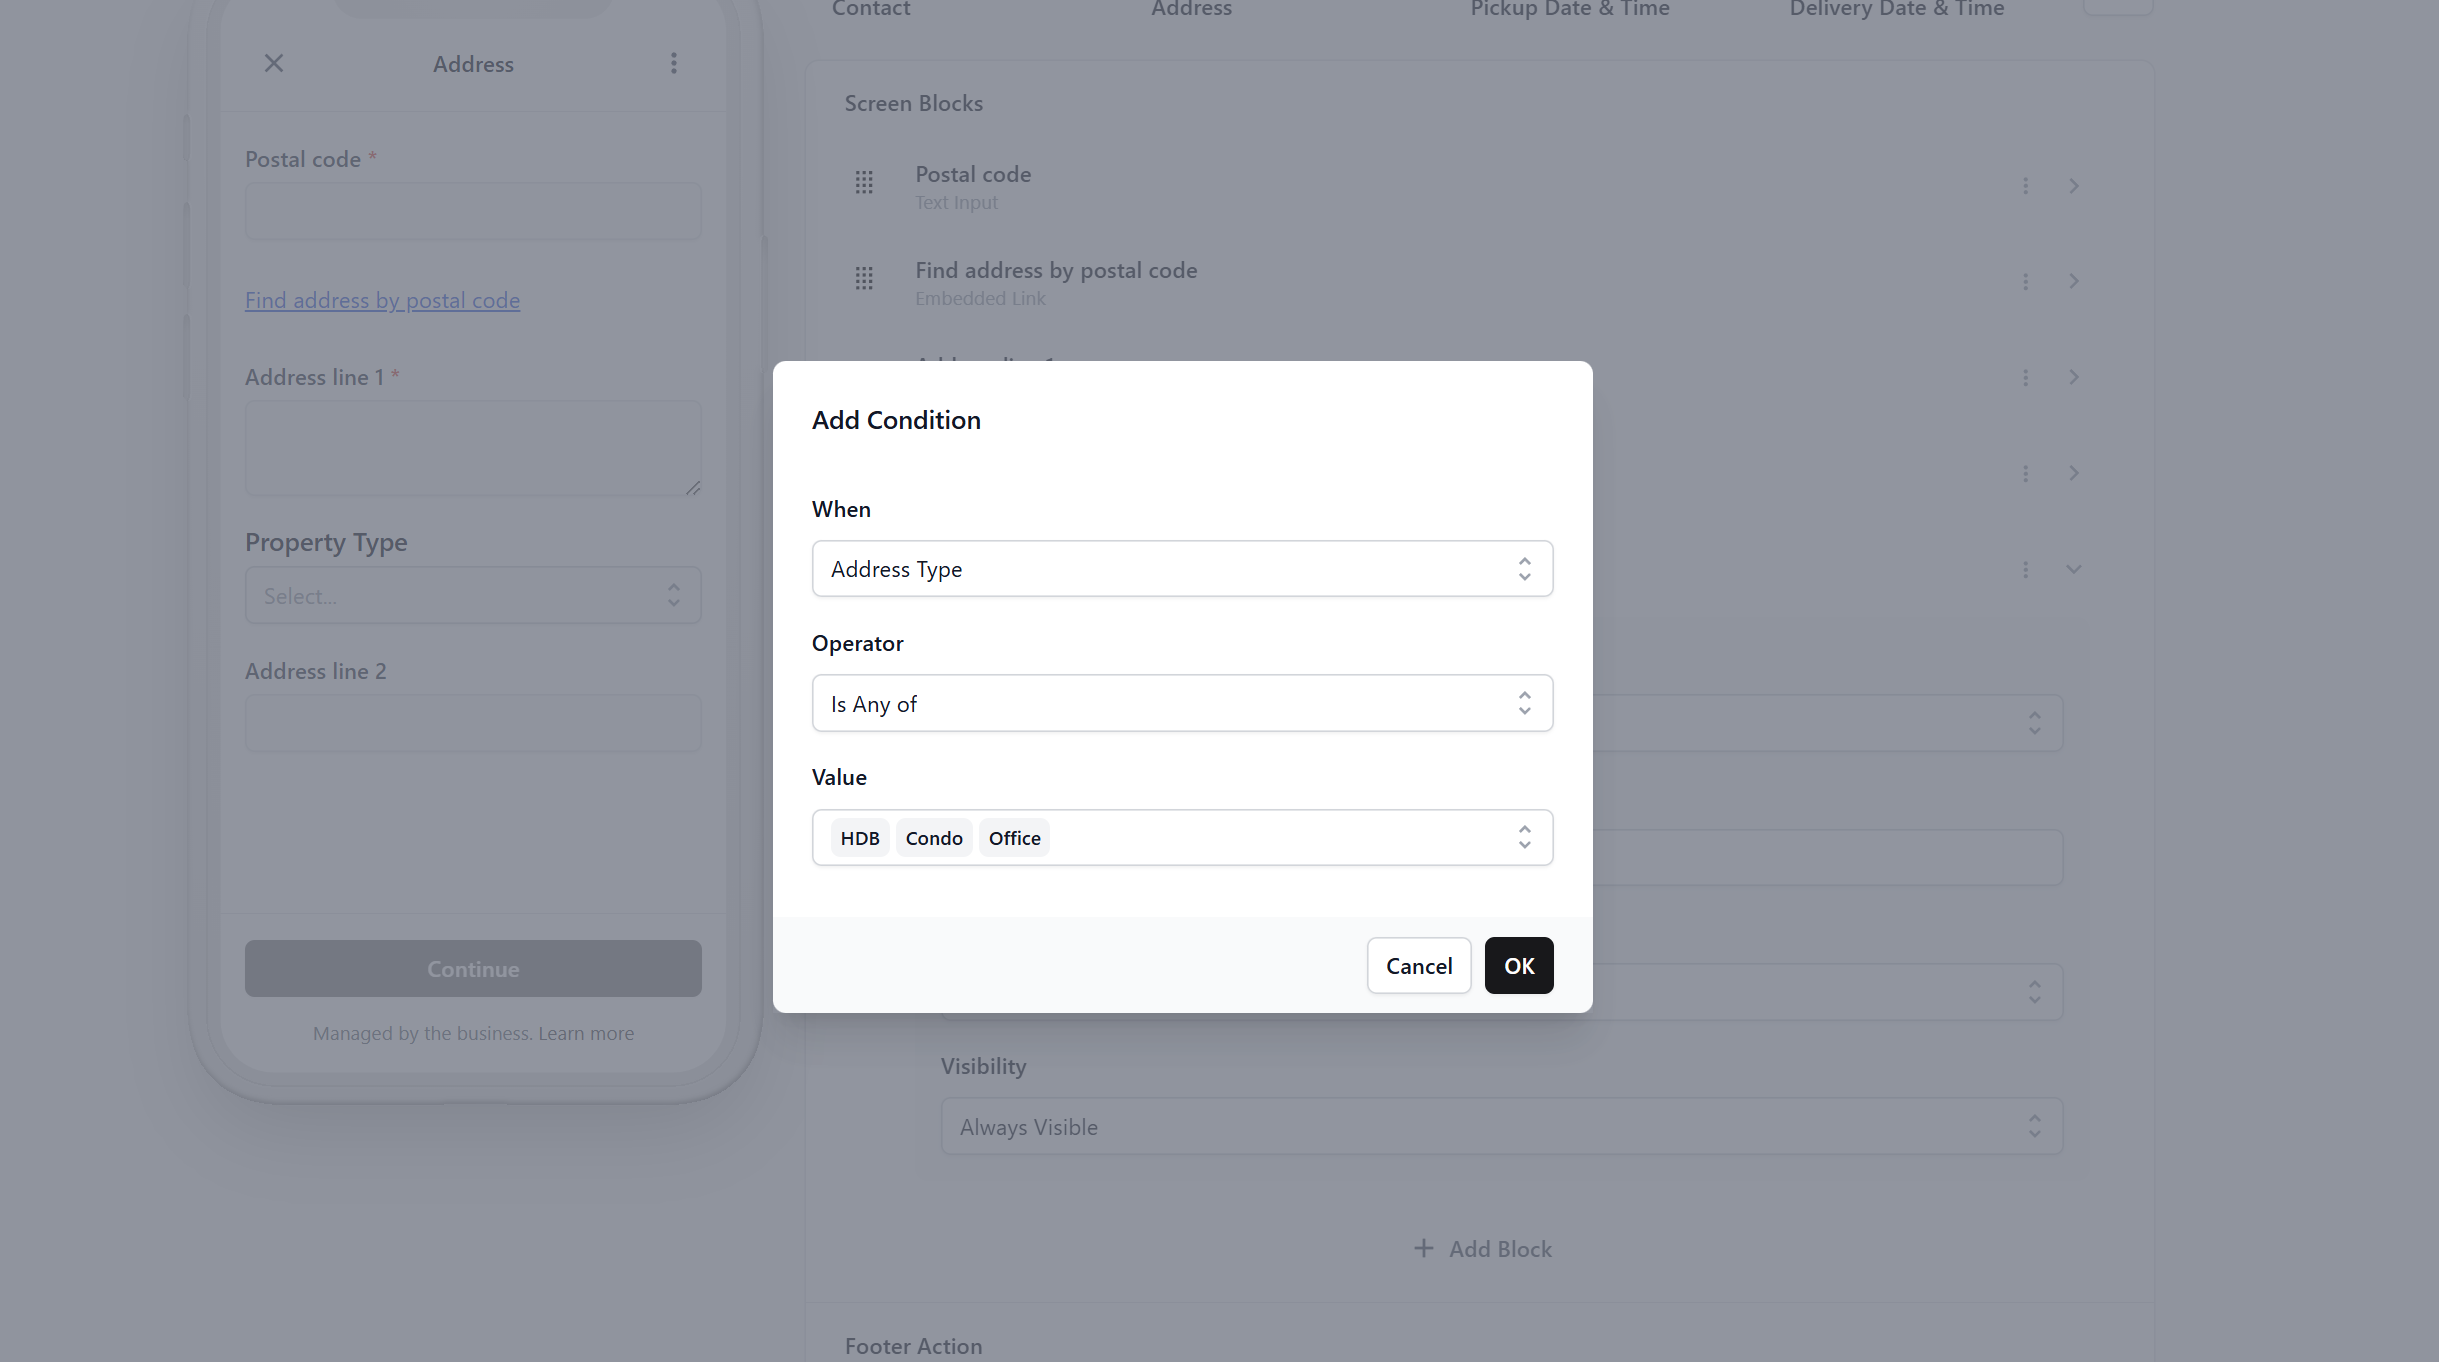
3. Set When Address Type, Operator Is Any Of, Value HDB, Condo, Office.
Address line 2 is now compulsory for apartments and optional for landed homes.
---
## Publish
Click Publish, confirm your WhatsApp Business Account, then use Send Test to fill the form in yourself before sending it to a customer. Full steps are in [How the Mini App Builder Works](/docs/how-the-mini-app-builder-works).
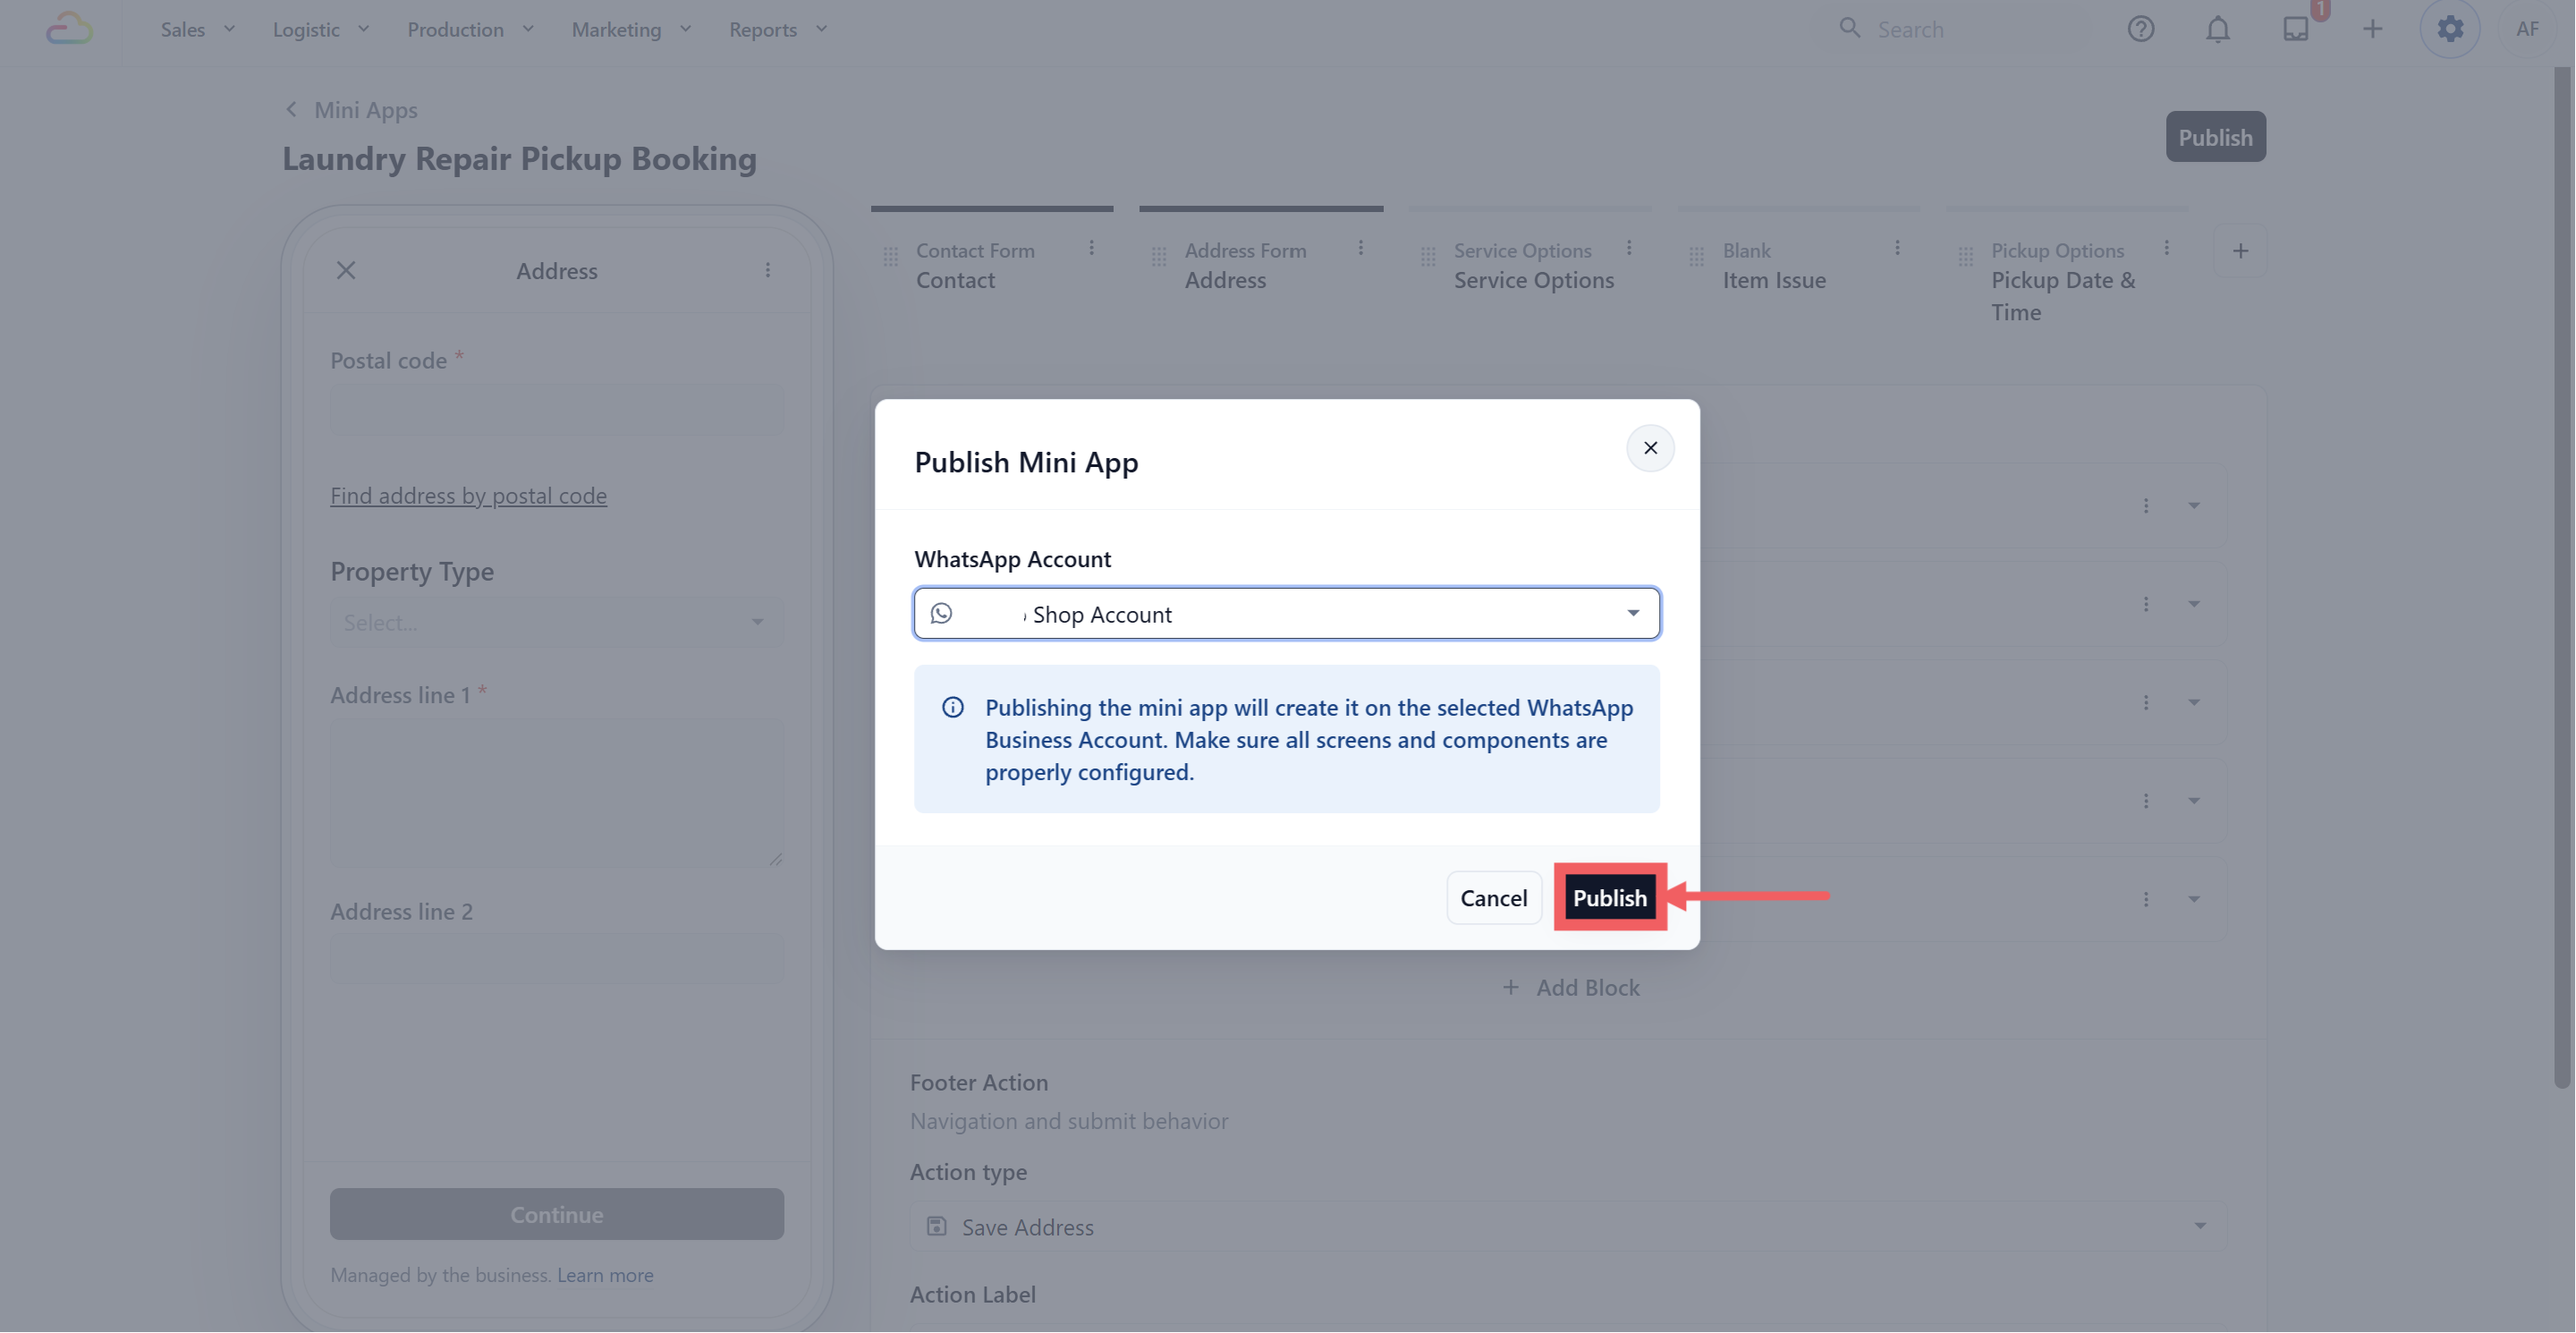
The Send Test button only appears after the Mini App is published. Publish first, then send yourself a test.
Complete the whole form using your own phone. Check that the correct service options appear, the minimum charge is clear, the pickup dates and times are correct, and the customer can select more than one item issue. If you make any changes after testing, publish the Mini App again before sending it to customers.
---
## FAQs
**When should I use Pickup Only instead of Pickup & Delivery?**
> Use Pickup Only when you cannot promise the return date at the time of collection, such as repair, alteration or specialty cleaning. Use Pickup & Delivery when your turnaround is fixed, like next day laundry.
**Does this Mini App still create an order?**
> Yes. When the customer taps the last button, EasyBiz creates the order with the pickup job attached.
**How do I arrange the return delivery later?**
> Once the item is ready, send the customer the Schedule Delivery Mini App. It attaches the delivery to the same order, so nothing is typed twice.
**Why is there no Delivery Date screen in this template?**
> On purpose. This form is for shops that do not know the finish date yet. Adding a delivery screen would force the customer to guess.
**Do the pickup dates follow my closed days and public holidays?**
> Yes. The pickup screen uses the same booking options and lead times as your counter, so customers cannot book a day you are closed.
**Can the customer tick more than one item issue?**
> Yes, if you use a Checkbox Group block. A Dropdown or Radio Buttons block only allows one answer.
**Where do the item issue answers show up?**
> They are saved on the order, so your staff can see the reported condition before the item arrives.
**Do I have to add the Service Options and Item Issue screens?**
> No. Both are optional. The three default screens are enough to start taking bookings today, and you can add the extra screens later.
**Can I use one Mini App for repair and for laundry?**
> Each Mini App is linked to one business unit and one sales channel. Create one per business unit so each order is created against the right service and lands in the right report.
---
## What's Next
Your Mini App is live, but it will not reach anyone until you send it. Continue to [Sending Your Mini Apps to Customers](/docs/sending-your-mini-apps-to-customers).