## Before You Start
You need three things in place before any method below will work.
| What you need | Why | Where to set it up |
| --- | --- | --- |
| A connected WhatsApp Business account | A Mini App is delivered as a button inside a WhatsApp message. Without the connection there is no chat to send it into. | [Set up WhatsApp Integration](/docs/connect-and-configure-whatsapp) |
| At least one **published** Mini App | A Mini App still in draft does not appear in any send list. | [How the Mini App Builder Works](/docs/how-the-mini-app-builder-works) |
| An existing order, **for delivery forms only** | Schedule Delivery and Reschedule forms attach to an order you already have. There is nothing to attach them to otherwise. | [Setting Up a Schedule Delivery Mini App](/docs/setting-up-a-schedule-delivery-mini-app) |
If you are not sure what a Mini App is or what your customer sees when they tap it, read [What Is a Mini App](/docs/what-is-a-mini-app) first, then come back here.
---
## Check That Your Mini App Is Published
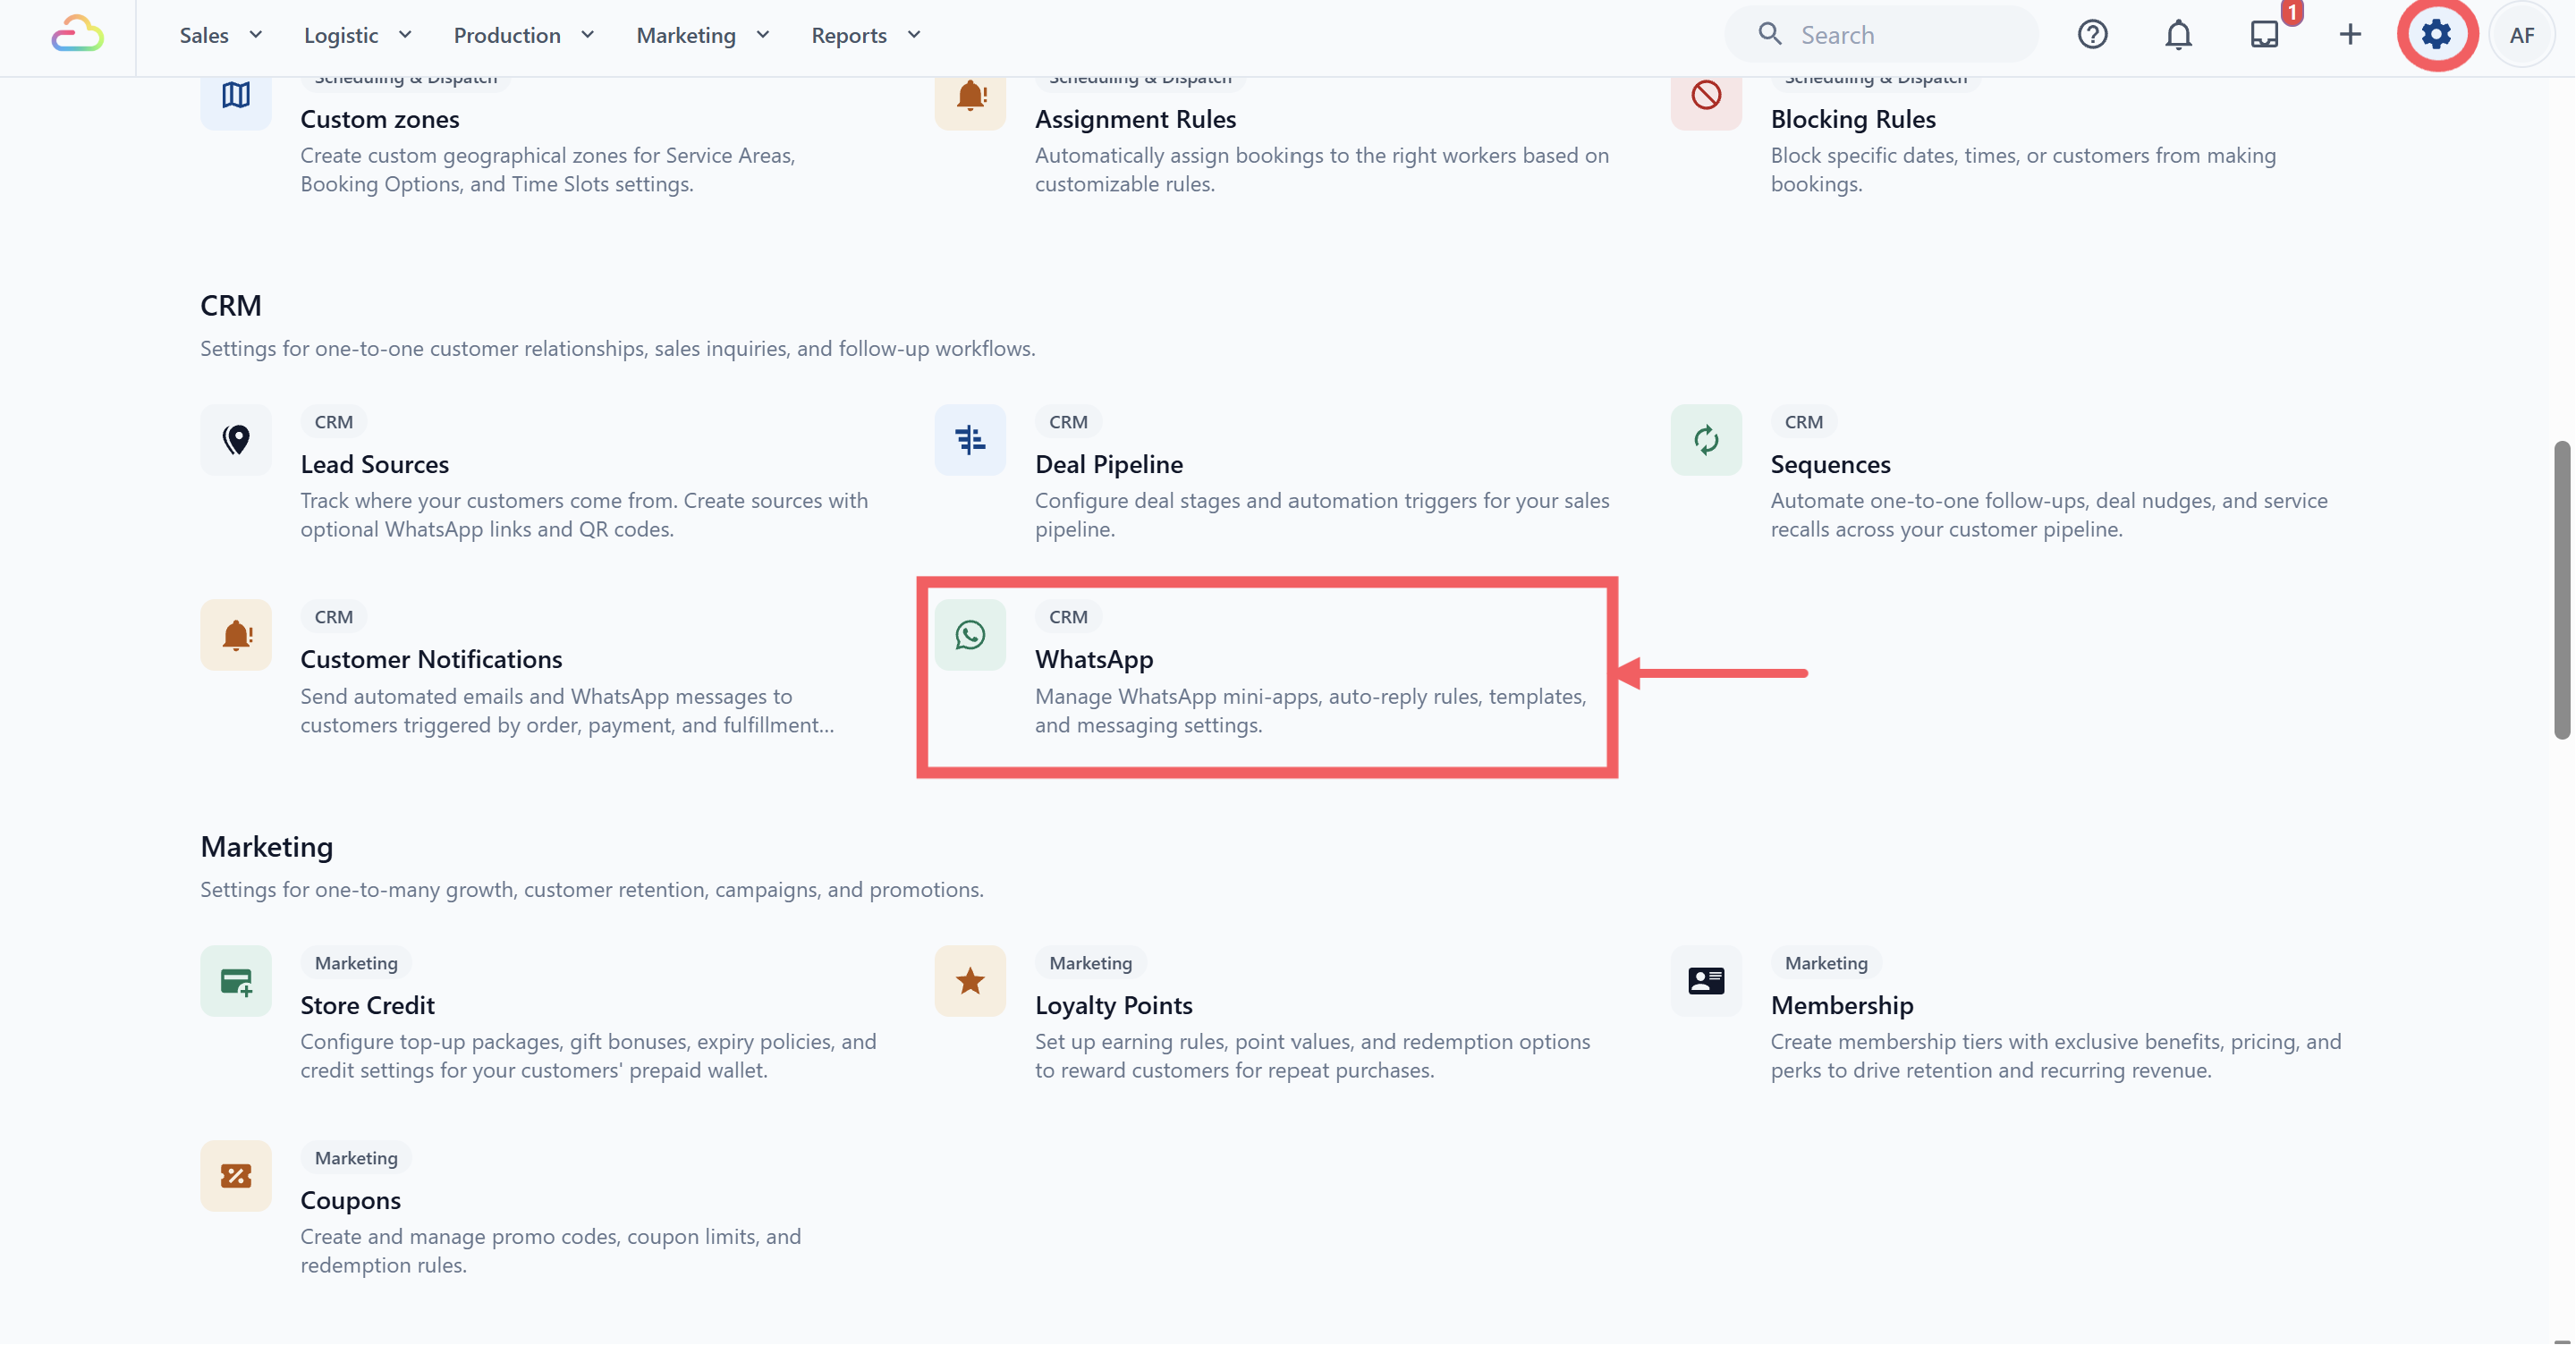
1. Click Settings in the top navigation bar.
2. Under the CRM section, click WhatsApp.
3. Click the Mini Apps tab.
4. Look at your Mini App in the list. A green Published chip means it is ready to send. A Draft chip means it is not.
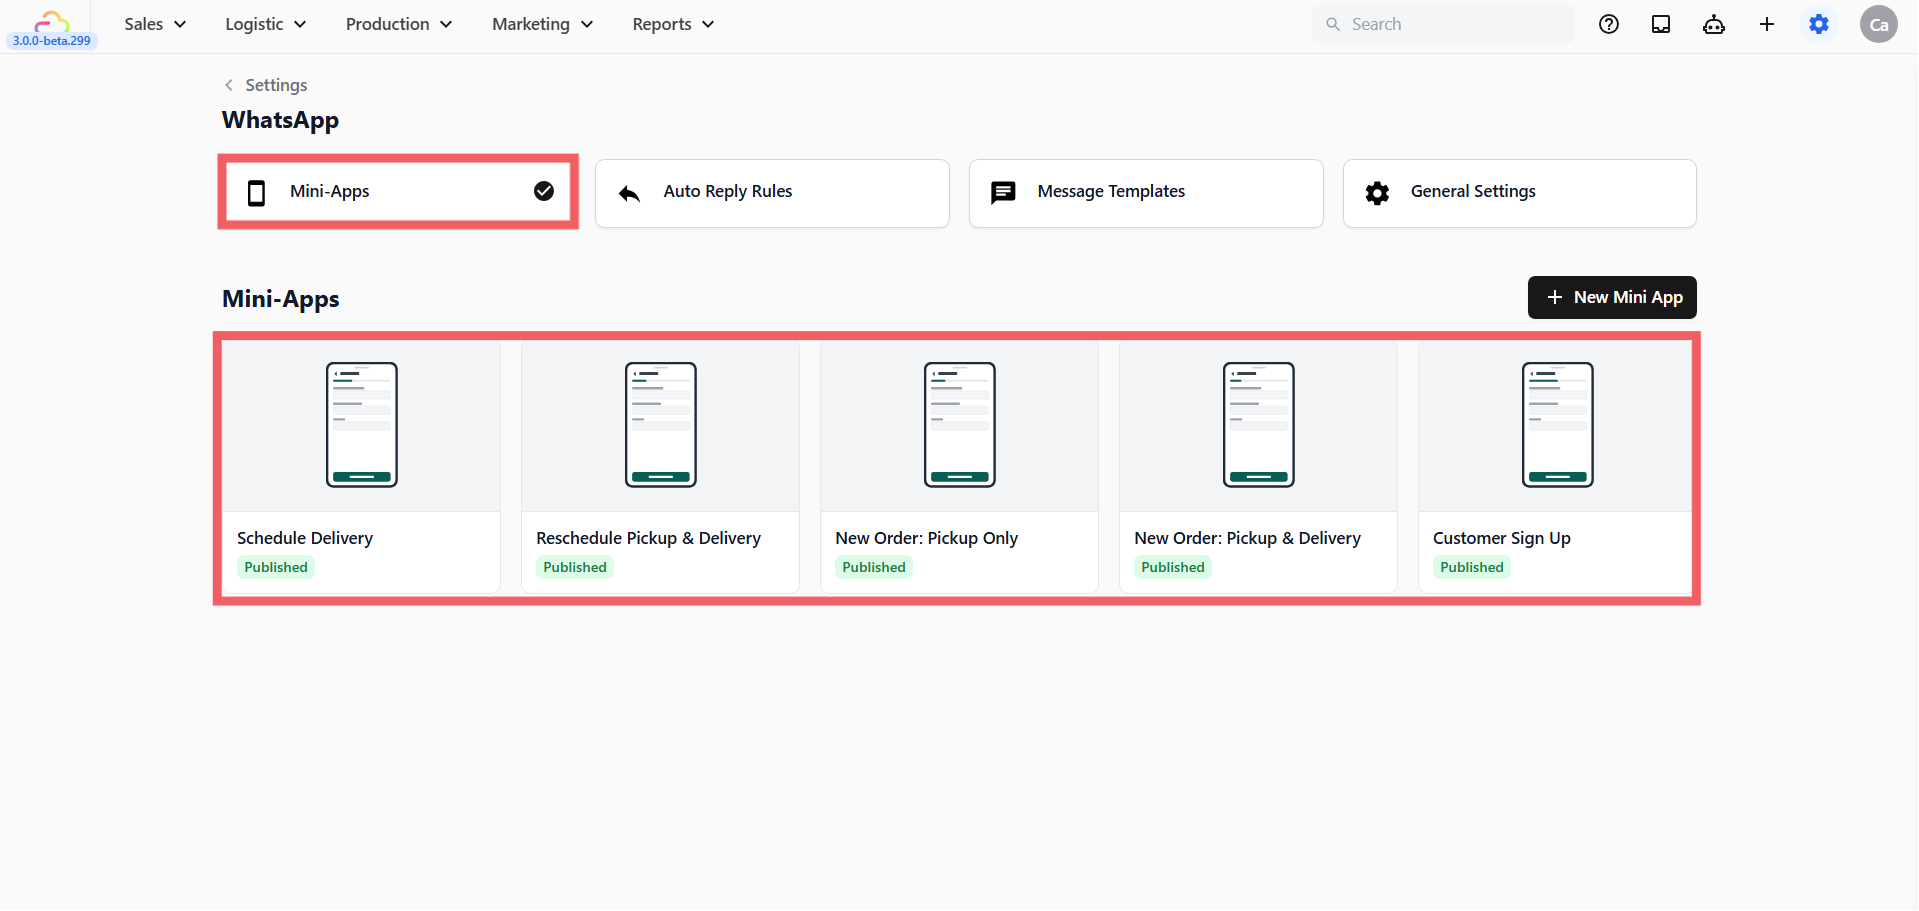
A Mini App in draft does not appear in the send list at all. If you cannot find your form when you try to send it, this is almost always the reason. Open it, click Publish, then come back.
---
## The One Rule That Decides Everything: the 24 Hour Window
WhatsApp does not let businesses message people whenever they like. The rule is simple:
When a customer sends you a message, WhatsApp opens a **24 hour window**. Inside that window you can reply with anything you want, free of charge. Once 24 hours pass with no new message from them, the window closes and you can only send a message that WhatsApp has approved in advance.
This is a WhatsApp rule, not an EasyBiz setting, and it cannot be turned off. It exists to stop businesses spamming people.
What this means for you in practice:
| Situation | What you can send |
| --- | --- |
| The customer messaged you in the last 24 hours | Anything — Method 1, 2 or 4 |
| The customer has gone quiet for more than 24 hours | Only an approved template — Method 3 |
When the window has closed, the message box in your WhatsApp Inbox is locked. You cannot type, and the Mini App and quick reply buttons will not send. Only the template button still works.
---
## Which Method Should You Use
All four methods put the same booking form in front of the customer. They differ in who triggers the send, and whether WhatsApp has to approve your message first.
**Method 1 — Send from the Inbox.** You are chatting with the customer right now, and you click a button to drop the form into the conversation. Nothing to set up. This is where every shop starts.
**Method 2 — Quick reply shortcut.** A quick reply is a saved message your team can send by typing /. You build it once, and after that any staff member sends the same booking form in two keystrokes instead of five clicks. Best when your counter staff send the same form twenty times a day.
**Method 3 — Utility or Marketing template.** This is a message WhatsApp has checked and approved in advance. It is the only way to reach a customer who has not replied in over 24 hours, which makes it your tool for reminders, follow-ups and promotions.
**Method 4 — Auto Reply Rule.** A rule that watches your incoming messages and replies on its own, without a staff member touching anything. A customer messages "pickup" at 11pm and the booking form arrives immediately. This is the one that keeps working after your shop closes.
| Method | Use it when | Who sends it | Needs WhatsApp approval |
| --- | --- | --- | --- |
| 1. Send from the Inbox | The customer is chatting with you right now | Your staff, by hand | No |
| 2. Quick reply shortcut | Your staff send the same form many times a day | Your staff, in two keystrokes | No |
| 3. Utility or Marketing template | The customer has not replied in over 24 hours | Your staff, by hand | Yes |
| 4. Auto Reply Rule | You want it sent automatically, even at 11pm | The system, on its own | No |
Use Method 1 today — it needs no setup at all. Add Method 4 next, because it works while your shop is closed. Methods 2 and 3 are worth the setup time once you know which form your team sends most.
---
## Method 1 — Send Directly from the Inbox
**Best for:** a customer who is messaging you right now.
1. Open your WhatsApp Inbox and click the customer's chat.
2. Below the message box, click the **Mini App icon**. A panel opens titled Attach Mini-App.
3. Click the Mini App you want to send.
4. Confirm the details in the panel.
- For pickup bookings and sign ups you will see a Select Customer field, already filled in with the person you are chatting with.
- For delivery bookings you will see a Select Order field. You must choose which order this delivery belongs to, so the date the customer picks lands on the right job.
5. Click Send.
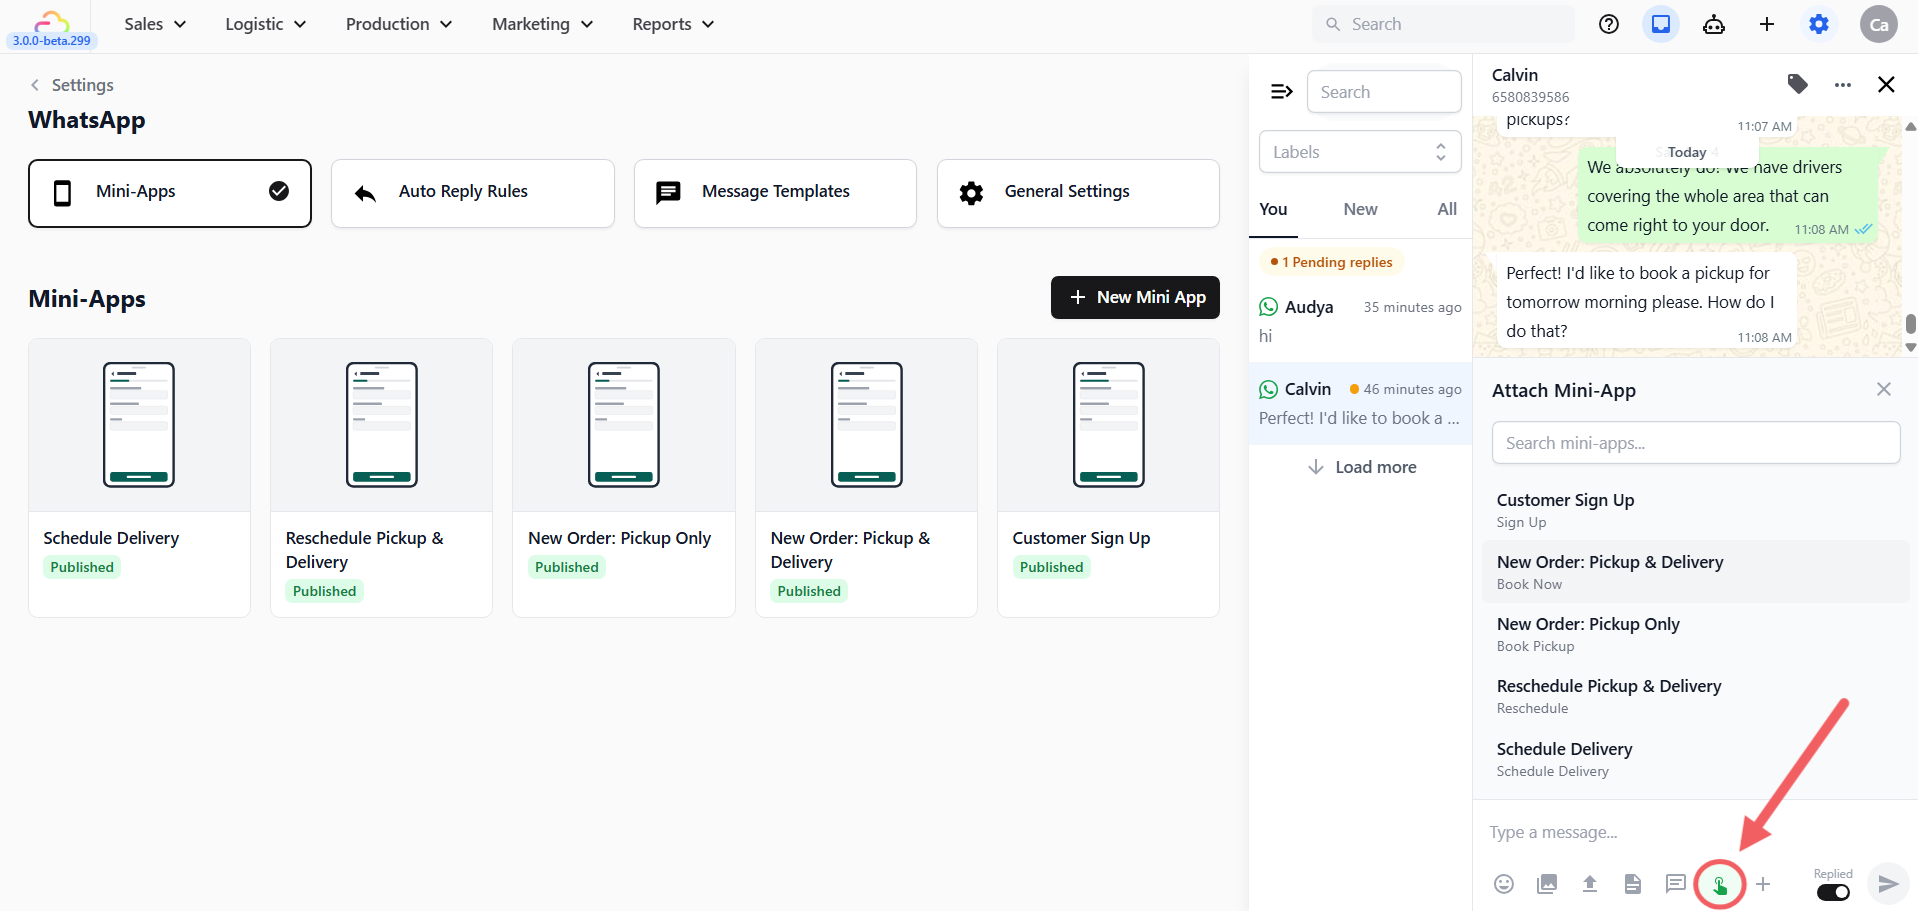
If the customer has not messaged you for more than 24 hours, the message box is locked and this will not send. Use Method 3 instead.
---
## Method 2 — Quick Reply Shortcut
**Best for:** staff who send the same form all day. Two keystrokes instead of five clicks.
### Set it up once
1. Click Settings in the top navigation bar, then under the CRM section click WhatsApp.

2. Open the Message Templates tab. You will see four bubbles across the top — Utility, Authentication, Marketing and Quick reply. Click Quick reply.
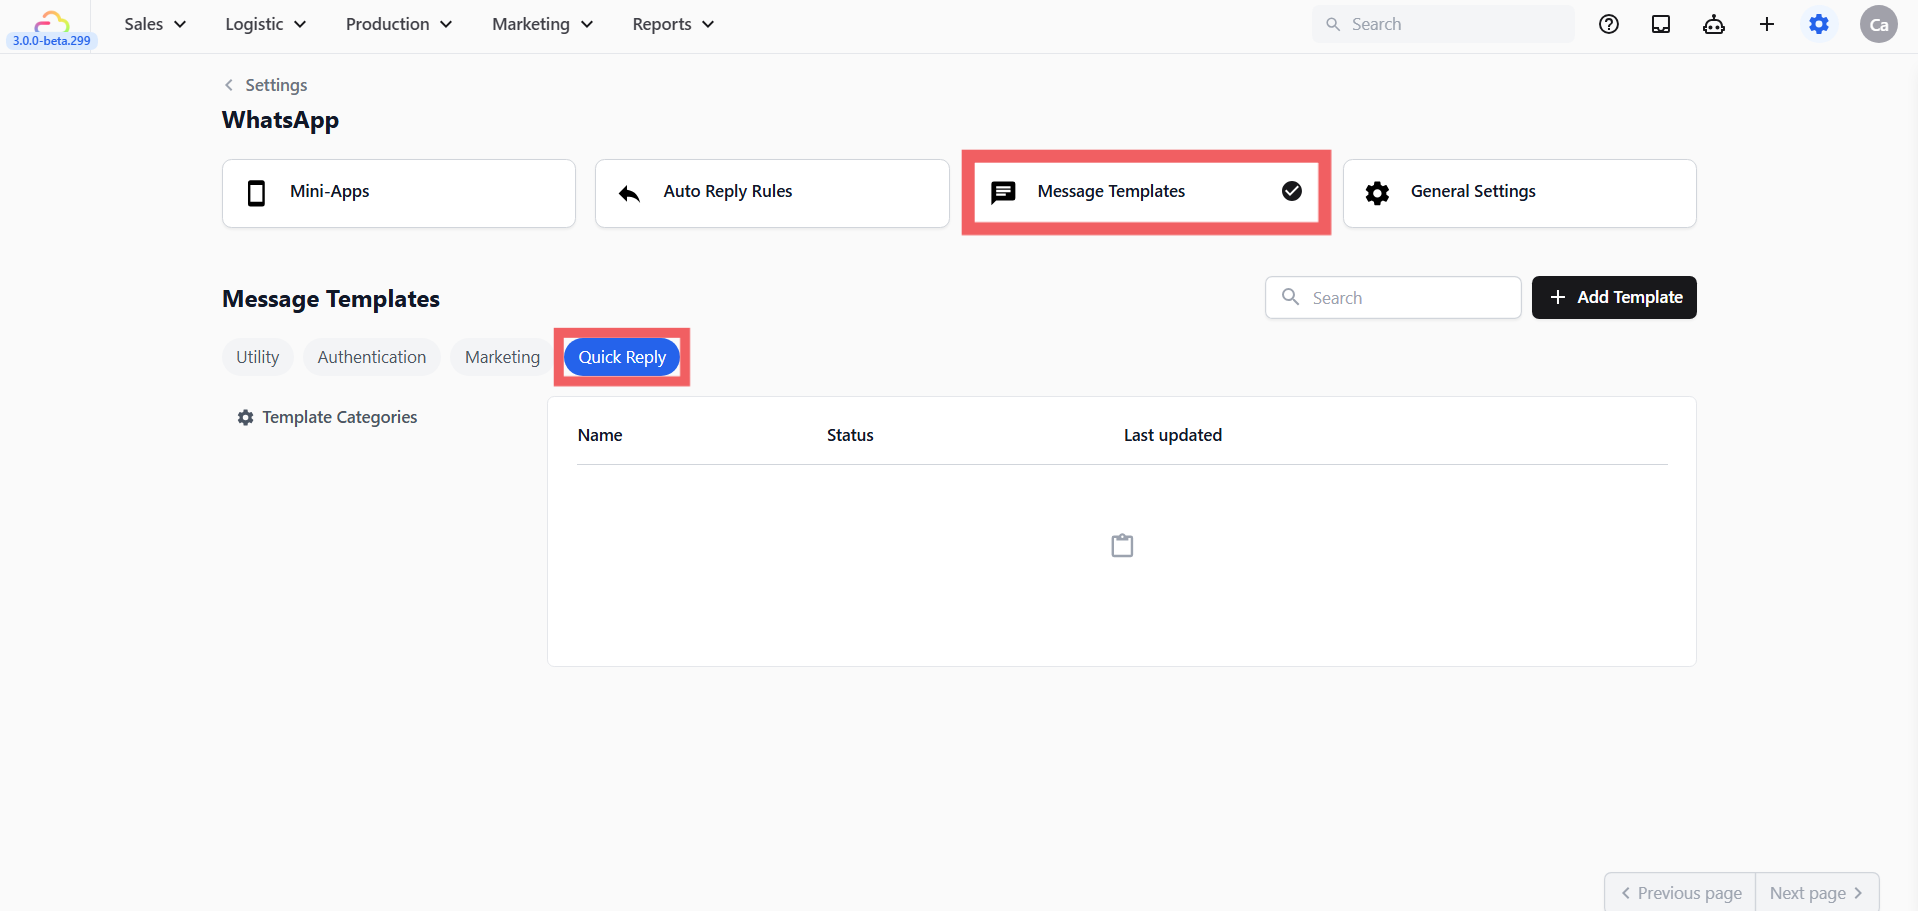
3. (Optional) Group your saved messages using Template Categories. Think of a category as a folder. If your team has twenty saved messages, folders make the right one easier to find.
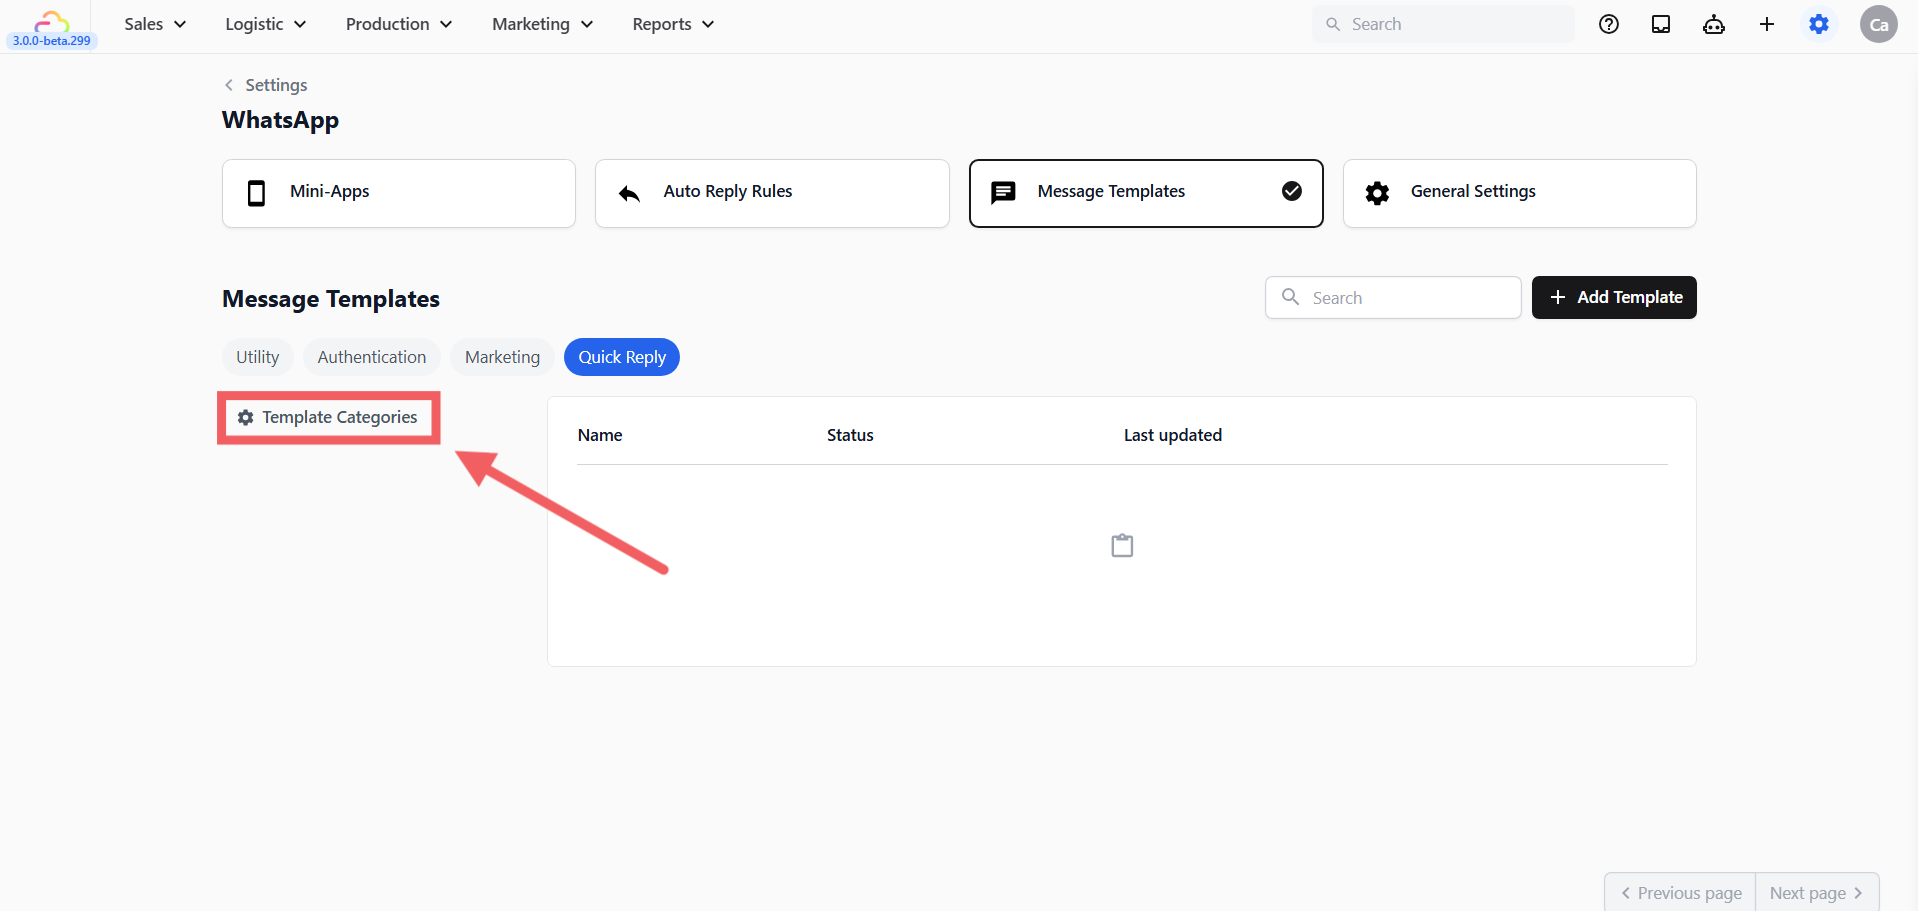
- On the left sidebar, click the Template Categories gear icon.
- Click + Add Category, enter a name such as Mini Apps Booking Forms, and click Save.
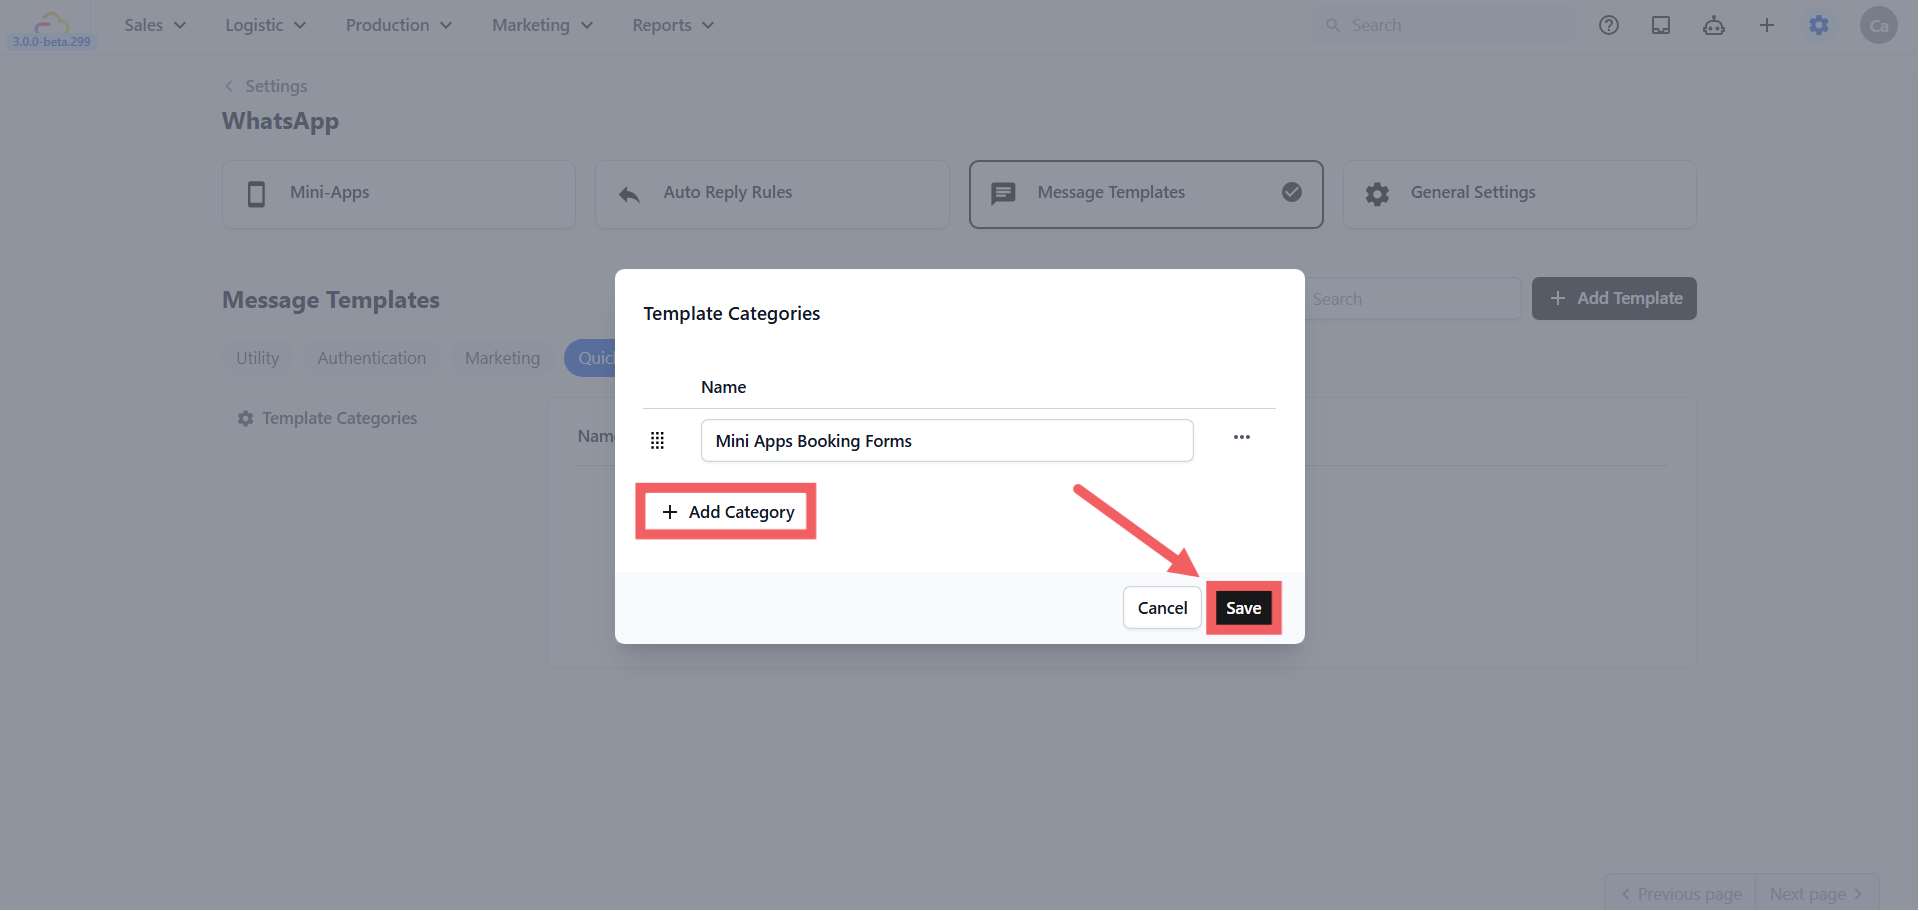
If you use categories, give **every** saved message a category. If you put one message in a folder and leave the rest blank, the ones with no folder disappear from the list. If you do not want folders, leave the category field empty everywhere.
4. Click + Add Template at the top right.
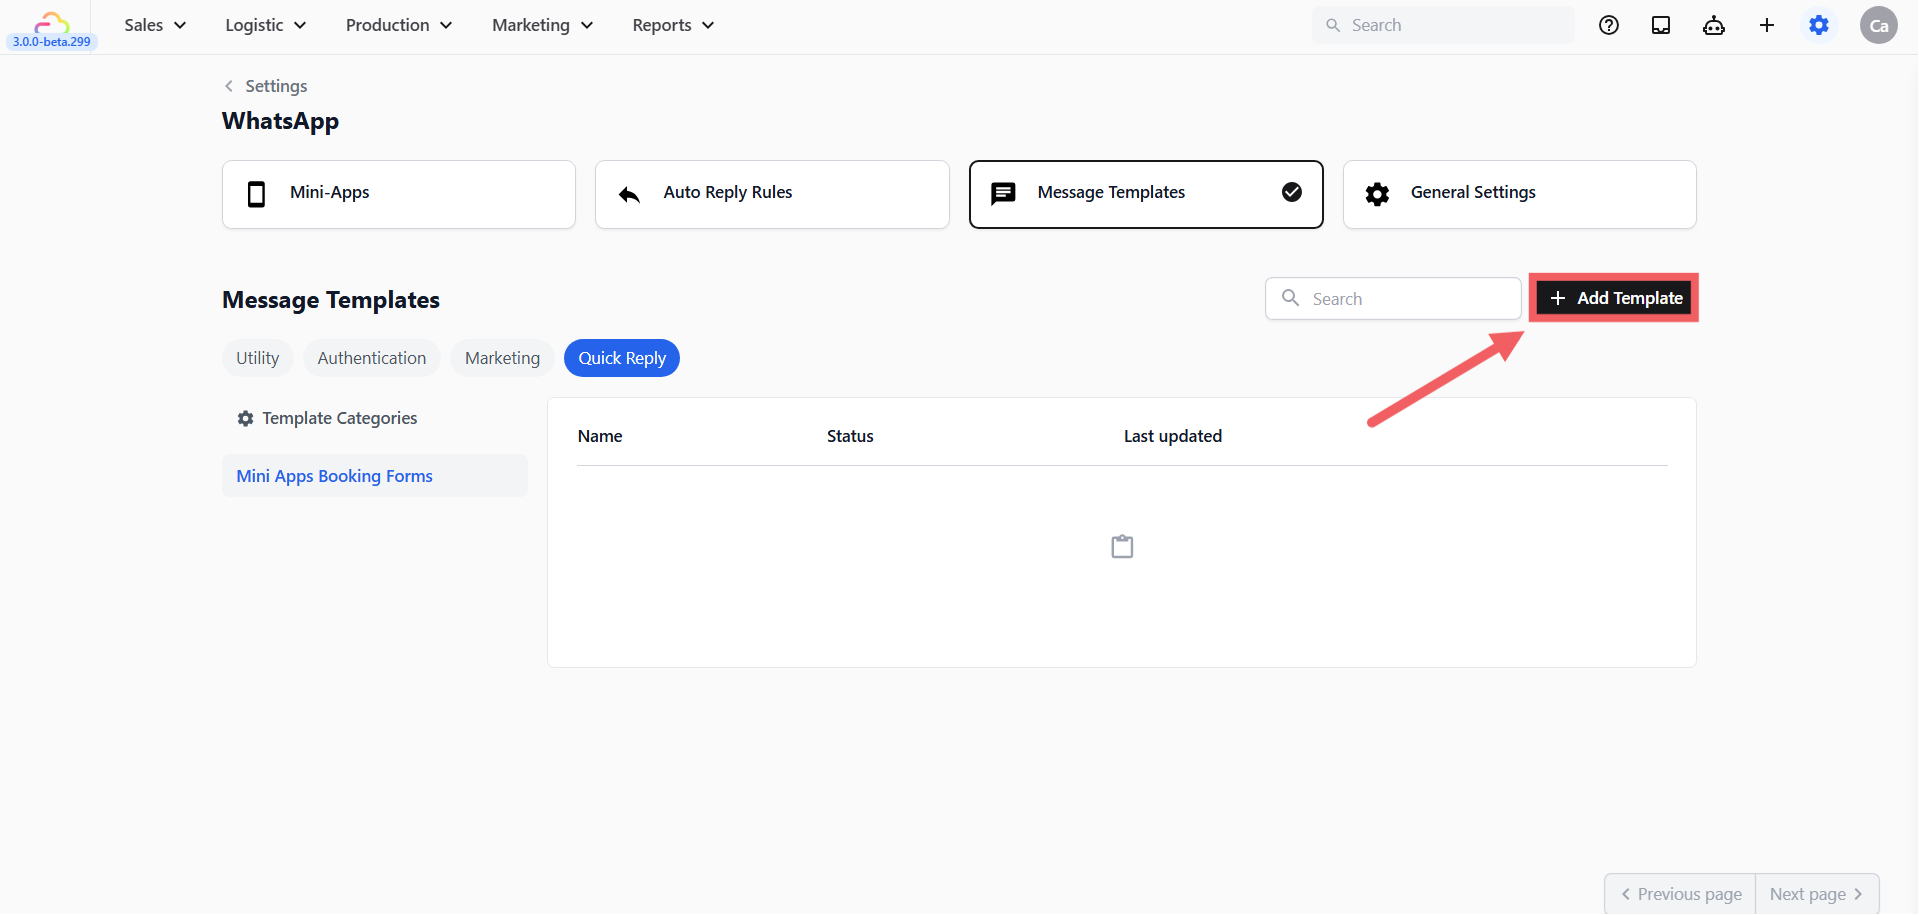
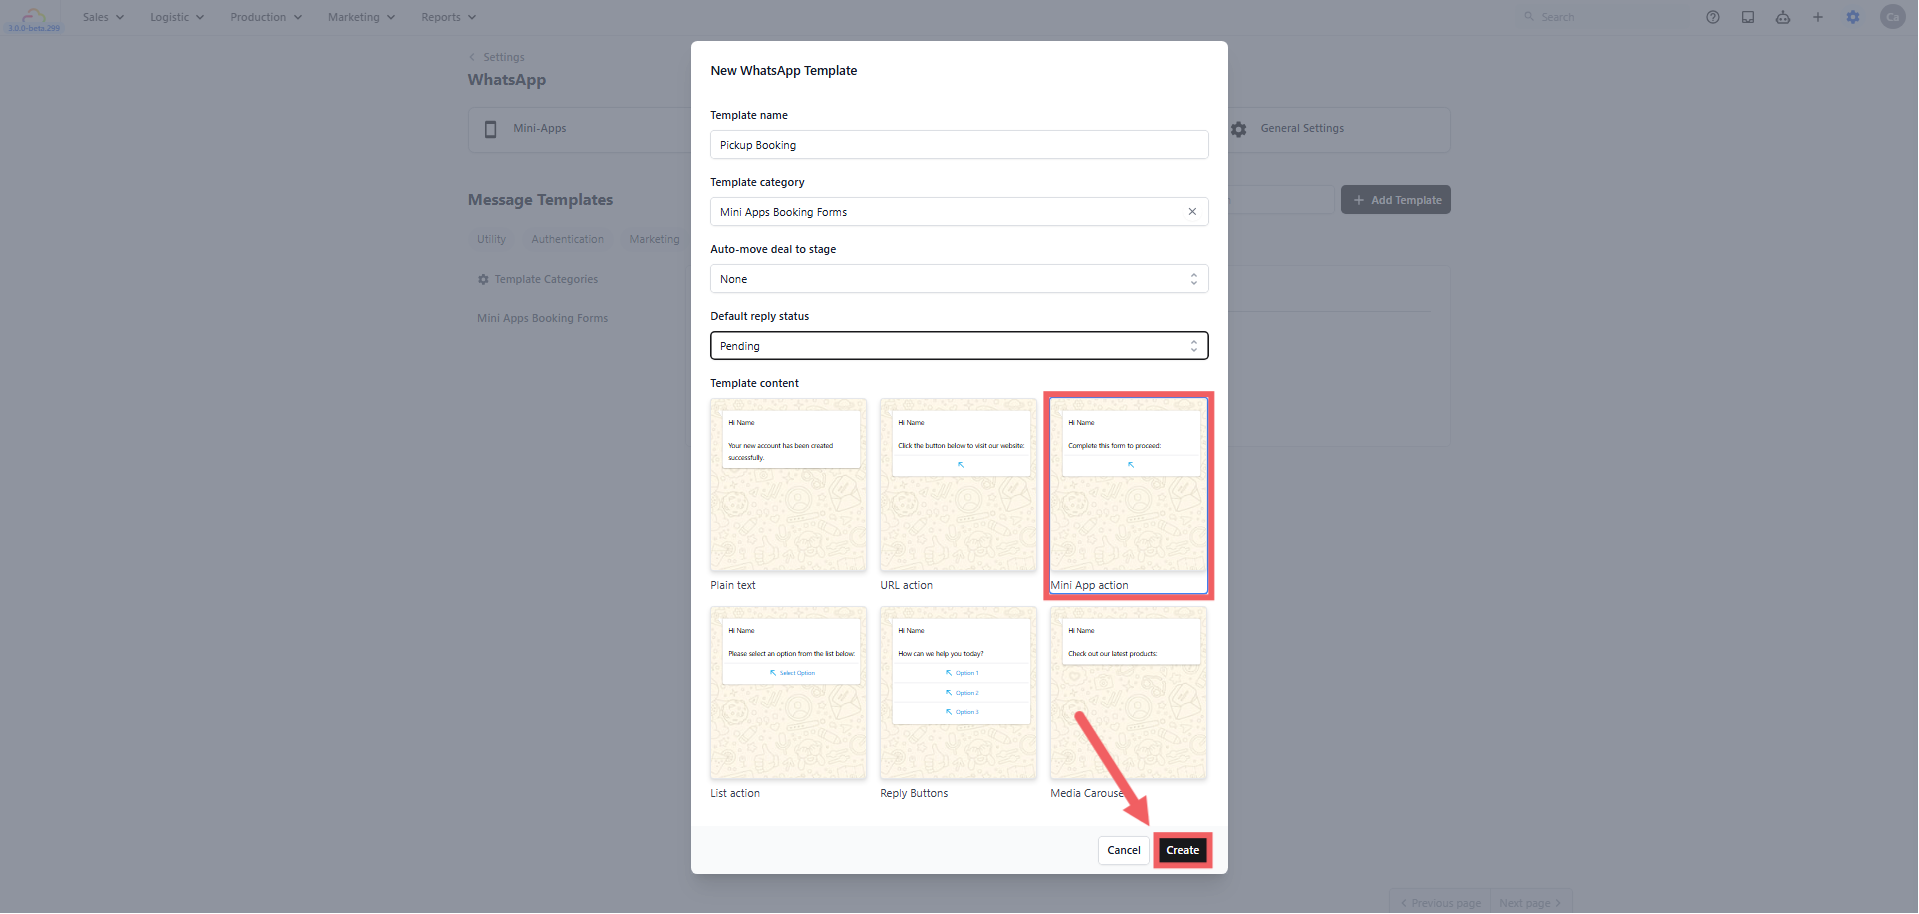
5. Enter a Template Name. This name is only seen by your team, so make it obvious, for example Send Pickup Booking Form.
6. Set the Default reply status. This decides what happens to the conversation after your staff send this message.
| Choose | What happens to the conversation |
| --- | --- |
| Replied | Marked as done and moves out of your Pending list |
| Pending | Stays in your Pending list so your team remembers to follow up |
7. Under Template Content, click the Mini App action card, then click Create.
8. Scroll to the Buttons section. The action type is already set to Open mini App. Choose your Mini App from the dropdown. The Button text fills in on its own, and you can change it to anything shorter, such as Book Pickup.
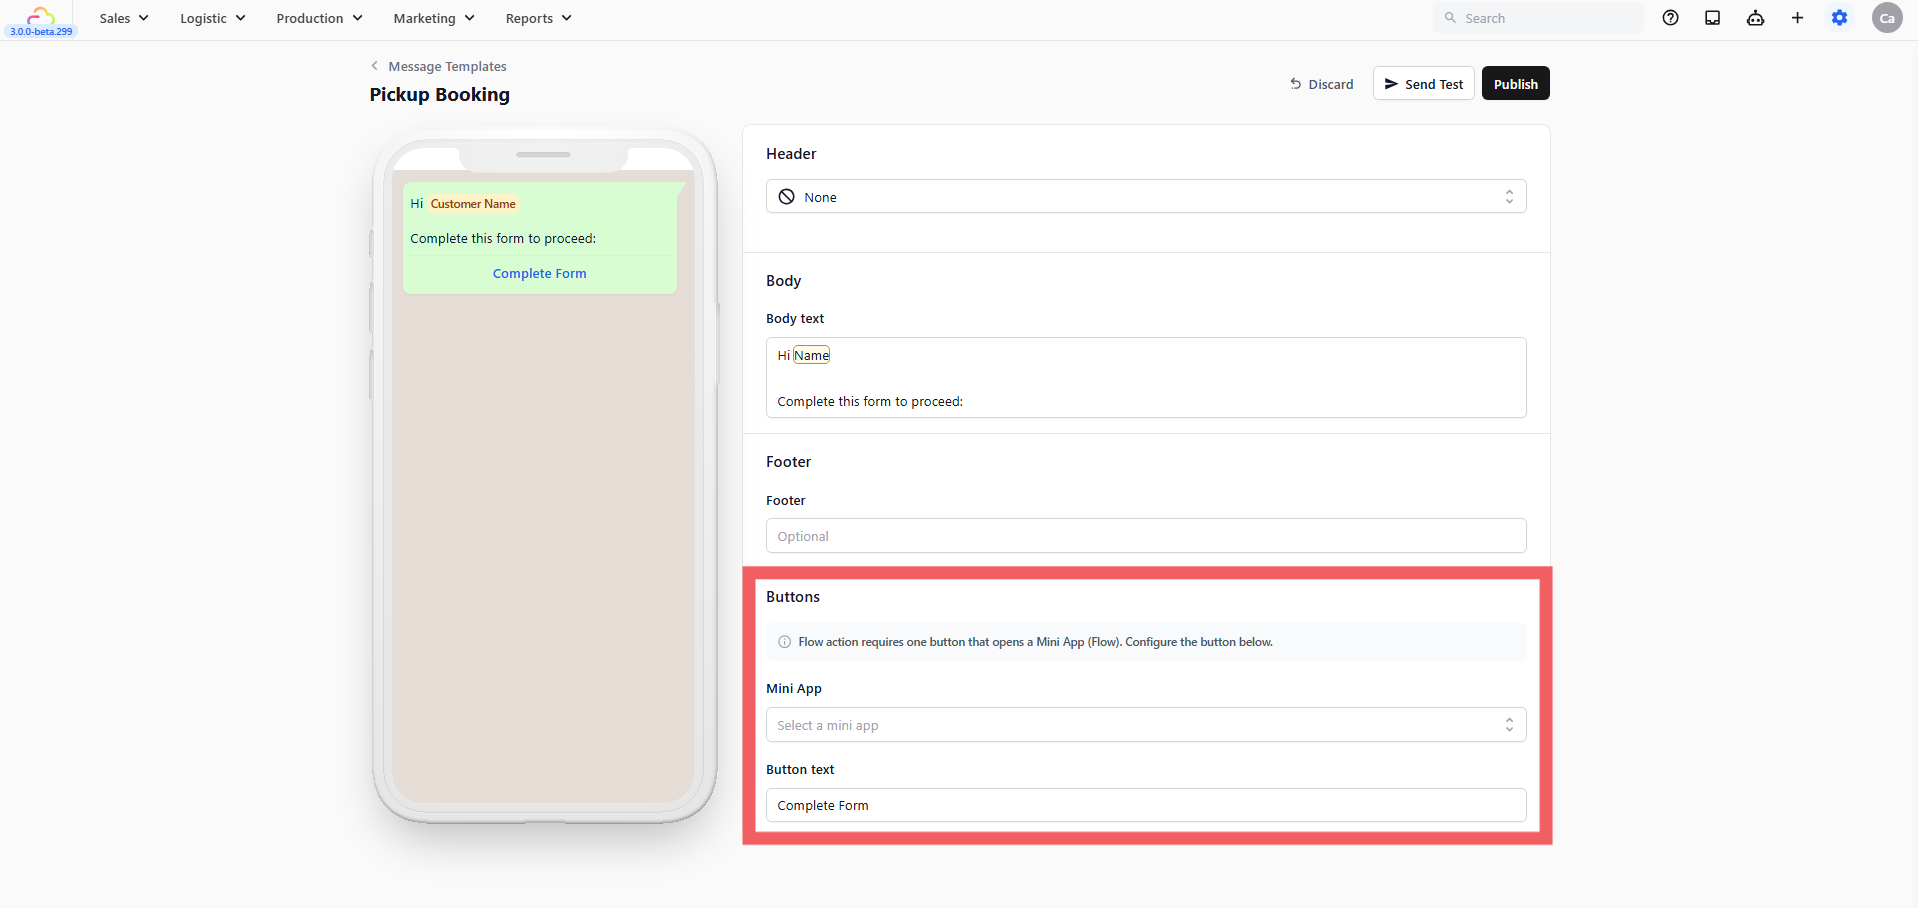
9. (Optional) Edit the Body text — this is the message that appears above the button. Type @ to drop in the customer's name so the message does not read like a machine wrote it.
10. Click Publish.
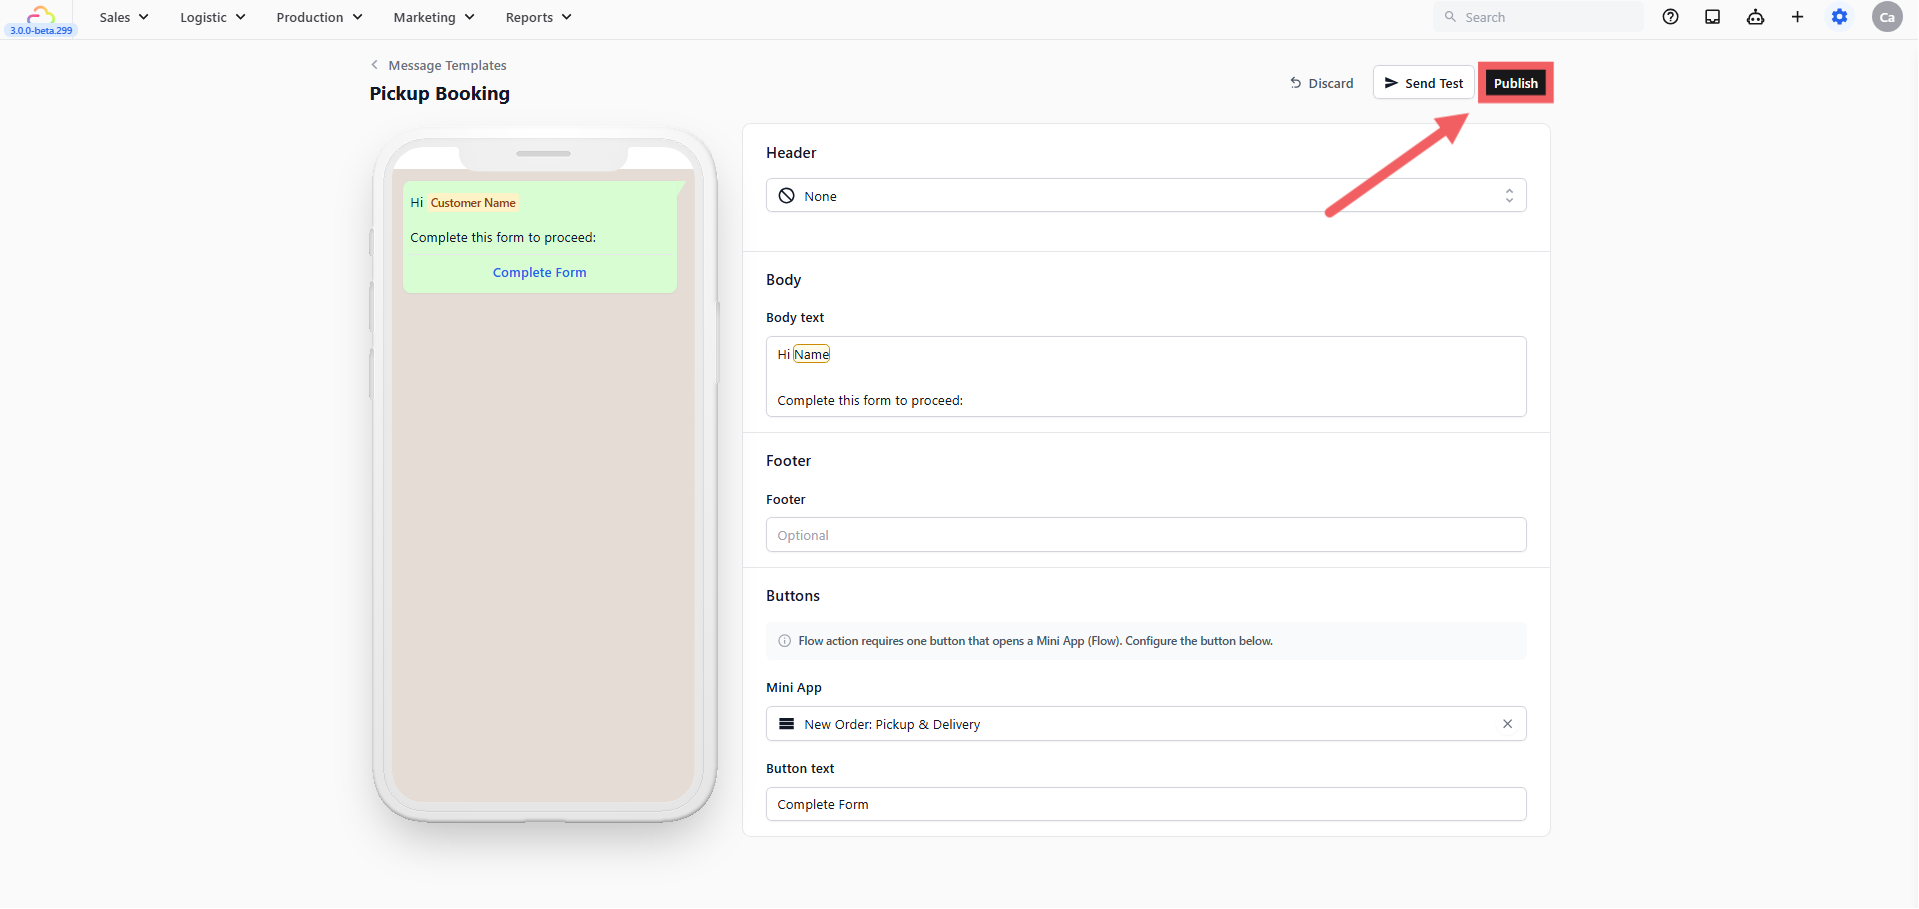
A quick reply is ready the moment you publish it. WhatsApp does not review it, because you can only send it to someone who messaged you first.
### Send it
1. Open the customer's chat in your WhatsApp Inbox.
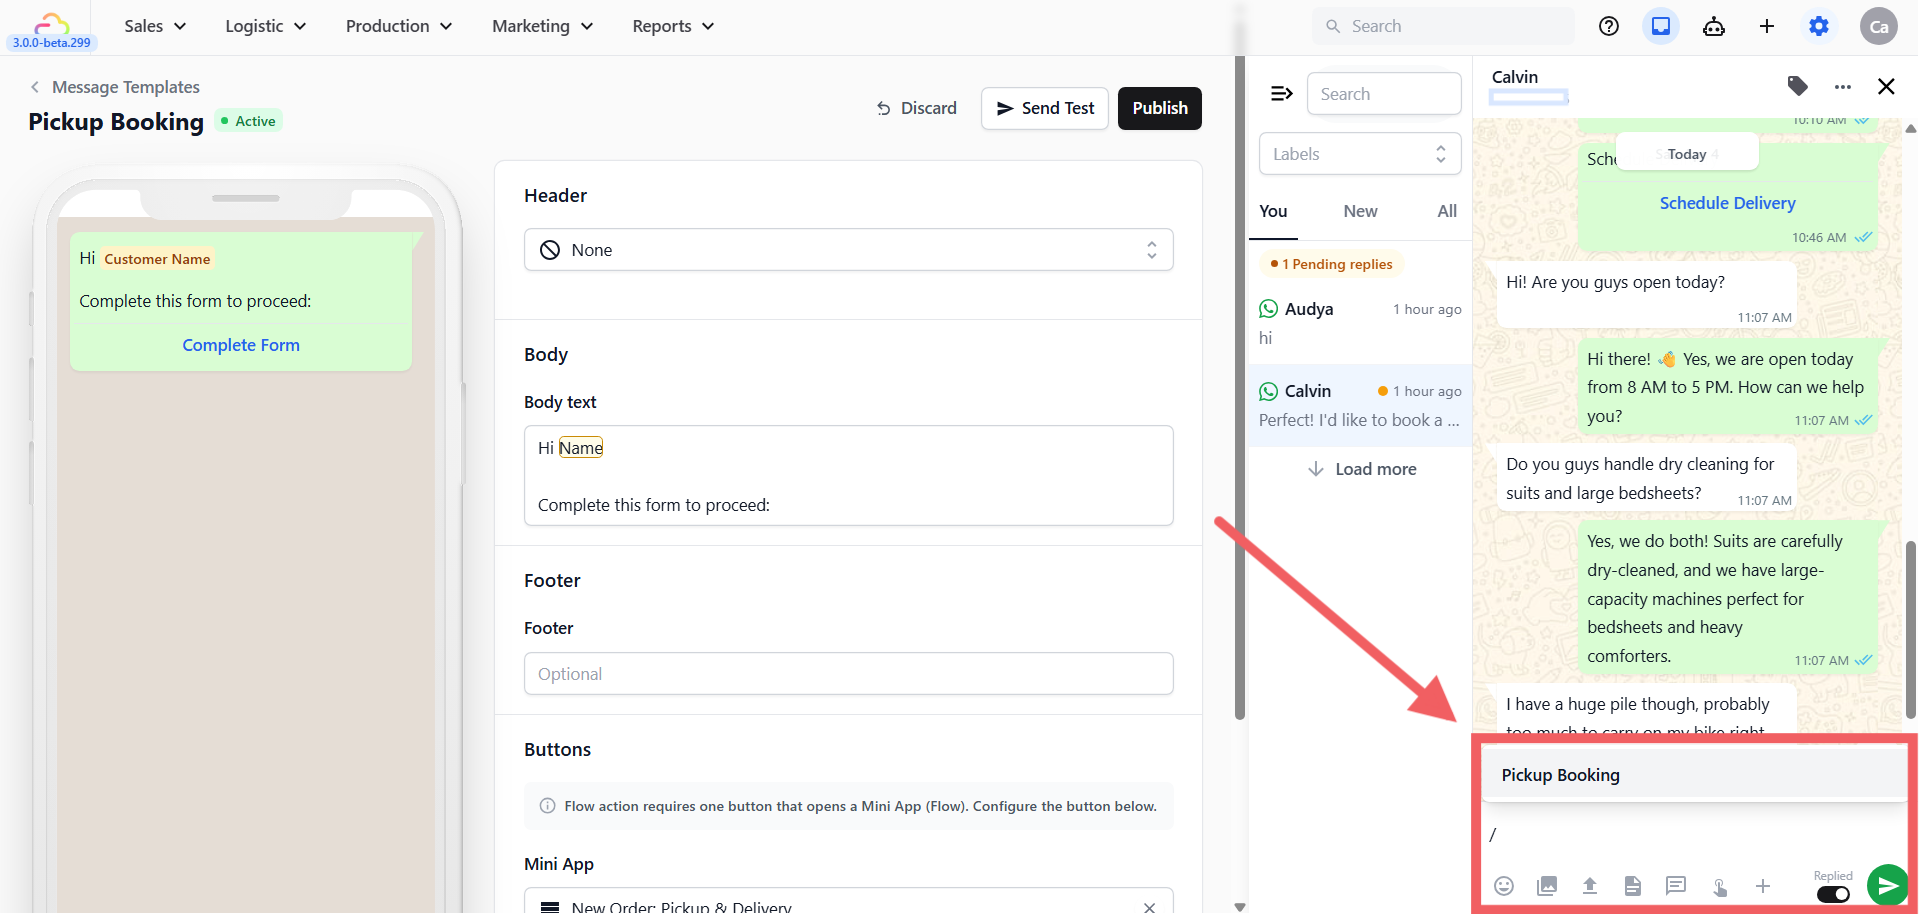
2. Type / in the message box.
3. Pick your saved message from the list that appears.
4. Confirm the customer or the order if you are asked, then click Send.
Like Method 1, a quick reply can only be sent within 24 hours of the customer's last message. After that the message box is locked and you must use Method 3.
---
## Method 3 — Utility or Marketing Template
**Best for:** customers who have gone quiet for more than 24 hours.
A template is a message you write in advance and send to WhatsApp for checking. Once WhatsApp approves it, you can send it to a customer at any time, even months after they last spoke to you. This is the only way to reach a quiet customer.
| Bubble | Use it for | Example |
| --- | --- | --- |
| Utility | Something about an order the customer already has | "Your bag is ready — pick your delivery date" |
| Marketing | Promotions and anything selling | "20% off this week — book a pickup" |
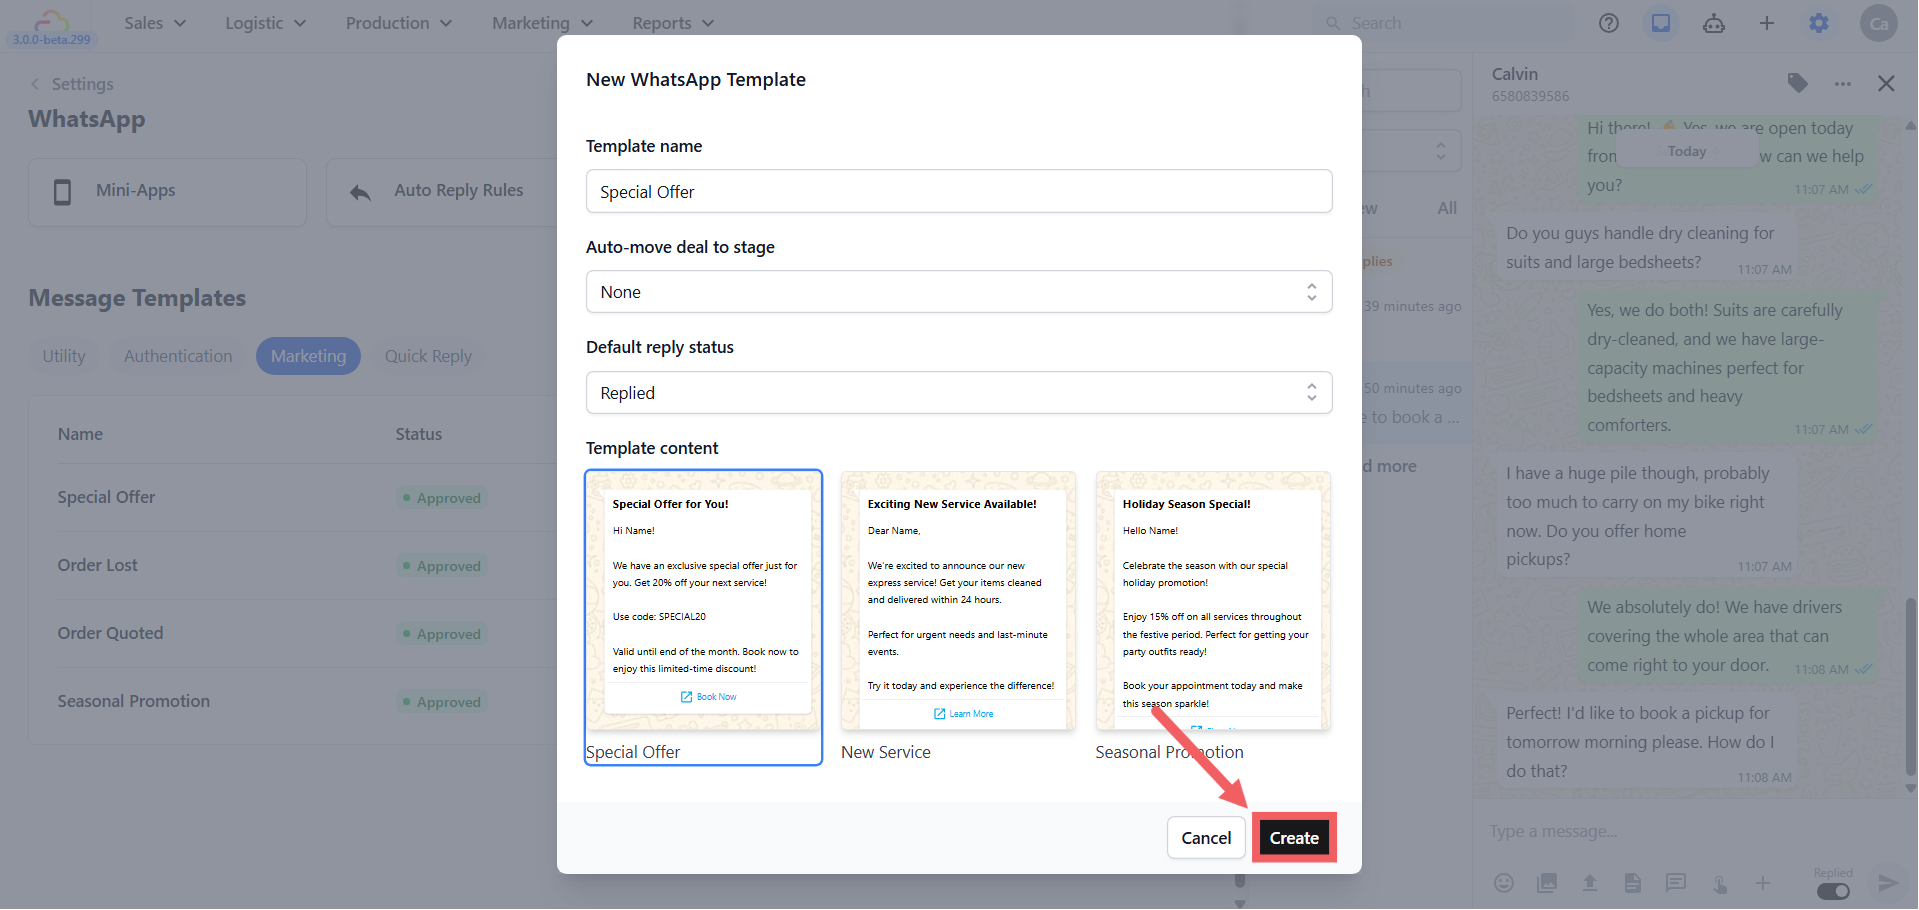
1. Open the Message Templates tab and click the Utility or Marketing bubble.
2. Click + Add Template.
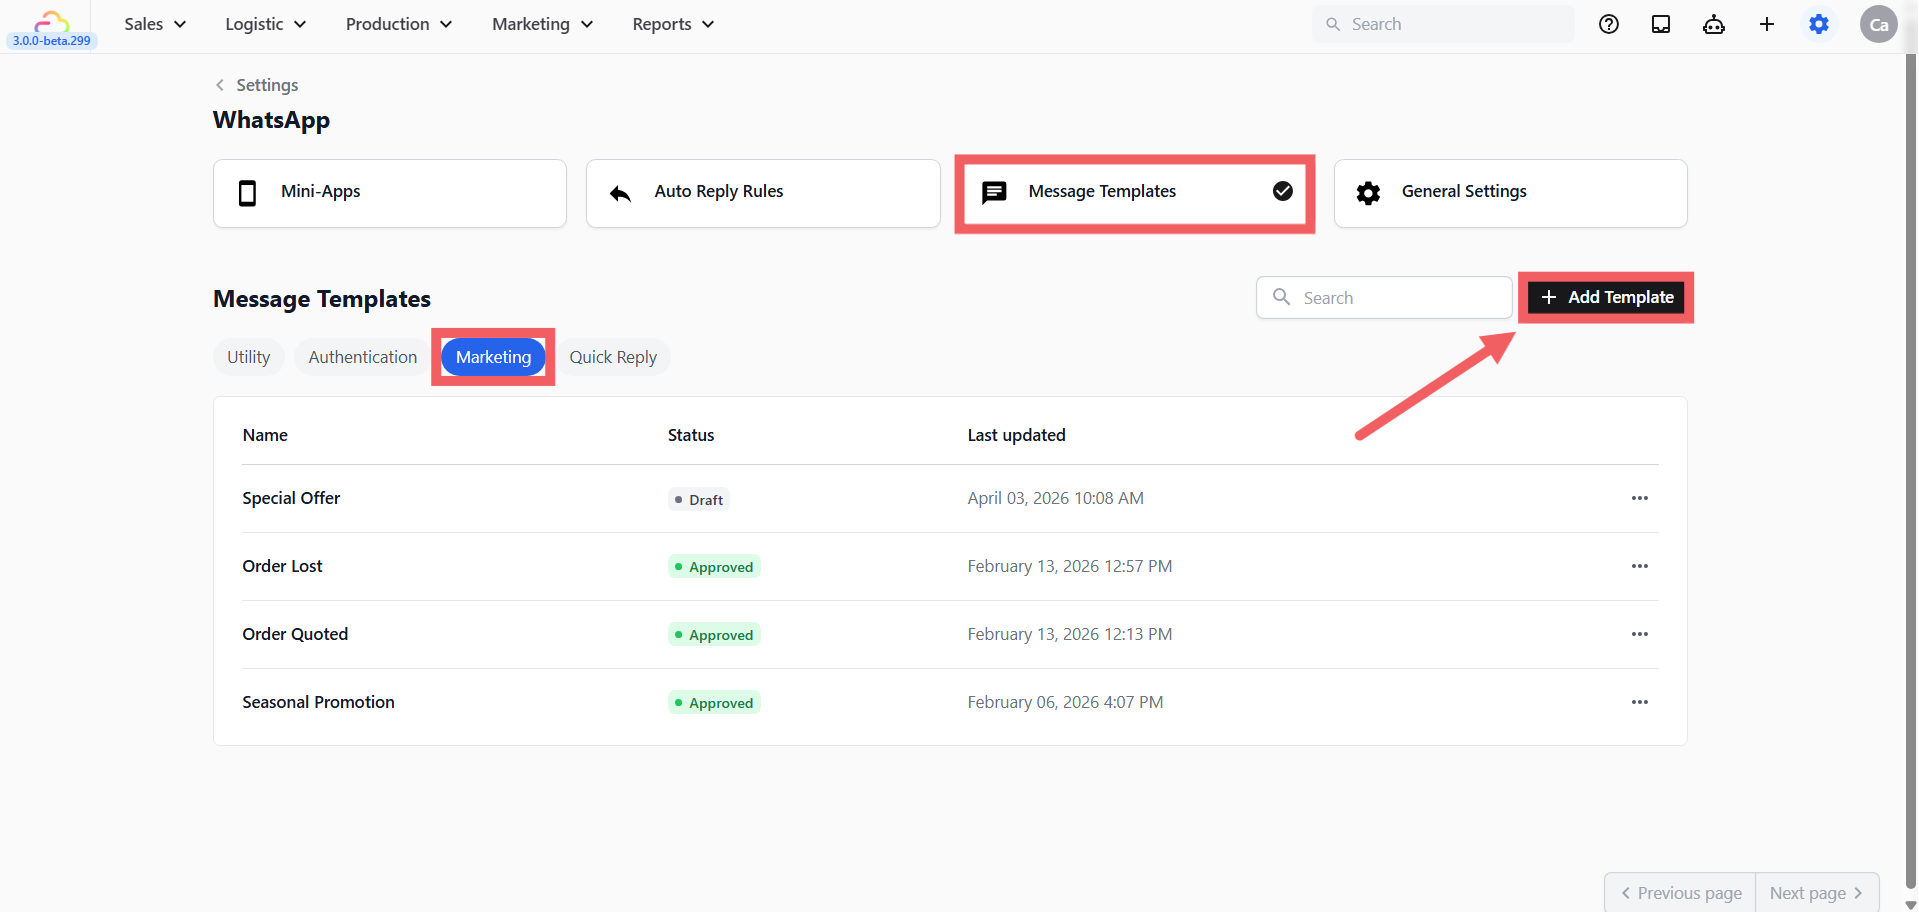
3. Enter a Template Name and set the Default reply status.
4. Under Template Content, pick a ready design, for example Special Offer, then click Create.
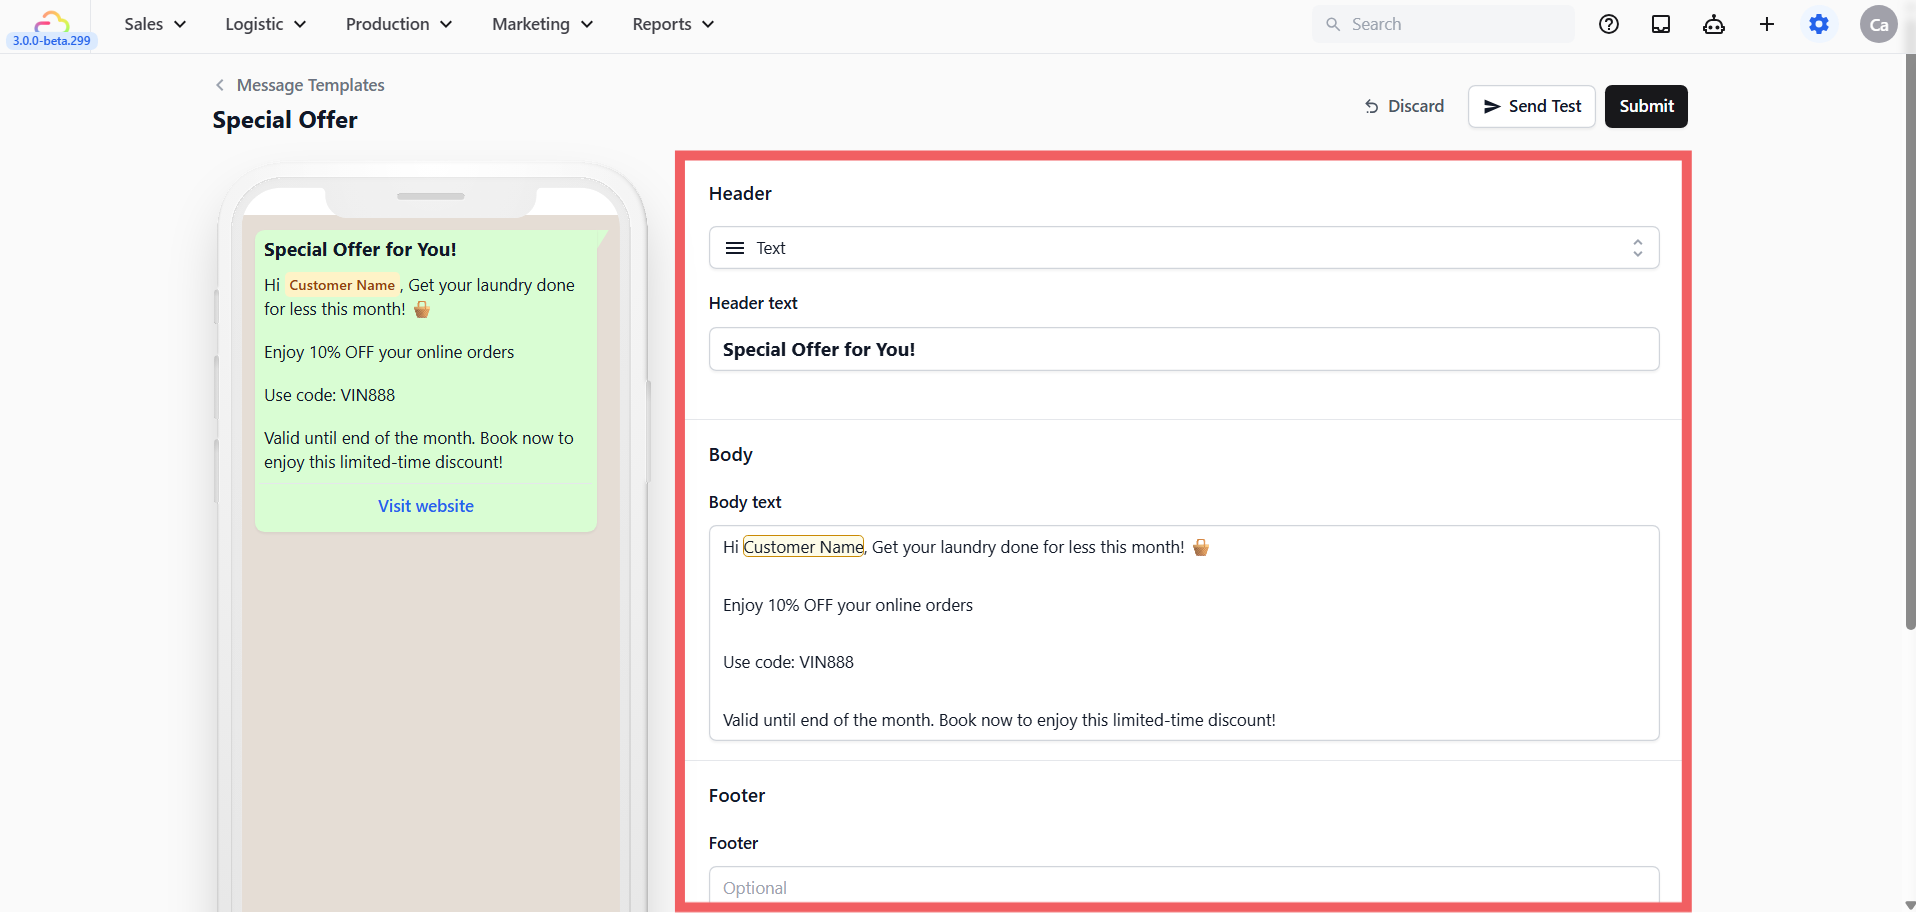
5. Edit the Body, and the Header or Footer if you want.
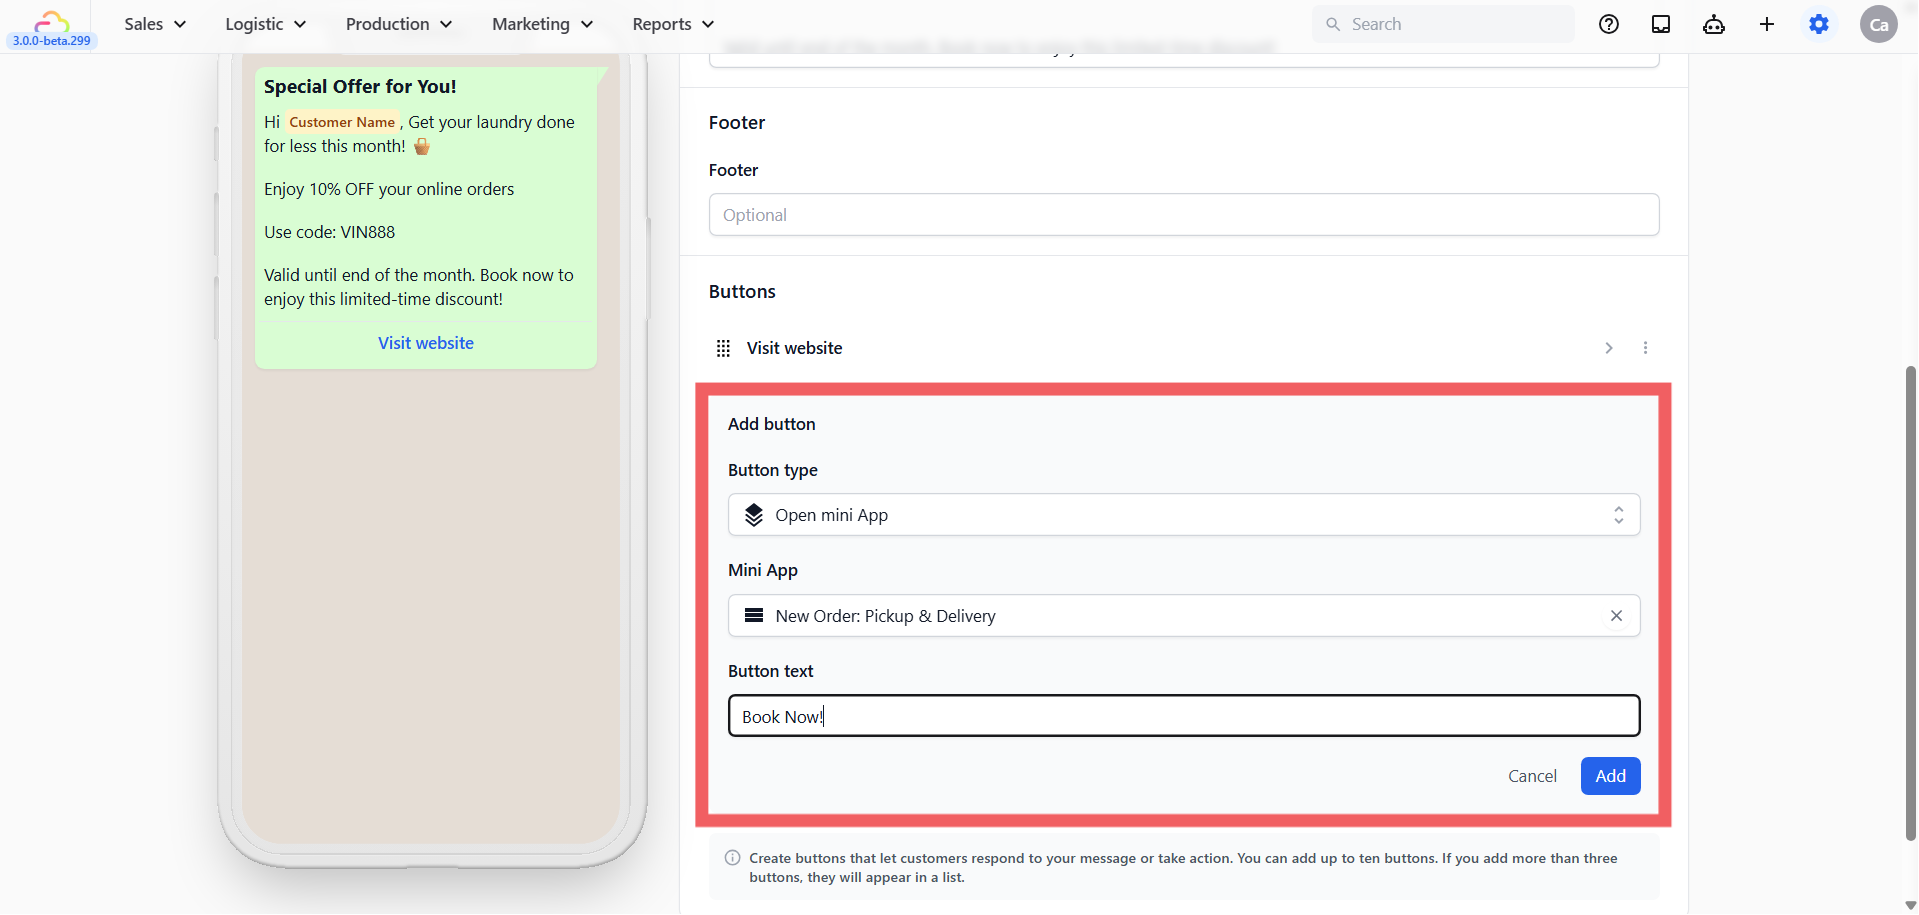
6. Scroll to Buttons. Marketing designs usually arrive with a Visit Website button already on them. You have three choices:
- **Keep both buttons.** Click + Add button, choose Open mini App, pick your Mini App, and give it text such as Book Now.
- **Change the order.** Drag a button up or down to decide which one the customer sees first.
- **Remove the website button.** Click the ⋮ next to it and choose Delete, then add your Mini App button.
7. Click Submit at the top right, then Submit again in the review dialog.
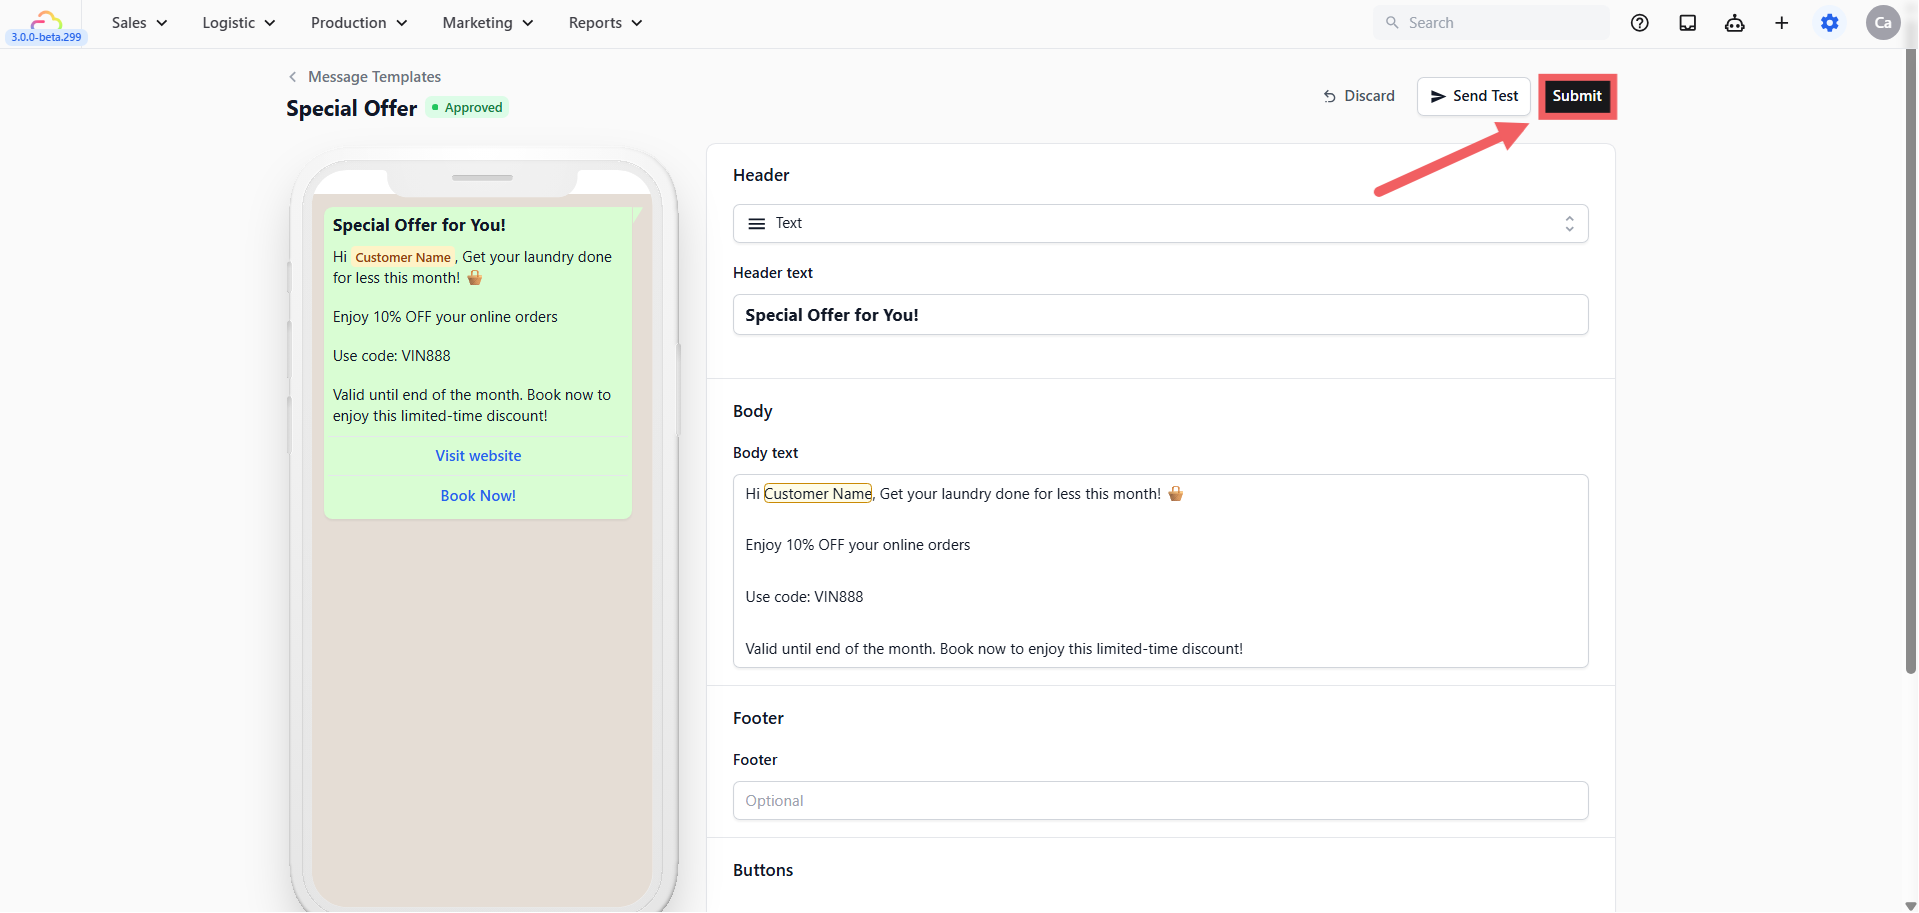
### What happens next: the WhatsApp review
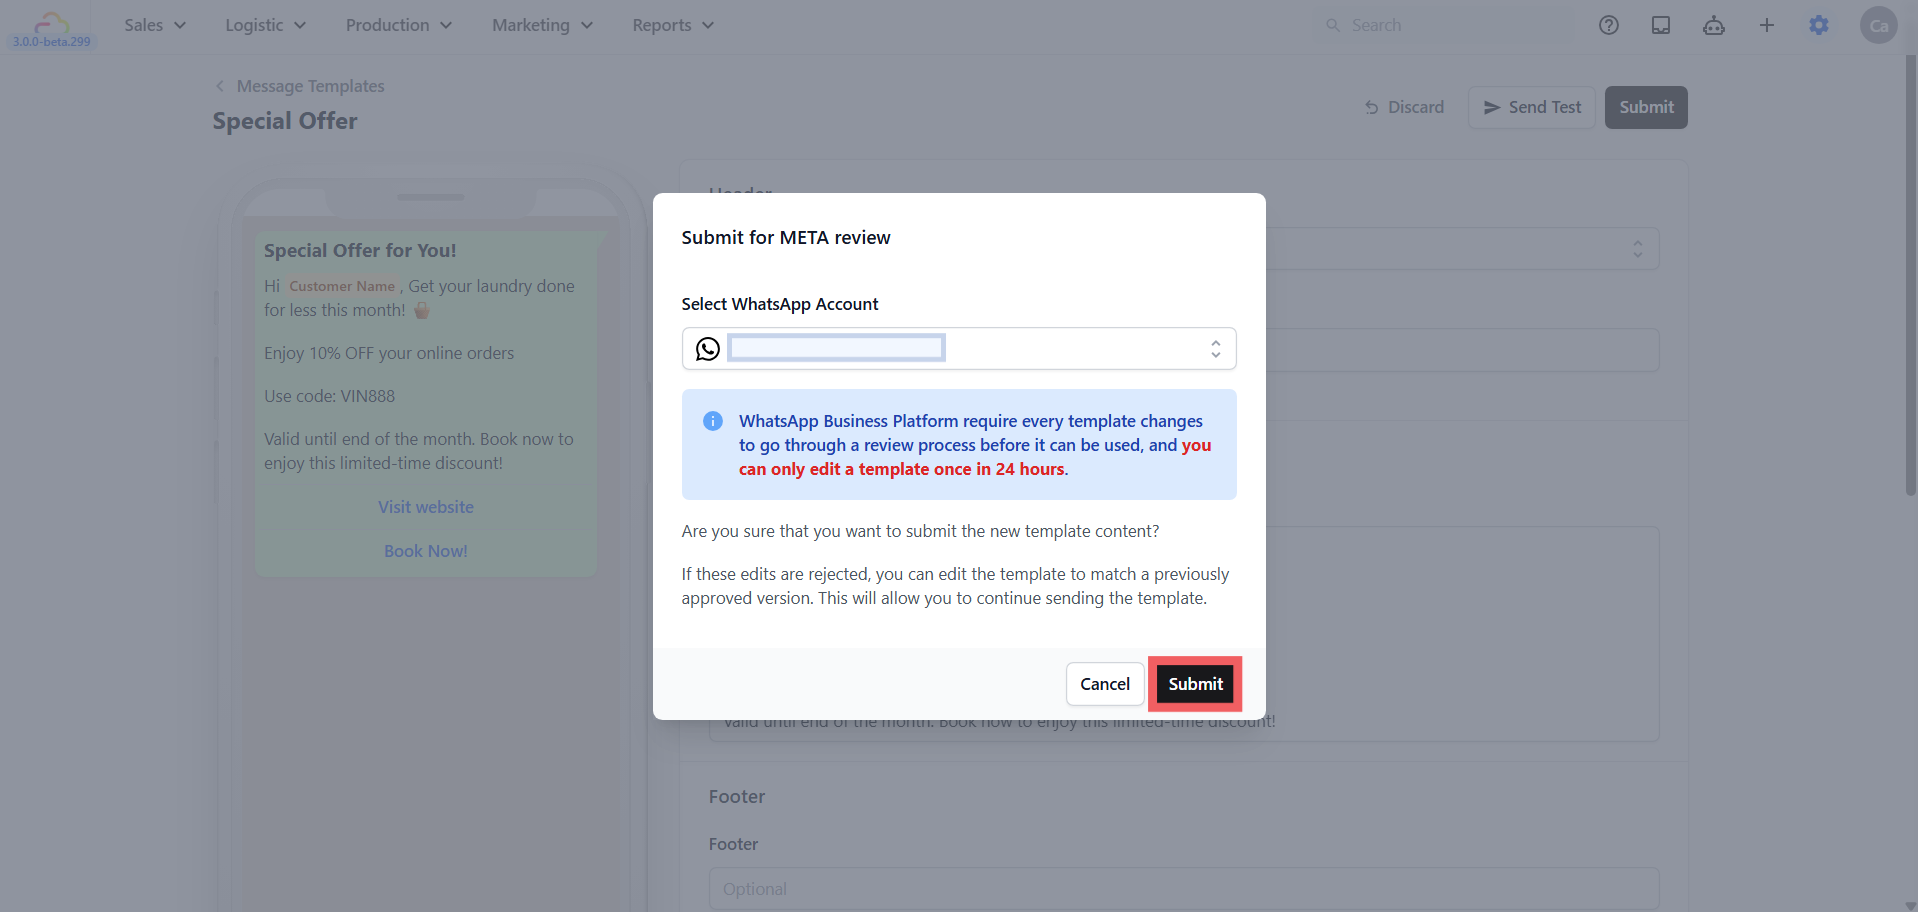
WhatsApp reads every Utility and Marketing template before allowing it, to stop businesses spamming people. Approval usually takes a few minutes, sometimes a few hours. You do not need to do anything while you wait.
Read your message carefully before you submit it. If you spot a typo after approval, you get one edit, then you must wait a full day for the next one.
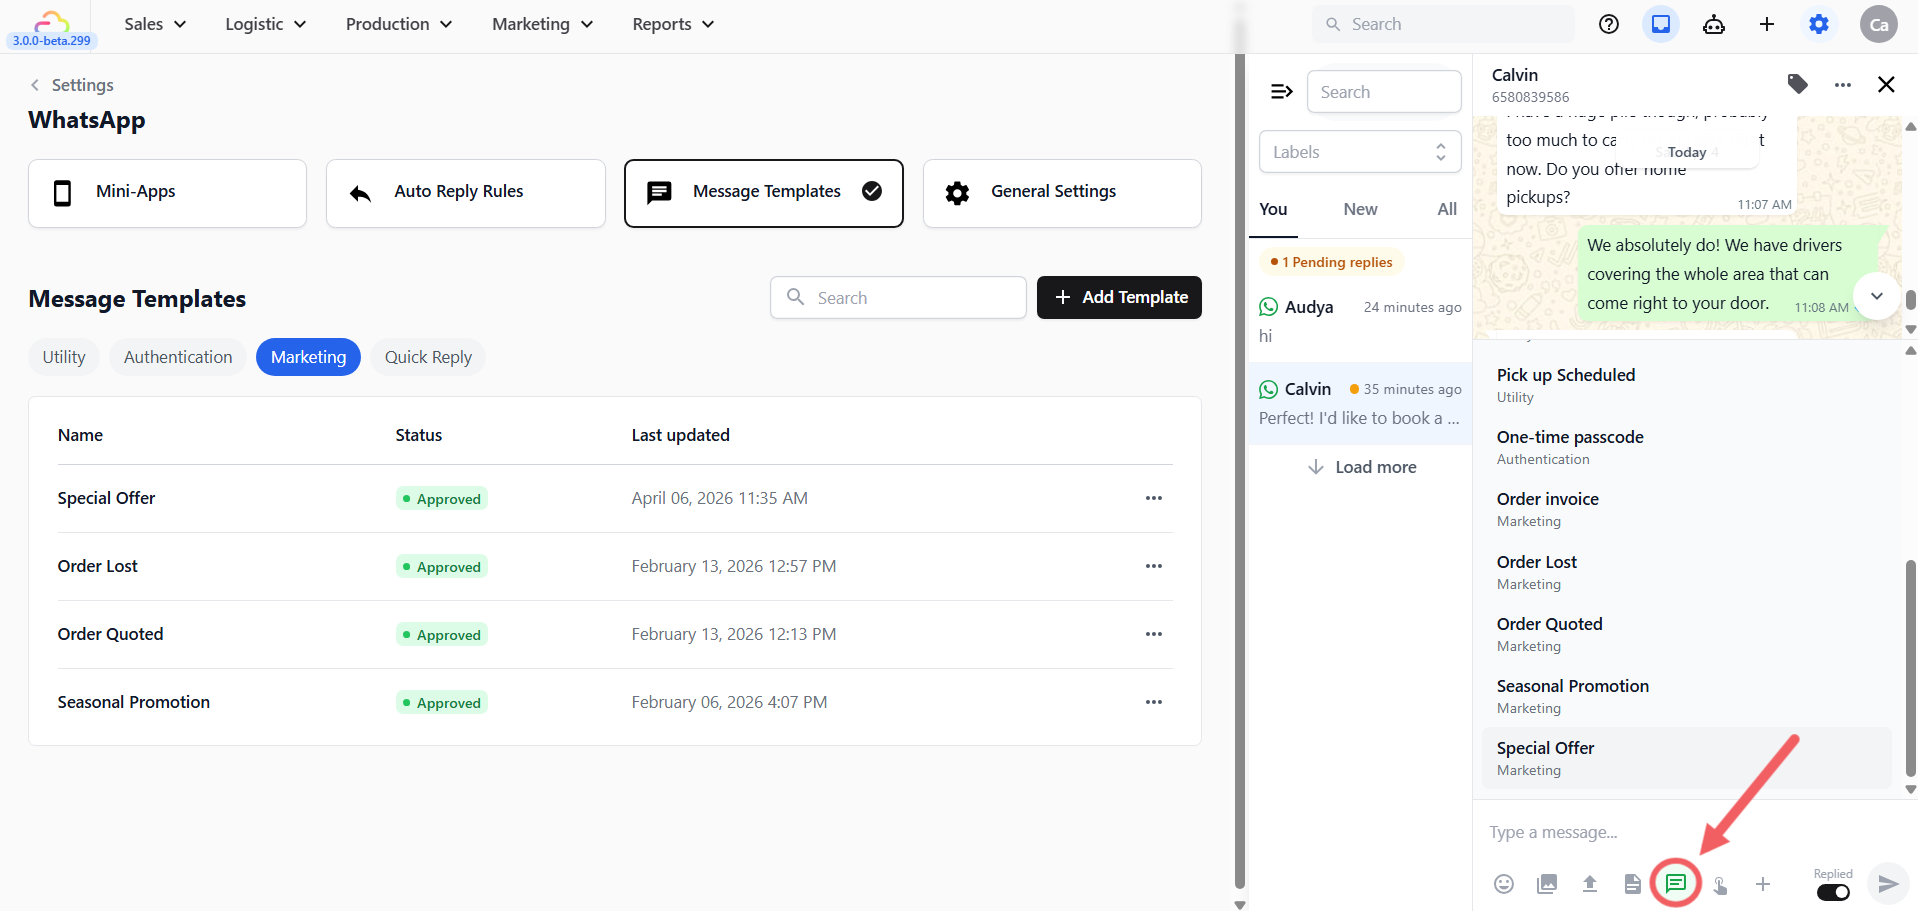
### Send it
1. Open the customer's chat in your WhatsApp Inbox.
2. Below the message box, click the **Template icon**. A panel opens titled Template message.
3. Choose your approved template and click Send.
---
## Method 4 — Let EasyBiz Send It Automatically
**Best for:** answering the customer the second they ask, including at 11pm when nobody is at the counter.
An Auto Reply Rule is a standing instruction you give EasyBiz once: **when a message like this arrives, send this reply.** Put a Mini App button on that reply, and the booking form goes out on its own — no staff, no waiting.
Below are three ready-made recipes. Copy the settings exactly, change the words to suit your shop, and you are done. Full details on every setting are in [Setting Up Auto Reply Rules for Your WhatsApp](/docs/setting-up-auto-reply-rules-for-your-whatsapp).
---
### Where to Set It Up
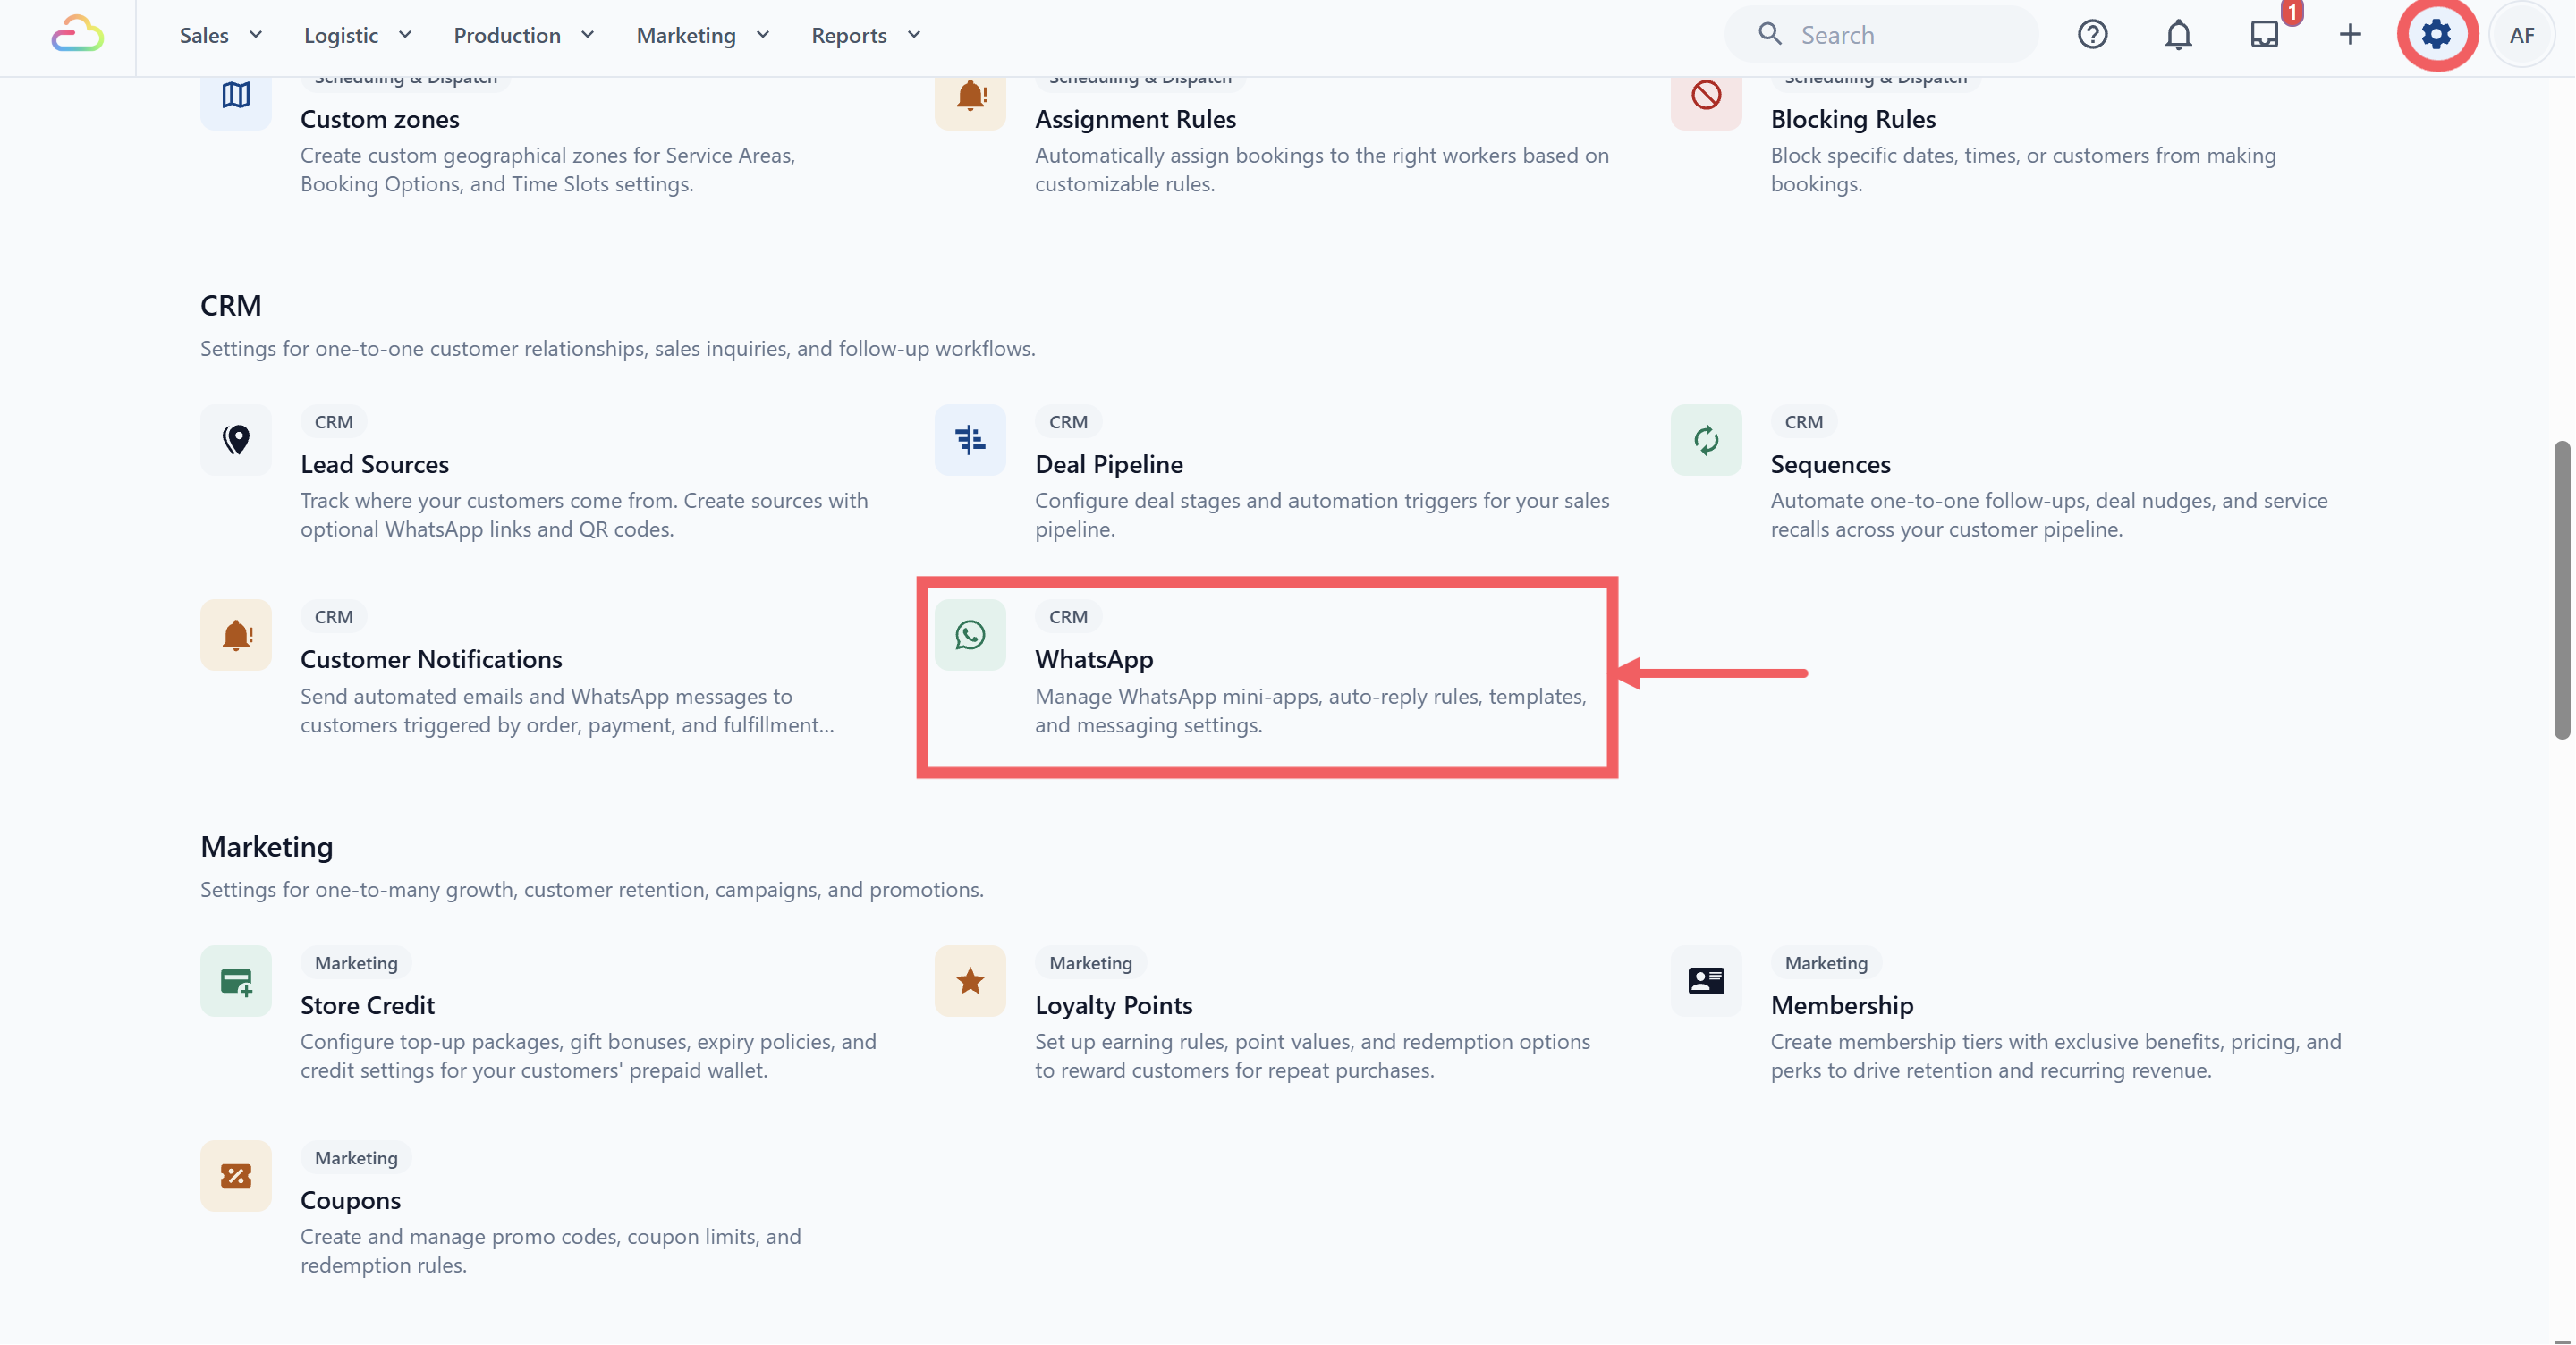
1. Click Settings in the top navigation bar.
2. Under the CRM section, click WhatsApp.
3. Open the Auto Reply Rules tab.
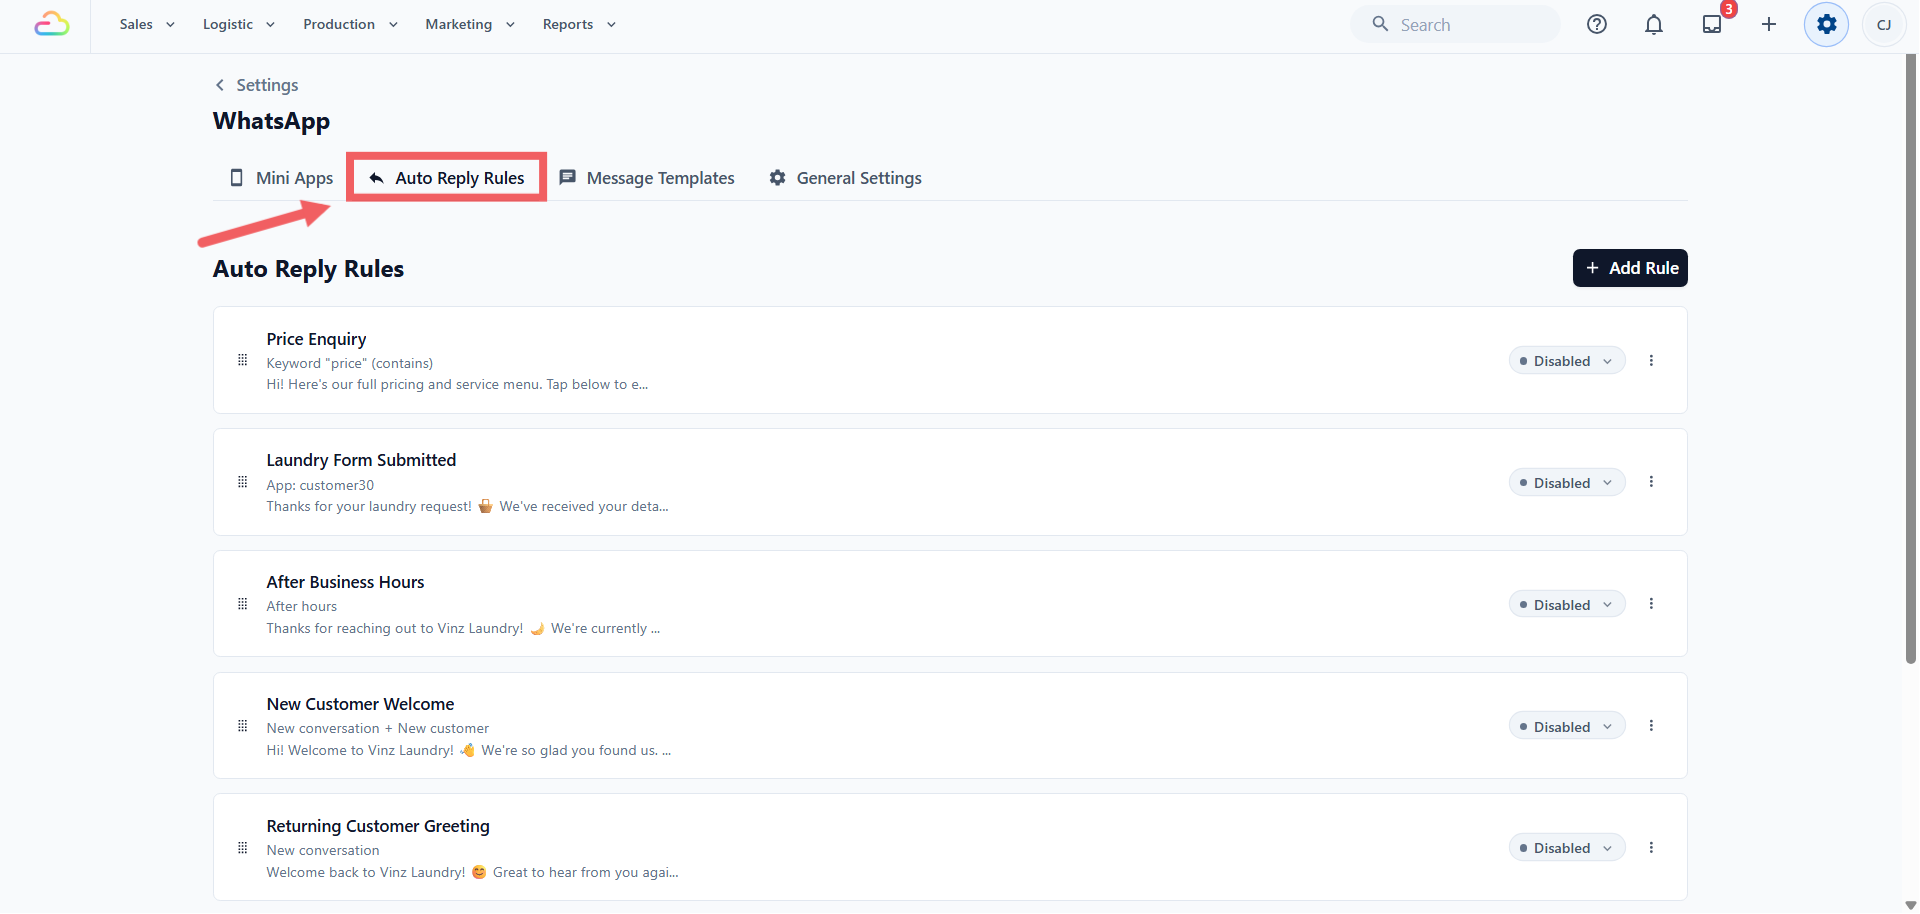
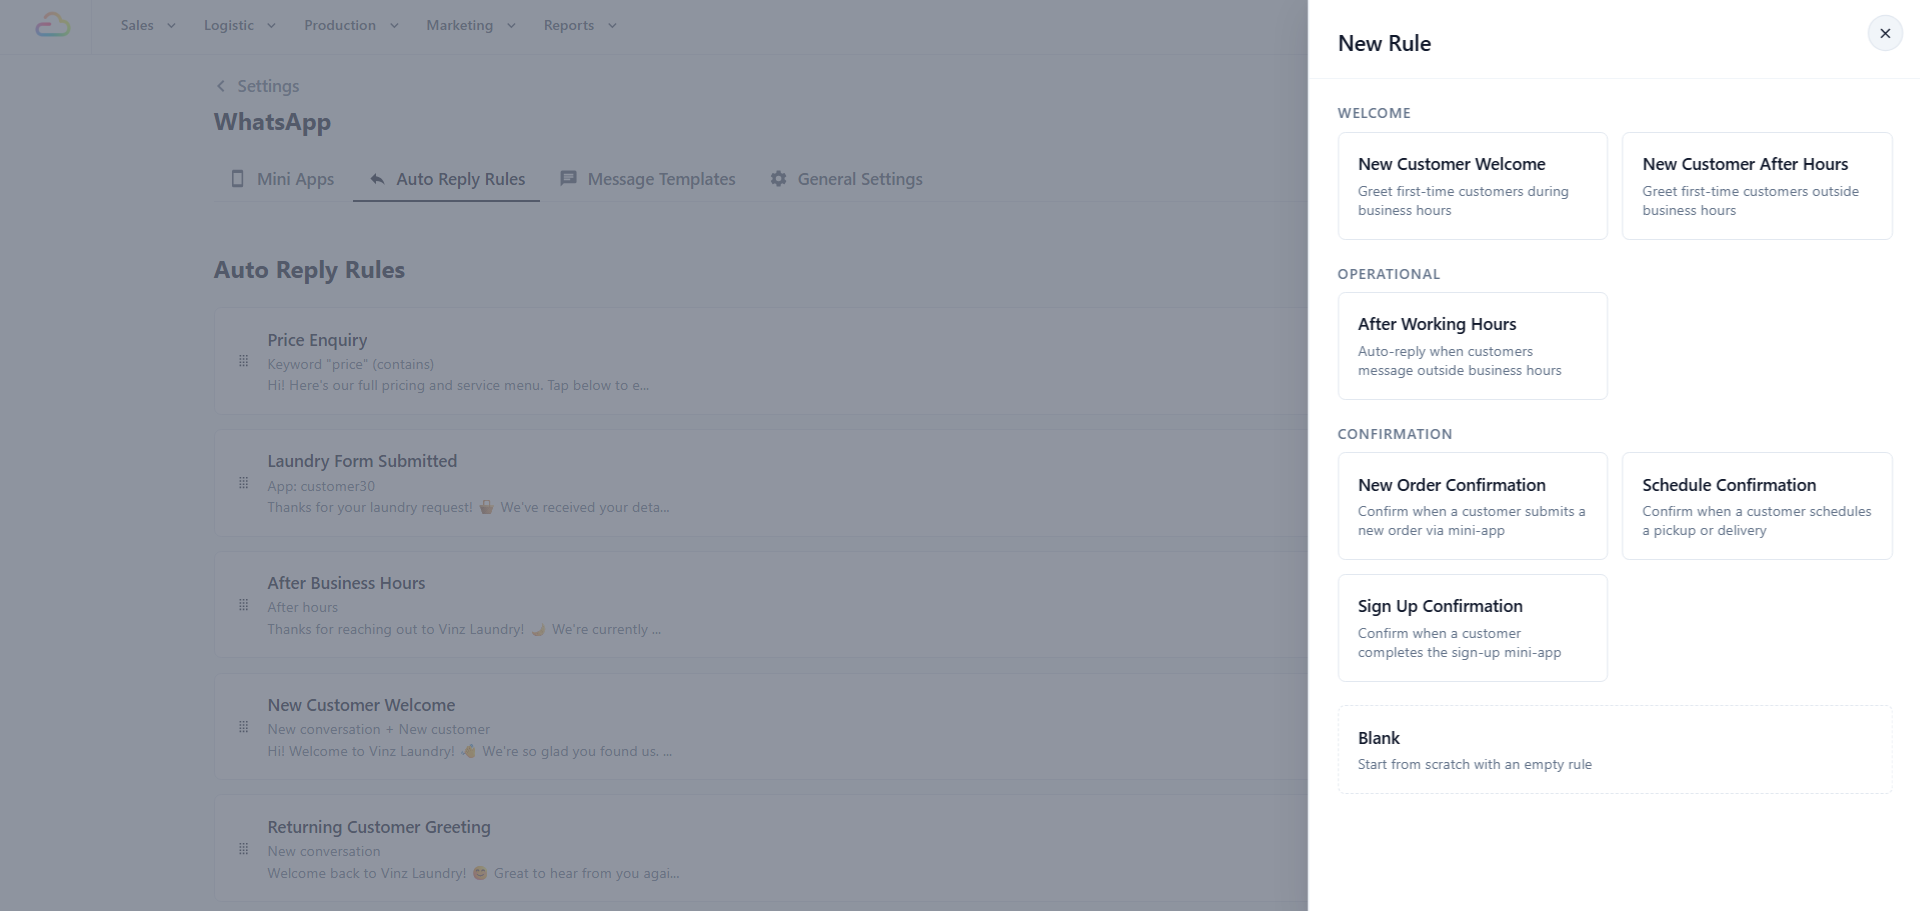
4. Click + Add Rule at the top right. A panel opens with ready-made rules grouped under **Welcome**, **Operational** and **Confirmation**, with a **Blank** card at the bottom.
---
### Recipe 1 — A Customer Asks to Book a Pickup
Your customer types "can I book a pickup" at any hour. EasyBiz sends the booking form immediately.
| Setting | What to enter |
| --- | --- |
| Start from | Blank |
| Rule name | Send pickup form when customer asks |
| Conditions | Click + Keyword match. Type pickup and leave the dropdown on Contains. |
| Reply Message | Sure, we can arrange a pickup for you. Tap the button below to choose your date and time. |
| Action | Action type Open mini App, choose your pickup Mini App, Button text Book Pickup |
| Send frequency | Once per conversation |
Contains means the word can sit anywhere in the sentence, so pickup catches "can I book a pickup?" and "pickup tomorrow ok?". Exact match only fires if the whole message is that one word. Almost every shop should use Contains.
Every condition in one rule must be true **at the same time**. Add pickup and collect to one rule and the customer's message must contain **both** words, which almost never happens. To catch two words, make two separate rules.
---
### Recipe 2 — Someone Messages After You Close
Your shop shuts at 8pm. A customer messages at 11pm. Instead of silence, they get your opening time and a booking form they can fill in tonight.
| Setting | What to enter |
| --- | --- |
| Start from | After Working Hours |
| Rule name | After hours notice |
| Conditions | Already filled in with After business hours. Leave it. |
| Reply Message | Hi, thanks for messaging! We are closed now and will reply from @Next Available Time. If you would like to book a pickup, you can do it right now using the button below. |
| Action | Action type Open mini App, choose your pickup Mini App, Button text Book Pickup |
| Send frequency | Once per 24 hours |
@Next Available Time prints your next opening, for example **Monday at 09:00**. It only works if you have switched on Business Hours in [WhatsApp General Settings](/docs/whatsapp-general-settings). Without that, the rule cannot tell when you are closed and the message arrives with a blank space where the time should be.
---
### Recipe 3 — A Stranger Messages Your Shop for the First Time
Somebody who has never ordered from you sends their first message. They get a welcome and a sign up form, so their name and address are saved before they book anything.
| Setting | What to enter |
| --- | --- |
| Start from | New Customer Welcome |
| Rule name | New customer welcome |
| Conditions | Already filled in with New customer, New conversation and Within business hours. Remove Within business hours with the ✕ if you want it to work at night too. |
| Reply Message | Welcome to our shop! Please tap below to save your details, so we can serve you faster next time. |
| Action | Action type Open mini App, choose your Customer Sign Up Mini App, Button text Register |
| Send frequency | Once per conversation |
Every rule you start from a card arrives with the wording filled in but **no button**. Adding the Open mini App action yourself is what turns a polite reply into a booking.
---
### The Words You Can Drop Into the Message
Type @ in Reply Message to insert information EasyBiz fills in for you. **Which ones appear depends on the conditions you added.**
| Available in every rule | What it shows |
| --- | --- |
| @Next Available Time | The next time your shop opens, e.g. Monday at 09:00 |
| @Current Date | Today's date |
| @Current Time | The time right now |
| Only after you add + App submitted | What it shows |
| --- | --- |
| @Customer Name | The customer's name |
| @Order Number | Their order number |
| @Pickup Date / @Pickup Time | The pickup slot they chose |
| @Delivery Date / @Delivery Time | The delivery slot they chose |
Those extra words only exist once a customer has filled in a form, so EasyBiz only offers them on rules that fire **after** a Mini App is submitted. On a keyword or after-hours rule you will not see them, and that is normal.
---
### Test It Before Customers See It
1. Click Save. Every new rule is saved as Testing, so no customer can receive it yet.
2. Add your own mobile number to the Test Group in [WhatsApp General Settings](/docs/whatsapp-general-settings).
3. Message your own shop number from your phone and check the reply and the button.
4. Open the status dropdown on the rule and switch it to Live.
A rule name, a reply message, and at least one of New conversation, After business hours, Keyword match or App submitted. Picking only New customer is not enough on its own.
Rules are checked from the top down and the first one that matches wins. Drag your pickup keyword rule **above** your general welcome rule using the grip handle, or the welcome rule will answer everybody and your booking form never goes out.
---
## FAQs
**Which method should I start with?**
> Method 1. It needs no setup at all. Add Method 4 next so customers who message you after closing time still get a form, then Method 2 once your staff are sending the same form several times a day.
**Can I put a Mini App link on my website or print a QR code?**
> No. A Mini App only opens inside a WhatsApp conversation, so there is no web link and no QR code for it. If you want a printed QR code that starts a WhatsApp chat with your shop, use Lead Sources instead.
**Why is my message box locked for some customers?**
> They have not messaged you for more than 24 hours, so WhatsApp has closed the free messaging window. Only an approved Utility or Marketing template can reach them now.
**Why is my Mini App not in the list when I try to send it?**
> It is still a draft. Open it, click Publish, and it will appear.
**Do I need WhatsApp approval for every method?**
> Only for Method 3. Inbox sends, quick replies and auto reply rules all work the moment you save them, because they only ever go to someone who messaged you first.
**What happens if a customer starts the form and does not finish it?**
> No order is created. The order is only made when they tap the button on the last screen. But their name, phone number and address are saved to your customer list as soon as they finish those screens. You can find them under Sales, then Contacts, and follow up with them in WhatsApp.
**Will an auto reply rule spam my customers?**
> Not on the default setting. Once per conversation sends the form a single time and will not send again until that conversation is closed and reopened.
**Can I test an auto reply rule before customers see it?**
> Yes. Leave the rule on Testing, add your own number to your test numbers in General Settings, and message yourself. Switch it to Live when you are happy.
**Can I send a delivery Mini App without choosing an order?**
> No. A delivery form has to be attached to an order that already exists, so the date the customer picks lands on the right job.
**My template was rejected by WhatsApp. What now?**
> Rejections are almost always about wording that reads like an advert in a Utility template. Move it to Marketing, or soften the wording, and submit again. Remember you can only edit once every 24 hours.
---
## What's Next
Learn how each booking form is built so you can adjust one to suit your shop: [How the Mini App Builder Works](/docs/how-the-mini-app-builder-works).