## Before You Start
- You can sign in to Console 3.0. See [Trouble Signing In](/docs/trouble-signing-in) if you can't get in.
- To change settings you need settings access. The account owner always has it. Other team members need it given to them. See [Inviting Your Team and Managing Access](/docs/inviting-your-team-and-managing-access).
- If a staff member can't open one of the pages below, see [When Staff Can't Open a Page](/docs/when-staff-cant-open-a-page).
- No customer setup is needed. Your customers are already in Console 3.0.
---
## The Quick Map
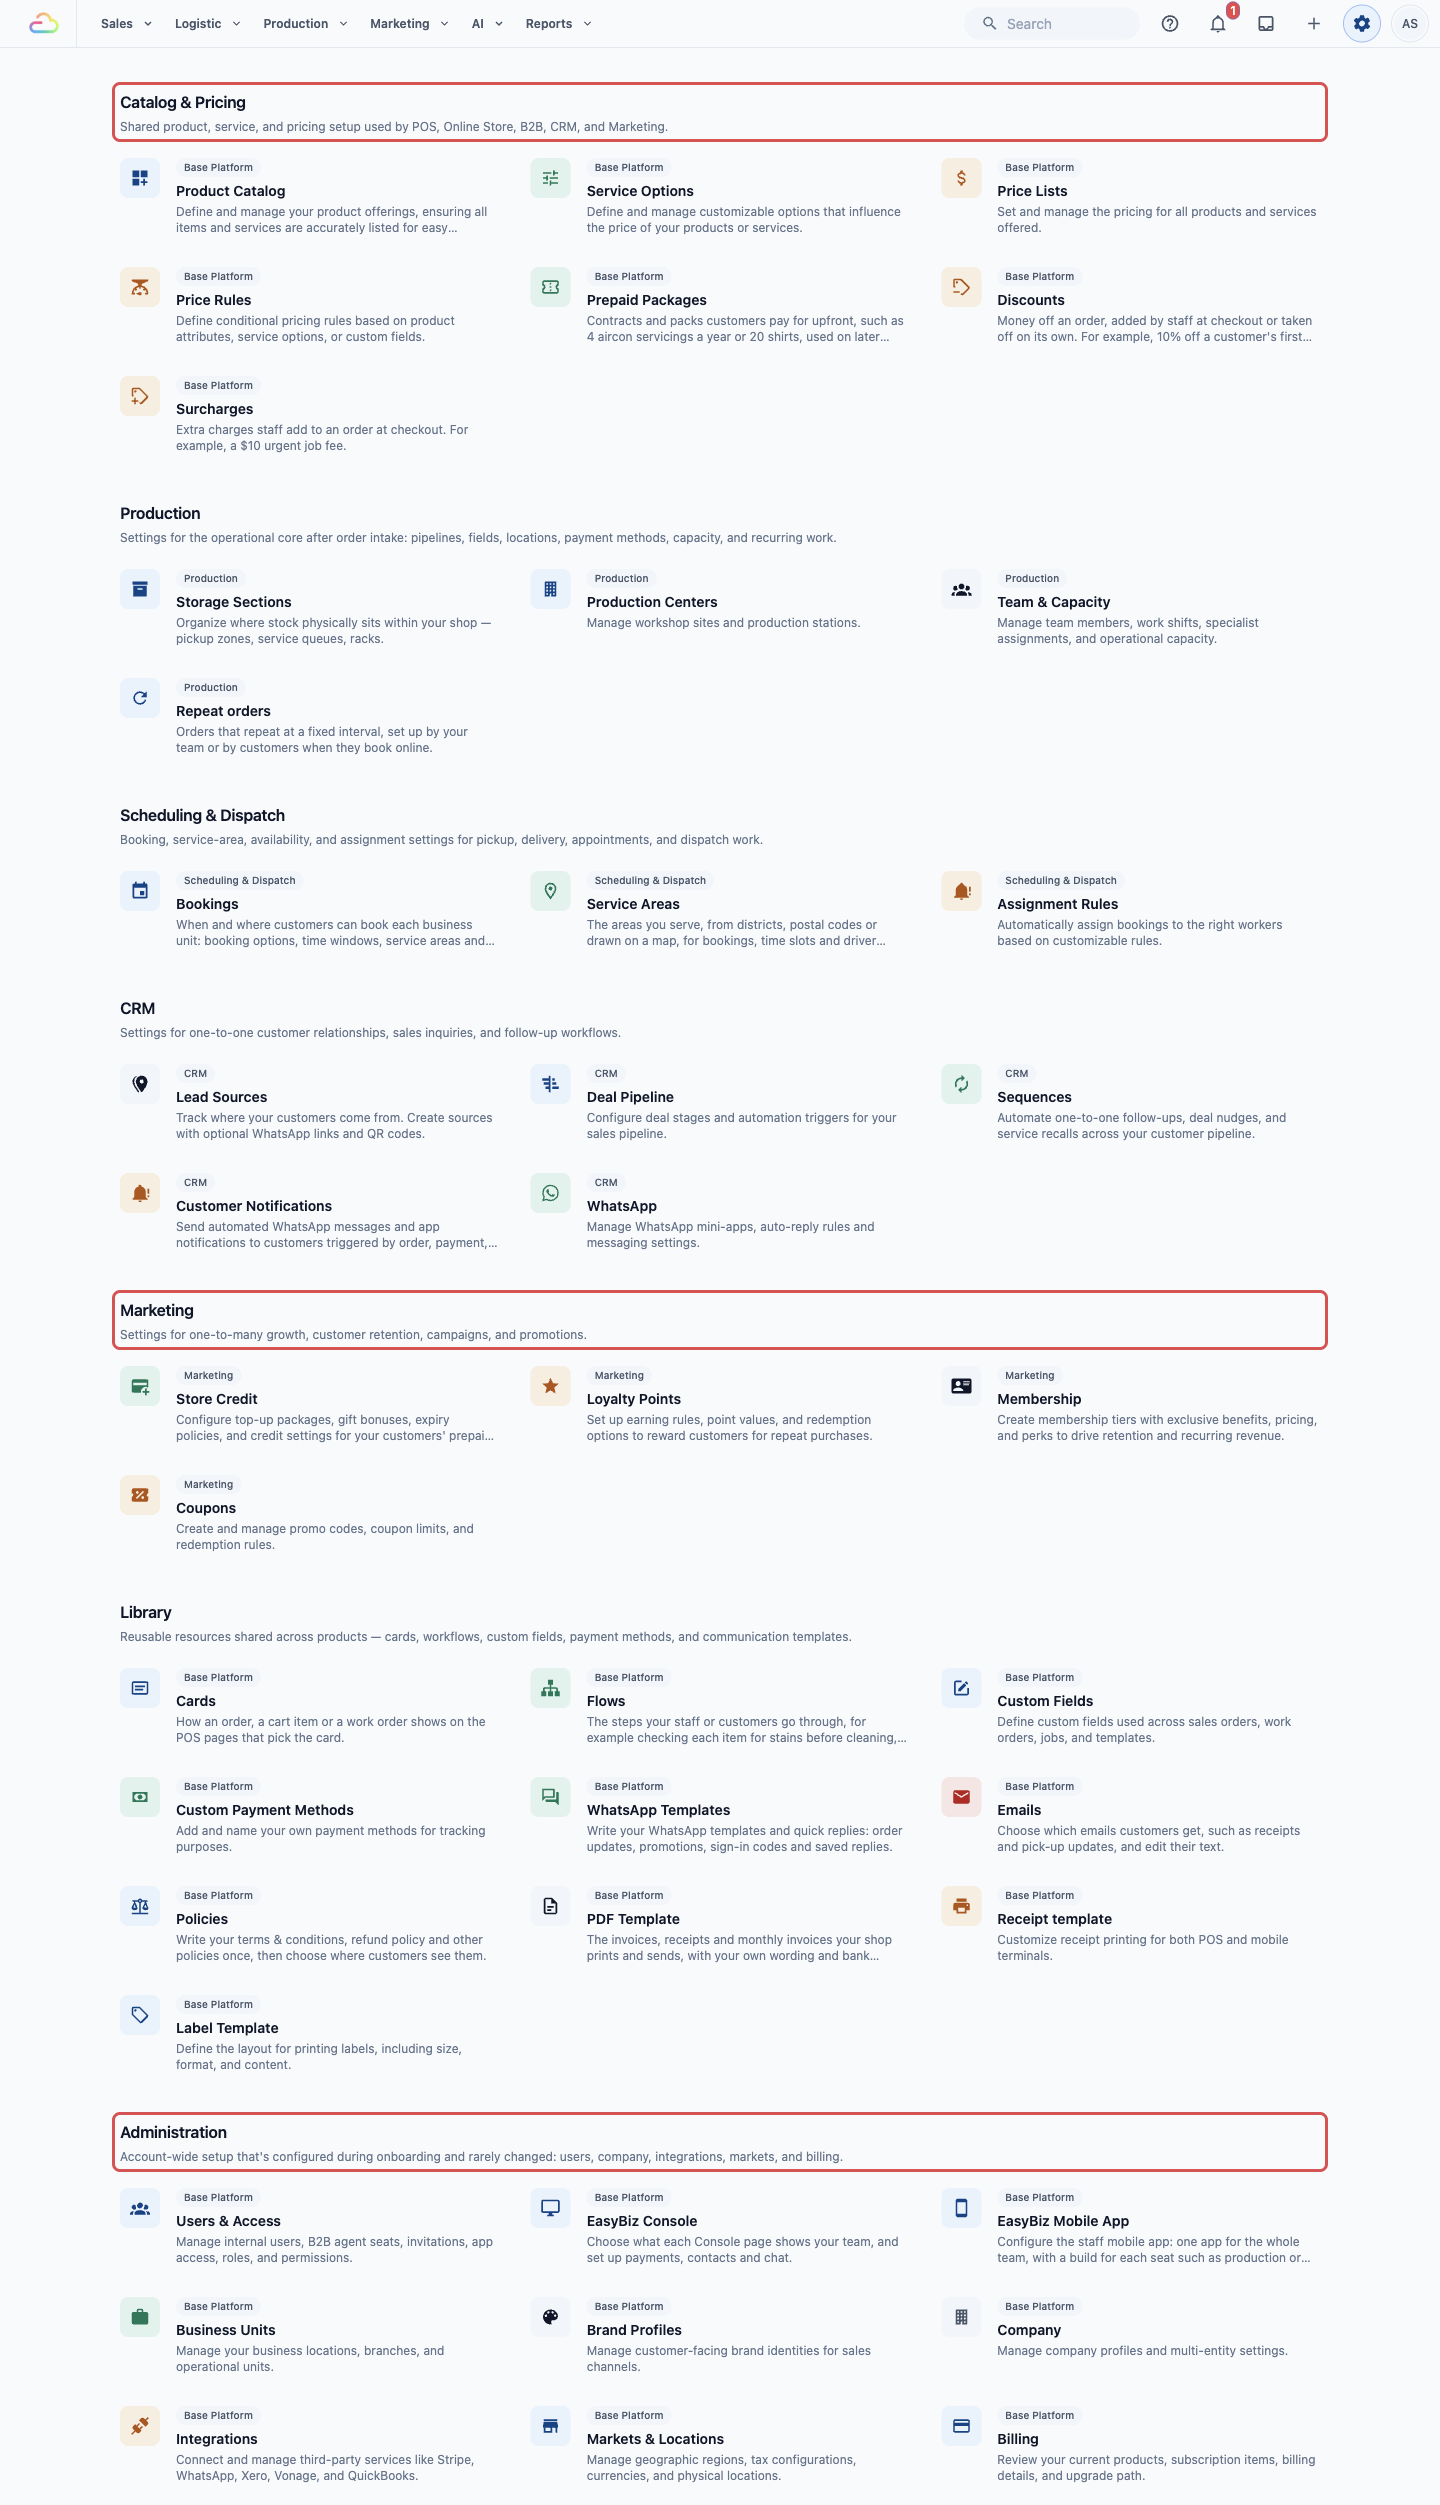
Settings in 3.0 means the ⚙️ Settings icon in the top-right corner. Its page is split into sections, such as **Catalog & Pricing** and **Marketing**.
| Feature | In 2.0 | In 3.0 |
| --- | --- | --- |
| Receipts | Settings › Printing | Settings › **Library** section › Receipt template |
| Daily orders | Store (or App) › Daily orders | Sales › Orders, filtered by Order date |
| Customer credit | Loyalty › Top-up program | Settings › **Marketing** section › Store Credit |
| Promo codes | Marketing › Promo code | Settings › **Marketing** section › Coupons |
| Private notes | Customer › the customer's profile | Sales › Contacts › the customer's details |
| Pricing page | Business › your business › Pricing | Settings › **Catalog & Pricing** section › Price Lists |
| Minimum order | Business › your business › Store POS order › Minimum order | Settings › **Administration** section › Business Units › Catalog tab |
| Surcharges and discounts | Business › Surcharge/Discount | Settings › **Catalog & Pricing** section › Discounts and Surcharges |
| Staff accounts | Settings › Accounts | Settings › **Administration** section › Users & Access |
| Customer notifications | Settings › Notification | Settings › **CRM** section › Customer Notifications |
| Terms & Conditions | Business › your business › Terms & Conditions | Settings › **Library** section › Policies |
| Payment methods | Settings › Payment methods | Settings › **Library** section › Custom Payment Methods |
| Servicing area and time slots | Business › your business › Online booking | Settings › **Scheduling & Dispatch** section › Bookings and Service Areas |
---
## What Moved Across and What to Set Up Again
These came across by themselves, because both Consoles share one account:
- Your orders. An order made in Console 2.0 opens in Console 3.0 too.
- Your customers and their private notes.
- Your customers' credit balances and credit history.
- Your 2.0 promo codes. Each code that was still running on 27 October 2026 is also a coupon in 3.0 now, with the same code.
Check or set up these again in 3.0:
- **Minimum order.** Console 3.0 does not use the minimum set in Console 2.0.
- **Receipts.** Changes to 2.0 receipts don't change your 3.0 receipts.
- **Staff limited to one store.** The 2.0 store limit on a staff account does not carry into 3.0.
- **Promo codes that had ended.** A 2.0 code that had already ended by 27 October 2026 was not copied. To use it again, create it as a coupon in 3.0.
- **Customer notifications.** If you still have notifications set up in 2.0, ask the EasyBiz team whether both will send, so customers don't get the same message twice.
---
## Receipts
Your receipt is what prints on the receipt printer when an order is taken. In 2.0 you edited it under Settings › Printing. In 3.0 all receipts, labels and PDFs sit together in the **Library** section of Settings.
1. Click the ⚙️ Settings icon in the top-right corner.
2. Under the **Library** section, click Receipt template.
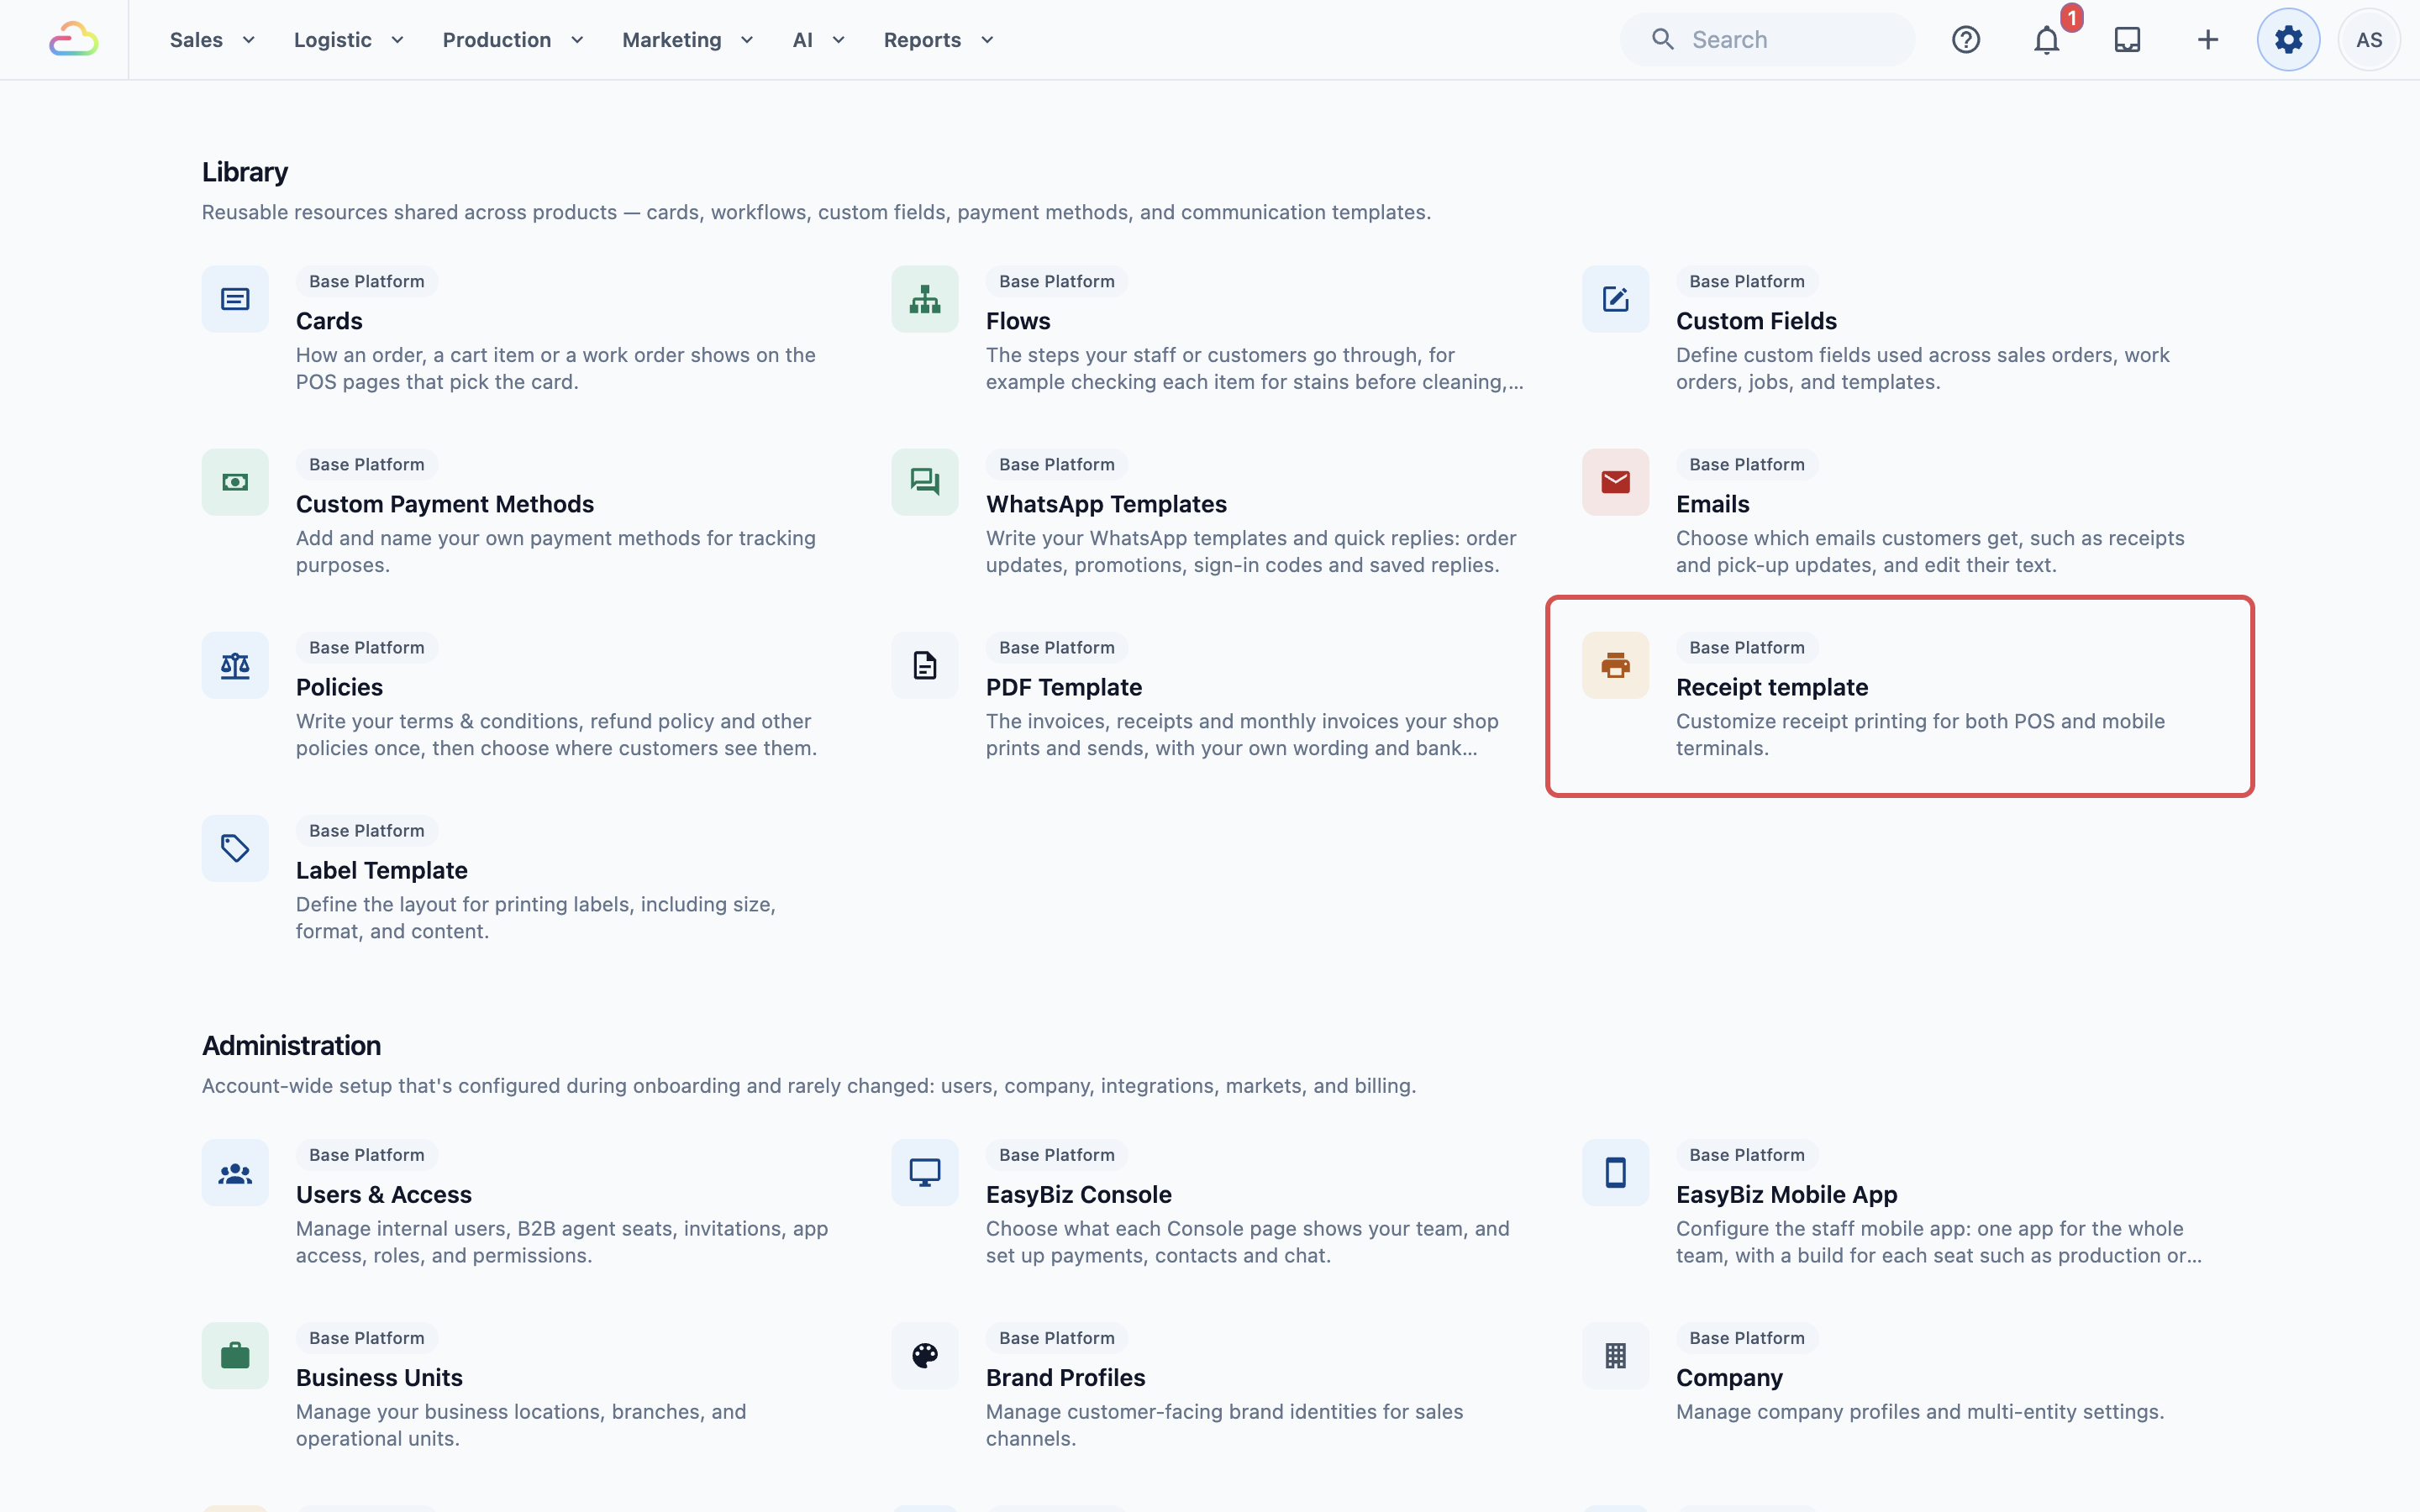
The **Receipt Templates** page lists your **Order receipts**, such as a customer receipt and a shop copy, and your **Slips and reports**.
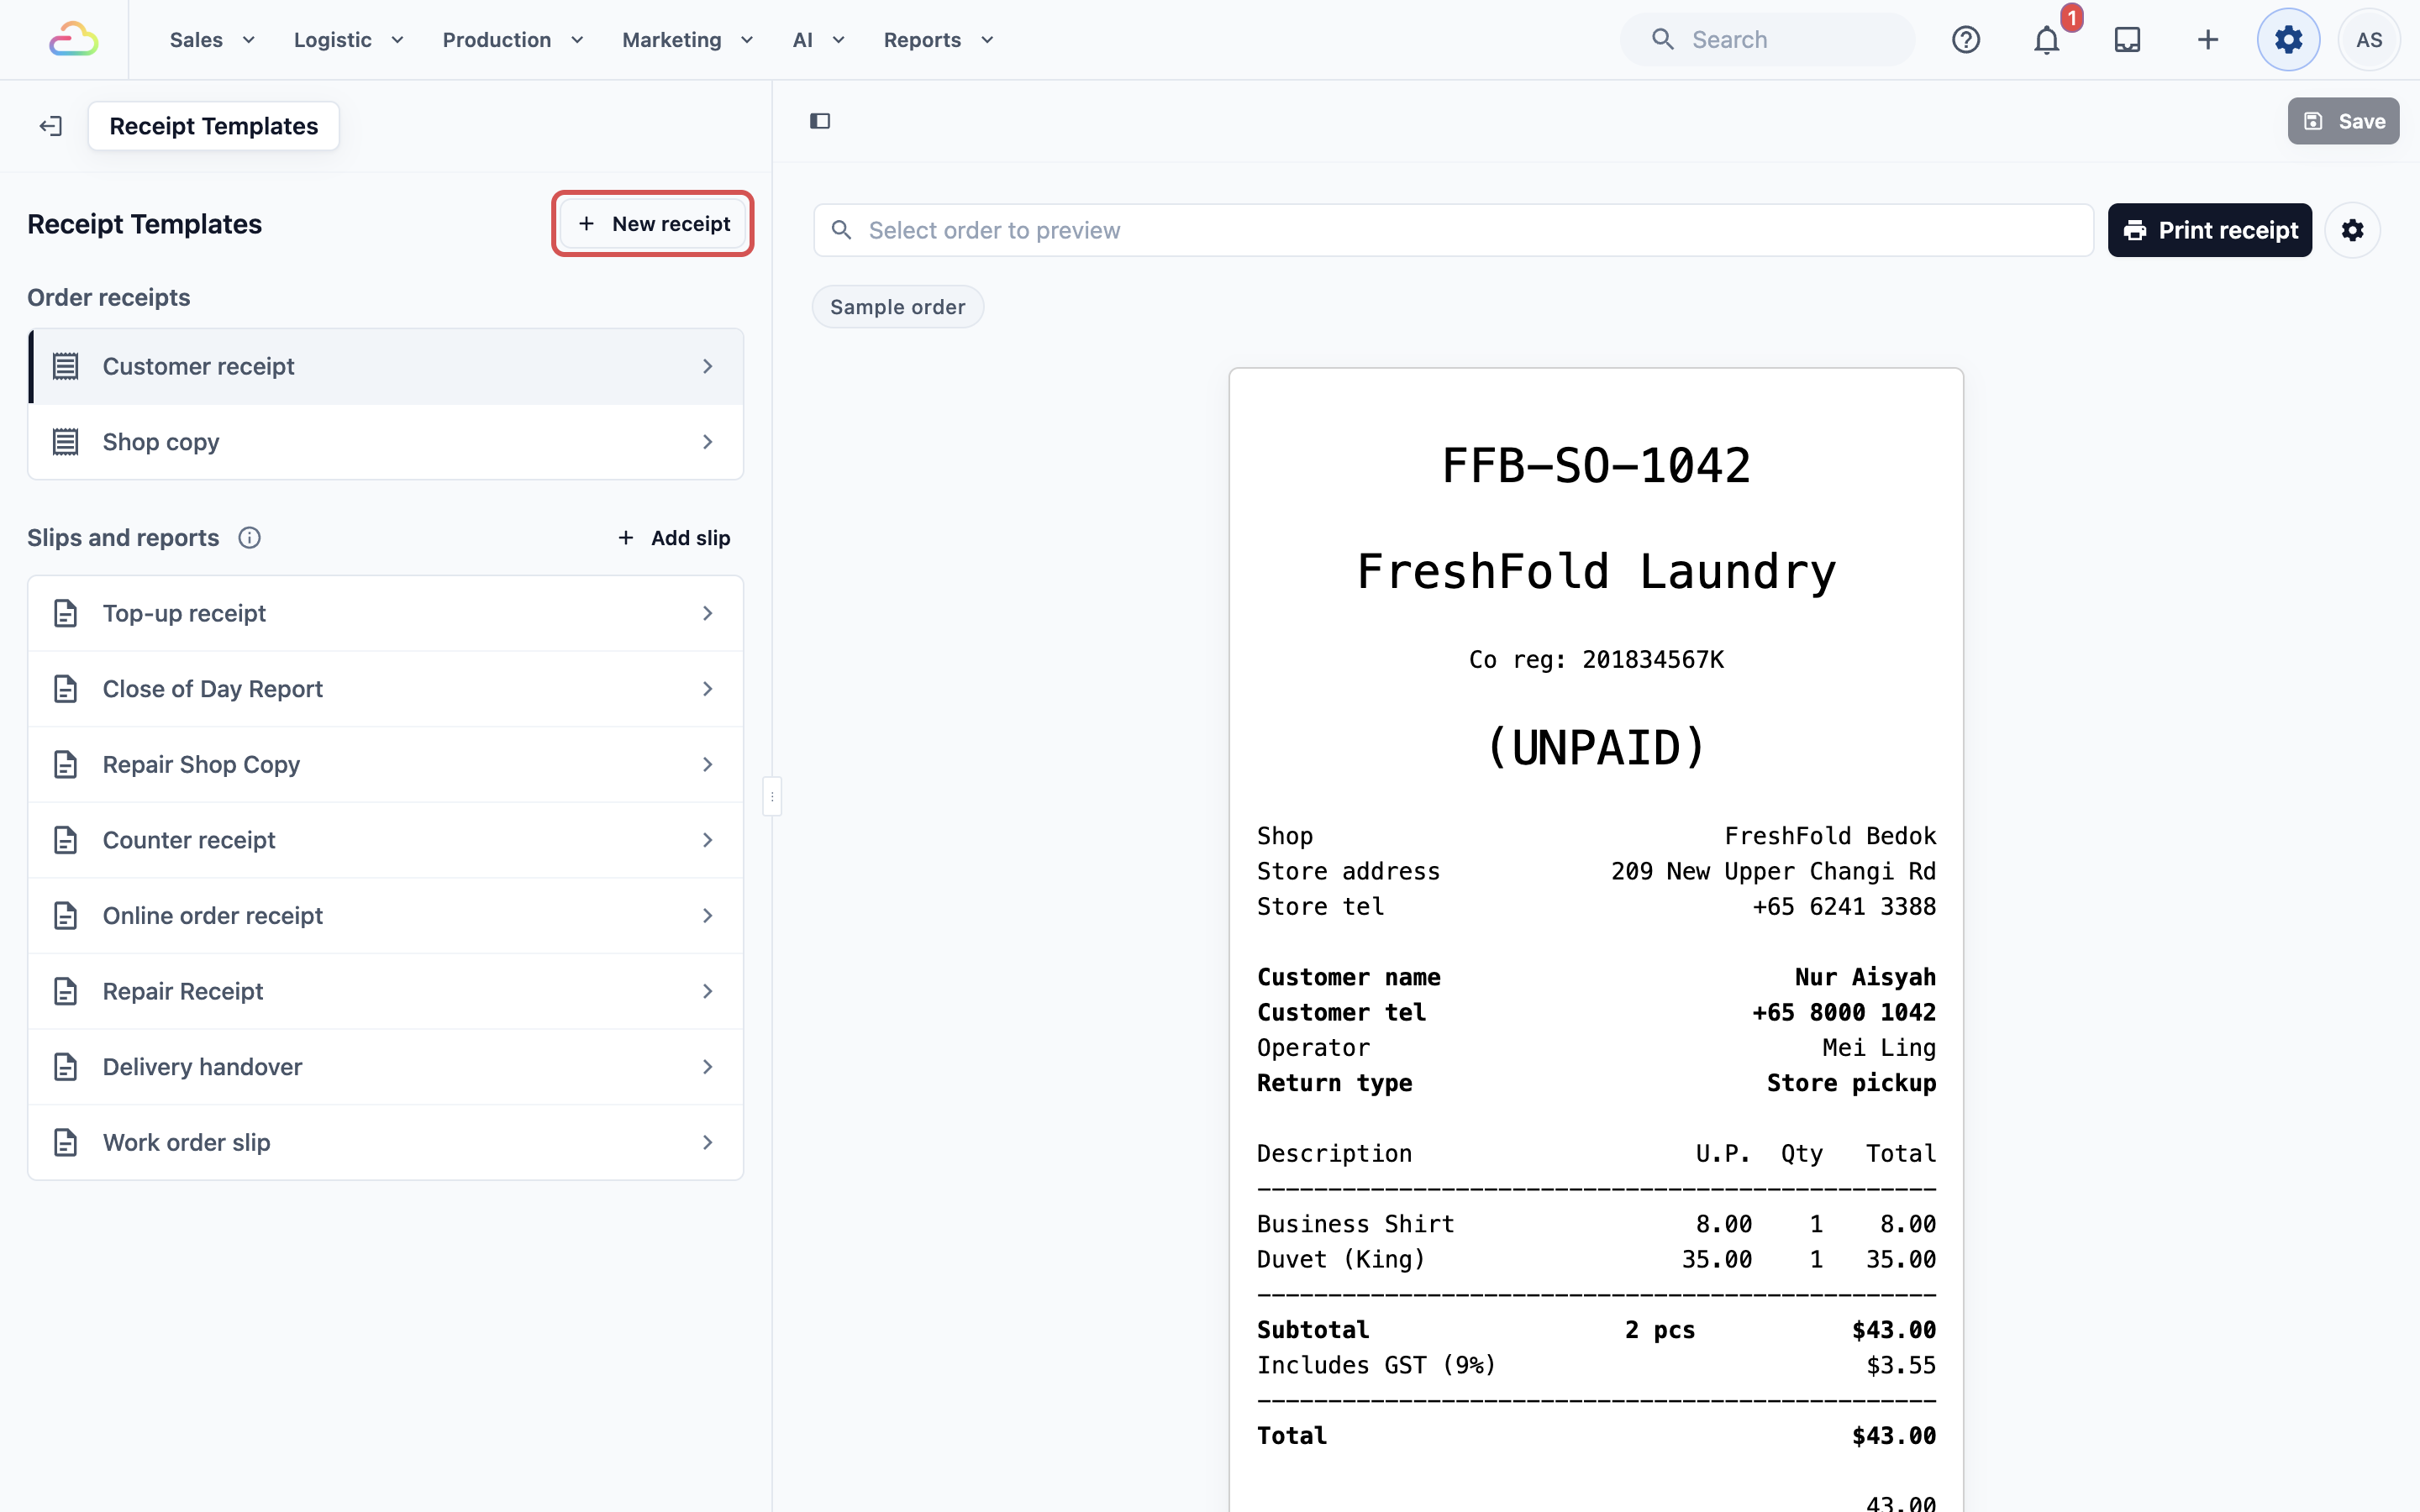
Each business unit (one kind of service you run, such as Laundry) chooses which receipt prints for its orders. To check it:
1. Click the ⚙️ Settings icon in the top-right corner.
2. Under the **Administration** section, click Business Units.
3. Open the business unit, then click the Documents tab.
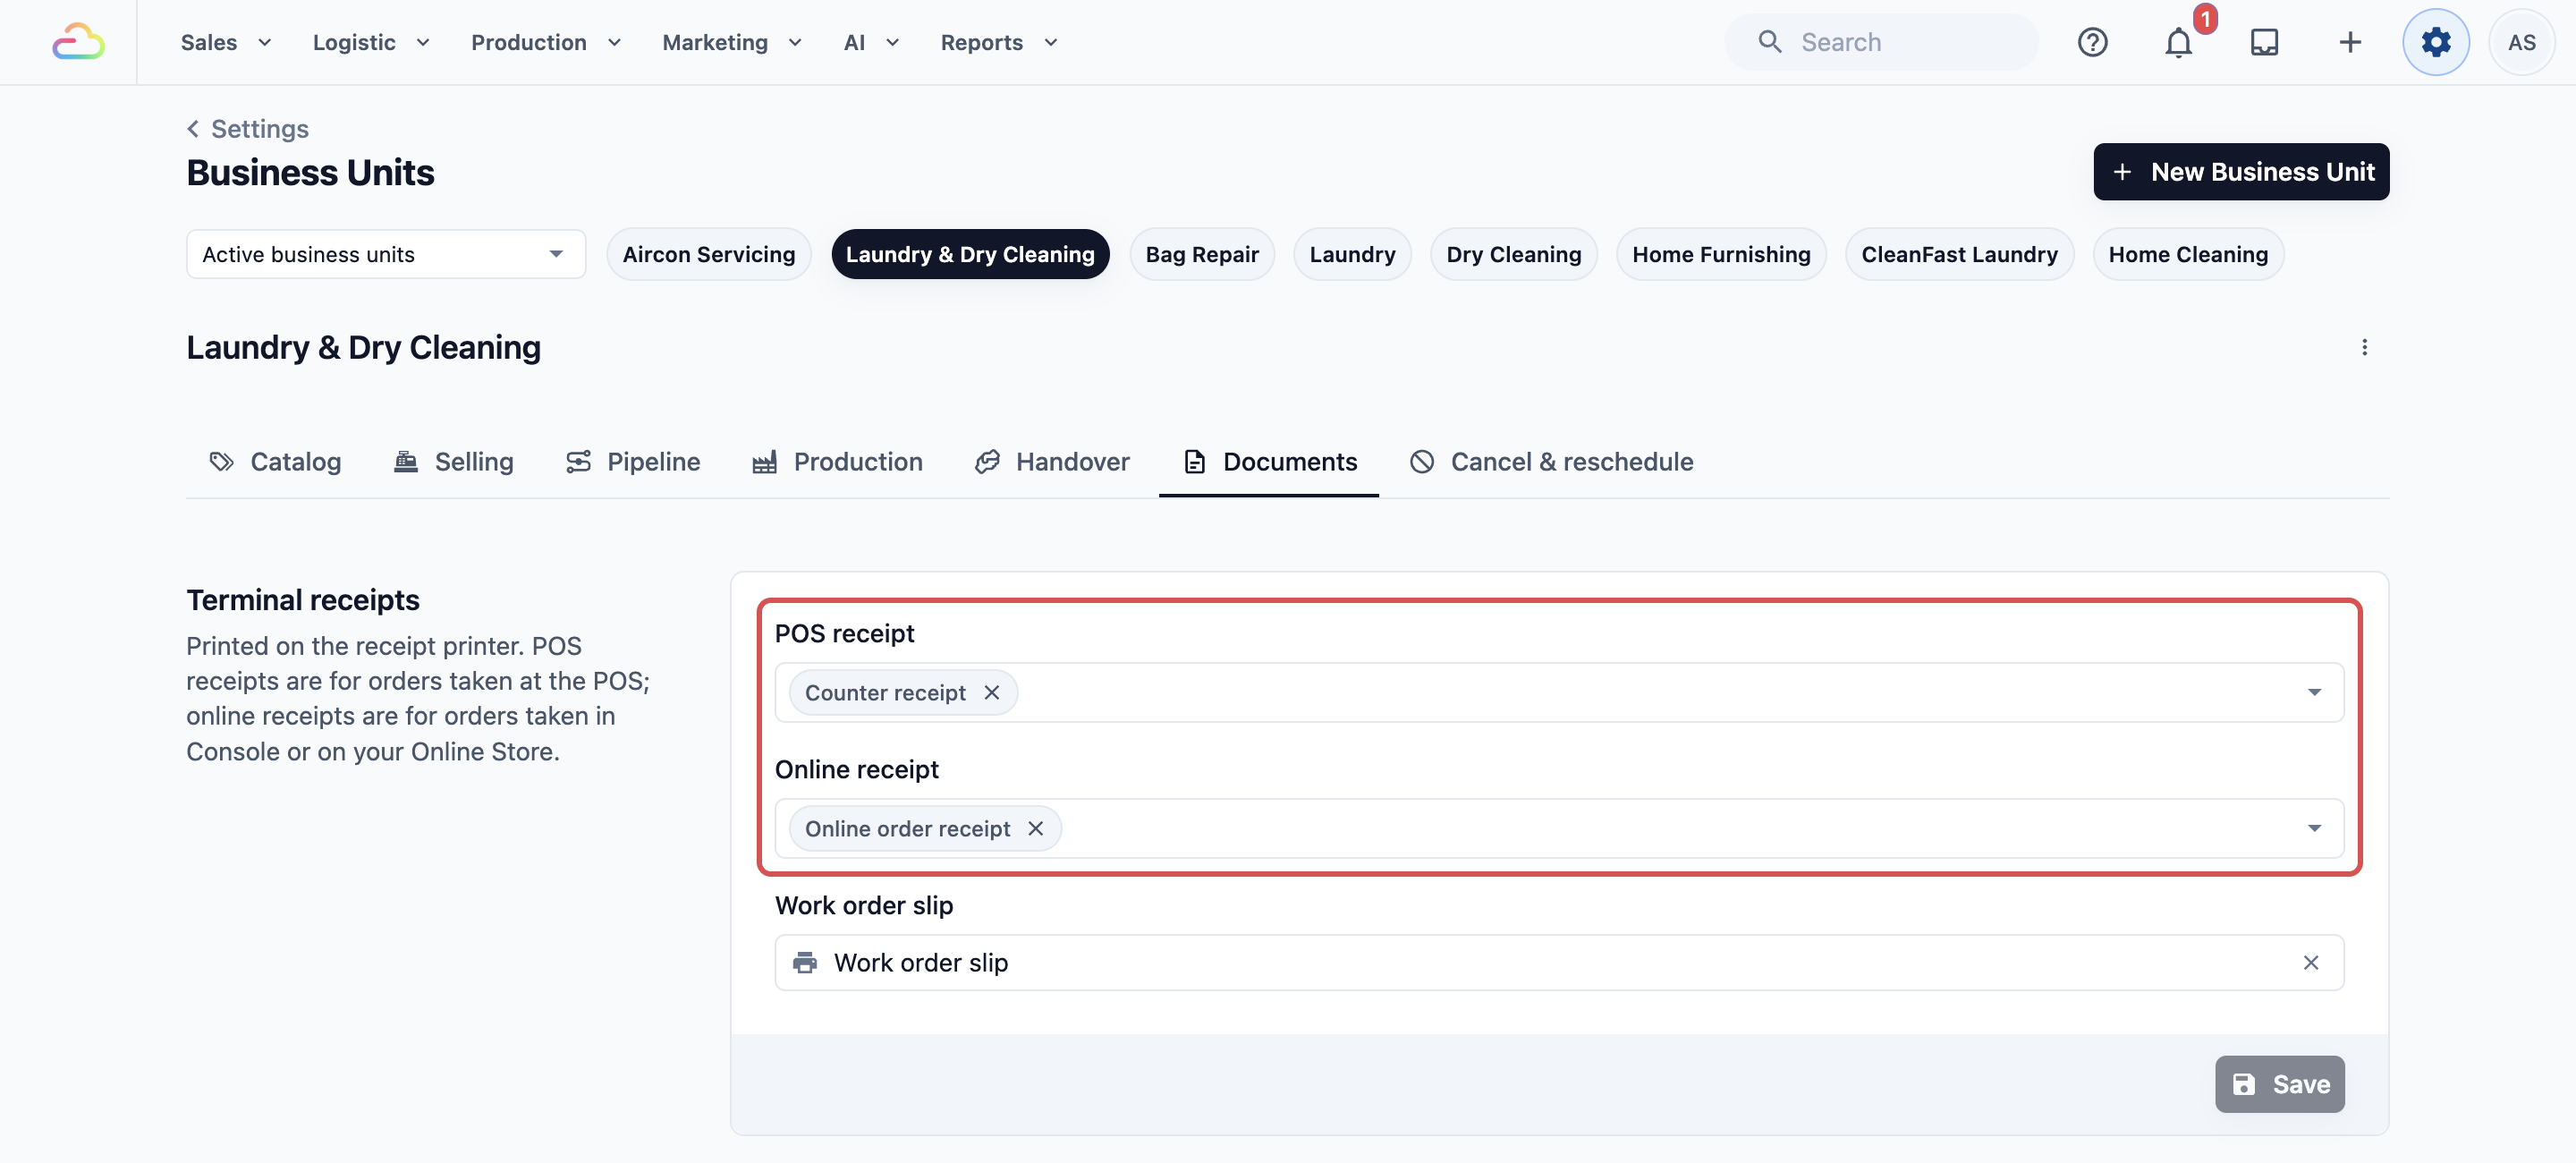
To see the 3.0 receipt of one order, open the order in **Sales** › **Orders** and click Show full receipt. For the full guide, see [Setting Up Your Order Receipt](/docs/setting-up-your-order-receipt) and [Setting Up Business Unit Documents](/docs/setting-up-business-unit-documents).
---
## Daily Orders
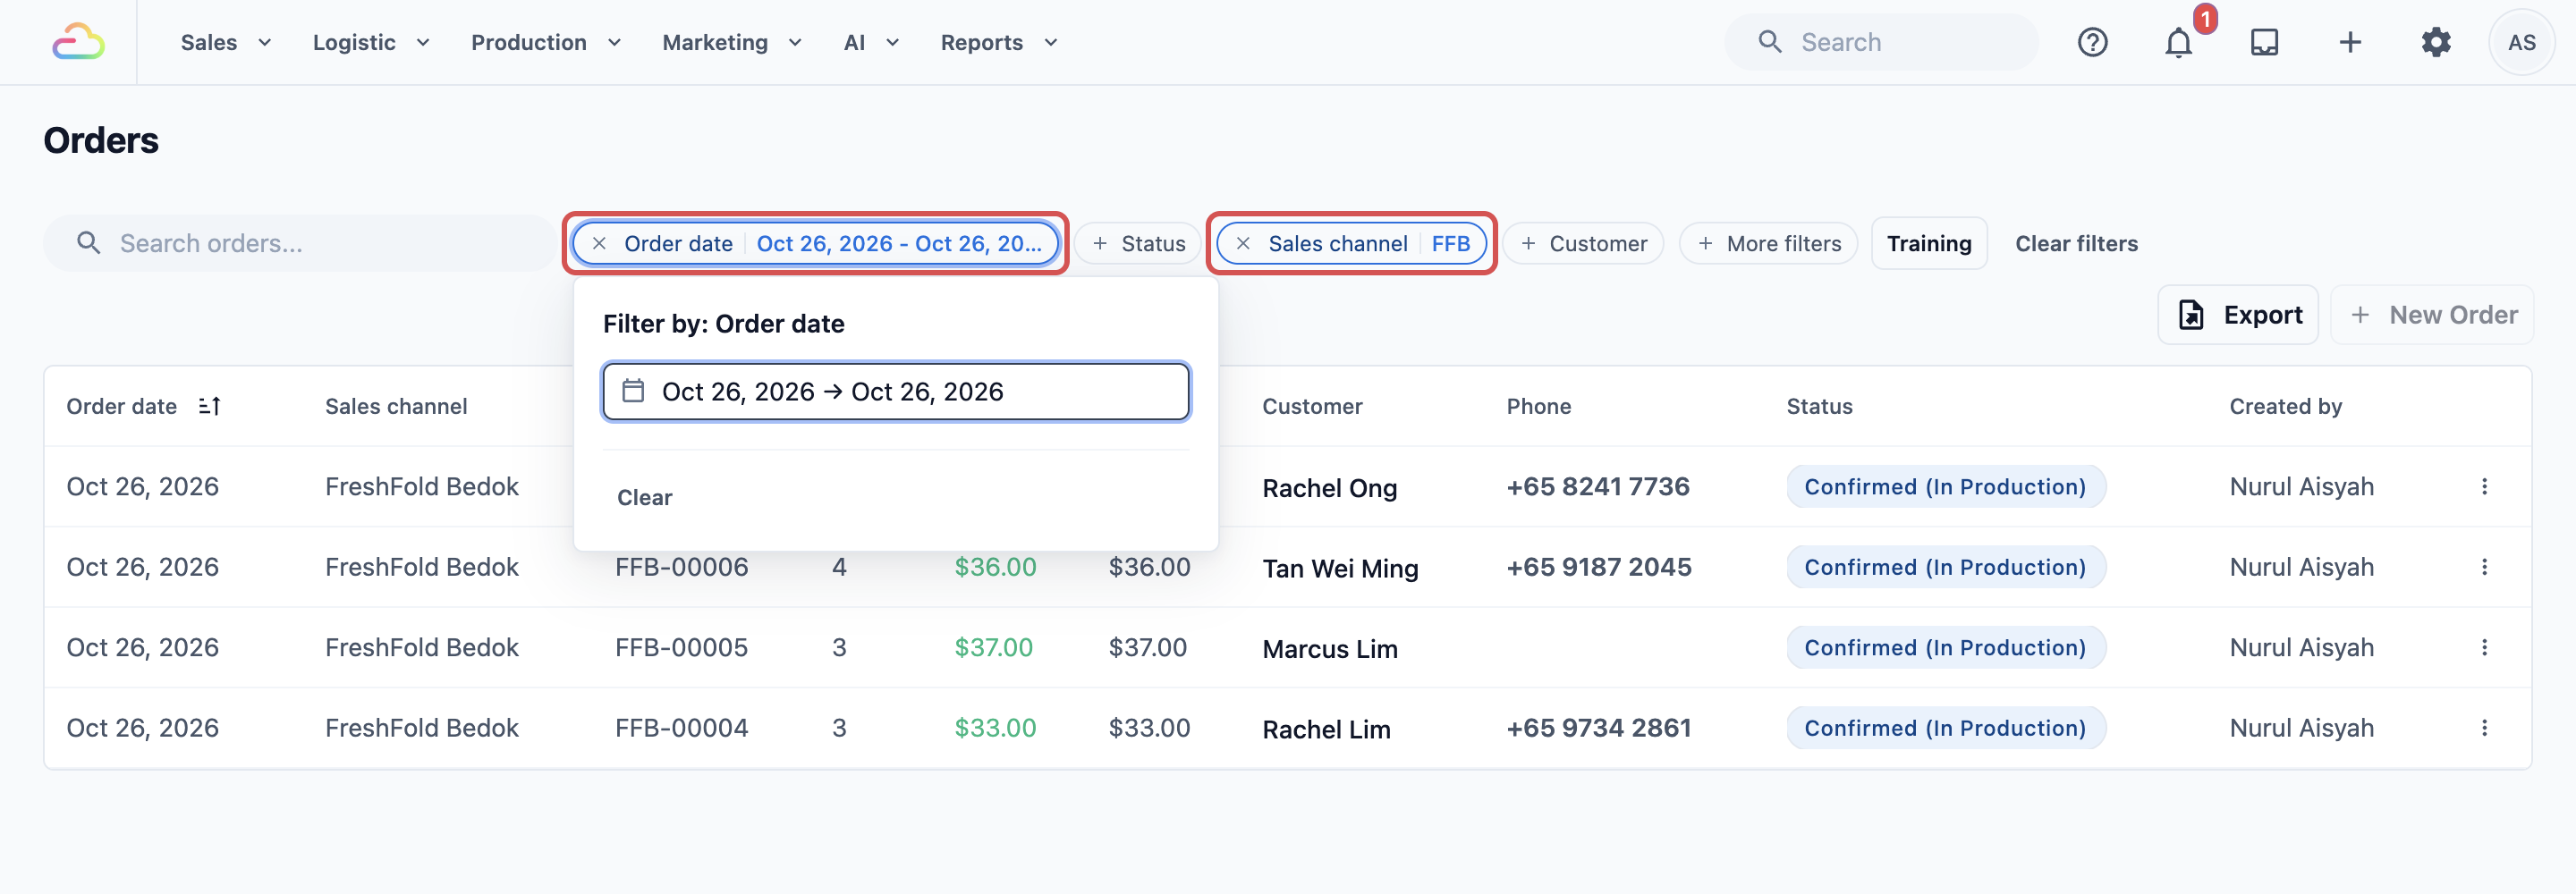
In 2.0, each store and each online app had its own Daily orders page. In 3.0 all orders are in one list, and you filter it by day and by shop.
1. In the top navigation bar, click the **Sales** dropdown, then click **Orders**.
2. Click the **Order date** filter above the list and pick the day.
3. To see one shop only, click the **Sales channel** filter and pick it. A sales channel is a place where orders are taken, such as a shop's POS or your Online Store.
For the day's totals, such as sales and payments, use **Reports** › **Sales**. The Orders list has no chart, but the Sales Report does: click **Monthly** or **Custom**, and the **Daily Trend** chart shows a bar for each day's sales. Hover over a bar to see that day's sales and number of orders. To chart one shop or your Online Store only, pick it in the **Sales channel** filter. For example, pick your Online Store to see each day's online sales this month. See [Reading the Sales Report](/docs/reading-the-sales-report).
---
## Customer Credit
Customer credit is a prepaid balance your customers top up and spend on orders. 3.0 calls it Store Credit. In 2.0 it was under Loyalty › Top-up program.
1. Click the ⚙️ Settings icon in the top-right corner.
2. Under the **Marketing** section, click Store Credit.
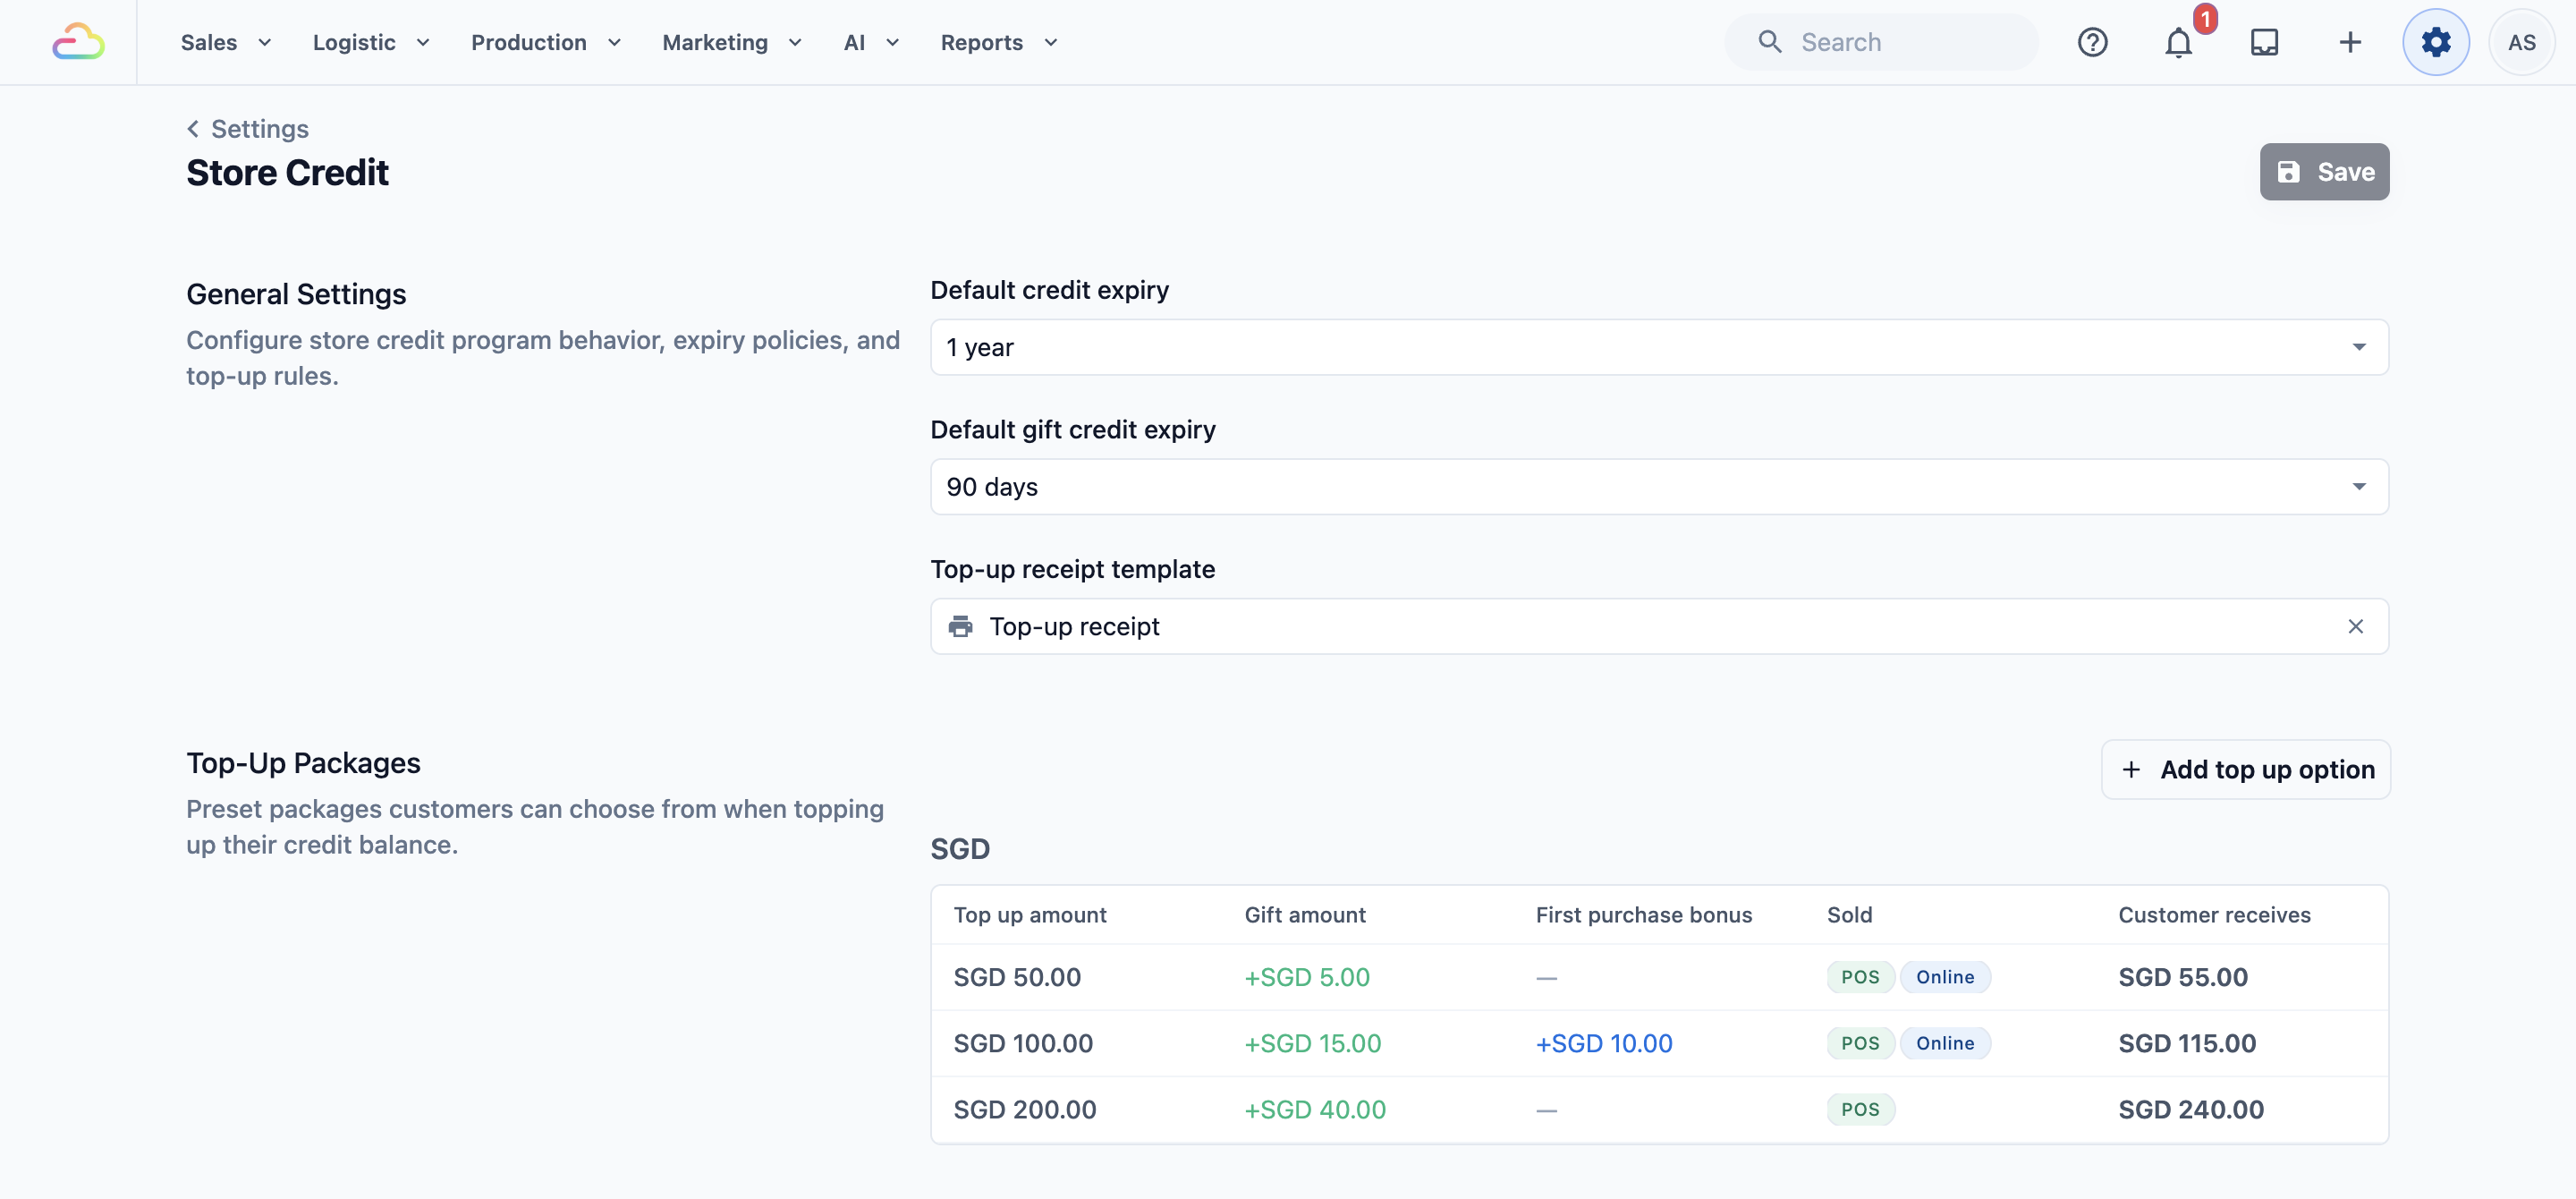
Your customers' balances came across from 2.0. Check that your top-up packages and expiry are set the way you want them. To see one customer's balance, open them in **Sales** › **Contacts**, then click Store Credit in the **Loyalty** section. For the full guide, see [Setting Up Your Store Credit Program](/docs/setting-up-your-store-credit-program).
---
## Promo Codes
Promo codes are now called coupons. In 2.0 they were under Marketing › Promo code.
1. Click the ⚙️ Settings icon in the top-right corner.
2. Under the **Marketing** section, click Coupons.
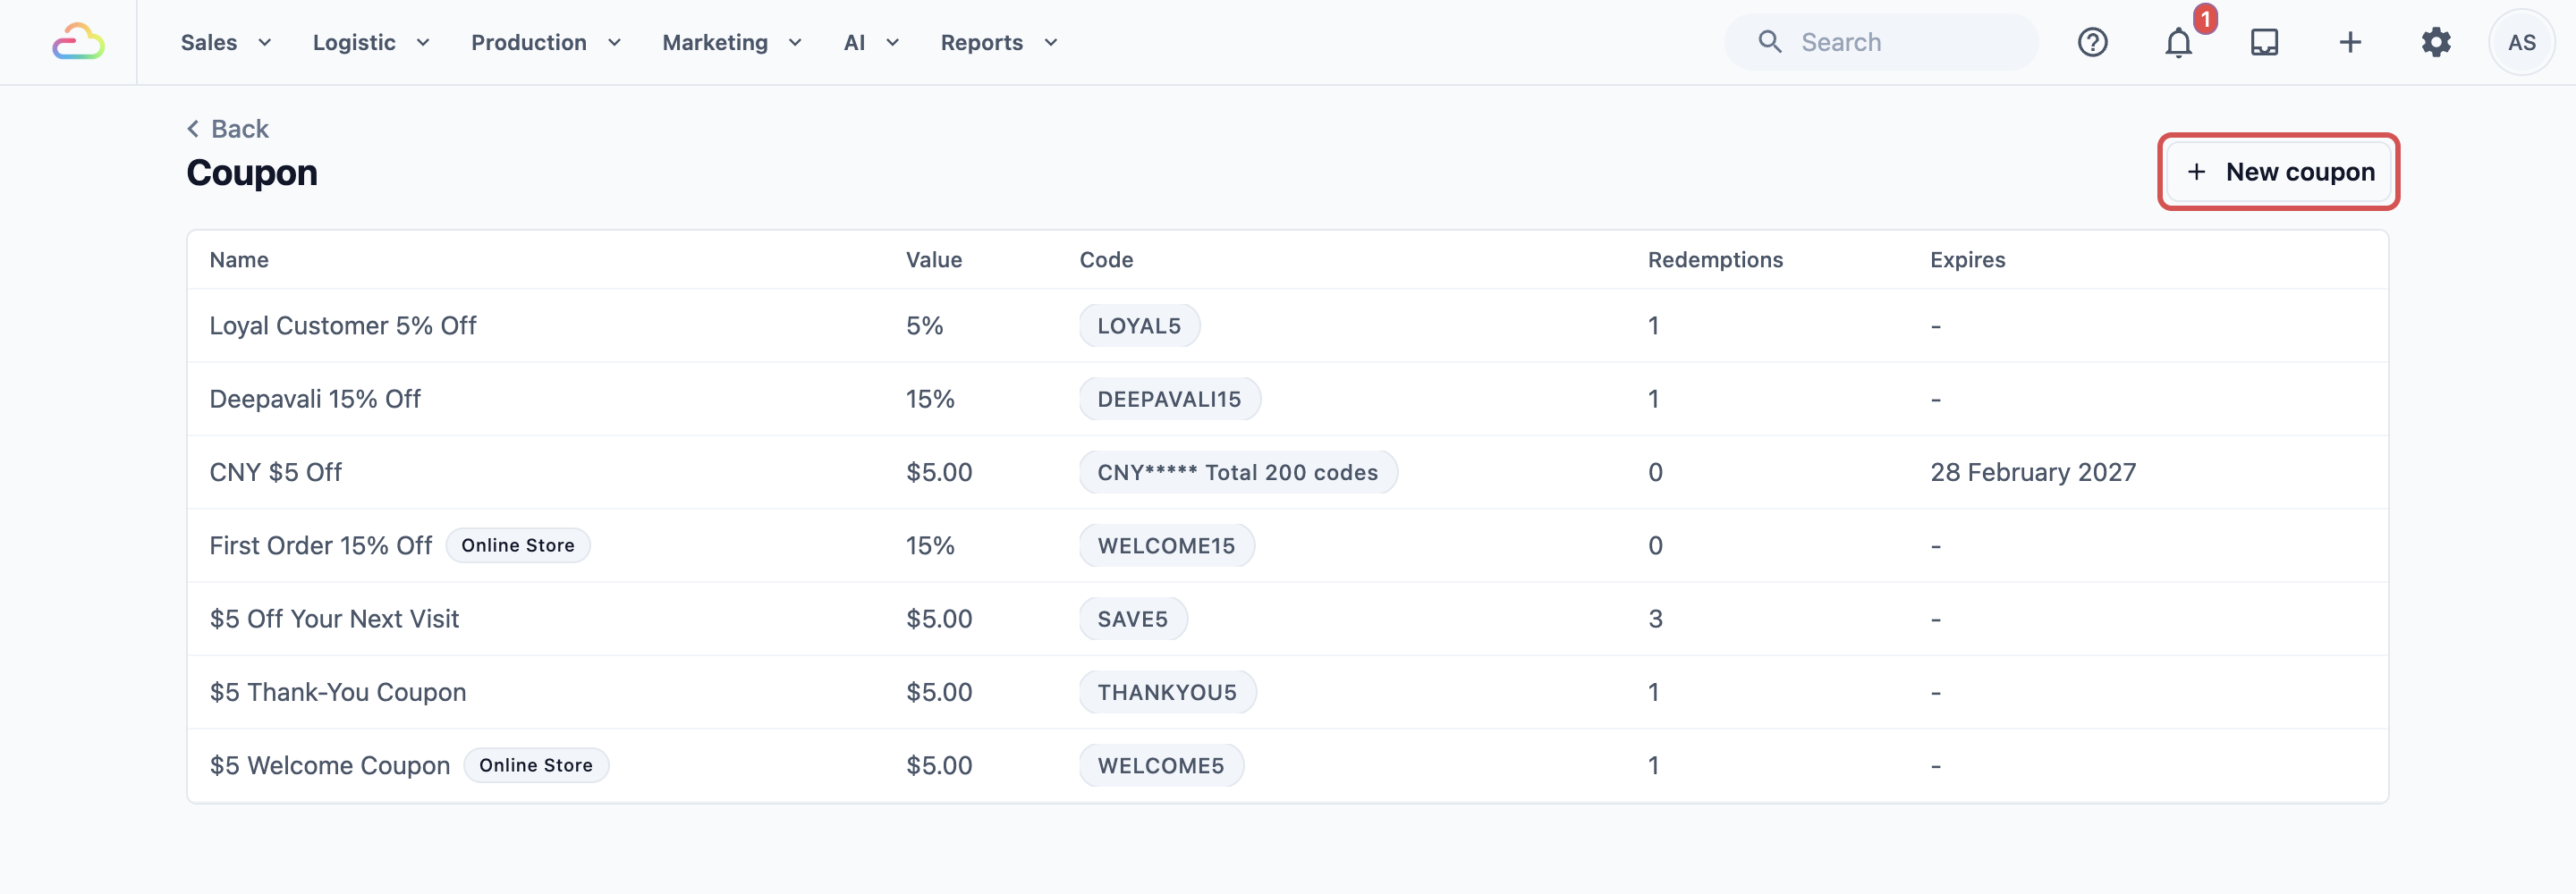
Your 2.0 promo codes are on this page too. Each code that was still running on 27 October 2026 was copied as a coupon with the same code, for example **SAVE10**. It works at your POS, in the Console, on your Online Store and in your Mobile App, and keeps any limit to some shops. It isn't listed on your Online Store's Promotions page until you turn on **Show on the Online Store**. While you still use Console 2.0, saving a promo code there also saves its coupon here, putting back the 2.0 dates, value and limits, and deleting it there deletes the coupon. So change each code in one Console only. The coupon's **Redemptions** count started on the day it was copied. For the full guide, see [Setting Up Coupons](/docs/setting-up-coupons).
A customer must be selected before staff can add a promo code at checkout. Without a customer, the button asks staff to select one first.
---
## Private Notes
A private note is a note about a customer that only your staff see, such as "Prefers no starch". In 2.0 it was on the customer's profile. In 3.0 it is on the contact, and it came across from 2.0.
1. In the top navigation bar, click the **Sales** dropdown, then click **Contacts**.
2. Click the customer.
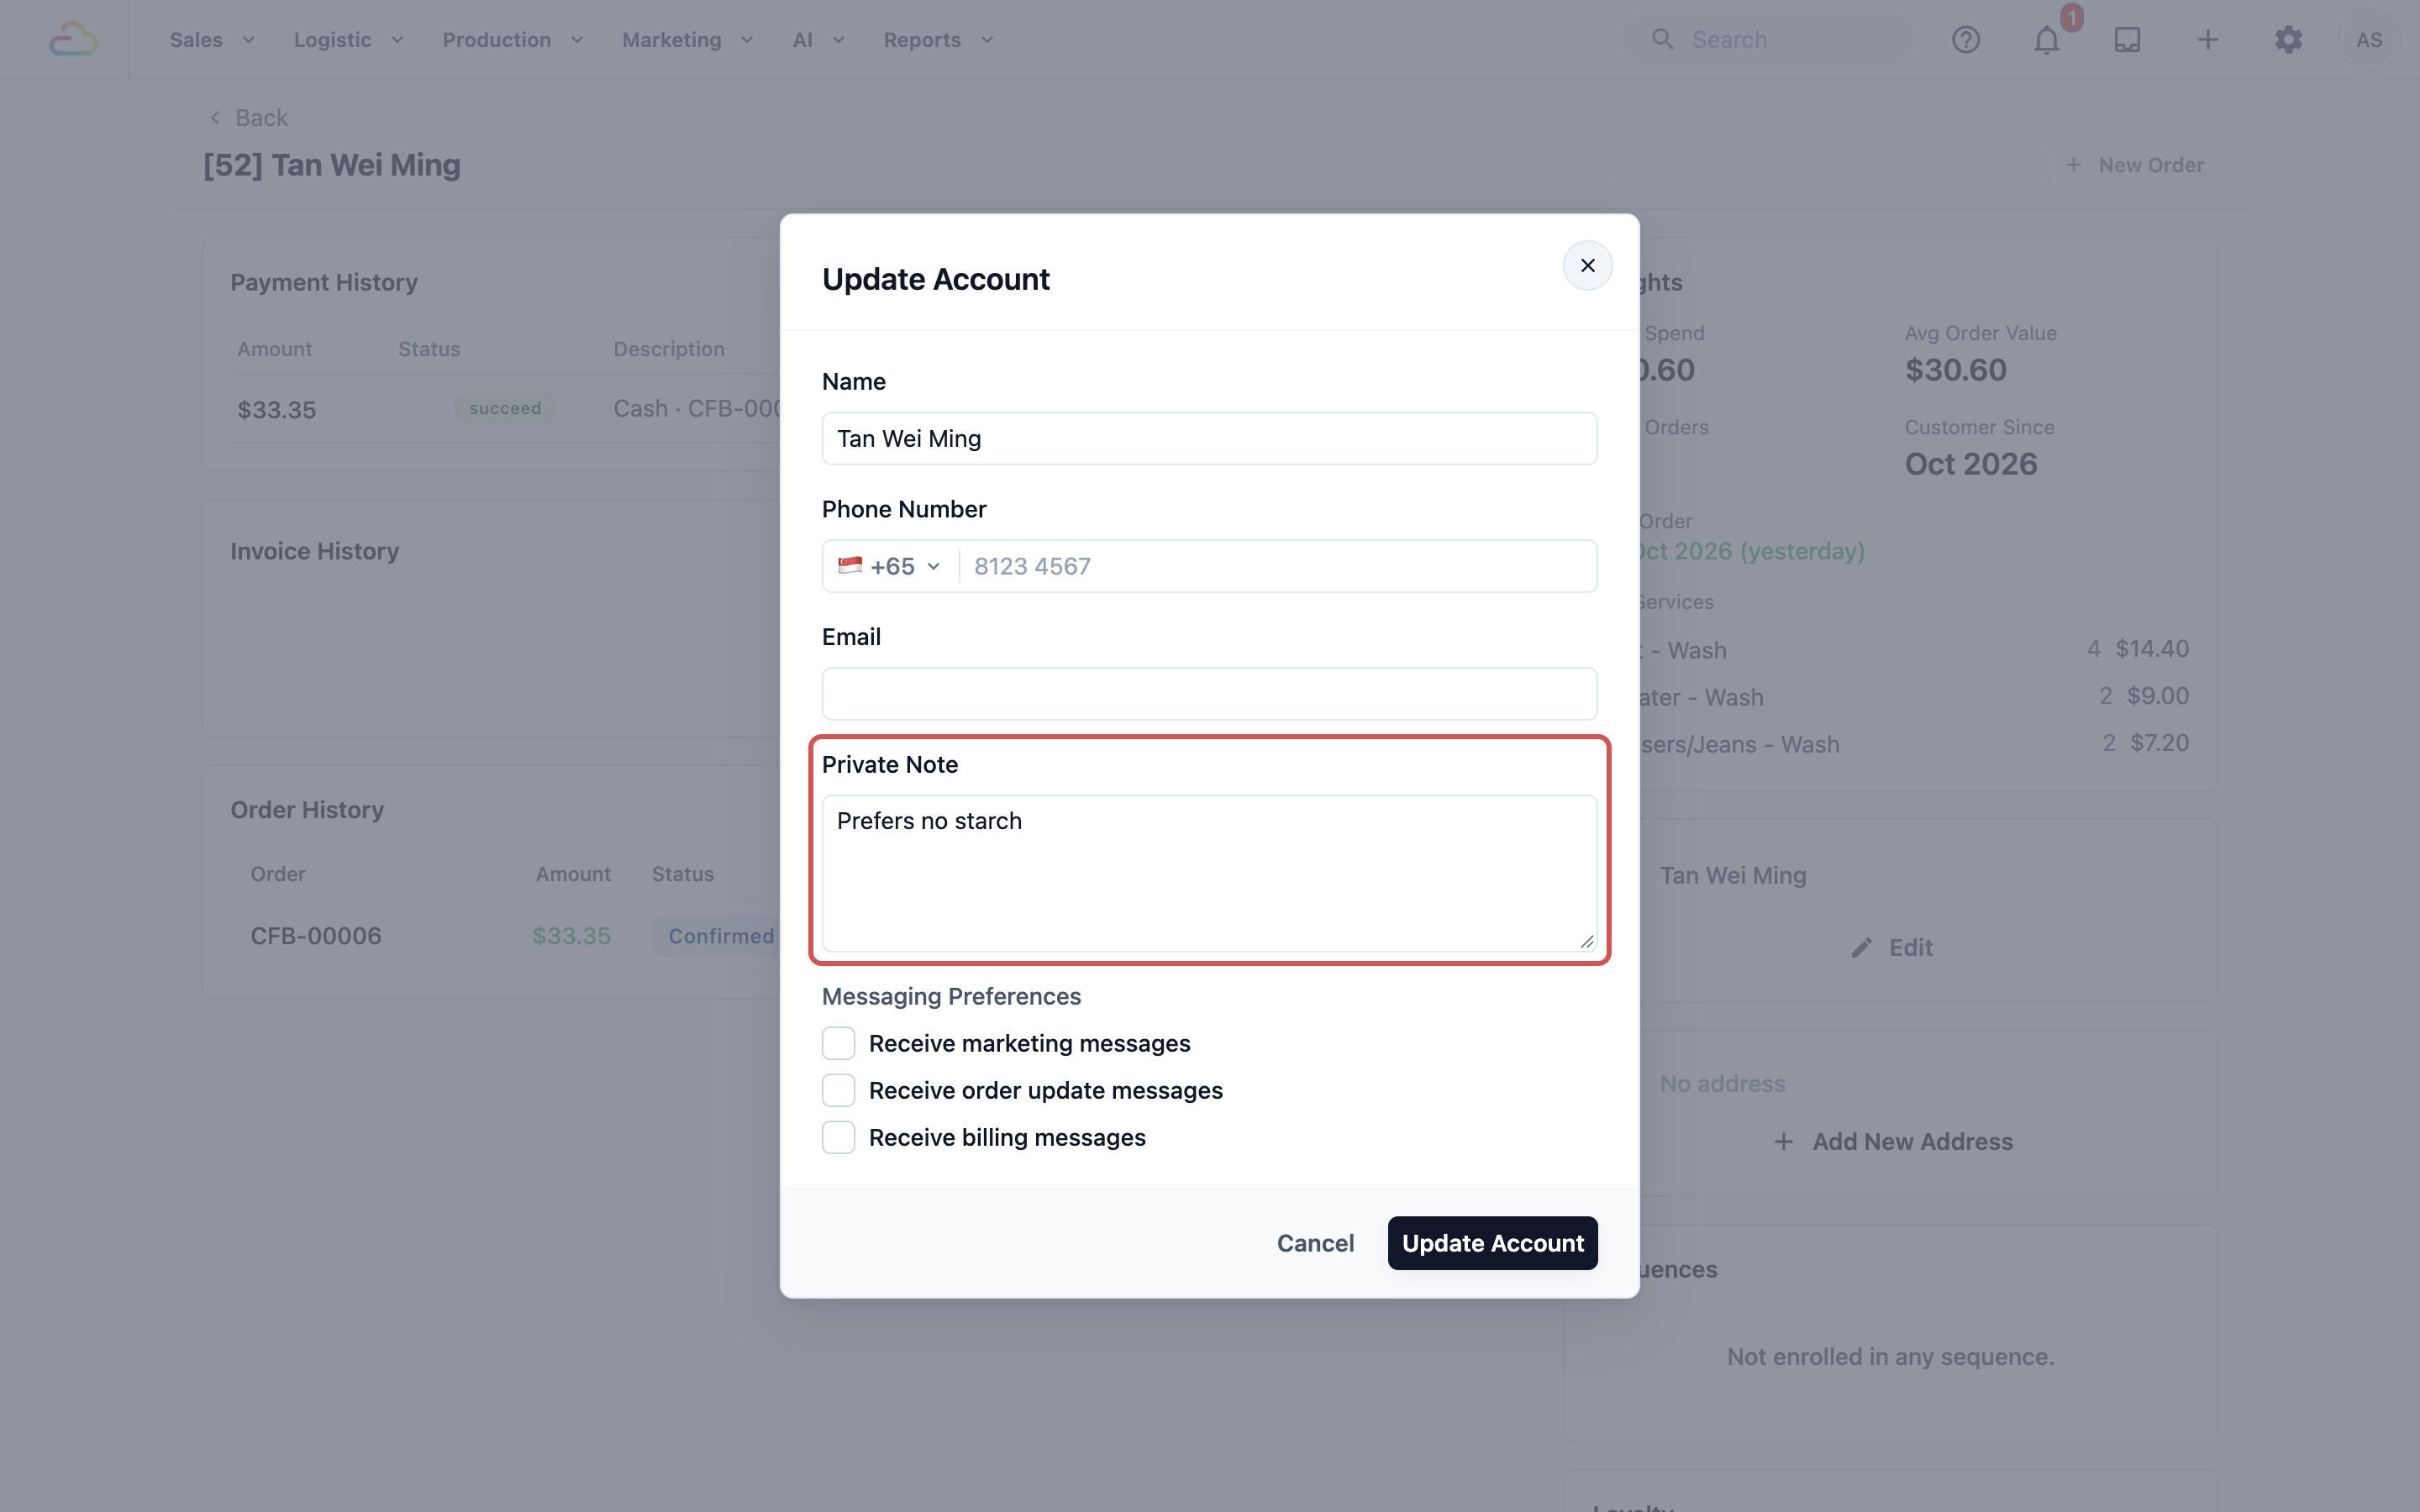
To add or change a note, edit the contact and fill in **Private Note**. See [Adding and Editing Contacts](/docs/adding-and-editing-contacts). Your Console can also show the note on each order of that customer, so staff see it while they work. See [Understanding the Contact Profile](/docs/understanding-the-contact-profile).
---
## The Pricing Page
In 2.0 you set prices on each business's Pricing page. In 3.0 prices sit in price lists, and each business unit uses one or more of them.
1. Click the ⚙️ Settings icon in the top-right corner.
2. Under the **Catalog & Pricing** section, click Price Lists.
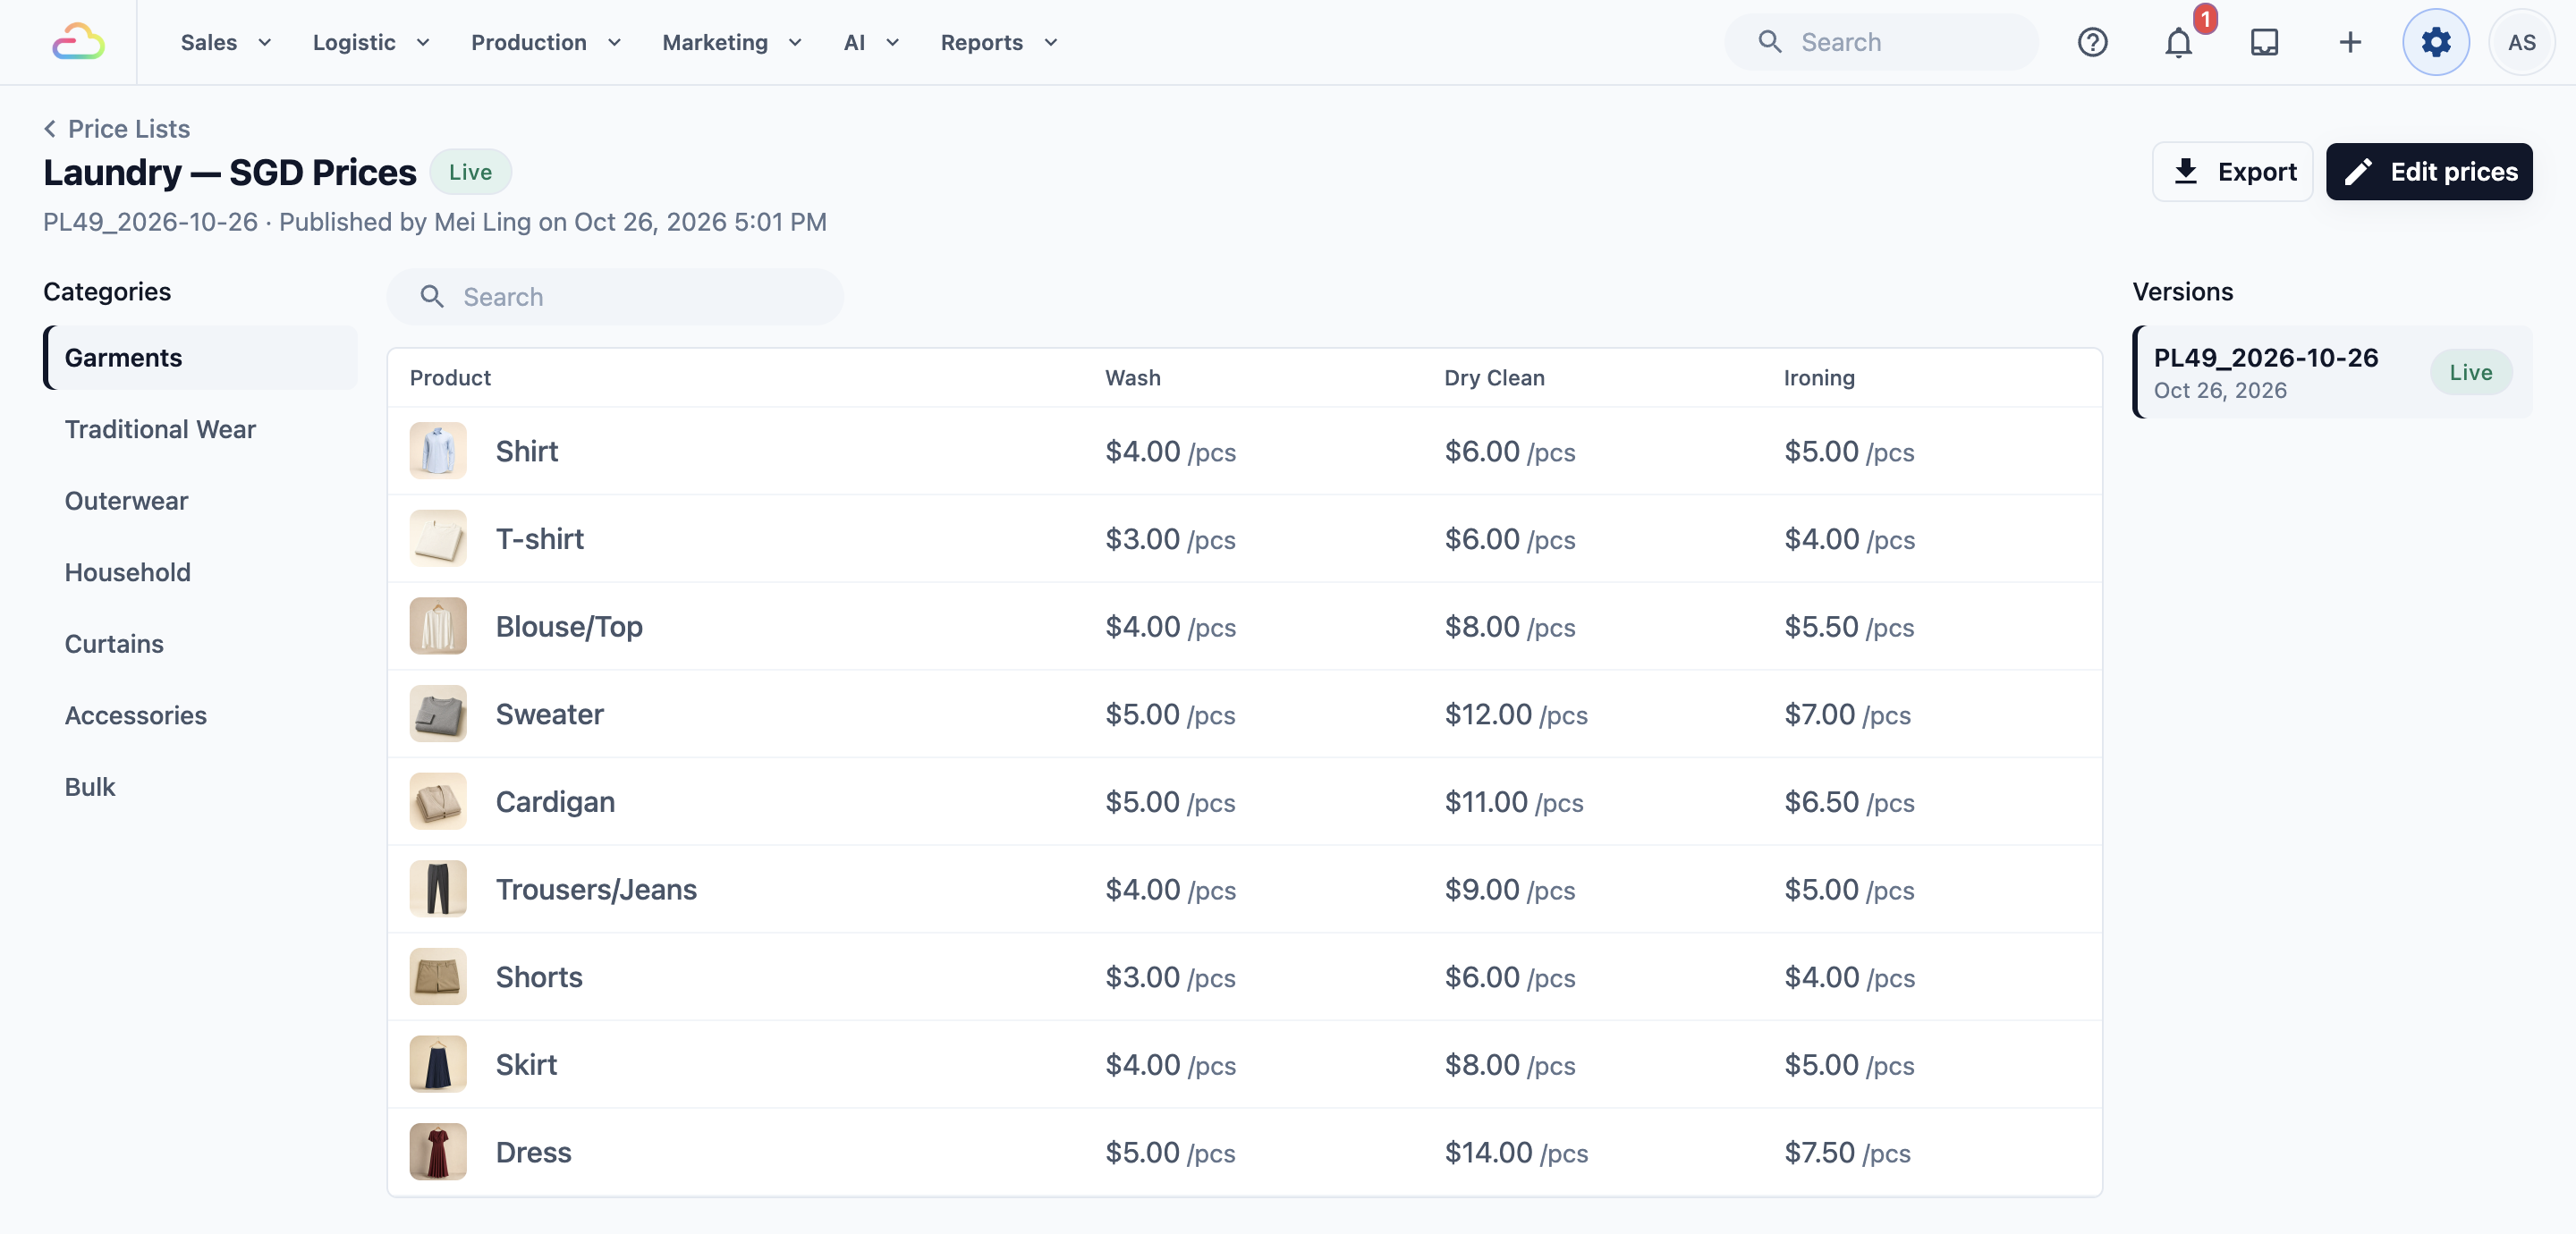
Before you move your counter over to 3.0, open your price list and check that every item and price you sold in 2.0 is there. For the full guide, see [Create Price Lists](/docs/create-price-lists).
---
## Minimum Order
A minimum order is the lowest amount an order can be. When an order is below it, EasyBiz adds the difference to the order. In 2.0 it was under Business › your business › Store POS order › Minimum order. Console 3.0 does not use that 2.0 setting, so set it up again here.
1. Click the ⚙️ Settings icon in the top-right corner.
2. Under the **Administration** section, click Business Units.
3. Open the business unit, then click the Catalog tab.
4. In the **Price list** section, click Add minimum order.
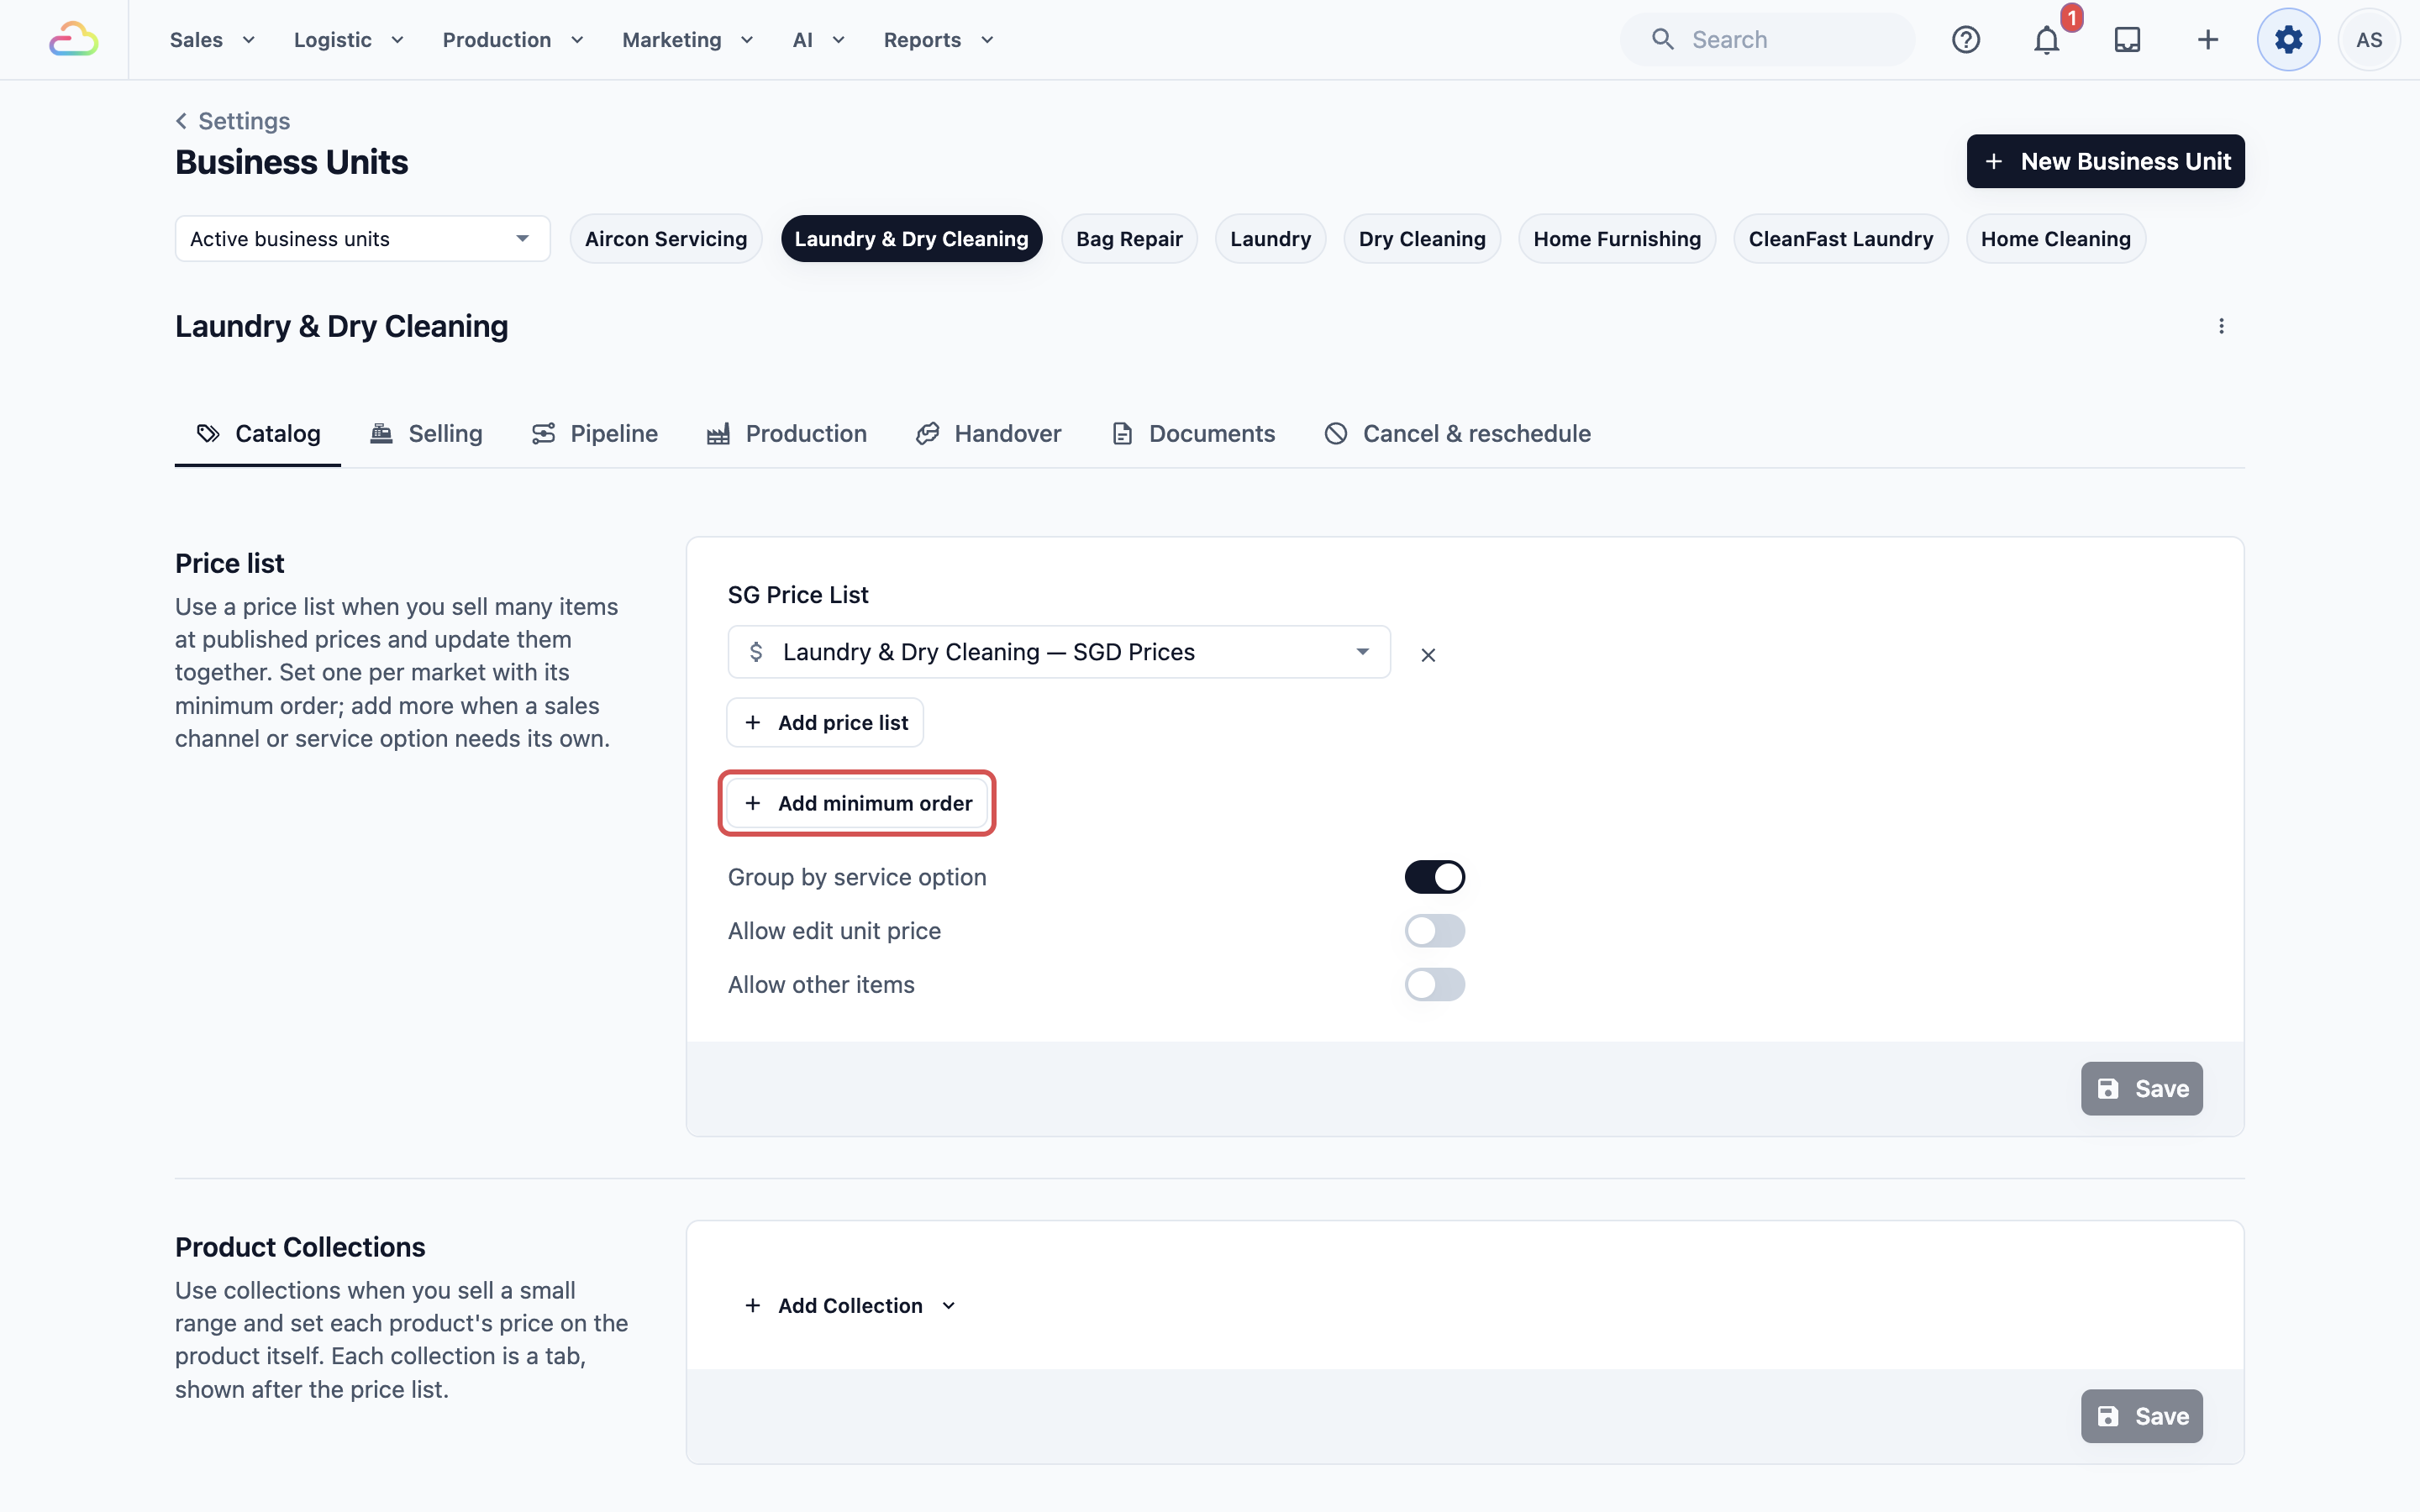
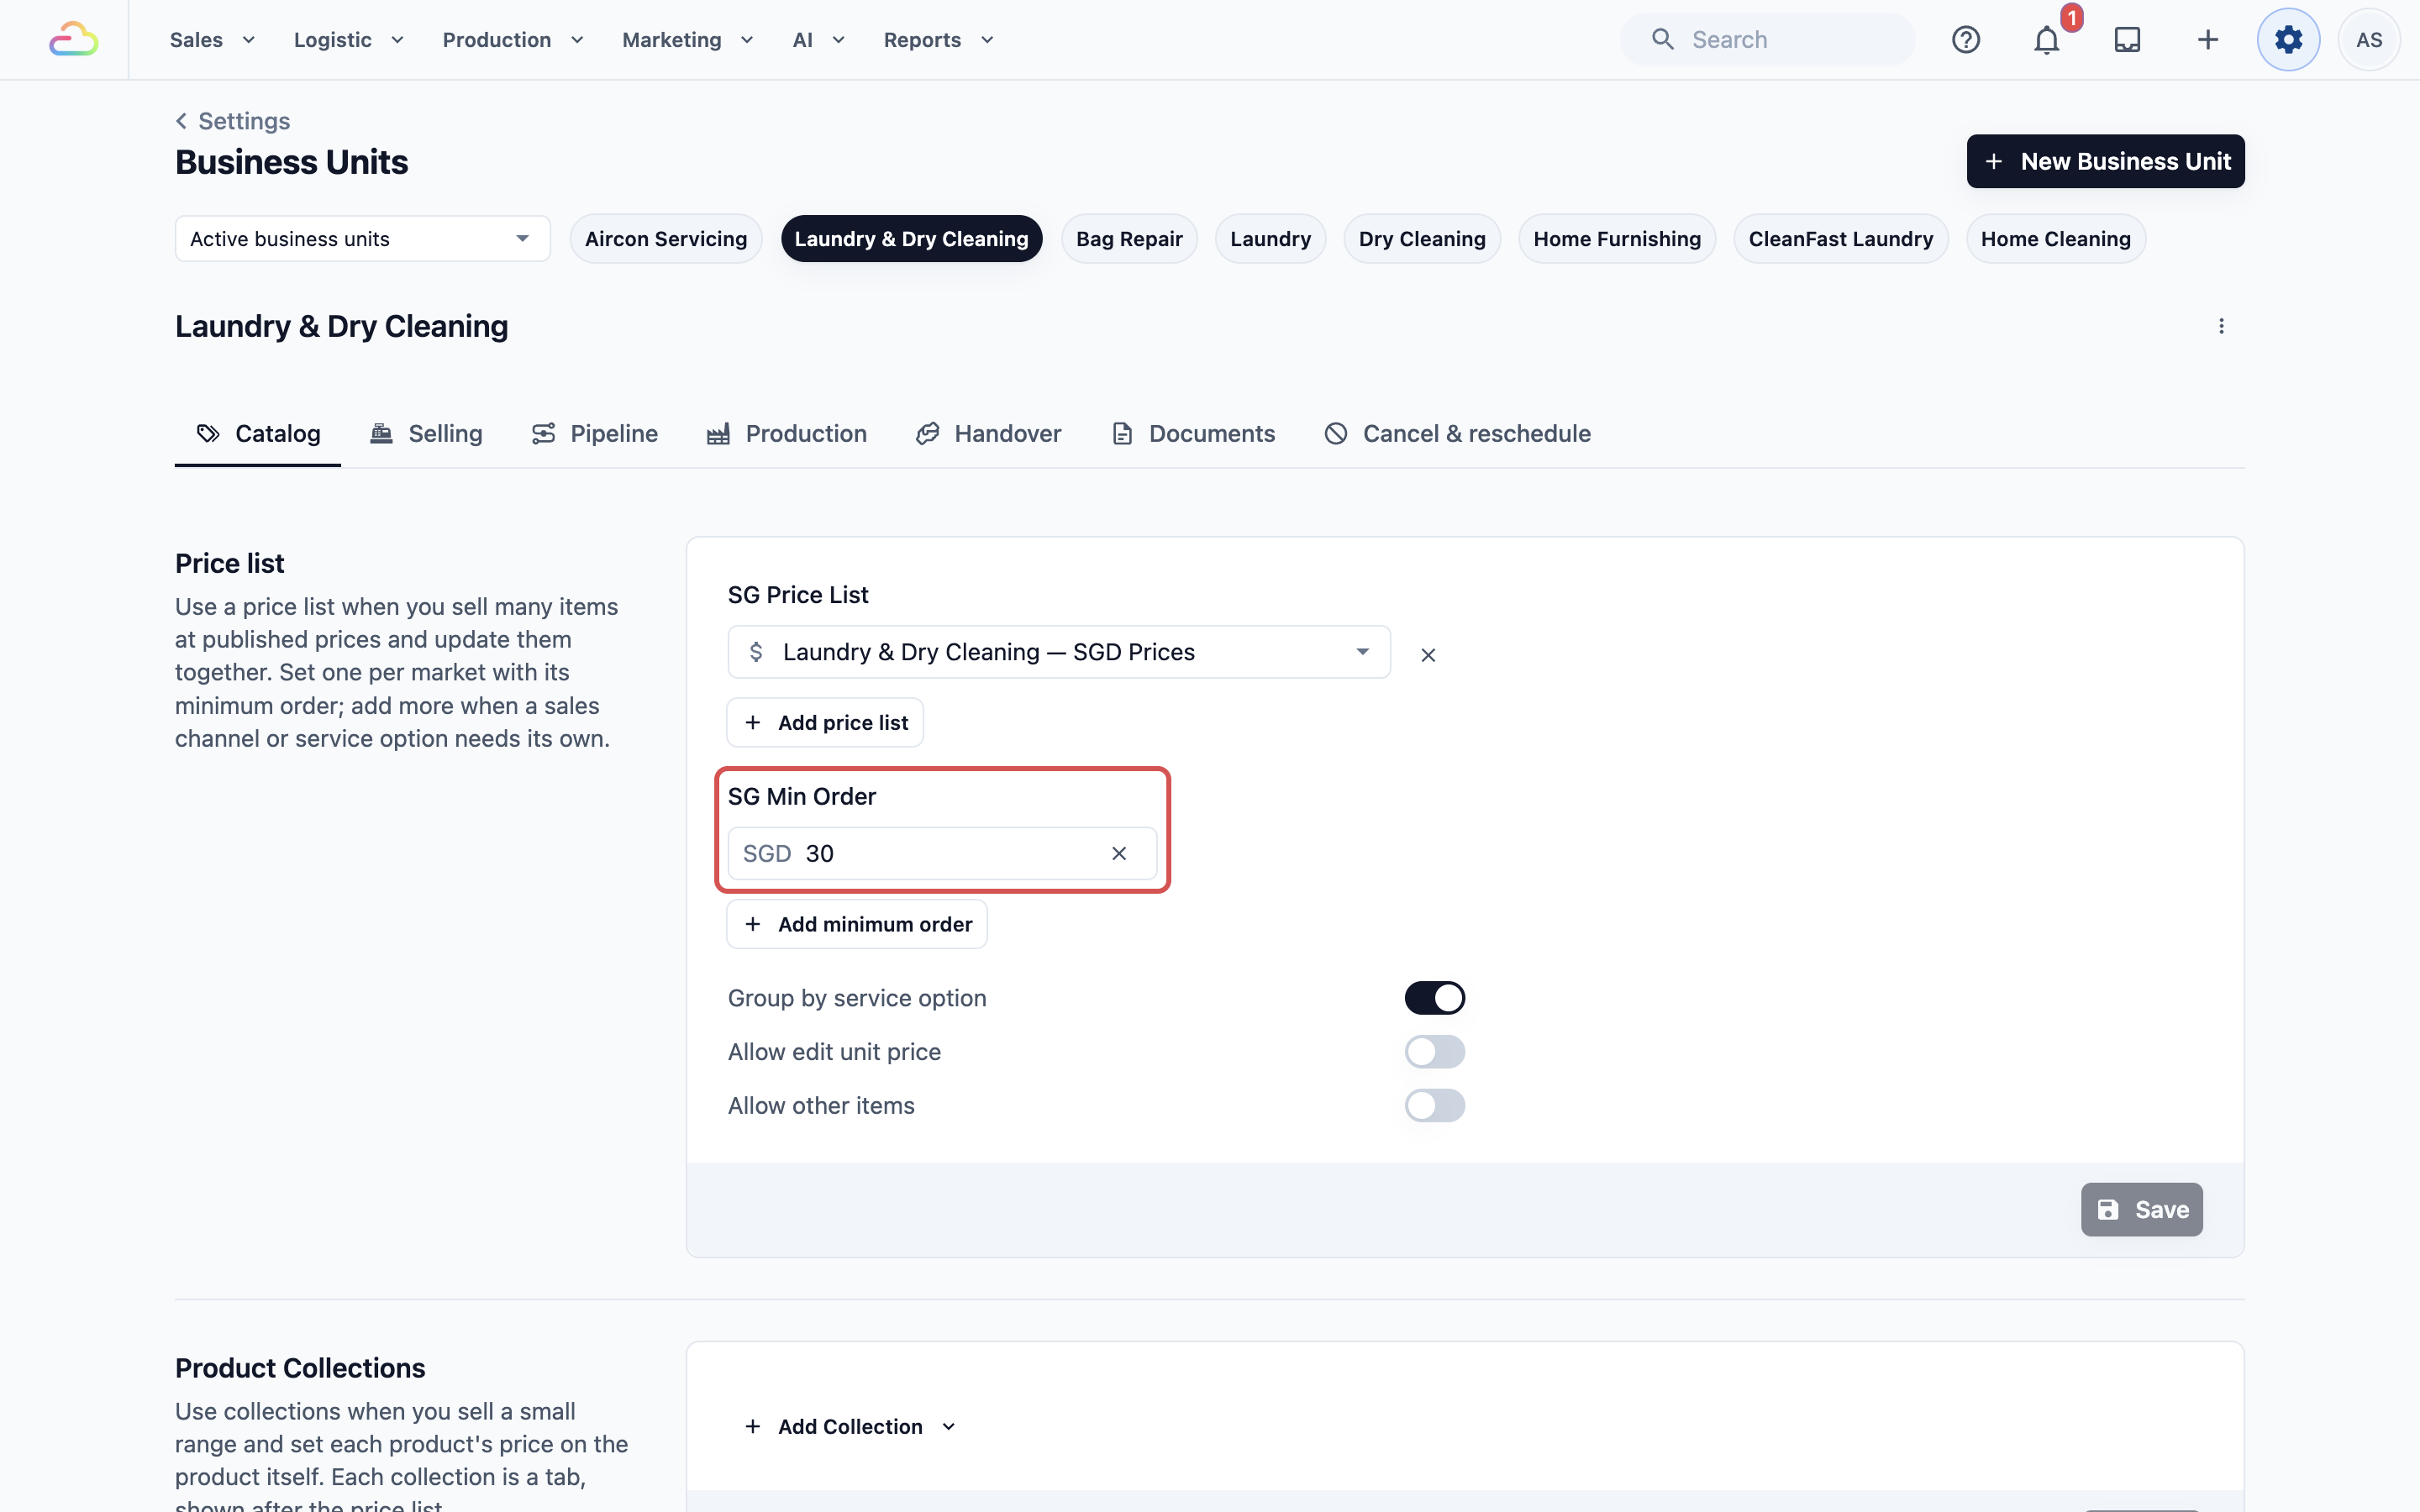
5. Enter the **Min. order** amount, for example $30, and click Add.
6. Click Save.
If you charge a different minimum for some areas, set it in **Settings** › **Bookings** › your business unit › **Service Areas**. When both are set, the higher one applies. See [Setting Up Business Unit Catalog](/docs/setting-up-business-unit-catalog) and [Setting Up Service Areas](/docs/setting-up-service-areas).
---
## Other Settings You May Look For
- **Surcharges and discounts** are now two pages, **Discounts** and **Surcharges**, under the **Catalog & Pricing** section. See [Create a Discount or Surcharge Option](/docs/create-a-discount-or-surcharge-option).
- **Staff accounts** are in **Users & Access** under the **Administration** section. If you limited a staff member to one store in 2.0, set **Sales Channel Access** for them here. See [Inviting Your Team and Managing Access](/docs/inviting-your-team-and-managing-access). If a driver had a **Fixed agent** in 2.0, choose that factory as their **Production center** on the same page, so the orders they pick up still go there. They then find and open only the orders that factory processes. See [Managing Production Centers](/docs/managing-production-centers).
- **Customer notifications** are in **Customer Notifications** under the **CRM** section. See [Setting Up Customer Notifications](/docs/setting-up-customer-notifications).
- **Terms & Conditions** are now **Policies** under the **Library** section. You write each policy once and choose where customers see it. See [Setting Up Your Policies and Customer Acknowledgements](/docs/setting-up-your-policies-and-customer-acknowledgements).
- **Servicing area and time slots** are in **Bookings** and **Service Areas** under the **Scheduling & Dispatch** section. See [Setting Up Service Areas](/docs/setting-up-service-areas).
---
## FAQs
**Do I need to move my orders and customers to 3.0?**
> No. Both Consoles use the same account. An order or customer made in 2.0 opens in 3.0, with its payments and history.
**Can my staff keep using 2.0 while I set up 3.0?**
> Yes, both work at the same time. Take each payment in one Console only. Taking it again in the other Console records a second payment.
**I changed my receipt in 2.0. Why does 3.0 print the old one?**
> The two Consoles keep separate receipts. Edit the receipt in 3.0 under Settings › Library › Receipt template.
**Why isn't my minimum order charged on 3.0 orders?**
> Console 3.0 does not read the 2.0 minimum. Add it on the business unit's Catalog tab, as shown above.
**A staff member could only see one store in 2.0. Why do they see every shop in 3.0?**
> The 2.0 store limit and the 3.0 setting are separate. Set their **Sales Channel Access** in Settings › Users & Access.
**Will customers get two messages for the same order?**
> They can, if notifications are set up in both Consoles. Ask the EasyBiz team to check which ones send for your shop.