## Before You Start
- You need access to **Sales** in the Console. The account owner sets this for each staff member. See [Inviting Your Team and Managing Access](/docs/inviting-your-team-and-managing-access).
- Some actions need their own permission. Changing items and moving an order need **Edit Order**. Cancelling needs **Cancel order**.
- If a staff member's **Sales Channel Scope** is limited to some shops, they only see those shops' orders in this list.
- **If you used Console 2.0:** **Daily orders** under each store is gone. All orders are now in one list under **Sales** › **Orders**, and you filter it by date and sales channel instead.
---
## Overview
Sales › Orders is the one list of every order your business takes, whether it came from the POS, the Console, your Online Store, your Mobile App or an agent. You can search it and filter it to find an order quickly. Opening an order shows everything about it on one page: the items, payments, pickups and deliveries, notes, photos and history. From that page, staff change items, move dates, cancel, reprint documents and see who did what. Every change is saved straight away, so the POS, your drivers and the customer's order page all see the same order.
**Where it works**
- **Console:** the Orders list and the order page described in this article.
- **POS and the staff app:** show the same orders, with the changes made here.
- **Online Store and Mobile App:** customers see new dates, new items and cancellations on their order page.
---
## Why use it
Customers call, message and walk in asking about their orders all day. With one list and one search box, staff answer while the customer is still on the line, instead of checking each shop's book.
It helps you:
- Find an order by phone number, name or order number, without asking the customer for a receipt.
- Change an order the moment the customer asks, so nothing is forgotten.
- Keep payments, refunds and reports correct automatically when an order changes.
- See who changed what, and when, if a customer disputes something.
---
## Where to find it
1. In the top navigation bar, click the **Sales** dropdown.
2. Click Orders.
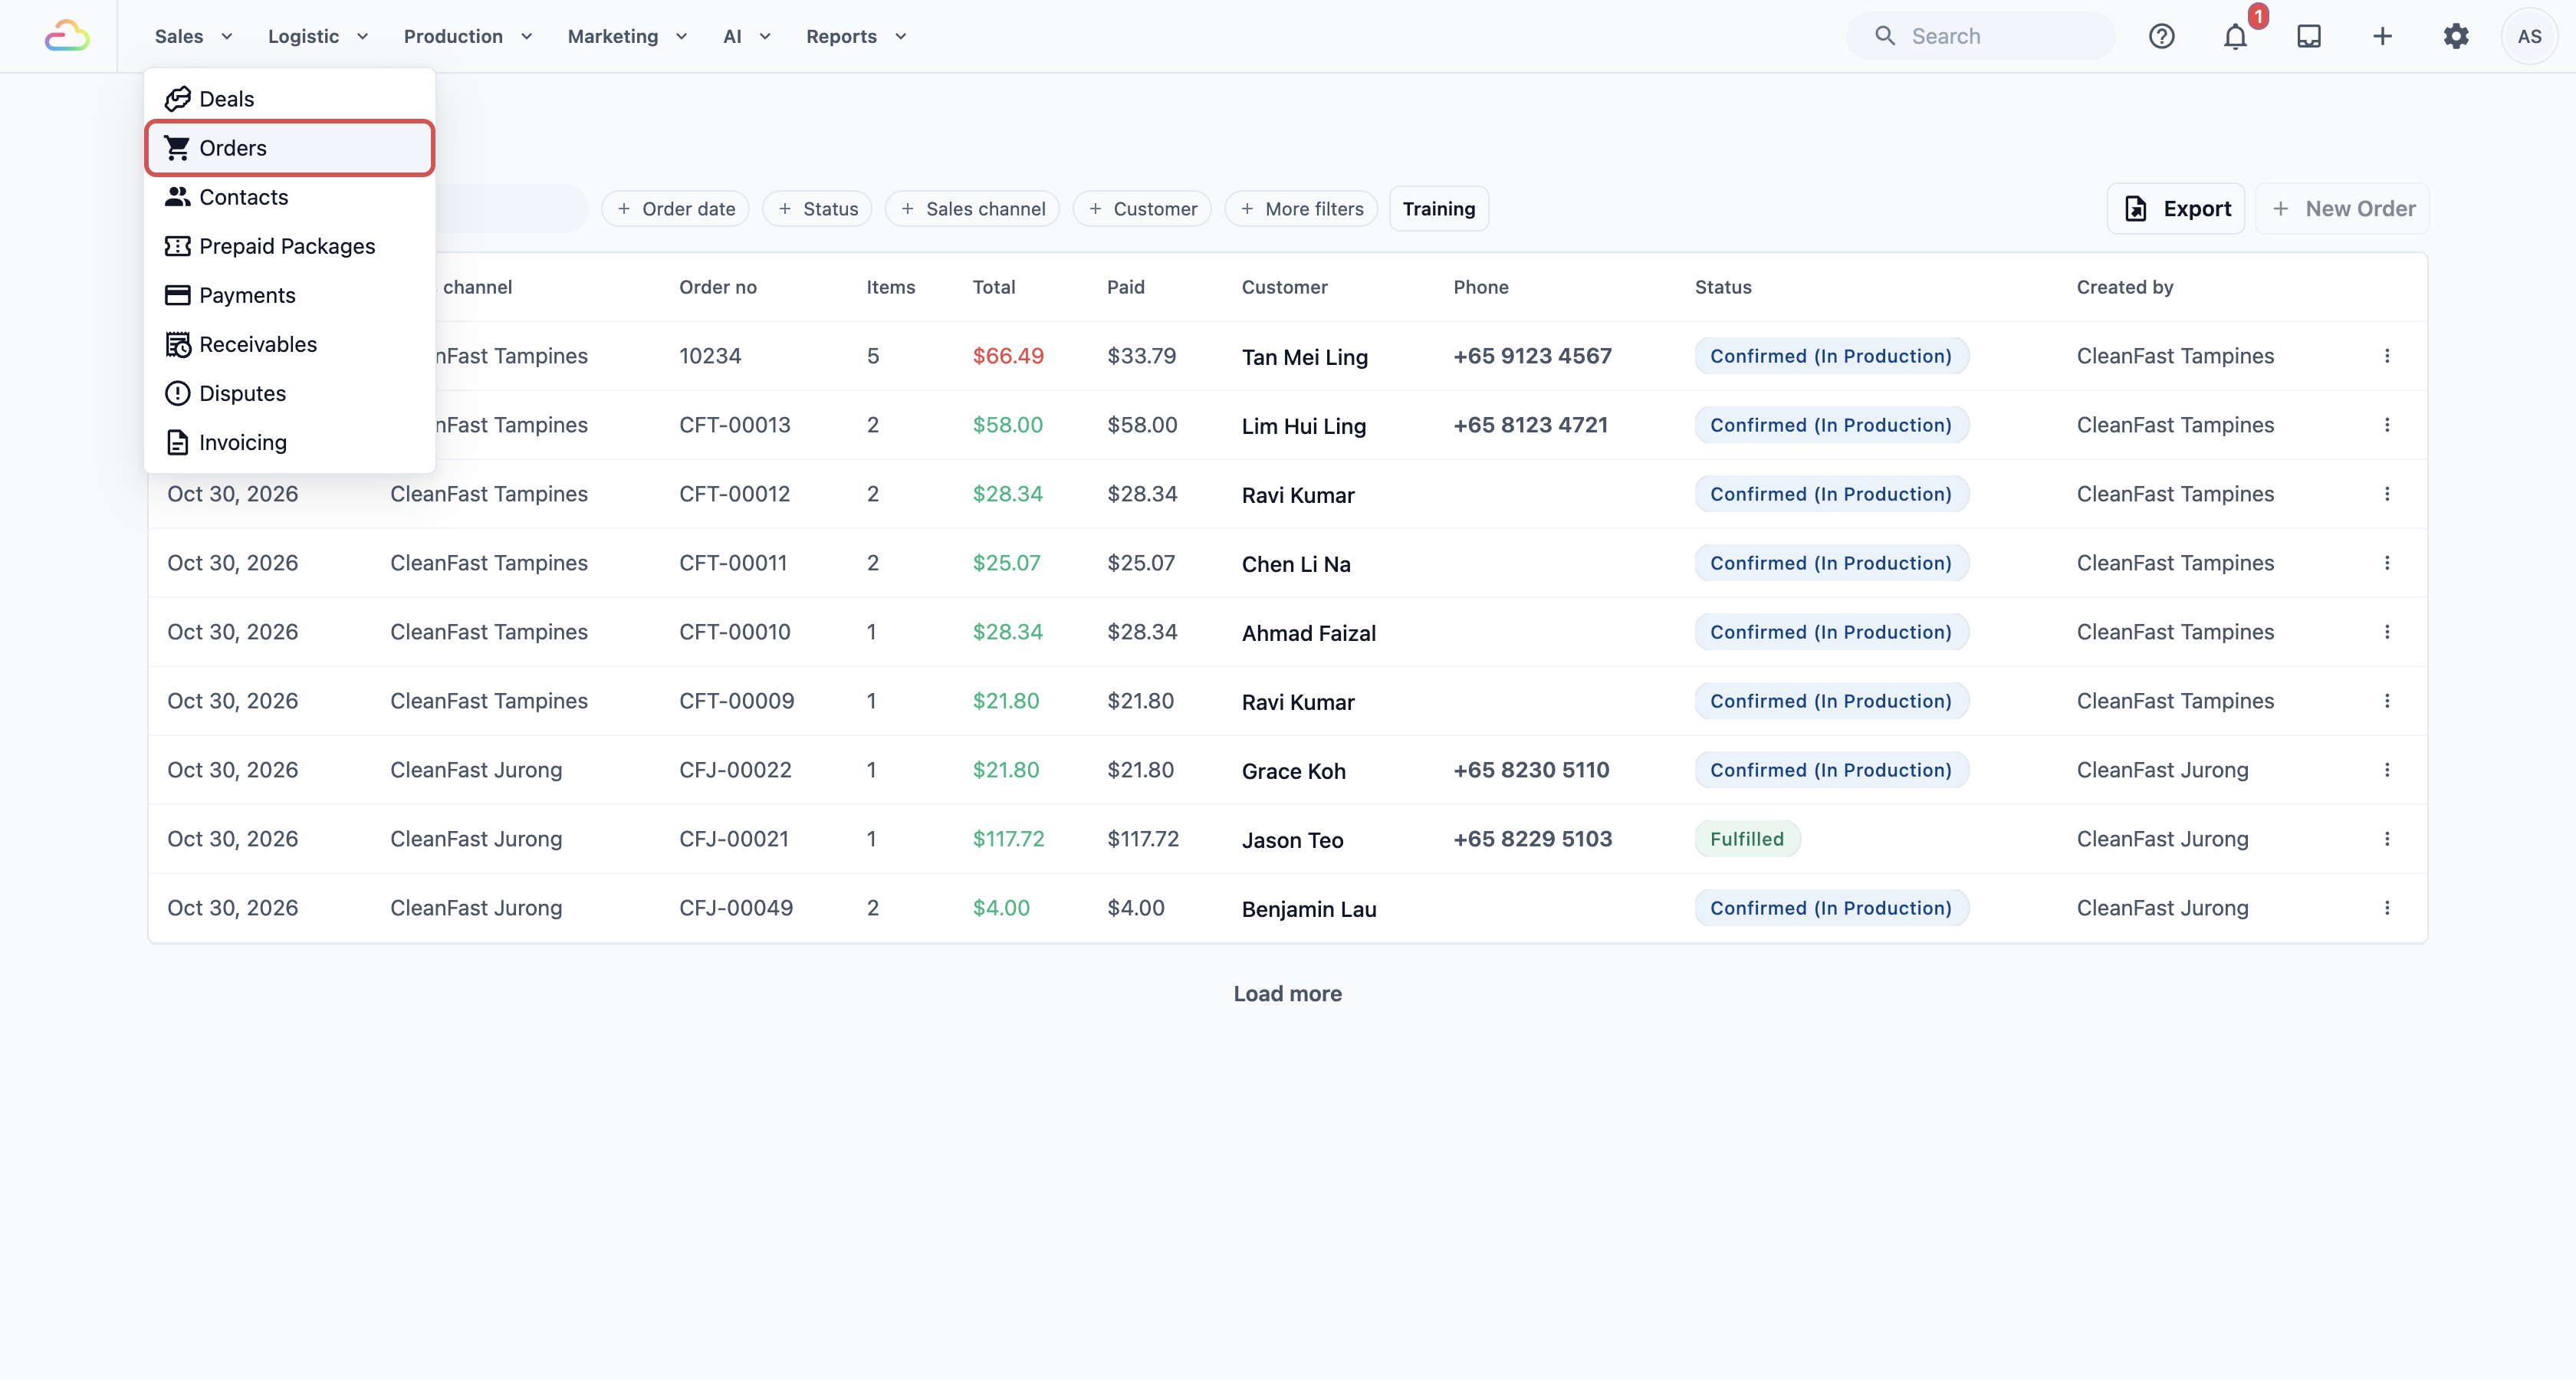
The newest orders show first, 20 at a time. Click Load more at the bottom to see older ones.
---
## Finding an order
### Search orders
Click the **Search orders...** box and type any of these:
- The order number, such as **10234**.
- The customer's name, or one word from it, such as **Tan**.
- The customer's phone number in full, or its last 4 digits.
- The customer's email.
- An item name, such as **Duvet**.
- The sales channel's short code, such as **TM**.
The list updates as you type.

The last 4 digits of the phone number is often the fastest search. Customers remember their number better than their order number.
### Filters
The first 4 filters sit next to the search box. Click one to choose a value. The rest are under More filters. A filter you are using always shows next to the search box, so you can see what the list is showing. Click Clear filters to remove them all.
**Order date**
Pick a start date and an end date to show only orders taken in that period. Leave it empty to see all orders, newest first.
**Collection date**
Pick one day to see every order due back to customers that day, collected at your shop or delivered. It's the date your receipt prints for collection (for example after **Collection** or **Ready by**). Pick this Saturday to see every order due on Saturday. Pick **Status** › **Confirmed** as well to see only the ones not handed over yet. Picking a collection date clears **Order date**, and picking an order date clears the collection date. If you don't see **Collection date** next to the search box, click More filters. On the POS, the **Collection** page lists the orders due each day. See [Setting Collection Dates for Store Pickup](/docs/setting-collection-dates-for-shop-orders).
**Status**
| Option | What it means |
|---|---|
| Draft | The order is saved but not confirmed yet, for example an online booking that still needs its price. |
| Quoted | You sent the customer a price and are waiting for them to accept it. |
| Confirmed | The order is accepted and your team is working on it. |
| Fulfilled | Everything has been handed over or delivered. |
| Cancelled | The order was cancelled. |
**Sales channel**
Choose one shop, POS or online store to show only the orders taken there, such as your Tampines shop.
**Customer**
Type a customer's name or phone number and pick them to see all their orders. If you don't see **Customer** next to the search box, click More filters.
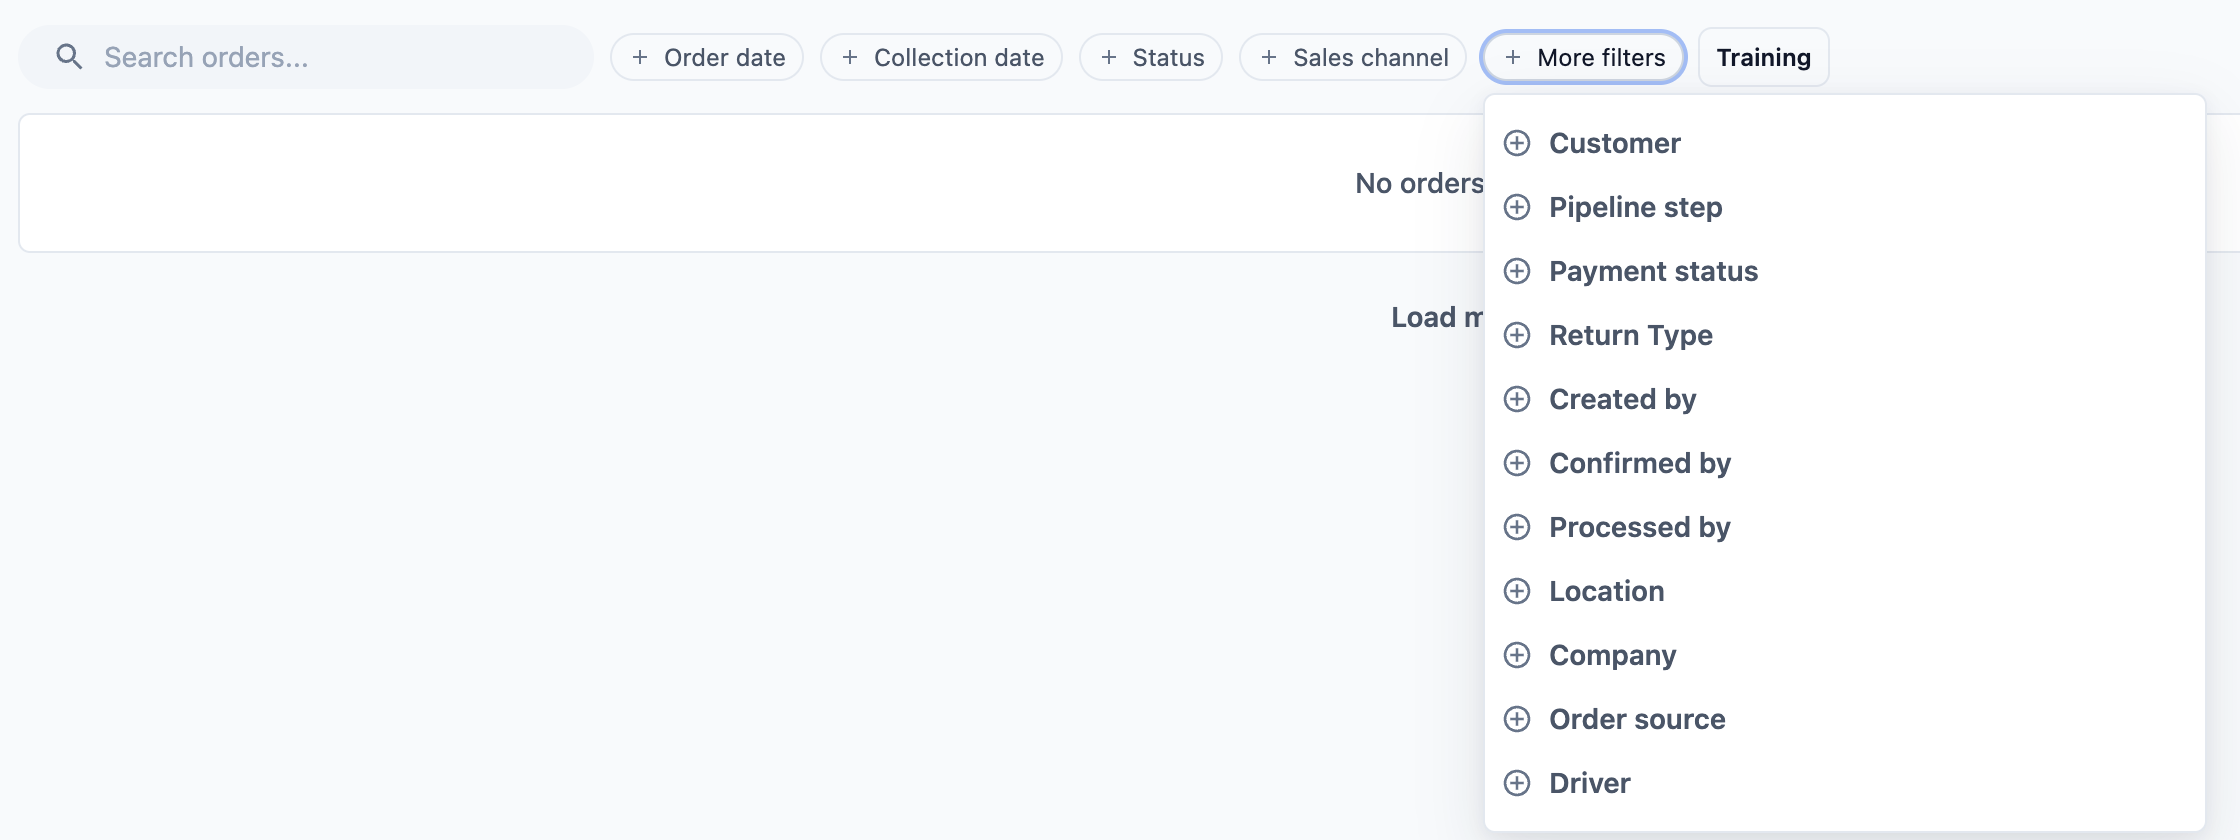
**More filters**
| Filter | What it shows |
|---|---|
| Pipeline step | Orders at one of your own order steps, such as Ready for Collection. |
| Payment status | Unpaid, Partially Paid or Paid orders. |
| Return Type | Orders going back to the customer by delivery (Customer) or collected at your shop (Store). |
| Created by | Orders made by the customer themselves (Customer (self-service)), by the system, by Console staff, by POS staff, or by one staff member. |
| Confirmed by | Orders whose price one staff member confirmed. |
| Processed by | Orders one of your shops or factories works on, whichever sales channel took them. |
| Driver | Orders one staff member picks up or delivers. Pick a collection date as well to check one day's runs, for example tomorrow's deliveries. |
| Location | Orders for one of your locations. Use this only if you have more than one. |
| Company | Orders for one of your companies. Use this only if you run more than one company. |
| Order source | Where the order came from: Console, POS, Online store/app, Recurring, TikTok Shop, WhatsApp or Factory. |
| Mix and match | Use several filters together. For example, Sales channel Tampines and Payment status Unpaid shows the Tampines orders that still need payment. |
There's no filter for business unit. To see one unit's orders, add the **Business Unit** column (see **Adding a column** below). The file from Export then has it too, so you can filter it in Excel. See [Export the order list](#export-the-order-list). To see one unit's orders for a period, open **Reports** › **Sales** and click the unit's row in **Sales by Business Unit**. See [Reading the Sales Report](/docs/reading-the-sales-report).
### Today's orders, the Console 2.0 way
If you miss the old **Daily orders** page, this gives you the same list:
1. Click **Order date**.
2. Pick today as both the start date and the end date.
3. Click **Sales channel** and choose your shop, such as Tampines.
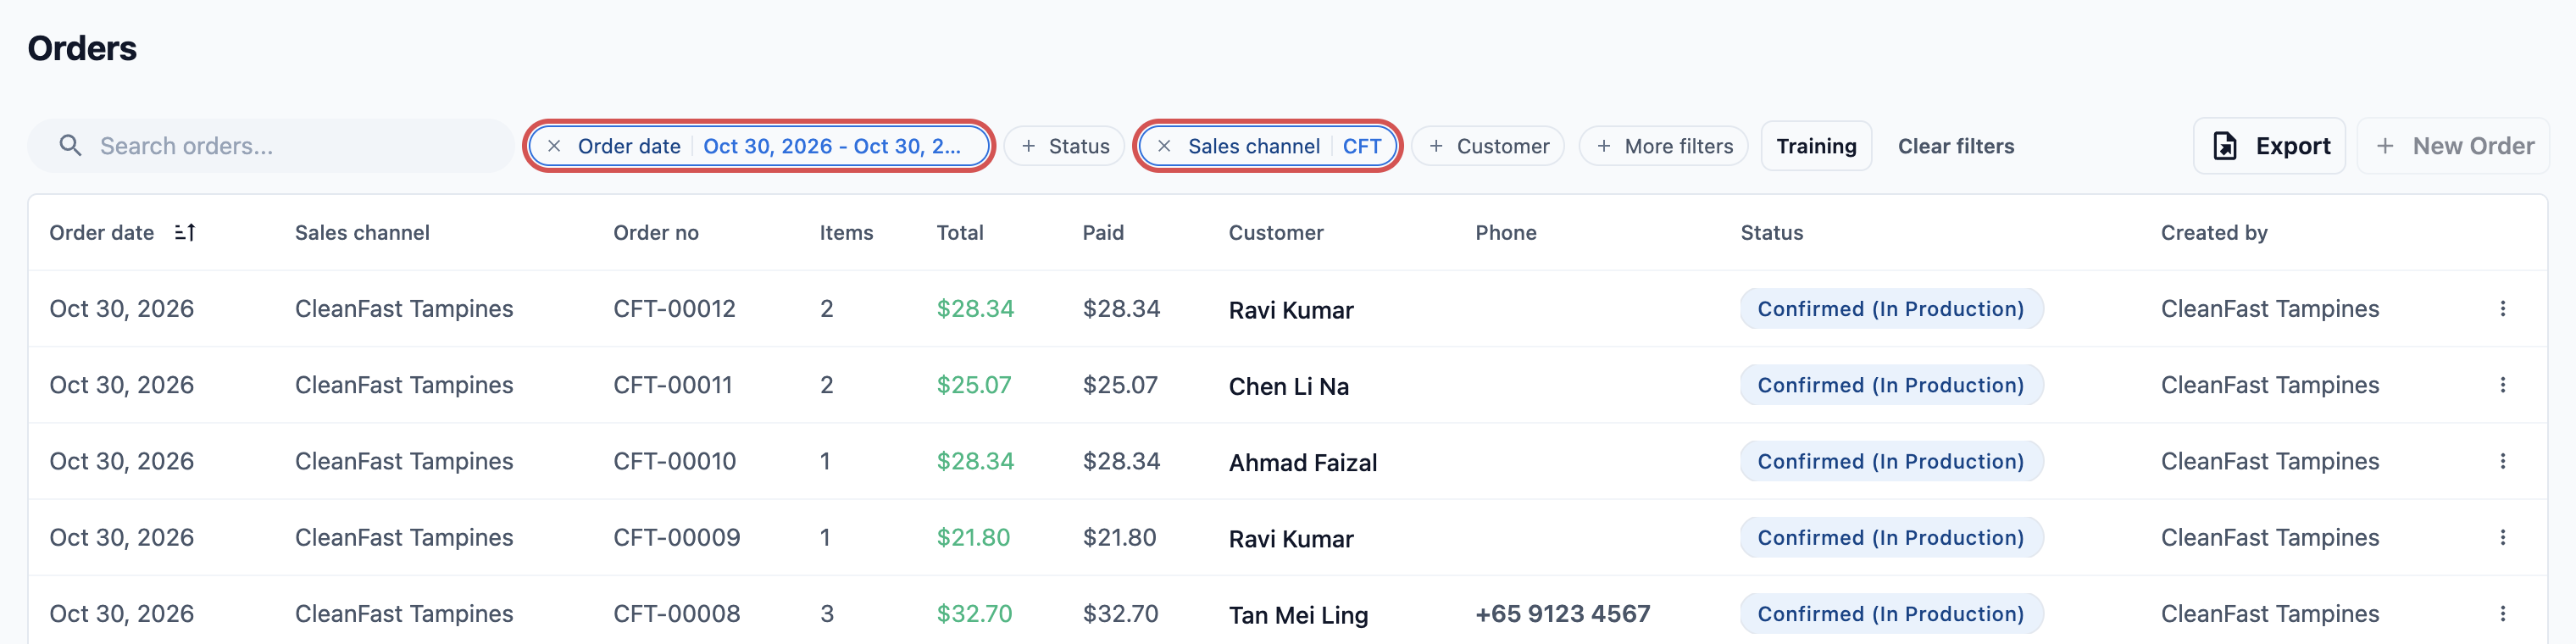
The filters stay in the page address, so you can bookmark this page and open it again tomorrow. Change the date to the day you need.
---
## Reading the list
Each row is one order. Click anywhere on the row to open it. To keep the list open, hold Ctrl (Cmd on a Mac) as you click, and the order opens in a new tab.
Your list shows these columns unless your account owner changed them:
- **Order date:** the day the order was taken.
- **Sales channel:** the shop, POS or online store that took it.
- **Order No.:** the order number printed on the receipt.
- **Items:** how many items are in the order. Click it to see the work orders, if the order has any.
- **Total:** the order's total.
- **Paid:** how much the customer has paid so far.
- **Customer** and **Phone:** who the order is for.
- **Status:** where the order is, such as Confirmed (Ready for Collection). The part in brackets is your own order step. Click the badge to see every step and when it was reached.
- **Created by:** the staff member, or the customer, who placed the order.
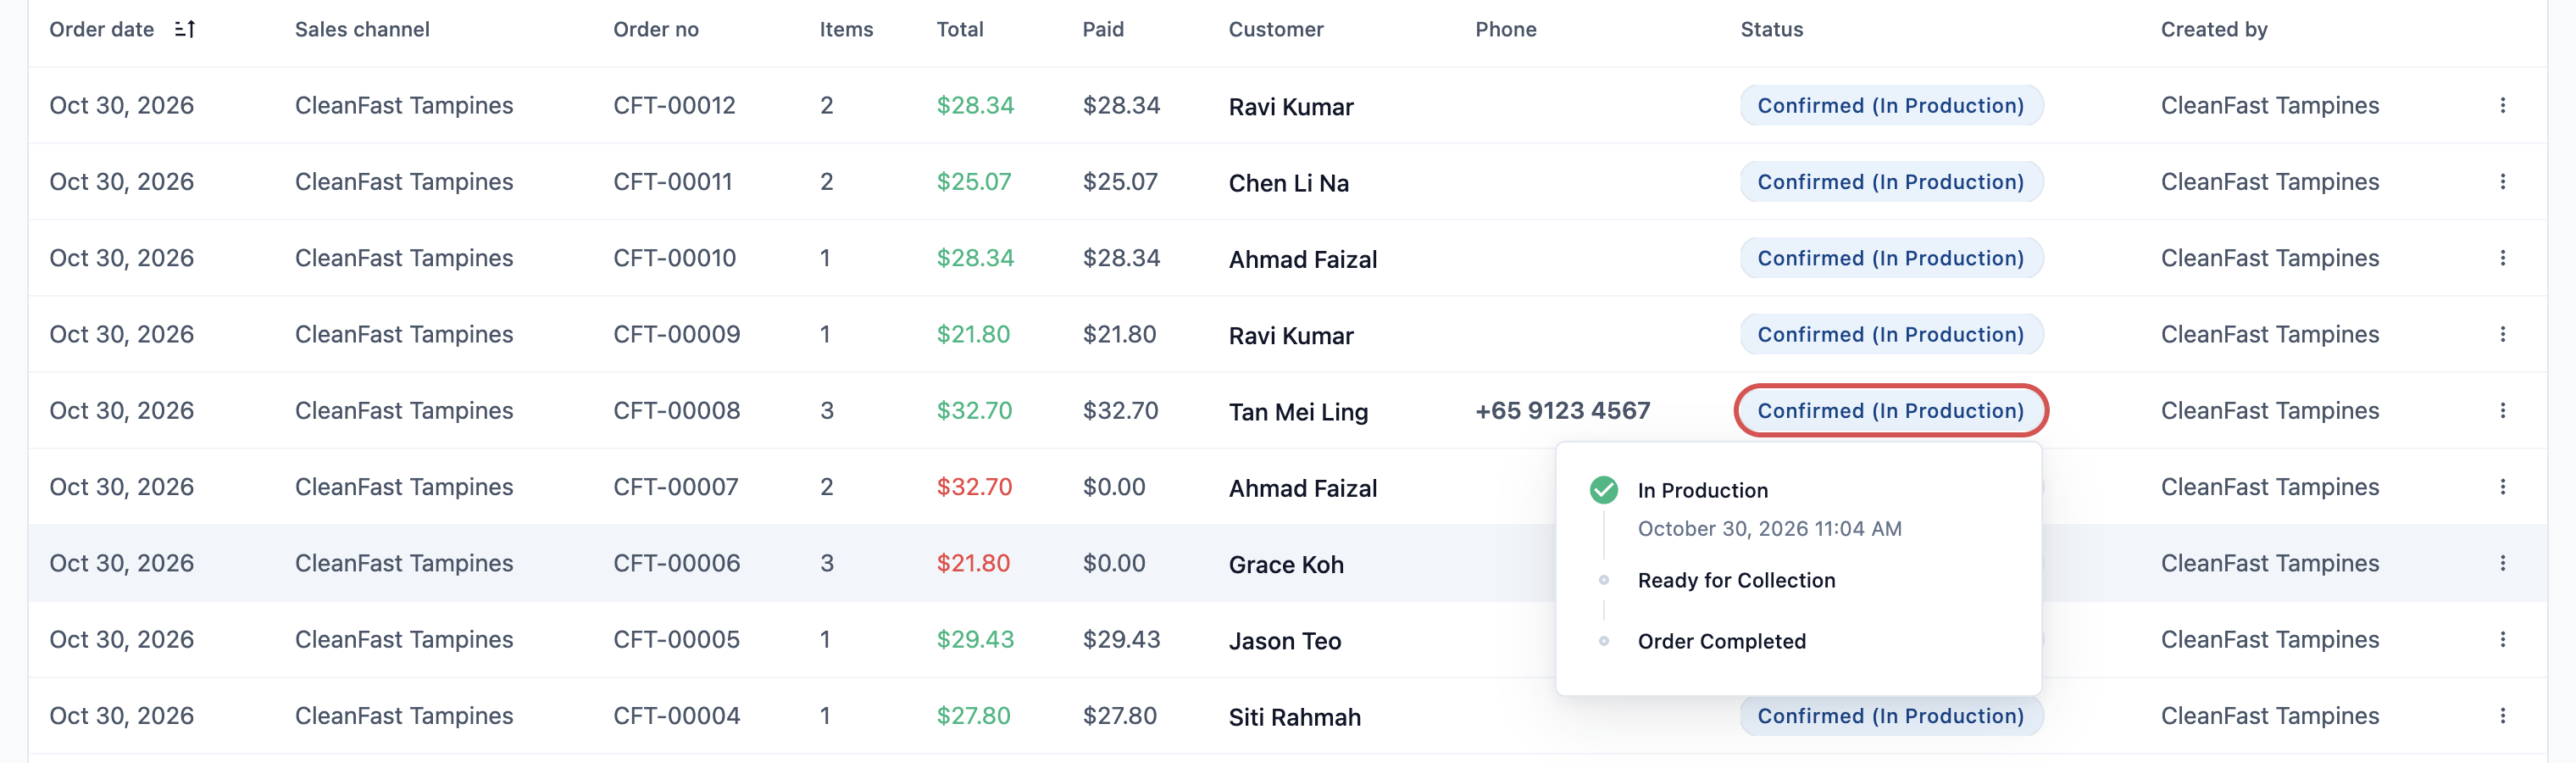
Training orders are hidden from this list. Click Training next to the filters to see only the test orders made in training mode. See [Handling Online Orders in the Console](/docs/handling-online-orders-in-the-console).
### Adding a column
To add a column to the list for your whole team, for example the date customers collect:
1. Click the ⚙️ Settings icon in the top-right corner, then click **EasyBiz Console**.
2. Under **Pages**, click **Orders**.
3. Under **Table columns**, click Add Column and pick a field, for example **Order Store Pickup Date**, **Order Business Unit Name** or **Order Note**. Each field can be added once.
4. Click Publish at the top right of the preview, then Publish again in **Review your changes**. Nothing changes for your team until you publish.
The new column has a short header, such as **Store Pickup Date**, **Business Unit** or **Note**. Only the **Order date** column sorts the list.
**A check list of every order**
To see at a glance where each order stands, add **Pick-up**, **Packing**, **Delivery**, **Pick-up driver**, **Delivery driver** and **Processed by**:
| Column | What it shows |
|---|---|
| Pick-up | **No pick-up date**, **Booked Nov 13** or **Picked up**. Empty when the customer brought the order to your shop. |
| Packing | **To pack** or **Packed**. If you pack some items separately (for example bedsheets apart from clothes), it shows **Packed** only once all of them are packed. |
| Delivery | **No delivery date**, **Booked Nov 14**, **To collect** (the customer comes to your shop), **Delivered** or **Collected**. |
| Pick-up driver, Delivery driver | The staff member on the order's pick-up or delivery job. It changes as soon as someone assigns or changes the driver on the **Jobs** page, and it's empty when nobody is assigned yet. |
| Processed by | The shop or factory that works on the order, for example your central factory. |
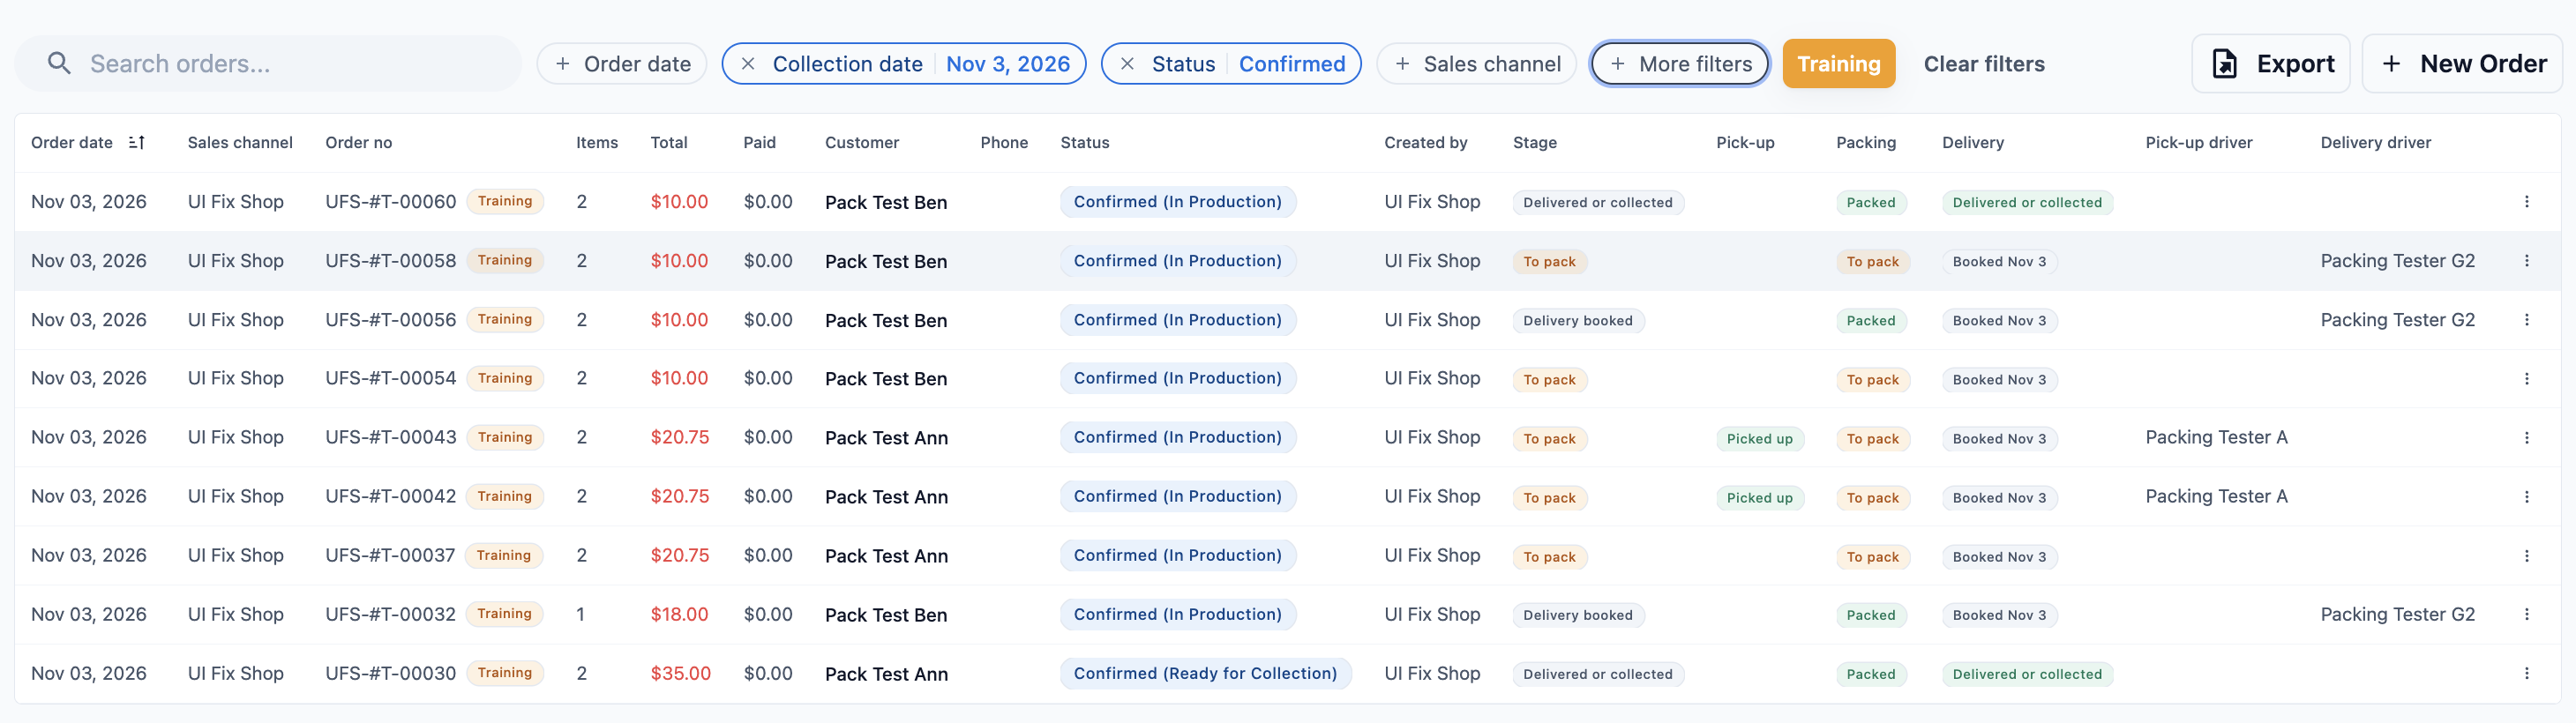
For example, to check tomorrow's deliveries go with the right drivers: click **Collection date** and pick tomorrow, then read the **Delivery driver** column. To see one driver's runs only, add **Driver** from More filters.
The file from Export has the same columns as the list, so a column you add here, such as **Note**, is in the file too. See [Export the order list](#export-the-order-list).
---
## Export the order list
Use Export to get the orders in your list as an Excel file, for example to send a hotel client its month of orders or to give your accountant one month's sales. The file holds the orders your filters show, for the dates you pick, with the same columns as your list.
1. Filter the list to the orders you need, for example **Sales channel** Tampines and **Payment status** Unpaid.
2. Click Export at the right of the filters.
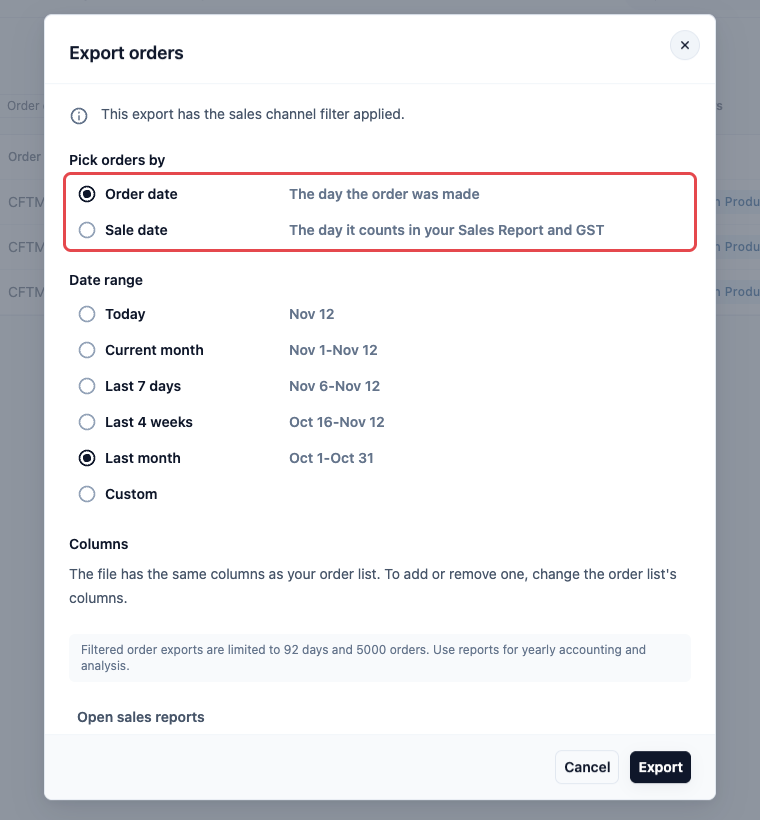
3. In **Export orders**, read the grey line at the top. It names the filters that go into the file, for example "This export has the sales channel and payment status filters applied."
4. Under **Pick orders by**, choose which date the period means.
5. Under **Date range**, pick the period.
6. Click Export. The button shows **Exporting...** while the file is made.
7. When **Export ready** shows, click Download.
**Pick orders by**
| Option | What it means |
|---|---|
| Order date | The day the order was made. The window starts on this every time you open it. |
| Sale date | The day the order counts in your Sales Report and for GST. Choose this when the file must match the Sales Report, for example for your accountant. |
An order counts as a sale once its price is confirmed, so its sale date can be later than its order date. With Sale date, drafts, quotes and orders still waiting for their price are not in the file.
**Date range**
| Option | What it covers |
|---|---|
| Today | Today only. |
| Current month | From the 1st of this month to today. |
| Last 7 days | Today and the 6 days before it. |
| Last 4 weeks | Today and the 27 days before it. |
| Last month | The whole of last month. |
| Custom | The start and end dates you pick in the calendar. |
If you set **Order date** on the list, the window starts on **Custom** with those dates. If you didn't, it starts on **Today**.
Without an Order date filter, the file holds only today's orders unless you pick another range. Check Date range before you click Export.
**Columns**
The file has the same columns as your list, in the same order. To add or remove one, change the list's columns. See [Adding a column](#adding-a-column). The **Pick-up**, **Packing** and **Delivery** columns show the same words as the list, such as "Booked Nov 14" or "Packed".
### What goes into the file
| Filter on the list | In the file? |
|---|---|
| Search orders..., Status, Sales channel, Customer | Yes. Only the orders that match. |
| Everything under More filters, such as Payment status, Created by or Order source | Yes. The grey line names them, for example "payment status" or "creator". |
| Training | If it's on, the file has only training orders. If it's off, training orders are left out. |
| Order date | It sets where Date range starts. The dates you pick in the window decide the file. |
| Collection date | No. A yellow note says "The collection date you picked is not used here." The window picks orders by the dates you choose in it. |
The file has one **Orders** sheet, newest orders first. It also stays on the **Downloads** page as **Order Export**, so you can download it again later. See [Exporting to Excel and Downloads](/docs/exporting-reports-and-downloads).
### Limits
| Your list | Longest date range | Most orders |
|---|---|---|
| Filtered to one customer | 366 days | 2,000 |
| Any other filters, or none | 92 days | 5,000 |
If the range is too long, a red message shows in the window and Export stays off. If more orders match than the limit, the export stops with "Order export is limited to 5000 orders. Narrow the date range or add more filters." For a whole year, click Open sales reports in the window and export the Sales Report instead. See [Reading the Sales Report](/docs/reading-the-sales-report).
---
## Opening an order
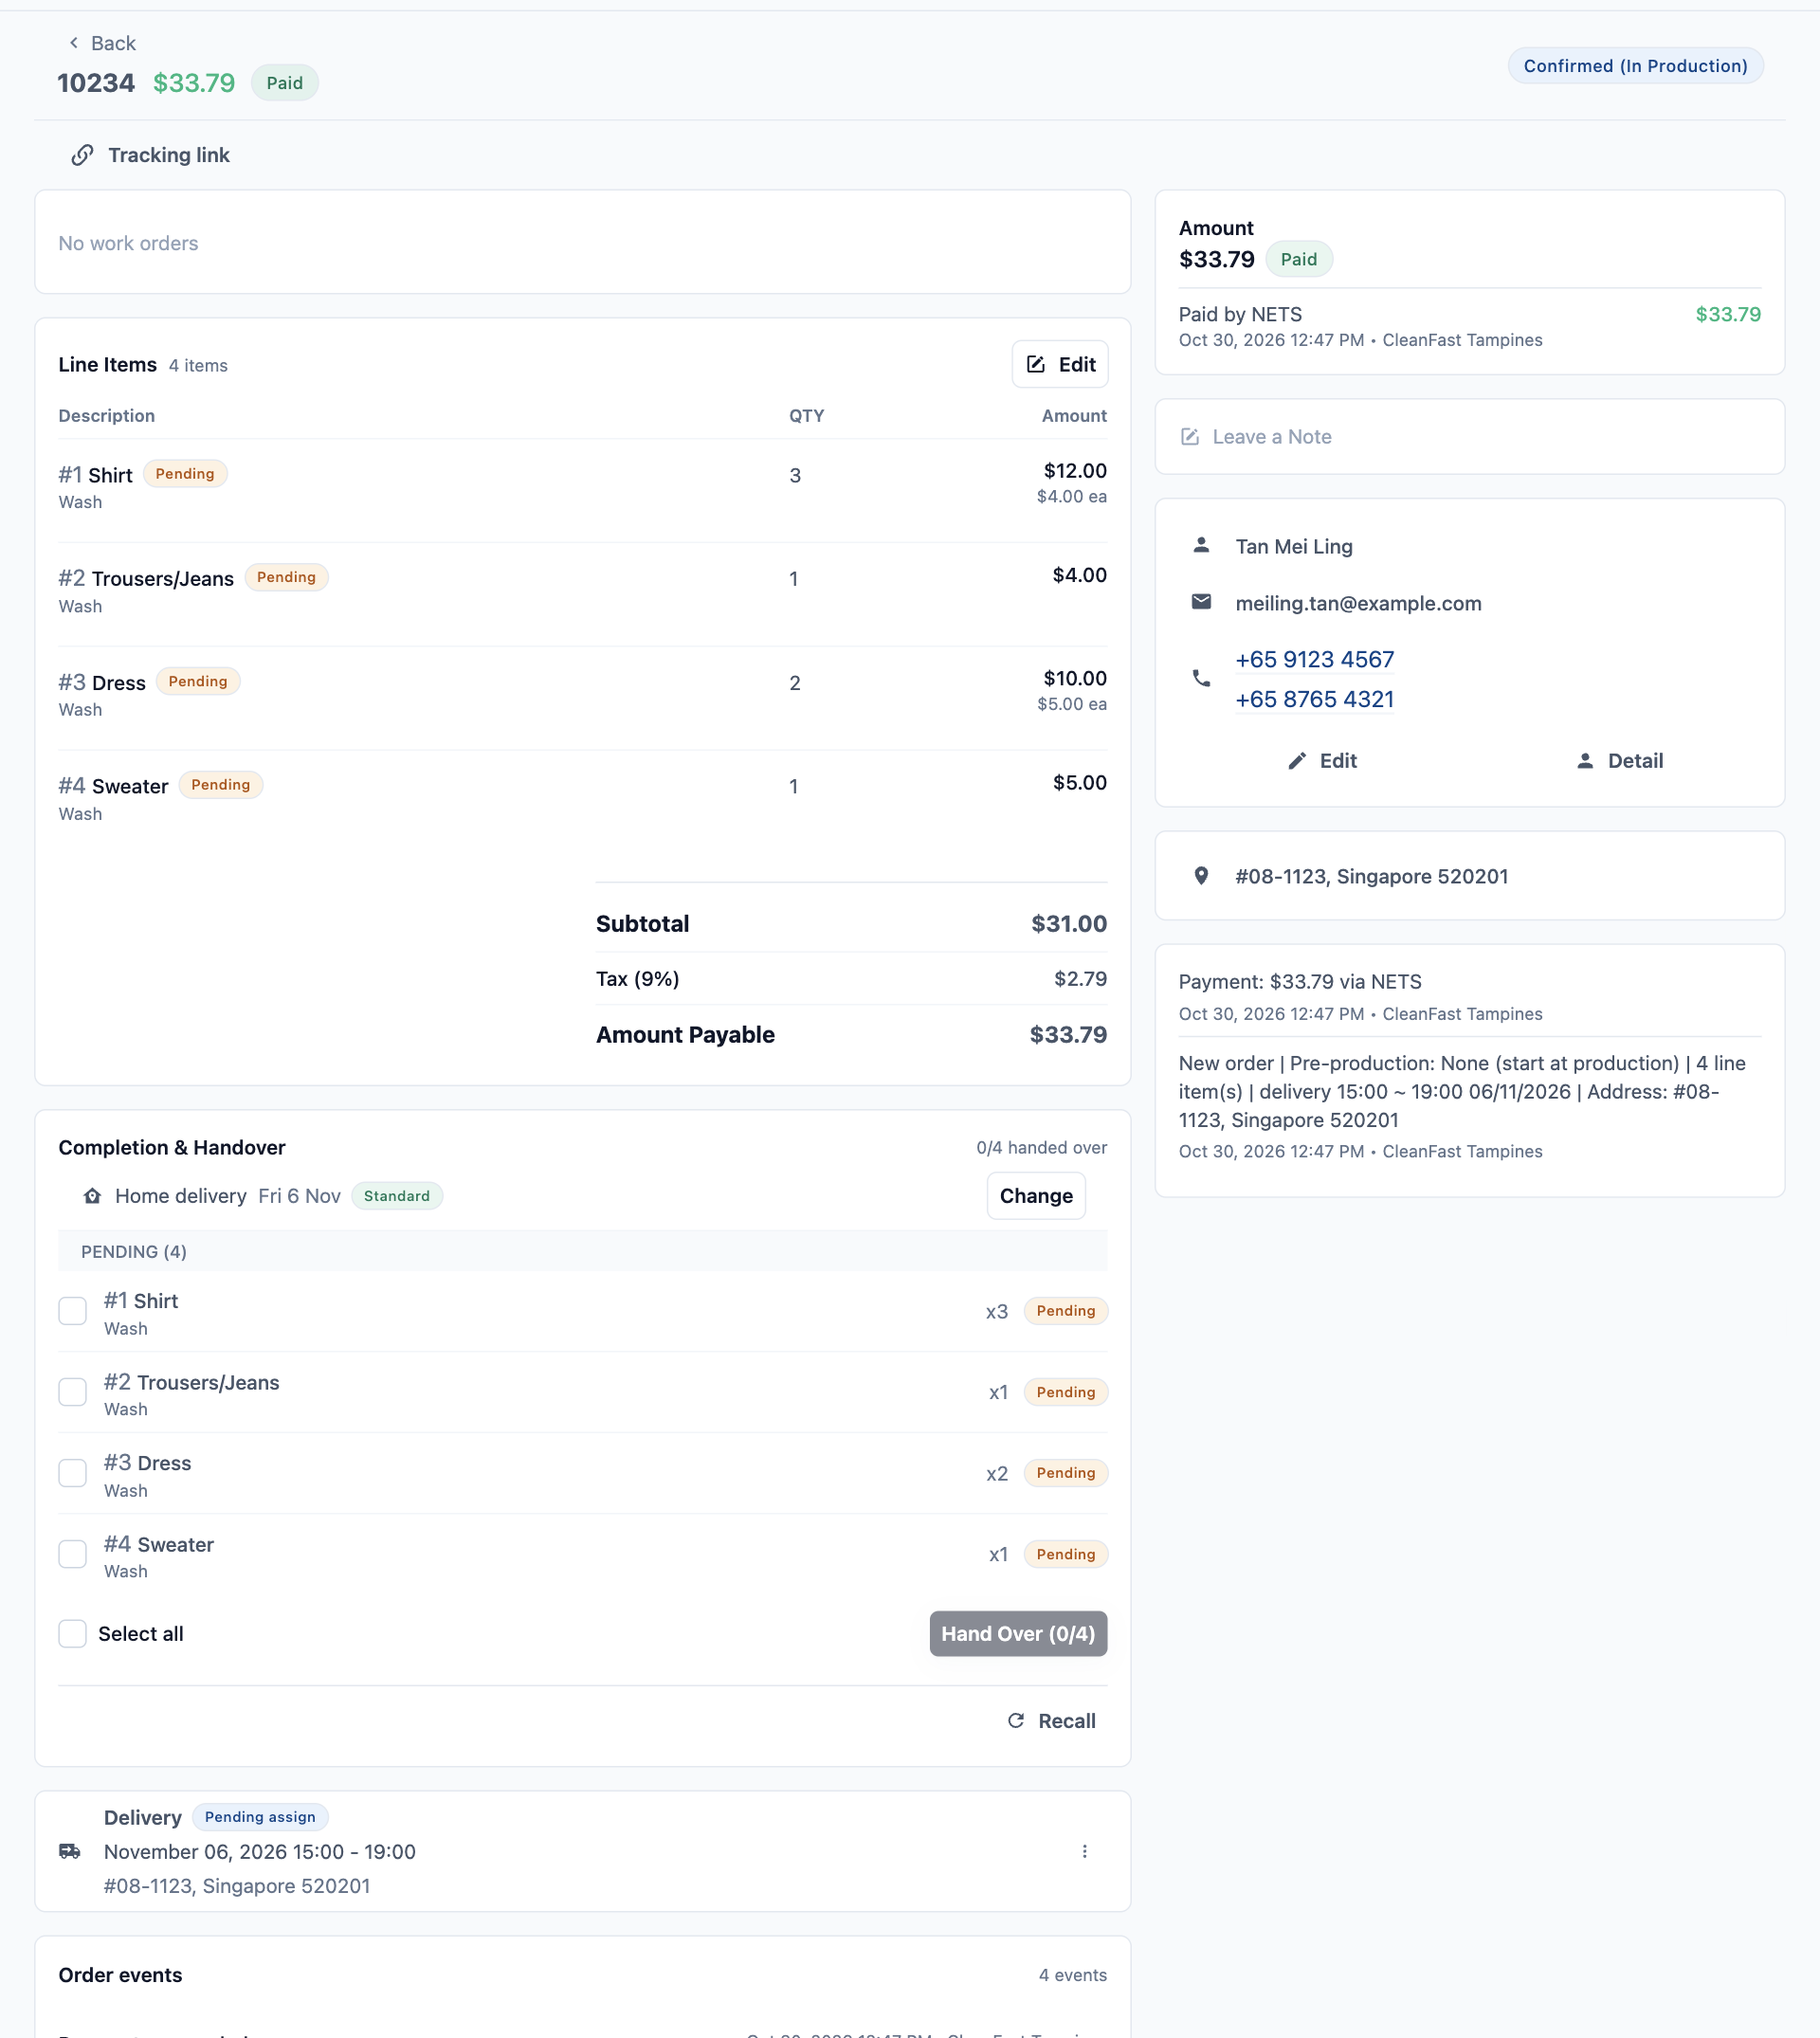
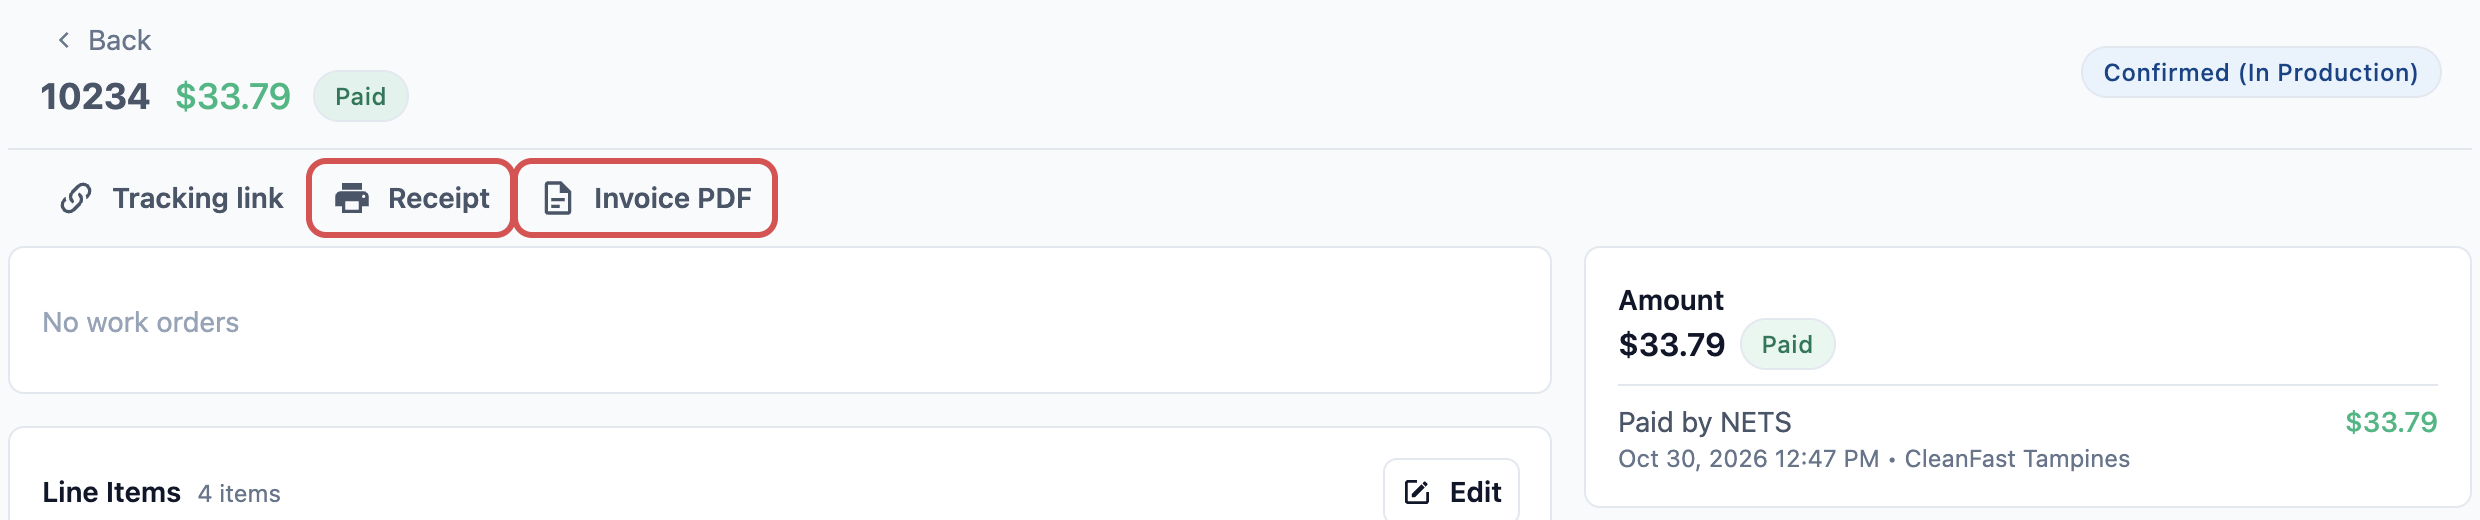
Click an order in the list. At the top you see the order number, the total and its payment status, such as Paid or Partially Paid, with the order status on the right.
The page is split into sections. Your account owner can choose which ones show and in what order, so yours may look a little different:
- **Line Items:** each item, its quantity and its price, with the order total.
- **Jobs:** the order's pickup, delivery or on-site visit, with its date, time and driver or worker.
- **Order events:** a timeline of what happened to the order.
- **Print:** a preview of the receipt and labels, ready to print.
- **Payment:** what the customer paid, how, and the **Amount due**.
- **Notes:** notes for your team about this order.
- **Contact:** the customer's details.
- **History:** every change to the order, who made it and when.
- **Photos** and **Completion & Handover:** item photos, and what has been handed over to the customer. These show if your order page includes them.
---
## Working on an order
### Change items or prices
Use this when a customer adds an item, removes one, or you need to correct a price.
1. In the **Line Items** section, click Edit.
2. A full-screen window opens with your catalogue on the left and the order's items on the right. Add, remove or change items, quantities or prices as you would on a new order.
3. Click Update Order.
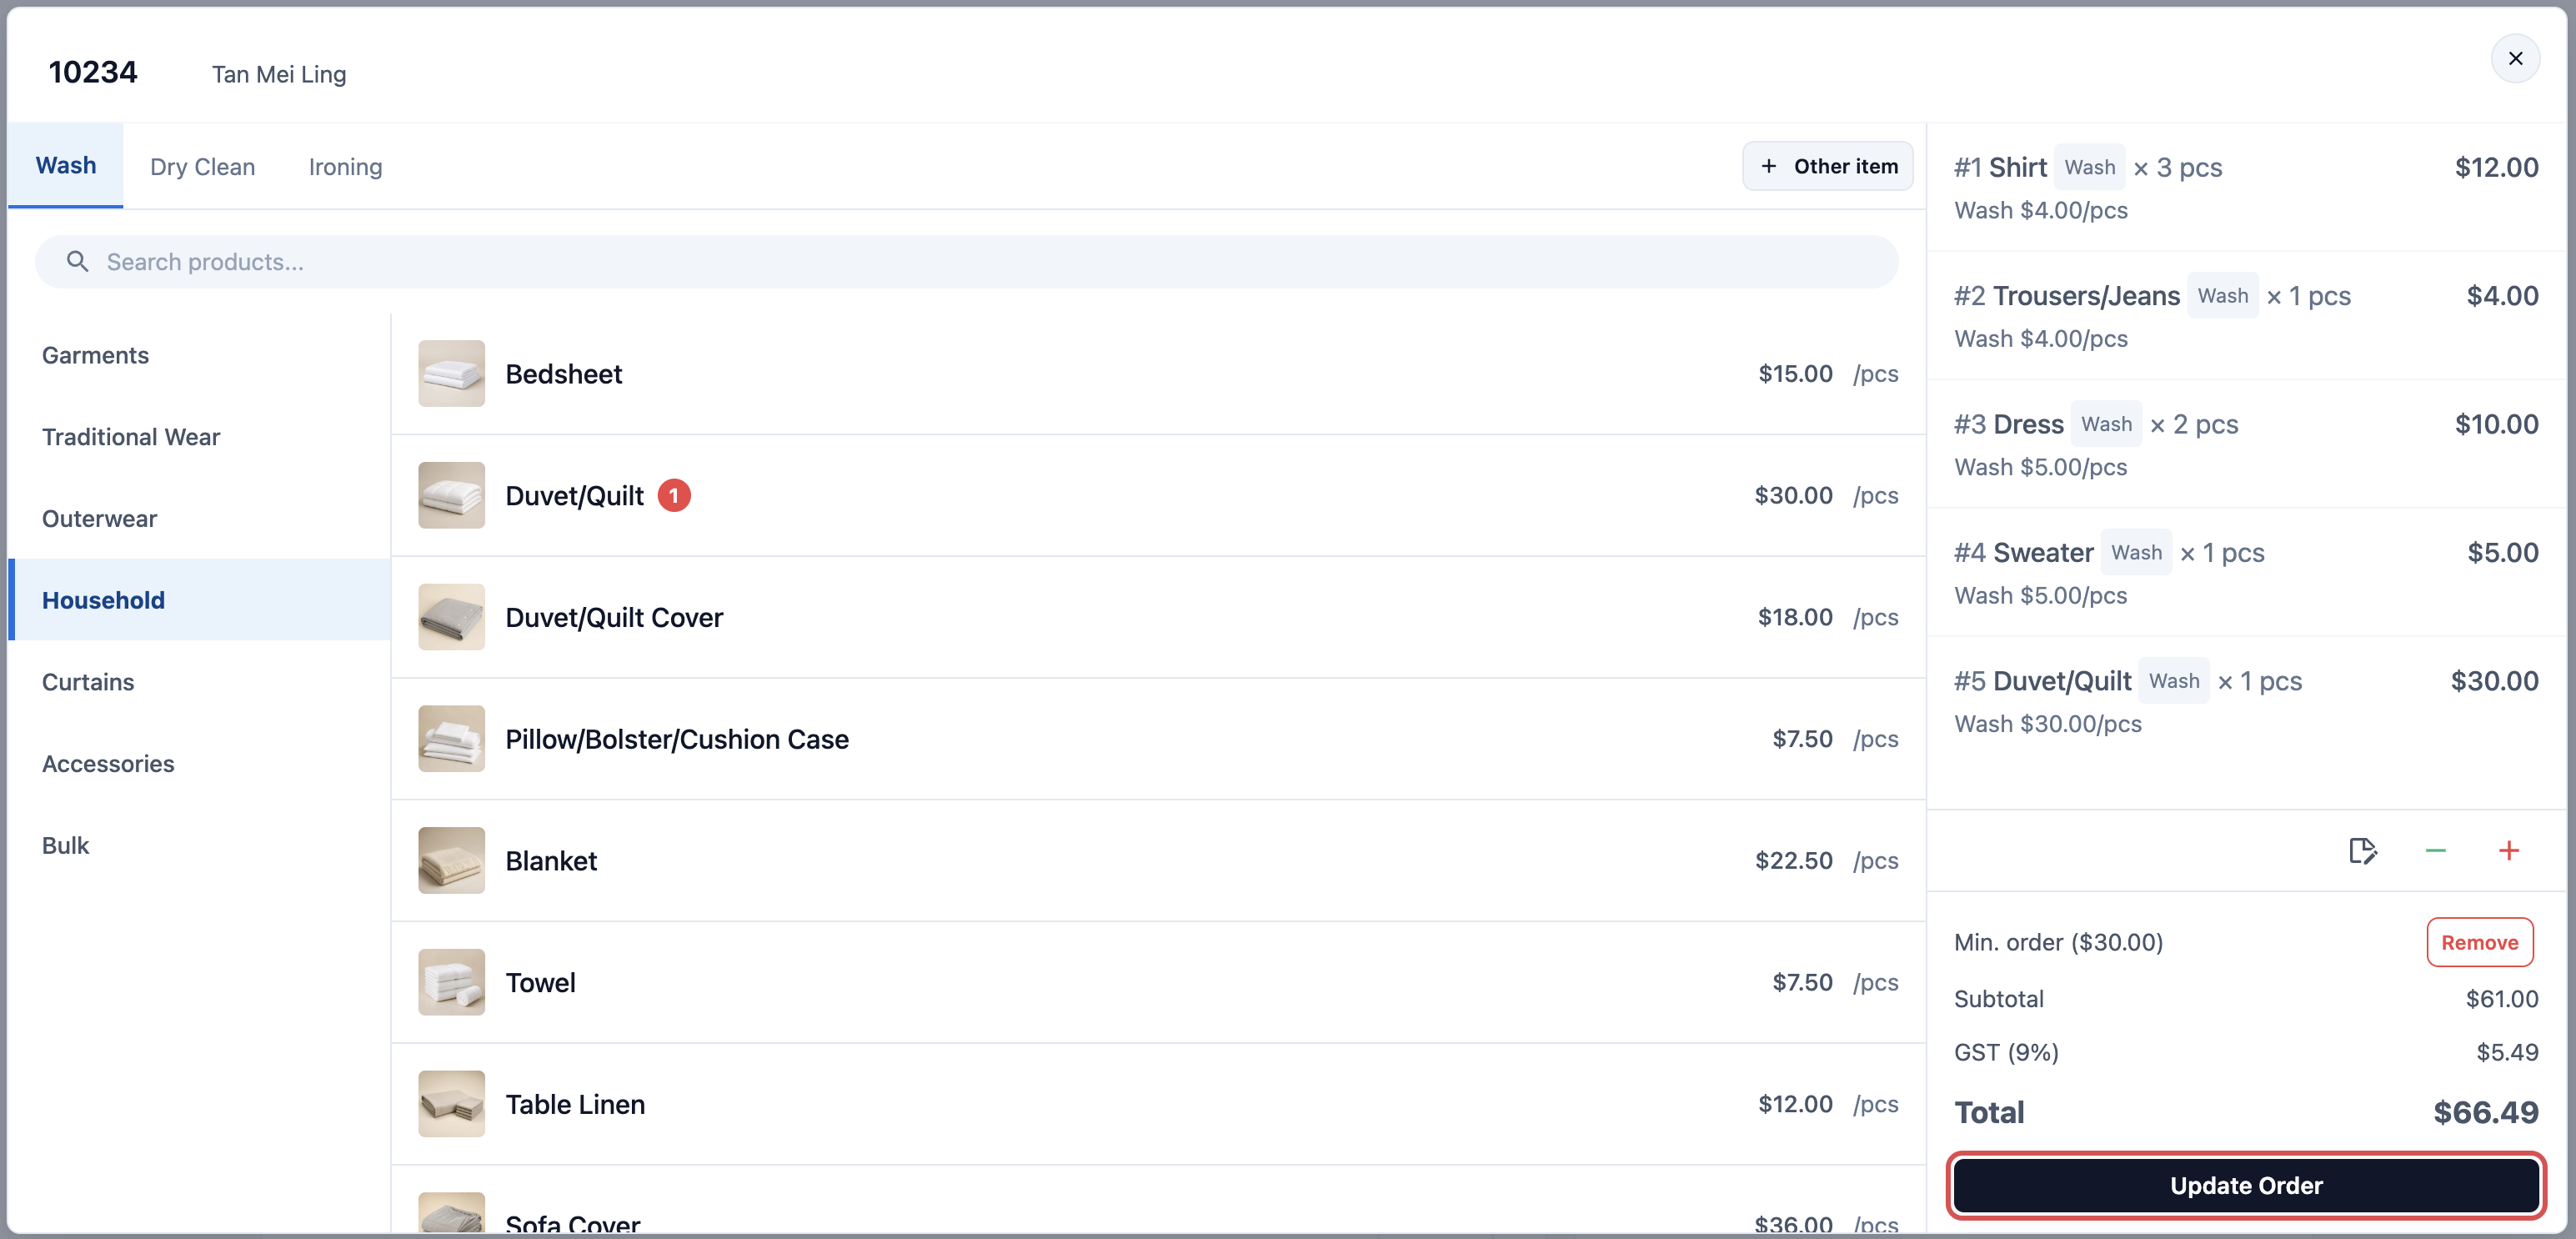
The order total changes straight away. **If the order is already paid:**
- If the new total is higher, the **Payment** section shows the extra as **Amount due**. Click Collect Payment when the customer pays.
- If the new total is lower, the **Payment** section shows **Amount Overpaid**. Click Refund overpaid to give the difference back. See [Processing Refunds and Returns](/docs/processing-refunds-and-returns).
The receipt shows the new items the next time you print or send it. If **Line Items** shows **Locked (edit period expired)** instead of **Edit**, the order is too old to change. Ask your account owner.
### Reschedule a pickup or delivery
1. In the **Jobs** section, find the pickup, delivery or visit.
2. Click the ⋮ menu on that job, then click Reschedule.
3. Choose the new date and time.
4. Click Update Job.
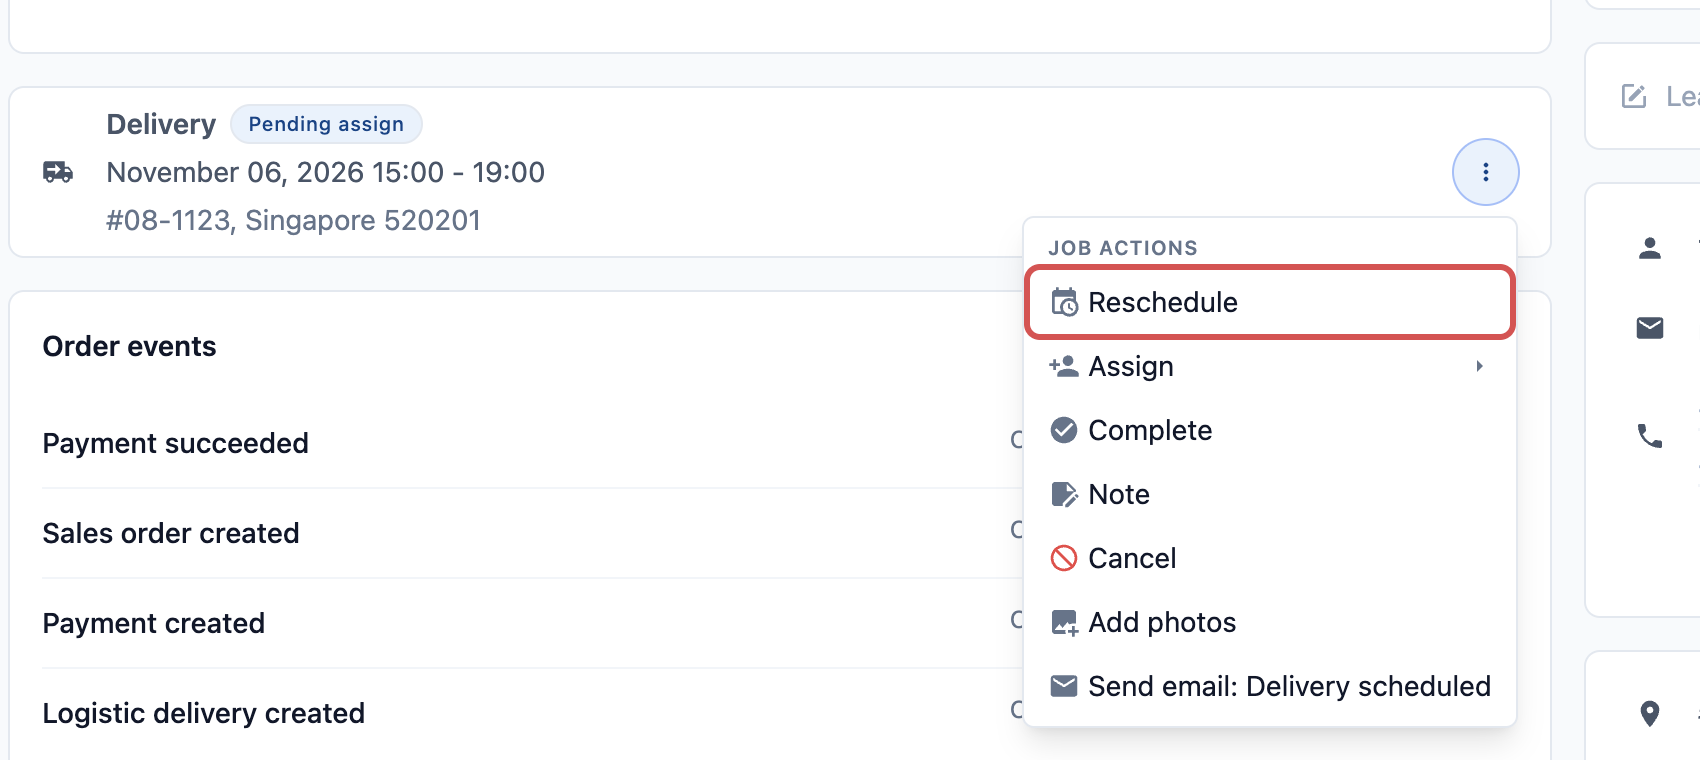
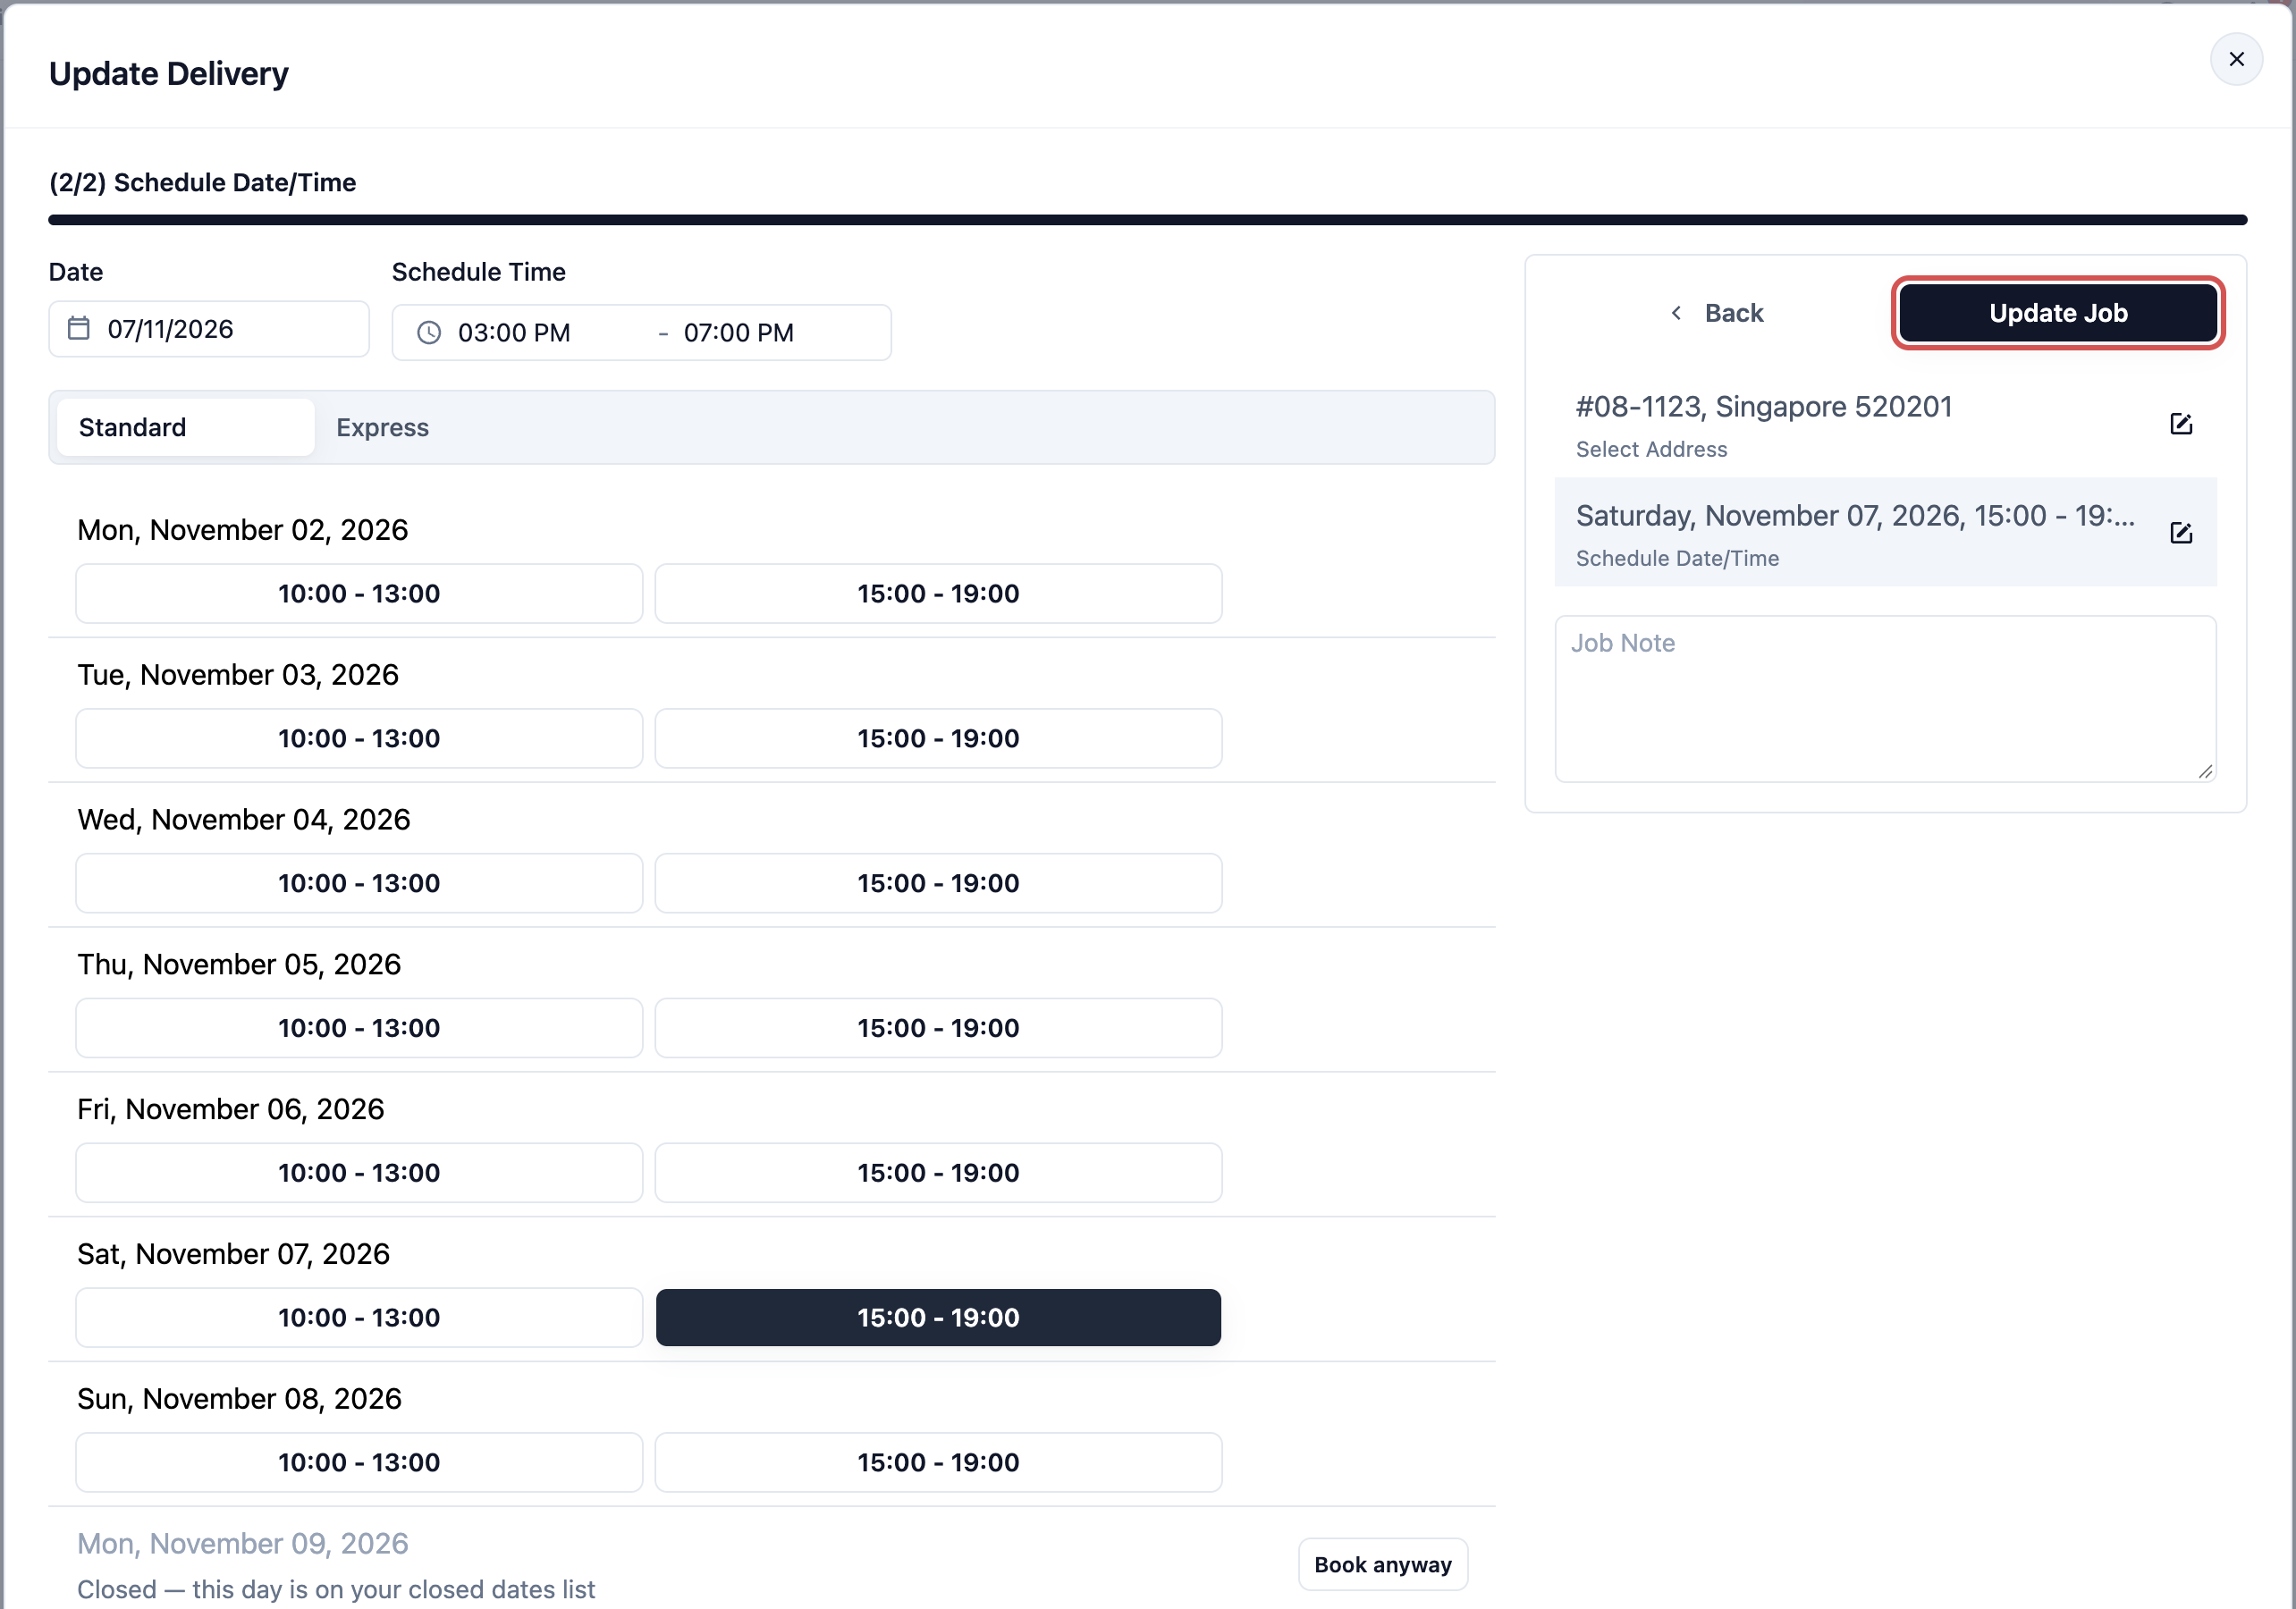
The new date shows on the job, in **Logistic** › **Jobs** and for the driver. If you send the **Logistic delivery rescheduled** or **Logistic pickup rescheduled** notification, the customer gets it with the new time.
Staff can move a job at any time. The **Customers can reschedule** setting of your business unit only limits customers changing their own booking online. See [Setting Up Cancel and Reschedule](/docs/setting-up-cancel-and-reschedule).
### Add a second delivery for the same order
Some orders go back in two trips, for example 5 curtains this week and 3 the next. Each trip is its own delivery on the order. Add the second delivery before you complete the first one: if you complete the only delivery on an order, every item is marked as delivered, including the 3 curtains still to come.
1. Go to **Logistic** › **Jobs** and click Add Job.
2. Under **Link to Sales Order**, choose the order. Set **Job Type** to **Delivery**.
3. Fill in **Job Address**, **Schedule Date** and **Schedule Time**.
4. In **Job Note**, write what goes on this trip, for example "3 curtains".
5. Click Add Job.
The second delivery shows as its own card in **Jobs** on the order page and in **Logistic** › **Jobs**. Complete each trip when it's done: the rest of the order waits for the last delivery. The note only tells your driver what to bring. You can't pick items for each trip.
Already completed the only delivery? Click the ⋮ menu on it, click Rollback, then Confirm. Its items go back to waiting. Add the second delivery as above, then complete the first trip again. If your shop messages customers when a delivery is done, the customer may get that message again. Reschedule moves a trip; it never adds one.
### Cancel an order
1. At the bottom of the order page, click Cancel order.
2. Check the current payment status. If the customer has paid, a message says **Refund will be processed automatically** and lists each payment that will be refunded.
3. Type a **Void Reason**, such as "Customer changed their mind". You can't cancel without one.
4. Click Void order.
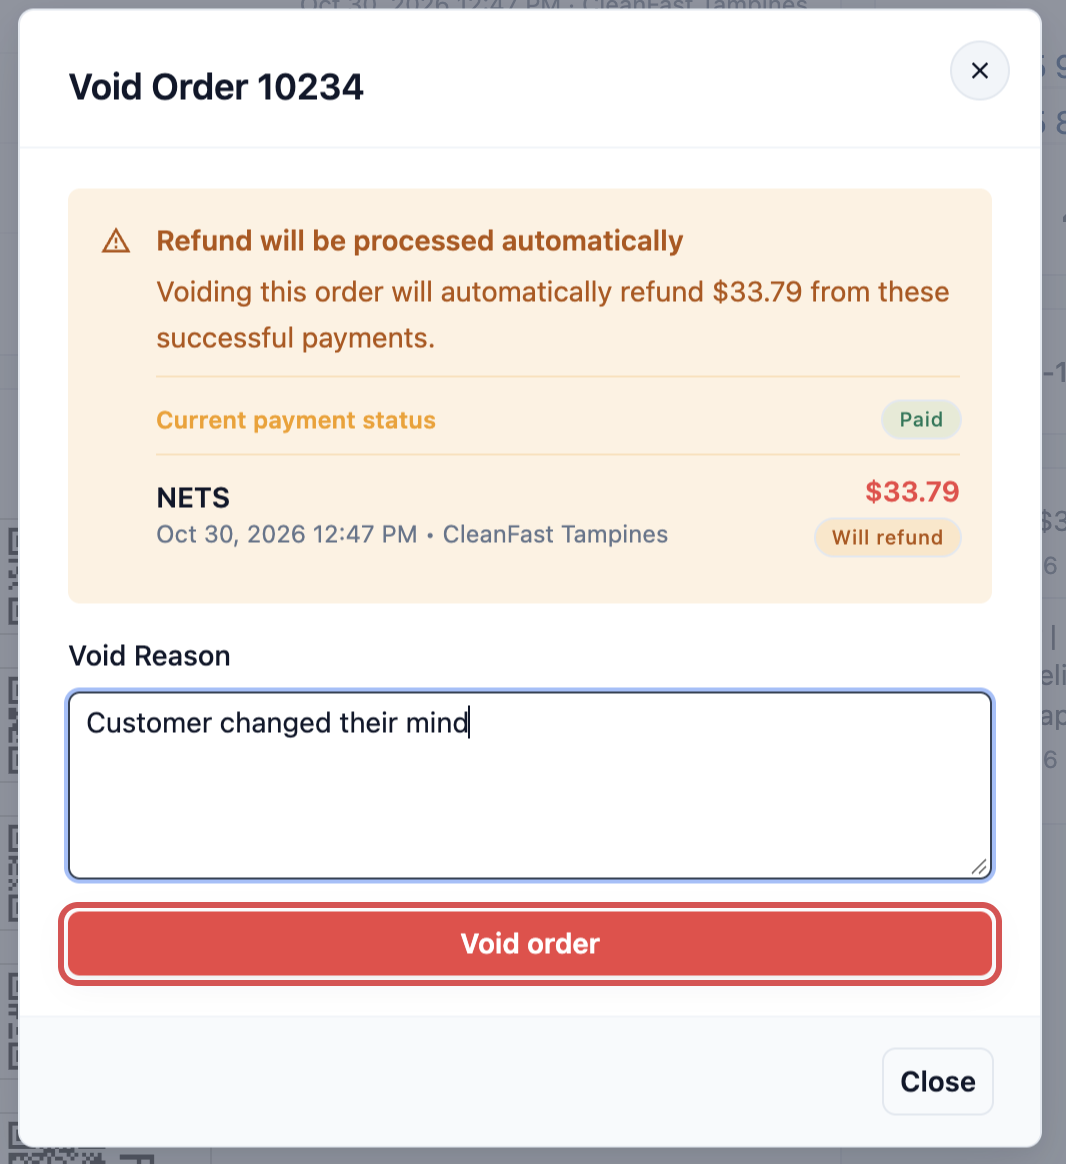
You see "Order has been cancelled". You can also cancel from the list: click the ⋮ menu at the end of the order's row, then click Void order.
When an order is cancelled:
- Its status changes to **Cancelled**, and you can no longer edit it.
- Its open pickups, deliveries and visits are cancelled. The assigned driver or worker gets a message with your reason.
- Each payment is refunded the way it was paid. A card payment goes back to the card, store credit goes back to the customer's credit, and cash is recorded as a cash refund.
- A coupon the customer used can be used again.
**Who can cancel:** staff whose role has the **Cancel order** permission. A role can be limited to orders placed today or in the last few days, and your business unit can stop staff cancelling orders past a certain step. The account owner can always cancel. To keep a fee for a late cancellation or a lockout instead, use Close with fee, explained in [Setting Up Cancel and Reschedule](/docs/setting-up-cancel-and-reschedule).
A cancelled order can't be reopened. If you cancel by mistake, create a new order for the customer.
### Move an order to another customer
Use this when an order was saved under the wrong customer, for example a family member's account.
1. At the bottom of the order page, click Move Order.
2. Under **Move to customer**, search for and select the right customer.
3. Click Move.
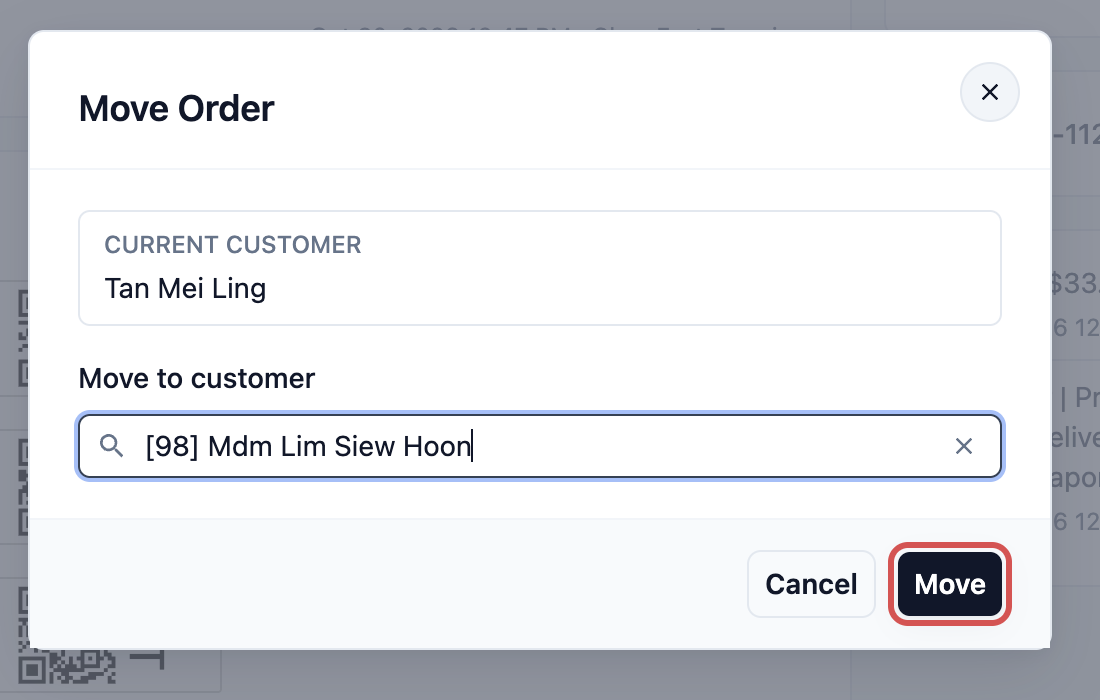
You see "Order moved". The order now shows in the new customer's order history. The button doesn't show on a cancelled order.
### Recall an order
A recall order is a new order to redo items the customer was not happy with, such as a shirt with a stain still on it. It is linked to the original order.
1. In the **Completion & Handover** section, click Recall.
2. Select the items to redo.
3. Choose a **Recall Reason**. You can add a note and photos for each item.
4. Click Create Recall Order.
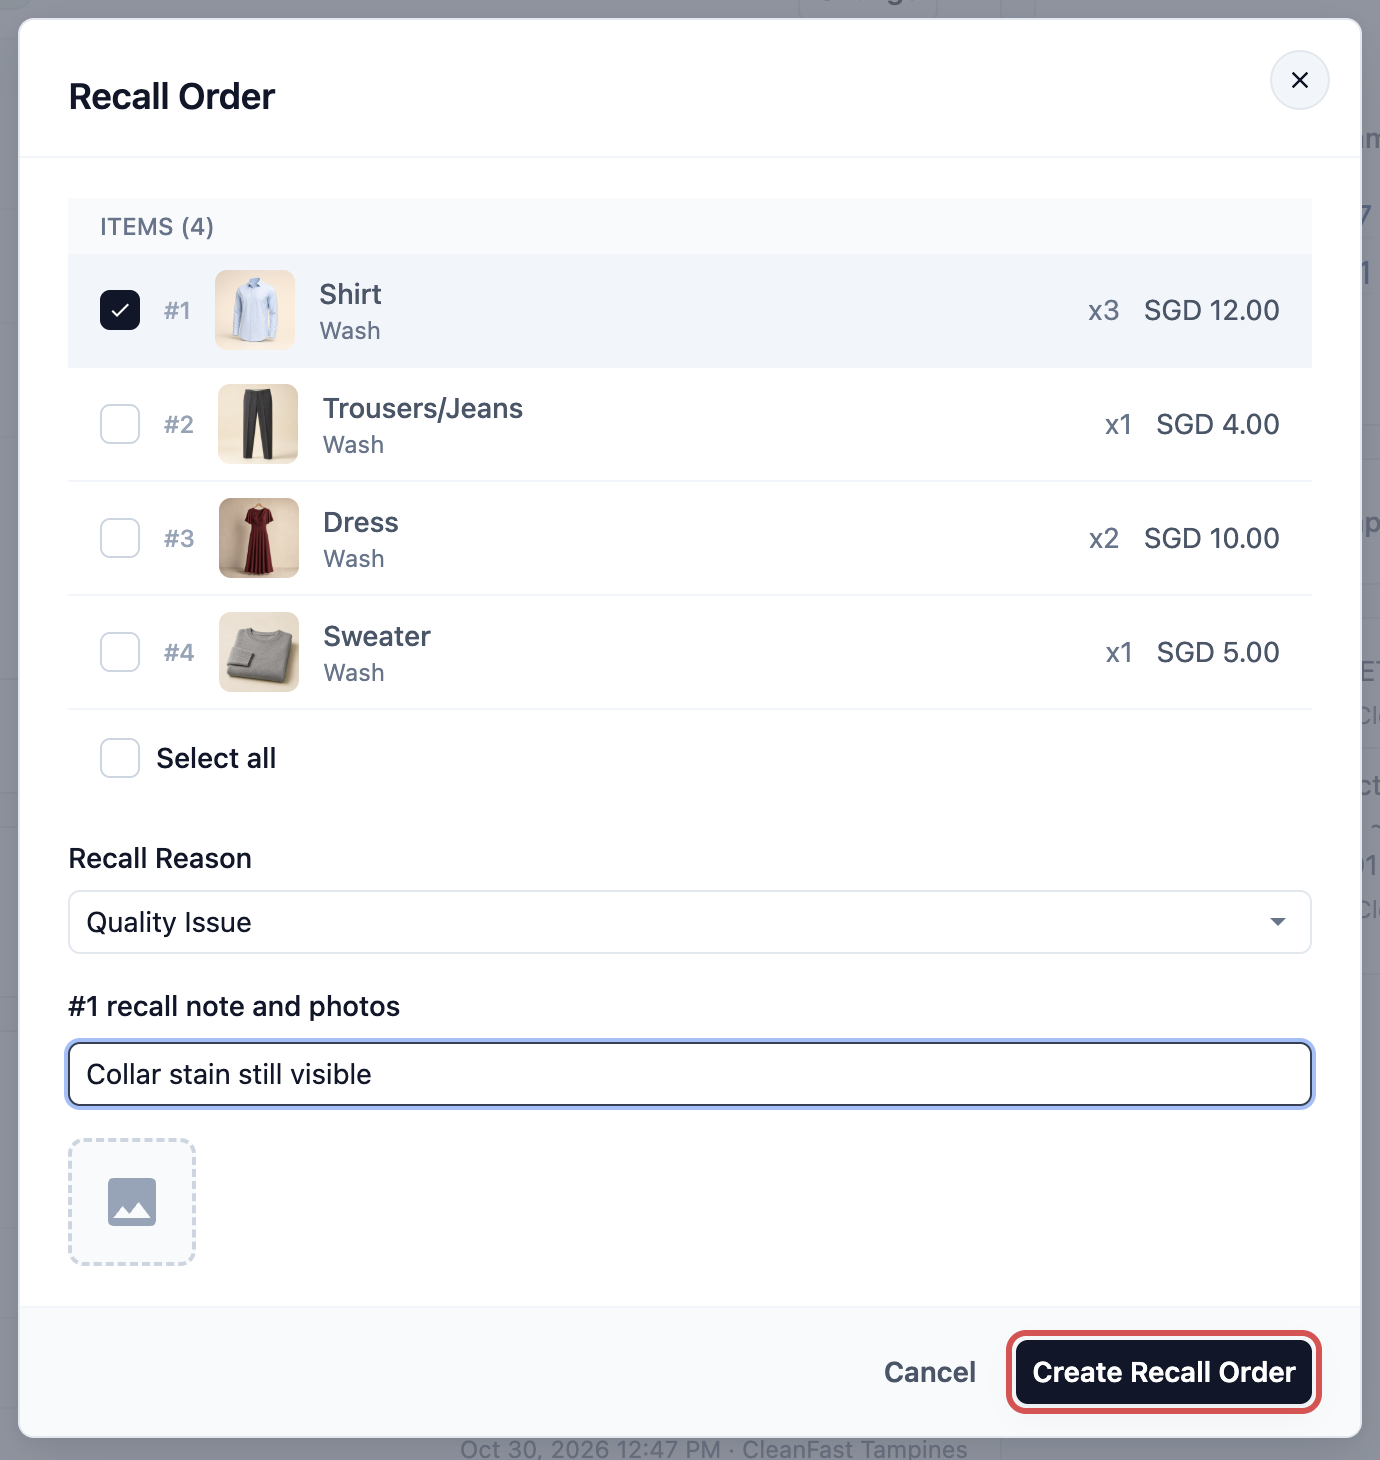
You see "Recall order created". The new order shows a **Recall of 10234** badge at the top, linking back to the original. **Recall** only works on a Confirmed or Fulfilled order, and shows only if your order page includes the **Completion & Handover** section.
### Reprint the receipt, labels or other documents
1. In the **Print** section, click the tab of the document you need, such as the receipt or item labels.
2. Check the preview. Click Show full receipt to see all of it.
3. Click the print button.
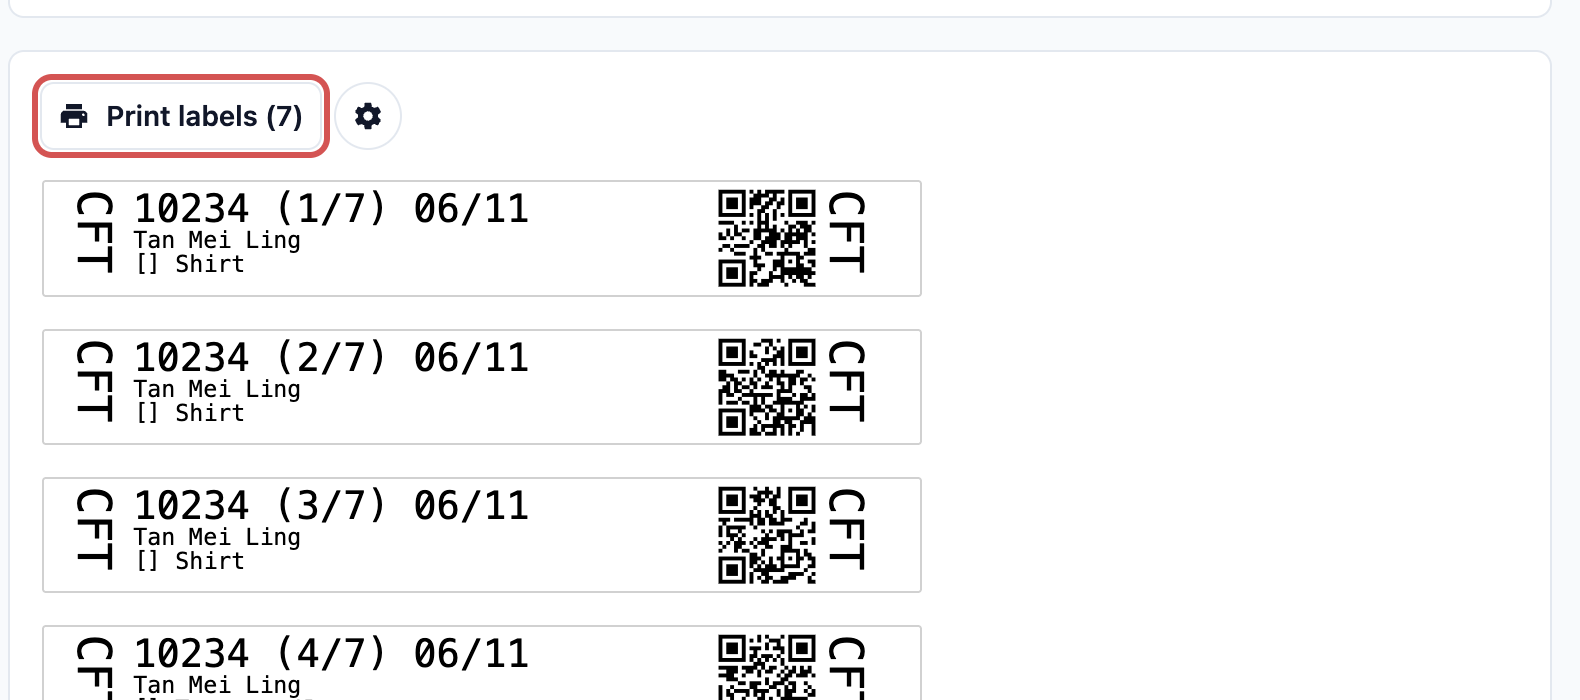
Your account owner can also add buttons to the top of the order page, such as Receipt, a labels button or Invoice PDF. Click one to print or open that document in one step.
---
## How it works with other features
- **Customer notifications:** changing an order can send the customer a message, but only for the events you have set up, such as **Sales order cancelled**, **Logistic job cancelled** or **Logistic delivery rescheduled**. See [Setting Up Customer Notifications](/docs/setting-up-customer-notifications).
- **Receivables:** an unpaid or part-paid order stays in **Receivables** until it is paid. Adding items raises what is owed, and cancelling the order removes it. See [Tracking Unpaid Bills in Receivables](/docs/tracking-receivables).
- **Reports:** sales reports update by themselves when you edit or cancel an order. A cancelled order no longer counts as a sale.
- **Downloads:** every file you export from this list stays on the **Downloads** page as **Order Export**. See [Exporting to Excel and Downloads](/docs/exporting-reports-and-downloads).
- **Stock:** cancelling an order puts back the stock of retail products that left with it.
---
## Example: CleanFast Laundry
Mdm Tan calls the Tampines shop on Friday. She dropped off her laundry yesterday, wants to add a duvet, and won't be home for Friday's delivery next week.
1. The counter staff type **4567**, the last 4 digits of her phone, in **Search orders...**. Her order 10234 from Thursday shows first.
2. They open it and click Edit in **Line Items**, add **Duvet (Queen)** and click Update Order.
3. In **Jobs**, they click the ⋮ menu on the delivery, click Reschedule, move it from Friday 6 November to Saturday 7 November and click Update Job.
Prices include GST. The order now adds up like this:
| Item | Amount |
|---|---|
| 5 × Shirt (Wash & Iron) at $3.00 | $15.00 |
| 1 × Trousers (Dry Clean) at $8.00 | $8.00 |
| 1 × Duvet (Queen), added | $25.00 |
| **New total** | **$48.00** |
| Paid at drop-off | $23.00 |
| **Amount due** | **$25.00** |
Mdm Tan sees the duvet and the Saturday delivery on her order page. Your driver sees the job on Saturday, and the $25.00 is collected at delivery.
---
## FAQs
**Where did Daily orders go?**
> It's now the Orders list filtered by date. Set **Order date** to today and **Sales channel** to your shop, then bookmark the page.
**How do I search for an invoice number?**
> The number on a receipt or on an order's invoice is its order number, unless your invoice template was changed. Type that number as it's printed, for example 10234, in **Search orders...** or in the **Search** box at the top of the Console. A monthly invoice for a business client has its own number: open **Sales** › **Invoicing**, pick the month, and find it in that client's **Invoices** column. An invoice you made for one customer in Console 3.0 is on their contact page, under **Invoice History**. Invoices made in Console 2.0 aren't listed in Console 3.0. Find them in Console 2.0: open the customer, click **Invoicing**, then **Invoice history**.
**Why can't some staff see all orders?**
> Their **Sales Channel Scope** is limited to some shops, so they only see those shops' orders. The account owner can change it under their access. Training orders are also hidden until you click **Training**.
**Can I undo a cancellation?**
> No. A cancelled order stays cancelled, and any refund has already been made. Create a new order for the customer instead.
**Does editing a paid order change the receipt?**
> Yes. The receipt always shows the order as it is now, so the next one you print or send has the new items and the new amount due. A receipt you printed earlier doesn't change.
**Why are Cancel order or Move Order missing?**
> The order is already cancelled, or your role doesn't have the **Cancel order** or **Edit Order** permission. Ask your account owner.
**Why does Cancel order say I can't cancel this order?**
> Your role may only cancel orders placed today or in the last few days, or your business unit stops staff cancelling orders past a certain step. The message tells you which. The account owner can still cancel it.
**Does rescheduling here follow my Cancel & reschedule settings?**
> Only the cancel limit does. The reschedule setting is for customers changing their own booking online. Staff can move a job at any time.
---
## What's Next
You can now find any order and handle the everyday changes customers ask for. Next, learn how to take the money still owed when the customer collects their items or your driver delivers them, in [Collecting the Balance at Pickup or Delivery](/docs/collecting-the-balance-at-pickup-or-delivery).