Your counter staff, office team and drivers each see the details they need on every order, customer and stop, laid out by the cards you made.
## Before You Start
- **At least one saved card.** A card is a small layout that decides what extra details show for one record, such as the phone number under a customer's name. Only saved cards appear when you pick one. See [Creating Your First Card](/docs/creating-your-first-card), and for work order and task cards, [Setting Up Work Order and Task Cards](/docs/setting-up-work-order-and-task-cards).
- **The page you want to change.** For the POS, you need a POS app. See [Create Your POS App](/docs/create-your-pos-app). For job cards, you need a driver app in **EasyBiz Mobile App** settings, and drivers signed in to EasyBiz Workflow on their phones. See [Getting the POS and Driver Apps](/docs/getting-the-pos-and-driver-apps).
- **Access:** you need a Console login that can manage the Point of Sale settings and the **EasyBiz Console** and **EasyBiz Mobile App** settings.
If you set this up before: the details you used to type into each page's settings now come from a card in **Settings › Cards**. A page you have not changed shows **System Default**.
## Choose your setup
| **Level** | **Fits shops like** | **What you set up** | **Read these sections** |
| --- | --- | --- | --- |
| Easy | One or two shops that take and look up every order at the POS counter | Cards on the POS Checkout and Orders pages | [Where to find it](#where-to-find-it), [Picking a card on your POS pages](#picking-a-card-on-your-pos-pages) |
| Intermediate | Shops where office staff also take or check orders in the Console | Everything in Easy, plus the Console's Checkout and Order Detail | Everything in Easy, [Picking a card in the EasyBiz Console](#picking-a-card-in-the-easybiz-console) |
| Advanced | Shops whose staff and drivers work from their phones | Everything in Intermediate, plus your staff app and driver app pages | Everything in Intermediate, [Picking a card in your staff and driver apps](#picking-a-card-in-your-staff-and-driver-apps) |
With Easy only, your counters show your own cards and every other place keeps **System Default**. You can add the Console and the phone apps later.
## Overview
A card only shows once a page picks it. Each page that lists orders, customers, cart items, work orders or driver stops has a card field in its settings, set to System Default until you change it. You choose which of your saved cards that page shows, then publish the page so your team gets it. One card can sit on many pages, so the Tampines counter, the Console and a staff phone can all show the same details. When you later change the card, every page that picked it changes too.
**Where it works**
- **POS:** the Checkout cart and the Orders page on every counter signed in with the POS app you changed.
- **Console:** the Checkout and Order Detail pages, for your whole team.
- **EasyBiz Workflow app:** the Order List and Contact List of a staff app, and the Job List of a driver app.
Customers do not see cards. They only change what your staff and drivers see.
---
## Why set it up
The card you made does nothing until a page uses it. Picking it puts the right details in front of the right people: the customer's note at the counter, the due date on each work order, the gate code on a driver's stop. Staff stop opening each order to find the same few details, and drivers stop calling the shop to ask how to get in.
If you skip this, every page keeps showing **System Default**, the standard details EasyBiz shows out of the box. Nothing breaks, but your own cards stay unused.
---
## Where to find it
Each card is picked in the settings of the page that shows it. This table shows where each one sits.
| **What staff see** | **Where you pick the card** | **Card** |
| --- | --- | --- |
| The customer in the POS cart | POS app editor › **Checkout** › **Contact** | Contact card |
| Each item in the POS cart | POS app editor › **Checkout** › **Cart** | Cart item card |
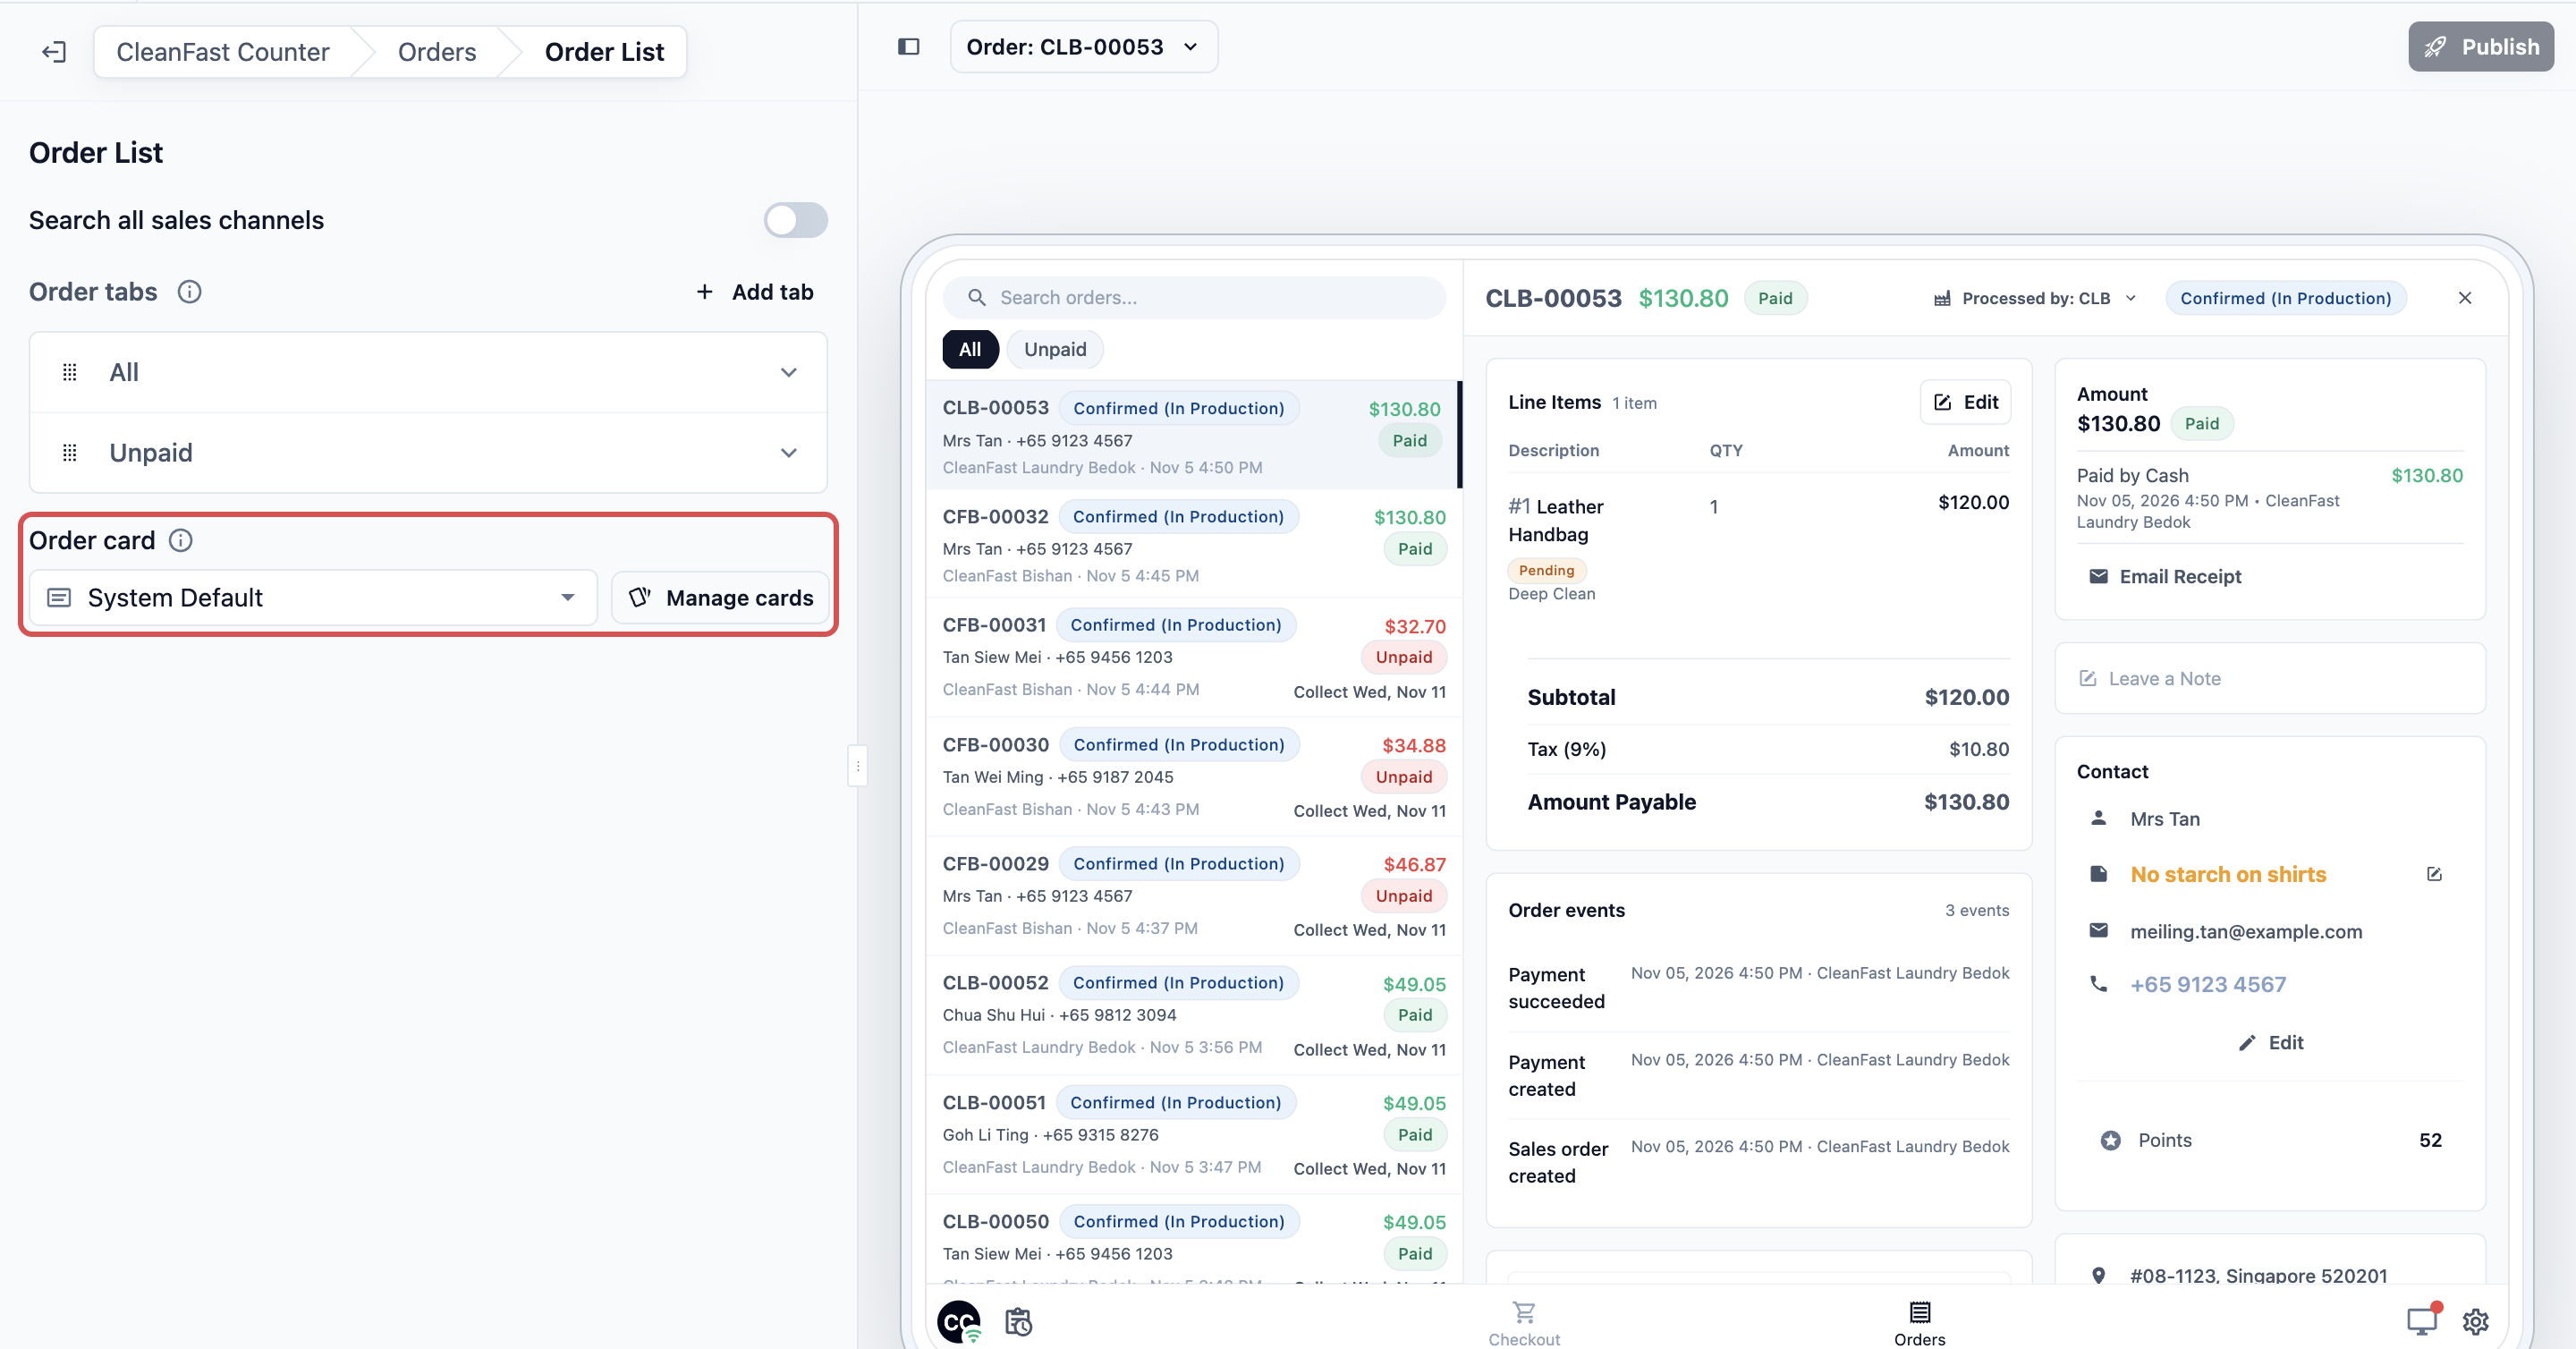
| Each order in the POS order list | POS app editor › **Orders** › **Order List** | Order card |
| Items and work orders in a POS order | POS app editor › **Orders** › **Order Detail** › **Line Items** or **Work Orders** | Line item card, Work order card |
| The customer and items in the Console Checkout | EasyBiz Console editor › **Checkout** › **Contact** or **Cart** | Contact card, Cart item card |
| Items and work orders in a Console order | EasyBiz Console editor › **Order Detail** › **Line Items** or **Work Orders** | Line item card, Work order card |
| Orders and contacts in a staff app | EasyBiz Mobile App › your app › **Order List** or **Contact List** | Order card, Contact card |
| Each stop in a driver app | EasyBiz Mobile App › your driver app › its **Job List** page | Job card |
A task card is not picked on a page. You pick it on a work order card, as shown in [Setting Up Work Order and Task Cards](/docs/setting-up-work-order-and-task-cards).
### The card field
Every place above has the same card field. It is named after the kind of card it takes, such as **Order card** or **Contact card**, with an ⓘ icon that explains what it changes.
**Card field**
| **Option** | **What it does** |
| --- | --- |
| System Default | The standard details EasyBiz shows. Every page starts with this. |
| A card you saved | Shows the details that card lays out. Only saved cards of the same kind are listed, from A to Z. |
Next to the field is one button:
- Manage cards shows while **System Default** is picked. It opens **Settings › Cards**, where you add a card.
- Edit card shows once you pick a card. It opens that card in **Settings › Cards**.
---
## Picking a card on your POS pages
1. Click the ⚙️ Settings icon in the top-right corner.
2. Under the **Sales channels** section, click **Point of Sale**.
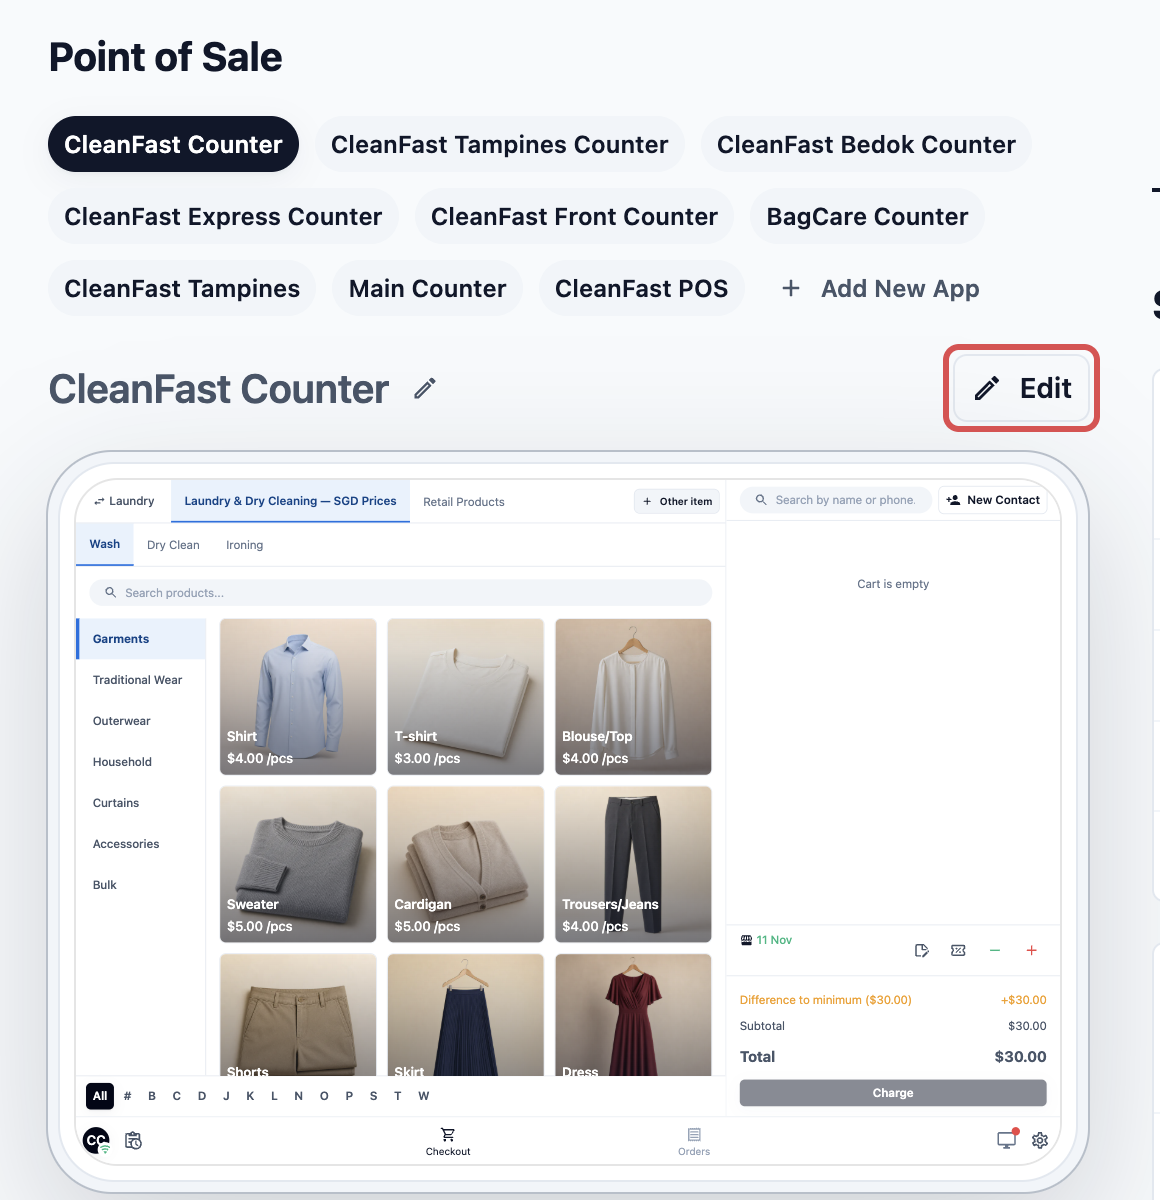
3. At the top of the page, click your POS app, then click Edit.
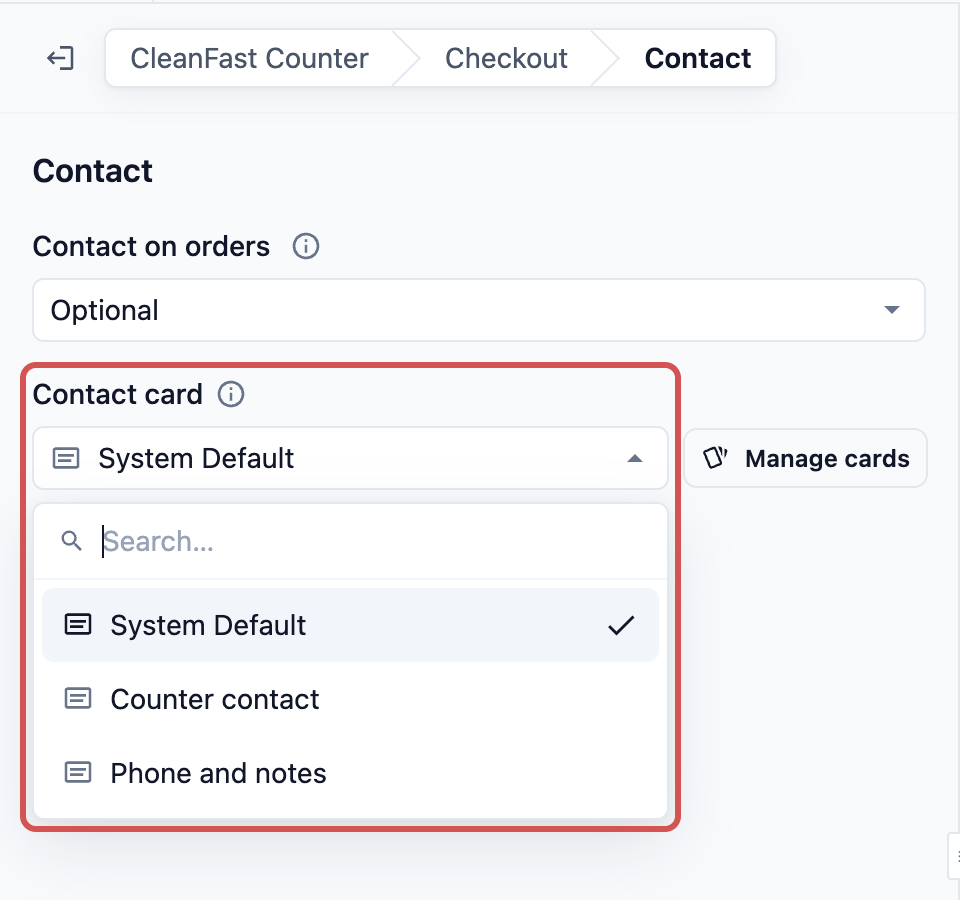
4. Under **Pages**, click **Checkout**, then click the **Contact** row.
5. In **Contact card**, pick your card, for example **Counter contact**.
6. Click the **Cart** row, then pick your card in **Cart item card**.
7. To change the order list, go back to **Pages**, click **Orders**, then click the **Order List** row and pick your card in **Order card**.
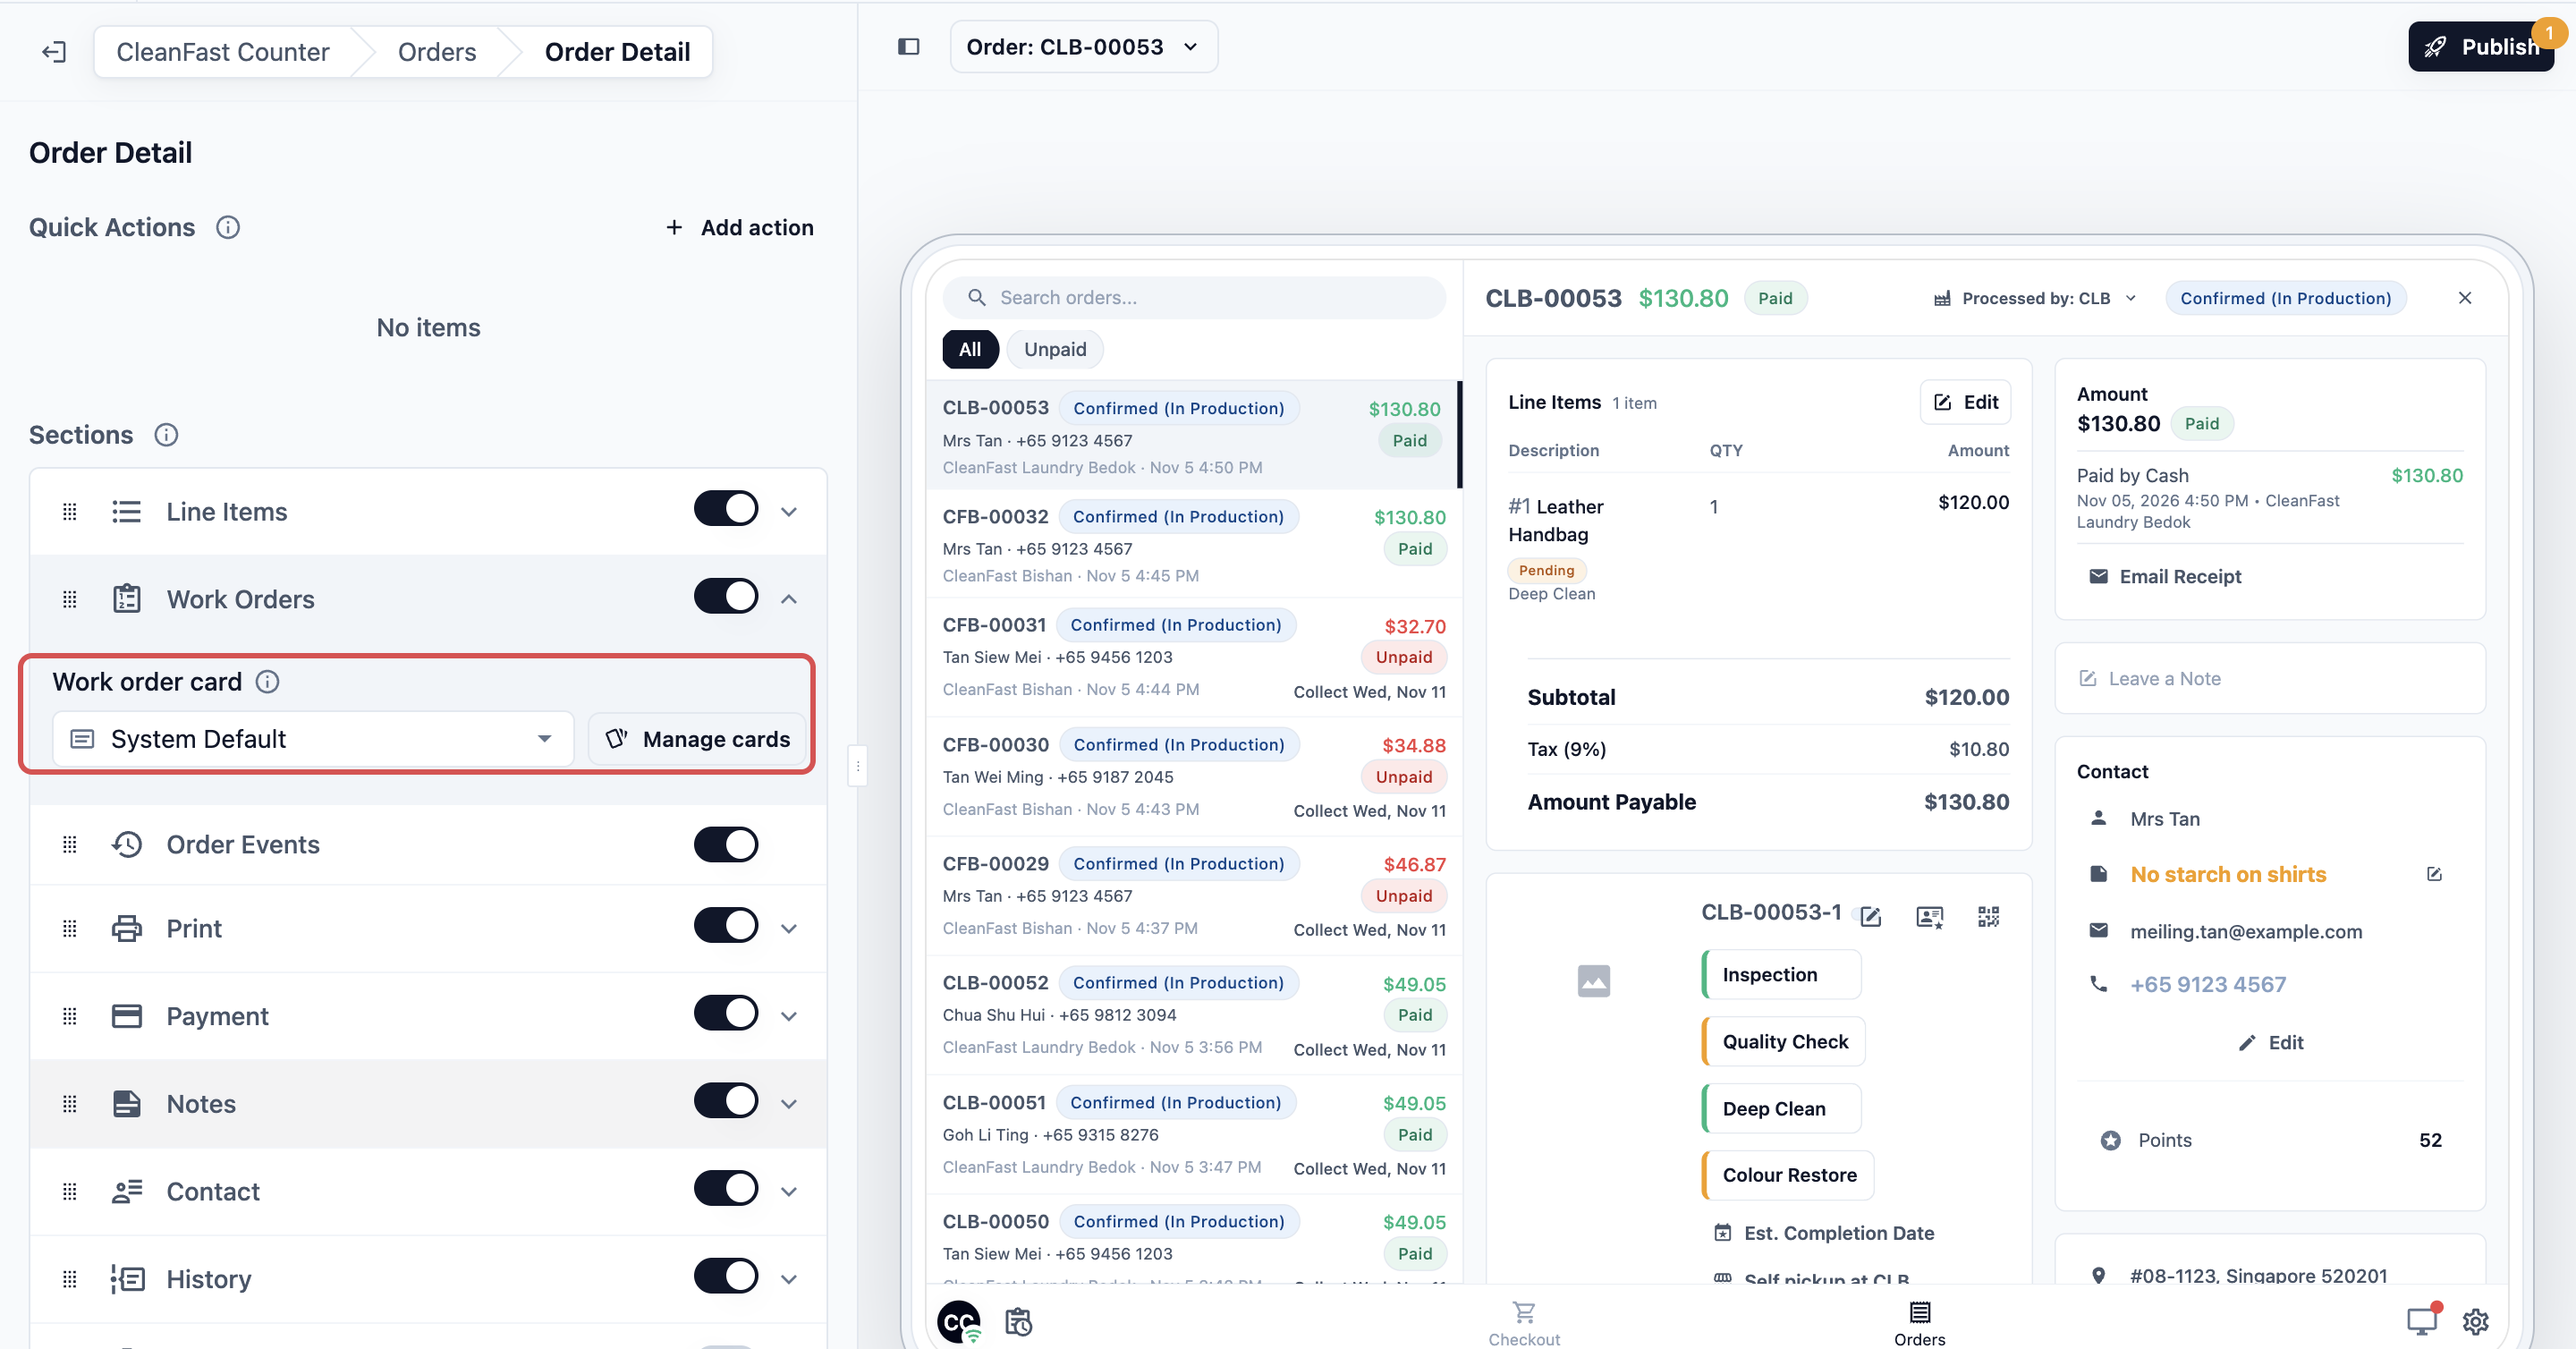
8. To change what staff see inside an order, click the **Order Detail** row. Under **Sections**, open **Line Items** to pick a **Line item card**, or **Work Orders** to pick a **Work order card**.
9. Click Publish, then Publish again in **Review your changes**.
You see "Published. Your counters have the changes." Every counter signed in with this POS app now shows your cards.
---
## Picking a card in the EasyBiz Console
For Intermediate and Advanced setups:
The Console has one setup for your whole team, so a card you pick here shows for everyone who uses the Console, whichever shop they work at.
1. Click the ⚙️ Settings icon in the top-right corner.
2. Under the **Staff app configuration** section, click **EasyBiz Console**.
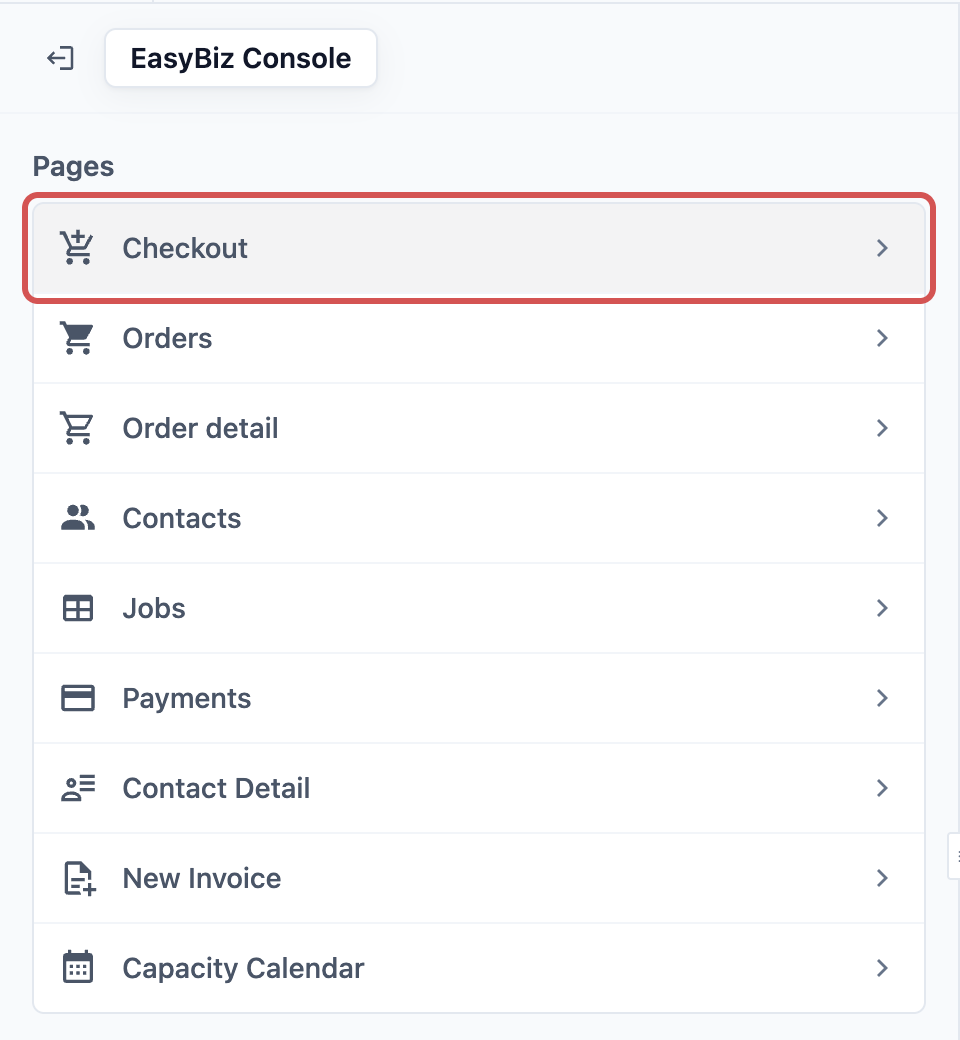
3. Under **Pages**, click **Checkout**.
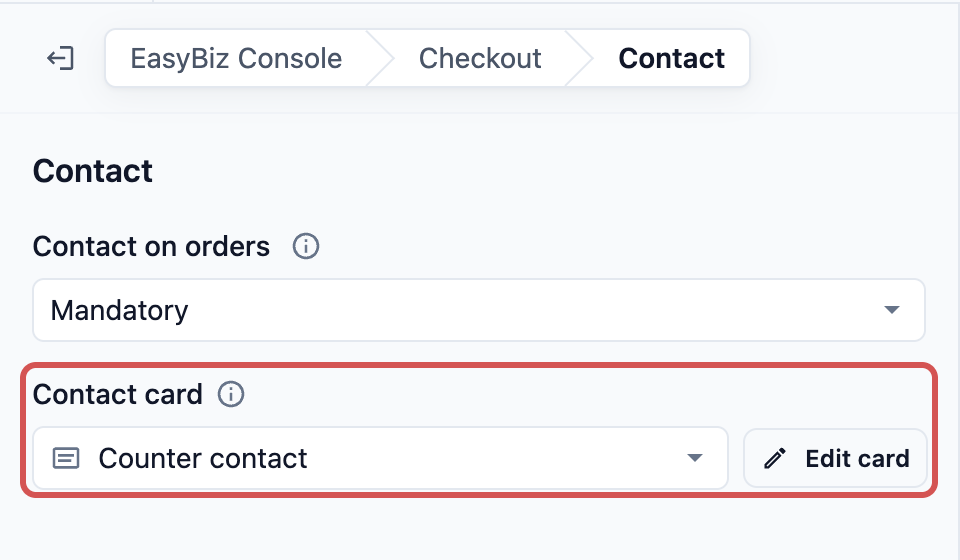
4. Click the **Contact** row and pick your card in **Contact card**. Then click the **Cart** row and pick your card in **Cart item card**.
5. To change what your team see inside an order, go back to **Pages** and click **Order Detail**. Under **Sections**, open **Line Items** or **Work Orders** and pick your card.
6. Click Publish, then Publish again in **Review your changes**.
You see "Published. Your team's Consoles have the changes."
---
## Picking a card in your staff and driver apps
For Advanced setups:
1. Click the ⚙️ Settings icon in the top-right corner.
2. Under the **Staff app configuration** section, click **EasyBiz Mobile App**.
3. Under **Apps**, click the app you want to change.
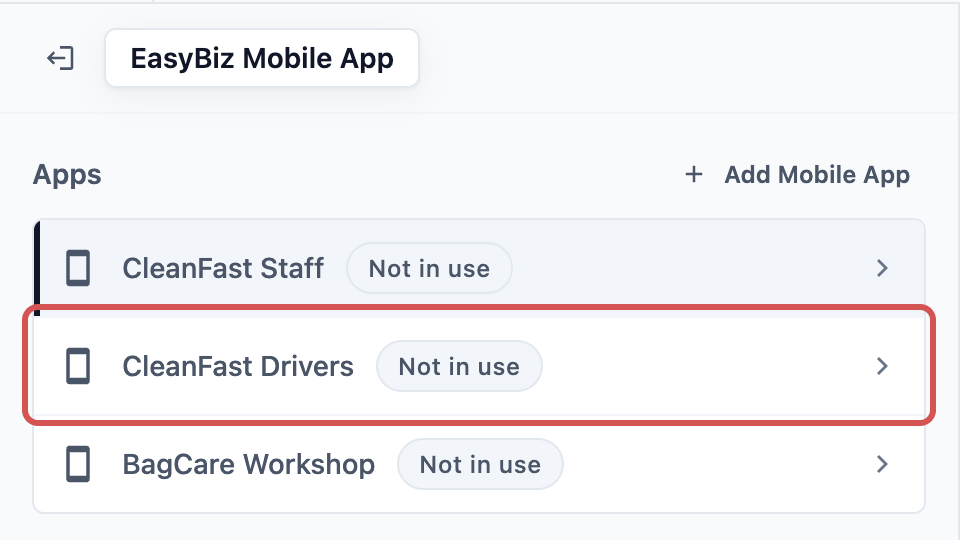
4. Click the page that shows the card:
- In a staff app, click its **Order List** page to pick an **Order card**, or its **Contact List** page to pick a **Contact card**.
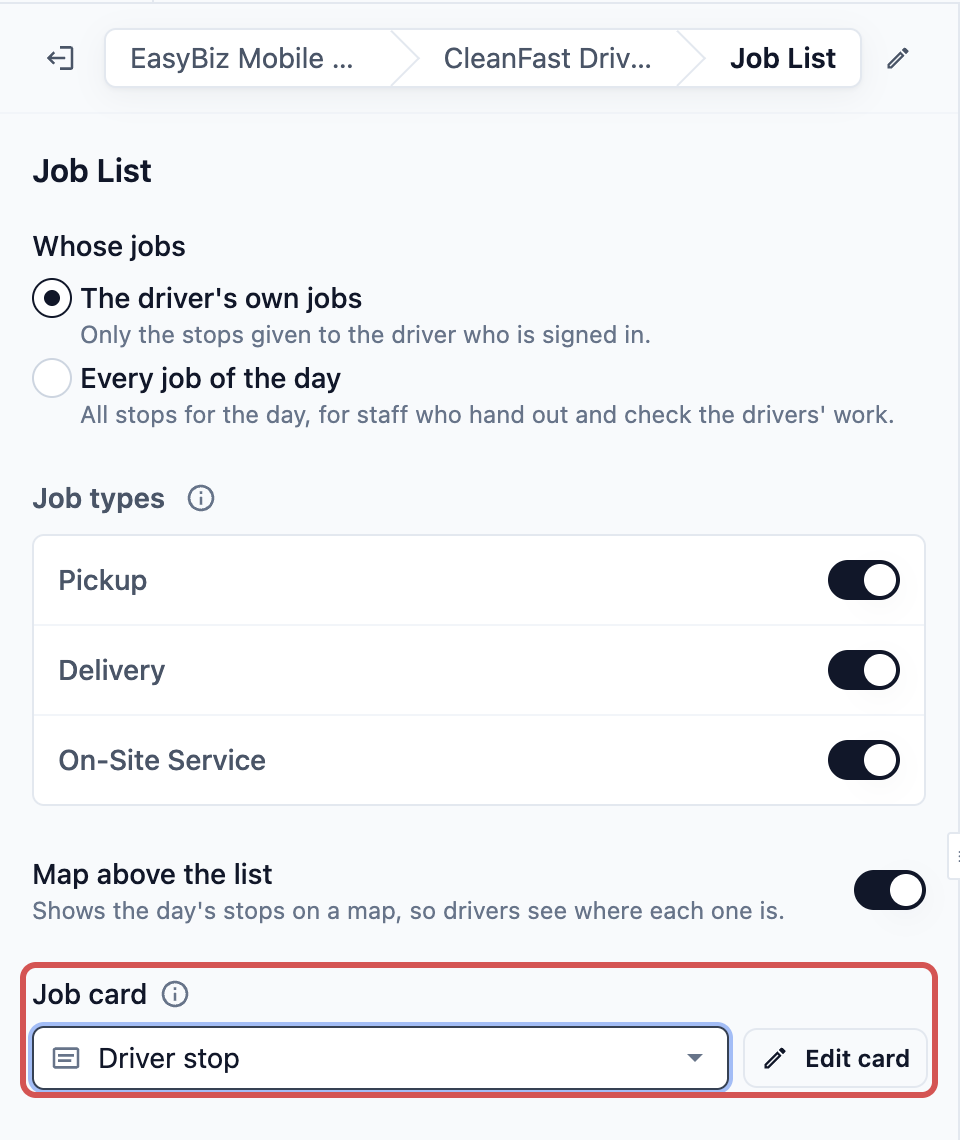
- In a driver app, click its **Job List** page. The **Job card** field sits under **Map above the list**.
5. Click Publish, then Publish again in **Review your changes**.
You see "Published. Your team's mobile apps have the changes."
If a page shows "Also used in …", another app uses the same page and your card shows there too. To use a different card in this app only, click Make a copy for this app first.
---
## Editing a card from the page settings
You can change a card without leaving the page you are setting up.
1. Next to the card field, click Edit card, or Manage cards to add a new card.
2. Make your changes in **Settings › Cards**, then click Save.
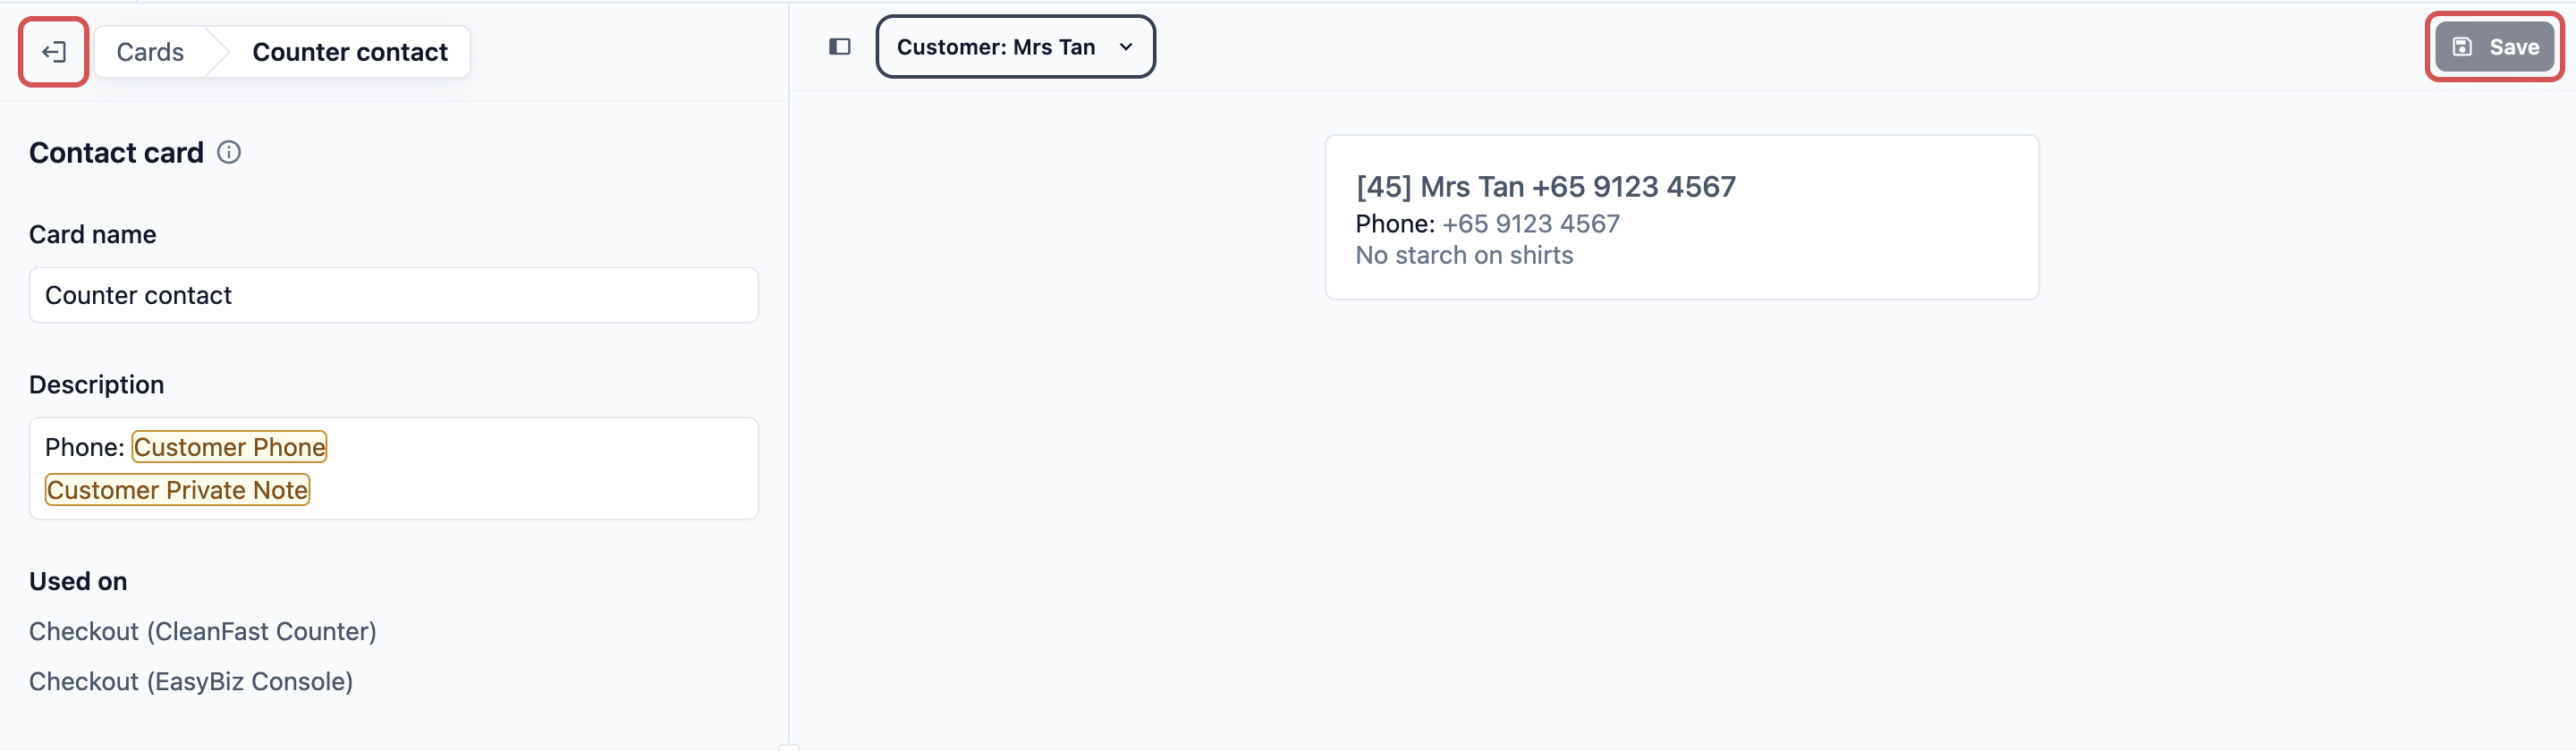
3. Click Back in the top-left corner to return to the page you came from.
4. If you added a new card, pick it in the card field.
If the page has changes you have not published yet, **Settings › Cards** opens in a new browser tab instead, so those changes stay safe in the editor. Save the card, close that tab and carry on in the editor.
A saved change to a card shows on every page that already uses it. Publish is only needed when you pick a different card on a page.
---
## Example setup
CleanFast Laundry's Tampines and Jurong counters both sign in with the **CleanFast Counter** POS app. The owner wants staff to see each customer's phone number and the note staff keep about them, and wants drivers to see how many bags to collect and the gate code.
| **Where** | **Field** | **CleanFast Laundry's choice** |
| --- | --- | --- |
| CleanFast Counter › Checkout › Contact | Contact card | Counter contact |
| EasyBiz Console › Checkout › Contact | Contact card | Counter contact |
| CleanFast Counter › Orders › Order List | Order card | System Default |
| CleanFast Drivers › Job List | Job card | Driver stop |
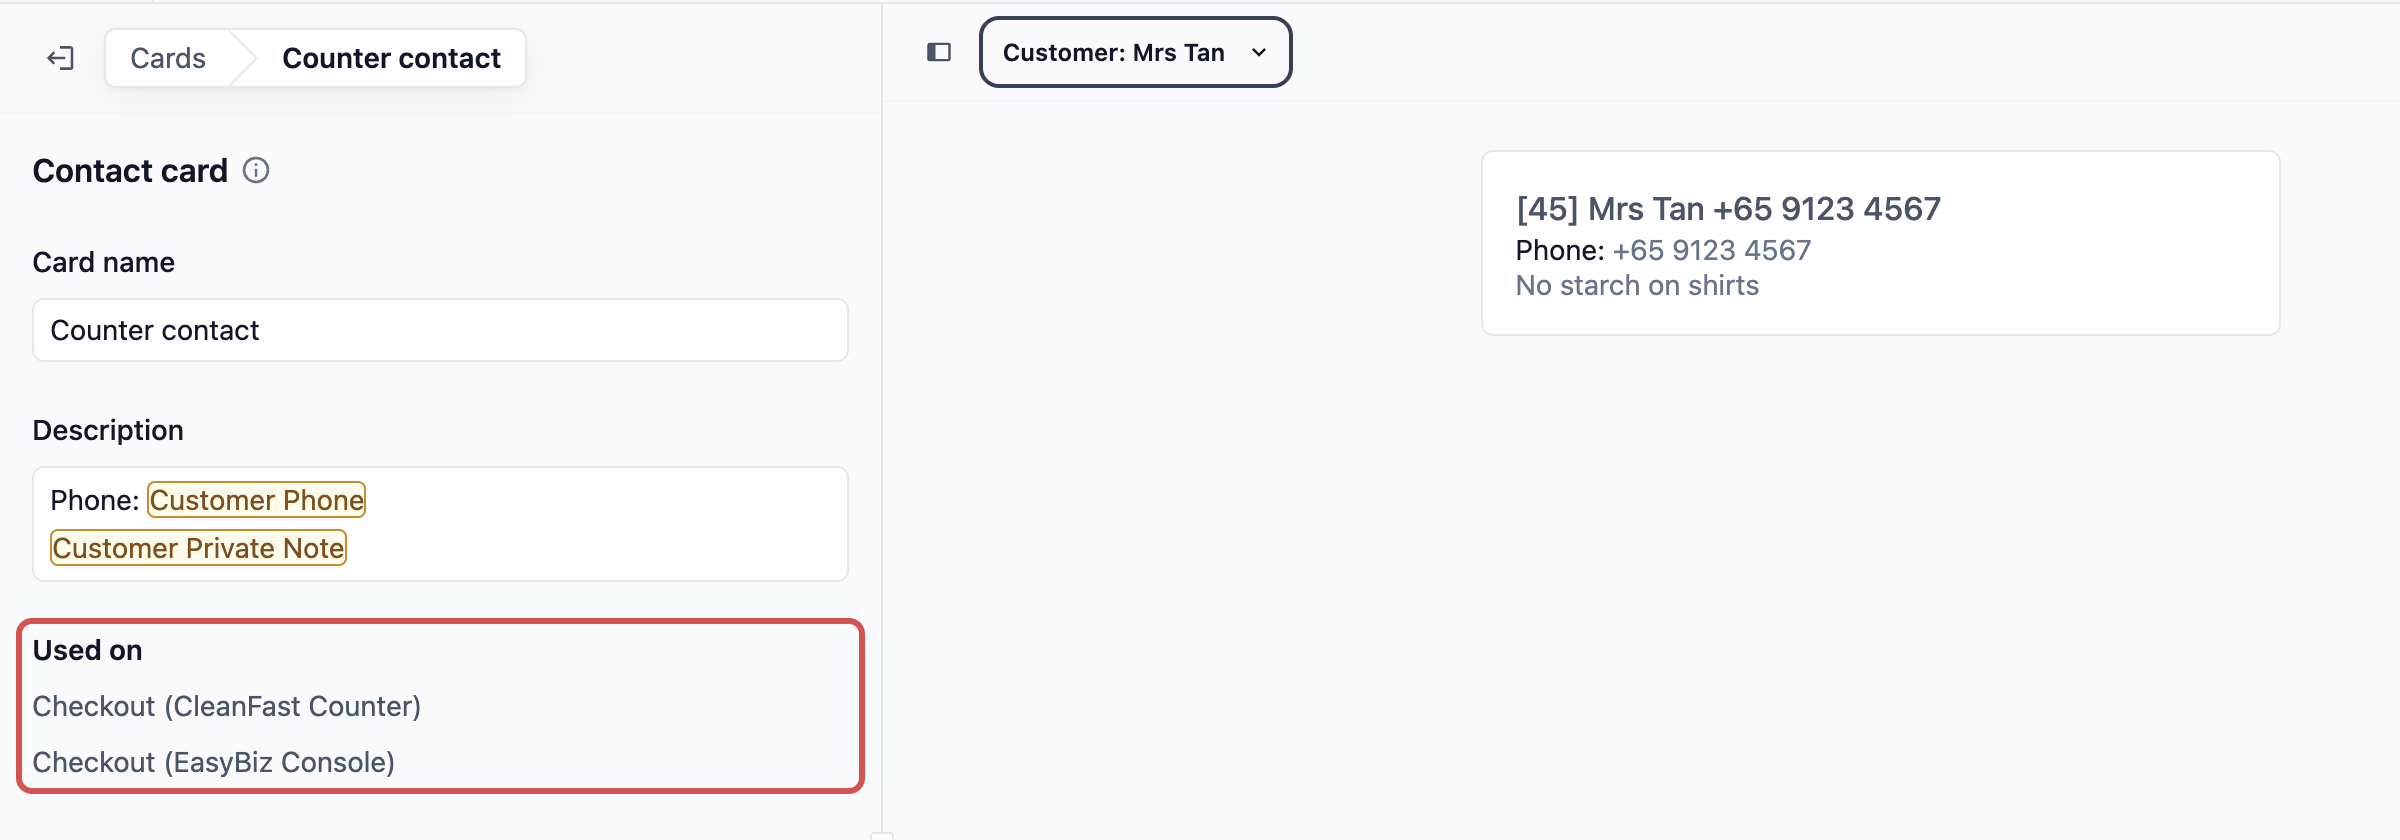
They publish the POS app, the Console and the driver app. Counter contact now shows on both counters and in the Console, and the **Used on** list of the card in **Settings › Cards** names each place.
---
## What staff and drivers see
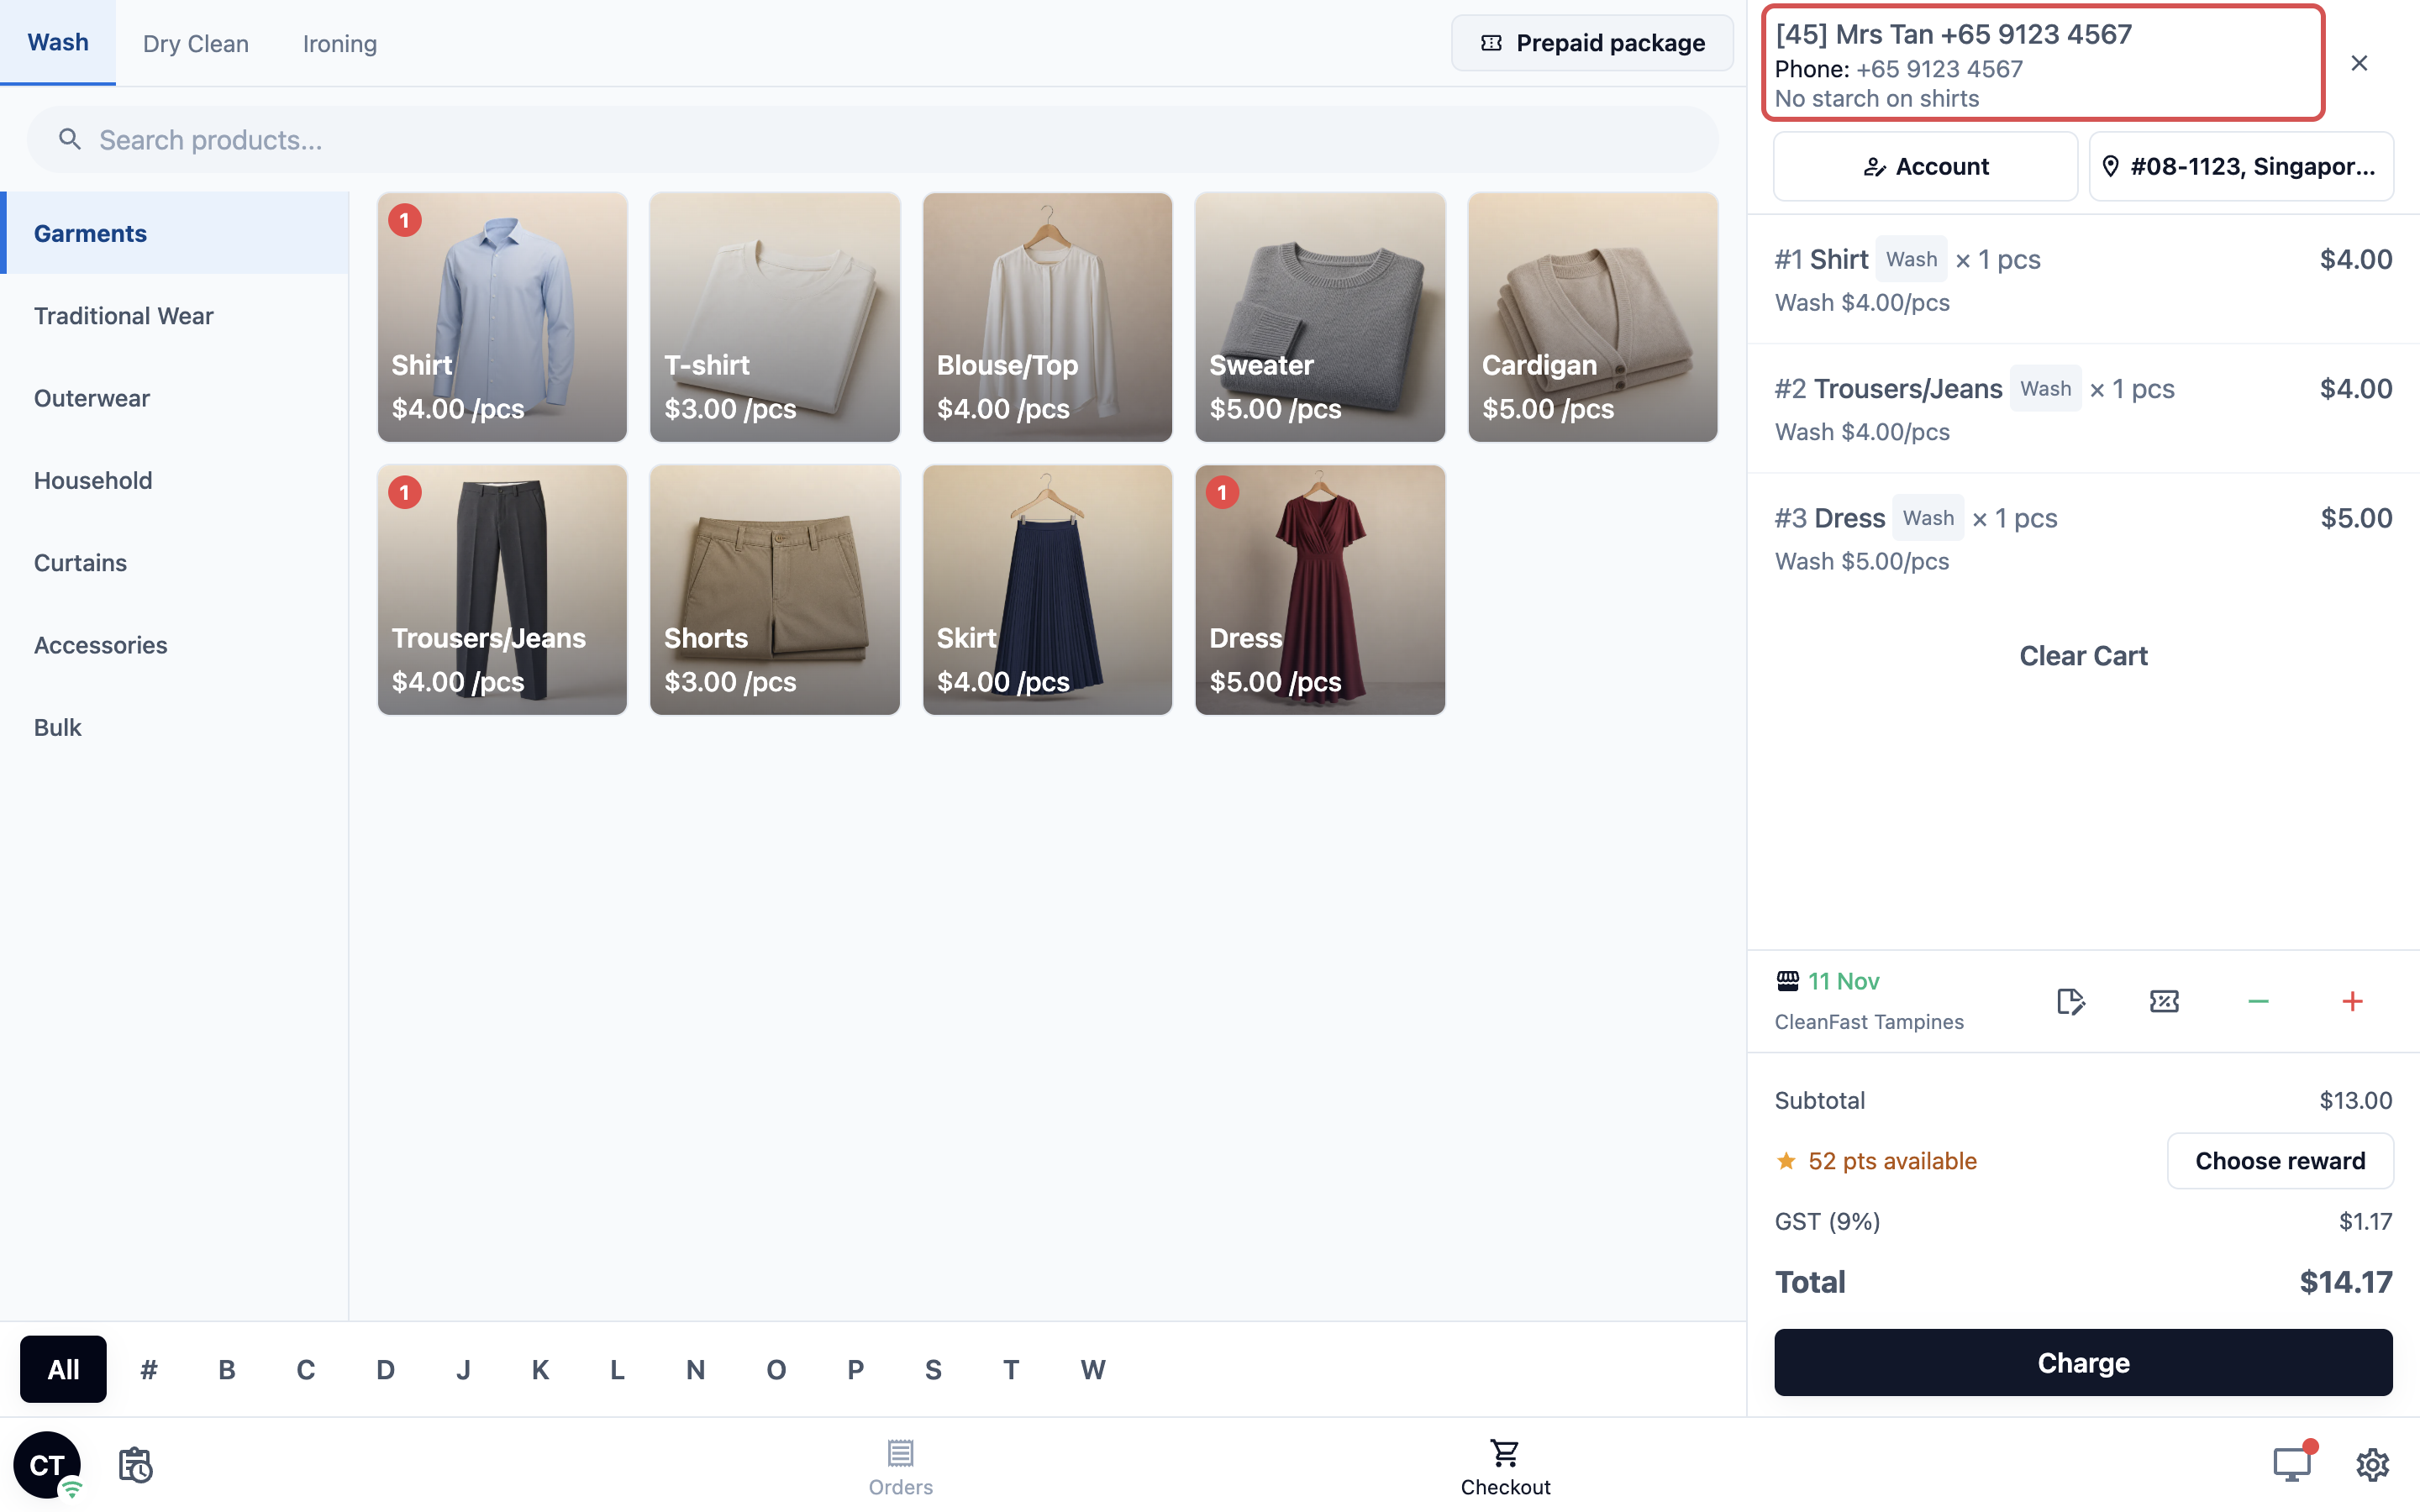
**At the POS counter:** when staff add Mrs Tan to an order at the Tampines counter, the cart shows her phone number and the note "No starch on shirts" under her name.
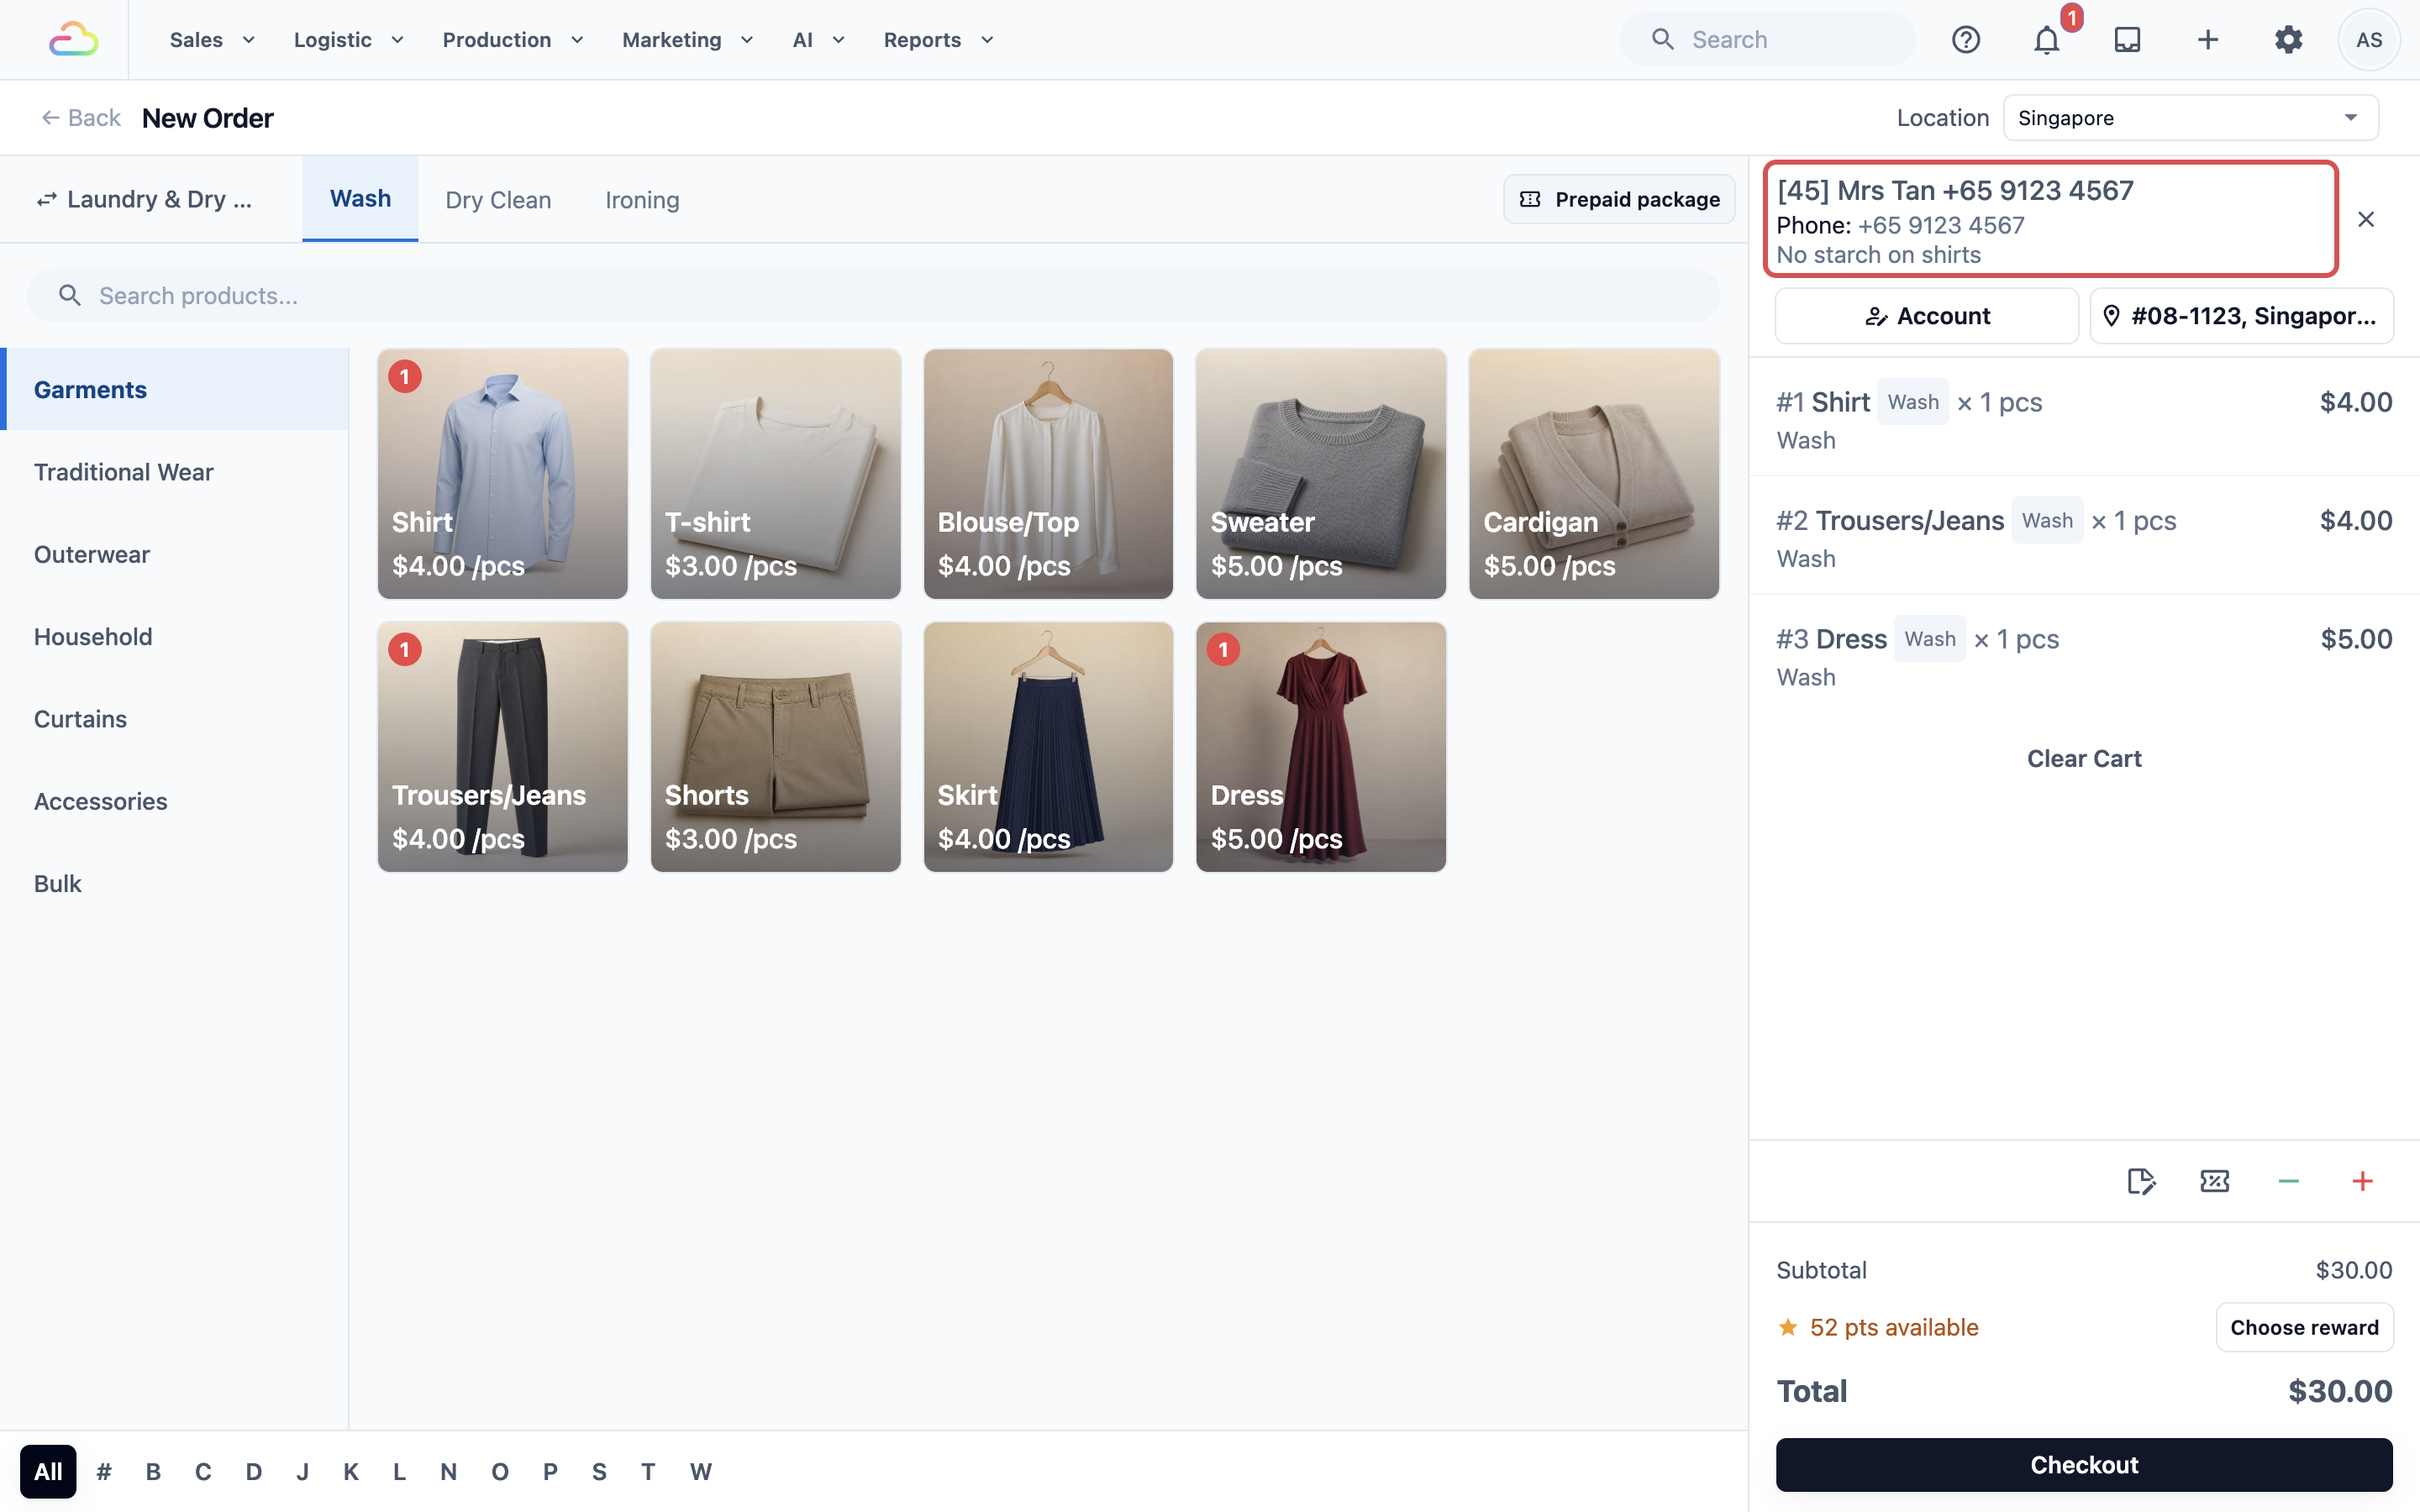
**In the Console:** office staff taking a phone order on the Console Checkout see the same details under the customer's name.
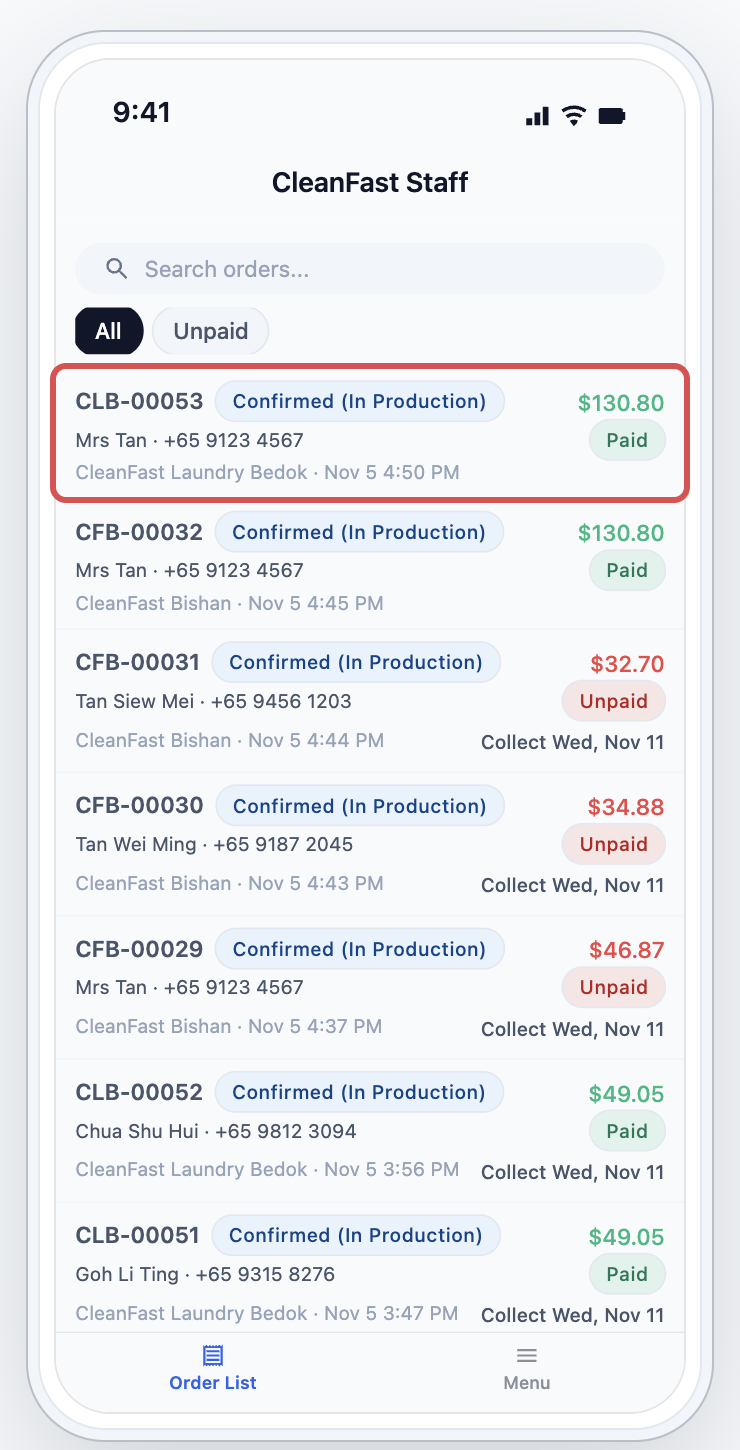
**In a staff app:** on the Order List, each order shows what its order card lays out, such as the customer and the collection date.
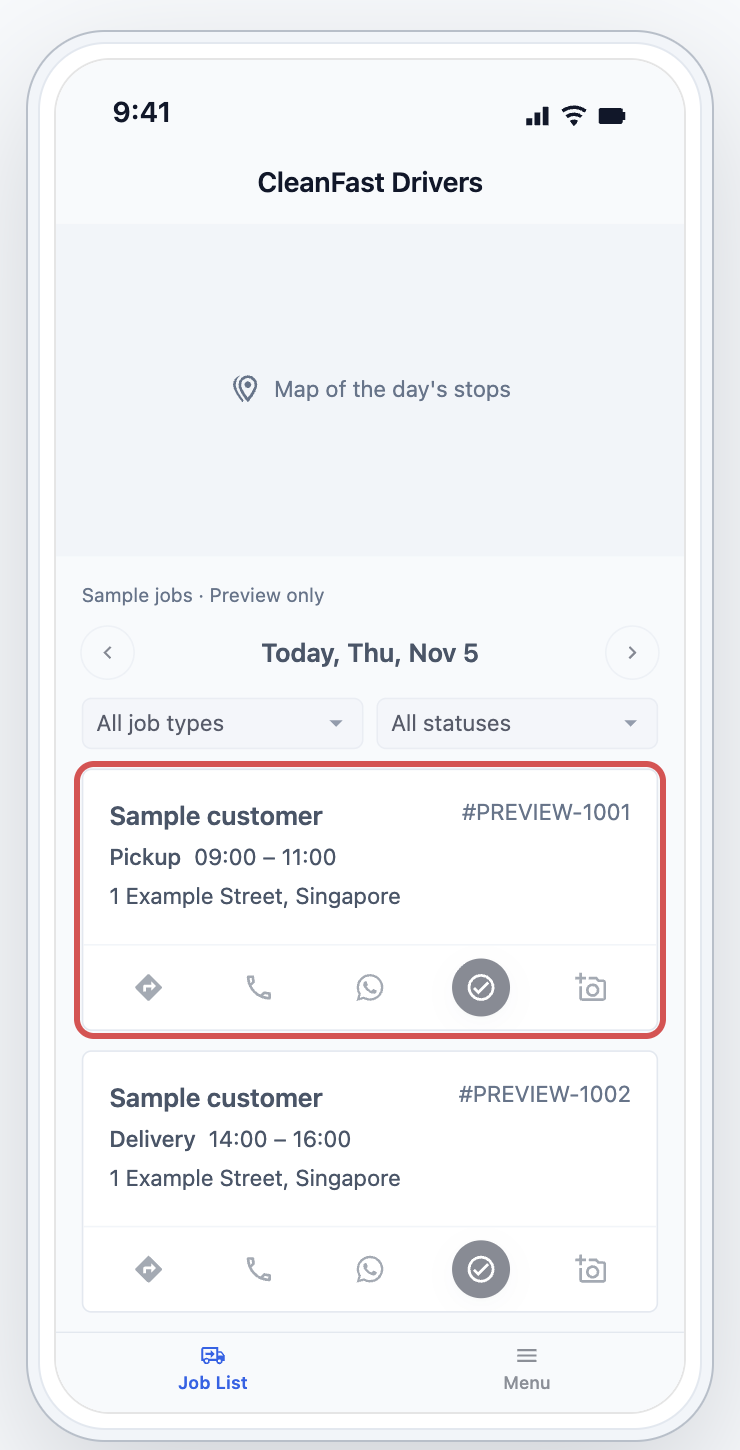
**In a driver app:** each stop on the Job List shows the customer, time and address, with the details its job card lays out underneath, such as the gate code you keep in the customer's note.
Nobody needs to restart anything. Once you publish, or save a card, open apps get the change on their own while the device is online.
---
## Managing it later
- **Use a different card:** pick it in the card field and publish again.
- **Go back to the standard look:** pick **System Default** in the card field and publish. Your card stays in **Settings › Cards** for later.
- **See where a card is used:** open it in **Settings › Cards** and read its **Used on** list.
Cards only change how records show. Your orders, customers and jobs stay the same, and past orders show with whichever card the page uses now.
---
## FAQs
**Why does my card say "Not on any page yet"?**
> No published page has picked it. Picking a card counts once you publish the page, so check that you clicked Publish after choosing it. A task card says "Not used yet" until a work order card picks it.
**Can our Tampines and Jurong shops use different cards?**
> On the POS, yes, when each shop's counters sign in with a different POS app. Pick a different card in each app. The Console has one setup for your whole team, so its cards are the same for every shop.
**I edited a card. Do I need to publish the page again?**
> No. Saving the card in **Settings › Cards** updates every page that uses it. You only publish when you pick a different card on a page.
**How do I go back to the standard look?**
> Pick **System Default** in the card field and publish. Nothing is deleted, and you can pick your card again any time.
**Why isn't the change showing on a staff member's phone yet?**
> Check that you published the app you changed, and that the phone is online. Then check the staff member uses that app: their **Mobile App Access** decides which app they get. If it still shows the old details, close the EasyBiz Workflow app and open it again.
**I changed a staff app page and another app changed too. Why?**
> Both apps share that page. Open the page, click Make a copy for this app, then pick the card you want in the copy.
---
## What's Next
You have picked your cards on every page that should use them, so your counters, Console and phone apps now show the details your team need. That completes the Cards series. Whenever your shop needs different details, edit the card once in **Settings › Cards** and every page that uses it follows.